
Aircrack-ng
Badges
GitHub CI
Others
Repository versions
Description
Aircrack-ng is a complete suite of tools to assess WiFi network security.
It focuses on different areas of WiFi security:
- Monitoring: Packet capture and export of data to text files for further processing by third party tools.
- Attacking: Replay attacks, deauthentication, fake access points and others via packet injection.
- Testing: Checking WiFi cards and driver capabilities (capture and injection).
- Cracking: WEP and WPA PSK (WPA 1 and 2).
All tools are command line which allows for heavy scripting. A lot of GUIs have taken advantage of this feature. It works primarily on Linux but also Windows, macOS, FreeBSD, OpenBSD, NetBSD, as well as Solaris and even eComStation 2.
Building
Requirements
- Autoconf
- Automake
- Libtool
- shtool
- OpenSSL development package or libgcrypt development package.
- Airmon-ng (Linux) requires ethtool, usbutils, and often pciutils.
- On Windows, cygwin has to be used and it also requires w32api package.
- On Windows, if using clang, libiconv and libiconv-devel
- Linux: LibNetlink 1 or 3. It can be disabled by passing —disable-libnl to configure.
- pkg-config (pkgconf on FreeBSD, DragonFlyBSD, OpenBSD and NetBSD)
- FreeBSD, DragonFlyBSD, OpenBSD, NetBSD, Solaris and OS X with Macports: gmake
- Linux/Cygwin: make and Standard C++ Library development package (Debian: libstdc++-dev)
Note: Airmon-ng only requires pciutils if the system has a PCI/PCIe bus and it is populated.
Such bus can be present even if not physically visible. For example, it is present,
and populated on the Raspberry Pi 4, therefore pciutils is required on that device.
Optional stuff
- If you want SSID filtering with regular expression in airodump-ng
(—essid-regex) PCRE or PCRE2 development package is required. - If you want to use airolib-ng and ‘-r’ option in aircrack-ng,
SQLite development package >= 3.3.17 (3.6.X version or better is recommended) - If you want to use Airpcap, the ‘developer’ directory from the CD/ISO/SDK is required.
- In order to build
besside-ng,besside-ng-crawler,easside-ng,tkiptun-ngandwesside-ng,
libpcap development package is required (on Cygwin, use the Airpcap SDK instead; see above) - rfkill
- If you want Airodump-ng to log GPS coordinates, gpsd is needed
- For best performance on SMP machines, ensure the hwloc library and headers are installed. It is strongly recommended on high core count systems, it may give a serious speed boost
- CMocka and expect for testing
- For integration testing on Linux only: tcpdump, HostAPd, WPA Supplicant and screen
Installing required and optional dependencies
Below are instructions for installing the basic requirements to build
aircrack-ng for a number of operating systems.
Note: CMocka, tcpdump, screen, HostAPd and WPA Supplicant should not be dependencies when packaging Aircrack-ng.
Linux
Arch Linux
sudo pacman -Sy base-devel libnl openssl ethtool util-linux zlib libpcap sqlite pcre2 hwloc cmocka hostapd wpa_supplicant tcpdump screen iw usbutils pciutils expect
Debian/Ubuntu
sudo apt-get install build-essential autoconf automake libtool pkg-config libnl-3-dev libnl-genl-3-dev libssl-dev ethtool shtool rfkill zlib1g-dev libpcap-dev libsqlite3-dev libpcre2-dev libhwloc-dev libcmocka-dev hostapd wpasupplicant tcpdump screen iw usbutils expect
Fedora
sudo yum install libtool pkgconfig sqlite-devel autoconf automake openssl-devel libpcap-devel pcre2-devel rfkill libnl3-devel gcc gcc-c++ ethtool hwloc-devel libcmocka-devel make file expect hostapd wpa_supplicant iw usbutils tcpdump screen zlib-devel expect
CentOS/RHEL 7
sudo yum install epel-release
sudo ./centos_autotools.sh
# Remove older installation of automake/autoconf
sudo yum remove autoconf automake
sudo yum install sqlite-devel openssl-devel libpcap-devel pcre2-devel rfkill libnl3-devel ethtool hwloc-devel libcmocka-devel make file expect hostapd wpa_supplicant iw usbutils tcpdump screen zlib-devel
Note: autoconf, automake, libtool, and pkgconfig in the repositories are too old. The script centos_autotools.sh automatically installs dependencies to compile then install the tools.
CentOS/RHEL 8
sudo yum config-manager --set-enabled powertools
sudo yum install epel-release
sudo yum install libtool pkgconfig sqlite-devel autoconf automake openssl-devel libpcap-devel pcre2-devel rfkill libnl3-devel gcc gcc-c++ ethtool hwloc-devel libcmocka-devel make file expect hostapd wpa_supplicant iw usbutils tcpdump screen zlib-devel
openSUSE
sudo zypper install autoconf automake libtool pkg-config libnl3-devel libopenssl-1_1-devel zlib-devel libpcap-devel sqlite3-devel pcre2-devel hwloc-devel libcmocka-devel hostapd wpa_supplicant tcpdump screen iw gcc-c++ gcc ethtool pciutils usbutils expect
Mageia
sudo urpmi autoconf automake libtool pkgconfig libnl3-devel libopenssl-devel zlib-devel libpcap-devel sqlite3-devel pcre2-devel hwloc-devel libcmocka-devel hostapd wpa_supplicant tcpdump screen iw gcc-c++ gcc make expect
Alpine
sudo apk add gcc g++ make autoconf automake libtool libnl3-dev openssl-dev ethtool libpcap-dev cmocka-dev hostapd wpa_supplicant tcpdump screen iw pkgconf util-linux sqlite-dev pcre2-dev linux-headers zlib-dev pciutils usbutils expect
Note: Community repository needs to be enabled for iw
Clear Linux
sudo swupd bundle-add c-basic devpkg-openssl devpkg-libgcrypt devpkg-libnl devpkg-hwloc devpkg-libpcap devpkg-pcre2 devpkg-sqlite-autoconf ethtool wget network-basic software-testing sysadmin-basic wpa_supplicant os-testsuite
Note: hostapd must be compiled manually, it is not present in the repository
BSD
FreeBSD
pkg install pkgconf shtool libtool gcc9 automake autoconf pcre2 sqlite3 openssl gmake hwloc cmocka
DragonflyBSD
pkg install pkgconf shtool libtool gcc8 automake autoconf pcre2 sqlite3 libgcrypt gmake cmocka
OpenBSD
pkg_add pkgconf shtool libtool gcc automake autoconf pcre2 sqlite3 openssl gmake cmocka
NetBSD
pkg_add pkgconf libtool gcc7 automake autoconf pcre2 sqlite3 openssl gmake cmocka
macOS
XCode, Xcode command line tools and HomeBrew are required.
brew install autoconf automake libtool openssl shtool pkg-config hwloc pcre2 sqlite3 libpcap cmocka
Windows
Cygwin
Cygwin requires the full path to the setup.exe utility, in order to
automate the installation of the necessary packages. In addition, it
requires the location of your installation, a path to the cached
packages download location, and a mirror URL.
An example of automatically installing all the dependencies
is as follows:
c:\cygwin\setup-x86.exe -qnNdO -R C:/cygwin -s http://cygwin.mirror.constant.com -l C:/cygwin/var/cache/setup -P autoconf -P automake -P bison -P gcc-core -P gcc-g++ -P mingw-runtime -P mingw-binutils -P mingw-gcc-core -P mingw-gcc-g++ -P mingw-pthreads -P mingw-w32api -P libtool -P make -P python -P gettext-devel -P gettext -P intltool -P libiconv -P pkg-config -P git -P wget -P curl -P libpcre2-devel -P libssl-devel -P libsqlite3-devel
MSYS2
pacman -Sy autoconf automake-wrapper libtool msys2-w32api-headers msys2-w32api-runtime gcc pkg-config git python openssl-devel openssl libopenssl msys2-runtime-devel gcc binutils make pcre2-devel libsqlite-devel
GNU/Hurd
Debian
apt-get install build-essential autoconf automake libtool pkg-config libssl-dev shtool zlib1g-dev libpcap-dev libsqlite3-dev libpcre2-dev libhwloc-dev libcmocka-dev screen expect libbsd-dev
Docker containers
We have two repositories on DockerHub:
- aircrackng/release: Each release
- aircrackng/git: every commit in the git repository
Base command for the git version:
sudo docker run --rm -it aircrackng/git
Available platforms/CPU architectures:
- linux/386 (base image: debian:unstable-slim)
- linux/amd64 (base image: debian:unstable-slim)
- linux/arm/v5 (base image: debian:unstable-slim)
- linux/arm/v6 (base image: alpine:3)
- linux/arm/v7 (base image: debian:unstable-slim)
- linux/arm64/v8 (base image: debian:unstable-slim)
- linux/mips64le (base image: debian:unstable-slim)
- linux/ppc64le (base image: debian:unstable-slim)
- linux/riscv64 (base image: debian:unstable-slim)
- linux/s390x (base image: debian:unstable-slim)
Compiling
To build aircrack-ng, the Autotools build system is utilized. Autotools replaces
the older method of compilation.
NOTE: If utilizing a developer version, eg: one checked out from source control,
you will need to run a pre-configure script. The script to use is one of the
following: autoreconf -i or env NOCONFIGURE=1 ./autogen.sh.
First, ./configure the project for building with the appropriate options specified
for your environment:
TIP: If the above fails, please see above about developer source control versions.
Next, compile the project (respecting if make or gmake is needed):
-
Compilation:
make -
Compilation on *BSD or Solaris:
gmake
Finally, the additional targets listed below may be of use in your environment:
-
Execute all unit testing:
make check -
Execute all integration testing (requires root):
make integration -
Installing:
make install -
Uninstall:
make uninstall
./configure flags
When configuring, the following flags can be used and combined to adjust the suite
to your choosing:
-
with-airpcap=DIR: needed for supporting airpcap devices on Windows (Cygwin or MSYS2 only).
Replace DIR above with the absolute location to the root of the
extracted source code from the Airpcap CD or downloaded SDK available
online. Required on Windows to buildbesside-ng,besside-ng-crawler,
easside-ng,tkiptun-ngandwesside-ngwhen building experimental tools.
The developer pack (Compatible with version 4.1.1 and 4.1.3) can be downloaded at
https://support.riverbed.com/content/support/software/steelcentral-npm/airpcap.html -
with-experimental: needed to compile
tkiptun-ng,easside-ng,buddy-ng,
buddy-ng-crawler,airventriloquistandwesside-ng.
libpcap development package is also required to compile most of the tools.
If not present, not all experimental tools will be built.
On Cygwin, libpcap is not present and the Airpcap SDK replaces it.
See —with-airpcap option above. -
with-ext-scripts: needed to build
airoscript-ng,versuck-ng,airgraph-ngand
airdrop-ng.
Note: Each script has its own dependencies. -
with-gcrypt: Use libgcrypt crypto library instead of the default OpenSSL.
And also use internal fast sha1 implementation (borrowed from GIT).
Dependency (Debian): libgcrypt20-dev -
with-duma: Compile with DUMA support. DUMA is a library to detect buffer overruns and underruns.
Dependency (Debian): duma -
disable-libnl: Set up the project to be compiled without libnl (1 or 3). Linux option only.
-
without-opt: Do not enable -O3 optimizations.
-
enable-shared: Make OSdep a shared library.
-
disable-shared: When combined with enable-static, it will statically compile Aircrack-ng.
-
with-avx512: On x86, add support for AVX512 instructions in aircrack-ng. Only use it when
the current CPU supports AVX512. -
with-static-simd=: Compile a single optimization in aircrack-ng binary. Useful when compiling
statically and/or for space-constrained devices. Valid SIMD options: x86-sse2,
x86-avx, x86-avx2, x86-avx512, ppc-altivec, ppc-power8, arm-neon, arm-asimd.
Must be used with —enable-static —disable-shared. When using those 2 options, the default
is to compile the generic optimization in the binary. —with-static-simd merely allows
to choose another one. -
enable-maintainer-mode: It is important to enable this flag when developing with Aircrack-ng. This flag enables additional compile warnings and safety features.
Examples:
-
Configure and compiling:
./configure --with-experimental make -
Compiling with gcrypt:
./configure --with-gcrypt make -
Installing:
make install -
Installing (strip binaries):
make install-strip -
Installing, with external scripts:
./configure --with-experimental --with-ext-scripts make make install -
Testing (with sqlite, experimental and pcre2)
./configure --with-experimental make make check -
Compiling on OS X with macports (and all options):
./configure --with-experimental gmake -
Compiling on macOS running on M1/AARCH64 and Homebrew:
autoreconf -vif env CPPFLAGS="-Wno-deprecated-declarations" ./configure --with-experimental make make check -
Compiling on OS X 10.10 with XCode 7.1 and Homebrew:
env CC=gcc-4.9 CXX=g++-4.9 ./configure make make checkNOTE: Older XCode ships with a version of LLVM that does not support CPU feature
detection; which causes the./configureto fail. To work around this older LLVM,
it is required that a different compile suite is used, such as GCC or a newer LLVM
from Homebrew.If you wish to use OpenSSL from Homebrew, you may need to specify the location
to its installation. To figure out where OpenSSL lives, run:brew --prefix opensslUse the output above as the DIR for
--with-openssl=DIRin the./configureline:env CC=gcc-4.9 CXX=g++-4.9 ./configure --with-openssl=DIR make make check -
Compiling on FreeBSD with gcc9
env CC=gcc9 CXX=g++9 MAKE=gmake ./configure gmake -
Compiling on Cygwin with Airpcap (assuming Airpcap devpack is unpacked in Aircrack-ng directory)
cp -vfp Airpcap_Devpack/bin/x86/airpcap.dll src cp -vfp Airpcap_Devpack/bin/x86/airpcap.dll src/aircrack-osdep cp -vfp Airpcap_Devpack/bin/x86/airpcap.dll src/aircrack-crypto cp -vfp Airpcap_Devpack/bin/x86/airpcap.dll src/aircrack-util dlltool -D Airpcap_Devpack/bin/x86/airpcap.dll -d build/airpcap.dll.def -l Airpcap_Devpack/bin/x86/libairpcap.dll.a autoreconf -i ./configure --with-experimental --with-airpcap=$(pwd) make -
Compiling on DragonflyBSD with gcrypt using GCC 8
autoreconf -i env CC=gcc8 CXX=g++8 MAKE=gmake ./configure --with-experimental --with-gcrypt gmake -
Compiling on OpenBSD (with autoconf 2.69 and automake 1.16)
export AUTOCONF_VERSION=2.69 export AUTOMAKE_VERSION=1.16 autoreconf -i env MAKE=gmake CC=cc CXX=c++ ./configure gmake -
Compiling and debugging aircrack-ng
export CFLAGS='-O0 -g'
export CXXFLAGS='-O0 -g'
./configure --with-experimental --enable-maintainer-mode --without-opt
make
LD_LIBRARY_PATH=.libs gdb --args ./aircrack-ng [PARAMETERS]
IDE development
VS Code — devcontainers
A VS Code development environment is provided, as is, for rapid setup of a development environment. This additionally adds support for GitHub Codespaces.
Requirements
The first requirement is a working Docker Engine environment.
Next, an installation of VS Code with the following extension(s):
Remote - Containersby Microsoft.
The «Remote — Containers» extension will refuse to work with OSS Code.
Usage
- Clone this repository to your working folder:
$ git clone --recursive https://github.com/aircrack-ng/aircrack-ng.git
$ cd aircrack-ng
- After cloning this repository, open the folder inside VS Code.
IMPORTANT: You should answer «Yes», if it asks if the folder should be opened inside a remote container. If it does not ask, then press
Ctrl+Shift+Pand typeopen in container. This should bring up the correct command, for which pressing enter will run said command.
- A number of warnings might appear about a missing
compile_commands.jsonfile. These are safe to ignore for a moment, as this file is automatically generated after the initial compilation. - Now build the entire project by pressing
Ctrl+Rand selectingBuild Fullfrom the pop-up menu that appears. - VS Code should detect the
compile_commands.jsonfile and ask if it should be used; selecting «Yes, always» will complete the initial setup of a fully working IDE.
IMPORTANT: If it doesn’t detect the file, pressing
Ctrl+Shift+Pand typingreload windowwill bring up the selection to fully reload the environment.
- At this point, nearly all features of VS Code will function; from Intellisense, auto-completion, live documentation, to code formatting. Additionally, there are pre-configured tasks for builds and tests, as well as an example GDB/LLDB configuration for debugging
aircrack-ng.
Packaging
Automatic detection of CPU optimization is done at run time. This behavior
is desirable when packaging Aircrack-ng (for a Linux or other distribution.)
Also, in some cases it may be desired to provide your own flags completely and
not having the suite auto-detect a number of optimizations. To do this, add
the additional flag --without-opt to the ./configure line:
./configure --without-opt
Using pre-compiled binaries
Linux/BSD
Aircrack-ng is available in most distributions repositories. However, it is not always up-to-date.
Windows
- Install the appropriate «monitor» driver for your card; standard drivers don’t work for capturing data.
- Aircrack-ng suite is command line tools. So, you have to open a command-line
Start menu -> Run... -> cmd.exethen use them - Run the executables without any parameters to have help
Documentation
Some more information is present in the README file.
Documentation, tutorials, … can be found on https://aircrack-ng.org
Support is available in the GitHub Discussions and on IRC (in #aircrack-ng on Libera Chat).
Every tool has its own manpage. For aircrack-ng, man aircrack-ng
Infrastructure sponsors
Requirements
- Have a Windows computer.
- Have a connection to the internet.
- Download Aircrack-ng: https://download.aircrack-ng.org/aircrack-ng-1.2-win.zip
Steps:
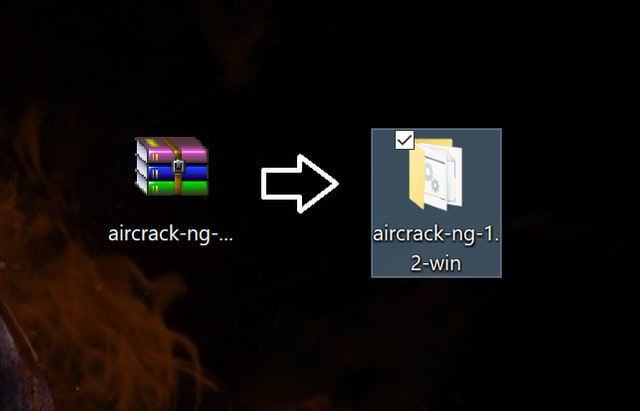
First Step: Download and uncompress the Aircrack-ng file. Personally, I prefer to move the .rar file to the desktop to have a more clear working area. If your web browser does not ask you where to save the file, then just go to your «Downloads» section of your file explorer.
This is how it should look:
Second Step: Determine if your Windows architecture is 64-bit or 32-bit.
You should get something like this:
Third Step: Go to your ‘Local Disk (C:) and open the folder «Program Files» or «Program Files (x86)» depending on your windows architecture. Since my Windows is 64-bit I will choose the ‘Program Files’ folder.
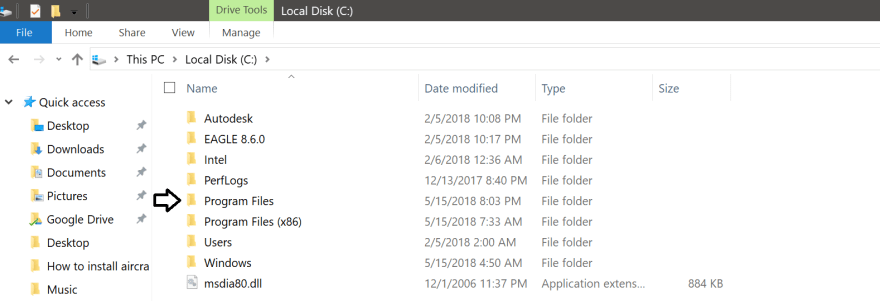
Then, copy and paste the Aircrack-ng folder that you uncompressed before inside the «Program Files» folder.
The Aircrack-ng folder should look like this inside the «Program Files» folder.
After pasting the «Aircrack-ng» folder inside the «Program files» or «Program Files (x86)» you have to go inside of that folder.
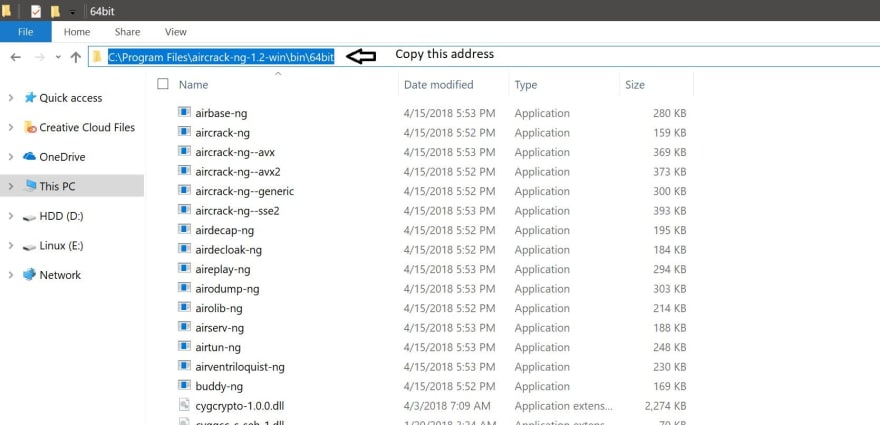
Once inside the folder you will have to open the «bin» folder.
Depending on your Windows architecture you will choose the folder according to your Windows. In my case I chose the «64-bit» folder since my Windows architecture is 64-bit.
Once inside your corresponding folder, you will have to copy the address of that folder as it is shown below:
Fourth Step: Now, you will have to go to «This PC» properties once again.
Once you get the window below, you will have to left click on «Advanced system settings» as it is on the picture shown below.
Now you will have to click on the button that says «Environment Variables…»
Once you got inside «Environment Variables» you should get a screen just like this:
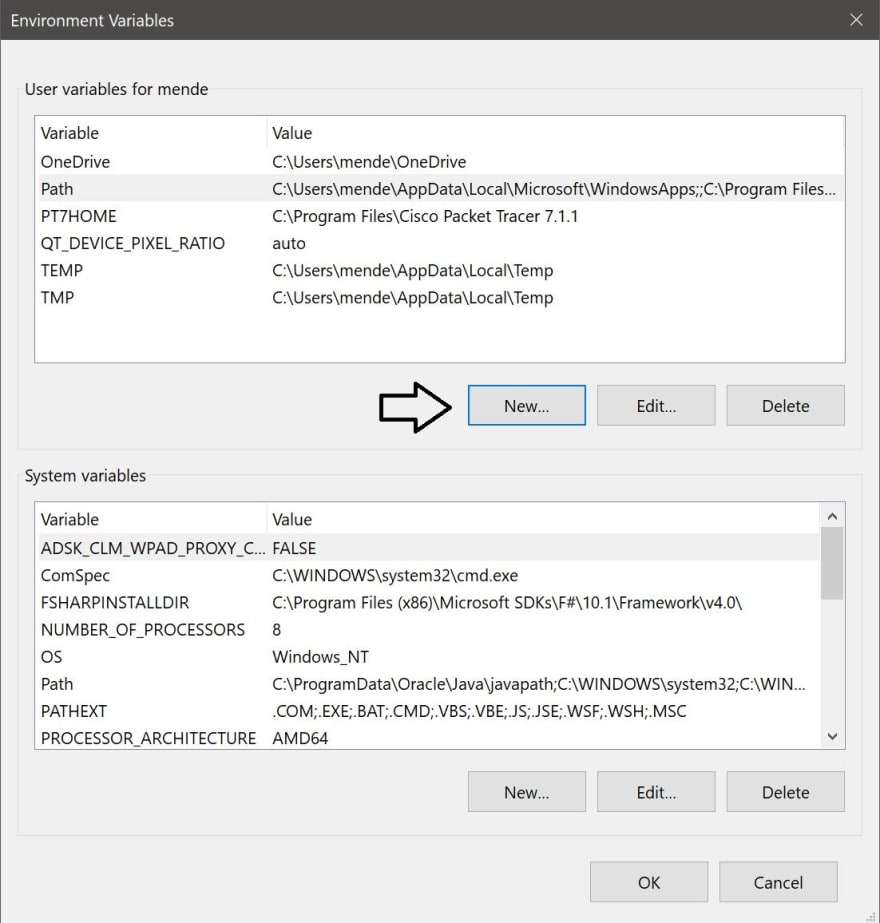
Once you got this window, you will have to click the «New» button pointed with the arrow.
In this new window, you have to write (path) inside the «Variable name:» box. Then, you will have to paste the address that you copied before in step #4 inside the «Variable value:» box. All the procedures are shown below.
After that, just click «OK» on all the windows that are open. Also, click on «Apply» if you see the option.
Final Step: Go to your desktop and press the keys «Ctrl + R» to open the «Run» program. Inside «Run» type «cmd» as it is shown below.
Then press «OK»
You should get a window like this one below
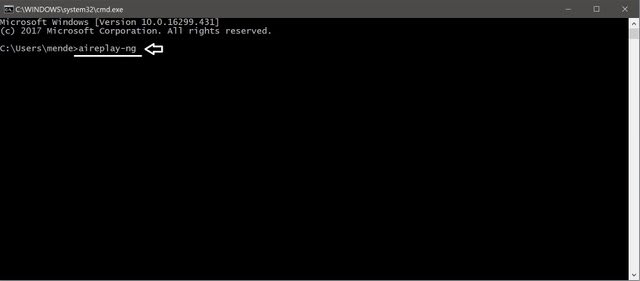
Now that you have opened the «cmd» you will have to type «aireplay-ng» inside the «cmd».
Then, press enter.
You should get a set of information just like it is on the picture above.
Now you are done and ready to use it.
Reading Time: 5 minutes
Aircrack-ng is a popular open-source tool suite used for wireless network auditing, packet capturing, and cracking WEP and WPA/WPA2 encryption keys. It is primarily designed for Linux systems, but it is also possible to install and use Aircrack-ng on Windows. While the Windows version doesn’t offer all the features available on Linux, such as packet injection and monitor mode support, it can still be highly useful for network analysis and security testing in a Windows environment.
In this article, we will guide you through the step-by-step process of installing Aircrack-ng on Windows, including prerequisites, installation procedures, and common troubleshooting tips. Whether you’re a penetration tester, ethical hacker, or just someone interested in network security, this guide will walk you through the process of getting Aircrack-ng running on your Windows machine.
Prerequisites for Installing Aircrack-ng on Windows
Before installing Aircrack-ng on Windows, it is important to ensure your system meets certain prerequisites. These include:
1. Supported Windows Version
Aircrack-ng supports Windows 7, Windows 8, and Windows 10. It is always a good idea to use the most up-to-date version of Windows to ensure compatibility with newer software versions and features.
2. Wireless Network Adapter
To fully use Aircrack-ng for tasks like packet injection or cracking WPA/WPA2 passwords, you need a wireless network adapter that supports monitor mode and packet injection. However, note that many consumer-grade Wi-Fi cards do not support these features on Windows, so a compatible USB adapter is recommended. Popular options for Aircrack-ng include:
- Alfa AWUS036NHA
- TP-Link TL-WN722N (v1 model)
3. WinPcap
Aircrack-ng for Windows relies on WinPcap for packet capture. This software is required to capture packets from the wireless network and send them to Aircrack-ng for analysis. WinPcap is usually bundled with the Aircrack-ng installer, but you can also install it separately if needed.
4. Administrator Privileges
You need to have administrative privileges on your Windows system to install and run Aircrack-ng, as it requires access to network interfaces and system resources.
Step-by-Step Guide to Installing Aircrack-ng on Windows
Step 1: Download the Aircrack-ng Windows Installer
The first step in installing Aircrack-ng on Windows is to download the Windows version of the tool. You can do this by following these steps:
- Visit the official Aircrack-ng website: https://www.aircrack-ng.org/
- Navigate to the Downloads section.
- Select the Windows version of Aircrack-ng. Make sure to download the latest stable release for Windows.
- Download the
.exeinstaller file for Windows. This is the most straightforward method for installation.
Alternatively, you can directly access the Aircrack-ng repository on GitHub and download the latest release for Windows from there.
Step 2: Install WinPcap (if not already installed)
WinPcap is a crucial component for Aircrack-ng to function correctly on Windows, as it allows the program to capture network packets. If you do not have WinPcap installed, follow these steps:
- Download WinPcap from the official website: https://www.winpcap.org/install/default.htm
- Run the installer and follow the on-screen instructions to install WinPcap on your system.
- After the installation is complete, restart your computer to ensure the changes take effect.
Step 3: Install Aircrack-ng
Once you have downloaded the Aircrack-ng installer, follow these steps to install it:
- Run the Installer: Double-click the
.exefile that you downloaded from the Aircrack-ng website to begin the installation process. - Select Installation Folder: The installer will prompt you to select a directory where Aircrack-ng will be installed. The default location is usually fine, but you can choose a different folder if needed.
- Install Additional Components: During the installation process, the Aircrack-ng setup may ask you to install certain components, such as WinPcap. Ensure that these components are selected for installation.
- Complete the Installation: Click on the “Install” button to begin the installation. Once the installation is complete, click on “Finish” to exit the installer.
Step 4: Verify the Installation
After the installation is complete, you can verify that Aircrack-ng has been installed correctly by opening a Command Prompt window and checking the version.
- Press Windows + R, type
cmd, and press Enter to open the Command Prompt. - In the Command Prompt, type the following command to check if Aircrack-ng was successfully installed:
If Aircrack-ng is installed correctly, this command should return the version number of Aircrack-ng, confirming that the installation was successful.
Step 5: Running Aircrack-ng
Now that Aircrack-ng is installed, you can start using it from the Command Prompt. You can navigate to the Aircrack-ng directory using the following command:
|
cd C:\Program Files (x86)\Aircrack—ng |
Once you’re in the Aircrack-ng folder, you can begin running Aircrack-ng commands. For example, to see the available commands and options, you can use:
This will display a list of all available commands and usage instructions for Aircrack-ng.
Step 1: Capture Packets with airodump-ng
Aircrack-ng can be used to capture packets from Wi-Fi networks for analysis. However, remember that your wireless network adapter must support monitor mode for this to work. In Windows, this capability is limited, but for basic packet capture, you can still use airodump-ng to listen to nearby wireless networks.
To start capturing packets, run the following command:
Replace <interface> with the name of your wireless network adapter. You can find the available network interfaces by running:
Step 2: Crack WEP/WPA Keys
Once you’ve captured enough packets (especially the WPA/WPA2 4-way handshake), you can proceed to crack the WEP or WPA keys. For WPA/WPA2, Aircrack-ng requires a dictionary file containing potential passwords. You can either use a pre-built wordlist or create your own.
Run the following command to crack the WPA key using a dictionary attack:
|
aircrack—ng —w <path—to—wordlist> —b <target—BSSID> <capture—file> |
<path-to-wordlist>is the path to your wordlist file.<target-BSSID>is the MAC address of the target router.<capture-file>is the file containing the captured handshake.
For WEP cracking, use a similar approach, but the command will be slightly different.
Step 3: Monitor and Analyse Network Traffic
Once you’ve captured enough data, you can use Aircrack-ng to analyse network traffic and look for potential vulnerabilities in the network’s security. You can inspect captured packets using Wireshark or other similar tools, though Wireshark does not work natively with Aircrack-ng on Windows.
Troubleshooting Common Installation Issues
1. “No wireless interfaces found” Error
If Aircrack-ng is unable to detect your wireless interface, ensure that your Wi-Fi adapter is compatible with monitor mode and packet injection on Windows. Some network cards are not fully supported in Windows, so it’s crucial to verify compatibility before using them with Aircrack-ng. If using a USB Wi-Fi adapter, check that the device drivers are installed correctly.
2. Packet Injection Not Working
On Windows, packet injection is often limited, as many wireless network cards do not support it. If you are not able to perform packet injection, you may need to use a different adapter or switch to a Linux-based system that provides full support for this functionality.
3. Error Message Related to WinPcap
If you encounter issues with WinPcap, ensure that it is correctly installed on your system. You can try reinstalling WinPcap from its official website or reinstalling Aircrack-ng, as it often includes a bundled version of WinPcap.
Conclusion
Installing Aircrack-ng on Windows may not provide the same level of functionality as on Linux, but it still offers a robust set of tools for wireless network auditing and security testing. By following this guide, you should be able to successfully install and run Aircrack-ng on your Windows system. Whether you’re testing the security of your own Wi-Fi network or conducting penetration testing in a legal and ethical context, Aircrack-ng is a valuable tool for cybersecurity professionals.
Always remember that cracking Wi-Fi passwords without permission is illegal and unethical. Always obtain explicit consent before testing the security of any network.
Disclaimer: This post may contain affiliate links. If you make a purchase through one of these links, Cyberly may earn a small commission at no extra cost to you. Your support helps us continue providing free tutorials and content. Thank you!
Для Windows
Характеристики
Описание
Версии
Обновлено
Совместимость
Windows XP, Windows Vista, Windows 7, Windows 8
Описание
Aircrack-ng — это программа позволяет проверить устойчивость шифровальных ключей для конфиденциальности и безопасности. Приложение англоязычно. Используют Aircrack-ng для Windows. Приложение позволяет защитить беспроводную сеть и предотвратить хакерские атаки. Лицензия на свободное ПО предоставляет возможность загрузить Aircrack-ng бесплатно.
Пакет программ состоит из утилит
- airodump — собирает данные об отправленных пакетах;
- aireplay — генерирует информацию и ускоряет ее получение;
- aircrack — взламывает используемую для конфиденциальности защиту передаваемых файлов, авторизированных пользователей WEP, и технологию шифрования для беспроводных соединений WPA-PSK;
- airdecap — выявляет слабость шифрования WEP, дешифрует документы WEP и WPA.
Рассмотрим особенности:
- Проверяет надежность пароля беспроводной сети Wi-Fi. Для выявления плохо защищенных сетей приложение перехватывает передаваемые при соединении первые пакеты, считывает пароли и отправляет пользователю для подключения к Интернету.
- Если пользователь забыл пароль Wi-Fi, предоставляется попытка узнать его, используя приложение Aircrack-ng. Программа выполняет функции подбора пароля по словарю.
- Приложение воспринимает все беспроводные адаптеры, адаптируемые под режим мониторинга.
- Генерирует пакетные внедрения, атакующие клиента, и пытается проанализировать работу беспроводной сети. Расшифровывает перехваченные файлы. Пытается взломать доступ к Wi-Fi несколькими способами одновременно, перехватывает и расшифровывает трафик, проверяя защиту соединение.
- Показателем безопасности сети является невозможность взлома программой Aircrackk-ng.
- Софт совершенствуется разработчиками, выпускаются обновления.
На нашем сайте разрешено скачать бесплатно Aircrack-ng для компьютера.
Версии
Нет официального представителя разработчика на сайте
Нажмите, для быстрой оценки
Оставить отзыв
Вот и хорошо, что виндовые пользователи так и останутся там, где они есть =) Играйте в игры =) Под виндовс эта утилита ничто =)
Ребяят? А не кому не пришла в голову идея создать МОБИЛЬНУЮ ВЕРСИЮ ЧТОБЫ ОНА РАБОТАЛА?!?!?!?[:+4:]
я разобрался все просто програма что надо[:+5:]
появился Aircrack-ng 1.2 RC 2 . Прошу Вас опубликовать данную программу на Вашем сайте
Ребяят? А не кому не пришла в голову идея создать МОБИЛЬНУЮ ВЕРСИЮ ЧТОБЫ ОНА РАБОТАЛА?!?!?!?
Похожие приложения
Актуальные статьи
The improved version of Aircrack known as Aircrack-ng comes with a number of essential tools for assessing the security aspects of a network. This software started its debut on February 2006 and has been since then undergone a lot of changes to improve its performance.
Regarding the update frequency, sometimes Aircrack-ng is updated frequently within a year, sometimes there is no update at all. One thing for sure, though, that Aircrack-ng is not an abandoned project as can be proven by the recent changes that have been made to the software.
Features and Highlights
The developer advises to use Aircrack-ng on Linux if you want to get the most out of it. It is still possible to use on Windows but it suffers from dozens of limitations that perhaps one day convince you to finally make a switch to the open source Linux operating system to utilize the full power of Aircrack-ng. If you still want to keep using Windows as your main operating system, you can use live Linux distro as an alternative method to access Aircrack-ng.
One of the limitations in Windows operating system in regard to wireless activities is the way it captures packets. It is a passive capture. There is no other way to capture packets other than waiting for them to arrive, unlike in Linux where you can speed it up. Consequently, cracking a WEP key could take a very long time in Windows.
There is no doubt that Aircrack-ng is a powerful security network suite but it is obviously not for anyone who doesn’t want to have anything to do with the command line. If you want to use Aircrack-ng to the fullest, you have to learn using the command line in addition to having a sufficient amount of knowledge in the fields of networking and operating system.
With the collection of tools it has, Aircrack-ng offers the chance for you to learn how to hack a network so that you can figure out what kinds of actions that an intruder will likely to take to get access to your network. The information will be very useful to help you strengthen your network security.
Aircrack-ng has a graphical user interface with several tabs in it such as aircrack-ng that uses a number of attack methods to obtain WEP keys and Airodump-ng for viewing and collecting information about the surrounding networks. In order to be able to use all of its features properly, make sure that the wireless card is supported by the software, otherwise you are out of luck.
Aircrack-ng Free Download for Windows
While many other software require installation, Aircrack-ng doesn’t. The files are compressed in a zip archive so all you have to do is simply extracting the files and run the executable file. It is unfortunate that Aircrack-ng has a rather poor compatibility with Windows because of the restrictions imposed by the operating system. Hopefully someday in the future this situation will improve somehow. You can click the link below to download Aircrack-ng for Windows: