
- Как в VirtualBox подключить флешку? Привет всем! Установил на виртуальную машину новейшую операционную систему Windows 10 и хочу, чтобы VirtualBox видела мою флешку и внешний жёсткий диск USB, каким образом это можно осуществить?
- Здравствуйте remontcompa.ru, помогите решить проблему, операционная система установленная на виртуальную машину VirtualBox не видит флешку с файлами подключенную к компьютеру, также не виден мой переносной винчестер USB. В настройках виртуальной машины выбрал Устройства->Устройства USB, далее выбираю свою флешку и отмечаю её галочкой, но флешка всё равно не появляется в окне Компьютер и Управлении дисками.
Как в VirtualBox подключить флешку
Привет друзья. Ситуаций, когда Вам нужно будет подключить флешку с вашими файлами или внешний жёсткий диск USB к операционной системе установленной на виртуальную машину может возникнуть довольно много. Например Вы хотите установить в виртуальную машину программу, а установщик этой программы у Вас на флешке или наоборот, какие-то файлы Вам нужно с виртуальной машины перебросить в основную операционную систему, а создавать общую папку Вам влом, да и не очень это удобно и быстро, а может Вы вовсе хотите подключить к виртуальной машине принтер! Уверяю Вас, сделать всё это очень просто.
{banner_google1}
Примечание: На нашем сайте есть статьи о VirtualBox и они могут быть Вам интересны
В этой статье мы настроим VirtualBox так, что в ней можно будет работать с нашим внешним диском USB и флешкой.
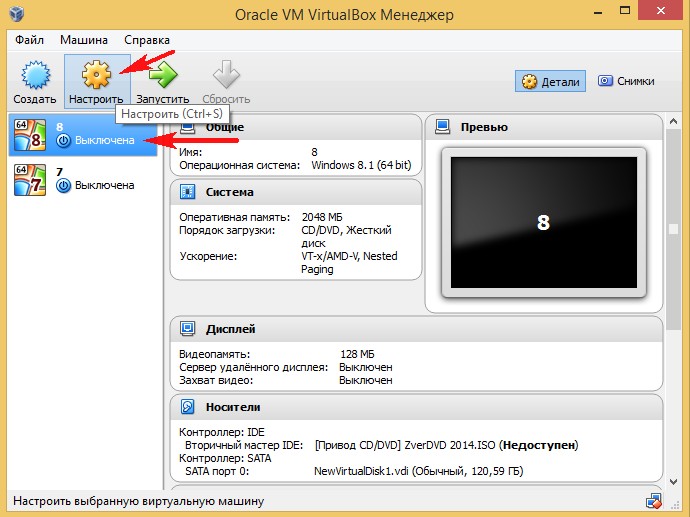
В первую очередь подключаем флешку к компьютеру и запускаем VirtualBox, затем в главном окне виртуальной машины выделяем левой мышью нужную вам машину (если у вас их несколько) и жмём на кнопку Настроить.
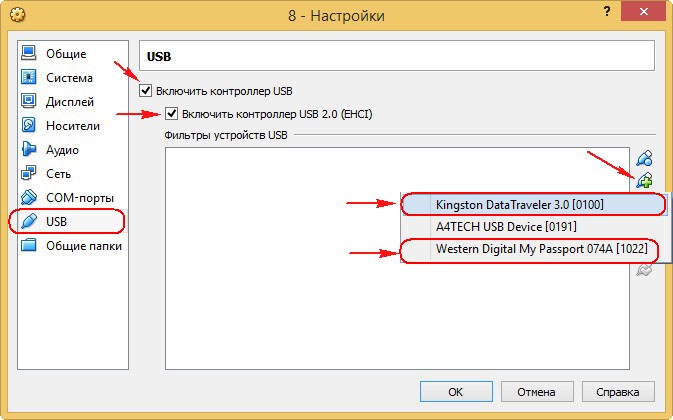
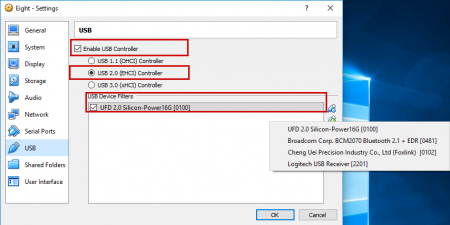
Выбираем Категорию USB.
Отмечаем пункты Включить контроллер USB
Включить контроллер USB 2.0 (EHCI)
В окне Фильтры устройств USB, добавляем новый USB фильтр, жмём на + и выбираем нашу флешку (в моём случае Kingston DataTraveler 3.0 отмечаем её левой мышью.
Далее отмечаем левой мышью переносной жёсткий диск USB Western Digital My Passport,
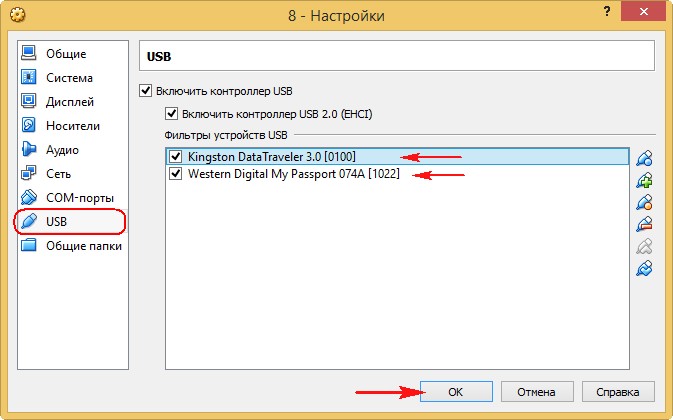
вот и всё, два новых USB фильтра в виде нашей флешки и внешнего жёсткого диска добавлены в виртуальную машину, жмём ОК
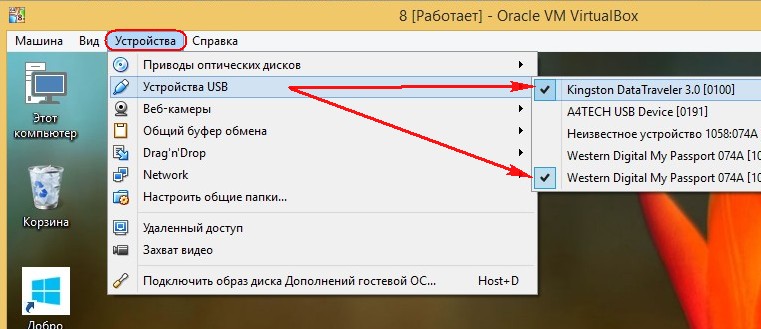
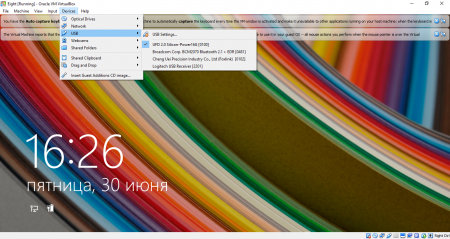
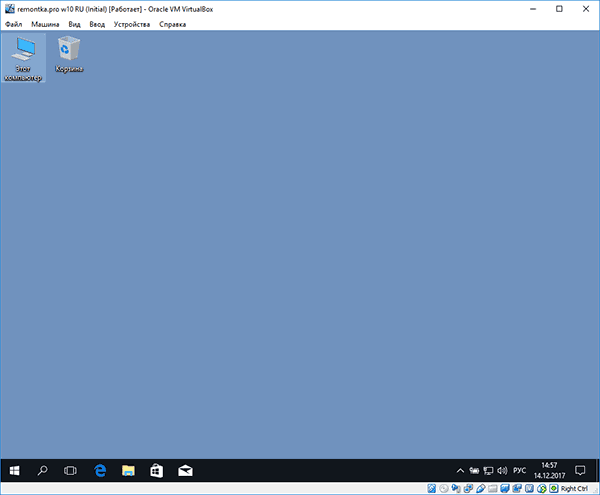
Загружаем операционную систему установленную на VirtualBox, например Windows 10, затем в главном окне Устройства->Устройства USBвыбираю свою флешку Kingston DataTraveler 3.0 и отмечаю её галочкой, точно также отмечаю галочкой свой переносной жёсткий диск USB Western Digital My Passport.
{banner_google1}
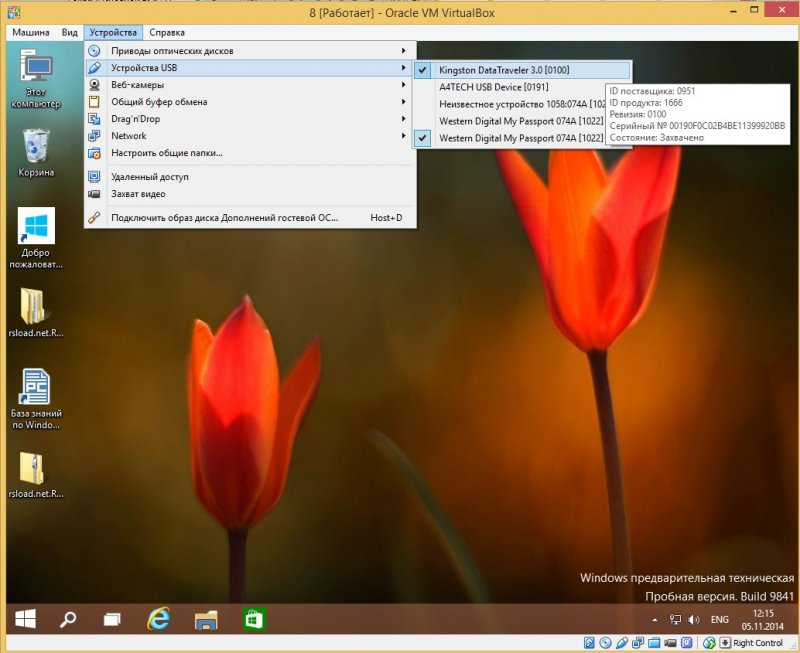
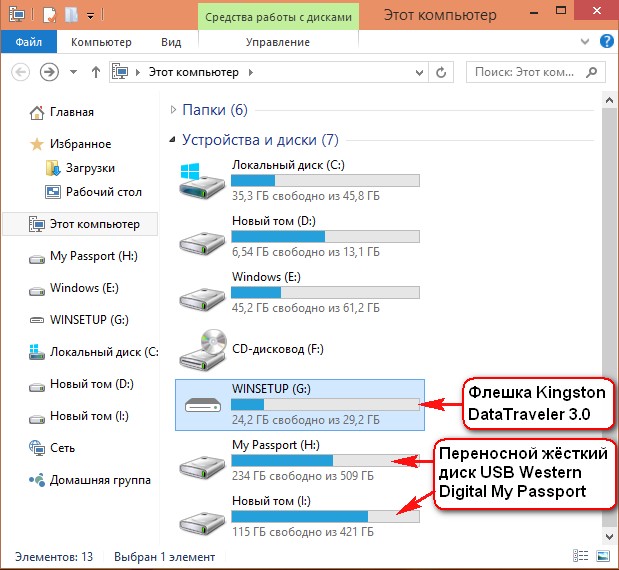
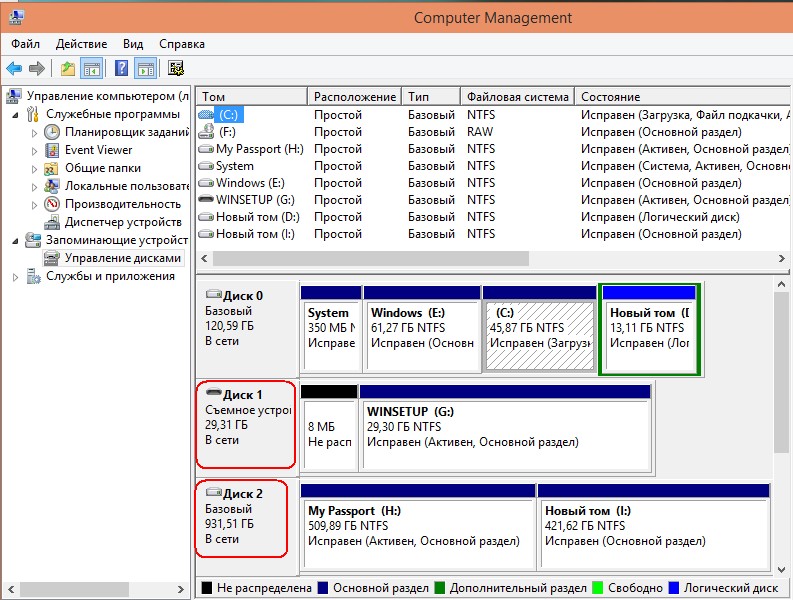
Теперь оба устройства: флешка и переносной винчестер доступны в окне Компьютер операционной системы Windows 10 и в Управлении дисками.
Если Вам нужно чтобы флешка появилась в основной операционной системе, тогда в главном окне Устройства->Устройства USB, выбирайте свою флешку Kingston DataTraveler 3.0 и снимите с неё галочку
Щёлкните для увеличения изображения левой мышью

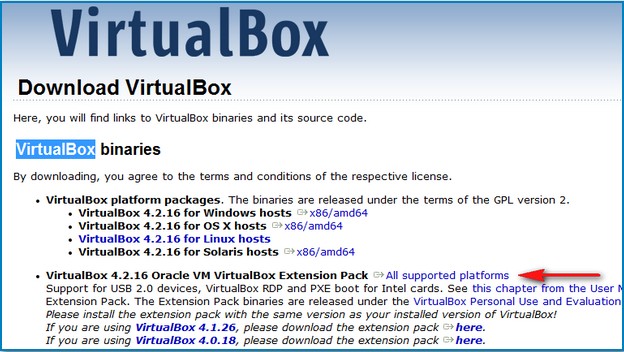
Чтобы все подключенные флешки USB-2.0 нормально работали в вашей виртуальной машине, установите себе плагин VirtualBox 4.2.16 Oracle VM VirtualBox Extension Pack, скачайте его на оф. сайте https://www.virtualbox.org/
Полезная статья по этой теме: Как загрузить виртуальную машину с флешки с помощью программы Virtual Machine USB Boot 1.5
How to use USB in VirtualBox
- 60
- 1
- 2
- 3
- 4
- 5
2

Sometimes the user urgently needs to connect the USB flash-drive or hard disk to the virtual machine. Despite all the manual efforts, he is just not capable to do it on his own, and in this case my instruction will be especially helpful. In this note I will in detail explain, how to connect USB-device to VirtualBox. Also I will mention, how to boot from USB drive in VirtualBox, and how to do it easily and simply.
One of the main preconditions for performing this manual is prior setting up of Oracle VM VirtualBox app, VirtualBox Guest Additions package and VirtualBox Extension Pack onto your PC. I will not clarify how to install most of this software, except Extension Pack. Just make sure, that all of the defined plugins are configured and customized before continuing the basic procedure.
How to install VirtualBox Extension Pack on the VM?
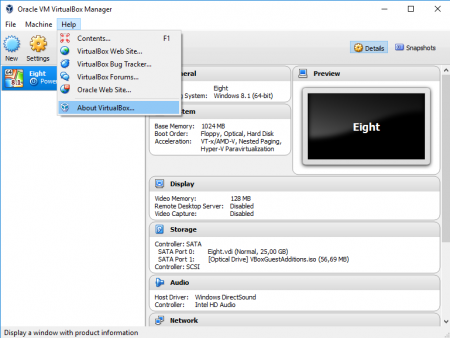
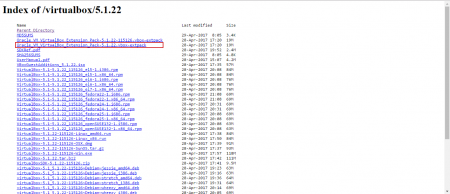
Extension pack is a set of utilities designed to enhance the interaction between the user and the virtual machine. The procedure of installing the package is absolutely elementary and intuitive. One primary condition – the package should be installed in VirtualBox, i.e. when the VM is running. At first we need to surf the web in search of the extension package, visit the official VirtualBox FTP-server and download the corresponding installation distributive from there. The link goes right here: http://download.virtualbox.org/virtualbox. Check out the active version of your current VirtualBox installation. In order to bring this intention to life, click Help -> About VirtualBox item in the upper menu.
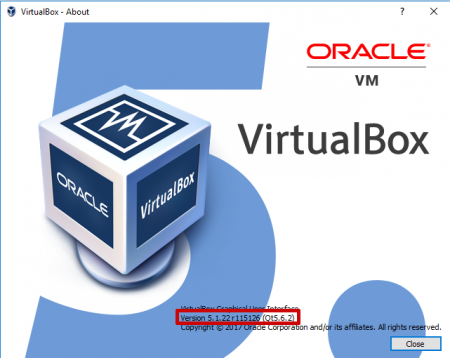
In the bottom part of the displayed window the build number will display. Following this information, you will have to download the appropriate package from the FTP-server.
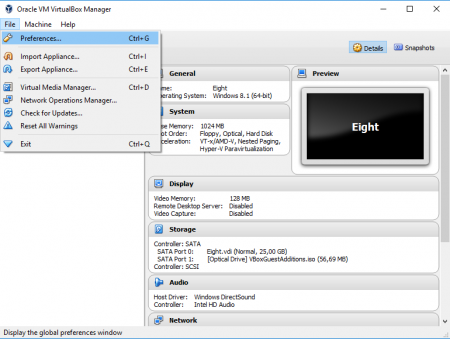
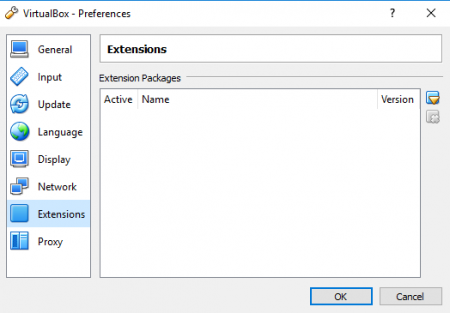
Now, when the file is downloaded, choose the active VM instance, click File -> Preferences in the upper menu and go to “Extensions” subcategory.
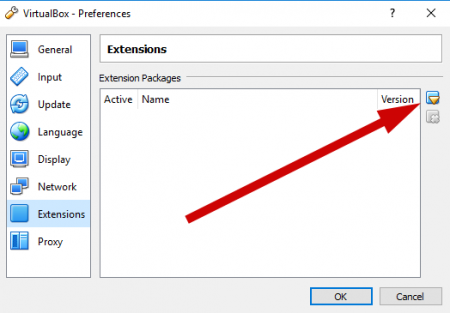
After that click on the button with an arrow on the right and specify a path to the just downloaded from FTP-server package.
At last, the dialogue form appears with prompt of extension pack installing. Agree on it and click “Install” button.
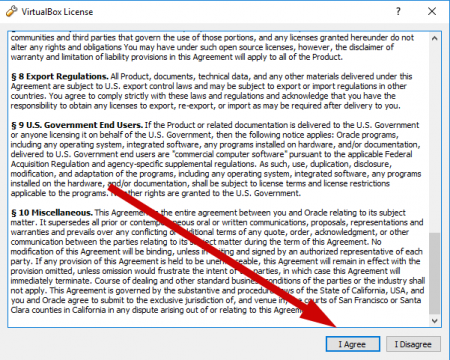
Then the agreement form appears, scroll it to the very bottom and click “I Agree” button below.
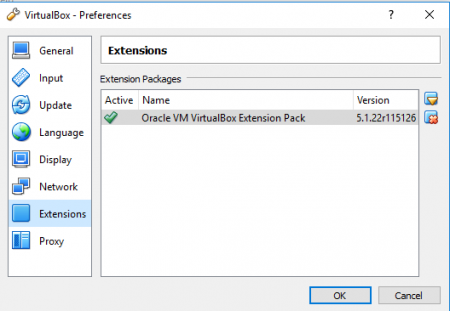
Soon afterwards the confirmation message is displayed on the screen with the note regarding the installing of VirtualBox extension pack, and new line appears in the list of additions being installed.
Now the setting up routine is over and we may continue with the basic procedure.
How to use USB drives in VirtualBox guest OS?
The latest VirtualBox version supports USB 3.0 devices. In order to be capable to get the whole bonuses of using USB 3.0 speeds, you will have to install Extension Pack, as we defined it earlier. Otherwise, the maximum transfer speed of the data will be equal to 12 Mbit/s, which is valid for USB 1.0 controller. In other case, the USB-disk may not be initialized at all, so let’s not forget about such a circumstance.
At first, before running the virtual machine, address to the main menu of the VM and open the “Settings” category, appropriate for the used machine instance. When the form opens, move to the “USB” section and put on the “Enable USB Controller” and “USB 2.0 (EHCI) Controller” checkboxes. Also create a filter for the required USB-device, specifying it in the list of all available USB-drives, either external hard disks or flash-drives.
Now boot the virtual machine, and when the instance will be initiated, click Devices -> USB in the upper menu and select the proper USB-device which you want to use in the VM.
After that the USB-drive will be immediately attached and initialized.
How to boot OS from USB on VirtualBox?
Whatever weird it may seem to you, but you may boot guest OS from USB-drive on VirtualBox. Lower I will present the instruction how to do it from Windows host.
Actually, booting from USB is a hidden feature in VirtualBox, which guarantees raw access to drives. This functionality isn’t available in app basic interface, but it’s a part of the VBoxManage command.
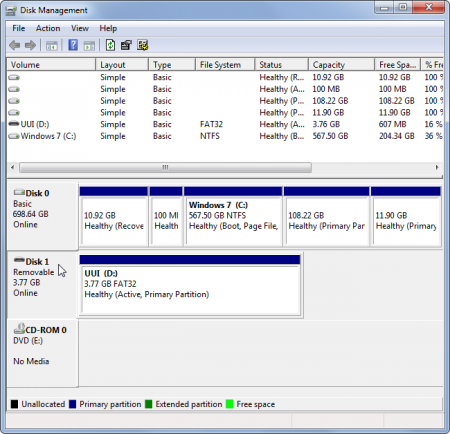
The first step, which you should perform prior to booting the external OS from USB-drive, is to connect the appropriate USB-drive with OS installed in it, to the PC. Use Windows + R hotkey combination, type diskmgmt.msc in the Run dialog form and press Enter button. As a result, the Disk Management window will be opened.
Search the USB drive in the Disk Management form and remember the disk number, corresponding to it. For instance, in my case, the USB drive is Disk 1.
Now, close any opened VBox application forms.
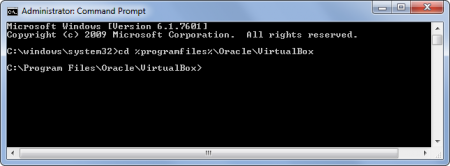
After that, open a Command Prompt with Administrator permissions. On Windows 10, use Windows + X combination on the keyboard and select Command Prompt (Admin) item from the menu.
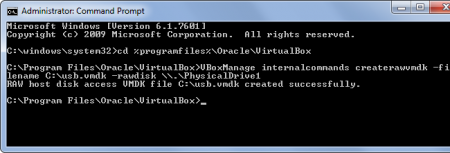
Enter the mentioned command into the command line and press Enter button. This command is dedicated to changing the active path to the VirtualBox default installed path. If you set up the app into the different folder, you will have to specify your own directory instead of mentioned in the example.
cd %programfiles%\Oracle\VirtualBox
Enter the defined command in the command line, replacing # sign with the number of the disk you noted earlier in the Disk Management form, and then press Enter button.
VBoxManage internalcommands createrawvmdk –filename C:\usbdisk.vmdk -rawdisk \\.\PhysicalDrive#
Instead of C:\usbdisk.vmdk you can specify any path you desire. As a result of this command, the VMDK-file will be created, which points to the physical drive you select. After you load the VMDK-object as a drive in VirtualBox, actually the VM will get access to the physical disk of your HDD.
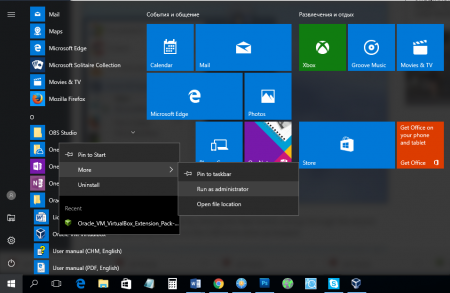
After this iteration is completed, open VirtualBox as administrator. Make a right click on the app shortcut and choose Run as administrator in the context menu. The virtual machine may get access to raw disk drives only with admin rights.
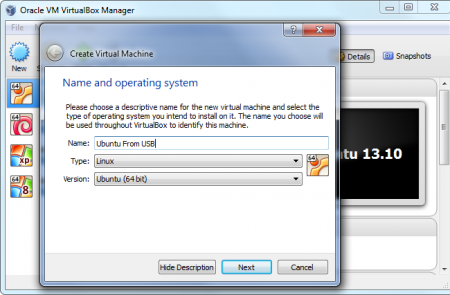
Generate a new VM instance by clicking the New button and process the wizard steps. Choose the OS on the USB-drive when the prompt appears.
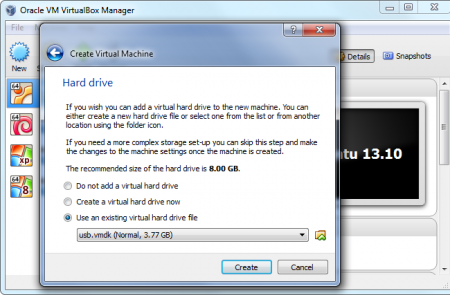
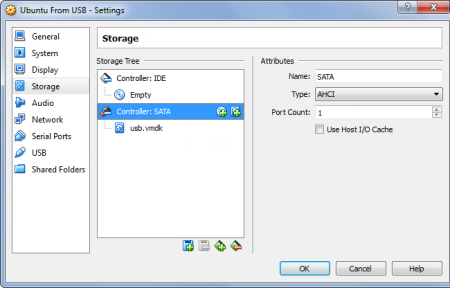
When the request is standing visible on the screen to define a hard disk, choose Use an existing virtual hard drive file option, make a click on the button to select a file on the hard disk, and search it – that will be C:\usbdisk.vmdk if you didn’t specify your unique path.
Load the VM and as a consequence the OS from your USB-device should load, in the same way as if you were loading it on a standard PC.
Pay attention to the following fact: the USB device should be the first hard disk in your VM settings, otherwise VirtualBox won’t load from it. Talking in another words, you are not able just to generate a default VM and attach a USB-drive afterwards.
If you are willing to install an OS from the USB, you would require to attach a hard drive later from the VM’s settings form. Make sure that USB logical device is the first drive in the list.
As you can see, beforehand I precisely described, how to use USB devices in VirtualBox. This article will surely come in hand, if you decide to boot from USB in VirtualBox or to attach an external USB drive to the VM.
-
Glijnos
- Posts: 24
- Joined: 22. Aug 2012, 22:28
Tutorial: Installing Windows 3.11 with (working) drivers! [Updated]
{mod note}This is a copy of a tutorial created by user Glijnos back in 2012. Unfortunately Glijnos made a lot of use of IMG tags, which the forum now deprecates for security reasons (offsite images can be substituted with nasty stuff that we won’t go into), hence his tutorial was ruined. Presented below is the same tutorial using local attachments, broken into multiple posts so that each post can remain below the forums three attachments limit
—————————————————————————————————————————————————————————————
Tutorial: Installing Windows For Workgroups 3.11 (Windows 3.11) on VirtualBox with full driver support.
Introduction
For this Tutorial VirtualBox has to be installed (correctly) on your computer.
This tutorial was tested on the hosts Windows 7 SP1 and Linux (Ubuntu 11.04). But should probably work on other hosts as well.
For this tutorial I used my 3.5-inch floppy disks of MS-DOS 6.22 and Windows 3.11. My present pc no longer has a floppy disk drive, so I used an old pc to create floppy images (.IMA) from my old floppy’s.
-

- floppyimages.jpg (55.78 KiB) Viewed 89218 times
Now that we have created the floppy images we can start to configure VirtualBox.
Create a virtual machine
Create in VirtualBox a new virtual machine with the name Windows 3.11 or any name you like. By OS Type select the Operating System: Microsoft Window. Under version select: Windows 3.1.
-
- vitualboxnewvm.jpg (50.34 KiB) Viewed 89218 times
Hit Next.
By memory use the default Base memory size of 32 megabyte.
Hit Next.
Create a new hard disk.
Hit Next.
Use the default file type: VDI (Others may also work).
Hit Next.
By storage details use the option you like (I used Dynamically allocated)
Hit Next.
If you like, you can give the virtual disk another name or location.
Use the default disk size of 1,00 Gigabyte (MS-DOS 6.22 can only recognise hard disks up to 2.1 GB)
Hit Next, then two times Create to create the virtual machine.
-
Glijnos
- Posts: 24
- Joined: 22. Aug 2012, 22:28
Adding a Floppy Controller
Post
by Glijnos »
Before you start the virtual machine you have to add a floppy controller.
Right click on the new virtual machine, then Settings, under Storage click: Add floppy controller.
-
- newvmcreatedfloppy.jpg (38.54 KiB) Viewed 89134 times
Add the newly added controller click on the green plus(+). A new window will popup, select: leave empty.
-
- floppyleaveempty.jpg (44.12 KiB) Viewed 89134 times
Now that this is finished you can start the virtual machine.
-
Glijnos
- Posts: 24
- Joined: 22. Aug 2012, 22:28
Selecting the MS-DOS Boot floppy
Post
by Glijnos »
MS-DOS is needed to run Windows 3.11. You can see Windows 3.11 as a graphical shell that depends on MS-DOS architecture.
Now that your virtual machine is running you will get the following message:
-
- vmrunninghalted.jpg (18.19 KiB) Viewed 89025 times
In the menu bar click on devices then —> Floppy Devices —> Choose a virtual floppy disk file… then select your first MS-DOS 6.22 setup floppy image file.
-
- vmrunningselectmsdosflo.jpg (32.7 KiB) Viewed 89025 times
Hit Right Ctrl + R or use the menu bar —> Machine —> Reset to reboot the virtual machine.
After the reboot VirtualBox loads the floppy Image and it will show the MS-DOS setup screen.
-
- msdossetup.jpg (49.46 KiB) Viewed 89025 times
-
Glijnos
- Posts: 24
- Joined: 22. Aug 2012, 22:28
Installing MS-DOS 6.22 (Format virtual hard disk)
Post
by Glijnos »
Hit Enter to start the setup.
Next Choose: Configure Unallocated disk space.
Next, hit Enter to reboot your virtual machine.
After the reboot MS-DOS will format the virtual hard disk.
-
- msdosformat.jpg (31.13 KiB) Viewed 89073 times
If the formatting hangs on 0%, then you have to reboot the virtual machine (right ctrl + R) and hit F8 until you see the following screen:
-
- msdossetuphitf8screen.jpg (26.61 KiB) Viewed 89073 times
Refuse loading of AUTOEXEC.BAT
When the A:\> prompt will appears, give the command «format c:» and enter the command «setup» once formatting is done.
-
- msdossetuphitf8screenfo.jpg (41.05 KiB) Viewed 89073 times
when the MS-DOS setup is running again you can follow the instructions on screen for installing MS-DOS.
-
Glijnos
- Posts: 24
- Joined: 22. Aug 2012, 22:28
Installing MS-DOS 6.22 (Continued)
Post
by Glijnos »
When the MS-DOS setup asks for Setup Disk #2, you have to load the next MS-DOS Floppy image.
Click on devices in the menu bar again, then —> Floppy Devices —> Choose a virtual floppy disk file… then select your next MS-DOS 6.22 floppy image file.
Use the same method for disk #3.
-
- msdossetupnewdisk.jpg (43.79 KiB) Viewed 89073 times
When the setup is done, remove the floppy disk from the virtual drive, and press ENTER.
-
- msdossetupfinishremoved.jpg (41.01 KiB) Viewed 89073 times
Setup complete:
-
- msdossetupfinishfinal.jpg (33.21 KiB) Viewed 89073 times
-
Glijnos
- Posts: 24
- Joined: 22. Aug 2012, 22:28
Installing Windows 3.11
Post
by Glijnos »
Now that MS-DOS is installed we can start to run the Windows 3.11 setup.
Click on devices in the menu bar again then —> Floppy Devices —> Choose a virtual floppy disk file… then select your first Windows 3.11 floppy image file.
At the C:\> prompt, give the command «A:\» and enter the command ‘setup’ once the prompt A:\> will appear and hit enter.
The Windows for Workgroups 3.11 setup screen will appear.
-
- 311setupscreen.jpg (36.69 KiB) Viewed 89074 times
Hit enter to setup Windows for Workgroups 3.11.
On the next screen choose the Express Setup with the enter key (the express setup is usually fine).
Windows will now be installed. When the setup asks for disk 2, click on devices in the menu bar again then —> Floppy Devices —> Choose a virtual floppy disk file… then select your next Windows 3.11 floppy image file.
After that the setup will reboot to a more graphical style and ask for your name, company and product number (use your windows 3.11 product number )
-
- 311setupproductnumber.jpg (60.39 KiB) Viewed 89074 times
Click Continue.
Verify your information and Click Continue.
The setup will now continue. When it ask for the next disk, select your next Windows 3.11 floppy image and hit Enter.
-
- 311setupfloppydisk3.jpg (47.49 KiB) Viewed 89074 times
Repeat this action for the following floppy disks.
-
Glijnos
- Posts: 24
- Joined: 22. Aug 2012, 22:28
Installing Windows 3.11 (Continued)
Post
by Glijnos »
When it asks for printer installation, just leave the «No Printer Attached» option selected and press the Install button.
When it asks for Network Setup, just press continue (You have to configure this later).
When it asks for the application name for C:\DOS\EDIT.COM, leave the default «MS-DOS Editor» option enabled and press OK.
You can choose to either Run Tutorial or Skip Tutorial.
Setup complete!
Remove your last floppy Image and press Restart Computer.
-
- 311setupcomplete.jpg (49.87 KiB) Viewed 89074 times
After the reboot, you can type win into the MS-DOS command line to see your new, working Windows 3.11! It is fully usable at this point, but continue with the rest of this tutorial to enable network support, CD-ROM drivers, video drivers, sound drivers and Internet Explorer.
-
- 311windows.jpg (76.71 KiB) Viewed 89073 times
-
Glijnos
- Posts: 24
- Joined: 22. Aug 2012, 22:28
Adding CD-ROM Support
Post
by Glijnos »
It works quicker to load all drivers and setup files on a single CD-ROM disk image then on multiple floppy’s images, so the first thing we need to do is to configure the ms-dos/Win 3.11 installation to recognise the VirtualBox (virtual) CD-ROM drive.
Search the web for the file AOATAPI.SYS and Copy the AOATAPI.SYS file to a floppy disk image, or use the CD-ROM driver floppy Image that I already made for you.
Start your virtual machine. Load the floppy Image, and then type COPY A:\AOATAPI.SYS C: at the command prompt to copy the AOATAPI.SYS file to your C: drive.
After that you must edit your AUTOEXEC.BAT and CONFIG.SYS files.
At the C:\ command prompt type EDIT AUTOEXEC.BAT. Place the line: c:\dos\mscdex.exe /d:idecd000 in the autoexec.bat and save, then exit (use the Alt key to activate the menu).
-
- cdromeditautoexec.jpg (45.24 KiB) Viewed 89072 times
At the C:\ prompt type EDIT CONFIG.SYS. Place the line device=c:\aoatapi.sys /d:idecd000 in the config.sys and then save, then exit.
-
- cdromeditconfig.jpg (45.65 KiB) Viewed 89072 times
Restart the virtual machine and go into windows. Open the File Manager and now you will see Drive D for the CD ROM.
I loaded the VirtualBox Guest additions for testing.
-
- cdromloaded.jpg (45.47 KiB) Viewed 89072 times
-
Glijnos
- Posts: 24
- Joined: 22. Aug 2012, 22:28
Sound Card Installation
Post
by Glijnos »
Search the web for the Sound Blaster 16/AWE for DOS/Windows 3.1 drivers and Copy them to a CD-ROM disk image or floppy disk image, or use the CD-ROM disk image that I already made for you.
Start-up MS-DOS to a C:\ prompt. Load the floppy or CD image, access the SoundBlaster 16 drivers on the A: or D: drive, then type install.
Note: On my driver CDROM type CD sb16 at the command prompt and then install.
-
- soundinstallcmd.jpg (32.32 KiB) Viewed 89184 times
Accept all of the defaults in the installation.
-
- soundinstallsettings.jpg (45.51 KiB) Viewed 89184 times
When the installation is complete you can run windows with sound.
When you run windows it will create a Audio Program Group automatically.
-
- soundwindows311.jpg (38.2 KiB) Viewed 89184 times
-
Glijnos
- Posts: 24
- Joined: 22. Aug 2012, 22:28
Network Installation
Post
by Glijnos »
Search the web for the «AMD PCNET Family (NDIS2/NDIS3)» driver and the » Microsoft TCP-IP-32 3.11b»drivers for Windows 3.11. Copy them to a CD-ROM disk Image or floppy disk Image, or use the CD-ROM disk Image that I already made for you.
Boot into windows 3.11 and open the program group «Main». In «Main» open the program «Windows Setup», click «options» and then «Change Network Settings».
-
- networksetup.jpg (60.12 KiB) Viewed 89073 times
On the «Network Setup» screen click on networks. On the next screen select «Install Microsoft Windows Network» and hit «OK».
-
- networkinstallnetwork.jpg (65.24 KiB) Viewed 89073 times
Click «OK» again on the «Network Setup» screen.
On the «Add Network Adapter» screen select the «Unlisted or Updated Network Adapter» option and click «OK».
-
- networksetupunlisted.jpg (51.35 KiB) Viewed 89073 times
-
Glijnos
- Posts: 24
- Joined: 22. Aug 2012, 22:28
Network Installation (Continued)
Post
by Glijnos »
On the CDROM drive or Floppy disk Image select the directory where you stored the » AMD PCNET Family » drivers —> windowsnetdrv (windowsn) and click «OK».
-
- networkdriverlocationse.jpg (61.76 KiB) Viewed 89073 times
And «OK» again, then select the «Advanced Micro Devices PCNET family» driver and click «OK» again.
-
- networkdriveramdselect.jpg (51.05 KiB) Viewed 89073 times
Enter an User Name, Workgroup and Computer Name or keep the defaults and click «OK» again.
-
- networkcomputername.jpg (42.49 KiB) Viewed 89073 times
-
Glijnos
- Posts: 24
- Joined: 22. Aug 2012, 22:28
Network Installation (Continued)
Post
by Glijnos »
When the setup asks for your Windows 3.11 Disk 7 and 8 floppy, load them and Click «OK».
When the installation is complete click «OK» and then click «Restart Computer».
Don’t forget to remove your windows 3.11 installation floppy!
-
- networksetupfinishmodif.jpg (50.58 KiB) Viewed 89027 times
When the reboot is complete start Windows Again. You get the messenger: welcome to Windows for Workgroups. Click «OK» to make a new password or «Cancel» the start the Program Manager.
-
- welcomecq.jpg (31.09 KiB) Viewed 89027 times
Go to the program group «Network» and click «Network Setup». On the Network setup click on «Drivers», then «Add protocol» and select «Unlisted or Updated Protocol», then hit «ÖK».
-
- networkprotocolsetup.jpg (59.64 KiB) Viewed 89027 times
-
Glijnos
- Posts: 24
- Joined: 22. Aug 2012, 22:28
Network Installation (Continued)
Post
by Glijnos »
On the CDROM drive or Floppy disk Image select the directory where you stored the «Microsoft tcpip311b» drivers and click «OK».
Select the Microsoft TCP/IP32 3.11b protocol and click «OK» again.
-
- networkmicrosoftprotoco.jpg (53.93 KiB) Viewed 88768 times
When the installation is complete click «Close», after that click «OK».
When the «Microsoft TCP/IP configuration» window pops up select «Enable Automatic DHCP configuration» or use your own configuration and hit «OK».
-
- networkdhcp.jpg (53.92 KiB) Viewed 88768 times
Click on «Restart Computer» to finish the installation.
To confirm that networking is working at this stage, try opening a MS-DOS Prompt from the «Main» group and type «ping http://www.google.nl».
-
- networkping.jpg (54.55 KiB) Viewed 88768 times
If you get a reply, then your network installation is working correctly. Type exit to return to windows.
-
Glijnos
- Posts: 24
- Joined: 22. Aug 2012, 22:28
Installing Internet Explorer 5.01
Post
by Glijnos »
To browse the internet you need to install a browser.
Search the web for the «Internet Explorer 5 (windows 3.11)» and copy the installer to a CD-ROM disk Image. You can also use the CD-ROM disk image that I made for you.
In windows open the File Manager, open your D:\ drive and run the msie501w311 installer.
-
- ie5setupbrowse.jpg (45.28 KiB) Viewed 88810 times
WinZip will extract the installation files and start the setup.
-
- ie5setup.jpg (58.7 KiB) Viewed 88810 times
Click «Next >» and accept the agreement. Click «Next >» again.
Use the default Full install and click «Next >».
-
- ie5setupfullinstall.jpg (61.88 KiB) Viewed 88810 times
Виртуальные машины представляют собой эмуляцию устройств на другом устройстве или, в контексте этой статьи и упрощенно, позволяют запускать виртуальный компьютер (как обычную программу) с нужной операционной системой на вашем компьютере с той же или отличающейся ОС. Например, имея на своем компьютере Windows, вы можете запустить Linux или другую версию Windows в виртуальной машине и работать с ними как с обычным компьютером.
В этой инструкции для начинающих подробно о том, как создать и настроить виртуальную машину VirtualBox (полностью бесплатное ПО для работы с виртуальными машинами в Windows, MacOS и Linux), а также некоторые нюансы по использованию VirtualBox, которые могут оказаться полезными.
Для чего это может потребоваться? Чаще всего, виртуальные машины используют для запуска серверов или для тестирования работы программ в различных ОС. Для начинающего пользователя такая возможность может быть полезна как для того, чтобы попробовать в работе незнакомую систему или, например, для запуска сомнительных программ без опасности получить вирусы на своем компьютере.
Кстати, в Windows 11/10 Pro и Enterprise есть встроенные средства для работы с виртуальными машинами, см. Виртуальные машины Hyper-V в Windows 10, а с недавних пор для личного использования стало бесплатным ПО от VMWare. Примечание: если на компьютере установлены компоненты Hyper-V, то VirtualBox будет сообщать об ошибке Не удалось открыть сессию для виртуальной машины, о том как это обойти: Запуск VirtualBox и Hyper-V на одной системе.
Установка VirtualBox
Вы можете бесплатно скачать ПО для работы с виртуальными машинами VirtualBox с официального сайта https://www.virtualbox.org/wiki/Downloads где представлены версии для Windows, Mac OS X и Linux. Несмотря на то, что сайт на английском, сама программа будет на русском языке. Запустите загруженный файл и пройдите простой процесс установки (в большинстве случаев достаточно оставить все параметры по умолчанию).

Во время установки VirtualBox, если вы оставите включенным компонент для доступа к Интернету из виртуальных машин, вы увидите предупреждение «Warning: Network Interfaces», которое сообщает о том, что в процессе настройки ваше Интернет-подключение будет временно разорвано (и восстановится автоматически после установки драйверов и настройки подключений).
По завершении установки можете запустить Oracle VM VirtualBox.
Создание виртуальной машины в VirtualBox
Примечание: для работы виртуальных машин требуется, чтобы на компьютере была включена виртуализация VT-x или AMD-V в БИОС. Обычно она включена по умолчанию, но, если что-то пойдет не так, учитывайте этот момент.
Теперь давайте создадим свою первую виртуальную машину. В примере далее используется VirtualBox, запущенная в Windows, в качестве гостевой ОС (той, которая виртуализируется) будет Windows 10.
- Нажмите «Создать» в окне Oracle VM VirtualBox Менеджер.

- В окне «Укажите имя и тип ОС» задайте произвольное имя виртуальной машины, выберите тип ОС, которая будет на нее установлена и версию ОС. В моем случае — Windows 10 x64. Нажмите «Далее».

- Укажите объем оперативной памяти, выделяемой для вашей виртуальной машины. В идеале — достаточный для её работы, но не слишком большой (так как память будет «отниматься» от вашей основной системы, когда виртуальная машина будет запущена). Рекомендую ориентироваться на значения в «зелёной» зоне.

- В следующем окне выберите «Создать новый виртуальный жесткий диск».
- Выберите тип диска. В нашем случае, если этот виртуальный диск не будет использоваться за пределами VirtualBox — VDI (VirtualBox Disk Image).
- Укажите, динамический или фиксированный размер жесткого диска использовать. Я обычно использую «Фиксированный» и вручную задаю его размер.
- Укажите размер виртуального жесткого диска и место его хранения на компьютере или внешнем накопителе (размер должен быть достаточным для установки и работы гостевой операционной системы). Нажмите «Создать» и дождитесь завершения создания виртуального диска.

- Готово, виртуальная машина создана и отобразится в списке слева в окне VirtualBox. Чтобы увидеть информацию о конфигурации, как на скриншоте, нажмите по стрелке справа от кнопки «Машины» и выберите пункт «Детали».


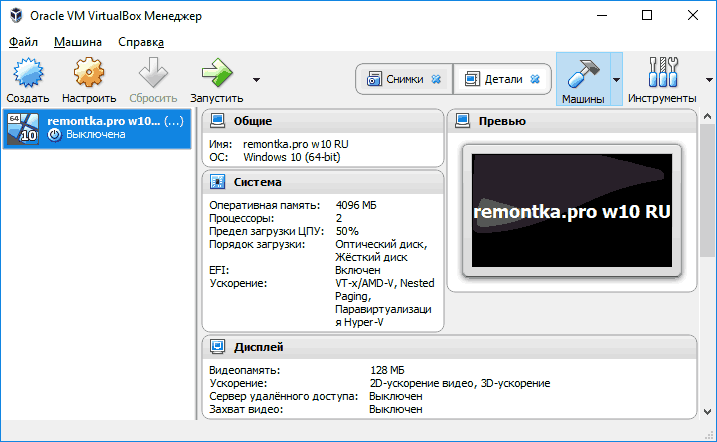
Виртуальная машина создана, однако, если её запустить, вы не увидите ничего кроме черного экрана со служебной информацией. Т.е. создан пока только «виртуальный компьютер» и никакая операционной система на нём не установлена.
Установка Windows в VirtualBox
Для того, чтобы установить Windows, в нашем случае Windows 10, в виртуальной машине VirtualBox вам потребуется образ ISO с дистрибутивом системы (см. Как скачать образ ISO Windows 10). Дальнейшие шаги будут выглядеть следующим образом.
- Вставьте образ ISO в виртуальный привод DVD. Для этого выберите виртуальную машину в списке слева, нажмите кнопку «Настроить», перейдите в пункт «Носители», выберите диск, нажмите по кнопке с диском и стрелкой и выберите пункт «Выбрать образ оптического диска». Укажите путь к образу. Затем в пункте настроек «Система» в разделе «Порядок загрузки» установите «Оптический диск» на первое место в списке. Нажмите «Ок».

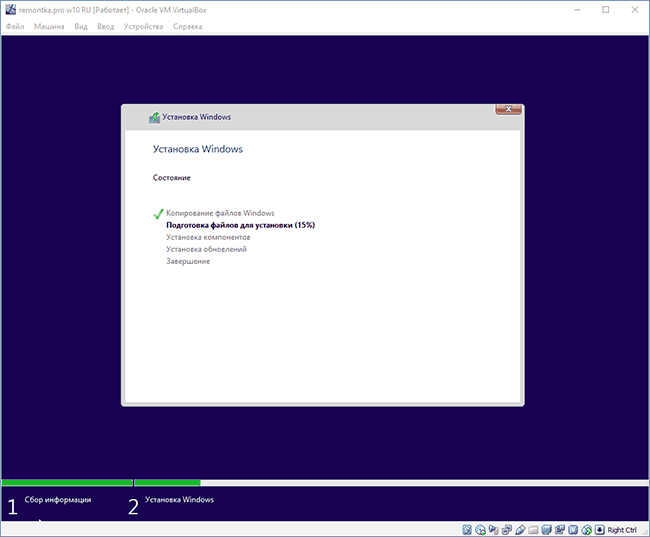
- В главном окне нажмите «Запустить». Запустится созданная ранее виртуальная машина, при этом загрузка будет выполнена с диска (с образа ISO), можно выполнить установку Windows так, как это делается на обычном физическом компьютере. Все шаги первоначальной установки аналогичны таковым на обычном компьютере, см. Установка Windows 10 с флешки.

- После того, как Windows была установлена и запущена, следует установить некоторые драйверы, которые позволят гостевой системе правильно (и без лишних тормозов) работать в виртуальной машине. Для этого выберите в меню «Устройства» — «Подключить образ диска дополнений VirtualBox», откройте компакт-диск внутри виртуальной машины и запустите файл VBoxWindowsAdditions.exe для установки этих драйверов. При ошибке подключения образа, завершите работу виртуальной машины и подключите образ из C:\ Program Files\ Oracle\ VirtualBox\ VBoxGuestAdditions.iso в настройках носителей (как в первом шаге) и снова запустите виртуальную машину, а затем произведите установку с диска.

По завершении установки и перезагрузки виртуальной машины она полностью будет готова к работе. Однако, возможно, вы захотите выполнить некоторые дополнительные настройки.
Основные настройки виртуальной машины VirtualBox
В настройках виртуальной машины (учтите, что многие настройки недоступны, пока виртуальная машина запущена) вы можете изменить следующие основные параметры:
- В пункте «Общие» на вкладке «Дополнительно» можно включить общий с основной системой буфер обмена и функцию Drag-n-Drop для перетаскивания файлов в гостевую ОС или из неё.
- В пункте «Система» — порядок загрузки, режим EFI (для установки на GPT диск), размер оперативной памяти, количество ядер процессора (не следует указывать число более количества физических ядер процессора вашего компьютера) и допустимый процент их использования (низкие значения часто приводят к тому, что гостевая система «тормозит»).
- На вкладке «дисплей» можно включить 2D и 3D ускорение, задать объем видеопамяти для виртуальной машины.
- На вкладке «Носители» — добавить дополнительные приводы дисков, виртуальные жесткие диски.
- На вкладке USB — добавить USB устройства (которые физически подключены к вашему компьютеру), например, флешку, к виртуальной машине (нажмите по значку USB с «плюсом» справа). Для использования контроллеров USB 2.0 и USB 3.0 установите Oracle VM VirtualBox Extension Pack (доступно для скачивания там же, где вы загружали VirtualBox).

- В разделе «Общие папки» можно добавить папки, которые будут общими для основной ОС и виртуальной машины.

Некоторые из указанных выше вещей можно выполнить и из запущенной виртуальной машины в главном меню: например, в пункт «Устройства» можно подключить флешку, извлечь или вставить диск (ISO), включить общие папки и т.п.
Дополнительная информация
В завершение — некоторая дополнительная информация, которая может оказаться полезной при использовании виртуальных машин VirtualBox.
- Одна из полезных возможностей при использовании виртуальных машин — создание «снимка» (snapshot) системы в её текущем состоянии (со всеми файлами, установленными программами и прочим) с возможностью отката к этому состоянию в любой момент (и возможностью хранить несколько снимков). Сделать снимок в VirtualBox можно на запущенной виртуальной машине в меню «Машина» — «Сделать снимок состояния». А восстановить в менеджере виртуальных машин, нажав «Машины» — «Снимки» и выбрав вкладку «Снимки».

- Некоторые комбинации клавиш по умолчанию перехватываются основной операционной системой (например, Ctrl+Alt+Del). Если вам требуется отправить подобное сочетание клавиш в виртуальную машину, используйте пункт меню «Ввод».
- Виртуальная машина может «захватывать» ввод клавиатуры и мышь (так, что нельзя перевести ввод на основную систему). Чтобы «освободить» клавиатуру и мышь, если потребуется, используйте нажатие хост-клавиши (по умолчанию это правый Ctrl).
- На сайте Майкрософт есть готовые бесплатные виртуальные машины Windows для VirtualBox, которые достаточно импортировать и запустить. Подробно о том, как это сделать: Как скачать бесплатные виртуальные машины Windows с сайта Майкрософт.
- При необходимости вы можете включить загрузку виртуальной машины VirtualBox с физической флешки или другого накопителя

Обновлено:
Опубликовано:
Используемые термины: Virtualbox, Windows, Linux.
Virtualbox позволяет легко организовать тестовую среду у себя на компьютере. Он удобен и прост в установке и использовании. Мы рассмотрим его установку на компьютеры под управлением Windows и Linux. Также мы установим Extension Pack.
Установка на Windows
Linux
Ubuntu
CentOS
Extension Pack
Шпаргалка с командами
Решение возможных проблем
На Windows
В качестве примера мы установим Virtualbox на Windows 10.
Скачиваем последнюю версию программы с официального сайта.
* на момент обновления это была версия 6.1.12.
Запускаем скачанный файл. В открывшемся окне нажимаем Next — откроется окно выбора компонентов. Оставьте все, как есть и нажмите Next:

В следующем окне оставьте галочки, как есть (для Virtualbox будут созданы ярлыки на рабочем столе, в меню Пуск и все файлы данной программы будут автоматически открываться в ней при двойном клике).
В следующем окне установщик предупредит, что на момент установки Virtualbox произойдет кратковременная потеря сети. Убедитесь, что сеть не понадобиться в ближайшие 2-3 минуты и нажмите Yes.
В последнем окне нажмите Install — начнется процесс инсталляции платформы виртуализации.
В процессе выскочит окно с предупреждением об установки дополнительных устройств — соглашайтесь.

Когда установки будет завершена, нажмите Finish.
На Linux
Для примера мы установим Virtualbox на Ubuntu и CentOS. Мы будем использовать командную строку — это быстрый и универсальный подход для работы с Linux.
Ubuntu
В Ubuntu программное обеспечение Virtualbox есть в репозиториях. Поэтому для установки вводим одну команду:
apt-get install virtualbox
Запуск программы выполняется командой:
virtualbox
… или в графическом интерфейсе среди приложений.
CentOS
Для установки на CentOS сначала переходим на страницу Download VirtualBox for Linux Hosts и копируем ссылку на последнюю версию платформы виртуализации для нужной версии Linux:

С помощью скопированной ссылки, скачиваем файл RPM на компьютер с CentOS командой:
wget https://download.virtualbox.org/virtualbox/6.1.12/VirtualBox-6.1-6.1.12_139181_el8-1.x86_64.rpm
* если мы получим ошибку, то выполним установку программы для загрузки файлов командой yum install wget.
Для установки virtualbox из загруженного файла вводим:
yum localinstall VirtualBox-*.rpm
Extension Pack (для Windows и Linux)
Extension Pack расширяет функциональные возможности Virtualbox, например — поддержка USB 3, PXE загрузка, шифрование диска. Установка выполняется одинаково для всех операционных систем.
С официального сайта скачиваем последнюю версию пакета:

Запускаем Virtualbox — кликаем по Файл — Настройки:
Нажимаем Плагины — добавление нового:

Выбираем скачанный файл — Установить — прокручиваем до конца лицензионное соглашение и кликаем по Я согласен (кнопка станет активной после пролистывания текста соглашения до конца).
Плагин будет установлен и появится в списке:
Некоторые команды для управления из консоли
Управление гипервизором из командной строки выполняется с помощью утилиты vboxmanage. Рассмотрим некоторые часто используемые команды в Linux и Windows для управления Virtualbox. Предполагается, что мы будем работать с виртуальной машиной с названием VMname.
Команды нужно выполнять от пользователя, под которым созданы виртуальные машины, так как при работе в многопользовательской среде, у каждого будет свой профиль с настройками Virtualbox.
1. Список виртуальных машин
Простой список:
vboxmanage list vms
Список с подробным выводом информации:
vboxmanage list vms -l
С сортировкой:
vboxmanage list vms -s
Подробная информаци о конкретной виртуальной машине:
vboxmanage showvminfo VMname
Список запущенных машин:
vboxmanage list runningvms
2. Создание виртуальной машины
Выполняется в несколько этапов. Для удобства работы, созданим переменную с названием создаваемой машины, например:
export VM_NAME=’Astra01′
* предполагается, что мы создаем машину с названием Astra01.
Создаем VM:
vboxmanage createvm —name ${VM_NAME} —ostype Debian_64 —register —basefolder ~/»VirtualBox VMs»
* данная команды создаст машину с типом операционной системы Debian (x64). Ее папка будет размещена в каталоге VirtualBox VMs, который находится в домашней директории другого пользователя — эту опцию нужно проверить и проверить, где данная папка находится в вашем случае.
Список типов операционных систем можно посмотреть командой:
vboxmanage list ostypes
Мы должны получить соощение на подобие:
Virtual machine ‘Astra01’ is created and registered.
UUID: ecff742b-1fd2-4480-a923-dca50044e7b6
Settings file: ‘/home/dmosk/VirtualBox VMs/Astra01/Astra01.vbox’
Задаем нужные опции:
vboxmanage modifyvm ${VM_NAME} —ioapic on
vboxmanage modifyvm ${VM_NAME} —memory 2048 —vram 128
vboxmanage modifyvm ${VM_NAME} —nic1 nat
* где ioapic включает расширенную поддержку управления питанием на уровне БИОС; memory укажет на объем оперативной памяти; vram — объем видеопамяти; nic1 nat — создаст сетевое подключение типа NAT.
Создадим и подключим дисковый накопитель:
vboxmanage createhd —filename ~/»VirtualBox VMs»/${VM_NAME}/${VM_NAME}_DISK.vdi —size 16384 —format VDI
vboxmanage storagectl ${VM_NAME} —name «SATA Controller» —add sata —controller IntelAhci
vboxmanage storageattach ${VM_NAME} —storagectl «SATA Controller» —port 0 —device 0 —type hdd —medium ~/»VirtualBox VMs»/${VM_NAME}/${VM_NAME}_DISK.vdi
Подключим образ ISO:
vboxmanage storagectl ${VM_NAME} —name «IDE Controller» —add ide —controller PIIX4
vboxmanage storageattach ${VM_NAME} —storagectl «IDE Controller» —port 1 —device 0 —type dvddrive —medium /ISO/debian.iso
Зададим порядок загрузки:
vboxmanage modifyvm ${VM_NAME} —boot1 dvd —boot2 disk —boot3 none —boot4 none
Разрешаем удаленный рабочий стол на 10001 порту:
vboxmanage modifyvm ${VM_NAME} —vrde on
vboxmanage modifyvm ${VM_NAME} —vrdemulticon on —vrdeport 10001
Запускаем созданную виртуальную машину:
vboxheadless —startvm ${VM_NAME}
Открываем клиент RDP (например, подключение к удаленному рабочему столу Windows) и выполняем установку системы.
3. Включение, выключение и перезагрузка
Включить:
vboxmanage startvm VMname
В зависимости от того, с графикой мы хотим запустить машину или нет, мы можем применить опцию type:
vboxmanage startvm —type gui VMname
vboxmanage startvm —type headless VMname
* где gui и headless, соответственно, для графики (отображение окна виртуальной машины) или в фоне.
Остановить:
vboxmanage controlvm VMname poweroff soft
Перезагрузка (грубая):
vboxmanage controlvm VMname reset
4. Редактирование
Переименовать виртуальную машину:
vboxmanage modifyvm «Rocky Linux 01» —name «Rocky-Linux-01»
* в данном примере мы изменили название с Rocky Linux 01 на Rocky-Linux-01.
Изменить количество ядер процессора:
vboxmanage modifyvm «Rocky Linux 01» —cpus 4
Изменить объем оперативной памяти:
vboxmanage modifyvm «Rocky Linux 01» —memory 4096
Включить вложенную виртуализацию:
vboxmanage modifyvm «Rocky Linux 01» —nested-hw-virt on
5. Работа с дисками
Добавление диска:
vboxmanage createmedium disk —filename «/home/user/VirtualBox VMs/VMname/disk_test.vdi» —size 10240 —format VDI —variant Standard
* где:
- filename — путь до файла с виртуальным диском.
- size — максимальный размер диска. Указывается в мегабайтах.
- format — формат диска. Возможные варианты: VDI, VMDK, VHD.
- variant — формат файла. Возможны варианты: Standard, Fixed, Split2G, Stream, ESX.
Подключение диска к вируальной машине.
Для начала выключаем виртуальную машину. Это можно сделать из самой операционной системы или как указано ранее в инструкции:
vboxmanage controlvm VMname poweroff soft
После можно выполнить команду:
vboxmanage storageattach VMname —medium «/home/user/VirtualBox VMs/VMname/disk_test.vdi» —storagectl «SATA» —port 1 —type hdd
Посмотреть имя контроллера у виртуальной машины можно командой:
vboxmanage showvminfo VMname | grep «Storage Controller Name»
Можно снова включать виртуальную машину:
vboxmanage startvm VMname
6. Работа со снимками
Показать список снапшотов для виртуальной машины:
vboxmanage snapshot VMname list
Создать снимок:
vboxmanage snapshot VMname take snapshot-name [—description=description] [—live]
* где:
- snapshot-name — имя для снимка.
- description — описание.
- live — не выключать машину для создания снимка (дольше по времени).
Восстановить из снимка:
vboxmanage snapshot VMname restore snapshot-name
* виртуальная машина должна быть выключена.
Удалить снимок:
vboxmanage snapshot VMname delete snapshot-name
7. Работа с сетью
Список сетей NAT:
vboxmanage list natnets
Возможные проблемы
Рассмотрим проблемы, с которыми мы можем столкнуться при установке или работе с Vitrualbox.
The VirtualBox Linux kernel driver is either not loaded or not set up correctly
Проблема может появиться при попытке запустить виртуальную машину. В ошибке говорится, что необходимо ввести команду ‘/sbin/vboxconfig’ от пользователя root для решения проблемы. Однако, при вводе данной команды мы получаем ошибку:
This system is currently not set up to build kernel modules.
Please install the Linux kernel «header» files matching the current kernel
for adding new hardware support to the system.
The distribution packages containing the headers are probably:
kernel-devel kernel-devel-5.11.12-300.fc34.x86_64
* где kernel-devel kernel-devel-5.11.12-300.fc34.x86_64 — конкретная версия исходников ядра, которой не хватает программе.
Причина: для корректного запуска виртуальной машине не хватает конкретной версии исходников ядра. Данная версия указывается в сообщении об ошибке.
Решение: необходимо просто установить необходимые исходники. В зависимости от установленной системы Linux команды могут отличаться.
а) для Ubuntu / Debian:
apt-get install kernel-source-5.11.12-300.fc34.x86_64
б) для CentOS / Fedora:
yum install kernel-devel-5.11.12-300.fc34.x86_64
После выполняем команду:
/sbin/vboxconfig
Она должна выполниться без ошибок. После чего можно запускать виртуальную машину.