
Environmental introduction:
Zabbix version: 3.2.11
Zabbixagent version: zabbix_agents_3.2.7.win
Operating system: Windows server 2008 R2
Steps:
(1) The official download agent installs a large version of the corresponding server
https://www.zabbix.com/download_agents
(2) Copy to windows custom directory to extract the file
Conf directory
Zabbix_agentd.win.conf //Main configuration file
Bin directory
Zabbix_agentd //agent
Zabbix_get //passive acquisition
Zabbix_sender //actively get
(3) Install zabbix agent
If this file is placed in C:\zabbix
1. First modify the main configuration file c:\zabbix\zabbix_agents_3.2.7.win\conf\zabbix_agentd.win.conf
PidFile=c:\zabbix\zabbix_agentd.pid (optional)
LogFile=c:\zabbix\zabbix_agentd.log (optional)
Server=<server IP address>
Hostname=<client hostname>
2, start the zabbix client on the client host —> use cmd terminal
C:\Users\Administrator> c:\zabbix\zabbix_agents_3.2.7.win\bin\win64> //Switch to the client directory
c:\zabbix\zabbix_agents_3.2.7.win\bin\win64>zabbix_agentd.exe -c  c:\zabbix\zabbix_agents_3.2.7.win\conf\zabbix_agentd.win.conf -i
zabbix_agentd.exe [75792]: service [Zabbix Agent] installed successfully
zabbix_agentd.exe [75792]: event source [Zabbix Agent] installed successfully
3, start zabbix on the client host
c:\zabbix\zabbix_agents_3.2.7.win\bin\win64>zabbix_agentd.exe -c c:\zabbix\zabbix_agents_3.2.7.win\conf\zabbix_agentd.win.conf -s
zabbix_agentd.exe [54028]: service [Zabbix Agent] started successfully
4. Check if the service port is started.
c:\>netstat -ano | find /i   "10050"
  TCP    0.0.0.0:10050          0.0.0.0:0              LISTENING       80236
    TCP    [::]:10050                 [::]:0                     LISTENING       80236
-i means not case sensitive
Note: The zabbix agent port is 10050
5. Verify that the zabbix agent starts automatically.
Start —> Management Tools —> Services —> Zabbix_Agent Service Starts Automatically
The meaning of the zabbix_agent parameter:
-c Make the location of the configuration file
-i is the installation client
-s start the client
-x stop client
-d uninstall client
Reprinted at: https://blog.51cto.com/7603402/2163251
- На главную
- Категории
- Сеть
- Zabbix
- Zabbix agent для Windows — установка и настройка
Периодически приходится устанавливать на ПК с Windows 7/8/10 и на сервера с Windows Server 2008R2/2012/2012R2/2016 zabbix agent. Сначала это делалось так — качался скрипт, руками прописывался как служба, это очень неудобно, особенно когда количество хостов начинает увеличиваться. Вручную надо заходить в папку с zabbix агентом и прописывать службу: zabbix_agentd.exe
2017-01-31 09:59:1060

Периодически приходится устанавливать на ПК с Windows 7/8/10 и на сервера с Windows Server 2008R2/2012/2012R2/2016 zabbix agent.
Сначала это делалось так — качался скрипт, руками прописывался как служба, это очень неудобно, особенно когда количество хостов начинает увеличиваться.
Вручную надо заходить в папку с zabbix агентом и прописывать службу:
zabbix_agentd.exe --config <ваш_файл_конфигурации> --install
Проблема была решена — на просторах интернета был найден инсталятор zabbix агента для Windows.
Скачать zabbix_agent-3.2.3_installer
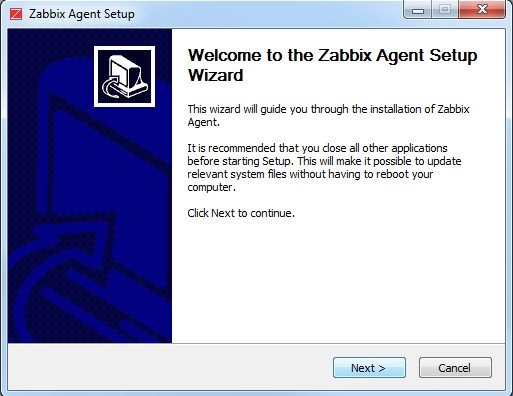
После скачивания запускаем установщик
Установка zabbix agent’ a windows:
Нажимаем «Next«:
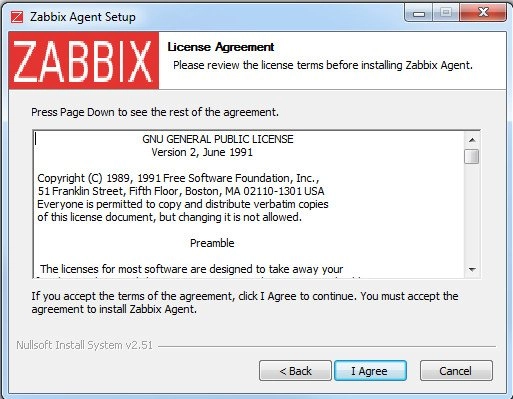
Соглашаемся с лицензией использования «I Agree»:
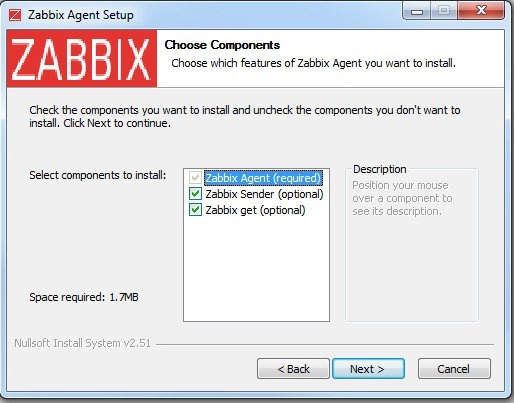
Выпираем опции, которые нам нужны (я выбираю по default) и нажимаем «Next«:
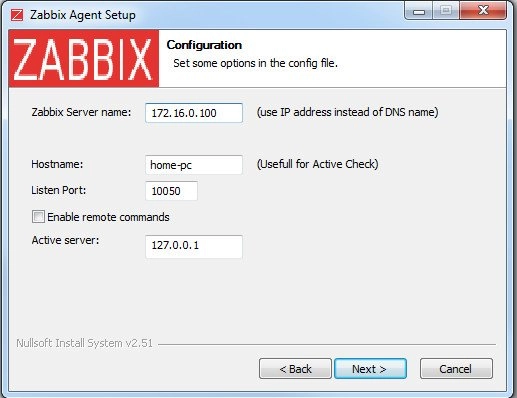
Вводим основные настройки:
Zabbix Server name: IP адрес zabbix-сервера
Hostname: Имя узла, которое будет в заббик сервере
Listen Port: Порт, по которому будут общаться сервер с агентом
Нажимаем «Next«:
Выбираем папку, в которую установим наш zabbix agent и нажимаем «Install«:

Установка завершена, нажимаем «Close«:

Вот и все! Установка завершена. Осталось добавить host в zabbix сервер и повесить на него стандартный шаблон «Template OS Windows».
Если Вам надо будет перезапустить агента, то необходимо зайти в Панель управления -> Администрирование -> Службы, там найти службу — zabbix agent, нажать на ней правой кнопкой мыши и выбрать то действие, которое Вы хотите сделать (Запустить, остановить, перезапустить).
Свои параметры можно добавить в файле «C:\Program Files (x86)\Zabbix Agent\zabbix_agentd.conf»
Лог хранится — «C:\Program Files (x86)\Zabbix Agent\Zabbix_agentd.txt»
P.S.: Не забываем про брандмауэр/firewall. Не забываем открыть порт 10050 для пассивного агента / 10051 для активного агента
Я надеюсь Вам помогла данная статья.
Не забываем, что все ссылки на скачивание и версии агента актуальны на момент написания статьи. Если у Вас еще остались вопросы, можете задавать их в комментарии, с удовольствием на все отвечу!
Скачать zabbix_agent-3.2.3_installer
Ваш покорный слуга — компьютерщик широкого профиля: системный администратор, вебмастер, интернет-маркетолог и много чего кто. Вместе с Вами, если Вы конечно не против, разовьем из обычного блога крутой технический комплекс.
Source: Internet
zabbix-3.0.4 adding monitoring for Windows 2008r2
One, the configuration of the Windows client
Shut down Windows Firewall or open ports 10050 and 10051
(1), Shut down the firewall (not recommended to close directly, the test can do so, especially the recent ransomware virus violently)
Start-Control Panel-windows Firewall
(2), open the Zabbix need to use the port (recommended)
1. Start-management tools-Windows Firewall with Advanced Security
2, choose the left inbound rules—click on the right to create a new rule-port-tcp, a specific local port (10050-10051)-Allow connection-default-fill in the name (complete)
3, choose the left out rule—click on the right to create a new rule-port-tcp, a specific local port (10050-10051)-Allow connection-default-fill in the name (complete)
Once configured, starting the installation of zabbix-agent is actually adding zabbix-agent to the Windows service:
Unzip the package download to the C packing directory Http://www.zabbix.com/downloads/3.0.4/zabbix_agents_3.0.4.win.zip
To modify a configuration file:
C:\conf\zabbix_agentd.win.conf
# server Address
Server=zabbix.chinasoft.com
listenport=10050
Serveractive=zabbix.chinasoft.com
HOSTNAME=WINDOWS2008R2 # Get host name by running Hostname cmd
Under Windows Console, execute the following command:
C:\bin\win64\zabbix_agentd.exe-c C:\conf\zabbix_agentd.win.conf-i
The start command is as follows:
C:\bin\win64\zabbix_agentd.exe-c c:\conf\zabbix_agentd.win.conf-s
II. configuration on the server-side web
Add host select Windows template to
zabbix-3.0.4 adding monitoring for Windows 2008r2
Требуется следить за некоторой группой людей.
Проводящих работы на сервере с документооборотом
Железка зацеплена на ZABBIX по SNMP
И успешно мониторится
Для проверки результатов деятельности «зондэр команды» выделена 1 штатная еденица
Означен список служб windows должных быть в состоянии «работает».
Дополнительный контроль решено осуществить через zabbix agent (active)
Скачиваем нужную версию агента
http://www.zabbix.com/ru/download2.php
Помещаем в папку на сервере, например: c:\zabbix
Далее правим zabbix_agentd.win.conf
# This is a config file for the Zabbix agent daemon (Windows)
# To get more information about Zabbix, go to http://www.zabbix.com
############ GENERAL PARAMETERS #################
### Option: LogFile
# Name of log file.
# If not set, Windows Event Log is used.
#
# Mandatory: no
# Default:
# LogFile=
LogFile=c:\zabbix\zabbix_agentd.log # тут говорим где живут логи
### Option: LogFileSize
# Maximum size of log file in MB.
# 0 — disable automatic log rotation.
#
# Mandatory: no
# Range: 0-1024
# Default:
# LogFileSize=1
### Option: DebugLevel
# Specifies debug level
# 0 — no debug
# 1 — critical information
# 2 — error information
# 3 — warnings
# 4 — for debugging (produces lots of information)
#
# Mandatory: no
# Range: 0-4
# Default:
DebugLevel=1 # это правит количество мусора в логах
### Option: SourceIP
# Source IP address for outgoing connections.
#
# Mandatory: no
# Default:
# SourceIP=
### Option: EnableRemoteCommands
# Whether remote commands from Zabbix server are allowed.
# 0 — not allowed
# 1 — allowed
#
# Mandatory: no
# Default:
# EnableRemoteCommands=0
### Option: LogRemoteCommands
# Enable logging of executed shell commands as warnings.
# 0 — disabled
# 1 — enabled
#
# Mandatory: no
# Default:
# LogRemoteCommands=0
##### Passive checks related
### Option: Server
# List of comma delimited IP addresses (or hostnames) of Zabbix servers.
# Incoming connections will be accepted only from the hosts listed here.
# No spaces allowed.
# If IPv6 support is enabled then ‘127.0.0.1’, ‘::127.0.0.1’, ‘::ffff:127.0.0.1’ are treated equally.
#
# Mandatory: no
# Default:
# Server=
Server=127.0.0.1 # указываем где живет наш сервер
### Option: ListenPort
# Agent will listen on this port for connections from the server.
#
# Mandatory: no
# Range: 1024-32767
# Default:
# ListenPort=10050
### Option: ListenIP
# List of comma delimited IP addresses that the agent should listen on.
# First IP address is sent to Zabbix server if connecting to it to retrieve list of active checks.
#
# Mandatory: no
# Default:
# ListenIP=0.0.0.0
### Option: StartAgents
# Number of pre-forked instances of zabbix_agentd that process passive checks.
# If set to 0, disables passive checks and the agent will not listen on any TCP port.
#
# Mandatory: no
# Range: 0-100
# Default:
# StartAgents=3
##### Active checks related
### Option: ServerActive
# List of comma delimited IP:port (or hostname:port) pairs of Zabbix servers for active checks.
# If port is not specified, default port is used.
# IPv6 addresses must be enclosed in square brackets if port for that host is specified.
# If port is not specified, square brackets for IPv6 addresses are optional.
# If this parameter is not specified, active checks are disabled.
# Example: ServerActive=127.0.0.1:20051,zabbix.doma
#
# Mandatory: no
# Default:
# ServerActive=
ServerActive=127.0.0.1 # тут правим адрес сервера для активных запросов (обычно одно и тоже)
### Option: Hostname
# Unique, case sensitive hostname.
# Required for active checks and must match hostname as configured on the server.
# Value is acquired from HostnameItem if undefined.
#
# Mandatory: no
# Default:
# Hostname=
Hostname=Windows host # это надо указать точно как при заведении хоста #на сервере ZABBIX иначе не будут работать active checks
### Option: HostnameItem
# Item used for generating Hostname if it is undefined.
# Ignored if Hostname is defined.
#
# Mandatory: no
# Default:
# HostnameItem=system.hostname
### Option: RefreshActiveChecks
# How often list of active checks is refreshed, in seconds.
#
# Mandatory: no
# Range: 60-3600
# Default:
# RefreshActiveChecks=120
### Option: BufferSend
# Do not keep data longer than N seconds in buffer.
#
# Mandatory: no
# Range: 1-3600
# Default:
# BufferSend=5
### Option: BufferSize
# Maximum number of values in a memory buffer. The agent will send
# all collected data to Zabbix server or Proxy if the buffer is full.
#
# Mandatory: no
# Range: 2-65535
# Default:
# BufferSize=100
### Option: MaxLinesPerSecond
# Maximum number of new lines the agent will send per second to Zabbix Server
# or Proxy processing ‘log’, ‘logrt’ and ‘eventlog’ active checks.
# The provided value will be overridden by the parameter ‘maxlines’,
# provided in ‘log’, ‘logrt’ or ‘eventlog’ item keys.
#
# Mandatory: no
# Range: 1-1000
# Default:
# MaxLinesPerSecond=100
############ ADVANCED PARAMETERS #################
### Option: Alias
# Sets an alias for parameter. It can be useful to substitute long and complex parameter name with a smaller and simpler one.
# For example, if you wish to retrieve paging file usage in percents from the server,
# you may use parameter «perf_counter[\Paging File(_Total)\% Usage]», or you may define an alias by adding the following line to configuration file
# Alias = pg_usage:perf_counter[\Paging File(_Total)\% Usage]
# After that you can use parameter name «pg_usage» to retrieve the same information.
# You can specify as many «Alias» records as you wish.
# Aliases cannot be used for parameters defined in «PerfCounter» configuration file records.
#
# Mandatory: no
# Range:
# Default:
### Option: Timeout
# Spend no more than Timeout seconds on processing
#
# Mandatory: no
# Range: 1-30
# Default:
# Timeout=3
### Option: PerfCounter
# Syntax: <parameter_name>,»<perf_counter_path>»
# Defines new parameter <parameter_name> which is an average value for system performance counter <perf_counter_path> for the specified time period <period> (in seconds).
# For example, if you wish to receive average number of processor interrupts per second for last minute, you can define new parameter «interrupts» as following:
# PerfCounter = interrupts,»\Processor(0)\Interrupts/sec»
# Please note double quotes around performance counter path.
# Samples for calculating average value will be taken every second.
# You may run «typeperf -qx» to get list of all performance counters available in Windows.
#
# Mandatory: no
# Range:
# Default:
### Option: Include
# You may include individual files in the configuration file.
#
# Mandatory: no
# Default:
# Include=
# Include=c:\zabbix\zabbix_agentd.userpara
####### USER-DEFINED MONITORED PARAMETERS #######
### Option: UnsafeUserParameters
# Allow all characters to be passed in arguments to user-defined parameters.
# 0 — do not allow
# 1 — allow
#
# Mandatory: no
# Range: 0-1
# Default:
# UnsafeUserParameters=0
### Option: UserParameter
# User-defined parameter to monitor. There can be several user-defined parameters.
# Format: UserParameter=<key>,<shell command>
#
# Mandatory: no
# Default:
# UserParameter=
Далее ставим агента как сервис
zabbix_agentd.exe —config c:\zabbix\zabbix_agentd.win.conf –install
далее видим успешную интеграцию с windows
и стартуем только что рожденный сервис.
zabbix_agentd.exe —config c:\zabbix\zabbix_agentd.win.conf –start
Оно читает конфиг и пишет если что в лог файл
Далее мы должны повесить на ZABBIX новый template
Мне подошёл вот этот – только его надо подточить
https://www.zabbix.org/mw/images/9/91/Zbx_mssqlsrv_template.xml
В теле есть некоторые недочеты
Надо проитись поиском и поправить
<expression>{Template App Microsoft SQL Server:perf_counter[\SQLAgent:Jobs(_Tota
Правим на
<expression>{Template App Microsoft SQL Server:perf_counter[\SQLAgent:Jobs(_Tota
И так везде добавить 0 в скобках
Так же исправить SNMP авторизацию на нужную вам.
После этого импортируем в ZABBIX
И привязываем к хосту, если не привязать еще и стандартный template для windows.
Мы не увидим огонек об успешном зацеплении сервера ZABBIX и хоста – хотя все нужные данные будут поступать
Далее ждем письма или иные виды уведомлений при возникновении событий

Hi! This video describes how to install Zabbix Agent on Microsoft Windows based Server or Computer (Server 2003, 2008, 2008 R2, 2012, 2012 R2, Client 7, 8, …
source
windows server