
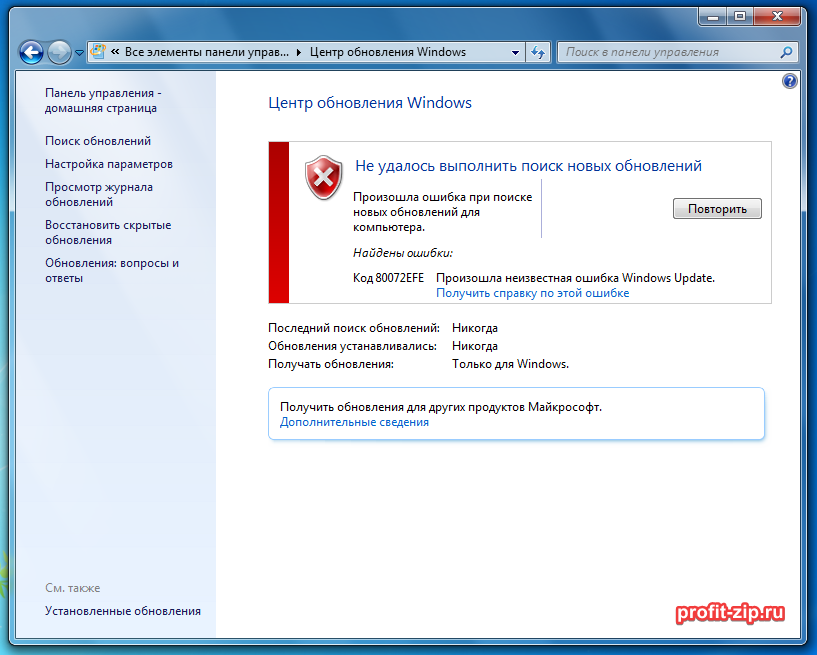
Ошибка под номером 80072EFE при попытке обновления Windows 7, Windows 8, Windows Server 2008 и Windows Server 2012 возникает из-за того, что Агент обновления устарел и не может связаться с серверами Microsoft.
Первым делом необходимо узнать разрядность вашей системы. Для этого откройте Проводник и перейдите в «Компьютер». Под списком локальных дисков, в пустом месте, нажмите правой кнопкой мыши и нажмите «Свойства». В свойствах компьютера найдите графу «Тип системы»: он может быть указан как «32-разрядная операционная система», «64-разрядная операционная система», либо «Itanium».
Вероятнее всего, у вас будет 32-разрядная (также иногда обозначается как x86 или 32-bit) или 64-разрядная ОС, так как это самые распространённые типы системы.
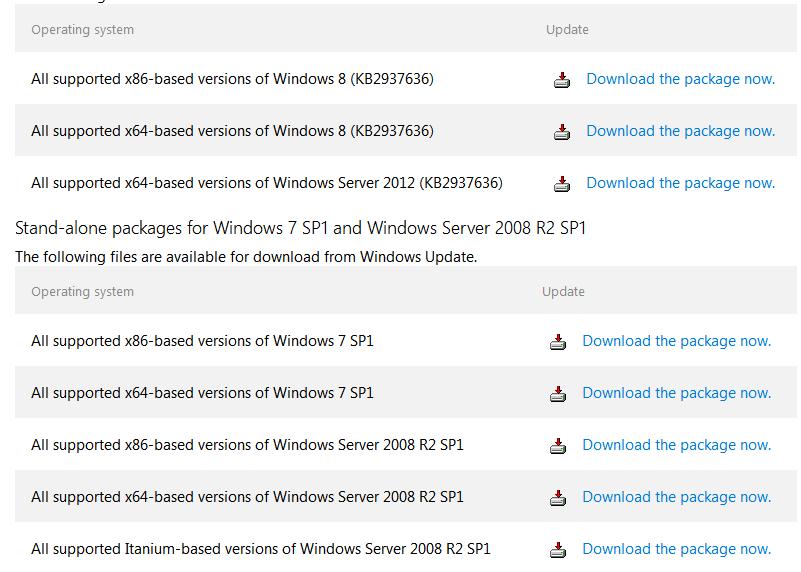
Для обновления Агента обновлений необходимо вручную установить одно из следующих обновлений (подходящее по версии и разрядности):
- Windows 8 – обновление KB2937636:
- 32bit: из центра загрузок Microsoft.com, зеркало (.msu, 3.7Мб)
- 64bit: из центра загрузок Microsoft.com, зеркало (.msu, 4.5Мб)
- Windows Server 2012 – обновление KB2937636 для 64-разрядных систем: из центра загрузок Microsoft, зеркало (.msu, 4.5Мб)
- Windows 7, Windows Server 2008:
- 32bit: из центра загрузок Microsoft, зеркало (.exe, 9.3Мб)
- 64bit: из центра загрузок Microsoft, зеркало (.exe, 10.7Мб)
- IA64 (Itanium): из центра загрузок Microsoft, зеркало (.exe, 13.8Мб)
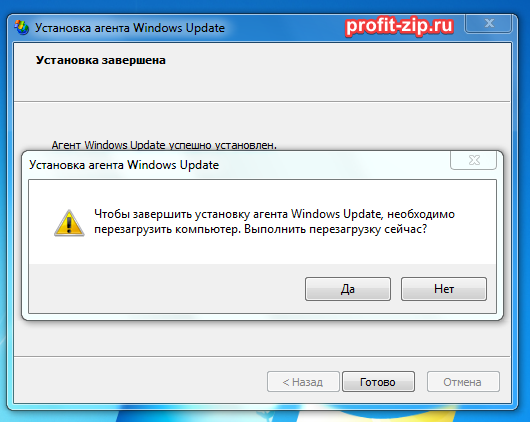
Установите следующий обновления и согласитесь на перезагрузку ПК. Если запрос на перезагрузку ПК не появится, перезагрузите ПК вручную.
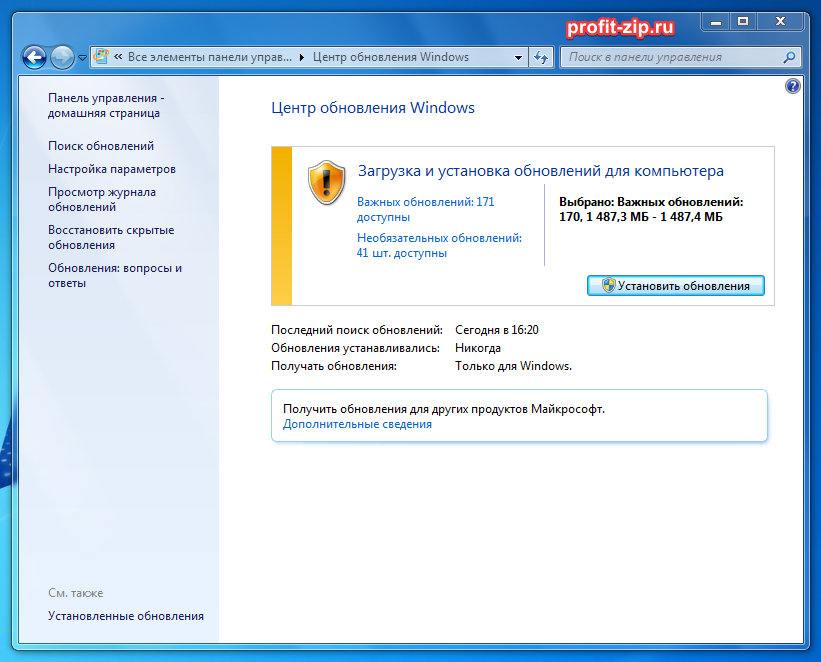
После установки обновления, запустите поиск обновлений через Центр обновления Windows. Процесс первого поиска обновлений может продолжаться достаточно длительное время (вплоть до пары часов), в зависимости от количества доступных обновлений.
Ошибка всё равно появляется
В особо устаревших версиях Windows 7 случается и такое, что после установки вышеуказанного обновления, продолжает отображаться ошибка 80072EFE.
В этом случае требуется сделать следующее:
- Установить пакет обновления Service Pack 1 (SP1) для Windows 7 (KB976932):
https://www.catalog.update.microsoft.com/Search.aspx?q=KB976932
Пакет обновления массивный: чуть более 540Мб для 32-разрядных систем, и чуть более 910Мб для 64-разрядных систем, поэтому ссылки на зеркало на нашем сайте, к сожалению, прикрепить не можем; - После установки перезагрузить компьютер;
- Заново установить обновление Агента обновления из начала статьи;
- Перезагрузить компьютер;
- Вновь попробовать установить обновления через Центр обновлений Windows.
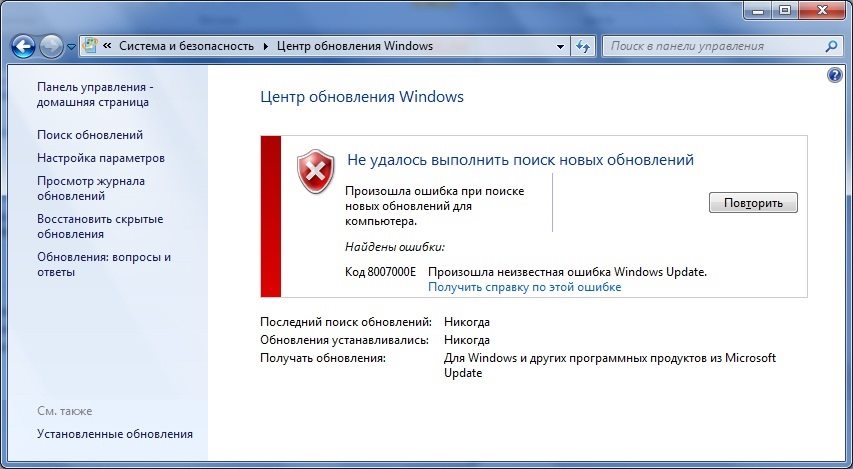
Ошибка 8007000E
В особо запущенных случаях, когда пропущено слишком много обновлений Windows 7, после установки SP1 и обновления Агента обновления, может появляться ошибка 8007000E:
В этом случае потребуется дополнительно вручную (поверх SP1) установить следующие обновления:
- KB4474419 v3:
Windows 7 x86: с сайта Microsoft, зеркало
Windows 7 x64: с сайта Microsoft, зеркало - KB4490628:
Windows 7 x86: с сайта Microsoft, зеркало
Windows 7 x64: с сайта Microsoft, зеркало - KB4516655:
Windows 7 x86: с сайта Microsoft, зеркало
Windows 7 x64: с сайта Microsoft, зеркало - KB5006749:
Windows 7 x86: с сайта Microsoft, зеркало
Windows 7 x64: с сайта Microsoft, зеркало - KB2533552:
Windows 7 x86: с сайта Microsoft, зеркало
Windows 7 x64: с сайта Microsoft, зеркало - KB3083324:
Windows 7 x86: с сайта Microsoft, зеркало
Windows 7 x64: с сайта Microsoft, зеркало
Или все эти же обновления в одном архиве:
- Для Windows 7 x86: Windows7-RenewUpdateAgent-x86.zip
- Для Windows 7 x64: Windows7-RenewUpdateAgent-x64.zip
После установки всех обновлений перезагрузите компьютер и попробуйте выполнить обновление ОС через Центр обновлений Windows.
Если служба обновлений Windows работает не корректно, обновления не загружаются или не устанавливаются, то самый простой и эффективней способ решить проблему со службой Windows Update – восстановить ее исходные настройки. В этой статье мы покажем, как сбросить конфигурацию агента и службы обновлений Windows Update.
Содержание:
- Средство устранения неполадок Центра обновления Windows
- Сброс настроек Windows Update с помощью PowerShell
- Утилита Reset Windows Update Tool
- Восстановление исходных настроек Windows Update из командной строки
Обычно для отладки и дебага ошибок службы обновления Windows администратору необходимо проанализировать коды ошибок в файле журнала обновлений %windir%\WindowsUpdate.log (в Windows 10 и 11 получить файл WindowsUpdate.log можно таким способом). Количество возможных ошибок, с которыми может столкнуться администратор при анализе журнала обновлений исчисляется десятками (список всех ошибок Windows Update) и процесс их разрешения в основном нетривиальный. В некоторых случаях вместо детального анализа ошибок Windows Update гораздо быстрее и проще сначала произвести полный сброс настроек службы Windows Update. После сброса Windows Update вы можете выполнить сканирование и поиск обновлений.
Средство устранения неполадок Центра обновления Windows
Прежде чем перейти к сбросу конфигурации центра обновления Windows, настоятельно рекомендуем сначала попробовать более встроенное средство для автоматического исправления проблем в службе обновления Windows – средство устранения неполадок Центра обновления Windows (Windows Update Troubleshooter).
В Windows 10 и 11 Windows Update Troubleshooter уже встроен в современную панель Settings. Для предыдущих версий Windows его придется скачать вручную по ссылкам ниже:
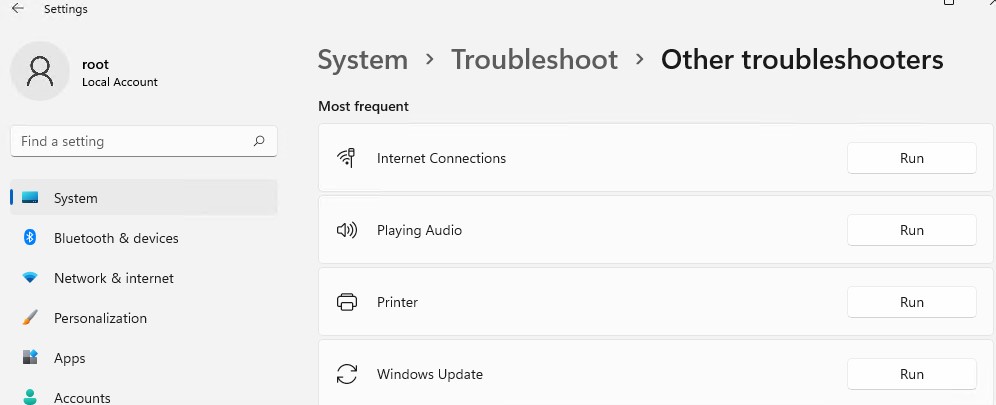
- Windows 11 — Settings -> System -> Troubleshooter -> Other Troubleshooter -> Windows Update;

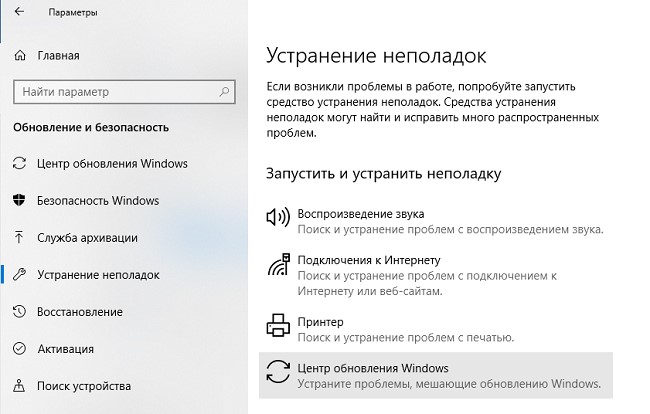
- Windows 10 – скачите wu10.diagcab по ссылке https://aka.ms/wudiag , либо запустите локальную версию инструмента: Пуск -> Параметры -> Обновления и безопасность -> Устранение неполадок -> Центр обновлений Windows (Start -> Settings -> Updates and Security -> Troubleshoot -> Additional Troubleshooters-> Windows Updates – resolve problems that prevent you from updating windows);

Для быстрого доступа к средствам исправления неполадок Windows можно использовать команду ms-settings:
ms-settings:troubleshoot - Windows 7 и Windows 8.1 — WindowsUpdate.diagcab (https://aka.ms/diag_wu).
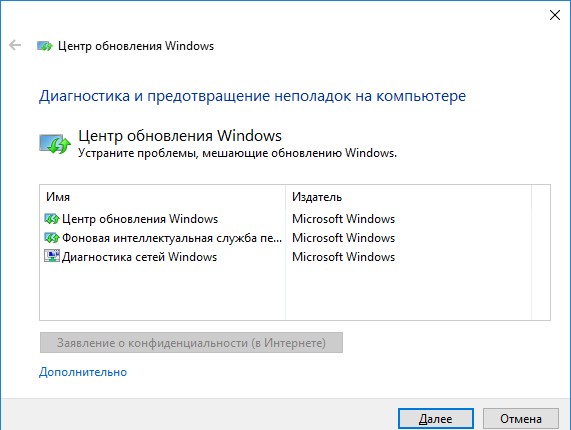
Дождитесь пока средство устранения неполадок Центра обновления Windows просканирует систему и попытается автоматически исправить все ошибки в службе Windows Update и связанных компонентах.
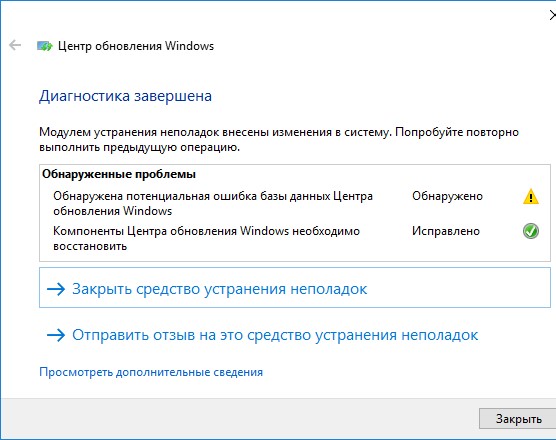
В моем случае была обнаружена и исправлена потенциальная ошибка в базе данных Центра обновления Windows. После этого перезагрузите компьютер и попробуйте выполнить поиск обновлений. Если обновления не загружаются или не устанавливаются, перейдите к следующему этапу.
Сброс настроек Windows Update с помощью PowerShell
Вы можете использовать PowerShell модуль PSWindowsUpdate для сброса настроек агента и службы Windows Update.
Установите модуль на свой компьютер из галереи скриптов PSGallery:
Install-Module -Name PSWindowsUpdate
Разрешите запуск PowerShell скриптов:
Set-ExecutionPolicy –ExecutionPolicy RemoteSigned -force
Выполните команду:
Reset-WUComponents –verbose
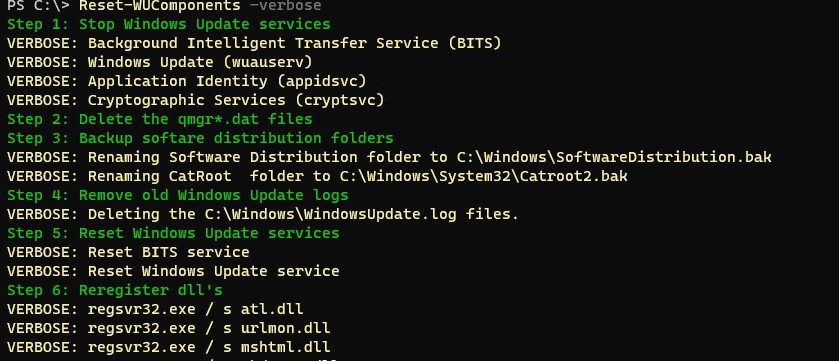
Команда Reset-WUComponents выполняет действия, по остановке служб, перерегистрации dll и очистке каталога C:\Windows\SoftwareDistribution, что и описанный чуть ниже bat скрипт.
VERBOSE: Background Intelligent Transfer Service (BITS)
VERBOSE: Windows Update (wuauserv)
VERBOSE: Application Identity (appidsvc)
VERBOSE: Cryptographic Services (cryptsvc)
Step 2: Delete the qmgr*.dat files
Step 3: Backup software distribution folders
VERBOSE: Renaming Software Distribution folder to C:\Windows\SoftwareDistribution.bak
VERBOSE: Renaming CatRoot  folder to C:\Windows\System32\Catroot2.bak
 Step 4: Remove old Windows Update logs
VERBOSE: Deleting the C:\Windows\WindowsUpdate.log files.
Step 5: Reset Windows Update services
VERBOSE: Reset BITS service
VERBOSE: Reset Windows Update service
Step 6: Reregister dll's
VERBOSE: regsvr32.exe / s atl.dll
VERBOSE: regsvr32.exe / s urlmon.dll
VERBOSE: regsvr32.exe / s mshtml.dll
VERBOSE: regsvr32.exe / s shdocvw.dll
VERBOSE: regsvr32.exe / s browseui.dll
VERBOSE: regsvr32.exe / s jscript.dll
VERBOSE: regsvr32.exe / s vbscript.dll
VERBOSE: regsvr32.exe / s scrrun.dll
VERBOSE: regsvr32.exe / s msxml.dll
VERBOSE: regsvr32.exe / s msxml3.dll
VERBOSE: regsvr32.exe / s msxml6.dll
VERBOSE: regsvr32.exe / s actxprxy.dll
VERBOSE: regsvr32.exe / s softpub.dll
VERBOSE: regsvr32.exe / s wintrust.dll
VERBOSE: regsvr32.exe / s dssenh.dll
VERBOSE: regsvr32.exe / s rsaenh.dll
 VERBOSE: regsvr32.exe / s gpkcsp.dll
VERBOSE: regsvr32.exe / s sccbase.dll
VERBOSE: regsvr32.exe / s slbcsp.dll
VERBOSE: regsvr32.exe / s cryptdlg.dll
VERBOSE: regsvr32.exe / s oleaut32.dll
VERBOSE: regsvr32.exe / s ole32.dll
VERBOSE: regsvr32.exe / s shell32.dll
VERBOSE: regsvr32.exe / s initpki.dll
VERBOSE: regsvr32.exe / s wuapi.dll
VERBOSE: regsvr32.exe / s wuaueng.dll
VERBOSE: regsvr32.exe / s wuaueng1.dll
VERBOSE: regsvr32.exe / s wucltui.dll
VERBOSE: regsvr32.exe / s wups.dll
VERBOSE: regsvr32.exe / s wups2.dll
VERBOSE: regsvr32.exe / s wuweb.dll
VERBOSE: regsvr32.exe / s qmgr.dll
VERBOSE: regsvr32.exe / s qmgrprxy.dll
VERBOSE: regsvr32.exe / s wucltux.dll
VERBOSE: regsvr32.exe / s muweb.dll
VERBOSE: regsvr32.exe / s wuwebv.dll
Step 7: Reset WinSock
VERBOSE: netsh winsock reset
Step 8: Reset Proxy
VERBOSE: netsh winhttp reset proxy
Step 9: Start Windows Update services
VERBOSE: Cryptographic Services (cryptsvc)
VERBOSE: Application Identity (appidsvc)
VERBOSE: Windows Update (wuauserv)
VERBOSE: Background Intelligent Transfer Service (BITS)
Step 10: Start Windows Update services
VERBOSE: wuauclt /resetauthorization /detectnow
Запустите поиск обновлений из панели управления или выполните поиск доступных обновлений с помощью команды PowerShell:
Get-WUList

Утилита Reset Windows Update Tool
Есть еще одни полезный и простой инструмент для сброса настроек Windows Update — Reset Windows Update Tool. Раньше это скрипт был доступен на TechNet. Сейчас автор ведет репозиторий на GitHub (м https://github.com/ManuelGil/Script-Reset-Windows-Update-Tool ).
Для загрузки предлагается скомпилированный exe файл (C++) или обычный скрипт. Я предпочитаю использовать cmd скрипт.
- Скачайте ResetWUEng.zip и распакуйте на диск;
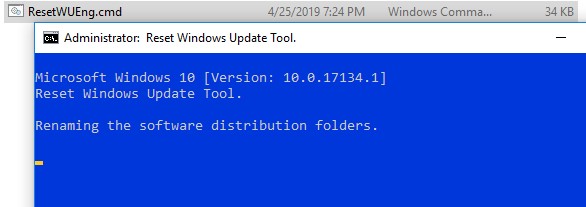
- Запустите файл ResetWUEng.cmd с правами администратора;
- Скрипт определит вашу версию ОС (в моем примере это Windows 10) и предложит 18 различных опций. Некоторые из них напрямую не относятся к сбросу настроек агента WU, но могут быть полезны для исправления различных неисправностей в Windows (проверка диска chkdsk, исправление ошибок в образе Windows с помощью DISM, сброс Winsock, очистка временных файлов и т.д.);

- Для сброса настроек Windows Update достаточно использовать опцию 2 — Resets the Windows Update Components (Сбросить компоненты службы обновления Windows). Нажмите 2 и Enter;
- Скрипт автоматически выполнит все действия, которые мы описали выше при выполнении ручного сброса агента обновлений Windows из командной строки.

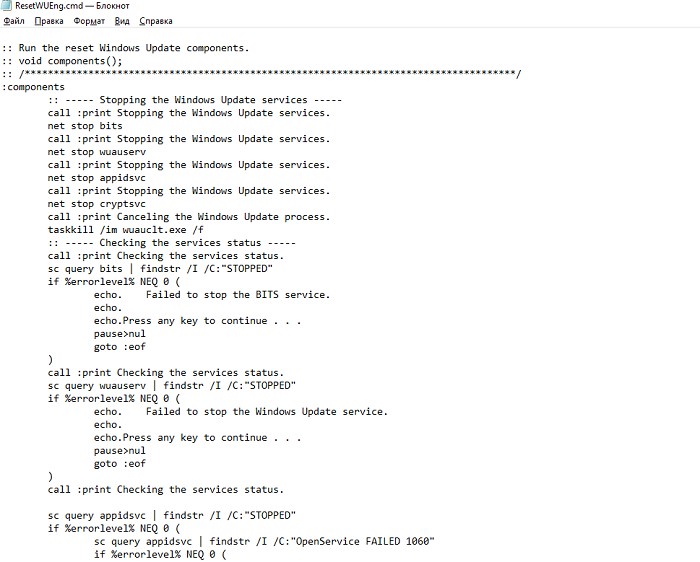
Вы можете самостоятельно посмотреть, что делает скрипт, открыв в файл ResetWUEng.cmd в любом текстовом редакторе и изучив его содержимое. Например, опция 2 отправляет на процедуру components.

- После окончания работы скрипта Reset Windows Update Agent перезагрузите компьютер и проверьте работу службы обновлений.

Скрипт ResetWUEng.cmd универсальный и подходит для всех версий Windows: начиная с Windows XP и вплоть до Windows 11.
Восстановление исходных настроек Windows Update из командной строки
Процесс сброса настроек агента и службы обновления Windows состоит из нескольких этапов. Все описанные операции выполняются в командной строке и собраны в один bat файл (готовый скрипт можно скачать по ссылке ниже).
С помощью данного скрипта можно полностью сбросить конфигурацию службы Центра обновлений Windows, и очистить локальный кэш обновлений. Скрипт является универсальный и будет работать как в Windows 11/10/8.1/7, так и в Windows Server 2022/2019/2016/2012 R2/2008 R2. Скрипт помогает устранить большинство типовых ошибок в работе службы Windows Update, когда центр обновлений перестает загружать новые обновления или пишет, что при установке обновления возникают ошибки.
Убедитесь, что настройки Windows Update на вашем компьютере на задаются с помощью доменных или локальных политик. Для вывода результирующих настроек GPO можно воспользоваться утилитой gpresult или rsop.msc. Можно сбросить настройки локальной GPO по этой инструкции.
Итак, по порядку о том, что делает скрипт:
- Остановить службы Windows Update (Центр обновлений Windows), BITS и службы криптографии:
net stop bits
net stop wuauserv
net stop appidsvc
net stop cryptsvc
taskkill /im wuauclt.exe /f - Удалить служебных файлы qmgr*.dat в каталоге %ALLUSERSPROFILE%\Application Data\Microsoft\Network\Downloader\:
Del "%ALLUSERSPROFILE%\Application Data\Microsoft\Network\Downloader\qmgr*.dat" - Переименовать служебные каталоги, в которых хранятся конфигурационные файлы и кэш обновлений (в случае необходимости их можно будет использовать как резервные копии). После перезапуска службы обновления, эти каталоги автоматически пересоздадутся:
Ren %systemroot%\SoftwareDistribution SoftwareDistribution.bak
Ren %systemroot%\system32\catroot2 catroot2.bak - Удаление старого журнала windowsupdate.log
del /f /s /q %windir%\windowsupdate.log - Сброс разрешений на службы BITS и Windows Update (в случае, если права на службы были изменены)
sc.exe sdset bits D:(A;;CCLCSWRPWPDTLOCRRC;;;SY) (A;;CCDCLCSWRPWPDTLOCRSDRCWDWO;;;BA) (A;;CCLCSWLOCRRC;;;AU) (A;;CCLCSWRPWPDTLOCRRC;;;PU)
sc.exe sdset wuauserv D:(A;;CCLCSWRPWPDTLOCRRC;;;SY) (A;;CCDCLCSWRPWPDTLOCRSDRCWDWO;;;BA) (A;;CCLCSWLOCRRC;;;AU) (A;;CCLCSWRPWPDTLOCRRC;;;PU)
sc.exe sdset cryptsvc D:(A;;CCLCSWLOCRRC;;;AU)(A;;CCDCLCSWRPWPDTLOCRSDRCWDWO;;;BA)(A;;CCDCLCSWRPWPDTLCRSDRCWDWO;;;SO)(A;;CCLCSWRPWPDTLOCRRC;;;SY)S:(AU;FA;CCDCLCSWRPWPDTLOCRSDRCWDWO;;WD)
sc.exe sdset trustedinstaller D:(A;;CCLCSWLOCRRC;;;AU)(A;;CCDCLCSWRPWPDTLOCRSDRCWDWO;;;BA)(A;;CCDCLCSWRPWPDTLCRSDRCWDWO;;;SO)(A;;CCLCSWRPWPDTLOCRRC;;;SY)S:(AU;FA;CCDCLCSWRPWPDTLOCRSDRCWDWO;;WD) - Перерегистрация файлов системных динамических библиотек (dll), связанных со службами BITS и Windows Update:
cd /d %windir%\system32
regsvr32.exe /s atl.dll
regsvr32.exe /s urlmon.dll
regsvr32.exe /s mshtml.dll
regsvr32.exe /s shdocvw.dll
regsvr32.exe /s browseui.dll
regsvr32.exe /s jscript.dll
regsvr32.exe /s vbscript.dll
regsvr32.exe /s scrrun.dll
regsvr32.exe /s msxml.dll
regsvr32.exe /s msxml3.dll
regsvr32.exe /s msxml6.dll
regsvr32.exe /s actxprxy.dll
regsvr32.exe /s softpub.dll
regsvr32.exe /s wintrust.dll
regsvr32.exe /s dssenh.dll
regsvr32.exe /s rsaenh.dll
regsvr32.exe /s gpkcsp.dll
regsvr32.exe /s sccbase.dll
regsvr32.exe /s slbcsp.dll
regsvr32.exe /s cryptdlg.dll
regsvr32.exe /s oleaut32.dll
regsvr32.exe /s ole32.dll
regsvr32.exe /s shell32.dll
regsvr32.exe /s initpki.dll
regsvr32.exe /s wuapi.dll
regsvr32.exe /s wuaueng.dll
regsvr32.exe /s wuaueng1.dll
regsvr32.exe /s wucltui.dll
regsvr32.exe /s wups.dll
regsvr32.exe /s wups2.dll
regsvr32.exe /s wuweb.dll
regsvr32.exe /s qmgr.dll
regsvr32.exe /s qmgrprxy.dll
regsvr32.exe /s wucltux.dll
regsvr32.exe /s muweb.dll
regsvr32.exe /s wuwebv.dll - Сброс параметров Winsock
netsh winsock reset - Сброс параметров системного прокси
netsh winhttp reset proxy - Опционально. При использовании локального сервера WSUS, возможно дополнительно сбросить текущую привязку клиента к серверу WSUS путем удаления следующих параметров в ветке реестра HKLM\SOFTWARE\Microsoft\Windows\CurrentVersion\WindowsUpdate:
REG DELETE "HKLM\SOFTWARE\Microsoft\Windows\CurrentVersion\WindowsUpdate" /v AccountDomainSid /f
REG DELETE "HKLM\SOFTWARE\Microsoft\Windows\CurrentVersion\WindowsUpdate" /v PingID /f
REG DELETE "HKLM\SOFTWARE\Microsoft\Windows\CurrentVersion\WindowsUpdate" /v SusClientId /f
REG DELETE "HKLM\SOFTWARE\Policies\Microsoft\Windows\WindowsUpdate" /v TargetGroup /f
REG DELETE "HKLM\SOFTWARE\Policies\Microsoft\Windows\WindowsUpdate" /v WUServer /f
REG DELETE "HKLM\SOFTWARE\Policies\Microsoft\Windows\WindowsUpdate" /v WUStatusServer /f - Запуск остановленных служб:
sc.exe config wuauserv start= auto
sc.exe config bits start= delayed-auto
sc.exe config cryptsvc start= auto
sc.exe config TrustedInstaller start= demand
sc.exe config DcomLaunch start= auto
net start bits
net start wuauserv
net start appidsvc
net start cryptsvc - Опционально. Для Windows 7 и 8.1 можно установить/переустановить последнюю версию агента Windows Update Agent (WUA). Скачать актуальную версию агента можно со страницы https://support.microsoft.com/en-us/kb/949104. Нужно скачать файл для вашей версии Windows

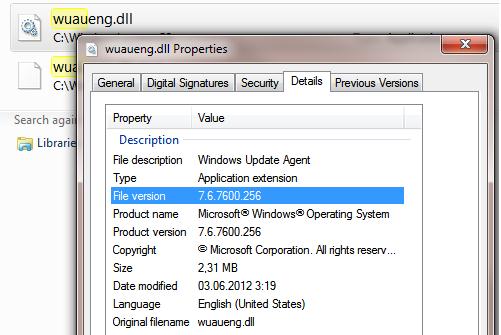
Актуальная версия агента WUA для Windows 7 SP1 x64 — 7.6. Принудительная переустановка агента WindowsUpdate выполняется следующими командами:
- для Windows 7 x86:
WindowsUpdateAgent-7.6-x86.exe /quiet /norestart /wuforce - для Windows 7 x64:
WindowsUpdateAgent-7.6-x64.exe /quiet /norestart /wuforce
Совет. Текущую версию агента Windows Update Agent (WUA) в Windows 7 можно узнать в свойствах файла %windir%\system32\Wuaueng.dll. В нашем примере это 7.6.7600.256.

- для Windows 7 x86:
Осталось перезагрузить компьютер и запустить синхронизацию с сервером Windows Update /WSUS.
wuauclt /resetauthorization /detectnow
Затем зайдите в Центр обновления и проверьте, пропали ли проблемы при поиске, скачивании и установке обновлений.
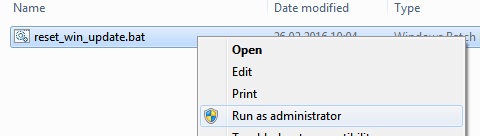
Сам скрипт reset_win_update.bat можно скачать по ссылке reset_win_update.zip (пункты 9 и 11 в скрипте не выполняются, т.к. являются опциональными). Скрипт нужно скачать, распаковать и запустить с правами администратора.
После этого перезагрузите компьютер, затем зайдите в Центр обновлений и проверьте, пропали ли проблемы при поиске, скачивании и установке обновлений.
Если обновления Windows стали скачиваться и устанавливать корректно, можно удалить папки резервные копии папок:
Ren %systemroot%\SoftwareDistribution SoftwareDistribution.bak
Ren %systemroot%\system32\catroot2 catroot2.bak
Если ничего не помогло, попробуйте вручную скачать и установить последнее кумулятивное обновление для вашей версии Windows из каталога обновлений Microsoft Update Catalog.
На свежей Windows 7 SP1, устанавливается «update agent 7.6.7600.320» и все.
После этого уже штатными средствами обновления не работают, update agent на 100% грузит один процессор. Что я только не пробовал, все методы которые нашел (fix update …. ), ничего не помогает.
На свежей Windows 7, без обновлений, все работает до момента установки SP1 и нового агента.
Не иначе, MS что-то подкрутили в связи выходом Windows 10. До этого много раз ставил все нормально.
Началось как раз 1-2 месяца.
Такая же беда, как и здесь:
Windows 7 sp1 грузит процессор и съедает ОЗУ при включенной службе обновления windows?
Windows 7 лицензия, пробовал и BOX версию и корпоративную, x86, x64. Устанавливал на виртуальной машине qemu-kvm, под Centos 7 и Centos 6 на трех компах. На реальном железе не пробовал, но на этих машинах до этого проблем не было.
Если у кого есть под рукой может тоже проверит.
Спасибо.
-
Вопрос задан
-
33059 просмотров
Пригласить эксперта
Только что на виртуалке поднял пиратку и прекрасно обновился.
столкнулись с такой же проблемой,на 22шт. компов свежеустановленная Win7 pro x64, успешно прошла активацию, при запуске обновлений сам по себе ставится update agent 7.6.7600.320, и после этого бесконечно висит поиск обновлений. помогло решение отсюда
Такая же хрень на лицензионном Windows 7 OEM 64 bit professional активировал ключем из коробки из лицензионного диска, низнаю что и делать теперь стоит без обновлений поиск обновлений висит уже целых 7 часов с самого утра, несдержался снес лицуху поставил сборку пиратку ультиматум с включенными обновлениями, только деньги за лицуху отвалил, браво майкрософт так держать!
Суть проблемы и ее решение описаны по ссылке. Нужно установить обновления по списку, который со временем обновляется. От себя добавлю, что наличие проблемы удобно диагностировать, наблюдая при поиске обновлений загрузку процессорного ядра процессом svchost.exe. В случае успеха ядро должен грузить процесс ThrustedInstaller. Лично я использую обновления из списка выше, а поверх ставлю пакет обновлений от simplix.
Войдите, чтобы написать ответ
-
Показать ещё
Загружается…
Минуточку внимания
- Thread Status:
-
Not open for further replies.
-
just happened minutes ago…
i have Windows Updates set to *Notify only* but this update installed without any user interaction.
that was a little unnerving because i’ve never seen a Windows update do that before.
i thought for a moment i was infected (when it was updating at boot) until i searched online:
http://social.technet.microsoft.com…y/thread/7c2b893b-7bfe-4090-a6a7-5533b6487456 -
It’s supposed to do that for security reasons: only the latest Windows Update Agent Version can CHECK for new updates (an action that is needed to «notify» you of new updates).
-
well,
i would have liked to be notified first.
that’s why i checked the box *Check for updates but let me chose whether to download and install them*
-
Old versions of Windows Update Agent can’t check for new updates, so they can’t notify you of new updates. Old versions are often vulnerable and can be compromised, so they block their access to the Microsoft’s servers.
The only way to block the automatic update of the Windows Update Agent is to disable Windows Update entirely. When you set it to «notify», you are allowing it to do whatever is necessary to notify you.
-
it could have at least notified me *after* the fact. lol
after all, it is listed in the History changes.if i had gone to the bathroom while the computer rebooted i would’ve never know this was installed.
-
Updates to the Windows Update Agent don’t require reboot.
-
i just happened to be rebooting after restoring an image.
the updates installed before the Desktop came online. -
So what’s your complaint now?
-
my complaint is the same as the first post in this thread:
i was not notified. -
This update shouldn’t be notified. If you are using Windows or Microsoft Update you should’ve understood since day one the fact that it requires its latest components to check for updates (you accepted the EULA where this is described).
Besides, they can’t automatically notify you of this *irrelevant* update (irrelevant because it can’t introduce issues or whatever) without notifying everyone that uses Windows/Microsoft Update. You can, however, voluntarily access the update history (as you did).
Now relax and stop complaining about futile things. rofl
-
Seems like if he set it to notify it should notify. Kinda a no-brainer there.
-
«To notify», WUA needs «to check». And «to check», WUA needs «to have its latest components/integrity verified». Seems pretty straightforward. This has always been the case, for more than a decade.
-
Don’t try to claim an issue where there is none, please. Stop spreading FUD.
-
Besides, the «notify only» option he is talking about reads as follows:
«Check for updates but let me choose whether to download and install them».
«To Check for updates» implies «making everything necessary to have the latest WUA Agent that is able to check for updates«.
«But let me choose whether to download and install them» implies «notify about updates for Windows and let the user picks the time to download and install them«.
Last edited by a moderator: Jun 26, 2012
-
From that link: «If Windows Update or Automatic Updates is turned on, the latest version of the Windows Update Agent will be automatically downloaded and installed on your computer. If you go to Windows Update before it gets installed automatically, you will see a message to install the Windows Update Agent»
-
How does WUA check there is an update for itself ?
-
false sense of security?
lol.i actually thought my computer was under attack by malware when that update decided to update automatically (and without my knowledge or consent) at boot times.
-
You had a moment of false sense of insecurity — thanks to your (previous?) ignorance on how WU works.
-
Anyway, the WUA may not install successfully in all machines. It didn’t in a relative’s system. More users have reported it, as you can see in this Heise Online article -http://www.h-online.com/security/news/item/Update-for-Windows-Update-has-teething-troubles-1624979.html
There’s a link for a Microsoft FixIt tool there: -http://diagnostics.support.microsoft.com/diagprov/provision/MicrosoftFixit.wu.Run.exe?_tenant=mats&diagid=wu&_ext=.exe
Just in case anyone is/will have issues.
-
TonyW
Registered Member- Joined:
- Oct 12, 2005
- Posts:
- 2,741
- Location:
-
UK
I had a look on a Windows 7 system. It appears WUA was updated successfully on 21 June. No-one noticed.
-
Even after applying the fix, it couldn’t update to the latest version. So, I had to dig a little bit, and I believe I found the solution.
This is what I did so far. I started Windows Update and looked for updates. I waited until I get the error reported at the H-Online website. Then I went to C:\Windows and opened the file WindowsUpdate.log.
To save you some steps, look for the following files: WUClient-SelfUpdate-ActiveX~31bf3856ad364e35~x86~~7.6.7600.256.cab, WUClient-SelfUpdate-Aux-TopLevel~31bf3856ad364e35~x86~~7.6.7600.256.cab and WUClient-SelfUpdate-Core-TopLevel~31bf3856ad364e35~x86~~7.6.7600.256.cab.
Here are the links:
-http://download.windowsupdate.com/v9/1/windowsupdate/b/selfupdate/WSUS3/x86/Vista/WUClient-SelfUpdate-ActiveX~31bf3856ad364e35~x86~~7.6.7600.256.cab
-http://download.windowsupdate.com/v9/1/windowsupdate/b/selfupdate/WSUS3/x86/Vista/WUClient-SelfUpdate-Aux-TopLevel~31bf3856ad364e35~x86~~7.6.7600.256.cab
-http://download.windowsupdate.com/v9/1/windowsupdate/b/selfupdate/WSUS3/x86/Vista/WUClient-SelfUpdate-Core-TopLevel~31bf3856ad364e35~x86~~7.6.7600.256.cabIf you’re x64, hopefully you only have to replace x86 with x64. lol
Download them. I’m not sure if both of the first two are needed, but download them both just in case.
Then, open the cmd line with administrative rights, and type the following for each of the files. Do it in the same I order I placed here.
start /w pkgmgr /ip /m:"path-to-each-of-the-cab-files"
Press enter. Hopefully, after these steps, it will upgrade to the latest version.
-
epsir19
Registered Member- Joined:
- Nov 3, 2010
- Posts:
- 15
there are also unofficial installers for WUA 7.6.7600.256 from this Wincert.org forum topic, since Microsoft has not yet provided standalone installers for this new version as noted in MS KB article 946928.
one might try those unofficial installers if WUA failed to install thru the normal methods.
- Thread Status:
-
Not open for further replies.
Quick fixes for solving Windows update error 80072EFE:
| Workable Solutions | Step-by-step Troubleshooting |
|---|---|
| Fix 1. Run Windows Update Troubleshooter | Try the built-in Windows Troubleshooter that is specifically designed to solve error 80072EFE…Full steps |
| Fix 2. Delete the CatRoot2 Folder | Corrupted files in the system folder of updates may lead to error 80072EFE. Delete the CatRoot2 Folder…Full steps |
| Fix 3. Run Network Adapter Troubleshooter | Go to the Start menu and search for «Troubleshoot». Open the «Troubleshoot settings»…Full steps |
| Fix 4. Install KB3138612 Update Patch | Manually installing the KB3138612 program on your device may solve Windows error 80072EFE…Full steps |
| More useful tips | Running 3rd party firewall and antivirus software may cause Windows error 80072EFE…Full steps |
What Is Error Code 80072EFE
Almost all versions of Windows have some bugs and errors that need to be resolved, like error 0x80070570, error code 0xc00000e, etc. Windows update error 80072EFE is a particular error shown on the screen when the system can’t update your apps and software. This error was primarily found in Windows 7, but it has been seen that Windows Server also shows this error. This problem is faced by users of all Windows versions instead of a specific one.
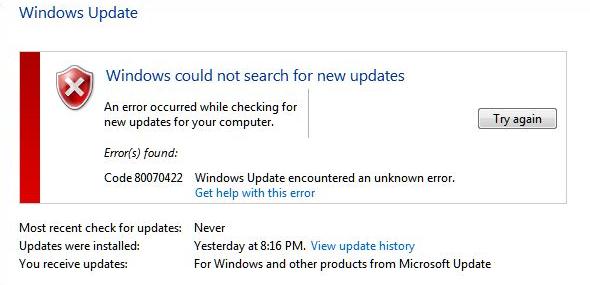
Have you ever seen a screen with a notification that Windows could not search for new updates? It is mainly due to the detection of error 80072EFE that normally occurs due to an interrupted connection between the Windows update server and your device.
Do you want to learn the best way to resolve this problem? Have you been fed up facing such a screen on your device during work? Don’t worry because we have wrapped the 6 best fixes to solve this error and let you get your device back to its normal condition.
Solve Windows Update Error 80072EFE in 6 Ways
Every Windows user knows that some errors occur in the system from time to time due to different problems. Like all other errors, Windows error 80072EFE can be solved using different techniques. As this error occurs due to different reasons, you need to follow different fixes to find the right one. Here we have listed those fixes that we have found effective in the solution to this error.
Fix 1. Run Windows Update Troubleshooter
Windows offer a built-in troubleshooter that is specifically designed to solve such errors. With the help of this program, you can resolve multiple errors and get your device back on the right track. Let us show you how you can run the Windows update troubleshooter step by step.
Step 1. Go to Start Menu. Search «Troubleshoot».
Step 2. Click on «Troubleshoot Settings». Open «Additional Troubleshooters».
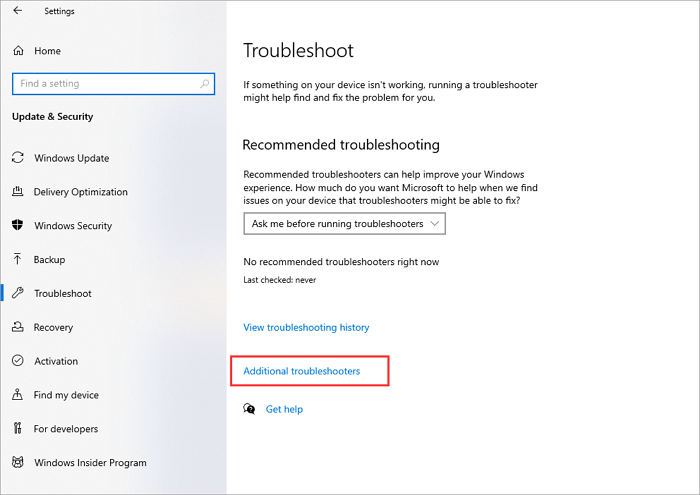
Step 3. Choose «Windows Update». Then, run the Troubleshooter.
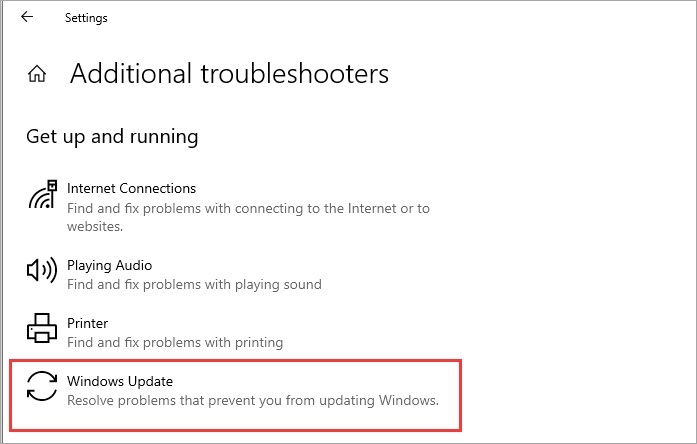
It will scan your computer to find errors and suggest solutions. You can easily follow the suggested solutions to find the right one to solve this error. This solution can also work with the following issue:
Fix 2. Delete CatRoot2 Folder for Windows Update
Sometimes, you might get Windows update error 80072EFE because of corrupted files in the system folder of updates. CatRoot2 is a particular folder responsible for Windows updates as it stores the specific Windows update package signatures. You can remove the corrupted or affected files by deleting this folder. To delete this folder, you need to follow a few steps mentioned below.
Step 1. Press the Window button and R key simultaneously.
Step 2. In the box that popped up on the screen, type services.msc. Tap on the «OK» button.
Step 3. Look for «Cryptographic Services» and launch it with a double click.
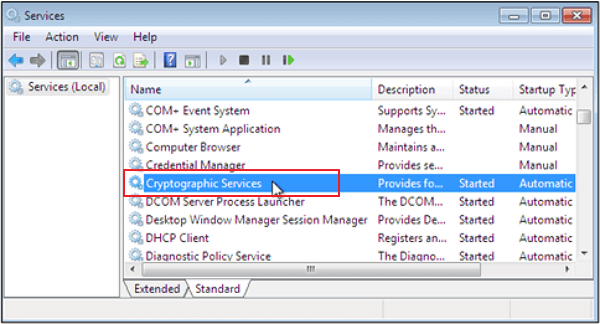
Step 4. Choose the «Stop» option from the window. Once done, tap on «Ok» to exit the window.
Step 5. Again, this time, simultaneously press the Windows button with the E key.
Step 6. Type C:WindowsSystem32 in the opened window. Right-click on the CatRoot2 folder and delete it now.
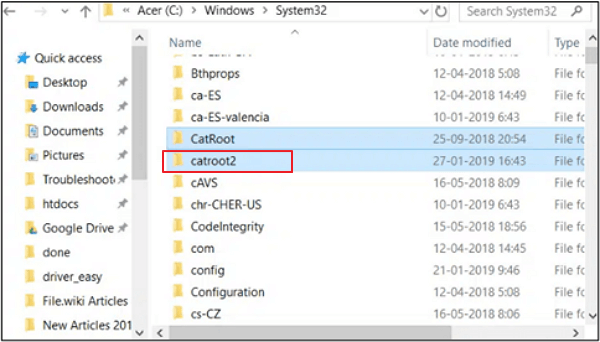
Remember that you can’t delete a file from the system folder unless you have adopted some steps before deleting it. That is why we have discussed a few steps just above the actual deleting process.
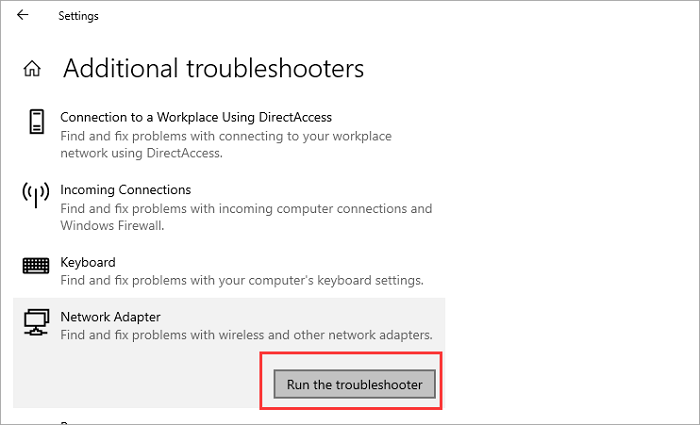
Fix 3. Run Network Adapter Troubleshooter
A common cause behind Windows update error 80072EFE is the interruption in the network. To find the troubles in the smooth working of a specified network, Windows offer a built-in troubleshooter. You can run this troubleshooter to solve the problem on your computer.
Step 1. Go to the Start menu and search for «Troubleshoot». Open the «Troubleshoot settings».
Step 2. Browse the «Additional Troubleshooters».
Step 3. Look for the «Network Adapter». Tap on the option to open the menu.
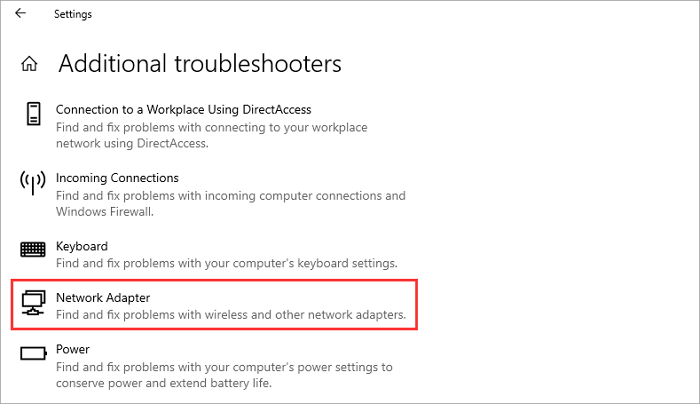
Step 4. Choose «Run the Troubleshooter» to start the check.
It will take a few minutes to scan your system and find the problems if due to this reason. You only have to follow the suggested ways mentioned on your screen to solve this problem.
Fix 4. Install KB3138612 Update Patch
This process is normally effective for users using Windows 7. You can try this fix to check whether it works for you. In this process, you have to manually install the KB3138612 program on your device. It will not take more than a few minutes to do so.
Step 1. Go to your web browser. Search for Windows Update Client for Windows 7 Page.
Step 2. Tap on the «Download Package Link».
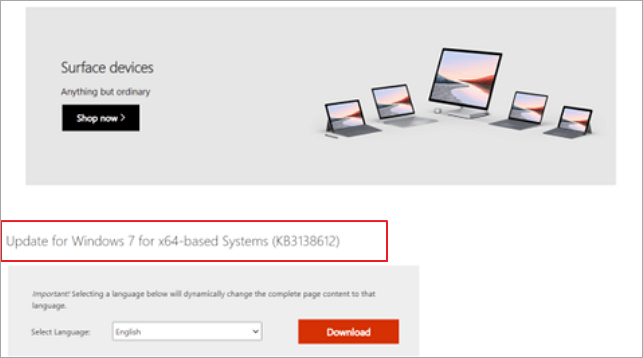
Step 3. Confirm the Download by clicking on the button.
Step 4. Once downloaded, open the folder. Install KB3138612 using the downloaded installer.
This fix is pretty simple and quicker than others, as you don’t have to deal with multiple keys to run operations. You can download and install the Windows updater manually from the Microsoft store without a problem.
Fix 5. Disable 3rd Party Firewall and Antivirus Software
It is common to download a third-party program like an antivirus to protect the data from unauthorized access. But this type of program can also harm your computer’s performance. It is also possible that such programs lead you towards errors like Windows error 80072EFE. So, you should also disable such programs and check whether the issue has been resolved.
Step 1. Go to the Control Panel of your device. Look for the «Programs and Features» option.
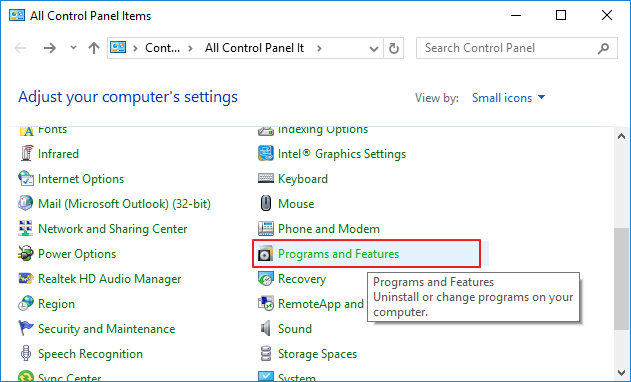
Step 2. Find third-party antivirus programs or any other software.
Step 3. Click on the program name to choose that program.
Step 4. Tap on the «Uninstall» button shown just beside the name.
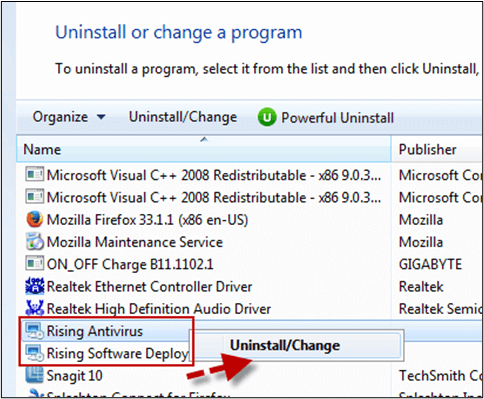
Step 5. Confirm the uninstallation by clicking on the window shown on the screen.
By doing this, you can uninstall that specific program and check if the Windows update error has been solved. But you should also have to reboot the system at least once before performing this check.
Fix 6. Reset Windows Update Components
As we all know, many errors occur in the device because of corrupted and affected files. Similarly, Windows update error 80072EFE can also occur when the updated files have been corrupted. So, you should also check it by resetting those files and checking the outcomes of your action.
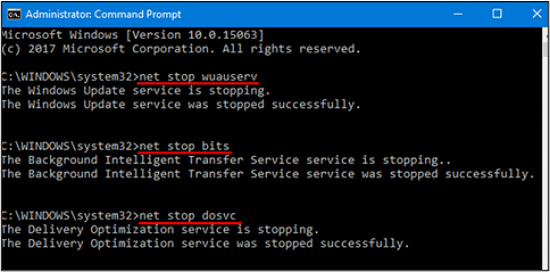
Step 1. Launch Command Prompt on your system. Run it as an administrator.
Step 2. Paste these four commands in order and press enter after every command.
net stop wuauserv
net stop cryptSvc
net stop bits
net stop msiserver
Step 3. Now, simultaneously press the Windows button with the E key and go to File Explorer.
Step 4. Search for «CatRoot 2 and Software Distribution» folders.
Step 5. Delete the entire data from these folders.
Step 6. Again open the Command Prompt and paste the above-mentioned keys. Click the Enter button and then close the Window.
Step 7. Reboot the system to save the settings properly.
This is the last fix that you can do to solve Windows update error 80072EFE. This process will work if nothing has worked for you from the above list. You will delete your system’s entire settings and reset them to save the new settings.
Useful Tips: How to Recover Deleted or Lost Data on Windows 7 or Windows Server
When your system cannot be upgraded for uncertain errors, like Windows update error 80072EFE, you may be at risk of data loss. If you want to keep your data safe in such conditions, use EaseUS data recovery software.
EaseUS Data Recovery Wizard has been designed to assist you in getting your data back with a high success rate. It doesn’t matter what is the reason behind the loss of your data; it can restore your data quickly. Additionally, you can recover data from a flash drive/SD card/pen drive/other devices instead of a PC only.
You will also find its interface pretty simple and user-friendly. Such a simple interface won’t demand you to be a technical person in the field. You can recover deleted files or data by following simple instructions from this tool.
Step 1. Select a drive and start scanning
Launch EaseUS Data Recovery Wizard and hover over the partition where you lost data. This could be an internal hard disk, external disk, USB, or SD card. Then, click «Search for Lost Data».

Step 2. Check and preview scanned files
Use the file format filter on the left or upper right corner to narrow the scan results until you find the files you need. Then, you can click the «Preview» button or double-click a file to preview its content, if you’d like.

Step 3. Recover lost data to a secure location
Click the checkbox next to the file and click «Recover» to restore the lost data to your local storage or Cloud drive. We recommend that you do not store the recovered data on the disk where you lost it earlier.

Wrap Up
Undoubtedly, Windows update error 80072EFE is one of the most common computer errors. We have seen a lot of users of Windows facing this problem often on their devices. In the above blog, we have discussed the best 6 fixes to solve this problem.
You should try them individually to find a suitable way to resolve this problem. Solving this error may take a while because you may not know the actual reason behind this issue. So, you should be patient and invest enough time to eliminate this error.
Windows Error 80072efe FAQs
In this part, we will answer some important questions that are related to Windows error 80072EFE.
How do I fix error 80072EFE?
There are multiple fixes through which you can get rid of this error:
- Fix 1. Run Windows update troubleshooter
- Fix 2. Delete the CatRoot2 folder for the Windows update
- Fix 3. Run the network adapter troubleshooter
- Fix 4. Install KB3138612 update patch
- Fix 5. Disable the 3rd party firewall and antivirus software
- Fix 6. Reset the Windows update components
What is the error code 80072EFE?
It is an error code that is shown by the Windows update program. It occurs because of an interruption between the Windows server and your device.
Are Windows 7 updates still available in 2022?
Windows 7 is available to be used in 2022, but support from the mainstream has been dropped by Microsoft for this version.