
-
Home
-
News
- What Is Aero Shake? How To Enable/Disable It On Windows 10
By Sarah |
Last Updated
Aero Shake is one of the tricks that can help Windows users organize their desktop quickly. This feature was first introduced in Windows 7, but not many users know the existence of it. Considering this, MiniTool Solution decides to introduce Aero Shake to you and then show you how to enable or disable Shake in Windows 10 when necessary.
There are many tricks that help you get the most of your Windows 10 computer. For instance, Microsoft offers different ways to help you show desktop on Windows 10 easily. Your desktop window will get cluttered if too many programs, folders, and files are opening at the same time. You can click on the Show Desktop icon (located in the lower right corner of the PC screen) to minimize all opening windows directly. Apart from that, you can also use the Aero Shake feature to tidy up the desktop quickly.
What Is Aero Shake
To get a better understanding of the Aero Shake feature in Windows, you should first know about the Windows Aero.
Tip: Please be careful enough when performing tasks on Windows to avoid mistake deletion as much as possible. If you unfortunately deleted important files, you should get a powerful recovery tool to help you recover them at once.
MiniTool Power Data Recovery TrialClick to Download100%Clean & Safe
What Is Windows Aero
Windows Aero is a design language introduced by Microsoft since Windows Vista operating system. The word Aero is an acronym for Authentic, Energetic, Reflective, and Open. Windows Aero was in force during the development of Windows Vista and Windows 7 operating systems. Later, during the development of Windows 8 and Windows Server 2012, Microsoft moved on to a new design language (its codename is “Metro”).
Features to manage opening windows in Windows 10:
- Aero Shake Windows 10: shaking (quickly dragging back and forth) a window you want to keep and minimize all other opening windows.
- Aero Peek Windows 10: putting your cursor over a taskbar thumbnail to preview the entire window.
- Aero Snap Windows 10: dragging a window to the right or left side of the desktop to fill it to the respective half of the screen.
Aero Shake provides a simple and direct way to tidy up your cluttered desktop on Windows 7/8/10. You can keep only one window on your desktop: shaking the window you want to focus on will minimize all other opening windows. How to enable or disable Aero Shake on Windows 10?
Windows 10 Enable Aero Shake
#1. Enable Aero Shake Windows 10 via Settings
The Aero Shake feature is turned on by default in Windows 10; if it has been disabled somehow, you can follow these steps to enable it.
- Open the Settings app like you usually do. The most direct way is to press Windows + I.
- Select System from the Windows Settings window.
- Shift to the Multitasking option from the left sidebar.
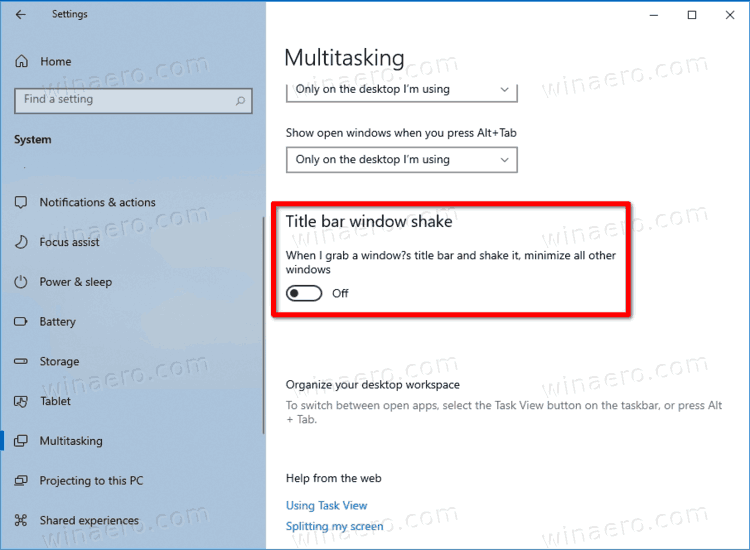
- Scroll down in the right pane to find the Title bar window shake section.
- Toggle the switch under When I grab a window’s title bar and shake it, minimize all other windows to On.
What if you can’t find the Title bar window shake section after clicking Multitasking? You should follow this guide instead:
- Navigate to Snap windows section in the right pane.
- Toggle the switch under Snap windows to On.
The section may also called Snap, and the option maybe named Arrange windows automatically by dragging them to the sides or corner of the screen.

#2. Enable Aero Shake Windows 10 Using Group Policy
- Press Windows + R -> type gpedit.msc -> click OK.
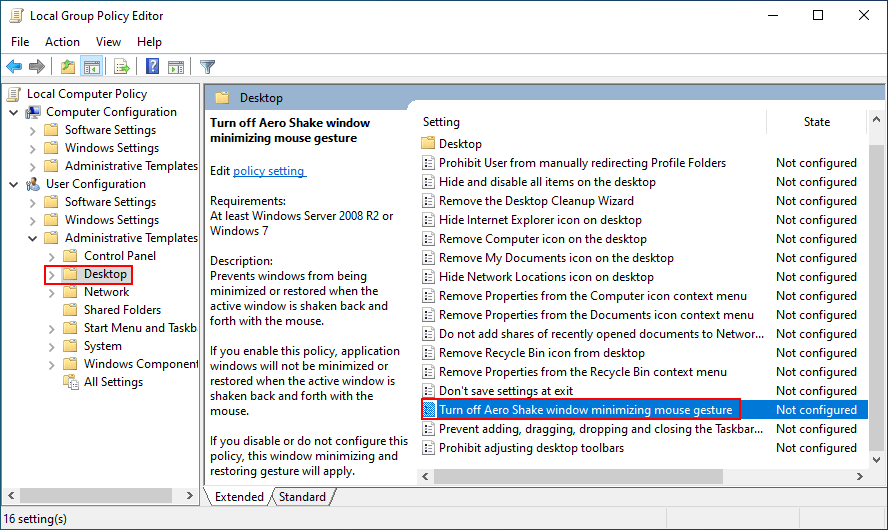
- Expand User Configuration & Administrative Templates and select Desktop in the left pane.
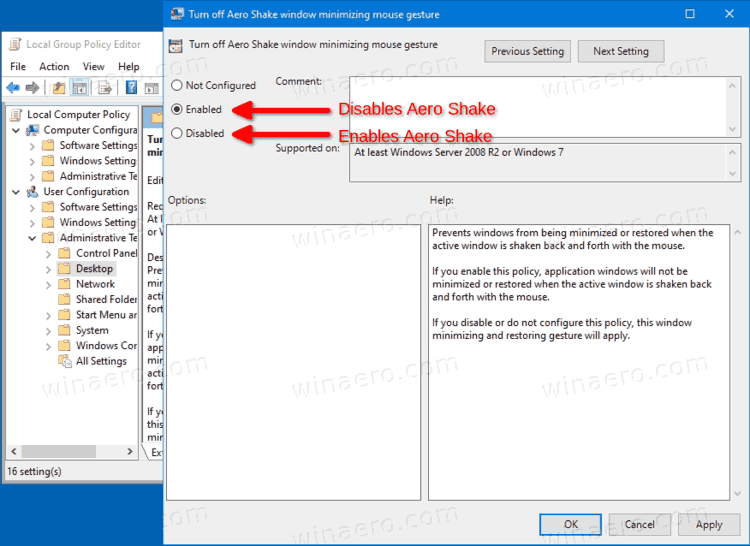
- Double click on the Turn off Aero Shake window minimizing mouse gesture option in the right pane.
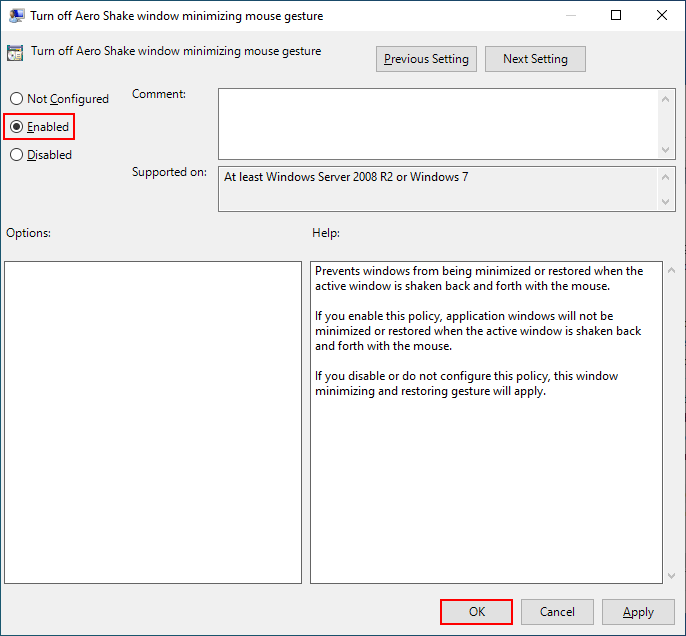
- Check either Not Configured or Disabled. Then, click OK.
You may encounter the gpedit.msc not found error when trying to open the Local Group Policy Editor.
Windows 10 Disable Aero
Some users want to know how to stop shaking. Here are some effective ways available.
#1. Windows 10 Disable Shake to Minimize via Settings
- Open Settings.
- Select System.
- Shift to Multitasking.
- Turn the corresponding option to Off.
#2. Disable Aero Shake Windows 10 in Group Policy
- Open Windows Local Group Policy Editor.
- Go to User Configuration -> Administrative Templates -> Desktop.
- Double click on Turn off Aero Shake window minimizing mouse gesture.
- Check Enabled and click OK.
#3. Disable Aero Shake Windows 10 Using Registry Editor
You’d better back up your Registry before editing it.
- Press Windows + R -> type regedit -> click OK.
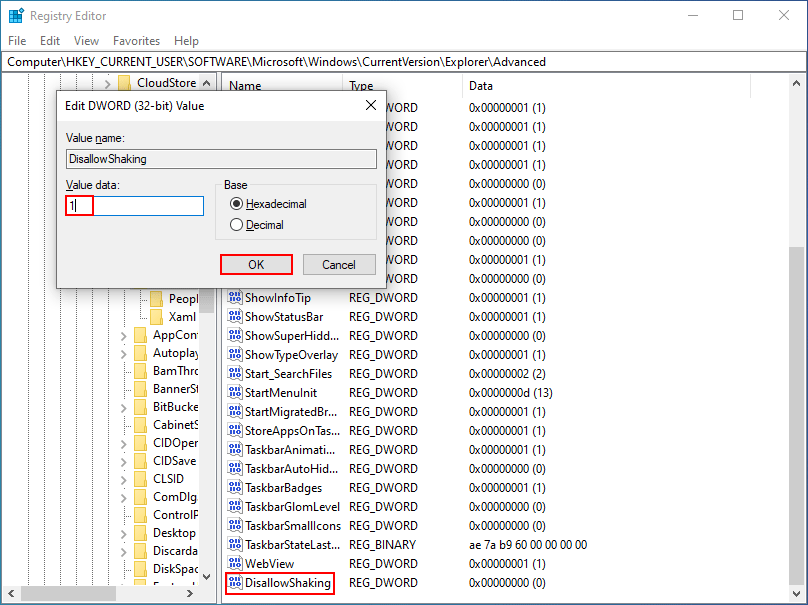
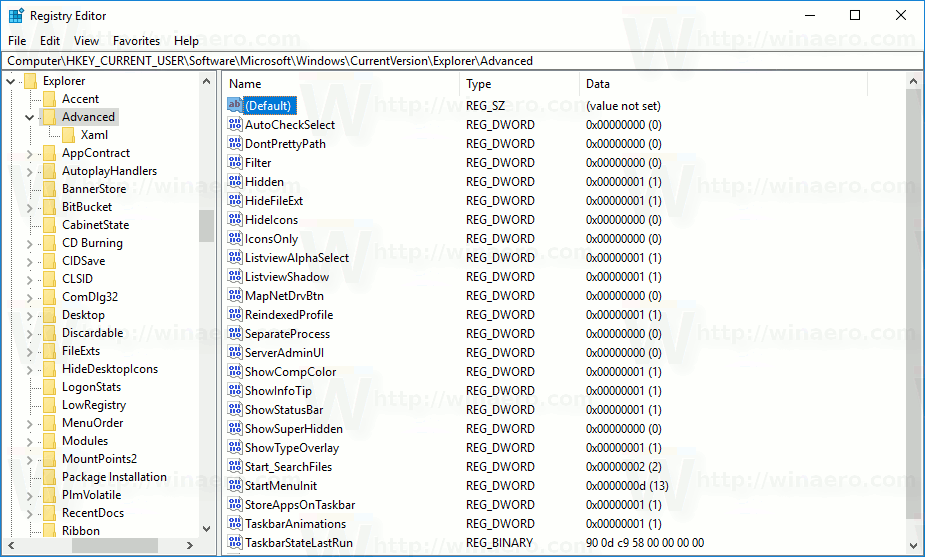
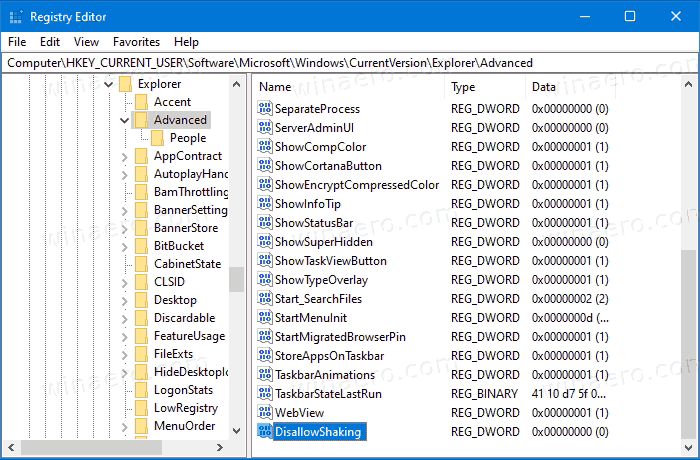
- Type Computer\HKEY_CURRENT_USER\Software\Microsoft\Windows\CurrentVersion\Explorer\Advanced into the address bar and press Enter.
- Look for the DisallowShaking registry in the right pane or click Edit -> New -> DWORD (32-bit) Value to create one.
- Double click on DisallowShaking and change the Value data from 0 to 1.
- Click OK to confirm.
Set The Taskbar To Display The Last Active Window In Windows 10.
About The Author
Position: Columnist
Sarah has been working as an editor at MiniTool since she graduated from university. Sarah aims at helping users with their computer problems such as disk errors and data loss. She feels a sense of accomplishment to see that users get their issues fixed relying on her articles. Besides, she likes to make friends and listen to music after work.
Learn to quickly manage your desktop clutter with Aero Shake, a handy Windows feature that lets you minimize all windows except the one you’re working on.
Published
2 min read

Aero Shake, also known as “Shake to Minimize,” is a nifty Windows feature that allows you to quickly declutter your desktop. By grabbing a window’s title bar and shaking it, you can minimize all other open windows, leaving only the one you’re focused on visible. Shaking the window again restores all the minimized windows. While this feature can be helpful for many users, others might find it disruptive. Let’s explore how to enable or disable Aero Shake in Windows 11 and 10.
Method 1: Using Windows Settings (Windows 11 and 10)
The easiest way to toggle Aero Shake is through the Windows Settings app. This method works for both Windows 11 and Windows 10.
Step 1: Open the Settings app by pressing Windows key + I.
Step 2: Click on “System” in the left sidebar.
Step 3: Scroll down and click on “Multitasking” in the right pane.
Step 4: Look for the “Title bar window shake” option. In Windows 11, it’s described as “When I grab a window’s title bar and shake it, minimize all other windows.” Toggle this switch on to enable Aero Shake or off to disable it.
The changes take effect immediately, so you can test the feature right away.
Method 2: Using the Group Policy Editor (Windows 10 Pro, Enterprise, and Education)
For users with Windows 10 Pro, Enterprise, or Education editions, the Group Policy Editor offers another way to manage Aero Shake.
Step 1: Open the Group Policy Editor by pressing Windows key + R, typing “gpedit.msc”, and pressing Enter.
Step 2: Navigate to User Configuration > Administrative Templates > Desktop.
Step 3: In the right pane, find and double-click on “Turn off Aero Shake window minimizing mouse gesture”.
Step 4: In the new window, select “Enabled” to turn off Aero Shake, or “Disabled” to keep it on. Click “Apply” and then “OK”.
Step 5: Restart your computer or sign out and back in for the changes to take effect.
Method 3: Editing the Registry (Advanced Users)
For advanced users comfortable with editing the Windows Registry, this method works across all Windows 10 and 11 editions. However, be cautious as incorrect changes to the Registry can cause system issues.
Step 1: Press Windows key + R, type “regedit”, and press Enter to open the Registry Editor.
Step 2: Navigate to the following key:
HKEY_CURRENT_USER\Software\Microsoft\Windows\CurrentVersion\Explorer\AdvancedStep 3: In the right pane, look for a DWORD value named “DisallowShaking”. If it doesn’t exist, right-click in the right pane, select New > DWORD (32-bit) Value, and name it “DisallowShaking”.
Step 4: Double-click on “DisallowShaking” and set its value to 1 to disable Aero Shake, or 0 to enable it.
Step 5: Close the Registry Editor and restart your computer for the changes to take effect.
Troubleshooting Aero Shake
If Aero Shake isn’t working as expected after enabling it, try these troubleshooting steps:
- Ensure you’re shaking the window vigorously enough. A gentle movement might not trigger the feature.
- Check if you have any third-party window management software installed, as it might interfere with Aero Shake.
- Make sure your graphics drivers are up to date, as outdated drivers can sometimes cause issues with Windows visual features.
- If you’re using a remote desktop connection, note that Aero Shake might not work in this environment.
Aero Shake can be a useful tool for managing multiple windows, but it’s not for everyone. Whether you choose to enable or disable it, these methods give you control over this Windows feature. Experiment with it to see if it fits your workflow, and remember that you can always change the setting if your preferences change.
Now that you know how to control Aero Shake, you can customize your Windows experience to suit your working style. Happy window managing!
You are here:
Home » Windows 10 » How To Enable or Disable Aero Shake In Windows 10
Aero Shake is one of the many features introduced with Windows 7 and continues to be part of Windows 10 as well. The feature enables you to quickly minimize all open windows except the currently active window by shaking the currently active window or using Windows logo + Home keyboard shortcut.
In earlier versions of Windows operating system, there was a dedicated option to enable or disable Aero Shake. Windows 10 Settings lacks a dedicated option to manage the Aero Shake.
While I personally like the Aero Shake and use it very often, there are users who find it annoying as it hides all inactive windows upon (accidentally) shaking the active window. If you are also not happy with the Aero Shake behavior, you can disable it.
Likewise, if the Aero Shake is not working or turned off on your Windows 10 PC, you can use this guide to enable it.
There are exactly three ways to enable or disable the Aero Shake feature in Windows 10.
Method 1 of 3
Enable or disable Aero Shake via Settings
We discovered this feature by accident! The Aero Shake feature doesn’t work if the Snap is turned off.
Step 1: Navigate to Settings app > System > Multitasking.
Step 2: Turn off Arrange windows automatically by dragging them to sides of corners of the screen option to disable the Aero Shake. Turn this option on to enable Aero Shake.

If you don’t want to turn off the snap feature or the multitasking features to get rid of Aero Shake, refer to the directions in Method 2 or Method 3.
Method 2 of 3
Enable or disable Aero Shake via Group Policy
Group Policy Editor is not part of Home edition of Windows 10. So, if you are running Windows 10 Home, please either use the directions in Method 1 or Method 3.
Step 1: Open the Group Policy Editor by typing Gpedit.msc in the Start/taskbar search box and then pressing Enter key. You can type Edit Group Policy in the search box to open the same as well.
Step 2: In the Group Policy Editor window, navigate to User Configuration > Administrative Templates > Desktop.
Step 3: Double-click on Turn off Aero Shake window minimizing mouse gesture policy. It will open the properties dialog.

Step 4: Finally, select Enabled and then click Apply button.

Method 3 of 3
Turn on or off Aero Shake via Registry
Step 1: Open Registry Editor. To do that, type Regedit in the Start/taskbar search field and then hit the Enter key.
Click Yes button if you get the User Account Control prompt.
Step 2: Navigate to the following key:
HKEY_CURRENT_USER\Software\Policies\Microsoft\ Windows\Explorer
Step 3: Double-click on NoWindowMinimizingShortcuts DWORD value and then change its value to 1 to disable Aero Shake and set the value to 0 to enable it.

NOTE: If NoWindowMinimizingShortcuts DWORD value doesn’t exist, create one by right-clicking > New > DWORD value (32-bit). On some PCs, even the Explorer key might not be present.
Step 4: Next, navigate to:
HKEY_LOCAL_MACHINE\SOFTWARE\Policies\Microsoft\ Windows\Explorer
Step 5: Double-click on NoWindowMinimizingShortcuts and set the value to 0 to enable and change the value to 1 to disable Aero Shake.
How to Enable or Disable Aero Shake in Windows 10. Three methods reviewed.
Aero Shake is a window management feature in Windows that allows quickly minimizing all open windows by ‘shaking’ the app you want to keep active. It will remain open on Desktop, and all other windows will be minimized down to the taskbar.
Aero Shake was part of the Windows Aero interface that has long been outdated. In Windows 7, Microsoft introduced two new ways to arrange windows and manage their size/position and window state. The two features are called «Aero Snap» and «Aero Shake» respectively. The Aero Snap feature arranges and resizes windows by moving them to the left, top or right edge of the screen. The second one, Aero Shake, allows you to minimize all open apps when you shake the active window.
Some Windows 10 users would like to turn off Aero Shake because it is easy to accidentally move a window and get others minimized.
This post will show you how to enable or disable Aero Shake in Windows 10. We will review various methods available in the OS. We will start with a Registry tweak.
- Open Registry Editor.
- Go to the following Registry key:
HKEY_CURRENT_USER\Software\Microsoft\Windows\CurrentVersion\Explorer\Advanced. See how to go to a Registry key with one click.
- In the right pane, create a new 32-bit DWORD value named DisallowShaking. Even if you are running 64-bit Windows you must still create a 32-bit DWORD value.
- Set its value data as follows: 1 = Disable Aero Shake, 0 = Enable Aero Shake.

- You can now close the Registry Editor app.
Note. Starting in Windows 10 Build 21277, the Aero Shake feature is disabled by default. By creating the DisallowShaking DWORD and leaving its value data as 0 you will force enable it.
Ready-to-use Registry files
To save your time, I’ve prepared a set of ready-to-use Registry files that will allow you to turn on or off Aero Shake in Windows 10 with one click. You can download them here.
Download Registry Files
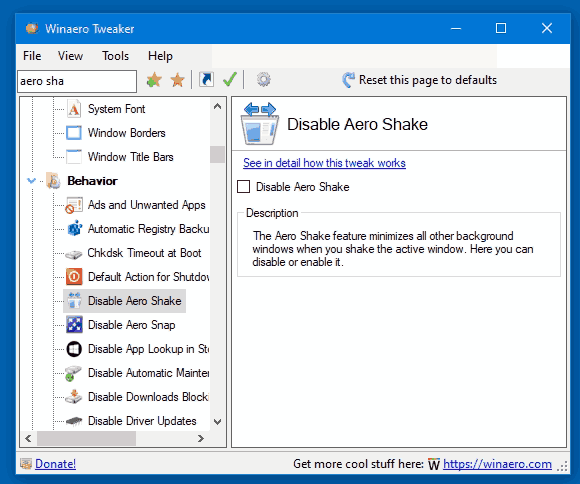
Also, I would like to mention that there is an option in Winaero Tweaker that allows disabling Aero Shake for your user account. It is under Behavior \ Disable Aero Shake in the left pane of the app. On the right, you’ll find the appropriate checkbox.
Also, starting in Windows 10 build 21364, you can use a new option in the Settings app that allows you to enable or disable window shaking with ease.
Enable or Disable Window Title bar Shake in Settings
- Open the Settings app.
- Go to System > Multitasking.
- On the right, turn on or off the Window Title bar Shake toggle option for what you want.

- You can now close the Settings app.
The alternative to the above method is Group Policy.
Enable or Disable Aero Shake in Group Policy
If you are running Windows 10 Pro, Enterprise, or Education editions, then you can use the Local Group Policy Editor app. It allows you to disable Aero Shake with a special option. Windows 10 Home users can omit this step, and instead apply a Registry tweak to get the same restriction working (described in the below chapter).
To enable or disable Aero Shake in Group policy, do the following.
- Open the Local Group Policy editor app, or launch it for all users except Administrator, or for a specif user.
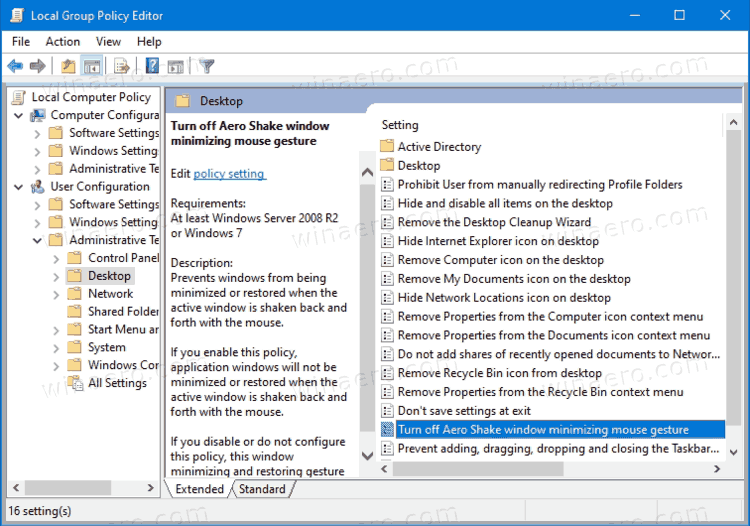
- Navigate to User Configuration > Administrative Templates > Desktop on the left.
- On the right, find the policy setting Turn off Aero Shake window minimizing mouse gesture.

- Double-click on it and set the policy to Enabled to disable the Aero Shake feature.

- Setting the policy to Disabled will enable Aero Shake.
- Choose Not configured to use system defaults.
- You can now close the Local Group Policy Editor app.
Alternatively, you can apply the above restrictions in the Registry. This method works in all editions of Windows 10, including Windows 10 Home. Let’s review how it can be done.
Enable or Disable Aero Shake with a Policy Tweak
- Download the following ZIP archive: Download ZIP archive.
- Unblock the file.
- Extract its contents to any folder. You can place the files directly to the Desktop.
- Double click on the file Disable Aero Shake with Group Policy.reg file to disable Aero Shake, and confirm UAC by clicking on Yes.

- To enable Aero Shake, use the file Enable Aero Shake with Group Policy.reg.
- Finally, to restore defaults used in your Windows 10 version, use the Reset Aero Shake to Defaults.reg file.
- Sign out and sign in to your user account, or restart the Explorer shell.
You are done!
How it works
The Registry files above modify the HKEY_CURRENT_USER\Software\Policies\Microsoft\Windows\Explorer Registry branch. They change the NoWindowMinimizingShortcuts DWORD value. It accepts the following data.
- 0 = Enable
- 1 = Disable
That’s it.
Support us
Winaero greatly relies on your support. You can help the site keep bringing you interesting and useful content and software by using these options:
If you like this article, please share it using the buttons below. It won’t take a lot from you, but it will help us grow. Thanks for your support!
How to Disable Aero Shake on Windows 10
Windows 10 is known for its sleek interface and various productivity features, one of which is Aero Shake. Aero Shake allows users to quickly minimize all open windows except the one they are currently working on by simply clicking and shaking that window. While this may be a helpful feature for some, it can also be a source of irritation if you frequently find yourself accidentally minimizing windows when attempting to move them. This article will guide you through different methods to disable Aero Shake on Windows 10, ensuring a smoother computing experience.
Understanding Aero Shake
Aero Shake was introduced with Windows 7 as part of the Aero desktop feature set. It has since evolved but remains a staple in Windows 10. When you grab the title bar of a window and shake it back and forth, all other open windows are minimized, leaving just the one you’re working on in full view.
For many users, this feature can be unintentional and disruptive. Imagine you’re focused on an important document, and in a moment of annoyance, you try to reposition your browser and accidentally trigger Aero Shake. This behavior can also be problematic for users with touchpads or various input devices that may cause movements mistakenly interpreted as a shake.
How to Disable Aero Shake in Windows 10
There are several methods to disable Aero Shake on Windows 10. You can achieve this through the Windows Registry Editor, Group Policy Editor, third-party software, or simply by adjusting your system settings. Below, we will outline these methods in detail.
Method 1: Using the Registry Editor
Editing the registry is a powerful way to change system settings; however, it can be risky if you’re not familiar with the process. Always ensure that you back up your registry before making any changes.
-
Open the Registry Editor
- Press
Windows + Rto open the Run dialog. - Type
regeditand hit Enter. - If prompted by User Account Control, click Yes.
- Press
-
Navigate to the Aero Shake Key
- In the Registry Editor, navigate to the following path:
HKEY_CURRENT_USERSoftwareMicrosoftWindowsCurrentVersionExplorerAdvanced
- In the Registry Editor, navigate to the following path:
-
Create a New DWORD Value
- Right-click in the right pane and select
New > DWORD (32-bit) Value. - Name the new value
NoAeroShake.
- Right-click in the right pane and select
-
Set the DWORD Value
- Double-click on the
NoAeroShakevalue you just created. - In the Value data field, enter
1. This disables the Aero Shake feature. - Click OK to save your changes.
- Double-click on the
-
Restart Windows Explorer
- To apply the changes, you can simply restart your computer or restart the Windows Explorer process.
- To restart Windows Explorer, press
Ctrl + Shift + Escto open Task Manager, find Windows Explorer in the list, right-click on it, and select Restart.
After completing these steps, Aero Shake should be disabled. Test it by trying to shake an open window to see if other windows minimize.
Method 2: Using the Group Policy Editor
The Group Policy Editor is only available in the Professional, Enterprise, and Education editions of Windows 10. Follow these steps to disable Aero Shake via the Group Policy Editor:
-
Open the Group Policy Editor
- Press
Windows + Rto open the Run dialog. - Type
gpedit.mscand hit Enter.
- Press
-
Navigate to User Configuration Settings
- In the Group Policy Editor, navigate to:
User Configuration > Administrative Templates > Start Menu and Taskbar
- In the Group Policy Editor, navigate to:
-
Locate the relevant setting
- Scroll through the list of policies until you find the one labeled
Turn off Aero Shake window minimizing mouse gesture.
- Scroll through the list of policies until you find the one labeled
-
Edit the Policy Settings
- Double-click on this policy to open its settings.
- Select the
Enabledoption to disable the Aero Shake feature. - Click Apply and then OK to save the changes.
-
Log Off or Restart
- For the changes to take effect, log off and then log back in or restart your computer.
This method disables Aero Shake for all users on the system. If you’re using a shared computer, this might be preferable.
Method 3: Using Third-Party Software
If you’d rather not go through the hassle of navigating through system files and settings, there are third-party applications that allow you to customize Windows features, including Aero Shake. Programs like Dexpot, DisplayFusion, or even specialized utilities like WinAero Tweaker can help you manage window behaviors.
-
Download and Install a Window Management Tool
- Search for a reliable window manager or customization tool that suits your needs.
- Download and install the software by following their instructions.
-
Disable Aero Shake Feature
- Open the downloaded tool, and typically in the settings or preferences, you should find options related to window management.
- Look for settings concerning Aero Shake or window gestures, and disable it.
Using third-party software often provides additional features that enhance window management, making your workflow even more efficient.
Method 4: Adjusting Touchpad and Mouse Settings
Another reason why users might experience frequent unintended Aero Shake triggers is due to their mouse or touchpad sensitivity settings. Here’s how you can adjust those settings:
-
Adjust Mouse Settings
- Go to
Settings > Devices > Mouse. - You will find various options to adjust the sensitivity settings. Lowering the speed might prevent inadvertent shakes.
- Go to
-
Modify Touchpad Settings
- Navigate to
Settings > Devices > Touchpad. - Depending on your device, you may explore options like disabling gestures.
- Look for «Touchpad Sensitivity» and set it to Medium or Low.
- Navigate to
-
Check Manufacturer Software
- If you have a specialized mouse or touchpad from manufacturers like Logitech, Synaptics, etc., these often come with their own configuration software. Be sure to review these settings.
These adjustments, while not entirely disabling Aero Shake, can minimize the chances of it activating inadvertently.
Conclusion
Disabling Aero Shake can lead to a more focused and less frustrating computing environment for users who are frequently distracted by accidental window minimization. Whether you choose to modify the registry, navigate through the Group Policy Editor, or use third-party applications, each method has its advantages and can be implemented relatively easily.
By following these steps, you should have no trouble permanently eliminating the Aero Shake feature on Windows 10. Remember to always proceed with caution when making system changes, especially in system settings or using third-party tools. With Aero Shake disabled, you can concentrate fully on your essential tasks without the worry of losing your open windows unexpectedly.