
Рабочий стол в Windows — это обычная папка, по умолчанию расположенная на диске C и всё, что пользователь хранит на рабочем столе, занимает на этом диске место. Если использовать рабочий стол как основное место хранение файлов, это может приводить к недостатку свободного места на системном диске. В такой ситуации разумным может быть перемещение папки рабочего стола на другой диск.
В этой пошаговой инструкции подробно описаны два способа изменить расположение папки рабочего стола с фокусом на переносе на другой диск, но при желании можно перенести рабочий стол просто в другую папку на том же диске. Способы подойдут для Windows 11, Windows 10 и предыдущих версий системы.
Изменение расположения папки Рабочий стол с помощью свойств папки
Первый способ — более предпочтительный, так как всё необходимое Windows сделает за вас, а каких-то проблем и ошибок возникнуть не должно. Чтобы переместить Рабочий стол на другой диск используйте следующие шаги:
- Откройте проводник и в панели слева или в разделе «Быстрый доступ» нажмите правой кнопкой мыши по папке «Рабочий стол». Также можно перейти по пути C:\Пользователи (Users)\Имя_пользователя и нажать правой кнопкой мыши по папке «Рабочий стол» в этом расположении. Выберите пункт «Свойства».

- В свойствах папки перейдите на вкладку «Расположение».
- Нажмите кнопку «Переместить».
- Перейдите на новый диск и/или новую папку для рабочего стола и нажмите «Выбор папки». Папку лучше создать заранее. Также не рекомендую использовать корень диска для файлов рабочего стола, если на этом диске хранится что-то ещё (иначе все папки с этого диска будут видны на рабочем столе).

- Убедитесь, что в окне «Расположение» указан нужный путь: все файлы и папки рабочего стола будут перемещены в это расположение. Нажмите кнопку «Ок».
- Вам будет предложено переместить все файлы из старого расположения в новое — рекомендую сделать это, если вы не планируете выполнять перенос вручную из старой папки.


Останется дождаться завершения процесса переноса — он может занять продолжительное время, особенно если вы активно «складировали» большие по объему файлы на рабочем столе.
В результате все файлы рабочего стола будут находиться на новом диске в указанной вами папке и не будут занимать места на диске C.
Перемещение Рабочего стола на другой диск в редакторе реестра
При желании переместить папку «Рабочий стол» можно и в редакторе реестра, однако следует учитывать, что при использовании этого способа автоматический перенос файлов выполняться не будет: вам потребуется вручную перенести все файлы из C:\Пользователи\Имя\Рабочий стол (или C:\Users\Имя\Desktop, что одно и то же) в указанное вами новое расположение.
Порядок действий:
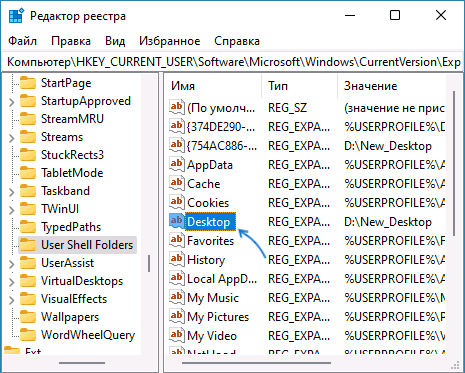
- Нажмите клавиши Win+R на клавиатуре (Win — это клавиша с эмблемой Windows), введите regedit и нажмите Enter.
- В открывшемся редакторе реестра перейдите к разделу
HKEY_CURRENT_USER\Software\Microsoft\Windows\CurrentVersion\Explorer\User Shell Folders
- Обратите внимание на параметр с именем «Desktop» — именно в нём указывается расположение папки рабочего стола.

- Чтобы изменить папку рабочего стола, дважды нажмите мышью по параметру Desktop, укажите новый путь к папке (папка должна быть создана заранее) и нажмите «Ок». Если путь к папке содержит пробелы, возьмите его в кавычки.
- Закройте редактор реестра.
Как правило, перезагрузка не требуется: достаточно перенести файлы из старой папки «Рабочий стол» в новую вручную, чтобы увидеть их на рабочем столе, а если после переноса они не появились, нажмите правой кнопкой мыши в пустом месте рабочего стола и выберите пункт «Обновить» в контекстном меню.
💻 Navigating Windows 11: Finding the Desktop Folder
Ever found yourself wondering where exactly the Desktop folder lives in Windows 11? While it might seem like a mystery, the Desktop folder is actually right where you expect it to be—nestled inside your user profile. In this guide, we’ll walk you through its location, how to access it, and why knowing its whereabouts can simplify your file management.
The Desktop folder is a key directory where all files, shortcuts, and folders that appear on your Windows 11 desktop are stored. It acts as a centralized hub for your frequently used items and can be customized to suit your workflow.
📍 Where Is the Desktop Folder Located?
The Desktop folder is typically located at:
C:\Users\<YourUsername>\Desktop
Replace <YourUsername> with your actual Windows username. This path holds everything you see on your desktop screen.
🔍 How to Access the Desktop Folder
Here are several easy ways to access the Desktop folder in Windows 11:
1️⃣ Using File Explorer
- Open File Explorer: Click the folder icon in your taskbar or press Win + E.
- Navigate to Your User Folder: Go to
C:\Users\<YourUsername>. - Find the Desktop Folder: Look for the folder labeled Desktop. Double-click to open it.
2️⃣ Through the Run Dialog
- Open the Run Dialog: Press Win + R.
- Type the Path: Enter
%USERPROFILE%\Desktopand hit Enter. This will directly open your Desktop folder.
3️⃣ Using the Quick Access Panel
- Quick Access: The Desktop folder often appears in the Quick Access section in File Explorer. Simply click on Desktop in the left pane to view its contents.
📊 Quick Comparison Table
| Method | Ease of Use | Speed | Customization Options |
|---|---|---|---|
| File Explorer Navigation | Very Easy ✅ | Fast ✅ | Direct folder access |
| Run Dialog | Extremely Easy ✅ | Instant ✅ | Direct link using environment variable |
| Quick Access | Easy ✅ | Immediate ✅ | Pinned for frequent use |
💡 Why Knowing Your Desktop Folder Matters
Understanding where your Desktop folder is located can help you:
- Easily Backup Important Files: Keep a backup of essential files stored on your desktop.
- Organize Data: Move items into subfolders for better organization without cluttering your screen.
- Troubleshoot Issues: When facing desktop icon or file display issues, knowing the exact path helps in manual file management.
🎯 Final Thoughts
The Desktop folder in Windows 11 is straightforward to find once you know where to look. Whether you use File Explorer, the Run dialog, or Quick Access, managing your files becomes simpler when you have a clear understanding of your system’s directory structure. Happy organizing, and may your desktop always be clutter-free!
💡 Pro Tip: Regularly clean and organize your Desktop folder to keep your workspace efficient and tidy.
-
Home
-
News
- Fixed: Desktop Folder Missing From User Profile Win 10/11
Fixed: Desktop Folder Missing From User Profile Win 10/11
By Shirley | Follow |
Last Updated
Have you ever encountered the “desktop folder missing from user profile” issue? Do you have any idea how to fix it? Now in this post from MiniTool, you can learn where is the desktop folder in Windows 11/10 and how to bring back the missing desktop folder in Windows 11/10.
Many users are troubled by folder-missing issues. We talked about how to fix the Windows Pictures folder missing issue and the problem of the Users folder missing before. Today we are going to guide you to fix the matter of the “desktop folder missing from user profile”.
Where Is the Desktop Folder in Windows 11/10
In general, the desktop folder is located under the user profile. In File Explorer, the default location of the desktop folder is C:\Users\Default\Desktop or C:\Users\username\Desktop.
Why Desktop Folder Not Showing in User Profile Windows 11/10
Many factors can cause the desktop folder to disappear. Here we list the most common causes.
- The desktop folder is hidden.
- The desktop folder location has been changed.
- There is another folder called Desktop so the default desktop folder not showing up due to folder conflict.
- The desktop folder is deleted by mistake or removed by viruses.
How to Fix Desktop Folder Missing From User Profile Windows 10/11
After knowing what causes the desktop folder to disappear, let’s see how to bring back the missing desktop folder in Windows 11/10.
Fix 1. Show Hidden Files and Folders
As said before, when your files or folders are hidden, you can not view them in File Explorer. In this situation, configuring it to show hidden files and folders is an effective way to get back the missing desktop folder.
Fix 2. Restore the Desktop Folder to the Default Path
When the desktop folder missing from user profile but showing up in another location, you can try to restore the desktop folder to its default path.
Step 1. In File Explorer, right-click the Desktop folder to select Properties.
Step 2. In the new window, move on to the Location tab and click Restore Default.
Step 3. If prompts are showing up, you need to follow the instructions to accomplish the task. Then click the OK button to exit desktop properties.
Finally, check whether the desktop folder is showing up under your Users folder now.
Fix 3. Check If There Is Another Desktop Folder
To check whether there is another folder called Desktop that is preventing you from viewing the default desktop folder, you can do as follows.
Step 1. In File Explorer, navigate to the location of C:\Users\username.
Step 2. Right-click any blank area to choose New > Folder. Then name the created folder to Desktop. If there is another desktop folder, you will receive a message stating “This destination already contains a folder named Desktop” as follows.

Step 3. Now you need to find the “fake” desktop folder and change its name to another one. Then find the real desktop folder and restore its name to Desktop.
Fix 4. Use MiniTool Power Data Recovery to Recover Lost Desktop Folder
If you cannot find the desktop folder by using all the ways listed above, the desktop folder may get lost due to accidental deletion, virus infection, or other reasons. To get back the missing desktop folder, you need to use a piece of free data recovery software.
MiniTool Power Data Recovery is the most recommended data recovery service. It works great on computer hard drive data recovery, USB flash drive data recovery, SD card data recovery, and so on.
Besides, it supports scanning and recovering files from a specific folder, the Recycle Bin, and the desktop individually. So, to restore the desktop folder from the Users folder, you can choose the Users folder to scan.
Now click the button below to get MiniTool Power Data Recovery Free installed and give it a try.
MiniTool Power Data Recovery FreeClick to Download100%Clean & Safe

Final Words
This post tells you how to fix the trouble of “desktop folder missing from user profile” by showing hidden files, restoring the desktop folder location to default, renaming the duplicate folder, and recovering the desktop folder by using MiniTool Power Data Recovery Free.
MiniTool Power Data Recovery FreeClick to Download100%Clean & Safe
Should you have any questions about this article, please feel free to leave your comments below.
About The Author
Position: Columnist
Shirley graduated from English major and is currently an editor of MiniTool Team. She likes browsing and writing IT-related articles, and is committed to becoming a professional IT problem solver. The topic of her articles are generally about data recovery, data backup, and computer disk management, as well as other IT issues. In spare time, she likes watching movies, hiking and fishing.

This tutorial will show you how to move or restore the default location of the Desktop folder for your account in Windows 10 and Windows 11.
The Desktop folder (shell:Desktop) is a component of the user profile that is used as a unified location for storing personal data. By default, the Desktop folder is a shell folder in the user’s profile (%UserProfile%) that is used as a default storage location items on your desktop.
The desktop (Win+D) is your home screen and working space in Windows that contains the taskbar and any icons (ex: shortcuts, files, folders, etc…) you add to and arrange on the desktop.
If you like, you can move the Desktop folder and its content to a location you want it at instead.
If the current Desktop folder path is incorrect or is no longer available, you can use the Restore Default option to restore the default path.
Contents
- Option One: Move Location of Desktop Folder in Properties
- Option Two: Restore Default Location of Desktop Folder in Properties
- Option Three: Restore Default Location of Desktop Folder using BAT file
Option One
Move Location of Desktop Folder in Properties
1 If you turned on back up Desktop folder to OneDrive, then you will need to temporarily turn off back up Desktop folder to OneDrive until after you moved the Desktop folder.
2 Open File Explorer (Win+E).
3 Navigate to the location (ex: «D») you want to move your Desktop folder to, and create a new folder named Desktop at this location. (see screenshot below)

4 Right click on the Desktop folder in the navigation pane of File Explorer, and click/tap on Properties. (see screenshot below)
If you don’t see the Desktop folder in the navigation pane, then type shell:Desktop into the address bar of File Explorer, and press Enter to open the Desktop folder no matter where it may be located.
You can then right click or press and hold on an empty area in the opened Desktop folder, and click/tap on Properties.

5 Click/tap on the Location tab, and click/tap on the Move button. (see screenshot below)

6 Navigate to and select the new Desktop folder from step 3, and click/tap on Select Folder. (see screenshot below)

7 Click/tap on OK. (see screenshot below)
8 Click/tap on Yes to move all the files from the old location to the new location. (see screenshot below)

Option Two
Restore Default Location of Desktop Folder in Properties
1 If you turned on back up Desktop folder to OneDrive, then you will need to temporarily turn off back up Desktop folder to OneDrive until after you restored the default location of the Desktop folder.
2 Open File Explorer (Win+E).
3 Right click on the Desktop folder in the navigation pane of File Explorer, and click/tap on Properties. (see screenshot below)
If you don’t see the Desktop folder in the navigation pane, then type shell:Desktop into the address bar of File Explorer, and press Enter to open the Desktop folder no matter where it may be located.
You can then right click or press and hold on an empty area in the opened Desktop folder, and click/tap on Properties.
4 Click/tap on the Location tab, and click/tap on the Restore Default button. (see screenshot below)
5 Click/tap on OK. (see screenshot below)
6 If prompted to create a Desktop folder at the default location, click/tap on Yes. (see screenshot below)

7 Click/tap on Yes to move all the files from the old location to the default location. (see screenshot below)
Option Three
Restore Default Location of Desktop Folder using BAT file
This option can be very useful if Option Two is not available.
This option will not move the contents of the Desktop folder from the old location to the default location. You will need to manually move the contents after restoring the default location if wanted.
1 If you turned on back up Desktop folder to OneDrive, then you will need to temporarily turn off back up Desktop folder to OneDrive until after you restored the default location of the Desktop folder.
2 Click/tap on the download button below to download the Restore_default_location_of_Desktop_folder.zip file.
(Contents of BAT file for reference)
Code:
@echo off

taskkill /f /im explorer.exe

timeout /t 2 /nobreak >nul

if not exist "%UserProfile%\Desktop" mkdir "%UserProfile%\Desktop"

reg add "HKCU\SOFTWARE\Microsoft\Windows\CurrentVersion\Explorer\Shell Folders" /v "Desktop" /t REG_SZ /d "C:\Users\%USERNAME%\Desktop" /f

reg add "HKCU\SOFTWARE\Microsoft\Windows\CurrentVersion\Explorer\User Shell Folders" /v "Desktop" /t REG_EXPAND_SZ /d %%USERPROFILE%%"\Desktop" /f

attrib +r -s -h "%USERPROFILE%\Desktop" /S /D

timeout /t 1 /nobreak >nul

start explorer.exe
3 Save the ZIP file to your desktop.
4 Unblock the ZIP file.
5 Extract the BAT file from the ZIP file.
6 Run the BAT file.
7 You will now see a command prompt open and close to kill the explorer process, run the commands to restore the default location and attributes of the Desktop folder, and restart the explorer process.
8 You can now delete the BAT file if you like.
That’s it,
Shawn Brink
Related Tutorials
- Add or Remove Location tab in Folder Properties in Windows 11
- Move or Restore Default Location of Documents Folder in Windows 11
- Move or Restore Default Location of Downloads Folder in Windows 11
- Move or Restore Default Location of Music Folder in Windows 11
- Move or Restore Default Location of OneDrive Folder in Windows 11
- Move or Restore Default Location of Pictures Folder in Windows 11
- Move or Restore Default Location of Saved Games Folder in Windows 11
- Move or Restore Default Location of Searches Folder in Windows 11
- Move or Restore Default Location of Videos Folder in Windows 11
-
Restore_default_location_of_Desktop_folder.zip
Restore_default_location_of_Desktop_folder.zip
659 bytes
· Views: 1,919
Где находится папка Рабочий стол Windows 11. Рабочий стол Windows 11: Путь к нему, Хранение файлов и Другие Тонкости
👇Читать дальше🤭Рабочий стол — это, пожалуй, самое привычное и часто используемое место в операционной системе Windows 11. 💻 Это та область, где мы размещаем ярлыки к нашим любимым программам, файлам, папкам, которые нам нужны под рукой. Но где же он хранится физически на жестком диске? Как найти нужную папку? Как узнать путь к рабочему столу? Давайте разберемся во всех этих нюансах!
Перейдите к нужной части, нажав на соответствующую ссылку:
🔵 Где Хранится Рабочий Стол в Windows 11
🔵 Как Найти Папку Рабочего Стола в Проводнике
🔵 Как Узнать Путь к Рабочему Столу
🔵 Другие Важные Папки в Windows 11
🔵 Где Хранятся Обои Рабочего Стола
🔵 Как Найти Файлы на Компьютере в Windows 11
🔵 Советы и Рекомендации
🔵 Заключение
😽 Комментировать
Где находится папка «Рабочий стол» в Windows 11?
Windows 11, как и предыдущие версии операционной системы, предоставляет удобный доступ к важным папкам, включая «Рабочий стол». Эта папка, являющаяся одним из основных элементов интерфейса, предназначена для быстрого доступа к часто используемым файлам, ярлыкам и документам. 💻
Но как же быстро найти эту папку, если вы случайно ее потеряли или не знаете, где она находится? 🔎
Самый простой способ – воспользоваться проводником файлов. 📁 Откройте проводник, который можно сделать, например, через меню «Пуск» или сочетание клавиш Win + E. В левой части окна вы увидите область навигации, где отображается список популярных папок.
Вот как найти «Рабочий стол» в проводнике:
1. Выберите «Главная»: В области навигации слева найдите и выберите раздел «Главная». 🏠
2. Используйте стрелки навигации: Если вы находитесь в другой папке, используйте стрелки «Вверх» ⬆️, расположенные слева от адресной строки. Эти стрелки помогут вам перейти на уровень выше в иерархии папок.
3. Проверьте список папок: В этом представлении вы увидите список из шести известных папок Windows, среди которых будет и ваша «Рабочий стол». 🖥️
Таким образом, «Рабочий стол» всегда доступен в проводнике файлов Windows 11. Он является одной из ключевых папок, доступных через область навигации. Не забывайте, что вы также можете создать ярлыки на «Рабочий стол» для быстрого доступа к часто используемым файлам и приложениям. 🖱️
Надеемся, что эта информация поможет вам быстро найти «Рабочий стол» и пользоваться всеми преимуществами удобного интерфейса Windows 11.
Где Хранится Рабочий Стол в Windows 11
Windows 11, как и предыдущие версии, хранит файлы с рабочего стола в специальной папке. Эта папка является частью файловой системы и имеет свой собственный путь.
Вот два основных варианта:
- Рабочий стол текущего пользователя:
Путь к нему выглядит так: `%UserProfile%\Desktop`.
Что это значит? `%UserProfile%` — это переменная, которая указывает на папку профиля текущего пользователя, который вошел в систему. А `Desktop` — это название самой папки, где хранятся все файлы с вашего рабочего стола.
Например, если имя пользователя — «Иван», то полный путь к папке рабочего стола будет: `C:\Users\Иван\Desktop`.
Помните, что каждый пользователь имеет свой собственный рабочий стол, со своими файлами и ярлыками.
- Общий рабочий стол:
Он предназначен для общего доступа ко всем пользователям системы. Его путь: `%Public%\Desktop`.
Однако, стоит отметить, что использование общего рабочего стола не так распространено в домашних условиях. Он больше пригодится в корпоративных сетях, где нужно обеспечить доступ к определенным файлам всем сотрудникам.
Как Найти Папку Рабочего Стола в Проводнике
Найти папку рабочего стола в проводнике Windows 11 проще простого!
- Запустите Проводник. Вы можете сделать это, нажав на значок «Проводник» на панели задач или нажав клавиши Win + E.
- Перейдите в раздел «Быстрый доступ». В этом разделе вы увидите список часто используемых папок, в том числе и «Рабочий стол».
- Выберите папку «Рабочий стол». Она будет выделена.
- Посмотрите на адресную строку. В ней будет отображен полный путь к папке рабочего стола.
Еще один способ:
- Откройте проводник.
- В левой панели навигации нажмите на «Этот компьютер».
- Разверните папку «Пользователи».
- Найдите папку с именем вашего пользователя.
- Внутри этой папки вы найдете папку «Рабочий стол».
Как Узнать Путь к Рабочему Столу
Если вам нужно узнать полный путь к папке рабочего стола, чтобы, например, скопировать файл или вставить его в командную строку, вы можете воспользоваться несколькими способами:
- Через проводник:
Как мы уже упоминали, в адресной строке проводника отображается полный путь к выбранной папке.
Просто откройте папку «Рабочий стол» в проводнике и скопируйте путь из адресной строки.
- Через командную строку:
Вы можете использовать команду `echo %userprofile%\Desktop`.
Эта команда выведет на экран полный путь к папке рабочего стола текущего пользователя.
- Через PowerShell:
В PowerShell вы можете использовать команду `$env:USERPROFILE + «\Desktop»`.
Она также выведет на экран полный путь к папке рабочего стола текущего пользователя.
Другие Важные Папки в Windows 11
Помимо рабочего стола, в Windows 11 есть еще несколько стандартных папок, которые хранят важные файлы. Они также отображаются в разделе «Быстрый доступ» проводника:
- Документы: Здесь хранятся ваши текстовые документы, таблицы и другие файлы, с которыми вы работаете.
- Загрузки: В эту папку сохраняются файлы, которые вы скачиваете из интернета.
- Изображения: В этой папке хранятся ваши фотографии и картинки.
- Музыка: Здесь хранятся ваши музыкальные файлы.
- Видео: В этой папке хранятся ваши видеофайлы.
Где Хранятся Обои Рабочего Стола
Обои рабочего стола — это картинки, которые украшают ваш экран. 🖼️ Windows 11 хранит их в двух местах:
- Файлы тем по умолчанию:
Эти файлы хранятся в папке `%WinDir%\Resources\Theme`.
`%WinDir%` — это переменная, которая указывает на папку, где установлена Windows. Обычно это `C:\Windows`.
В этой папке хранятся темы, которые поставляются с Windows 11.
- Файлы тем пользователя:
Если вы установили пользовательскую тему, файлы обоев будут храниться в папке `%LOCALAPPDATA%\Microsoft\Windows\Theme` или `%SystemDrive%\Users\User\AppData\Local\Microsoft\Windows\Themes`.
`%LOCALAPPDATA%` — это переменная, которая указывает на папку локальных данных пользователя.
Как Найти Файлы на Компьютере в Windows 11
Иногда бывает сложно найти нужный файл среди множества других. Windows 11 предлагает удобный инструмент для поиска — Поиск файлов. 🔎
- Откройте проводник.
- В правом верхнем углу окна проводника есть поле для поиска.
- Введите название файла или часть его названия.
- Нажмите Enter.
Windows 11 начнет искать файлы, которые соответствуют вашему запросу. Результаты поиска отобразятся в окне проводника.
Советы и Рекомендации
- Создавайте папки для организации файлов. Это поможет вам быстро найти нужные файлы в будущем.
- Используйте поиск файлов. Это сэкономит вам время, которое вы тратите на поиск файлов вручную.
- Регулярно очищайте рабочий стол. Не захламляйте его ненужными файлами и ярлыками.
- Создавайте резервные копии важных файлов. Это поможет вам избежать потери данных в случае поломки компьютера.
- Не храните важные файлы на рабочем столе. Перемещайте их в другие папки, чтобы избежать случайного удаления.
- Используйте виртуальные рабочие столы. Это поможет вам организовать работу с несколькими приложениями одновременно.
Заключение
Рабочий стол в Windows 11 — это не просто область для размещения ярлыков. 🖥️ Это важная часть файловой системы, которая хранит ваши файлы и ярлыки. Понимание того, как работает рабочий стол, как найти нужные файлы и как организовать рабочее пространство, поможет вам повысить свою производительность и удобство работы с Windows 11.
Надеюсь, эта статья была вам полезна!
***
Часто Задаваемые Вопросы:
- Где находится папка «Рабочий стол» в Windows 11? — Обычно она находится в папке профиля пользователя: `C:\Users\[Имя пользователя]\Desktop`.
- Как открыть папку «Рабочий стол»? — Вы можете открыть ее через проводник, нажав на значок «Рабочий стол» в разделе «Быстрый доступ».
- Как найти файлы на рабочем столе? — Вы можете использовать функцию поиска в проводнике или просто просмотреть файлы в папке «Рабочий стол».
- Можно ли перенести файлы с рабочего стола в другое место? — Да, вы можете переместить файлы в любую другую папку на вашем компьютере.
- Как изменить обои рабочего стола? — Вы можете изменить обои рабочего стола через настройки персонализации Windows 11.
- Что такое виртуальные рабочие столы? — Виртуальные рабочие столы позволяют вам создавать несколько рабочих пространств на одном компьютере, что удобно для работы с несколькими приложениями.
- Как создать новый рабочий стол? — Вы можете создать новый рабочий стол через «Просмотр задач», нажав на значок «Просмотр задач» на панели задач.
- Как удалить файлы с рабочего стола? — Вы можете удалить файлы с рабочего стола, выбрав их и нажав клавишу Delete.
- Что делать, если файлы с рабочего стола пропали? — Проверьте корзину. Возможно, файлы были случайно удалены. Если их нет в корзине, попробуйте восстановить файлы с помощью специальных программ для восстановления данных.
- Как очистить рабочий стол? — Вы можете удалить ненужные файлы и ярлыки с рабочего стола, выбрав их и нажав клавишу Delete.
Надеюсь, эта информация была полезной!
✳️ Как складываются оценки в диплом
✳️ Что значит 2 по цене 1
✳️ Как узнать номер консоли пс5
✳️ Как выглядит идентификационный номер Китая