
If you are experiencing computer problems, you may want to know how to open Add Remove Windows components in your PC. Microsoft Windows installation software comes with many built-in apps that occupy space on your hard drive and slow down the performance of your computer. To remove these programs from your PC, open the Control Panel and click on the Programs and Features tab. Once in this window, you can double-click on Add/Remove Windows components and click on “Remove.”
If you can’t find the Windows Messenger entry on the Add/Remove Windows Components page, go to Start > Run. You should see an entry called “Windows Messenger.” This option will allow you to remove the entire program. If you can’t find the program in the Start menu, try typing “Run” and hitting enter. You should see an error message. If it doesn’t, click “Close all Windows components” and retry the process.
To find out how to access the Add Remove Windows components tool in Windows 10, click the Start button and then type in “addremove.” Then, open the Start menu, and double-click on the “Add/Remove Programs” option. From here, choose “Add/Remove Windows components.”
First, open the Control Panel by clicking the Start menu and typing “control panel.” To open the Add Remove Programs panel, click the Start button and then click on “Programs and Features”. Next, choose the application you want to remove. After selecting it, right-click the application, then select “Uninstall.” If the program is not completely removed, you will have to reinstall it.
The Add Remove Windows components window displays a list of the features available in Windows 10. Each feature has a short description and can be disabled or enabled. You can also remove components that you no longer need. If you do not need one of these features, you can remove them. By removing them, Windows will not automatically update all of the other features. This process will install the required components and programs.
Where is Add/Remove in Windows 10?
If you’ve been having trouble removing programs from your computer, you’ve probably wondered where the Add/Remove Windows components panel is located. Windows 10 has two places to perform this task: the Settings interface and the Control Panel. The Settings interface provides a general uninstaller for all applications, but there’s no option to uninstall a specific program or remove a program entirely. The Control Panel, however, has many more useful features, including the Uninstall program command, which calls a registered uninstaller script.
To get to the Control Panel, press the Win+R key and type “control panel” into the search box. You can also open the Command Prompt by pressing Windows key and typing “control panel.”
How Do I Open Windows Components in Windows 10?
If you want to change the default settings of a Windows feature, open the Windows Features dialog. Unchecking unwanted Windows features may affect other programs or features. If you don’t need a feature, but are unsure about how to remove it, you can always click “Go online to learn more.”
First, open the Control Panel by pressing the Win+R key while holding down the Windows key. Once in the Control Panel, type “control panel” into the search box. Alternatively, open the Command Prompt by pressing Windows and typing control panel. If the Control Panel doesn’t open automatically, click the Start menu. After that, click “control panel” and then click “uninstall”. The program will be removed.
If you have any additional features, you can also turn them off. For example, you can disable the XPS viewer if you don’t use it. Many optional features are useful only in corporate environments, so they can be turned off. You can also manage optional features through the Settings app. The “Programs and Features” window is not the same as the Control Panel, as it only lists modern Windows 10 features.
How Do I Open Add Remove Programs?
Often, you may wonder how to open Add Remove Windows Components in a Windows 10 computer. This feature lets you uninstall software and adjust the features of your computer. It can also show you installed updates. Then, you can follow the instructions for uninstalling software. To access the section, click Start, select Settings, and then select Apps. Once you find it, right-click the program you want to remove and select “Uninstall.”
To open the Add Remove Windows Components panel, open the Control Panel or “Programs and Features.” Then, click the “Uninstall” link at the bottom-right corner of the window. To view other helpful features, you can download them from this Control Panel. This Control Panel is the main hub of your PC’s settings. However, recent updates have made it seem like it no longer exists.
To remove unnecessary programs and features, you can select them and uncheck the check boxes next to them. However, if you do not want to remove them, make sure that they don’t affect any other windows features. This feature also changes the default settings of other programs. To learn more, you can click the “Go online” link and read the generic Windows help page. If you’re not familiar with this method, try searching for “How to open Add Remove Windows Components in Windows 10” on Google.
How Do I Access Windows Components?
How do I access Windows components in Windows 10 – COM+ Explorer? In Windows 2000, you can access this tool from the Administrative Tools window or from the Start menu. Click the Administrative Tools menu and choose Component Services. You’ll see the Windows components that are installed on your machine and what you can do to access them. In Windows 10, you can access the Component Services app by clicking the Administrative Tools menu option.
The first step is to go to Control Panel. This will open the Device Manager. From here, you can access various components, including storage devices, display adapters, network adapters, processors, and memory. Clicking on any one of these components will show you detailed information, including its model and manufacturer. You can also click on the Device tab for detailed information on sound card settings. Finally, the System Information will give you detailed information about the system and its components.
How Do I See Windows Components?
The first step in seeing what your computer is up to is to access the Control Panel and open up the Administrative Tools category. There, you’ll find a tab called “Component Services” and the option to open it is right at the top. This window displays a list of all the components installed on your PC. Click on a component to get more information about its properties and functions. From here, you can also choose to view and change any settings related to it, such as the operating system version and type.
To view these components, open the System menu and click on the “About” tab. This dialog box shows the name of your PC, installed RAM, and CPU. Among other things, it shows you the version of Windows 10 your PC is running. If you suspect a component is malfunctioning, double-clicking on it will give you the necessary technical details and provide the option to update the driver.
How Do I Add Or Remove Hardware?
The Safely Remove Hardware and Eject Media icon can be found in the system tray. By default, this icon is hidden and not shown alongside the clock and network icon. You can make it visible by right-clicking on the device in question and moving it to a more prominent position in the system tray. Follow the steps below to see the icon. Identify the device, click the “Safely Remove Hardware” notification in the bottom right corner of the screen, and unplug it.
The Safely Remove Hardware icon can be brought back by running a command or typing in the command in the Start menu. Note that case is important. To stop USB devices, click the “Stop USB activity” button to restore the device’s icon to the system tray. If the device cannot be detected, the user can manually stop it in Device Manager. The Safely Remove Hardware icon can also be restored by right-clicking the hardware and selecting “New -Safely remove hardware” from the Start menu.
Learn More Here:
1.) Windows Help Center
2.) Windows – Wikipedia
3.) Windows Blog
4.) Windows Central
Both Windows 11 and Windows 10 come with predefined sets of features and components. You can customize Windows by removing the features you’re not using and by adding the ones you need but aren’t installed by default. Moreover, if you remove unwanted components, you can theoretically save a bit of space on your hard drive. This tutorial teaches you how to add and remove Windows features in Windows 11 and Windows 10. The process is pretty straightforward, so let’s get started:
How to open Windows Features
Although opening Windows Features is quite similar in Windows 11 and Windows 10, the visuals are slightly different. For that reason, we’re going to show you how to get to them first in Windows 11 and then in Windows 10:
How to open Windows Features in Windows 11
If you’re using Windows 11, click or tap the Search button on the taskbar that looks like a magnifying glass, and type “windows features” in the search field. Once the results are in, click or tap on “Turn Windows features on or off.”
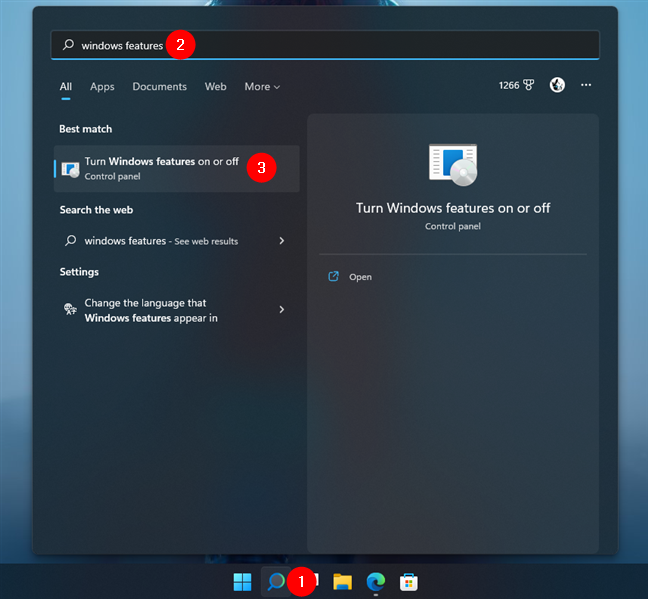
Search for windows features in Windows 11
Alternatively, you can also access Windows Features using the Settings app. Open it (Windows + I), select Apps on the left sidebar, and click or tap on Optional features on the right.
TIP: The Optional features settings from Windows 11 and Windows 10 allow you to add other extra functionality for your device. If you want to learn how to install new features or remove the ones you don’t need, check this other guide that we just published: How to add or remove optional features in Windows 11 and Windows 10.
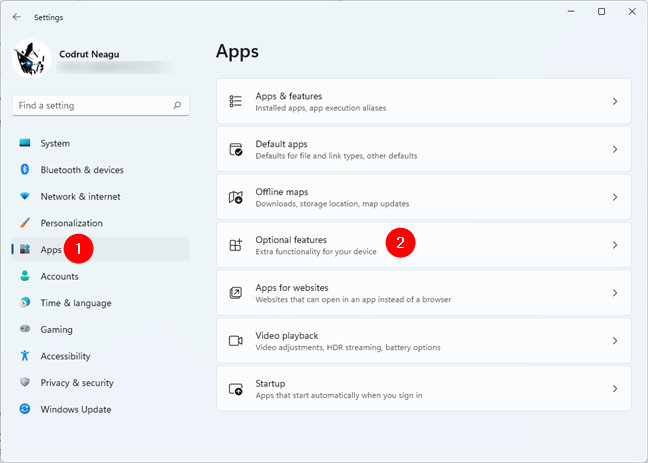
Access Optional features in Windows 11
On the Optional features page, scroll down to the Related settings section at the bottom, and click or tap on More Windows features.
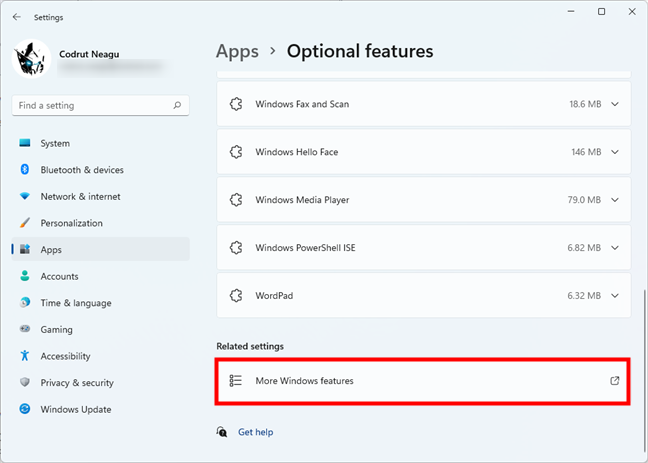
The More Windows features link in Optional features
And last but not least, a third method of getting to the Windows Features in Windows 11 is using the Control Panel. In it, go to Programs > Programs and Features and click or tap the “Turn Windows features on or off” option on the left.
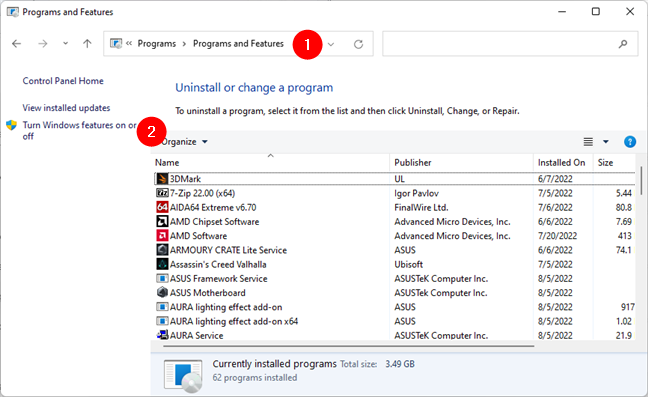
Click or tap on Turn Windows features on or off
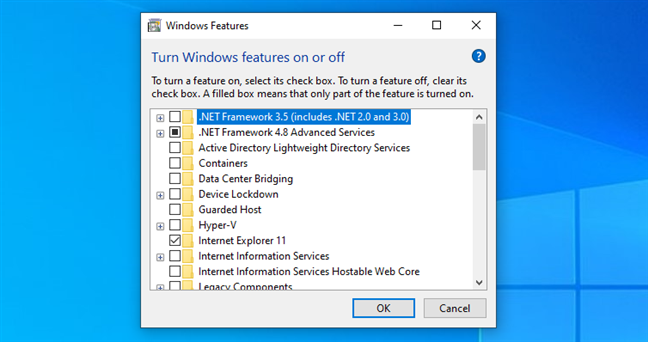
The Windows Features window opens, displaying a list of features you can add or remove according to your preferences.
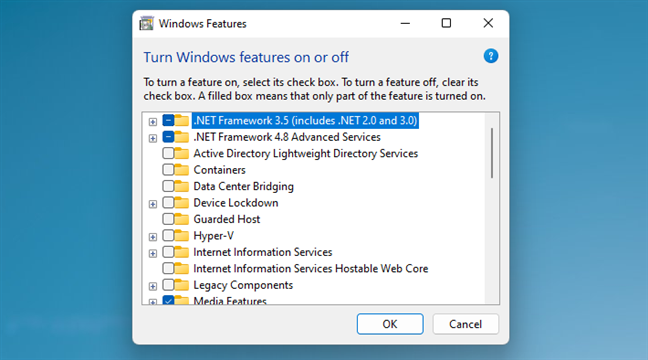
The Windows Features from Windows 11
The checked entries are already installed on your computer or device, while those unchecked are not.
How to open Windows Features in Windows 10
In Windows 10, click or tap the search field in your taskbar, and enter “windows features.” Click or tap the “Turn Windows features on or off” option from the list.
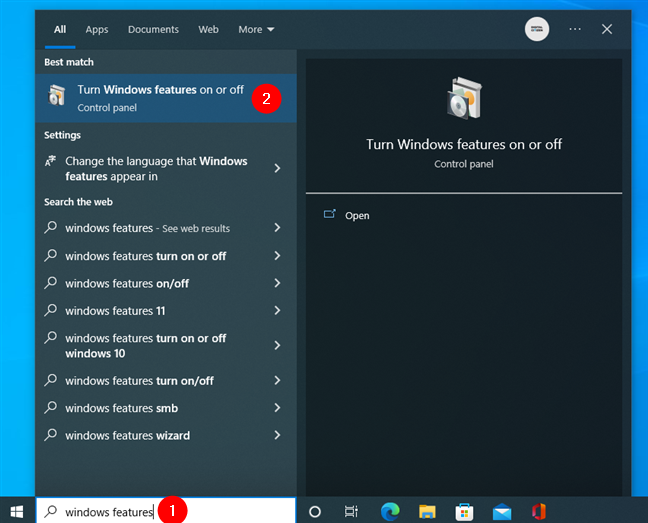
Type windows features in the taskbar’s search field
If you prefer, you can also choose the long way. Open the Settings app (Windows + I) and head to Apps > Apps & features > Optional features.
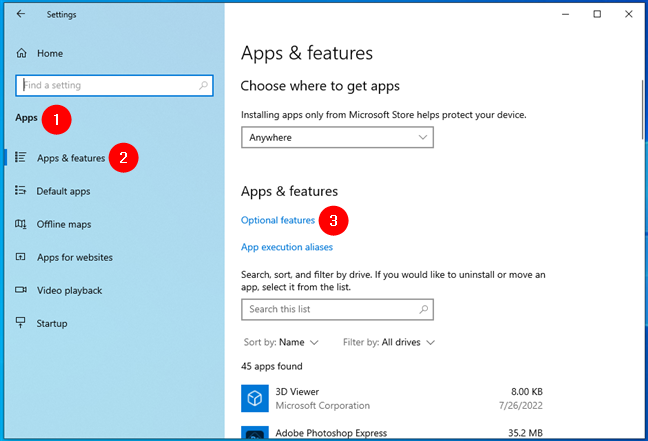
Access Optional features in Windows 10
Then scroll to the Related settings section and click or tap on the “More Windows features” link.
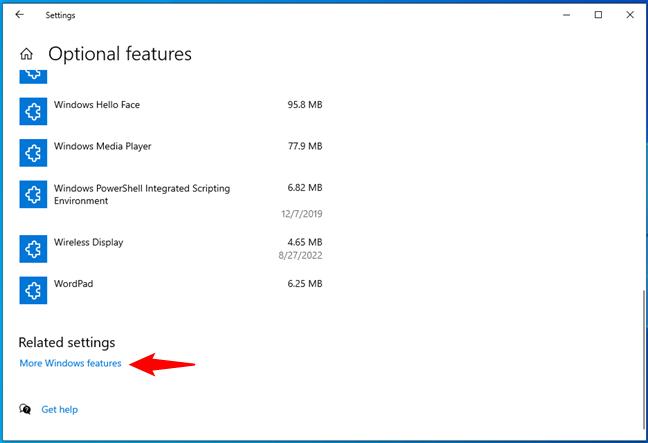
Open More Windows features in Windows 10
A third alternative method to access Windows Features in Windows 10 is provided by the Control Panel. Open it, navigate to Programs > Programs and Features, and click or tap “Turn Windows features on or off” on the left of the window.
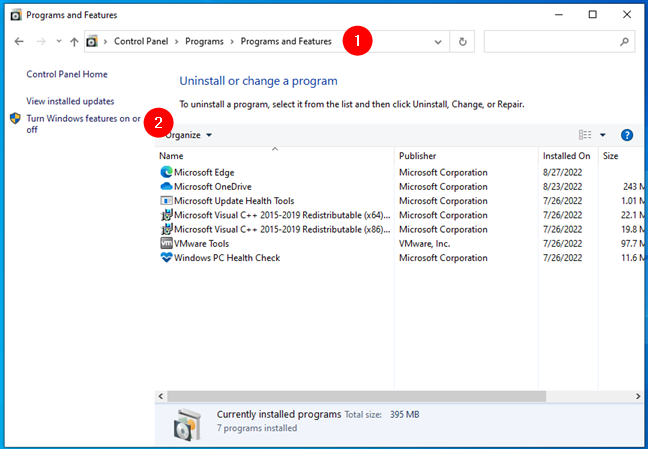
Turn Windows features on or off in Windows 10
Windows 10 then launches the Windows Features window. It shows you a list of features available to install or remove.
Windows Features and components available in Windows 10
The features with checkmarks are already installed, while those unselected are not.
NOTE: From here on, both the steps and the interface used to install or remove features and components are identical in Windows 11 and Windows 10. In consequence, we decided to use screenshots from Windows 11.
How to add Windows features or components
The Windows Features window lists all the features or components available for Windows. To view more information about a feature, hover on top of it with your mouse or tap on it, and a brief description appears. However, if you want even more details about each component, read: What are those Windows features that you can add or remove?.

A brief description is available for every Windows feature
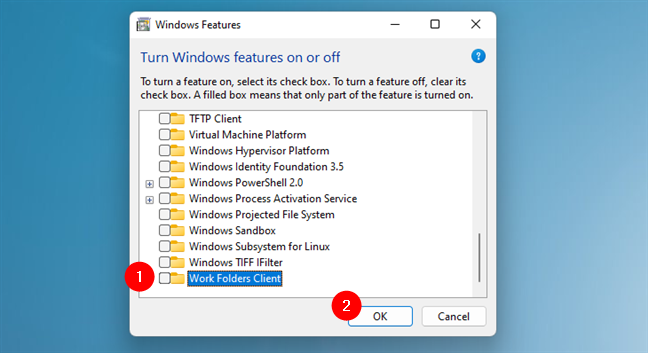
To add features to Windows 10 or Windows 11, check their boxes in the Windows Features window, and then click or tap OK.
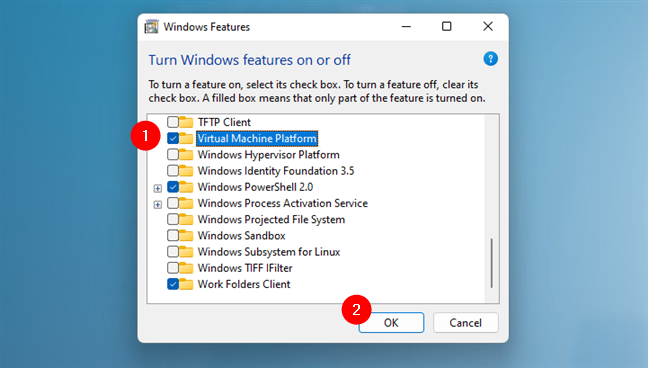
Adding the Virtual Machine Platform component
You must wait while Windows searches for the files required to install the selected feature.

A loading screen informs you of the progress
NOTE: For certain features, Windows might need to download some files from Windows Update to successfully add the requested components.
Once Windows finds the required files, it starts installing the optional feature, letting you know it’s “Applying changes.”
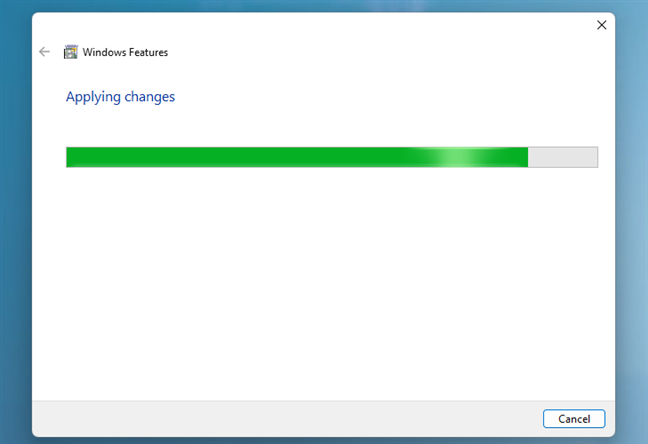
Wait while your changes are being applied
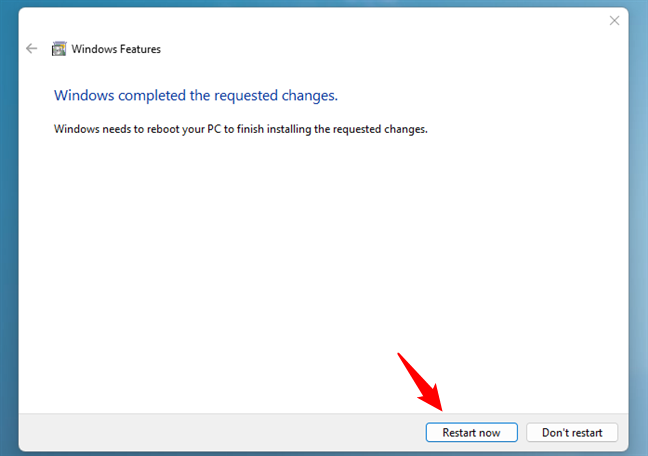
For certain components, like “Virtual Machine Platform,” rebooting your Windows computer or device is required to finish installing your changes. Click or tap “Restart now,” and remember that the reboot may take extra time to configure the added components.

Reboot to finish installing your changes
Other features, like “Windows Projected File System,” do not require a restart. Once your changes are completed, press Close to finish the process.
Press Close to finish completing the installation of new components
Windows now includes the feature(s) you selected for installation.
How to remove Windows features or components
Once you decide which components you want to be removed, uncheck the box next to them to uninstall unnecessary Windows features. When you uncheck certain features, like Internet Explorer 11, from Windows, you might get a warning that turning them off might affect other Windows features, programs, or default settings. If that happens, you’ll need to confirm again that you want to uninstall that certain feature.

Windows warns you about the consequences of disabling certain features
You might think that the “Go online to learn more” link might provide more specific info about the component you are disabling, but clicking or tapping on it takes you to a generic Windows help page offering more information about Windows.

The Windows help page provides generic tips and info
Either way, once you unchecked the features or components you want to remove, click or tap the OK button from the Windows Features window.
Press OK to apply your changes
A loading screen keeps you updated on the progress, letting you know your system is “Searching for required files” first.
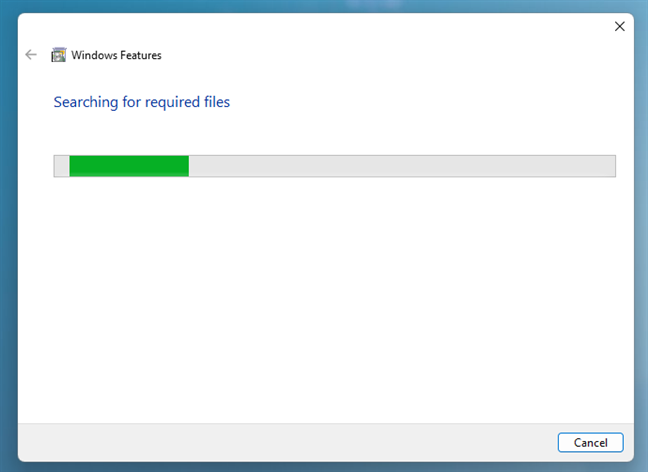
Windows is searching for the required files
You then have to wait while the changes you requested are being applied.

Wait for Windows to apply the changes
After removing certain features, Windows may inform you that it needs to restart your computer or device to apply the requested changes. Press Restart now and wait for the reboot to be performed. Keep in mind that this restart takes longer than usual because Windows needs to spend additional time configuring itself according to your instructions.
Restart your Windows PC to apply the changes
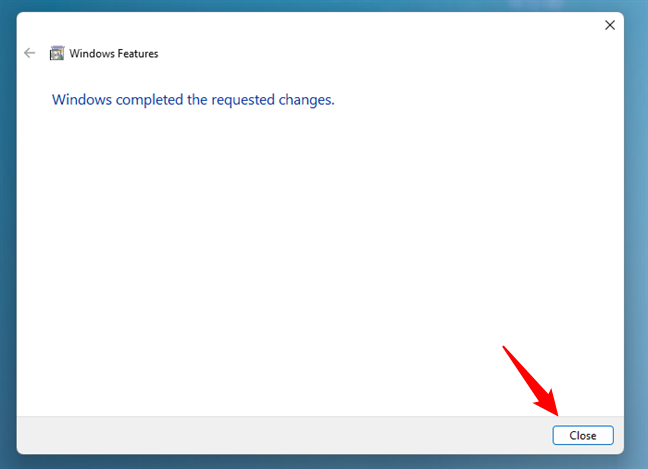
Other components may be removed without a system restart. If that is the case for the features you chose to get rid of, you are informed that “Windows completed the requested changes.” Click or tap Close, and you are done.

Press Close to exit Windows Features
TIP: If you are interested in purging your Windows computer or device of more unnecessary software, you can also read: Windows 11 and Windows 10 bloatware list (2022 update).
What Windows features or components did you add or remove?
We at Digital Citizen use certain optional features that are not installed by default in either Windows 11 or Windows 10. For example, Windows Sandbox and the Windows Subsystem for Linux. That’s why we add them to almost all our computers. On the other hand, there are features that we don’t usually need, like Internet Explorer, which we uninstall. What about you? What Windows components did you add or remove from your system? Let us know in the comments section below.
The deployment of multiple Windows ISO images becomes easier if you have a custom ISO image with all the changes you want to do after installing Windows.. You no longer need to deploy your ISO images beforehand and then make the necessary changes on each device, since the ISO images can be edited directly.
This article explains how you can add and remove Windows components before performing a fresh installation of Windows with that ISO image. It’s especially helpful for IT administrators who frequently upgrade their systems and software.
We had previously discussed slipstreaming in one of our posts. Slipstreaming is a process to integrate update packages released by Microsoft to existing ISO images so that one does not need to download an entire ISO package again, and simply update their existing one and use it for deployment.
Whereas the MSMG Toolkit that we are going to be using here is used to customize the existing packages and components within an ISO image or to add more standalone components.
Let’s talk about the MSMG Toolkit in more detail and its benefits.
Table of Contents
What is MSMG Toolkit
MSMG Toolkit is a command-line utility used to manipulate ISO, WIM, and ESD image files in all sorts of ways. It can be used for conversion, adding and removing components, creating bootable devices, etc. Today, we are going to be using this handy utility to add and remove Windows components so it becomes lightweight and bloat-free.

The MSMG Toolkit does not require you to learn any extra or complicated cmdlets. Rather, it is a system based on actions and their corresponding numbers. For example, simply select a number alongside the actions mentioned in the main menu in the image above. For example, if I want to select a source, I shall enter 1 and press Enter.
There are several advantages of using MSMG Toolkit, especially for those that regularly need to install OS on a number of devices. First, the changes made to the image will be replicated across all devices the image is used on. Thus, you will no longer be required to perform the same actions after deploying the image on each individual machine, saving both time and additional unnecessary effort.
You are also saving space on the system partition by removing bloatware (components that are not required) and simultaneously upgrading the ISO image by integrating additional add-ons such as feature packs, Windows updates, drivers, etc.
Having said that, in comparison, there is no downside to using MSMG Toolkit, except for the fact that you may require to spend some time performing the task of adding and removing components. But in reality, you will be saving it by not performing the same tasks on each device you deploy the image on.
Now let us discuss each item on the menu and what its function is. At this point, we would like you to understand that not only one item from the menu needs to be accessed to perform a task.
For example, if we wish to optimize an ISO image, we first need to select the source (1), integrate (2) or remove (3) components, or maybe both. We must apply (5) the changes and then save the customized image to a target (6) location. Thus, most of the menus need to be accessed one after the other.
Source

From the Source menu, you need to select the image you want to work on. For that, the image or its extracted content needs to be pasted/moved to a dedicated folder. This will be discussed in detail further down the article while performing the task.
Integrate

You can integrate content into the image from the Integrate menu, as you can see in the image above. Each type of component first needs to be moved to its dedicated and respective location first, which will be discussed further down the article.
Remove

From the Remove menu, you can remove existing components from the image, such as Windows components and Windows applications.
Customize

From the Customize menu, you can enable or disable Windows features as well as import or export system registries and other settings. This way, you can pre-enabled or remove the settings that are not required by the end-user.
Apply

Once all of the customizations and changes are made, it is now time to apply the changes to the new image through the Apply menu. This will save any changes made and dismount the image.
Target

The Target menu is from where you can create an ISO image or a bootable device using the new customizations.
Tools

The Tools menu can be used to customize the MSMG CLI itself or customize the new image that has been created, such as change its name, convert it, or merge it with another image, etc.
Now that you understand what each of the menus within MSMG Toolkit is for, let’s proceed to adding and removing Windows components.
How to add or remove Windows components from ISO images using MSMG Toolkit
To begin, you must initially have an ISO image you wish to customize. If you do not have one, refer to this guide to download any version of Windows 10.
Note: We strongly suggest that you create a system restore point before proceeding further as any incorrect manipulation could turn fatal for your own device’s OS.
Now follow the steps below to customize your ISO image as per your requirement.
Selecting the source
You must first select the source, which is the ISO image that you want to manipulate. Follow the steps below to initialize the process:
- Download the MSMG Toolkit by clicking here.
- Once downloaded, extract the zip file from any location of your preference. Ensure that the drive has ample extra space.
- Now copy the ISO image you want to manipulate and paste it into the ISO folder in the extracted MSMG Toolkit.
- Once pasted, run the MSMG Toolkit by double-clicking Start.cmd.
- When it runs, you will encounter a screen like the one below with the End User License Agreement (EULA). Press “A” on your keyboard to accept it.

- The toolkit will then automatically set some environment path variables. Press any key to continue.

- You will now be on the main menu. Press 1 and select Source.
- Now press 3 to extract the ISO image from the ISO folder and into the DVD folder.

- In the next window, enter the exact name of the ISO image that you have pasted and want to manipulate and press Enter. This step may take a while. Once it is done, you will see a “Press any key to continue” prompt. Do so.

- You will now be back on the main menu. Enter 1 again to select Source, and then press 1 to Select Source from <DVD> Folder.

- If prompted with another page to “Select Source Images,” enter the corresponding number of the version of Windows you want to manipulate, as in the example below:

- You will now be asked whether you want to mount Windows Setup Boot Image and Windows Recovery Image. Enter Y twice to mount them both. The mounting process will now begin and this step may take a few minutes to complete. If it is, press any key to continue.


You will now be back on the main menu. It is now time to proceed to manipulate the source using the guide provided for each element below.
Integrate components
Since there are several options in the Integrate menu, we will only be discussing one: Windows Updates. You can perform other operations using the same logic.
- From the main menu, enter 2 and go to Integrate menu.
- Now enter 4 and go to Windows Updates menu.
- You will now be prompted with a warning. Enter Y to proceed.

- You must now copy the updates into the Updates folder (in the complete correct path) within the extracted MSMG Toolkit folder. Below is an example of the complete correct path:
To download Windows updates, refer to Microsoft Update Catalog.
- Once copied, go back to the toolkit and enter 1 to select Integrate Windows Updates.
- As soon as you press 1, the toolkit will start integrating the update(s).

Once done, press any key to continue.


You can now continue to integrate other components as well if you require using the same process as above.
Remove components
Opposite to integrating components, you can also remove them. Follow the steps below:
- Enter 3 and select Remove from the main menu.
- On the next screen, press 1 to select “Remove Windows components.”

- Press 1 again to select “Select Windows Components.”
- On the next screen, select what you want to remove. We selected “(7) Windows apps.”
- A long list of components will now be listed. Enter the corresponding number for the component you wish to remove and press enter.

- Repeat the last step to select all the components you want to remove. The ones removed will be prefixed with the “-” instead of the “+” sign.
- When done, enter X and press enter to return to the previous menu. Keep pressing X until you reach the main menu.


This guide should help you remove any number of components from the image. It is important to note that they have not yet been deleted, but will be when you apply the changes, which will be done near the end of the process.
Customize ISO image
To customize the existing features in the image, follow the guide below. In this example, we will be making a few tweaks to the image.
- Press 4 to enter the Customize menu.
- Now press 8 to select Apply tweaks.

- In the next menu, press the associated alphabet to perform a system tweak.

- The toolkit will then apply the tweaks. Repeat the last step to make as many tweaks as required.
- When done, press X twice to go back to the main menu.


You have now successfully made the changes that were required. Remember that each sub-menu will have different options you can choose from, so choose wisely.
Apply changes
It is now time to apply all of the changes that you have made so far.
- Click 5 to select Apply.
- Now press 2 to save the changes made and apply them to the source image.
- You will then be asked if you want to clean up the image and wish to trim the OS editions that have not been selected. Press Y both times. The MSMG toolkit will then begin to save the changes. This step may take a few minutes.

- Once done, press any key to continue.

The changes have been applied and saved. However, there is still work to do. You must now create a new image from this customized image. For that, proceed to the next step.
Save to target
It is now time to create a new ISO image, or directly a bootable device of this new customized ISO image. We will be creating a simple ISO image in the example below.
- Press 6 to select Target from the main menu.
- Now press 1 to make an ISO image.

- You will now be asked for the details of the image you want to create. Fill them out as done in the image below:

- The toolkit will now begin creating the ISO image. This step may take a few minutes to complete. Once done, press any key to continue.


The new image created can be found in the same ISO folder where you had initially pasted the original ISO file in.
Closing words
MSMG Toolkit is a great utility to have, especially for system administrators. If you do not have a Windows Deployment Server (WDS) in your organization, this toolkit might be the next best thing for you.
You can use it to upgrade existing ISO images without having to download the latest ones and then deploy them with the required settings pre-configured.
Provide feedback
Saved searches
Use saved searches to filter your results more quickly
Sign up
No matter which version of Windows you use, there is a lot of features that are installed with the system by default, many of which you probably will never use. Disabling Windows features you don’t use can optimize your system, making it faster and saving precious hard disk space.
This article shows you how to enable and disable features in Windows 7/8/10, Vista, and XP.
Windows Vista, 7/8/10
To turn Windows features in Windows Vista to Windows 10 on or off, click Control Panel on the Start menu. You can also click on Start and then type in control panel.

Click the Programs link.
NOTE: If you are in Classic View, the link reads Programs and Features.
Under the Programs and Features heading, click the Turn Windows features on or off link.
NOTE: If you are in the Classic View, the Turn Windows features on or off link is on the left panel.

The Windows Features dialog box displays with a “Please wait…” message, while the features list is loaded.

When the list of features displays, you can move your mouse over one of the features and view a description of that feature.

For each feature you want to turn off, select the check box to the left of the feature so there is NO check mark in the box. For example, since we are not using a Tablet PC, we decided to turn off the Tablet PC Components feature, along with some other features we don’t use. Once you have made your changes, click OK to close the Windows Features dialog box.

A dialog box displays showing the progress of the changes being made to your Windows system.
You must restart your computer for the changes to be completed. Click Restart Now if you are ready to restart the computer now. If you want to wait to restart the computer, click Restart Later.
While the computer is shutting down and again while it is starting up, the following message displays. Be sure you don’t shut off the computer while the features are being configured.

To turn Windows features in Windows XP, click Control Panel on the Start menu.

Click the Add or Remove Programs link (or the icon in Classic View) on the Control Panel window.

On the Add or Remove Programs dialog box, click Add/Remove Windows Components in the left panel.
A dialog box displays asking you to wait while the list of Windows features is generated.
The Windows Components Wizard displays with a list of Components. If the check box to the left of a component has a gray background, there are sub-components within that component. Click Details to view the components under that main component.

For example, the following dialog box shows the components available under the Network Services main component. You can turn on or off any of these components and click OK to accept your changes and return to the Windows Components Wizard.

For each feature you want to turn off, select the check box to the left of the feature so there is NO check mark in the box. For example, we are not using MSN Explorer or Outlook Express, in addition to some other features. Once you have made your changes, click Next.

The Configuring Components screen displays the progress of the changes being made to your system.

When the changes have been made, the Completing the Windows Components Wizard dialog box displays. Click Finish.

You must restart your computer for the changes to be completed. Click Yes if you are ready to restart the computer now. If you want to wait to restart the computer, click No.

You can turn on any of the Windows features again, if desired, simply by following these procedures and selecting the check boxes for features you want so there is a check mark in each check box. Enjoy!
Related Posts
- How to Use Event Viewer to Troubleshoot Windows Problems
- How to Boot into Safe Mode in All Versions of Windows
- How to Reset Your Computer Password If You Lock Yourself Out
- 14 Command Prompt (CMD) Commands Windows Users Should Know
- Change from Public to Private Network in Windows