
Не все системные компоненты и даже не все стандартные программы включены в последних версиях Windows по умолчанию: для работы некоторых из них требуется установка со стороны пользователя. Это могут быть «Беспроводный дисплей», Песочница, виртуальные машины Hyper-V, .NET Framework или Telnet, Подсистема Windows для Linux, а в некоторых случаях даже такие программы как «Блокнот», которые тоже теперь относятся к опциональным компонентам.
В этой инструкции для начинающих о том, как установить дополнительные, не установленные по умолчанию, компоненты Windows 11 и Windows 10 — сейчас это выполняется сразу в двух расположениях системы.
- Установка компонентов в панели управления
- Дополнительные компоненты в Параметрах
- Установка в командной строке
Установка компонентов в панели управления
В Windows 11 и последних версиях Windows 10 установка дополнительных компонентов возможна сразу в двух расположениях: через панель управления и в параметрах. При этом компоненты в этих двух расположениях не дублируют друг друга. Сначала об установке компонентов в «Панель управления».
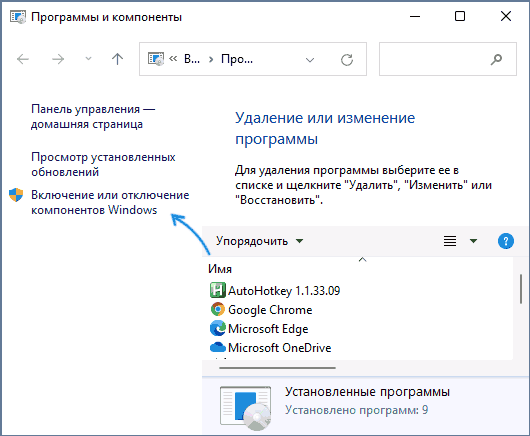
- Зайдите в Панель управления (можно использовать поиск в панели задач) и откройте пункт «Программы и компоненты». Второй путь попасть в нужное окно — нажать клавиши Win+R на клавиатуре, ввести appwiz.cpl и нажать Enter.
- В открывшемся окне слева нажмите «Включение или отключение компонентов Windows».

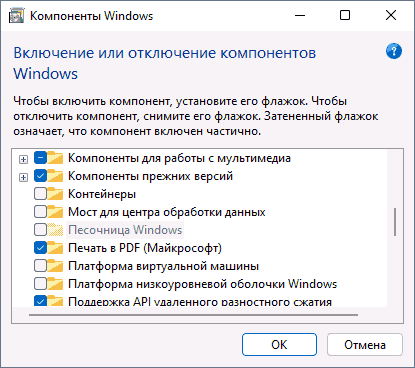
- Отметьте компоненты, которые требуется установить и нажмите «Ок».

- Дождитесь завершения установки, а при запросе на перезагрузку компьютера, выполните перезагрузку.
На этом установка требуемых компонентов будет завершена, и они должны исправно работать.
При необходимости удаления установленных описанным методом компонентов, зайдите в то же окно, снимите отметку с соответствующего компонента и нажмите «Ок»: будет выполнено удаление, для некоторых пунктов — с необходимостью последующей перезагрузки.
Как установить дополнительные компоненты в параметрах
Второе расположение, где выполняется установка дополнительных компонентов в последних версий Windows — «Параметры». Как было отмечено ранее, в списке доступных к установке элементов присутствует отличающийся от «панели управления» набор.
Установка дополнительных компонентов в Параметрах приложений Windows 11
В Windows 11 для установки дополнительных компонентов через Параметры выполните следующие шаги:
- Откройте Параметры (можно нажать клавиши Win+I) и перейдите в раздел «Приложения».
- Откройте пункт «Дополнительные компоненты». Обновление: в Windows 11 24H2 пункт «Дополнительные компоненты» находится в разделе «Система».

- В разделе «Добавление дополнительного компонента» нажмите «Посмотреть функции».

- Отметьте дополнительные компоненты, которые требуется установить и нажмите «Далее».
- Нажмите кнопку «Установить» и дождитесь завершения установки.


Опциональные компоненты в параметрах Windows 10
В Windows 10 все действия очень похожи, присутствуют лишь незначительные отличия в пути к нужным разделам параметров:
- Откройте Параметры и перейдите в раздел «Приложения».
- В пункте «Приложения и возможности» нажмите по ссылке «Дополнительные компоненты».

- Вверху следующего окна нажмите «Добавить компонент».

- Отметьте дополнительные компоненты, которые нужно установить и запустите установку кнопкой внизу окна выбора.


Установка компонентов в командной строке
Существует возможность установки дополнительных компонентов с помощью командной строке и команд Dism.exe. Получить список доступных в вашей версии Windows компонентов и их статус можно командой Dism /online /Get-Features
Последующая установка выполняется в командной строке, запущенной от имени администратора командой вида:
Dism /online /Enable-Feature /FeatureName:ИМЯ_функции /All
Более подробно об управлении дополнительными компонентами с помощью Dism можно прочитать в официальной справке на сайте Майкрософт.
Sometimes, you might find that your computer has some features you don’t really need, or maybe you’re missing something that could make your life a bit easier. No worries, I’ve got you covered! In this tutorial, I’ll walk you through the simple steps to add or remove optional features in Windows. First, I’ll show you how to enable optional features in Windows 10 and how to turn off the ones you no longer need. Then, I’ll tell you how to access optional features in Windows 11, how to add new ones, and how to uninstall the ones you don’t want. Without further ado, let’s begin:
What do Optional features mean?
Both Windows 11 and Windows 10 are complex operating systems with many built-in components. However, there are some features and tools that aren’t installed by default but can be added by the user. These are called Optional features, and you can choose whether you want them or not. While they’re not essential for the basic operation of the operating system, they provide new functions and can be useful for specific tasks or preferences. Some allow you to use legacy programs, and others are required by certain apps to run as expected. Now that you know what Optional features mean, let’s see how to change optional features in Windows 11 and Windows 10:
How to add optional features to Windows 10
To add an optional feature to Windows 10, first, open the Settings app (Windows + I). In Settings, click or tap System.
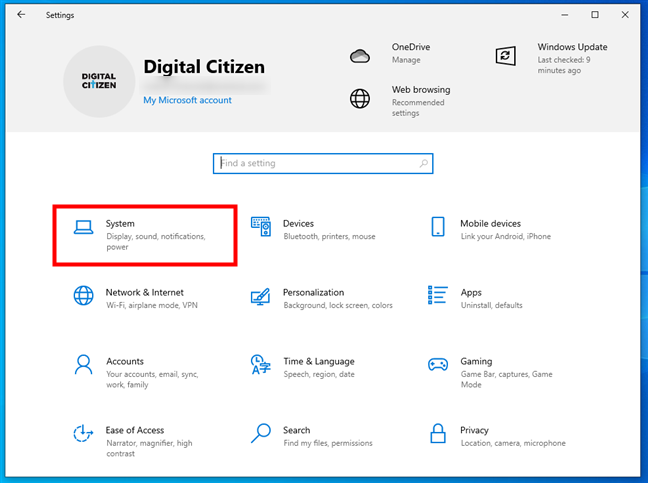
System in Windows 10’s Settings
Now, select Optional features in the left sidebar.
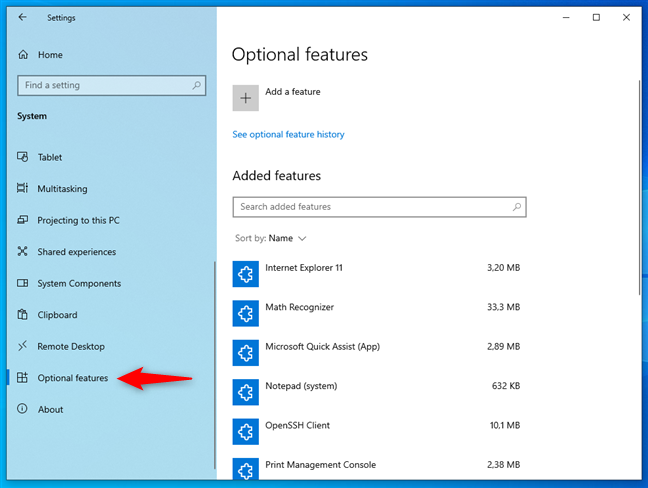
Select Optional features in the left sidebar
On the right side of the Settings window, you’ll now see the Optional features page. There, click or tap the Add a feature button at the top.

Add a feature to Windows 10
Windows 10 lists all the optional features available to install. The easiest way to find the one you want is to use the search at the top of the list.
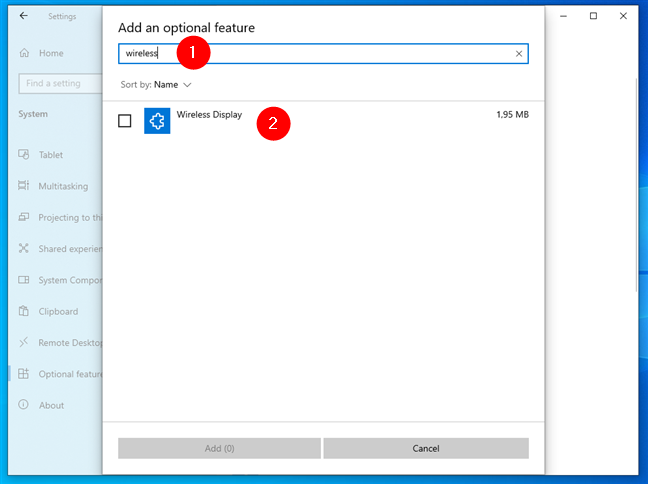
Searching for an optional feature
TIP: To learn more about the Wireless Display optional feature in the previous screenshot, check out this guide: How to use your Windows PC as a wireless display.
Alternatively, you can scroll through the list to find the optional feature you need.
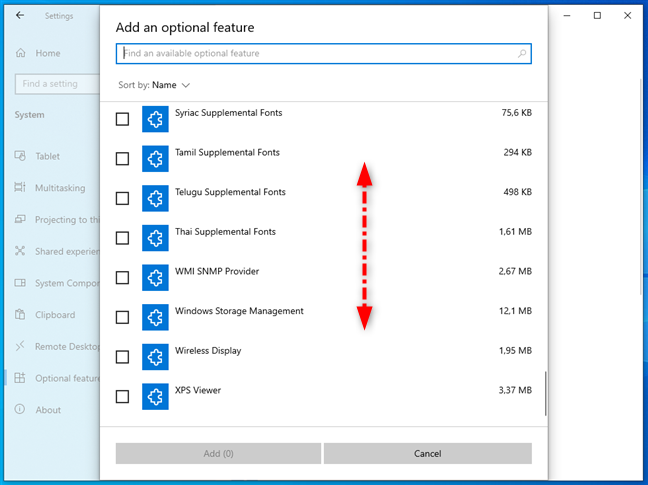
Scroll the list of optional features
If you’d like to learn more about an optional feature, click or tap its name, and Windows 10 will display a short description of it.
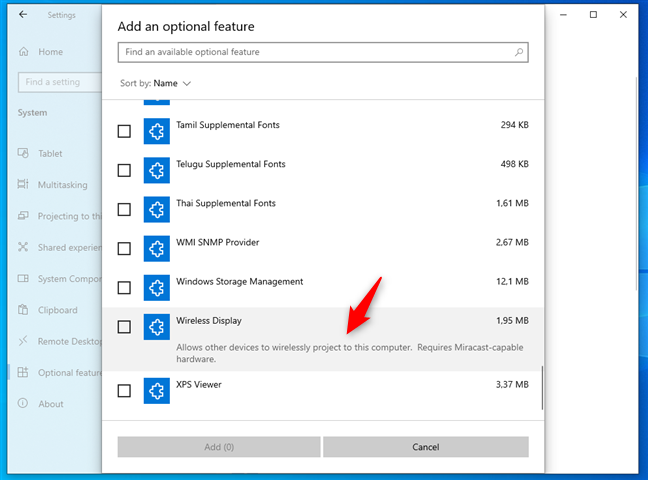
Click or tap on an optional feature to get quick info
After you’ve decided you want a certain feature, click or tap the checkbox next to it to select it. Note that you can also select multiple optional features at the same time.

Select an optional feature to install
Once you’ve checked all the optional features you want to add to Windows 10, click or tap the Add button at the end of the list.
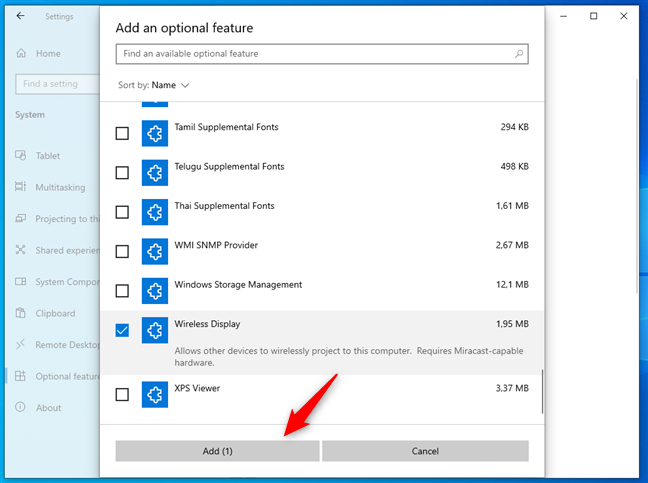
Installing optional features in Windows 10
Now all you have to do is wait for Windows 10 to install all the selected optional features.
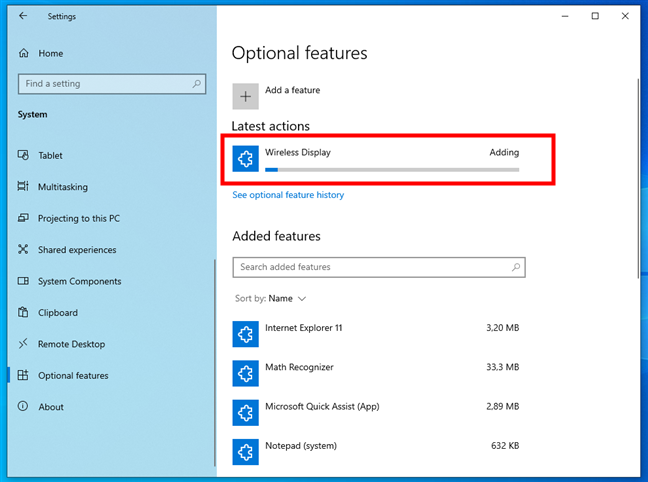
The optional feature is installing
When this is done, the Latest actions section from the Optional features page will show the Added status next to the optional feature you’ve selected.
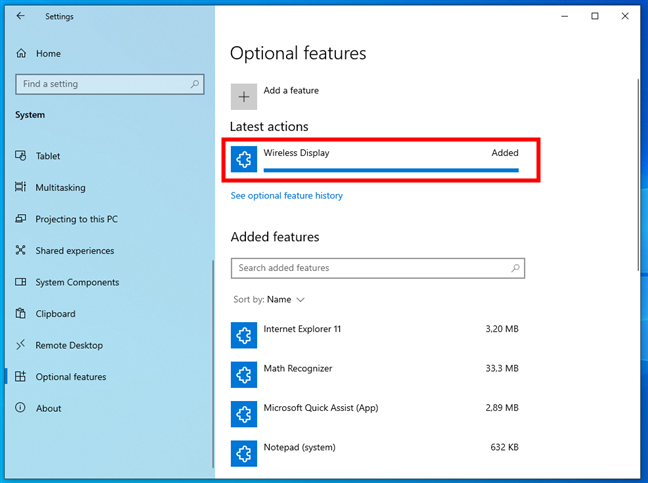
The optional feature was added to Windows 10
You can now start using the new optional feature(s) you installed. But what if you want to turn off optional features in Windows 10? Read on to see how to do that too:
TIP: There are even more features available to install in Windows than just the ones shown in the Optional features list. But you can only get them via the Control Panel. Here’s what they are and how to install or remove those other features and system components.
How to remove optional features from Windows 10
To remove optional features from your Windows 10 PC, the first steps are the same as the ones for installing them. Launch Settings, head to System > Optional features, and take a look at the Added features section on the right.
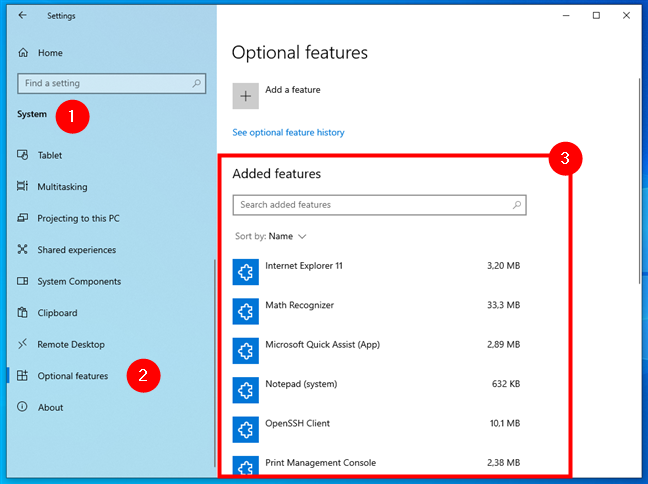
The list of optional features added to Windows 10
Use the Search added features field at the top to locate the feature you want to remove, or scroll through the list of installed features to find it. When you identify the optional feature, click or tap it to expand its options.
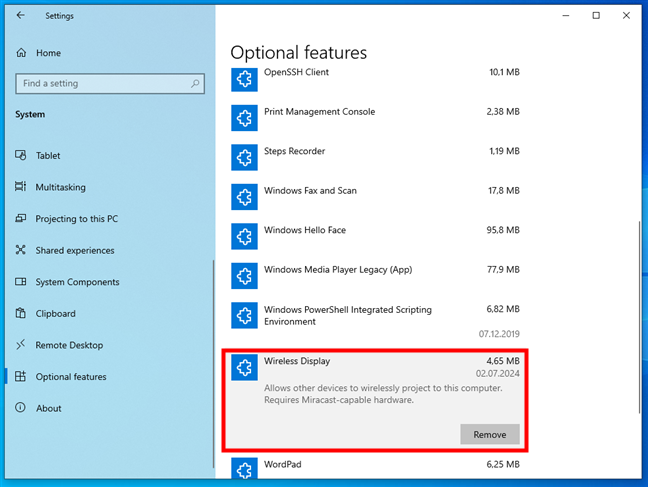
Expanding an optional feature’s entry
Click or tap the Remove button, and Windows 10 will immediately start uninstalling the optional feature from your system.
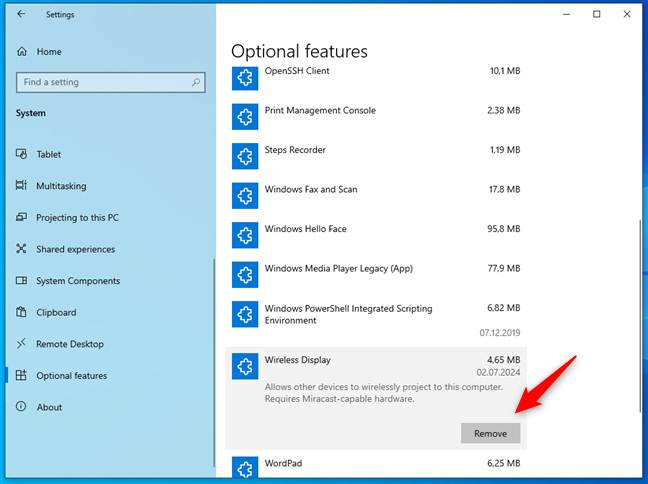
Remove an optional feature from Windows 10
When the process is over, the Latest actions section will notify you that the optional feature has been Removed.
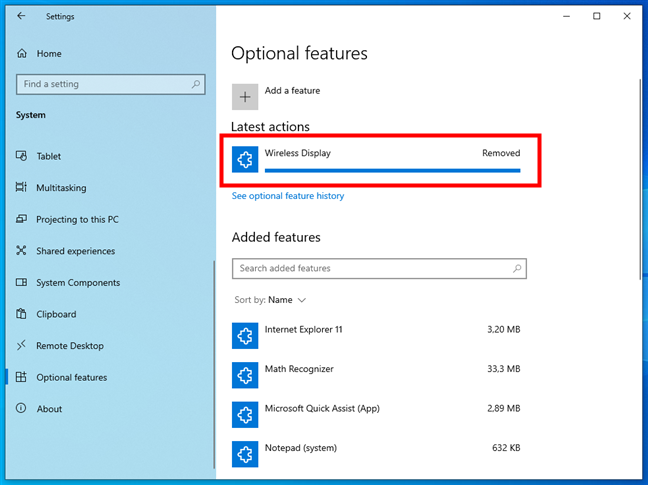
An optional feature is removed from Windows 10
That’s it! Repeat the process to remove all the optional features you don’t need on your Windows 10 computer.
How to add optional features to Windows 11
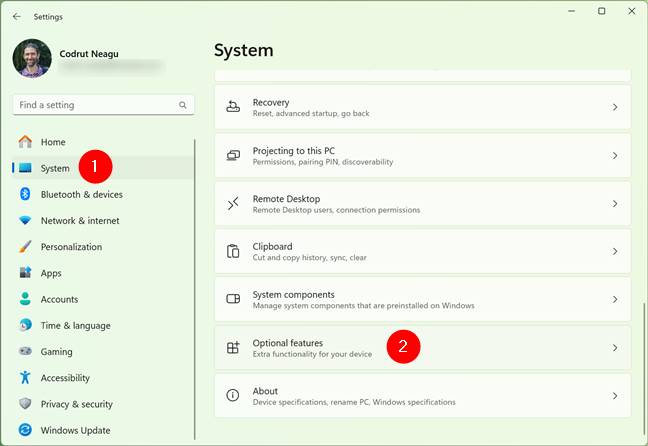
Windows 11 also has optional features and the first step to adding one is to open the Settings app (Windows + I). In Settings, select System in the left sidebar.
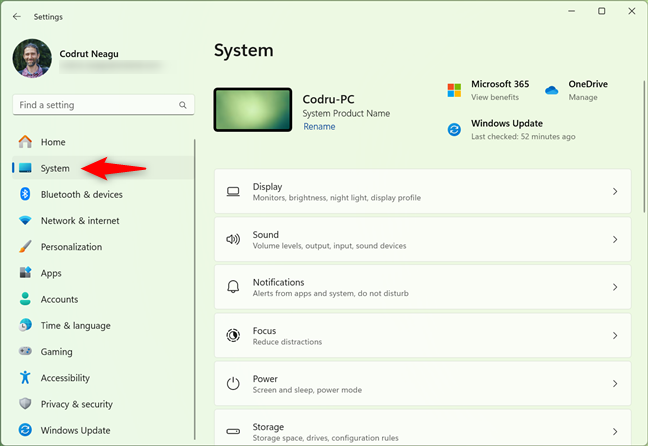
System in Windows 11’s Settings
On the right side of the window, locate the Optional features entry and click or tap it.
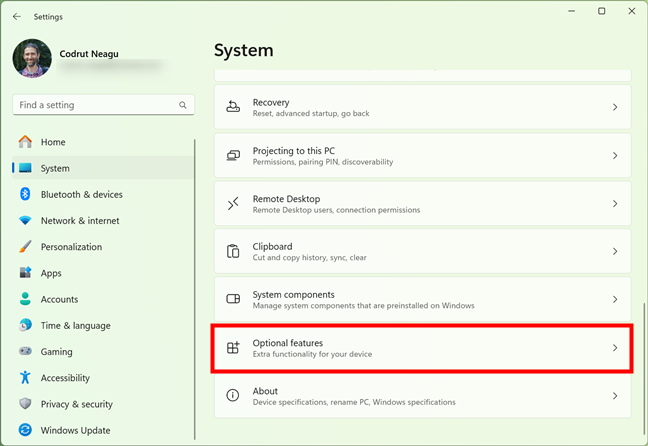
Where are the Optional features in Windows 11?
This opens the Optional features page. On it, click or tap the View features button next to Add an optional feature.
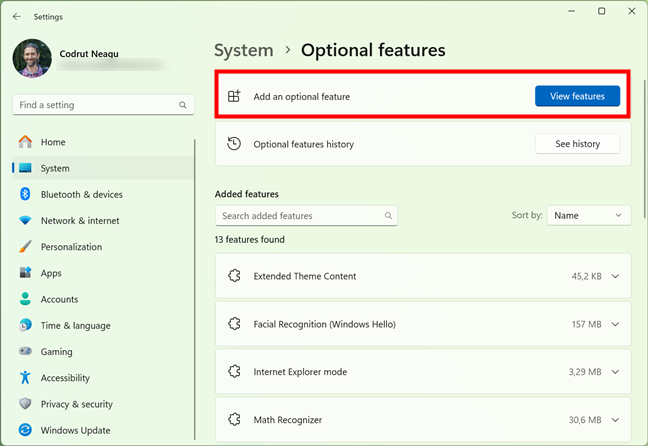
The View features button
Now, Windows loads the list of optional features. Use the search field at the top to find the one you want to install.
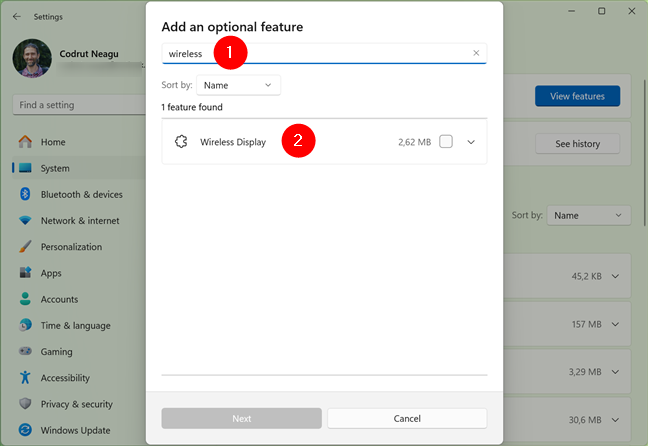
Search for an optional feature in Windows 11
Alternatively, scroll to explore the optional features available for your system.
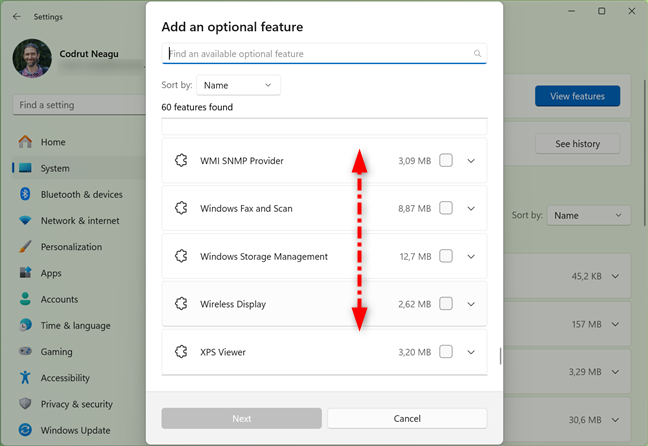
Browse the list of available optional features
If you’d like to see details about a certain feature, click or tap the small arrow button next to it.
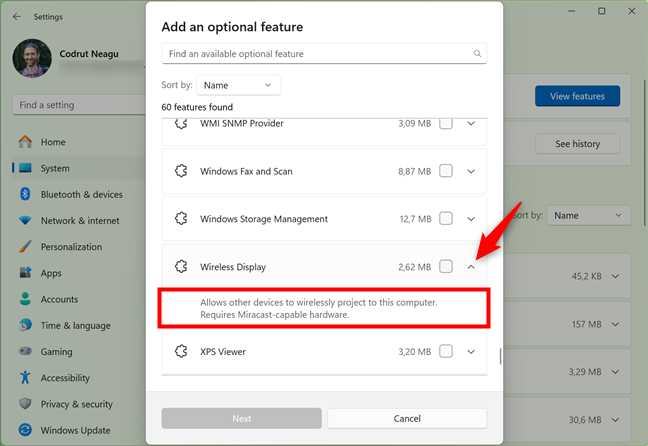
Discover details about an optional feature
Once you’ve found the optional feature you want, select it by clicking or tapping the checkbox next to it. If you want to add more than one feature, select all of them.
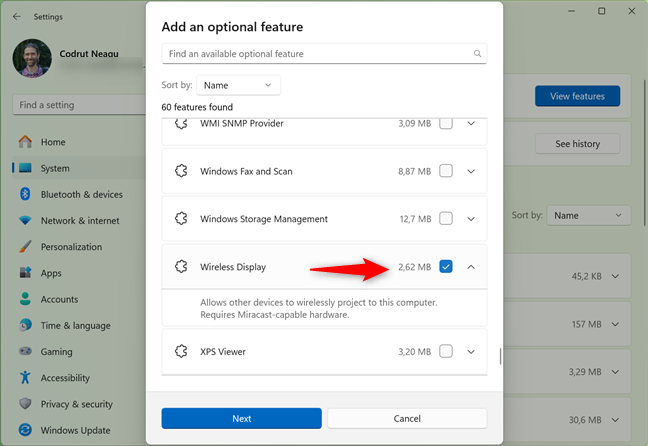
Select the optional features to install
After choosing the optional feature(s) to install, click or tap the Next button at the bottom of the list.
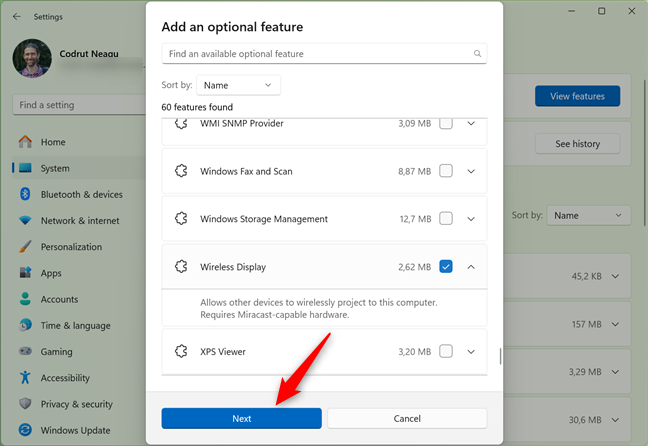
Press Next after selecting the optional feature(s) you want
Windows then shows you a summary of the optional features you’ve chosen to install. Click or tap Add to get them on your PC.
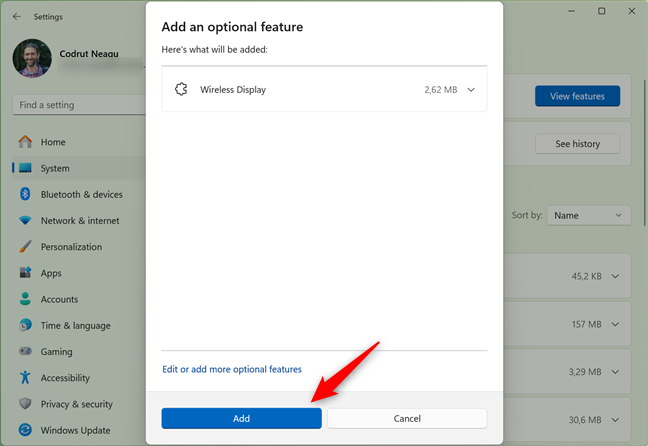
Install the selected optional features
Windows will then install all the optional features you’ve selected. You can see the progress in the Recent actions section of the Optional features page in Settings.
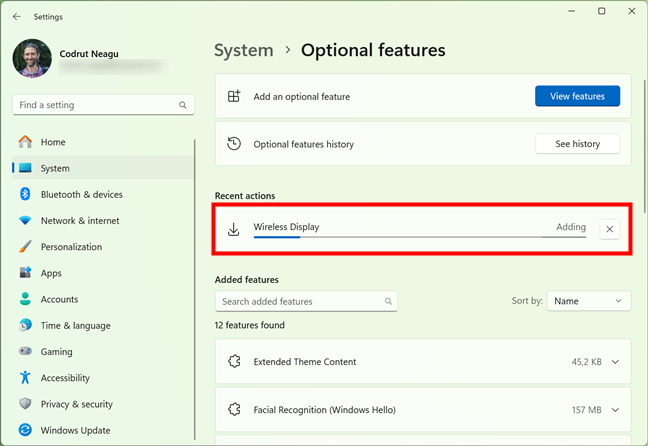
Windows 11 is adding an optional feature
When this is done, the status changes to Added. That means the optional feature(s) selected have been enabled in Windows 11.
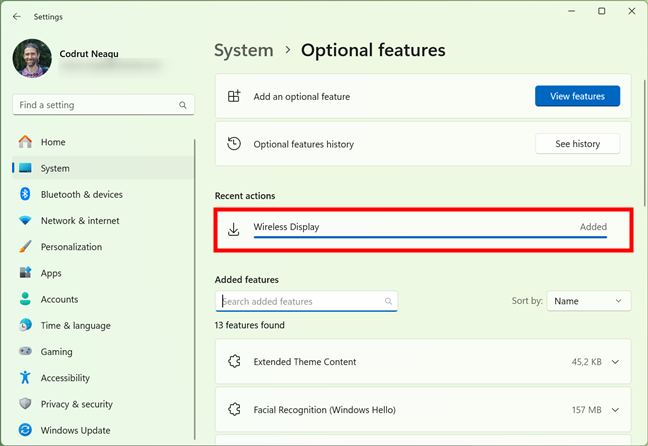
An optional feature has been added to Windows 11
You can now start using the new optional features you’ve added on your Windows 11 PC.
How to remove optional features from Windows 11
To uninstall one or more optional features from your Windows 11 PC, take the same initial steps. Open Settings (Windows + I), select System, and click or tap Optional features.
Optional features in Windows 11
Then, on the Optional features page, head to the Added features section.
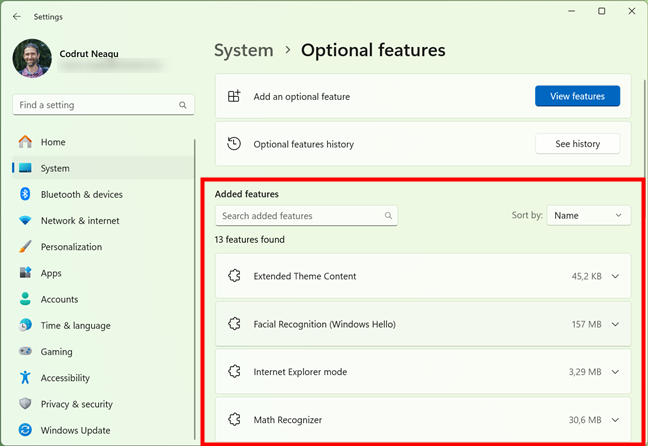
The list of optional features in Windows 11
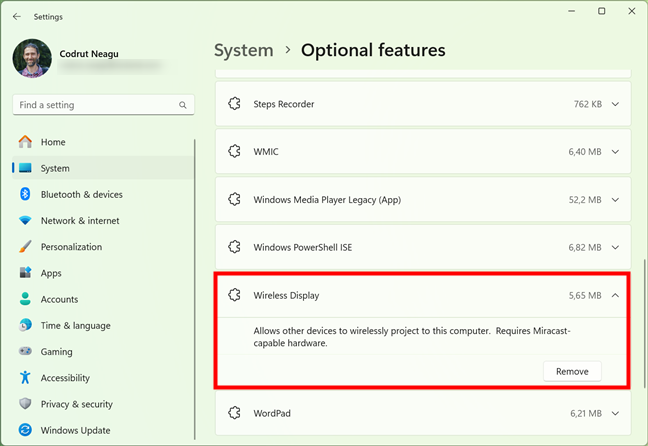
Type the name of the feature you want to uninstall (or part of its name) in the search field at the top of the list. Alternatively, browse the list to find the feature you want to remove. When you’ve located it, click or tap the optional feature to expand it.
Expanding an optional feature’s entry
Press the Remove button and wait for Windows to turn off that optional feature.
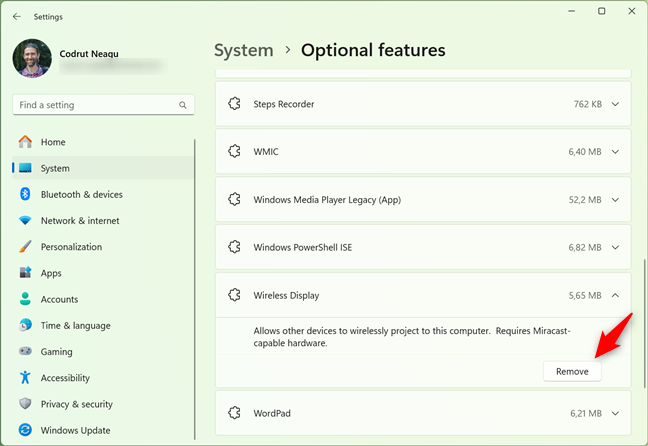
Uninstall an optional feature
You’ll then be brought back to the Optional features page in Settings. There, you can see the progress of the removal process under Recent actions. After a minute or two, the optional feature will be gone from your PC.
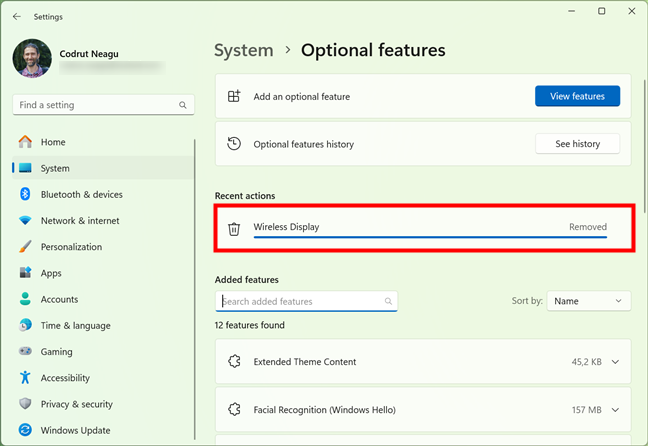
An optional feature has been removed from Windows 11
That’s it!
What optional Windows features did you install?
As you’ve seen, adding optional features to your Windows 10 or Windows 11 computer is easy. Just a few clicks or taps, and you can add new features or remove the ones you don’t need anymore. Which optional features did you install? And which ones did you decide to turn off? I’m curious, so if you don’t mind, let me know in the comments below.
Skip to content
Windows 10 comes with a number of features which are not enabled by default. For example, you can the SMB1 Sharing protocol manually if you really need it. Or, you can remove the XPS Viewer app if you find no use for it. These tasks can be done by managing Optional Features. In this article, we will see how to add or remove Optional features in Windows 10.
Note: The XPS Viewer is no longer installed by default if you install Windows 10 version 1803 from scratch (clean install). If you are using this Windows feature, you need to install it manually.
You can add or remove optional Windows features with Settings, DISM, PowerShell, or by using the appropriate classic Control Panel applet. Let’s review these methods.
To manage optional features in Windows 10, do the following.
- Open the Settings app.
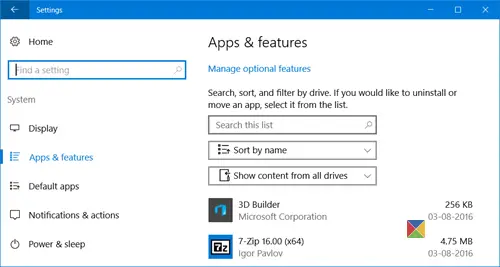
- Go to Apps > Apps & features.

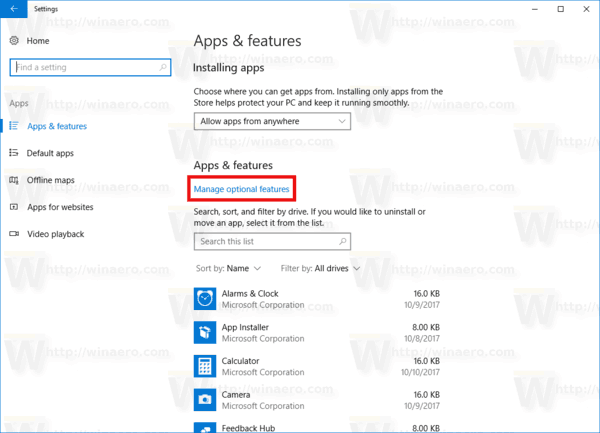
- On the right, click on the link Manage optional features.
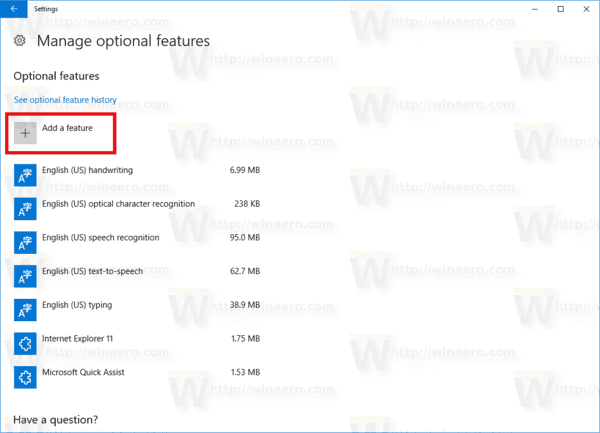
- Click on the button Add a feature at the top of the next page.
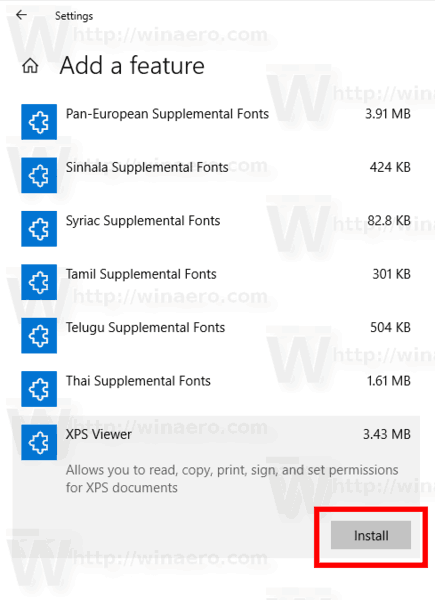
- Find the optional feature you need to install, e.g. XPS Viewer, in the list under Add a feature.
- Select it and click on the Install button.

- To remove an optional feature, select it in the list of the installed feature, and click on the Uninstall button.


Manage optional features using DISM
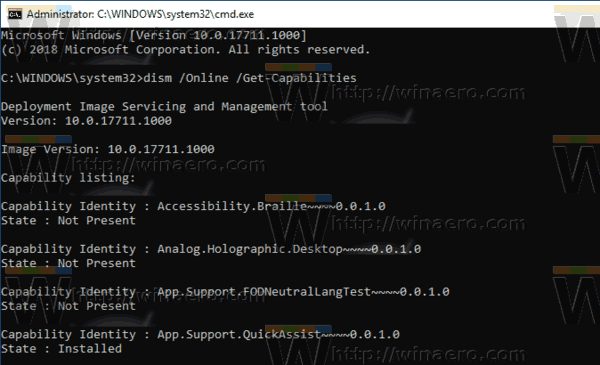
- Open an elevated command prompt.
- Type the following command:
dism /Online /Get-Capabilities.
- Make note of the name of the feature you want to add or remove.
- To add a feature, type
dism /Online /Add-Capability /CapabilityName:<feature name>, e.g.dism /Online /Add-Capability /CapabilityName:XPS.Viewer~~~~0.0.1.0.
- To Remove an optional feature, execute the command
dism /Online /Remove-Capability /CapabilityName:<feature name>, e.g.dism /Online /Remove-Capability /CapabilityName:XPS.Viewer~~~~0.0.1.0.

Manage Optional Features with PowerShell
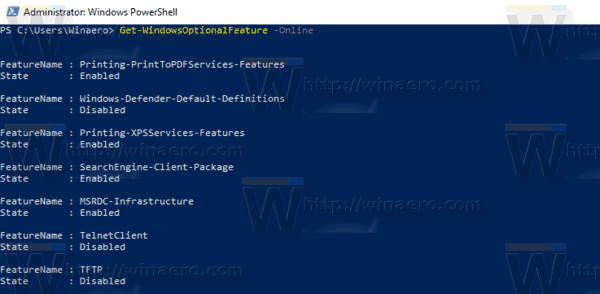
- Open PowerShell as Administrator.Tip: You can add «Open PowerShell As Administrator» context menu.
- Type or copy-paste the following command:
Get-WindowsOptionalFeature -Online.
- Make note of the name of the feature you want to add or remove.
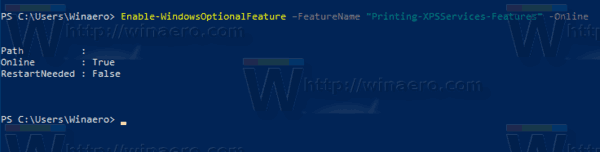
- To add an optional feature, run the command
Enable-WindowsOptionalFeature –FeatureName "name" -All -Online.
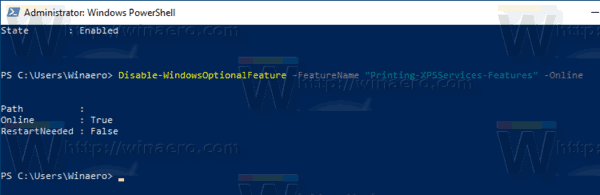
- To remove an optional feature, execute the command:
Disable-WindowsOptionalFeature –FeatureName "name" -Online.
- If prompted to restart the computer to apply, type Y, and hit the Enter key.
Finally, you can use the good old Control Panel applet.
Manage optional features using the Windows Features applet.
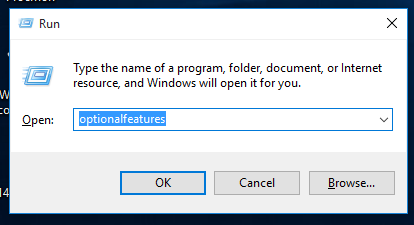
- Press the Win + R keys to open Run and type
optionalfeatures.exeinto the Run box.
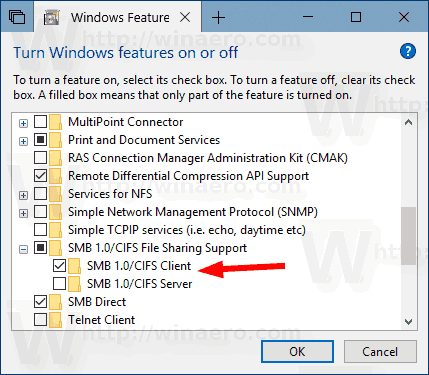
- Find the desired feature in the list and check the box to enable it.

- Unckeck the desired feature to remove it.
That’s it.
Support us
Winaero greatly relies on your support. You can help the site keep bringing you interesting and useful content and software by using these options:
If you like this article, please share it using the buttons below. It won’t take a lot from you, but it will help us grow. Thanks for your support!
The Windows operating system offers several additional features that most of us may not need. But they are there if you need them! In this post, we will see how to Turn Windows features On or Off via the Control Panel, and how to add, remove or manage some Optional Features using Windows 11/10 Settings. PowerShell and Command Prompt methods have also been discussed here.
While the default installation is good for most of us, there may be some features that IT Pro’s, System Administrators or Developers may need. Windows allows you to install and activate such features. You can turn some features on or off using the Control Panel, or you may need to use the Settings app in Windows 11/10 if you need to add some optional features.
What are Optional features?
As the name implies, Windows Optional features are the features that may or may not be required by Windows users. Windows OS has an option to add or remove these features. We have already explained the process to manage Optional features in Windows 11/10 in this article.
How do I add or remove Windows features?
The option to add or remove Windows features is available in the Control Panel or Windows Settings. We have described the process to install Windows features on Windows 11/10 computers above in this post. You can do it in 5 ways.
1] Turn Windows features On or Off using Control Panel
The steps to turn Windows features on or off via Control Panel are the same for both Windows 11 and Windows 10 computers. Hence, it does not matter whether you are a Windows 11 or Windows 10 user, the procedure that we have explained below implies to both of these operating systems.
From the Start Menu, open the Control Panel and click on the Programs and Features applet.

Here on the left side, you will see a link – Turn Windows features on or off. Click on it to open the following panel.
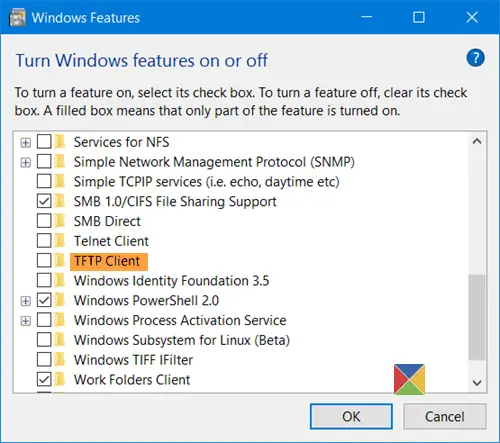
Here you will see the features that are available to you. You may expand a feature by clicking on the ‘+’ sign and select only those features you want to enable. Once you select the feature you want to turn on or deselect one which you want to turn off, click on OK. Windows will start applying the changes and ask you to restart your computer if need be.

On a Windows Pro PC, you will see the following features that you can enable or disable at will.
- .NET Framework 3.5
- .NET Framework 4.6 Advanced Services
- Active Directory Lightweight Services
- Containers
- Data Center Bridging
- Device Lockdown
- Hyper-V
- Internet Explorer 11
- Internet Information Services
- Internet Information Services Hostable Web Core
- Legacy Components like DirectPlay
- Media Features
- Microsoft Message Que Server
- Microsoft Print to PDF
- MultiPoint Connector
- Print and Document Services
- RAS Connection Manager Administration Kit
- Remote Differential Compression API Support
- RIP Listener
- Services for NFS
- Simple Network Management Protocol
- Simple TCPIP services
- SMB 1.0/CIFS Sharing Support
- SMB Direct
- Telnet Client
- TFTP Client
- Windows Identity Foundation 3.5
- Windows PowerShell 2.0
- Windows Process Activation Service
- Windows Subsystem for Linux
- Windows TIFF IFilter
- Work Folders Client
- XPS Services
- XPS Viewer.
See this post if your Turn Windows Features on or off is blank or empty.
2] Manage Optional features via Windows Settings
Windows 11
Windows 11 users have to go through the procedure explained below to manage optional features via Settings.
- Launch Windows 11 Settings app.
- Go to “Apps > Optional features.”
- Install or Optional features as per your requirements.
Let’s discuss these steps in detail.
1] Press Win + I keys to launch the Settings app.
2] In the Settings app, select Apps from the left pane. Now, click on the Optional features tab on the right side.

3] After that, Windows will show you a list of all the optional features installed on your system. If you do not want any of these features, you can uninstall them. For this, click on the down arrow next to the feature that you want to remove and then click on the Uninstall button. Don’t worry you can install the uninstalled feature anytime via the Add an optional feature option.

You have to wait till Windows uninstalls that feature.
4] Now, let’s see how you can install an Optional feature in Windows 11. Microsoft has made some features optional in Windows operating system, as they may or may not be required by the users. Notepad and Wordpad are among the optional features in Windows 11/10. This is the reason why some users have found Notepad or Wordpad missing from their computers.

To install an Optional feature in Windows 11, launch the Settings app and go to “Apps > Optional features.” Now, click on the View features button on the top right side. After that, Windows will show you the list of all the available features that are available for installation on your computer. Now, select a feature from the list and click Next. After that, click Install.

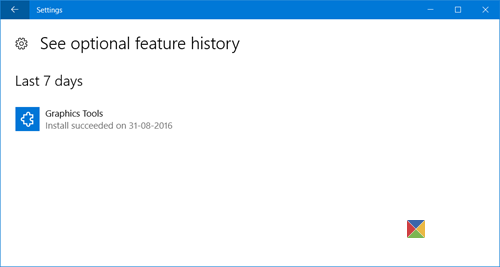
You can also view Optional feature history by clicking on the View history button.
Windows 10
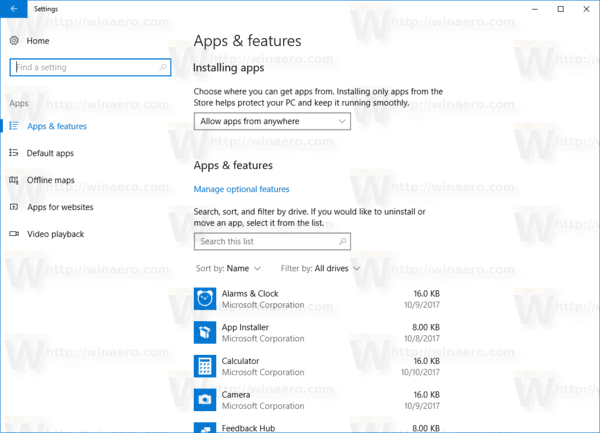
Windows 10 lets you add, remove or manage optional features via its Settings. To access this part, from the WinX Menu, open Settings > System and select Apps & features from the left side.
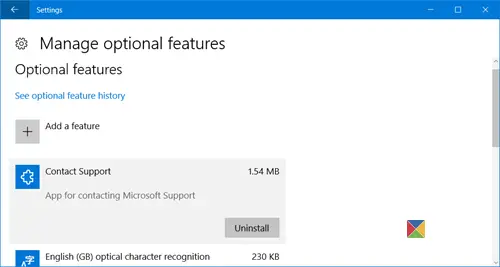
Clicking on the Manage optional features link will open the following box for you.

To remove an app or a feature, select the feature and click on the Uninstall button.
To add a feature, click on the “+ Add a feature” link as shown above. The following window will open.
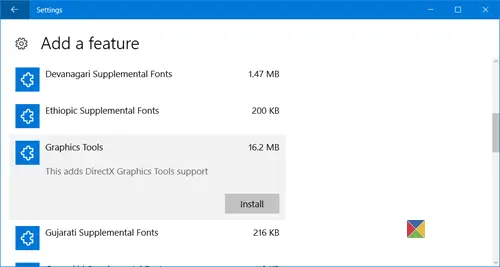
Here you can select the feature and click on the Install button.
Clicking on the See optional feature history will open the following panel, where you will be able to see a history of all the optional features that you added or removed.
In this way, you can install Graphics Tools, Windows Developer Mode, Fonts and several other optional features like it.
3] Enable or Disable Optional Windows Features using Powershell
Windows Powershell is indeed a very powerful tool. You can do a lot of things with this command line too. While using this, we will first populate the list of available features, then we will be downloading the desired feature, and finally, we will be talking about enabling and disabling that feature.
So first, to populate the list of features, enter this command,
Get-WindowsOptionalFeature -Online
After that, in order to install any feature from the list of features, enter this command:

Get-WindowsOptionalFeature -Online -FeatureName *Type feature name*
Then, to enable any downloaded feature, enter this command,
Enable-WindowsOptionalFeature -Online -FeatureName “Type feature name” -all
Finally, to disable any enabled feature, enter this command,
Disable-WindowsOptionalFeature -Online -FeatureName “Type feature name”
4] Turn On or Off Optional Windows Features using Command Prompt
Start by pressing WINKEY + X button combo or right-click on the Start button and click on Command Prompt (Admin) or just search for cmd in the Cortana search box, right click on the Command Prompt icon and click on Run as Administrator. Click on Yes for the UAC or User Account Control prompt that you get.
Now, type in the following command to populate the list of available features:
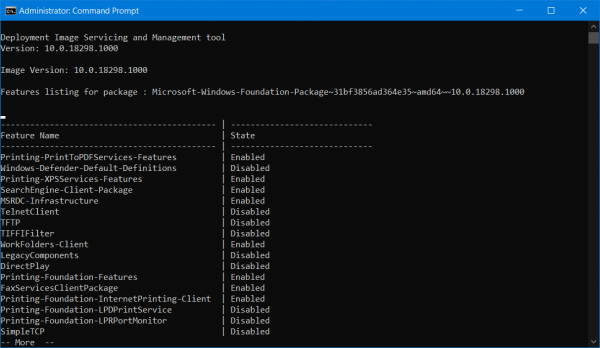
DISM /online /get-features /format:table | more
All you need to do now is copy the name of the feature that you need to enable.
Now, to enable the feature, enter the following command:

DISM /online /enable-feature /featurename:[Enter the name of the feature here] -All
Now, to disable any feature that is enabled on your computer, you need to follow some separate steps.
First, you need to check what all features are enabled. To populate a list of enabled features, enter this command,
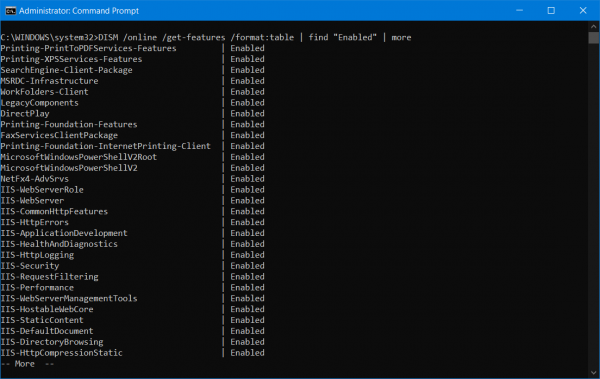
DISM /online /get-features /format:table | find “Enabled" | more
Now, to disable the Enabled feature, enter this command,
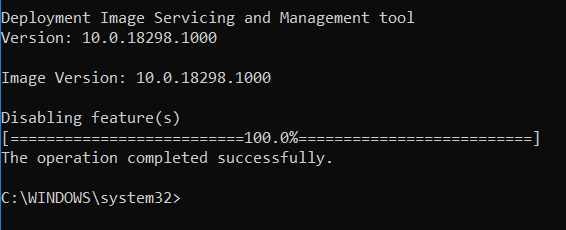
DISM /online /disable-feature /featurename:[Enter the name of the feature here] -All
As a bonus, if you wish to check information in detail about a specific feature, enter this command,
DISM /online /get-featureinfo/featurename:[Enter the name of the feature here]
5] Enable or Disable Optional Windows Features using an external installation source
You can also fetch the latest features from an updated offline source.
This source can be an ISO or any other type of image or just a folder.
For that, all you need to do is decide if you want to use the Command Prompt or Windows Powershell.
If you are using the Command Prompt, enter this command,
Dism.exe /online /enable-feature /featurename:< /All /Source:<Enter the path of the feature here>
And if you tend to use Windows Powershell command line, you can do it too. Just enter this command,
Install-WindowsFeature –Source “<Enter the path of the feature here>”
To get the latest features, you need to get the latest version of the image of the operating system that you are trying to install the feature from.
I hope this helps!
Related: Turn Windows features on or off stuck on Please wait.
Let’s see how to Add and Uninstall Optional Features in Windows 10 like apps, language packs, etc. Follow the underneath written steps along with screenshots to understand this article well.
Optional Features are some of the extra features which are available to your Windows 10 PC but are not installed. They might be script writing in different languages, typing of different languages like American, Albania, etc. or some J NET framework. You can access them quite easily on your PC. Earlier you use to get these applications from external sources but Windows 10 will let you install these features in the native environment. Here in the tips, we will focus on the steps which lead to Add and Uninstall Optional Features in Windows 10.
Related:
Windows 10 – How to Manage Default Apps Through Settings
How to Add and Uninstall Optional Features in Windows 10
Step 1: Go to the windows by clicking on the windows home screen. Start menu will appear on your desktop. Click on the Settings here. This will launch the Settings window of windows 10. A screenshot is shown below showing the paths to be followed with the help of arrows.
Step 2: Click on the system option as shown in the second slide. A new window will pop-up on your screen which is shown below. Scroll down and here you will find Apps and features option in the first slide (left panel). Clicking on Apps & features will open a new window which is shown in the second slide.
Step 3: Here in the apps and features section, you will find Manage Optional features link. This is the main section of this article and we will try to focus on and around this “optional features” throughout this article. This will let you Add and Uninstall Optional Features in Windows 10.
Step 4: Clicking on Manage optional features will open the Optional features section. Here, you can see a lot of features already provided to you. These are by default features installed on your PC on which you have no rights to delete. However, if you want, you can manage them a little bit.
Step 5: To add a new feature, all you need to do is to click on the + icon or press on Add a feature. A new window with Add A Feature heading pop-up. Note that you need to be connected to the internet to use this feature. If you don’t have the internet on your PC, then it will keep on browsing and at last will say there are no features available to you or Connect to the Internet.
Step 6: If you are connected to any network source, it will browse and show you some of the features which are available to you which is shown in the second slide of the above screenshot. All you need to do is click on them and then press the Install button which appears on its menu.
Step 7: If you install any feature on your PC and want to know about them i.e. keep a track of apps and features installed by you on your PC, go back to Step 4 i.e. to the optional features section. Here click on See optional feature history (shown in the first slide of the second screenshot). This will open up a new window which is shown below.
Step 8: The screenshot shown above consists of two slides. The second slide shows the optional feature history before the installation of any features on PC, however, the first slide shows the same after the installation of two features on PC. In this way, you can always get to know which features are running down into your system.
Step 9: If you want to uninstall any feature, just go back to Step 4 i.e. optional features section. All you need to do now is to select any feature which you want to uninstall by clicking on it. This will show you Uninstall button on the right side of selected app/ features. Just click it and it will be uninstalled from your PC. Note that, those features which came inbuilt with your PC will not allow you to uninstall them. If you select them, there will be a Manage option instead of Uninstall option. Click on Manage to see what you can do with them.
That’s it. If you have any query concerned to Add and Uninstall Optional Features in Windows 10 or any other bugs related to windows 10, tell us in the comment box below.