
On Windows 10, Credential Manager is the feature that stores your sign-in information for websites (using Microsoft Edge), apps, and networks (such as mapped drives or shared folders) when you check the option to save your credentials for future logins.
The Credential Manager feature isn’t new—it has been around for a long time. It allows you to securely store and manage your login credentials so you don’t have to constantly remember and re-enter your usernames and passwords. Usually, the system will automatically save your credentials when you check the option to remember your login information, but from the manager app, you can always view, delete, add, backup, and restore credentials.
When you visit a website or app for which you’ve saved credentials, Credential Manager automatically fills in your login information, saving you time and effort. Also, the feature encrypts your information using strong encryption algorithms, making it difficult to access it unauthorizedly.
In this guide, I will teach you how to use the Credential Manager on Windows 10 to control all your login information.
- View sign-in passwords on Credential Manager
- Edit sign-in information on Credential Manager
- Delete sign-in information on Credential Manager
- Add new sign-in information on Credential Manager
- Backup sign-in information on Credential Manager
- Restore sign-in information on Credential Manager
View sign-in passwords on Credential Manager
To view passwords through the Credential Manager, use these steps:
-
Open Control Panel on Windows 10.
-
Click on User Accounts.
-
Click on Credential Manager.
-
Click the Web Credentials tab.
-
Click on the login information.
-
Click the Show option.

-
Confirm your authentication.
-
Confirm the password for the credential.

After you complete the steps, the Credential Manager will reveal the password for the web login.
It’s important to note that you can only view passwords for web credentials. The manager doesn’t provide an option to view Windows passwords.
Edit sign-in information on Credential Manager
To update a password or username already stored on Windows 10, use these steps:
-
Open Control Panel.
-
Click on User Accounts.
-
Click on Credential Manager.
-
Click the Windows Credentials tab (or Web Credentials).
-
Select the account.
-
Click the Edit button.

-
Update the username and password as necessary.
-
Click the Save button.


Once you complete the steps, the information will update with the new credentials, which means no more login prompts if you initially saved the wrong credentials or changed the sign-in information.
Delete sign-in information on Credential Manager
To delete an account credentials already stored on Windows 10, use these steps:
-
Open Control Panel.
-
Click on User Accounts.
-
Click on Credential Manager.
-
Click the Windows Credentials tab (or Web Credentials).
-
Select the account.
-
Click the Remove button.
-
Click the Yes button.

After you complete the steps, the account credentials will no longer be available on the computer, meaning that future logins will require you to enter a username and password manually.
Add new sign-in information on Credential Manager
To add an app or network credential on Windows 10, use these steps:
-
Open Control Panel.
-
Click on User Accounts.
-
Click on Credential Manager.
-
Click the Windows Credentials tab.
-
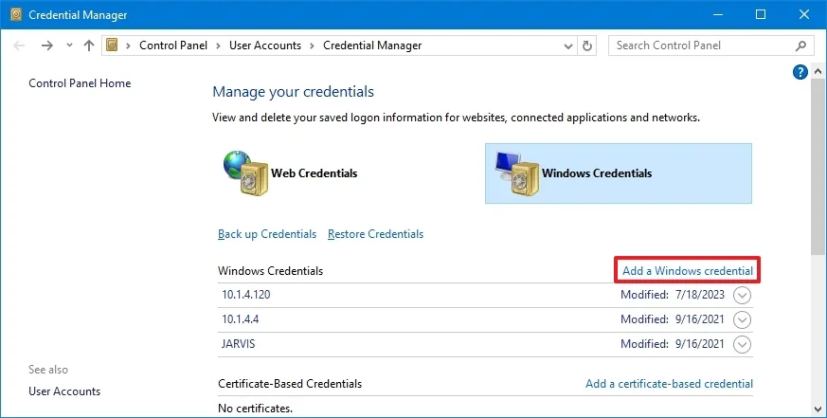
Click the “Add a Windows credential” (or “Add a certificate-based credential”) option.
-
Specify the internet or network address corresponding to the app or network resource.
-
Specify the username and password to authenticate.
-
Click the OK button.

Once you complete the steps, the new account information will be added to the computer to sign in automatically the next time you access the apps or network shared.
If the website or network location requires a certificate for authentication, you can choose the “Add a Certificate-Based Credential” option. On this page, you will be able to specify the address and load the required certificate.
In addition, Credential Manager also includes the option to save generic credentials through the “Windows Credentials” page. This a convenient way to store login information for various types of accounts and services that don’t fit into the standard “Web Credentials” or “Windows Credentials” categories.
Backup sign-in information on Credential Manager
To export and backup all your credentials for apps and networks, use these steps:
-
Open Control Panel.
-
Click on User Accounts.
-
Click on Credential Manager.
-
Click the Windows Credentials tab.
-
Click the Back up Credentials option.
-
Click the Browse button to specify a destination for the backup.

-
Specify a name for the .crd backup file.
-
Click the Save button.
-
Click the Next button.
-
Use the “Ctrl + Alt + Delete” keyboard shortcut to continue.
-
Specify a password to protect the Credential Manager file on Windows 10.

-
Click the Next button.
-
Click the Finish button.


After you complete the steps, you’ll end up with a “.crd” file containing all your Windows 10 and web credentials you can import to another computer or the same device after a clean installation.
The Credential Manager features only allow backing up the “Windows Credentials.” You cannot export the web credentials through this process. However, you can always use the password manager built into Microsoft Edge.
Restore sign-in information on Credential Manager
To restore your sign-in information from backup on Windows 10, use these steps:
-
Open Control Panel.
-
Click on User Accounts.
-
Click on Credential Manager.
-
Click the Windows Credentials tab.
-
Click the Restore Credentials option.
-
Click the Browse button.
-
Select the “.crd” files with the backup information.
-
Click the Open button.
-
Click the Next button.
-
Use the “Ctrl + Alt + Delete” keyboard shortcut to continue.
-
Confirm the password to unlock the Credential Manager backup.
-
Click the Next button.
-
Click the Finish button.


Once you complete the step, your device’s credentials for sites, apps, and networks will be restored.
While this guide focuses on Windows 10, Credential Manager has been available for a long time, which means the steps will also work on Windows 8.1 and Windows 7.
Update September 18, 2024: This guide has been updated to ensure accuracy and reflect changes to the process.
Время на прочтение4 мин
Количество просмотров3.6K
Скрипты Powershell в большинстве случаев используются для автоматизации выполнения определенных задач, и зачастую для их выполнения необходимо указывать определенные учетные данные, часто с повышенными правами. Для интерактивных сценариев это не проблема, поскольку при необходимости они могут предложить администратору ввести пароль, а вот для автоматизированных сценариев, требующих учетных данных, это становится более сложной задачей.
Да, бесчисленные руководства по кибербезопасности не устают повторять, что скрипты, требующие повышенных разрешений, должны запускаться только в защищенных системах, из каталогов, в которые имеют доступы только администраторы. Однако, при пентестах сетей Windows постоянно приходится сталкиваться со скриптами, содержащими жестко зашитые ученые данные. Причем очень часто это данные от привилегированных учеток. Очень часто так получается, что со временем уровень защищенности скриптов ослабевает. Бесчисленные копии, бекапы, старые версии – доступ к ним уже не так сильно ограничивается, в результате чего посторонним проще получить к ним доступ.
Поэтому администраторам важно помнить, что жестко вводить пароль в скрипт — плохая идея. Хотя можно зашифровать пароль в файл, как показано на рисунке, такие файлы лишь ненамного лучше, чем зашифрованный пароль с открытым текстом.

Это связано с тем, что любой, у кого есть доступ к файлу, может использовать его для аутентификации, не зная фактического пароля. Кстати, по похожему принципу построена атака pass the hash, когда злоумышленник вместо пароля использует его хэш, и этого бывает достаточно для аутентификации в системе.
Поэтому нужен более безопасный способ предоставления учетных данных автоматизированным сценариям PowerShell. В доменной инфраструктуре Active Directory мы можем использовать Windows Credential Manager для получения разрешений.
Хотя Windows Credential Manager существует в автономных системах, иногда его поведение может быть довольно странным. Например, если автономная система настроена без пароля (вообще без аутентификации), кэшированные учетные данные в диспетчере учетных данных часто не предоставляют доступ к подключенным сетевым дискам, даже если сохраненные учетные данные верны.
Специальные учетки
Первым шагом в этом процессе усиления защиты скриптов создание учетной записи специально для данного сценария PowerShell, которой и будут назначены необходимые разрешения. Хотя в некоторых организациях создается специальная учетная запись, которую могут использовать все сценарии PowerShell, такая практика может ослабить безопасность. Причина этого заключается в том, что использование универсальной “учетной записи PowerShell” нарушает принцип минимальных привилегий.
Принцип минимальных привилегий предполагает, что учетная запись должна иметь только те разрешения, которые необходимы для выполнения поставленной задачи, – ни больше, ни меньше.
Поскольку сценарии PowerShell часто выполняют привилегированные операции, создание единой учетной записи для обслуживания всех сценариев, по сути, приведет к созданию глобальной учетной записи администратора. Если злоумышленник скомпрометирует сценарий и получит доступ к такой учетной записи, последствия могут быть разрушительными для организации.
Поэтому лучше создать отдельные учетные записи Active Directory для каждого сценария PowerShell. Вы всегда можете сохранить эти учетные записи в специальной папке Active Directory, чтобы не загромождать папку пользователей. Просто убедитесь, что имя и описание каждой учетной записи четко указывают на ее назначение.
Настройка Windows Credential Manager
Чтобы настроить PowerShell на использование сохраненных учетных данных, необходимо открыть сеанс с повышенными правами (временно войти в систему с правами администратора) и установить модуль Credential Manager. Для установки модуля используйте следующую команду:
Install-Module CredentialManager
На скриншоте PowerShell показано, что модуль Credential Manager успешно установлен

После установки модуля вы можете добавить сохраненные учетные данные в Windows Credential Manager. Это уже можно делать в окне PowerShell без привилегированных прав доступа, используя учетную запись обычного пользователя. В переменной $Password мы сохраняем пароль.
$Username = PowerShellDemo@poseylab.com

$Password = ConvertTo-SecureString “P@ssw0rd” -AsPlainText -Force

$Credential = New-Object -TypeName PSCredential -ArgumentList $UserName, $Password

New-StoredCredential -Target PowerShell -Credential $Credential -Type Generic -Persist LocalMachine
Стоит отметить, что параметр Target, используемый в последней команде, по сути, присваивает понятное имя учетным данным (PowerShell). В принципе, вы можете назвать целевой объект как угодно. Однако важно запомнить присвоенное целевое имя, поскольку вам нужно будет ссылаться на него всякий раз, когда вы будете использовать сохраненные учетные данные.
На скриншоте ниже показано, что учетные данные были записаны в диспетчер учетных данных Windows.

Соответственно, для получения сохраненных учетных данных достаточно просто использовать эту команду:
Get-StoredCredential -Target <Target Name>
Теперь давайте рассмотрим практический пример, а именно создание нового пользователя Active Directory из сеанса PowerShell. При этом, у нас не будет прав доступа, позволяющих выполнить данную операцию, и нам придется использовать сохраненные учетные данные. Для этого добавим параметр -Credential в командлет New-ADUser, чтобы указать сохраненные учетные данные:
$Cred = Get-StoredCredential -Target PowerShell

 New-ADUser -Credential $Cred -Name “TestUser” -SamAccountName “TestUser” -UserPrincipalName TestUser@poseylab.com -AccountPassword (ConvertTo-SecureString “P@ssw0rd” -AsPlainText -Force) -Enabled $True
Следует отметить, что, хотя в команде New-ADUser отображается пароль в виде открытого текста, этот пароль присваивается новой учетной записи пользователя, которую мы создаем. Он не используется для повышения прав доступа, чтобы мы могли создать учетную запись. Повышение привилегий осуществляется с помощью параметра -Credential.
После создания новой учетной записи подтвердаем успешность операции с помощью этой команды:
Get-ADUser -Filter {SamAccountName -eq “TestUser”}
Вот что мы получили в итоге:

Заключение
Используя Windows Credential Manager, мы можем использовать в скриптах Powershell привилегированные учетные записи Active Directory, не снижая при этом общий уровень защищенности инфраструктуры.
18 июня для системных администраторов пройдет открытый урок, посвященный GPO: «Групповые политики как средство автоматизации». Записаться бесплатно можно на странице курса «Администратор Windows».
Applies ToWindows 11 Windows 10
Credential Manager lets you view and delete your saved credentials for signing in to websites, connected applications, and networks.
-
To open Credential Manager, type credential manager in the search box on the taskbar and select Credential Manager Control panel.
-
Select Web Credentials or Windows Credentials to access the credentials you want to manage.


Need more help?
Want more options?
Explore subscription benefits, browse training courses, learn how to secure your device, and more.
Managing network credentials in Windows 10 can seem daunting at first, but it’s quite straightforward once you know the steps. By following a simple tutorial, you’ll be able to add, remove, and manage your network credentials with ease. This will allow you to access shared resources on a network, such as drives and printers, without having to enter your password each time.
Step by Step Tutorial: Managing Network Credentials in Windows 10
Before we dive into the steps, it’s important to understand what network credentials are. They are the username and password you use to access shared resources on a network. Windows 10 has a Credential Manager that stores these credentials so you don’t have to enter them every time.
Step 1: Open Credential Manager
Type “Credential Manager” in the Windows search bar and select the app.
Credential Manager is a feature in Windows that stores your usernames and passwords for various network resources and websites. By opening Credential Manager, you can add, remove, or edit your stored credentials.
Step 2: Choose Windows Credentials
Select “Windows Credentials” to manage network credentials.
Windows Credentials are specifically for network resources like servers, mapped drives, and network shares. By choosing this option, you’re specifying that you want to manage credentials related to network access.
Step 3: Add a Windows Credential
Click on “Add a Windows Credential” and enter the network address, username, and password.
Adding a Windows Credential is useful if you frequently access a network resource and don’t want to enter your login information each time. Once you add the credential, Windows will automatically use it to log in to the network address you specified.
Step 4: Edit or Remove Existing Credentials
Select an existing credential to edit or remove it.
If your login information changes or you no longer need access to a network resource, you can easily edit or remove the stored credential. This helps keep your Credential Manager up-to-date and secure.
Step 5: Backup and Restore Credentials
Use the backup and restore feature to keep your credentials safe.
It’s a smart idea to back up your credentials, especially if you have many saved or if they grant access to important resources. If you ever need to reinstall Windows or move to a new computer, you can restore your credentials without a hassle.
After completing these steps, your network credentials will be managed and ready to use. Windows will automatically use the stored credentials to log you into the network resources you access, saving you time and effort.
- Tip 1: Regularly update your credentials to ensure they are current and secure.
- Tip 2: Remove credentials for networks you no longer access to maintain a clutter-free Credential Manager.
- Tip 3: Utilize the backup feature to avoid losing access to essential network resources.
- Tip 4: If you’re having trouble connecting to a network resource, check that the stored credentials are correct.
- Tip 5: Be careful when sharing your computer with others, as they may be able to access your stored network credentials.
Frequently Asked Questions
What is Credential Manager?
Credential Manager is a feature in Windows that stores and manages your usernames and passwords for network resources and websites.
Can I manage website credentials in Credential Manager?
Yes, you can also manage web credentials in Credential Manager by selecting the “Web Credentials” tab.
What should I do if Credential Manager is not saving my credentials?
Make sure the Windows service called “Credential Manager” is running, and check if there’s any policy in place that might prevent credentials from being saved.
How do I back up my credentials?
In Credential Manager, you can use the “Back up Vault” option to create a backup file of your credentials.
Are my credentials secure in Credential Manager?
Windows encrypts your credentials, but it’s still important to have a strong login password for your computer to ensure maximum security.
Summary
- Open Credential Manager
- Choose Windows Credentials
- Add a Windows Credential
- Edit or Remove Existing Credentials
- Backup and Restore Credentials
Conclusion
Understanding and managing network credentials in Windows 10 is an essential skill for anyone who frequently uses network resources. By following the steps outlined above, you can easily add, edit, and remove credentials, as well as back them up for safekeeping. It’s important to keep your credentials up-to-date and secure, as they provide access to potentially sensitive information and resources. Remember, the Credential Manager is a powerful tool that can save you time and help maintain your digital security. So, make use of it and simplify your networking experience on Windows 10.
Matt Jacobs has been working as an IT consultant for small businesses since receiving his Master’s degree in 2003. While he still does some consulting work, his primary focus now is on creating technology support content for SupportYourTech.com.
His work can be found on many websites and focuses on topics such as Microsoft Office, Apple devices, Android devices, Photoshop, and more.

Overview – Credential
Manager in Windows 11
Previously, Windows Credential Manager was introduced with Windows Vista as part of the Protected Storage system. It is a location where the Usernames, Passwords, Addresses, Login Information, and other sensitive data of a user are stored separately for both the web and System Activities and letting the users store all their saved login information in one central location where they can access it quickly and easily.

Let’s breakdown what we’re going to understand in this article:
Types of Credentials
Open Credential Manager
Create new Credentials
Edit existing Credentials
Delete Credentials
Backup Credentials
Restore Credentials from the Backup
Types of Credentials
Stored in Windows
1.
Certificate-Based Credentials
They’re primarily utilized for corporate network setups involving the use of smart cards. The majority of individuals will never need to use such credentials unless they use a smart card due to any reason.
2. Generic
Credentials
Some external third-party applications need to utilize the Windows System Resources for work, so these certificates are designated and given authorization/approval during the application installation in Windows. Some apps using generic credentials are Slack, VsCode Editor, Github, etc.
3. Web
Credentials
It involves the Storage of usernames, passwords, and login details of websites visited by the user. The data is automatically retrieved while surfing websites because of the use of Credential Management API integrated with forms and other inputs in the HTML Code, and you need not sign in every time repeatedly.
4. Windows
Credentials
These credentials are used by Microsoft Windows and services such as Windows Virtualization and Hyper-V. They are responsible for authenticating the Windows Based Local Network Shares, homegroups, virtual machines, and other Services and holding their sensitive data including usernames, passwords, IP addresses, login information, etc.
How To Open
Credential Manager on Windows
Step 1: Open the Control Panel from the Start Menu and click the “User Accounts” option.

“User Accounts” option
Step 2: Navigate between the “Windows Credentials” and “Web Credentials” options to manage the respective credentials by selecting the respective option.

Select the credentials
How To Create New
Credentials in Windows
In Windows, we can only create Windows Credentials, generic credentials, and certificate-based credentials, the Web credentials cannot be created manually.
Step 1: Click the User Accounts in the Control Panel, select the “Manage Windows Credentials” tab, and select the “Add a Windows Credential” option.

“Add a new credential” option
Step 2: Fill in the required login details depending on the type of credential being created (including IP Address, User name, and Password), and press the “OK” button.
Step 3: Once the credential is created, it’ll appear under its respective category.

Added Custom Credential
How To Edit Existing
Credentials in Windows
In Windows, we can modify/edit the Windows Credentials only. Before we proceed to edit the Windows credentials, it is recommended not to make changes in the default ones otherwise some Windows services will lead to some functionality issues.
Step 1: In the Windows Credentials tab, select the credential that you want to modify, and click the “Edit” option.

“Edit” button
Step 2: Modify the existing server, username, or password and press the “Save” button.
How To Delete
Existing Credentials in Windows
Step 1: In the Windows Credentials tab, select the credential that you want to modify, and click the “Remove” option.

“Remove” button
Step 2: A new window will appear. Select the “Yes” button to remove the credential permanently.

Press the “Yes” button
How To Backup the
Windows Credentials
Note: We can backup the Windows Credentials only and do not share the Windows Credentials with anyone.
Step 1: In the Windows Credentials tab, select the “Back up Credentials” option.

Backup Credentials
Step 2: Click the “Browse” button and select the destination where you want to save the backup credentials in the “.crd” file format. Press the “Next” button.

Backup File Location
Step 3: Press the “Ctrl + Alt + Delete” key combination to back up the credentials on Windows and add the Password to protect the Credentials file backup.

Add Backup File Password
How To Restore the
Windows Credentials
Step 1: In the Windows Credentials tab, select the “Restore Credentials” option.

Restore Credentials
Step 2: Select the “Browse” button and select the backed-up credentials file (“.crd” file extension)

Locate Backed-up Credentials
Step 3: Press the “Ctrl + Alt + Delete” key combination and enter the password to restore the backed-up credentials on Windows.

Add Password to the Backup File
FAQs Related to
Windows Credentials
Where are the
Windows Credentials stored in Windows?
The Windows Credentials are actually located in the following path in Windows:
C:\Users\UserName\AppData\Roaming\Microsoft\Credentials
Do I need to add a windows
credential?
No, the Windows Credentials are added automatically whenever you save any password on your Windows OS or while saving the passwords on the web.
Next
Steps
We’ve covered how to use the credential manager in Windows.
Overall, we can consider that the Windows Credential Manager is a valuable resource designed by Microsoft to help user retrieve their lost passwords and acts as a centralized location for saving passwords, usernames, and other necessary credentials in Windows.
Further, customize your device’s configuration by following the related articles below.