
Все способы:
- Способ 1: Системные «Параметры»
- Способ 2: Настройки электропитания
- Способ 3: Редактирование реестра
- Способ 4: Панель управления видеокартой
- Возможные проблемы
- Вариант 1: Перезапуск интегрированной видеокарты
- Вариант 2: Обновление драйвера графического адаптера
- Вариант 3: Средство устранения неполадок
- Вариант 4: Отключение службы
- Вопросы и ответы: 2
Способ 1: Системные «Параметры»
Адаптивная яркость актуальна далеко не всегда, и чаще она, наоборот, мешает, поскольку экран может потухать независимо от освещения окружающей среды. Отключить функцию можно через фирменное приложение Windows 10 – «Параметры»:
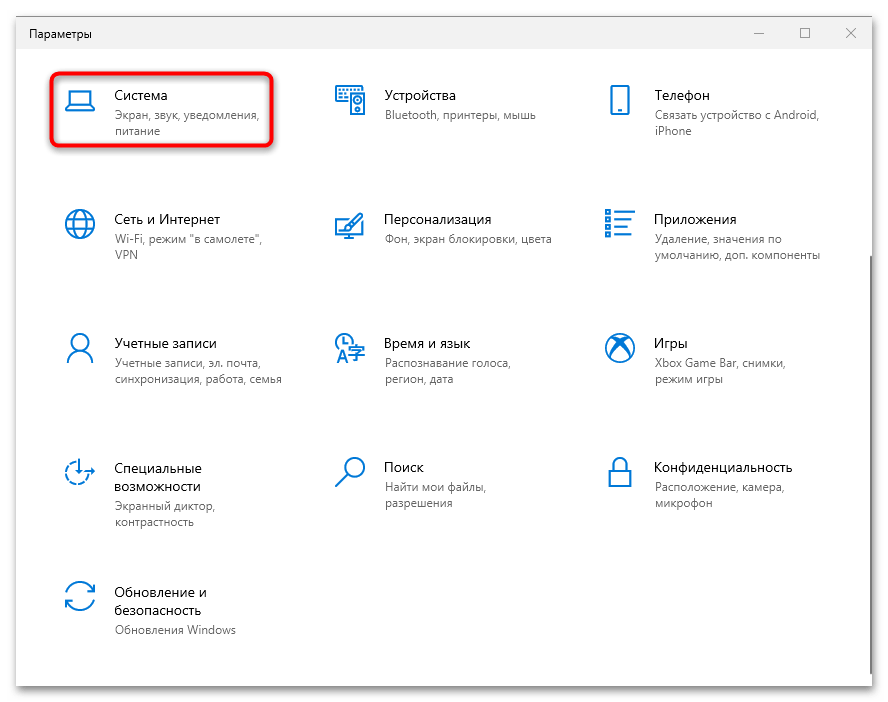
- Откройте штатное средство, вызвав его через меню «Пуск».
- В новом окне перейдите в раздел «Система».
- На панели слева выберите вкладку «Дисплей». В блоке «Яркость и свет» отключите функцию «Ночной свет» с помощью тумблера.
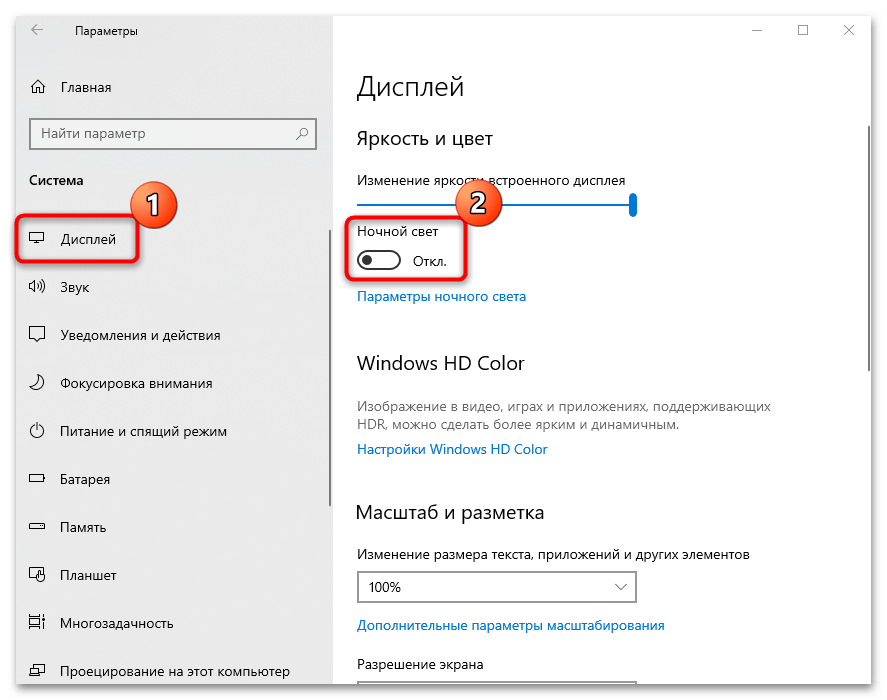
В Windows 10 функция работает таким образом, что цвет меняется в зависимости от времени суток, то есть он становится более теплым при низкой освещенности.
Читайте также: Изменение яркости на Windows 10
Способ 2: Настройки электропитания
В «Панели управления» пользователь может настроить схему электропитания, включая и отключая адаптивную регулировку яркости экрана:
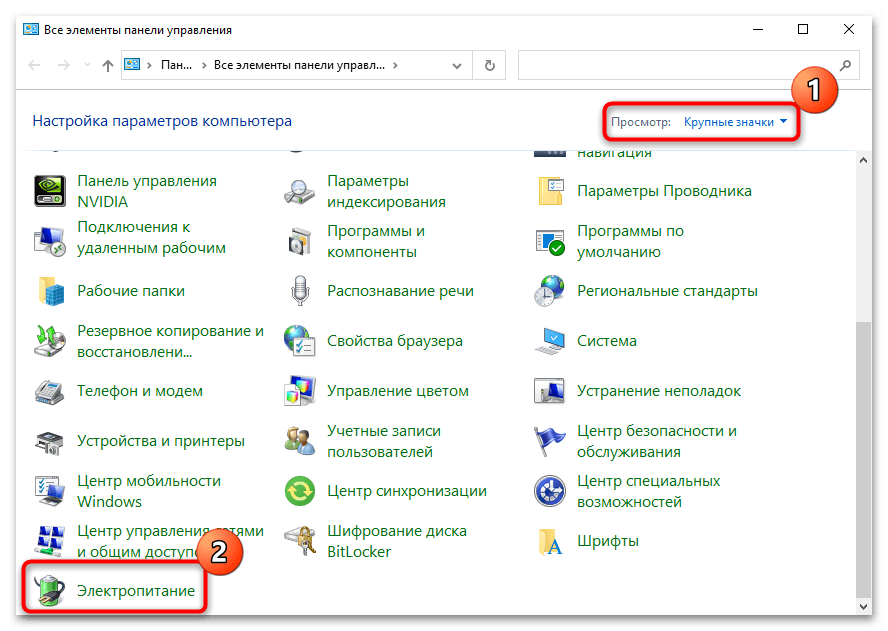
- Откройте «Панель управления», найдя это приложение по названию в «Пуске». В меню «Просмотр» выберите отображение разделов как мелкие или крупные значки. Перейдите в «Электропитание».
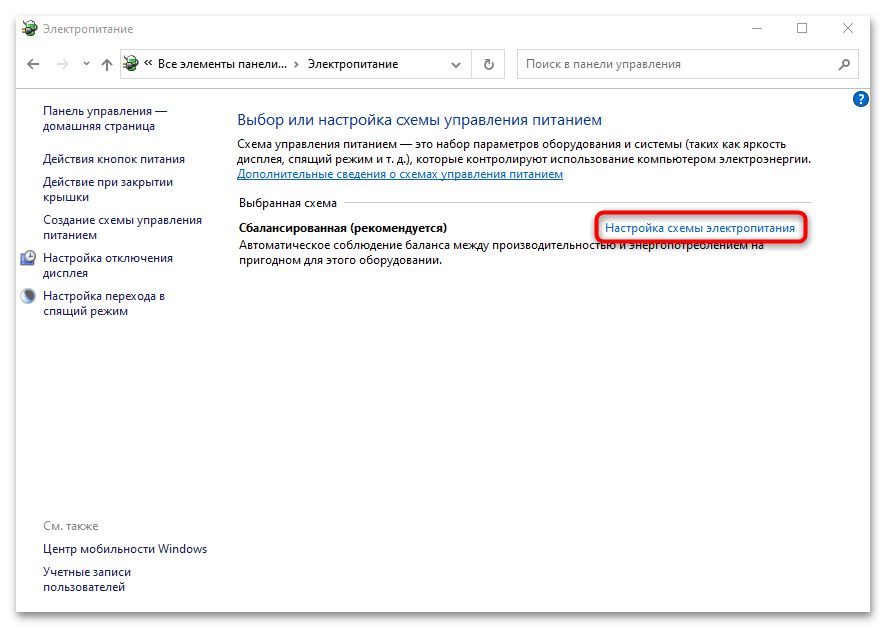
- Кликните по строке «Настройка схемы электропитания».
- В следующем окне выберите «Изменить дополнительные параметры питания».
- Разверните меню «Экран».
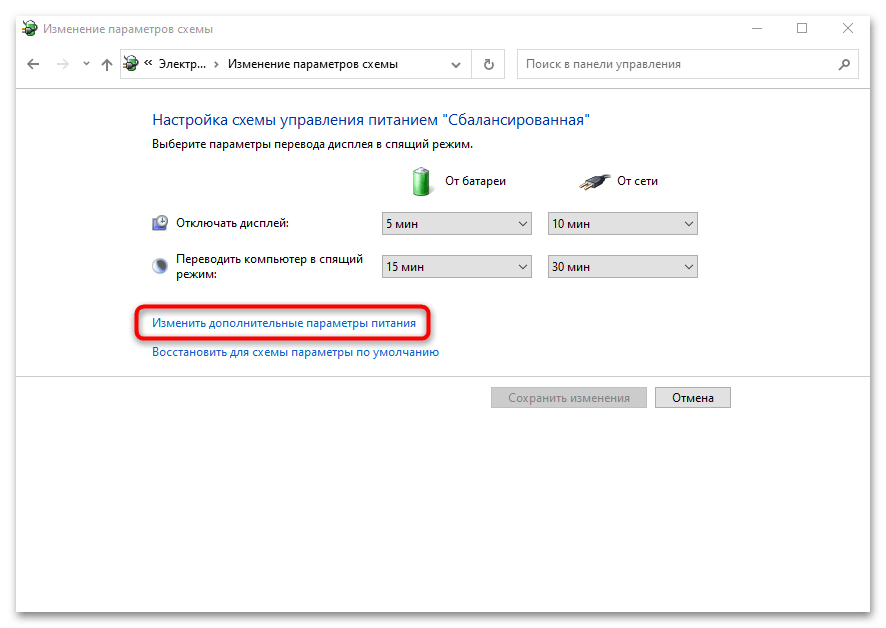
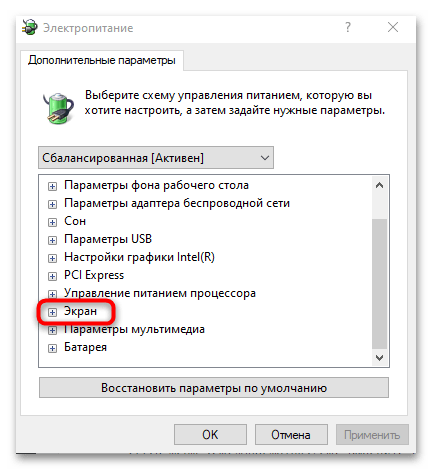
В списке найдите функцию адаптивной яркости экрана и выключите ее, выбрав соответствующий вариант работы. После настройки не забудьте подтвердить действие, нажав на кнопку «ОК».
Способ 3: Редактирование реестра
Иногда система настроена так, что автоматически затемняется не весь экран, а лишь его отдельная область – там, где открыто окно с приложением. При этом остальная часть дисплея становится более темной. Дело здесь не в адаптивной яркости, но убрать такую особенность можно, отредактировав реестр Windows 10:
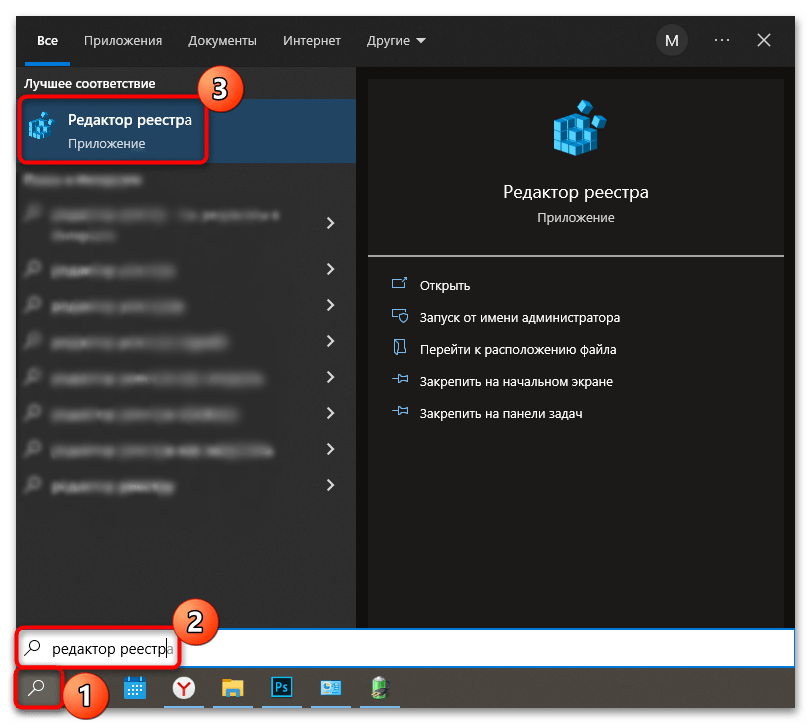
- Откройте «Редактор реестра». Для этого можно воспользоваться системной поисковой строкой.
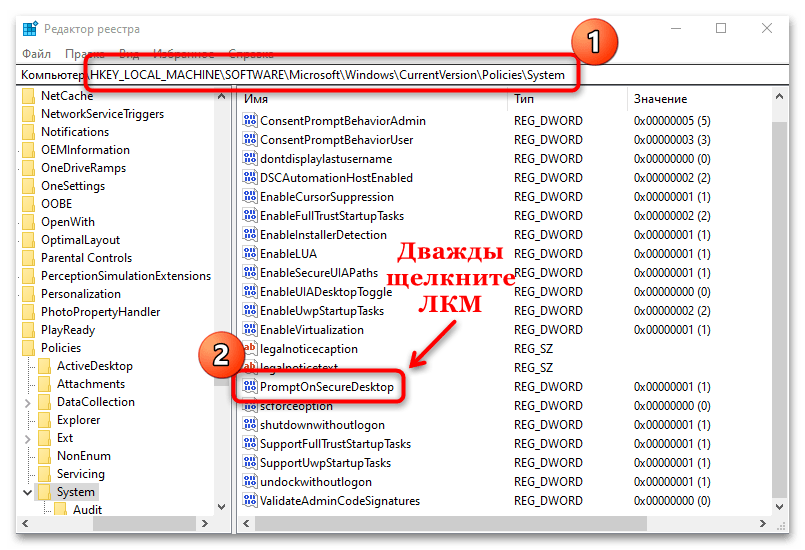
- Перейдите по пути:
HKEY_LOCAL_MACHINE\SOFTWARE\Microsoft\Windows\CurrentVersion\Policies\System. В главном окне отыщите параметр «PromptOnSecureDesktop» и откройте раздел с его свойствами, дважды щелкнув по названию левой кнопкой мыши. - В строке «Значение» замените существующее число на «0» и примените изменения кнопкой «ОК».
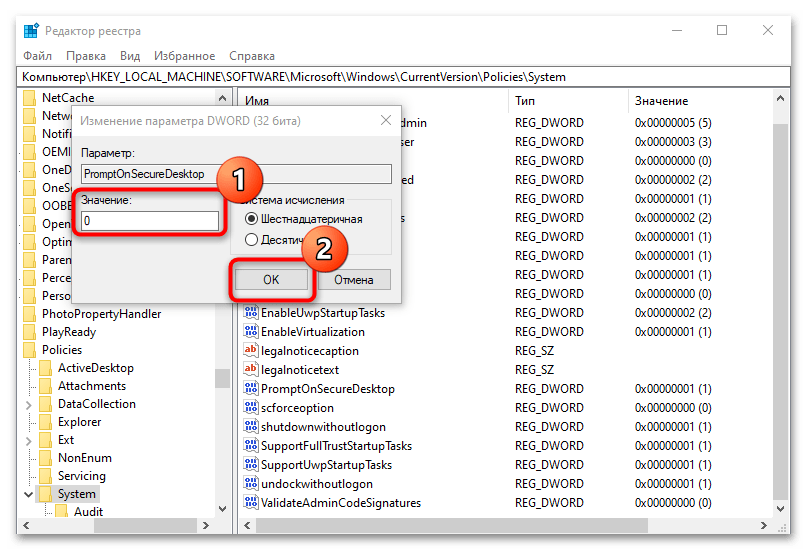
После того как реестр будет изменен, приложения станут работать без затемнения экрана. Если нужно вернуть функцию, то достаточно следовать инструкции выше, но в свойствах параметра значение заменить на «1».
Способ 4: Панель управления видеокартой
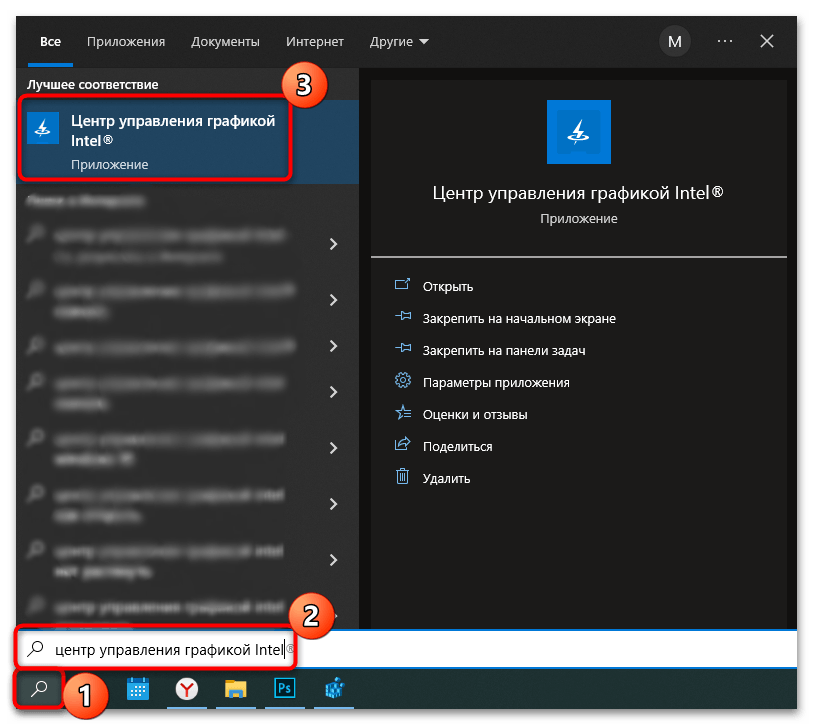
Производители графических адаптеров выпускают фирменный софт, с помощью которого настраивается дисплей и другие параметры. Например, у большинства ноутбуков интегрирована видеокарта от компании Intel, соответственно, в Windows предустановлено приложение «Центр управления графикой Intel», через которое можно настроить яркость экрана или отключить адаптивную яркость:
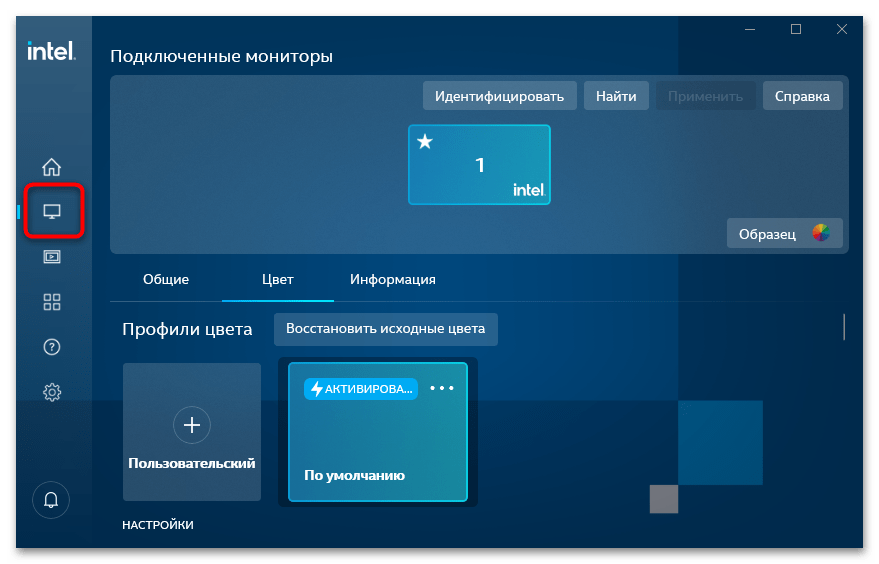
- Найдите в главном меню панель управления видеокарты.
- Настройка яркости экрана осуществляется в разделе «Дисплей». Изучите параметры и найдите функцию, которая связана с автоматической регулировкой яркости.
Аналогичным образом можно настроить параметр через панели управления от других производителей видеокарт. Универсального алгоритма действий не существует, поскольку интерфейс и возможности софта могут отличаться и зависят от поддерживаемых дисплеем и видеокартой функций, но в наших отдельных инструкциях вы можете найти информацию о том, как открываются приложения для настройки от таких компаний, как AMD и NVIDIA.
Подробнее: Как открыть панель управления AMD / NVIDIA
Возможные проблемы
Если штатные средства Windows 10 или фирменный софт видеокарты не помог убрать адаптивную яркость, то, вероятно, в работе компонентов произошел сбой, из-за чего и нет возможности выполнить поставленную задачу. Разберем наиболее распространенные проблемы.
Вариант 1: Перезапуск интегрированной видеокарты
Вследствие системных ошибок могут появиться проблемы в работе компонентов. Попробуйте перезапустить интегрированную видеокарту (при условии, что в компьютере установлено две видеокарты), поскольку именно из-за нее может происходить произвольное изменение уровня яркости:
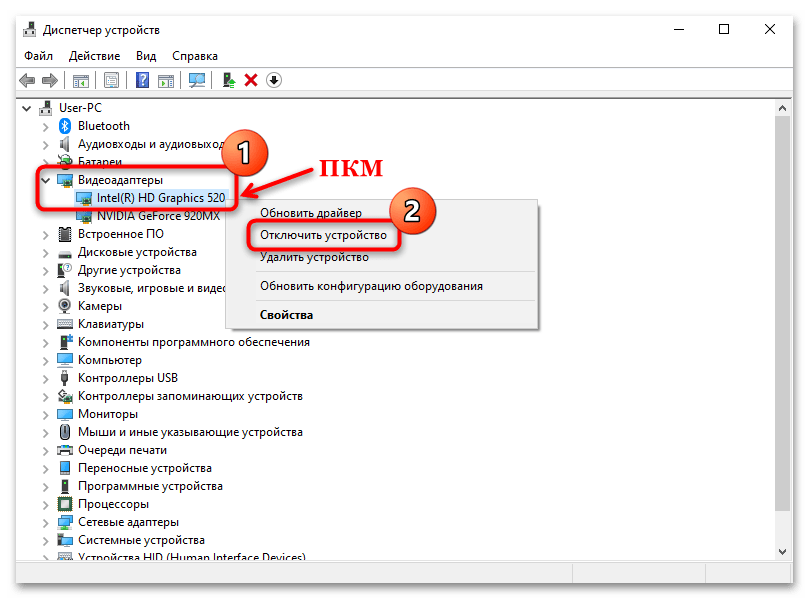
- Откройте «Диспетчер устройств». Самый простой способ – щелкнуть правой кнопкой мыши по кнопке «Пуск», затем из меню выбрать соответствующий пункт.
- Раскройте меню «Видеоадаптеры» и найдите название интегрированной видеокарты. Щелкните по нему правой кнопкой мыши и выберите пункт «Отключить устройство». Перезагрузите ПК.
После этого потребуется вновь активировать работу компонента аналогичным образом: вызвать контекстное меню компонента и выбрать пункт «Включить».
Вариант 2: Обновление драйвера графического адаптера
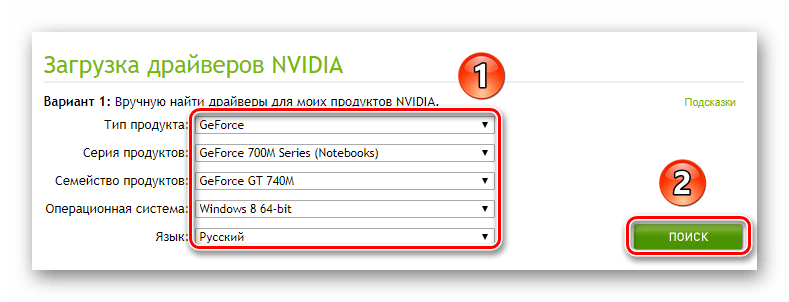
Проблемы с настройкой дисплея также появляются из-за устаревшей версии графического адаптера. Чтобы решить неполадку с настройкой автоматической регулировки яркости, попробуйте установить обновления для видеокарты, используя штатные средства Windows 10, сторонние средства или фирменные утилиты от производителей. Наш автор разбирал все способы установки актуальной версии компонента в отдельном материале.
Подробнее: Способы обновления драйвера видеокарты в Windows 10
Вариант 3: Средство устранения неполадок
Еще можно использовать встроенное средство системы, которое анализирует Windows на наличие неполадок и устраняет их, если таковые есть:
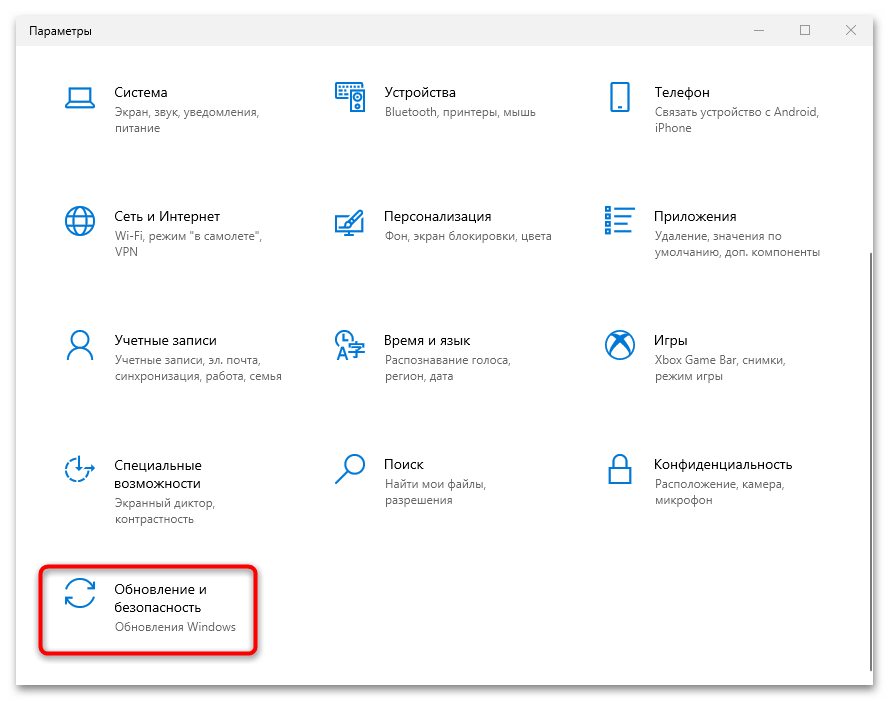
- Через приложение «Параметры» перейдите в раздел «Обновление и безопасность».
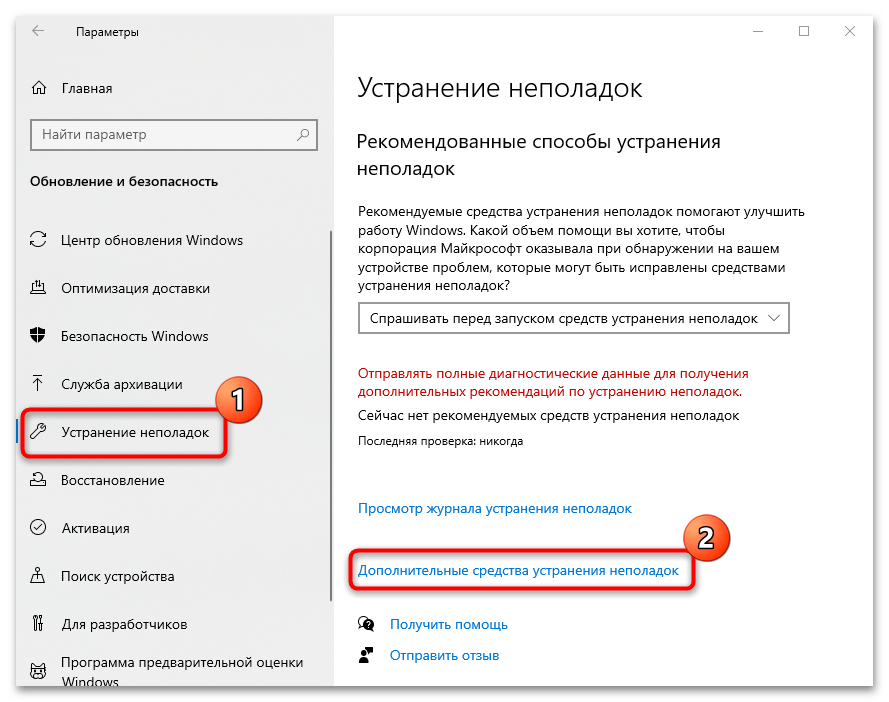
- Нажмите на вкладку «Устранение неполадок», затем кликните по ссылке «Дополнительные средства устранения неполадок».
- Найдите строку «Питание» и нажмите на нее левой кнопкой мыши. Отобразится кнопка для запуска средства устранения неполадок – щелкните по ней.
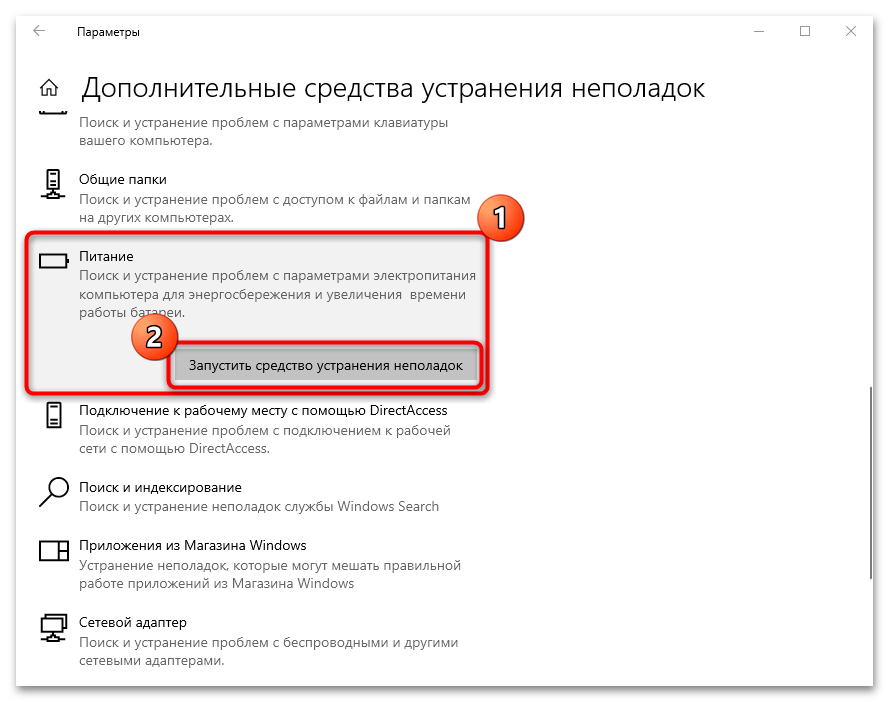
Система и электропитание будут проверены на наличие ошибок в работе. Если они выявятся, то отобразится причина неполадки и возможные пути ее устранения или уведомление о том, что требуются ручные действия.

Вариант 4: Отключение службы
Иногда проблема с определением уровня освещенности экрана возникает из-за работы службы, которая предназначена для мониторинга датчиков. Чтобы узнать, так ли это, попробуйте отключить ее:
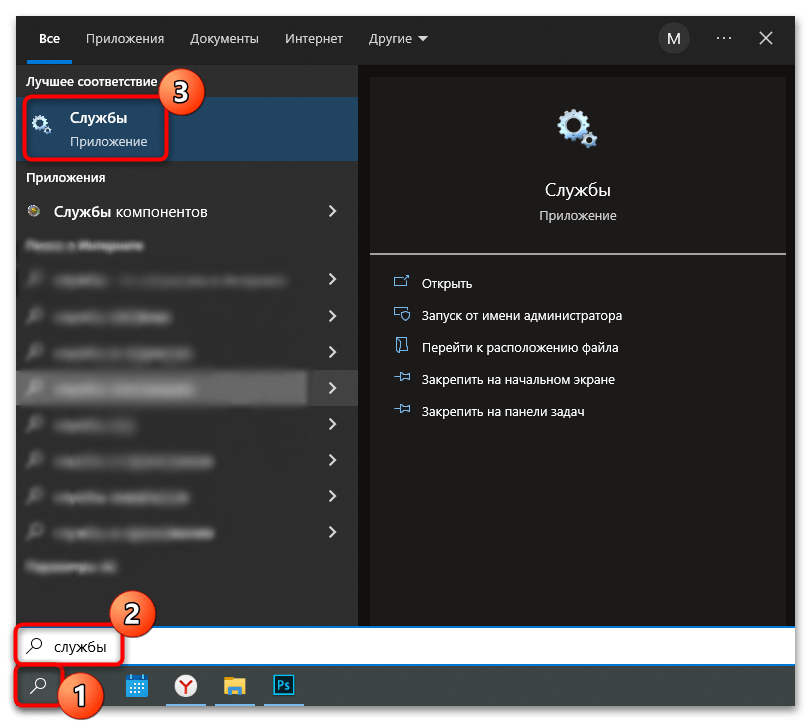
- Откройте приложение «Службы», используя строку системного поиска.
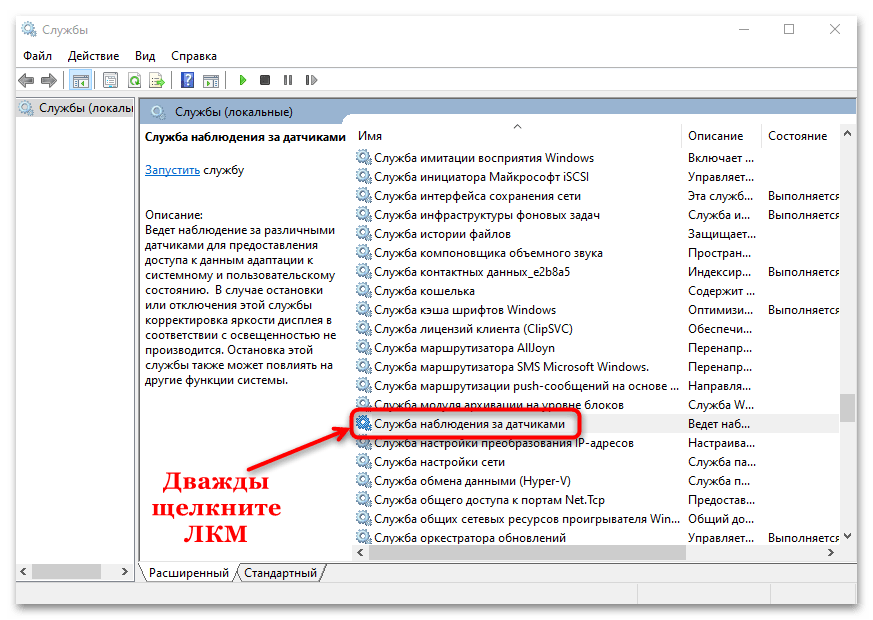
- В списке найдите «Службу наблюдения за датчиками» и дважды щелкните по ней, чтобы открыть окно со свойствами.
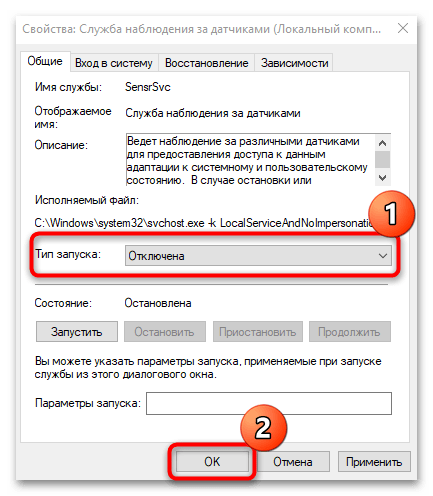
- В меню «Тип запуска» выберите пункт «Отключена», затем подтвердите настройки.
Такая проблема появляется нечасто, но в некоторых случаях именно этот метод способен помочь при проблемах с отключением автоматической яркости на ноутбуке.
Читайте также: Устранение проблемы с регулировкой яркости в Windows 10
Наша группа в TelegramПолезные советы и помощь

This tutorial will show you how to turn on or off Adaptive Brightness for all users in Windows 11.
Some PCs can let Windows automatically adjust screen brightness based on the current lighting conditions.
This automatic setting helps make sure your screen is readable wherever you go. Even if you use it, you can still move the Brightness slider to fine-tune the brightness level for a built-in display.
References:

Adaptive brightness
Describes adaptive brightness which is the screen brightness set automatically by the system in response to the ambient light sensor reading.
learn.microsoft.com
Contents
- Option One: Turn On or Off Adaptive Brightness in Settings
- Option Two: Turn On or Off Adaptive Brightness using BAT file
- Option Three: Turn On or Off Adaptive Brightness in Intel Graphics Control Panel
- Option Four: Turn On or Off Adaptive Brightness in AMD Radeon Settings
Option One
Turn On or Off Adaptive Brightness in Settings
1 Open Settings (Win+I).
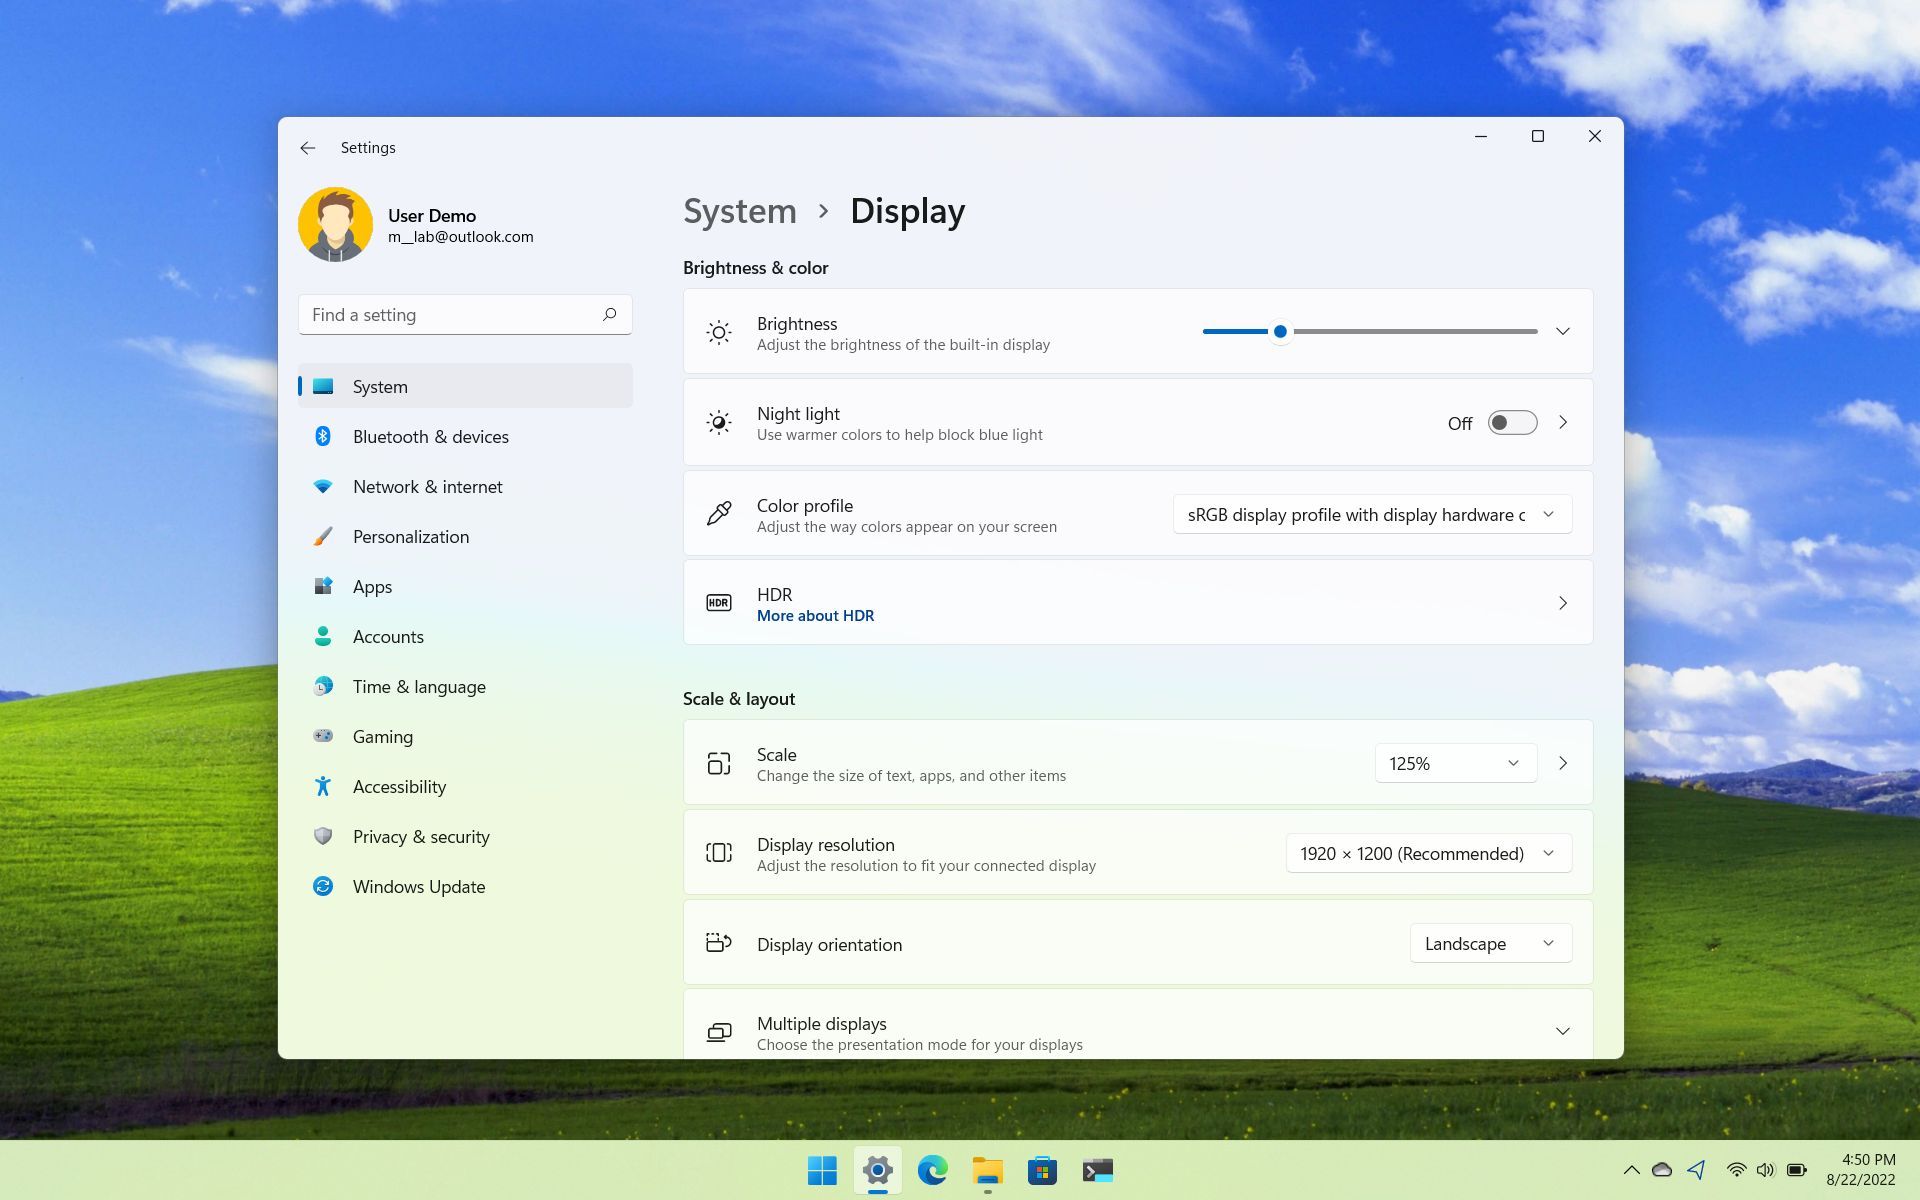
2 Click/tap on System on the left side, and click/tap on Display on the right side. (see screenshot below)

3 Click/tap on Brightness on the right side to expand it open. (see screenshot below step 4)
4 Check (on — default) or uncheck (off) Change brightness automatically when lighting changes for what you want. (see screenshot below)

5 You can now close Settings if you like.
Option Two
Turn On or Off Adaptive Brightness using BAT file
1 Do step 2 (on) or step 3 (off) below for what you want.
2 Turn On Adaptive Brightness
This is the default setting.
A) Click/tap on the Download button below to download the file you want to use below, and go to step 4 below.
Turn_ON_Adaptive_brightness_on_AC.zip
(Content of BAT file for reference)
Code:
powercfg -setacvalueindex SCHEME_CURRENT 7516b95f-f776-4464-8c53-06167f40cc99 FBD9AA66-9553-4097-BA44-ED6E9D65EAB8 1

powercfg -SetActive SCHEME_CURRENT
AND/OR
Turn_ON_Adaptive_brightness_on_battery.zip
(Content of BAT file for reference)
Code:
powercfg -setdcvalueindex SCHEME_CURRENT 7516b95f-f776-4464-8c53-06167f40cc99 FBD9AA66-9553-4097-BA44-ED6E9D65EAB8 1

powercfg -SetActive SCHEME_CURRENT
3 Turn Off Adaptive Brightness
A) Click/tap on the Download button below to download the file you want to use below, and go to step 4 below.
Turn_OFF_Adaptive_brightness_on_AC.zip
(Content of BAT file for reference)
Code:
powercfg -setacvalueindex SCHEME_CURRENT 7516b95f-f776-4464-8c53-06167f40cc99 FBD9AA66-9553-4097-BA44-ED6E9D65EAB8 0

powercfg -SetActive SCHEME_CURRENT
AND/OR
Turn_OFF_Adaptive_brightness_on_battery.zip
(Content of BAT file for reference)
Code:
powercfg -setdcvalueindex SCHEME_CURRENT 7516b95f-f776-4464-8c53-06167f40cc99 FBD9AA66-9553-4097-BA44-ED6E9D65EAB8 0

powercfg -SetActive SCHEME_CURRENT
4 Save the ZIP file to your desktop.
5 Unblock the ZIP file.
6 Extract the BAT file from the ZIP file.
7 Run the BAT file.
8 You will now notice a command prompt quickly flash open and close to apply.
9 You can now delete the downloaded .bat file if you like.
Option Three
Turn On or Off Adaptive Brightness in Intel Graphics Control Panel
1 Open the Intel Graphics Control Panel.
2 Click/tap on the Power icon. (see screenshot below)

3 Do step 4 (enable) or step 5 (disable) below for what you want.
4 Turn On Adaptive Brightness in Intel HD Graphics Control Panel
A) Select On Battery or Plugged in, and select the plan (ex: «Balanced Mode») for what you want to apply this to. (see screenshot below)
B) Select (check) Enable under Display Power Saving Technology, and adjust the slider to the level you want.
C) Click/tap on Apply, and go to step 6 below.
5 Turn Off Adaptive Brightness in Intel HD Graphics Control Panel
A) Select On Battery or Plugged in, and select the plan (ex: «Balanced Mode») for what you want to apply this to. (see screenshot below)
B) Select (check) Disable under Display Power Saving Technology, and click/tap on Apply, and go to step 6 below.
6 Click/tap on Yes to confirm. (see screenshot below)
Your changes will automatically be reverted in 15 seconds if you do not click/tap on Yes to confirm.

Option Four
Turn On or Off Adaptive Brightness in AMD Radeon Settings
This option is only available if your computer has AMD graphics and drivers installed.
This may override what you have set in Option One and Option Two.
1 Open AMD Radeon Settings.
2 Click/tap on Display. (see screenshots below)
3 If you have more than one display, select the Display # you want to change the brightness for.
4 Turn On or Off Vari-Bright for what you want.
5 If you turned on Vari-Bright, adjust the Vari-Bright Level slider to the available brightness level you want.
6 When finished, you can close AMD Radeon Settings if you like.


That’s it,
Shawn Brink
Related Tutorials
- Adjust Display Brightness in Windows 11
- Turn On or Off Content Adaptive Brightness Control in Windows 11
- Turn On or Off Night Light in Windows 11
- Enable or Disable Adaptive Color in Windows 11
- Turn On or Off Lower Screen Brightness when using Battery Saver in Windows 11
- Change HDR or SDR Content Brightness for HDR Display in Windows 11
- Enable or Disable Auto Adjust Video Brightness Based on Lighting in Windows 11
-
Turn_OFF_Adaptive_brightness_on_AC.zip
Turn_OFF_Adaptive_brightness_on_AC.zip
495 bytes
· Views: 837
-
Turn_OFF_Adaptive_brightness_on_battery.zip
Turn_OFF_Adaptive_brightness_on_battery.zip
506 bytes
· Views: 352
-
Turn_ON_Adaptive_brightness_on_AC.zip
Turn_ON_Adaptive_brightness_on_AC.zip
493 bytes
· Views: 491
-
Turn_ON_Adaptive_brightness_on_battery.zip
Turn_ON_Adaptive_brightness_on_battery.zip
503 bytes
· Views: 129
On Windows 11, you can change the brightness of the screen manually, or you can let the system adjust the settings automatically, which also improves video playback visibility and battery life.
The system provides two features to control brightness. If the device has an ambient light sensor, Windows 11 can regulate the brightness intensity based on the lighting in the room. Also, on specific screens, you can enable content adaptive brightness, a feature that improves battery life by adjusting the brightness and contrast levels based on the content you are watching.
This guide will walk you through the steps to allow Windows 11 to adjust the brightness automatically to improve video playback visibility and battery life.
How to enable automatic brightness settings on Windows 11
To adjust the brightness level on Windows 11 automatically, use these steps:
- Open Settings.
- Click on System.
- Click the Display page on the right side.
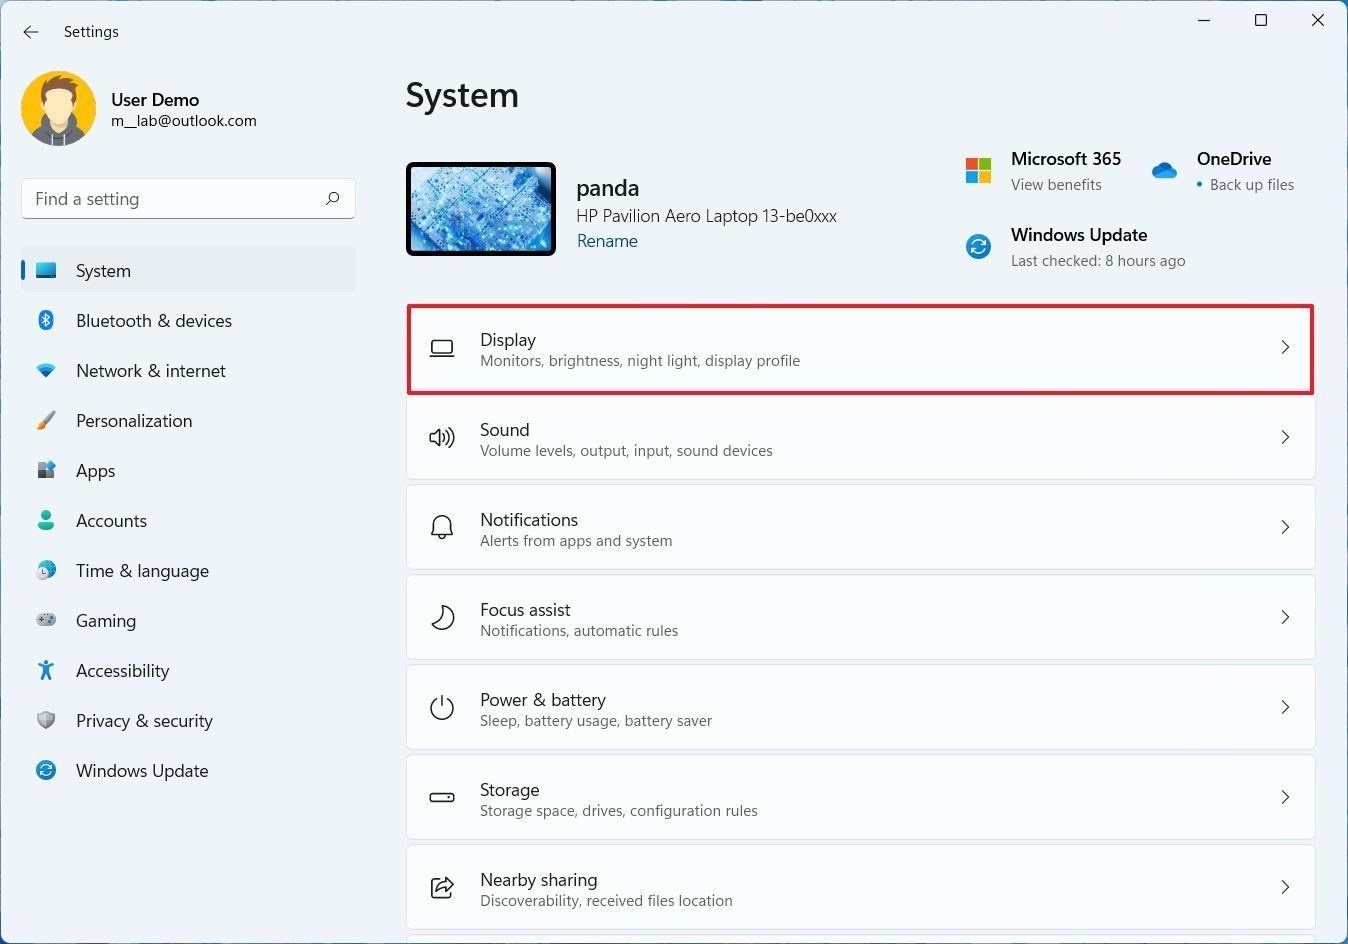
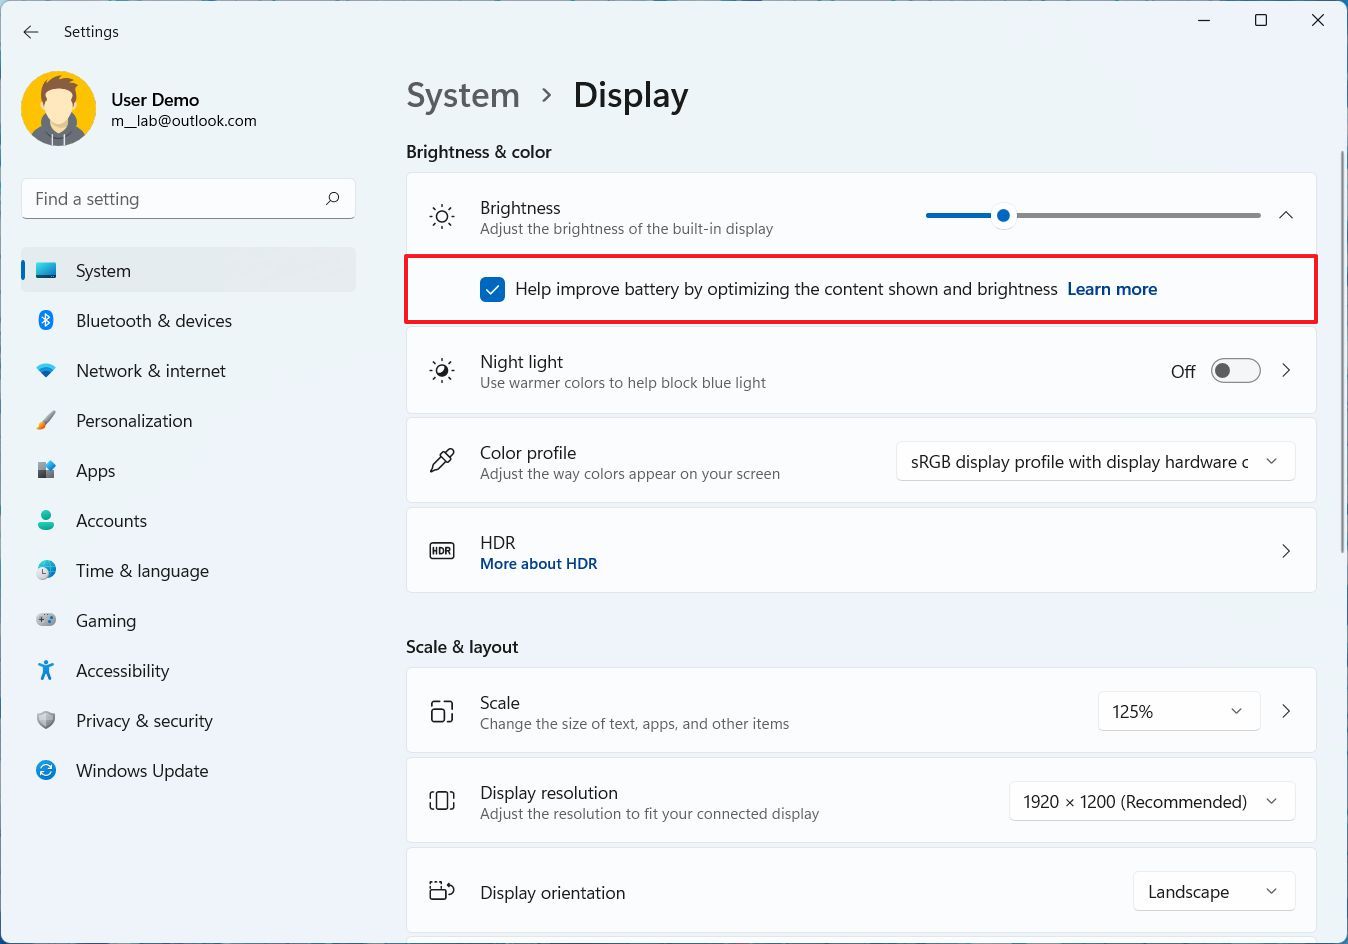
- Under the «Brightness & color» section, click the Brightness setting.
- Check the «Change brightness automatically when lighting changes» option (if available).
- Quick note: If the option is missing, the device does not have an ambient light sensor.
- Check the «Help improve battery by optimizing the content shown and brightness» option.
Once you complete the steps, the brightness will adjust automatically based on the environment’s lighting if the device has an ambient light sensor. Windows 11 will also change the brightness based on the content displayed on the screen.
How to disable automatic brightness settings on Windows 11
If the sudden brightness level changes are affecting the experience, causing problems with color accuracy, or you don’t like these features, you can turn off the ambient sensor and content adaptive brightness.
To disable automatic brightness settings on your computer, use these steps:
All the latest news, reviews, and guides for Windows and Xbox diehards.
- Open Settings.
- Click on System.
- Click the Display page on the right side.
- Under the «Brightness & color» section, click the Brightness setting.
- Clear the «Change brightness automatically when lighting changes» option.
- Clear the «Help improve battery by optimizing the content shown and brightness» option.
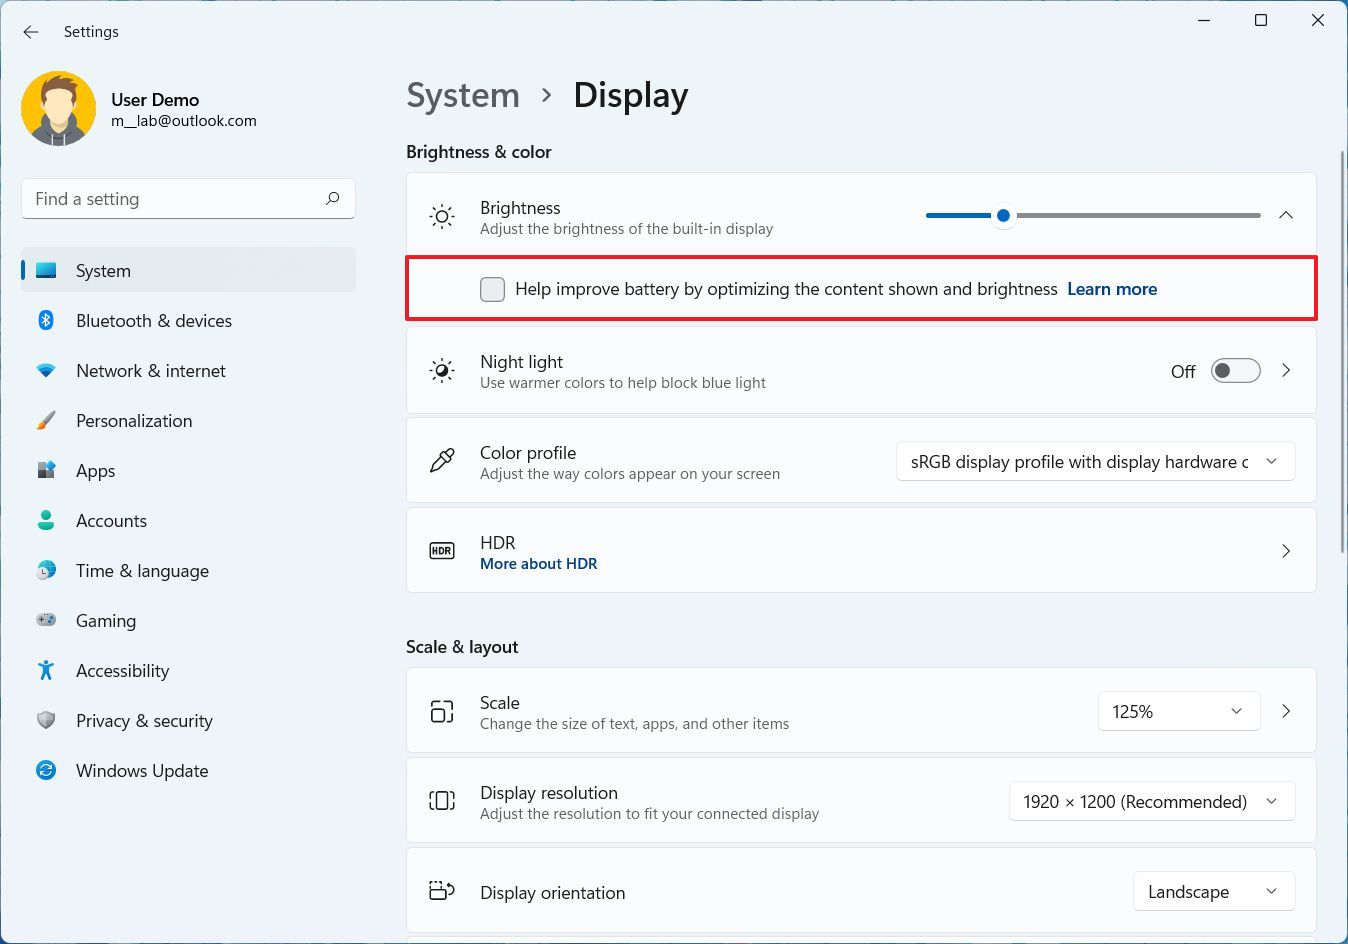
After completing the steps, the brightness and contrast will be constant and won’t change based on the ambient lighting or content displayed on the screen.
More resources
For more helpful articles, coverage, and answers to common questions about Windows 10 and Windows 11, visit the following resources:
- Windows 11 on Windows Central — All you need to know
- Windows 10 on Windows Central — All you need to know
Mauro Huculak has been a Windows How-To Expert contributor for WindowsCentral.com for nearly a decade and has over 15 years of experience writing comprehensive guides. He also has an IT background and has achieved different professional certifications from Microsoft, Cisco, VMware, and CompTIA. He has been recognized as a Microsoft MVP for many years.
Discover 9 methods to effortlessly adjust screen brightness.
Published
5 min read
9 Ways to Adjust Screen Brightness on Windows 11
Screen brightness settings play a crucial role in enhancing the user experience on any device. It affects not just visibility but also impacts battery life and eye strain. With Windows 11, Microsoft has streamlined the process of adjusting screen brightness, giving users a range of options to suit their specific needs. This article will explore nine different methods to adjust screen brightness on Windows 11. Whether you are using a desktop, a laptop, or a tablet, there is a solution for you!
Why Adjusting Screen Brightness is Important
Before diving into the methods, let’s take a moment to understand why adjusting your screen brightness is important.
-
Eye Comfort: Prolonged exposure to screens that are too bright or too dim can lead to eye strain. Adjusting brightness according to ambient light conditions allows for a more comfortable viewing experience.
-
Battery Life: On laptops and portable devices, reducing screen brightness can significantly extend battery life. Bright displays consume more power, and optimizing brightness can help you get through the day with less frequent charging.
-
Visibility: Sometimes, screen glare or reflections can make it difficult to see content clearly. Adjusting the brightness can help improve visibility and make your display more legible under various lighting conditions.
-
Personal Preference: Everyone has unique preferences when it comes to display settings. Some users prefer a brighter screen, while others may find softer tones more appealing.
Method 1: Using the Quick Settings Menu
One of the simplest ways to adjust screen brightness in Windows 11 is through the Quick Settings menu.
-
Access Quick Settings: Click on the network, sound, or battery icon located in the lower-right corner of the taskbar. This action opens the Quick Settings panel.
-
Find the Brightness Slider: Look for a brightness slider usually represented by a sun icon.
-
Adjust Brightness: Move the slider left to reduce brightness and right to increase it.
This method is quick and easily accessible, making it ideal for on-the-fly adjustments.
Method 2: Using Settings
For deeper control over your brightness settings, you can access the Settings app.
-
Open Settings: Press the
Windows + Ikey combination to open the Settings app. -
Select System: Click on “System” from the left sidebar.
-
Navigate to Display: In the right pane, select “Display.”
-
Adjust Brightness: Locate the brightness slider under the “Brightness and color” section. Adjust the slider to your preference.
This method is great for users who want to tweak other display settings, like scaling and night light options, while they’re at it.
Method 3: Using Keyboard Shortcuts
Many laptops come equipped with keyboard shortcuts that allow for quick brightness adjustments without the need to navigate through menus.
-
Identify the Brightness Keys: Look for a sun icon on your function keys, typically
F1toF12. -
Use the Function Key: Hold down the
Fnkey while pressing the appropriate function key to increase or decrease brightness.
This is especially useful for adjusting brightness on-the-go or when you’re multitasking.
Method 4: Using the Action Center
While similar to the Quick Settings menu, the Action Center provides another way to adjust brightness.
-
Open Action Center: Click on the Action Center icon next to the Quick Settings in the taskbar.
-
Locate Brightness Control: Look for the brightness slider.
-
Make Adjustments: Drag the slider left or right as needed.
This method provides a straightforward approach to managing brightness without delving into settings.
Method 5: Using Windows Mobility Center
For laptops, the Windows Mobility Center offers a simplified interface for adjusting several settings, including brightness.
-
Open Windows Mobility Center: Press
Windows + Xand select “Mobility Center” from the menu. -
Locate Brightness Slider: In the Mobility Center window, you’ll find a brightness slider.
-
Adjust as Needed: Modify the brightness level according to your preference.
This tool is handy for users who frequently adjust settings while on the move.
Method 6: Using Graphics Control Panel
If you have a dedicated graphics card, such as those from NVIDIA or AMD, you can also adjust brightness through the graphics control panel.
-
Open Graphics Control Panel: Right-click on the desktop and select either «NVIDIA Control Panel» or «AMD Radeon Settings» based on your graphics card.
-
Adjust Brightness: Look for display settings. You can often find options to change brightness, contrast, and gamma here.
-
Save Changes: Make your adjustments and save.
This method is beneficial for users who want to take advantage of advanced graphics settings to enhance visual experience.
Method 7: Using Command Prompt
For users who enjoy working from the command line, you can also adjust brightness through the Command Prompt.
-
Open Command Prompt: Press
Windows + R, typecmd, and hitEnter. -
Use the Correct Command: You will need to use a command that corresponds to your system’s display. However, be cautious, as incorrect commands can lead to settings issues.
-
Adjust Brightness: While this method is not as user-friendly, it could be beneficial for advanced users familiar with command line operations.
Method 8: Adjusting Brightness in Graphics Settings
Windows 11 allows users to tweak graphics settings for specific applications which can include brightness adjustments.
-
Open Settings: Press
Windows + Ito access Settings. -
Choose System: Select “System,” then click on “Display.”
-
Graphics Settings: Scroll to the “Graphics” settings.
-
Select Application: Choose the app you want to adjust and click on it for options.
-
Adjust Settings: Here you can modify the performance settings which may indirectly affect display brightness.
This method is mostly useful for gamers or those using graphics-intensive applications.
Method 9: Using Third-party Applications
If you find the built-in options insufficient, there are several third-party applications available that provide more control over brightness settings.
-
Download a Brightness Utility: Applications like «f.lux», «Iris», or others can control brightness beyond the capabilities of Windows.
-
Install and Configure: Follow the installation instructions and configure based on your needs. Many of these applications offer advanced features like automatic brightness adjustment based on time of day.
-
Enjoy Enhanced Features: Utilize features such as color temperature adjustments alongside brightness settings.
Conclusion
Adjusting screen brightness in Windows 11 can be an integral part of enhancing your overall computing experience. From quick adjustments through the Quick Settings menu to using third-party applications for advanced control, you have multiple options to suit your preferences. Whether you are looking to minimize eye strain, save battery life, or simply find the perfect brightness for your environment, the tools provided by Windows 11 make it easy to tailor settings to your needs. Explore these methods to find what works best for you and enjoy a more comfortable and efficient user experience.
FAQ
[Windows 11] Изменение яркости в зависимости от содержимого
Применимые продукты: ноутбук, игровой портативный компьютер
Некоторые устройства с Windows 11 могут автоматически регулировать яркость и контрастность экрана в зависимости от содержимого, отображаемого на встроенном экране. Например, если Вы смотрите видео, в котором есть темная сцена, за которой следует более яркая сцена (например, сцена, показывающая яркий солнечный день), яркость и контрастность могут измениться. Это нормально.
Адаптивное управление яркостью контента обеспечивает идеальные уровни яркости и контрастности, одновременно экономя электроэнергию и продлевая срок службы батареи. Если эти внезапные изменения яркости отвлекают вас или вы работаете в фото- и видеоприложениях, где для вас важна точность цветопередачи, эти настройки можно настроить так, чтобы они наилучшим образом соответствовали вашим потребностям, обеспечивая соответствующую яркость и контрастность и экономя заряд батареи.
Выполните следующие действия, чтобы настроить параметр «Изменить яркость в зависимости от содержимого»:
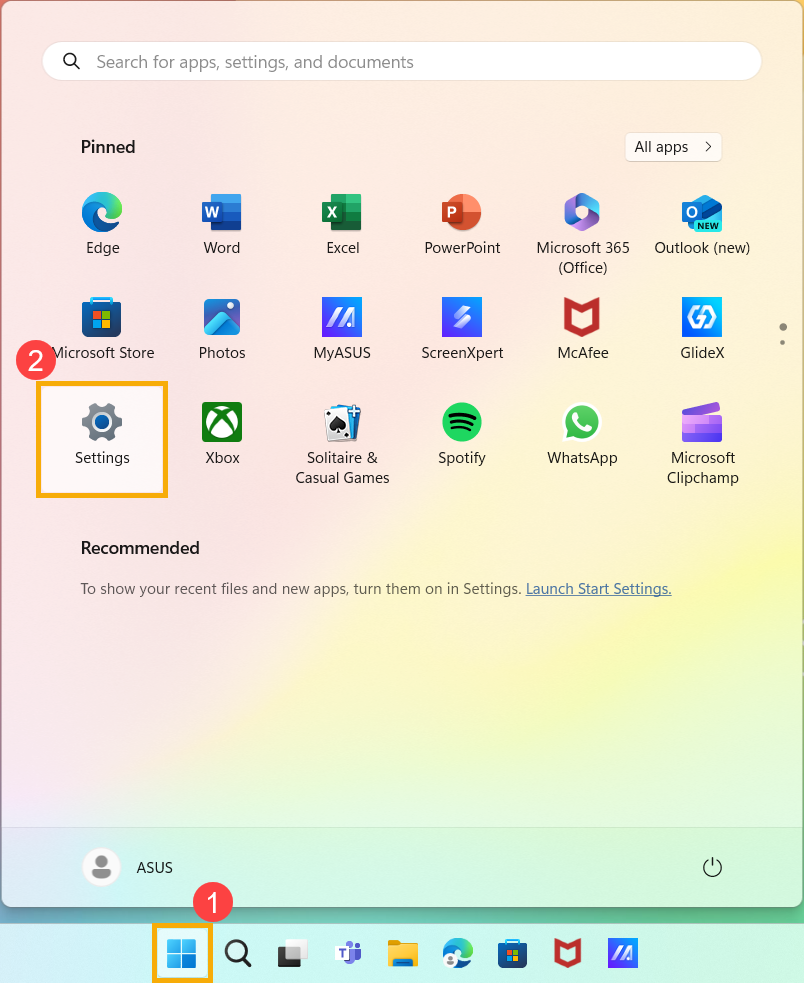
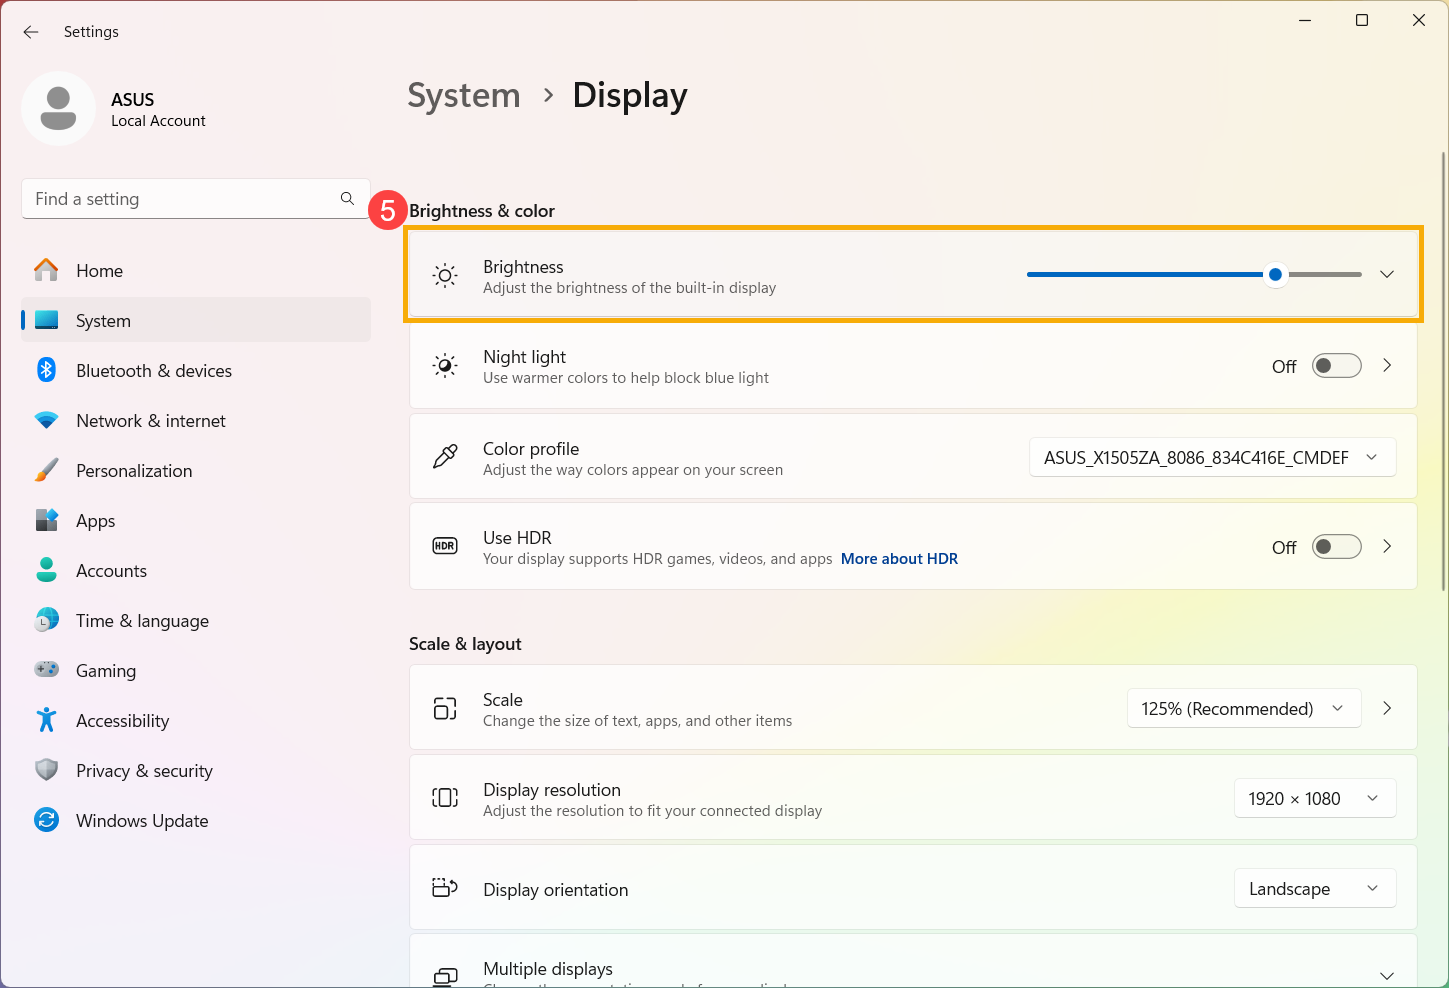
- Нажмите значок [Пуск] ① на панели задач, затем выберите [Настройки] ② .

- В настройках Windows нажмите [Система] ③ , затем выберите [Дисплей] ④ .
- В разделе «Яркость и цвет» нажмите [Яркость] ⑤ , чтобы развернуть дополнительные параметры.
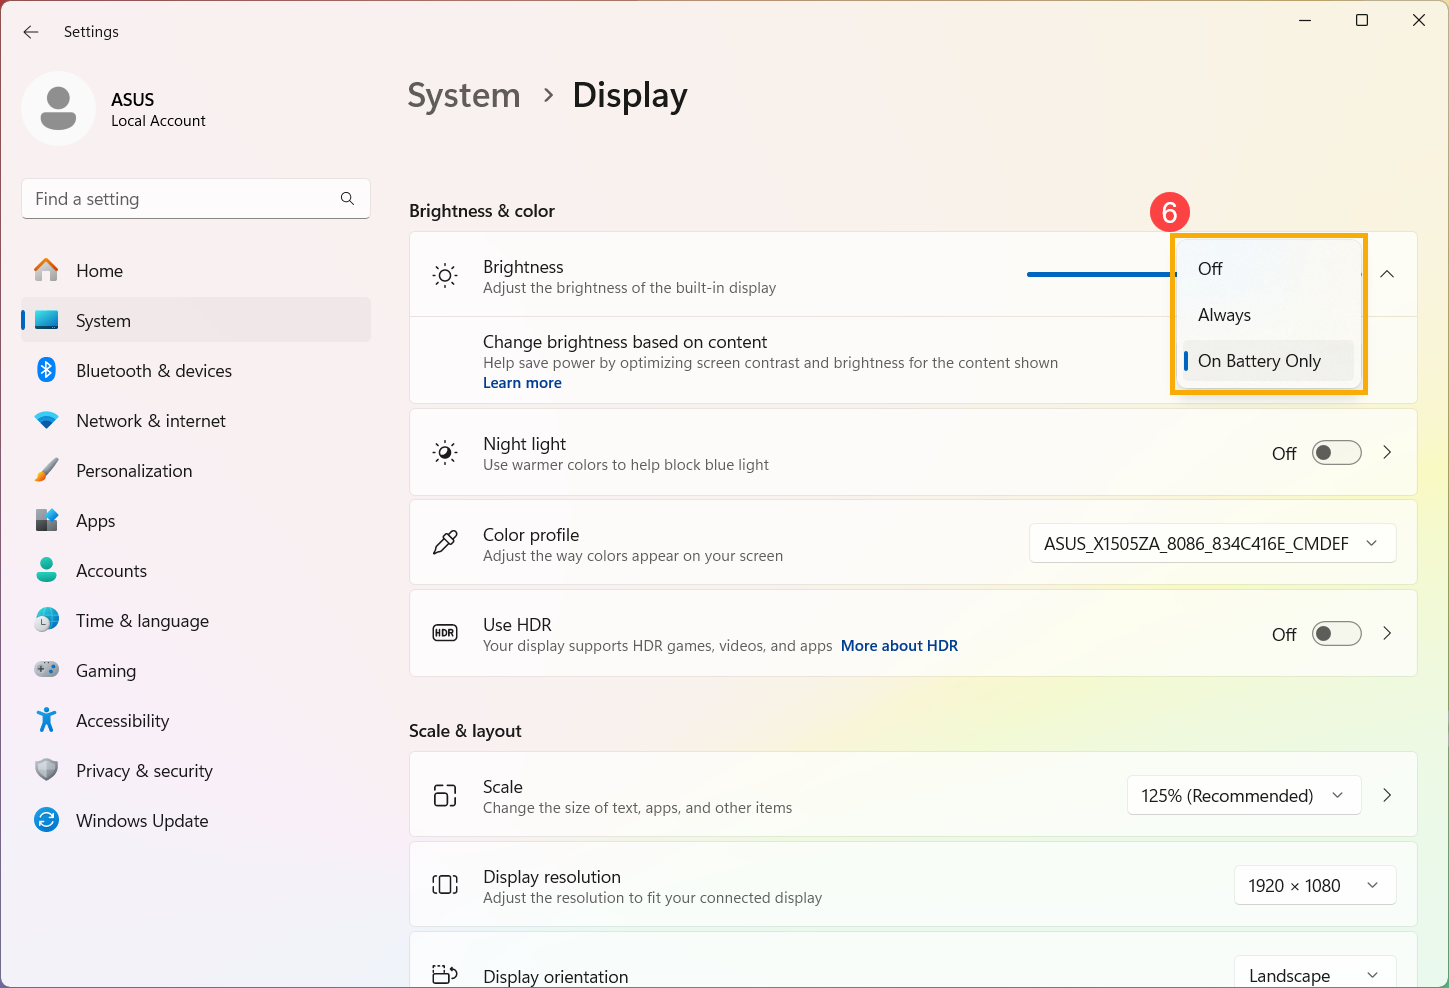
- Нажмите раскрывающееся меню настройки [ Изменить яркость в зависимости от содержимого] ⑥ , затем настройте настройку по своему усмотрению.
- Выкл.: адаптивное управление яркостью будет отключено, а яркость и контрастность экрана не будут регулироваться. Это может привести к сокращению срока службы батареи.
- Всегда: адаптивное управление яркостью всегда будет работать независимо от того, подключено ли устройство к сети или работает от аккумулятора.
- Только от батареи: адаптивное управление яркостью будет активировано только тогда, когда устройство работает от батареи.

Приведенная выше информация получена из адаптивного управления яркостью контента Microsoft в Windows .
Эта информация была полезной?
Yes
No
- Приведенная выше информация может быть частично или полностью процитирована с внешних веб-сайтов или источников. Пожалуйста, обратитесь к информации на основе источника, который мы отметили. Пожалуйста, свяжитесь напрямую или спросите у источников, если есть какие-либо дополнительные вопросы, и обратите внимание, что ASUS не имеет отношения к данному контенту / услуге и не несет ответственности за него.
- Эта информация может не подходить для всех продуктов из той же категории / серии. Некоторые снимки экрана и операции могут отличаться от версий программного обеспечения.
- ASUS предоставляет вышеуказанную информацию только для справки. Если у вас есть какие-либо вопросы о содержании, пожалуйста, свяжитесь напрямую с поставщиком вышеуказанного продукта. Обратите внимание, что ASUS не несет ответственности за контент или услуги, предоставляемые вышеуказанным поставщиком продукта.