
To manage your Adaptec RAID controller and its resources (RAID arrays, RAID logical disks, physical disks, …), you can use ACU (Adaptec Configuration Utility) accessible when your computer or server starts up.
Note: ACU is only accessible if your computer or server boots in LEGACY BIOS mode.
If your computer or server boots in UEFI mode, you will need to access the «PMC maxView Storage Manager» option available in a menu (usually named «Advanced») in your motherboard BIOS.
- Access ACU (Adaptec RAID Configuration Utility)
- Array Configuration Utility (configure RAID arrays)
- Manage Arrays (manage RAID arrays)
- Create Array (create a RAID array)
- Initialize Drives
- Rescan Drives
- Secure Erase Drives
- Global Hotspares
- Manage JBOD
- Create JBOD
- SerialSelect Utility (controller settings and battery status)
- Controller Configuration (controller settings)
- Advanced Configuration (power management)
- Backup Unit Status (ZMM battery status)
- Disk Utilities (manage physical disks)
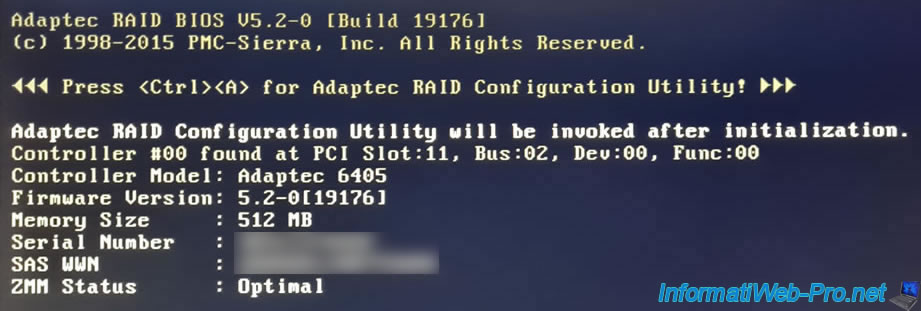
When your computer starts up, this is displayed:
Plain Text
Adaptec RAID BIOS V5.2-0 [Build 19176].
(c) 1998-2015 PMC-Sierra, Inc. All Rights Reserved.

Press <Ctrl><A> for Adaptec RAID Configuration Utility!

Booting the Controller Kernel...
As shown on the screen, to access ACU (Adaptec RAID Configuration Utility), press «CTRL + A» (on a QWERTY keyboard) or «CTRL + Q» (on an AZERTY keyboard).

Once you have pressed these 2 keys, you will see an additional line appear at the top of the screen.
Plain Text
Adaptec RAID Configuration Utility will be invoked after initialization.
Which means that ACU will appear once your Adaptec RAID controller has finished initializing.

The BIOS of your Adaptec RAID controller continues to boot and this is displayed.
Plain Text
Controller #00 found at PCI Slot:11, Bus:02, Dev:00, Func:00
Controller Model: Adaptec 6405
Firwmare Version : 5.2-0[19176]
Memory Size : 512 MB
Serial Number: ...
SAS WWN : ...
ZMM Status : Optimal
2. Array Configuration Utility (configure RAID arrays)
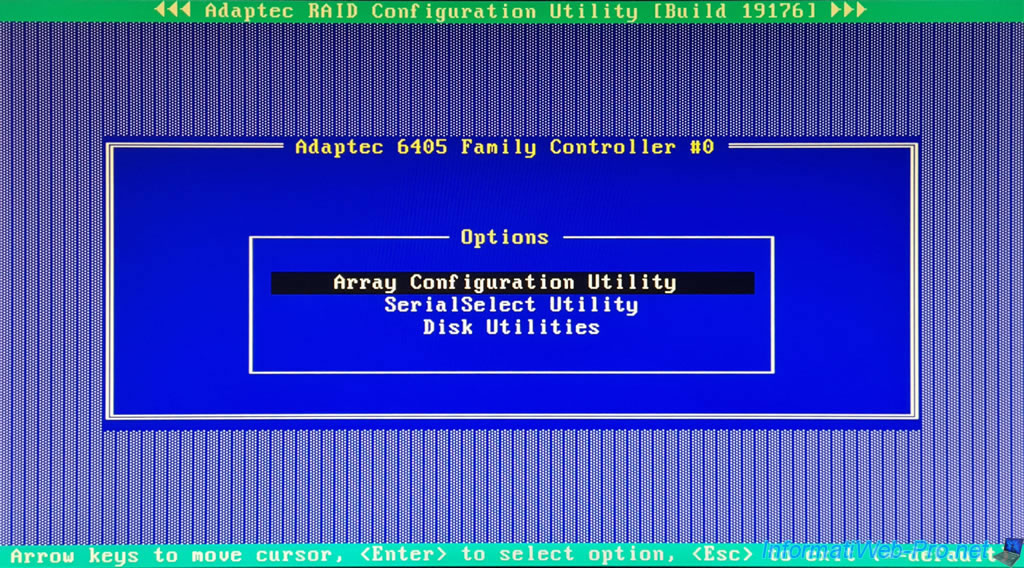
Once the Adaptec RAID controller is initialized, ACU (Adaptec RAID Configuration Utility) appears.
In ACU (Adaptec RAID Configuration Utility), you will find 3 sections:
- Array Configuration Utility: to manage and create RAID arrays.
- SerialSelect Utility: to manage Adaptec RAID controller settings.
- Disk Utilities: to manage the physical disks connected to your Adaptec RAID controller.
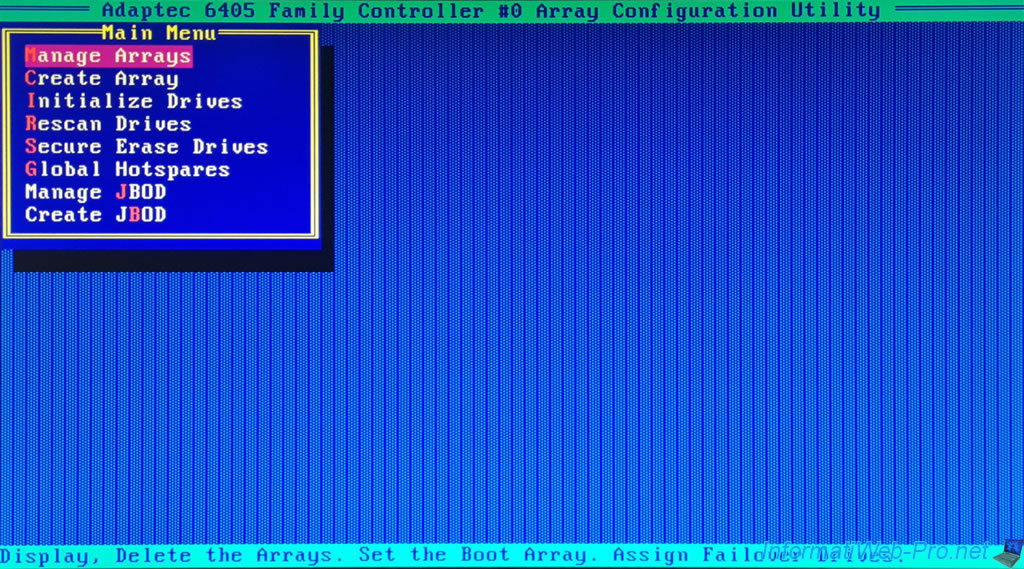
In this «Array Configuration Utility» section, you will be able to:
- Manage Arrays: manage your RAID arrays.
- Create Array: create a RAID array.
- Initialize Drives: initialize drives for trouble-free use in a future RAID array.
- Rescan Drives: rescan available drives to detect new hot-plugged drives.
- Secure Erase Drives: securely erase a physical drive.
- Global Hotspares: manage the hotspares that will be used in the event of a disk failure in one of your RAID arrays to automatically rebuild the missing disk.
- Manage JBOD: manage your JBOD arrays (a JBOD logical disk is simply an aggregation (a set) of several physical disks WITHOUT fault tolerance).
- Create JBOD: create a JBOD array.
2.1. Manage Arrays (manage RAID arrays)
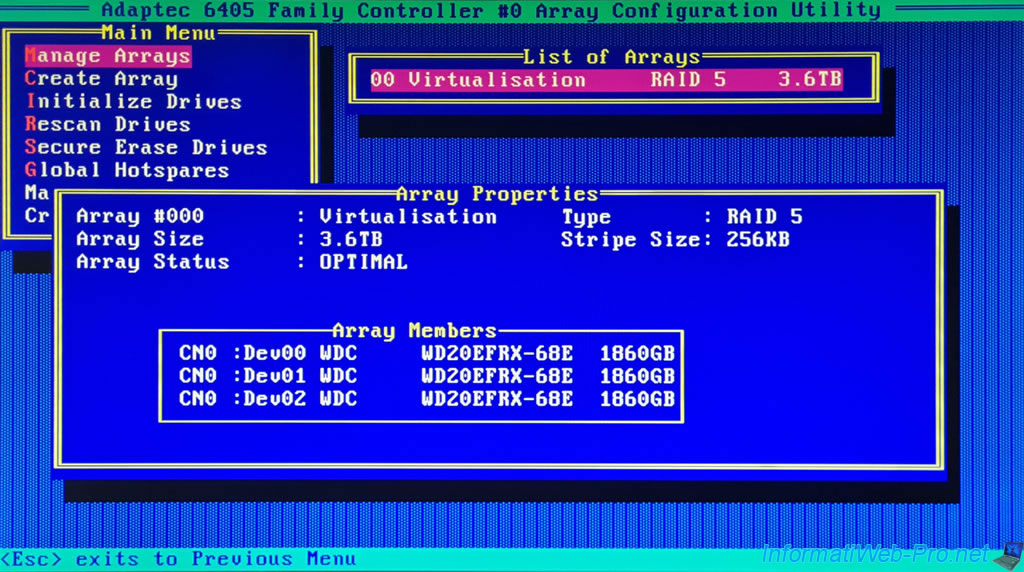
The «Manage Arrays» option allows you to see the list of RAID arrays (List of Arrays) already created on your Adaptec RAID controller.
For each of them, you will see: its number, its name, its RAID level (in our case: RAID 5) and its usable capacity.
Note: if you have already created multiple RAID arrays on your RAID controller, you can place the selected RAID array first for the boot order by pressing the «CTRL+B» keys (<Ctrl+B> Swap the Array with first in boot order).
Indeed, a boot option referring to your Adaptec RAID controller will be visible in the boot order of your motherboard BIOS.
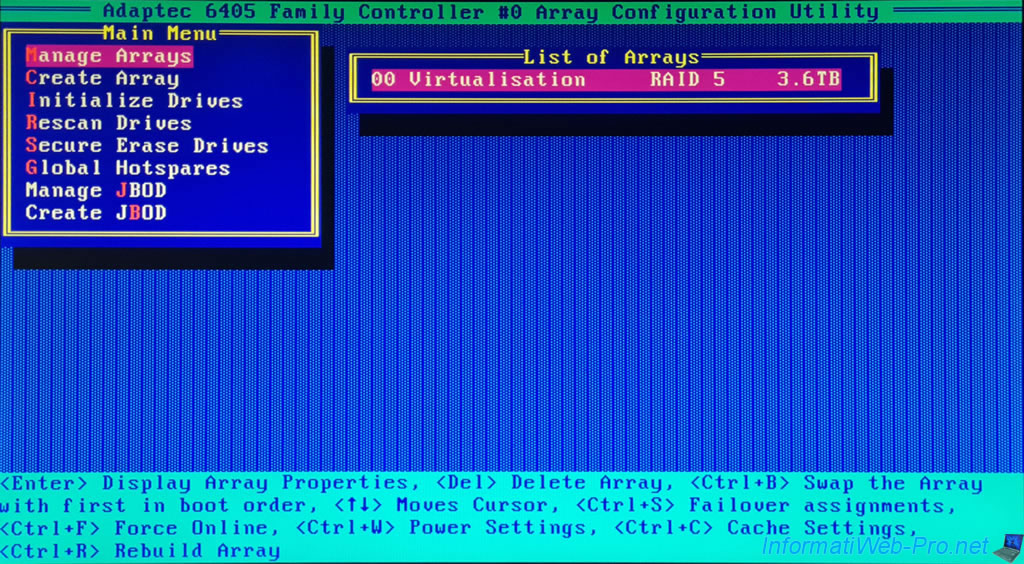
If you press «Enter» (<Enter> Display Array Properties), an «Array Properties» window will appear with:
- Array#: the number of the selected RAID array.
- Array Size: the usable capacity (disk space) (therefore not counting the space reserved for parity) on the RAID array.
- Array Status: the OPTIMAL status when an array is fully initialized/created.
When created, the status is «BUILD/VERIFY x%». This allows you to know the progress of creating a RAID array. - Type: the RAID level used.
In our case: RAID 5. - Stripe Size: the stripe size used.
- Array Members: the list of physical disks (connected to your Adaptec RAID controller) used for this RAID array with its make, model and actual capacity.
Note: to return to the RAID array list, press «Esc».
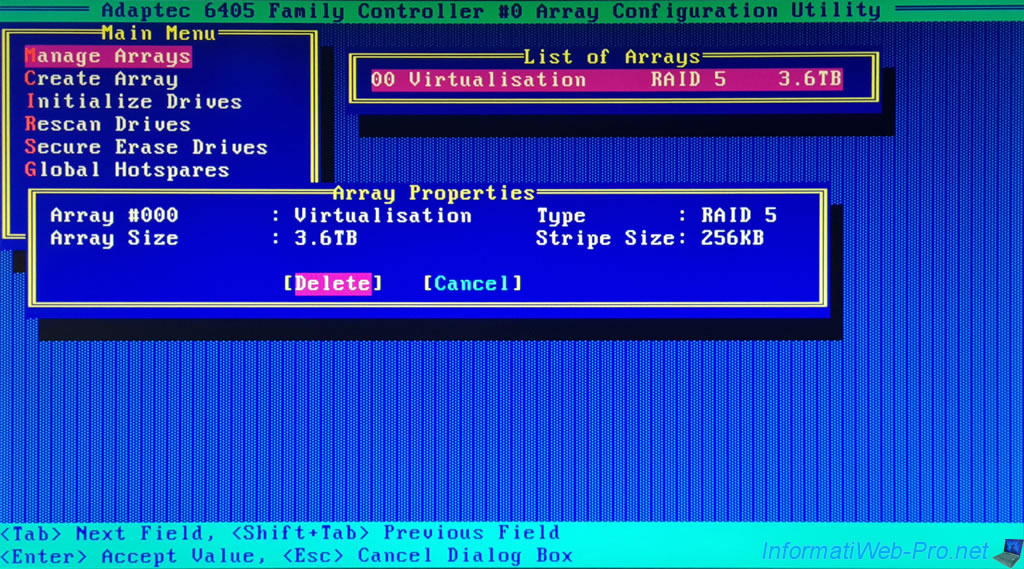
To delete the selected RAID array, press «Del» (<Del> Delete Array), then select «Delete» and press Enter (<Enter> Accept Value) to confirm deletion of this RAID array.
By pressing the «CTRL + S» keys (<Ctrl+S> Failover assignments), you will be able to assign physical disks as «hotspares».
These will only be used when a physical disk in a RAID array fails to automatically rebuild the missing disk on that hotspare.
If there is no free physical disk (not used by one of your RAID or JBOD arrays), an error message will be displayed telling you the capacity (size) that the disk must have for the selected RAID array .
Plain Text
There are no valid free drives or assigned hotspares.
1860GB is the required hotspare space for this array.

To force a RAID array (and its RAID logical drives) online, simply press the «CTRL + F» keys (<Ctrl+F> Force Online).
If the array is already online, the error below will appear.
Plain Text
Force Online only applies for offline arrays.
Force Upload is useful if a RAID logical drive does not appear in the operating system installed on your computer.

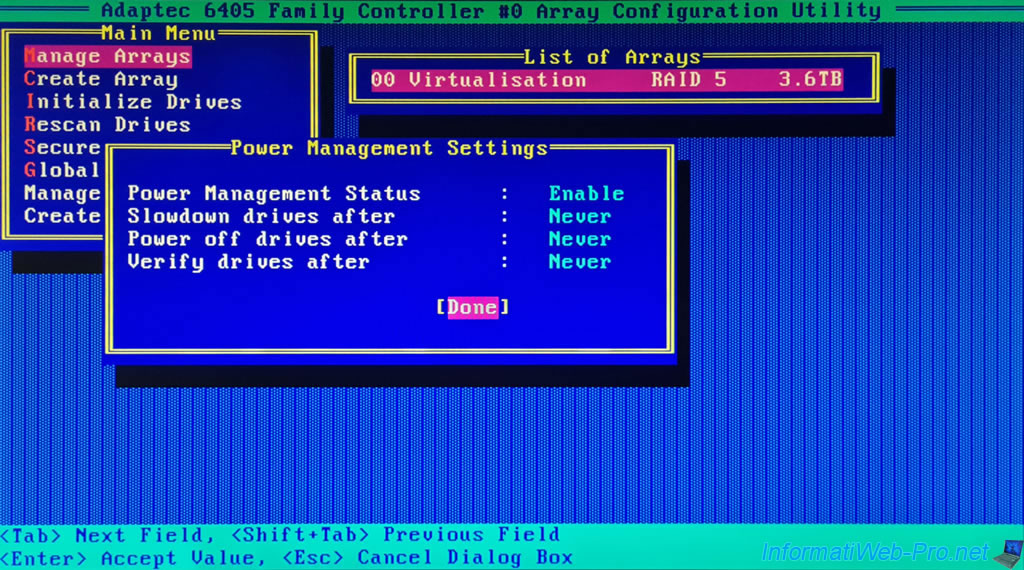
To manage the power settings for the physical disks in this RAID array, press the «CTRL + W» keys (<Ctrl+W> Power Settings).
In the «Power Management Settings» window that appears, you can:
- Power Management Status: Enable or Disable power management for this RAID array.
- Slowdown drives after: define the inactivity period (from 3 min to 3 h) after which the physical disks of this RAID array will be slowed down in low consumption mode or not (Never).
- Power off drives after: similar to the previous option, but for stopping these physical disks.
The possible values are identical (including the «Never» option), but this delay must obviously be longer than that defined above. - Verify drives after: the time interval at which the RAID controller will check the health of this RAID array and its disks.
This saves electricity when an array is not used for at least some time.
Source : Adaptec RAID Controller Installation and User’s Guide | Adaptec (page 83).
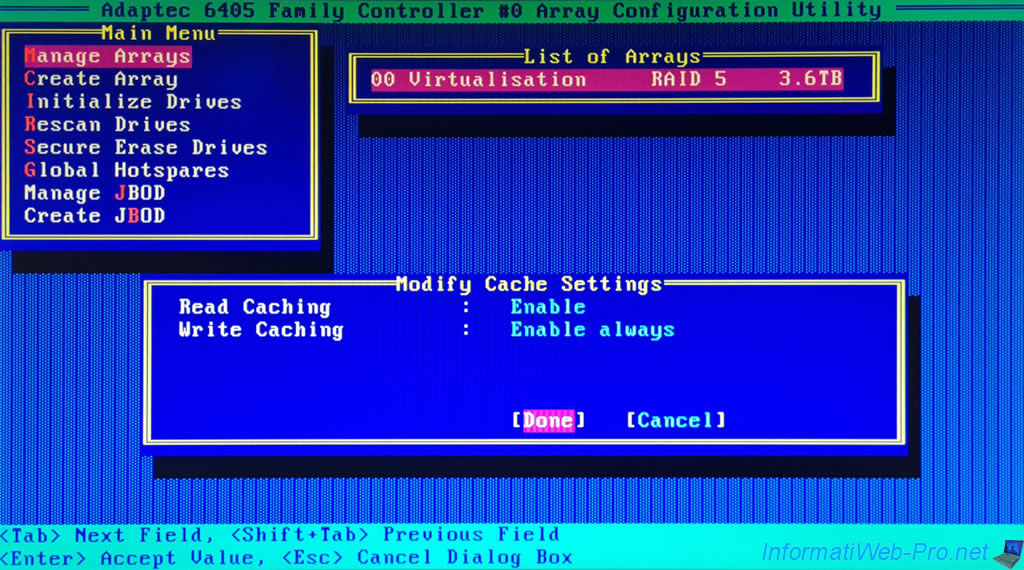
To enable or disable the use of read and/or write cache for the selected RAID array, press the «CTRL + C» keys (<Ctrl+C> Cache Settings).
In the «Modify Cache Settings» window, you can:
- Read Caching: Enable or Disable read caching for this RAID array.
- Write Caching: enable or disable write caching for this one.
- Enable always: always enable write cache, even if there is no battery (ZMM) connected to your Adaptec RAID controller or it is not sufficiently charged.
Warning: in the event of a power outage, data loss may occur. - Enable with ZMM: enable write cache only when a battery (ZMM) is plugged into your Adaptec RAID controller and the battery is sufficiently charged.
Recommended if you have a battery (ZMM) plugged into your Adaptec RAID controller. - Disable: disable write cache to prevent data loss in the event of a power outage.
- Enable always: always enable write cache, even if there is no battery (ZMM) connected to your Adaptec RAID controller or it is not sufficiently charged.
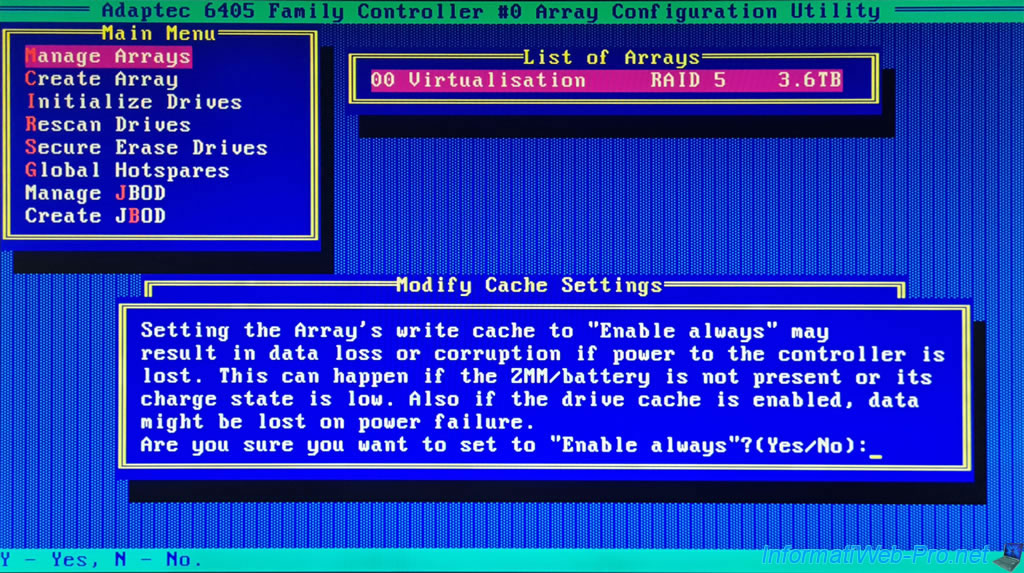
If you select «Enable always» for the write cache of the selected RAID array, a warning will appear to warn you that data loss or corruption may occur if the Adaptec RAID controller loses power.
This will happen if there is no battery (ZMM) plugged into this Adaptec RAID controller.
Plain Text
Setting the Array's write cache to "Enable always" may result in data loss or corruption if power to the controller is lost. This can happen if the ZMM/battery is not present or its charge state is low. ...
If a RAID array is degraded (when one of its physical disks has failed), you can start rebuilding it by pressing the «CTRL + R» keys (<Ctrl+R> Rebuild Array).
The controller will scan the disks and then retrieve the necessary information about them.
Plain Text
Scanning for drives ...
Updating Drive Information ...


If no array is degraded, the error below will appear.

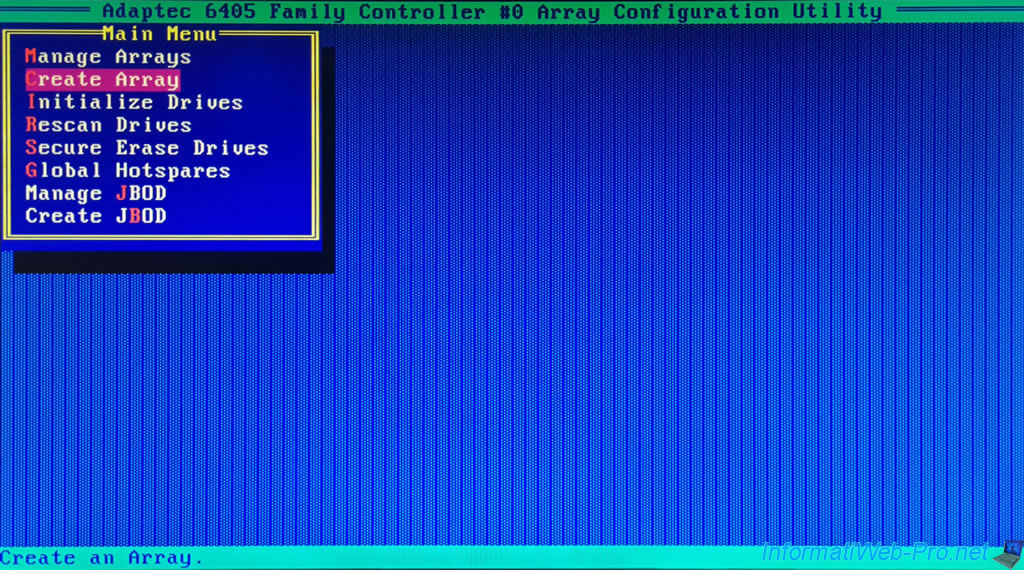
2.2. Create Array (create a RAID array)
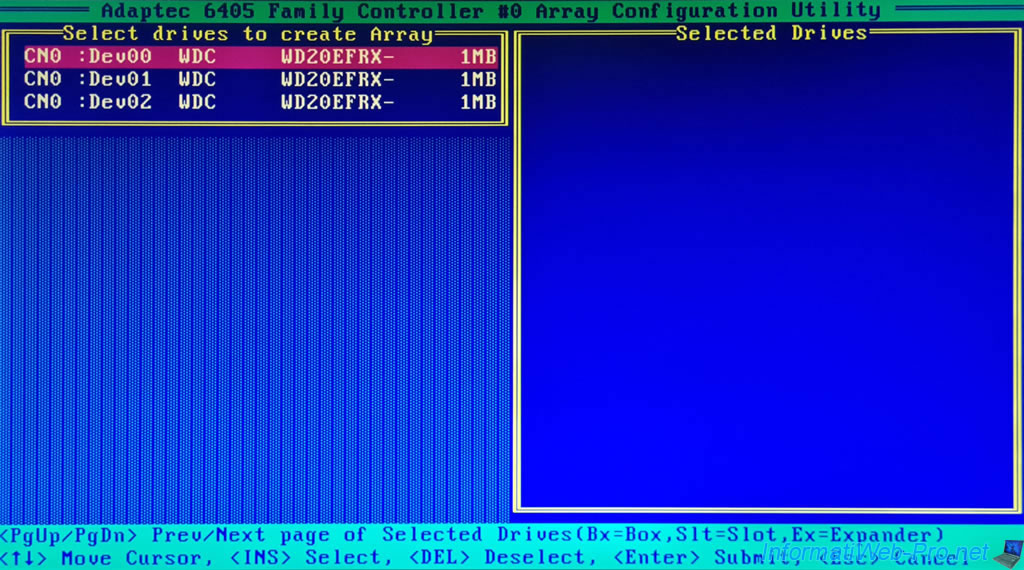
The «Create Array» option allows you to create a new RAID array on your Adaptec RAID controller.
Select the drives to use for this array by selecting them with the arrows, then pressing the «Insert» key (<INS> Select) to add them to the Selected Drives list.
To find out how to create a RAID array on an Adaptec RAID controller, refer to our tutorial: Adaptec RAID 6405 — Create and configure a RAID 0, 1, 5, …
В этом видео рассмотрим процесс создания RAID массива через внешний контроллер Adaptec. Я уже затрагивал тему создания зеркального RAID массива через встроенный в материнскую плату контроллер, а так же создание RAID массива средствами Windows 7. Но, в данной ситуации будем выполнять настройку внешнего контроллера Adaptec ASR-3405, который выглядит следующим образом.
Данный контроллер подключается к материнской плате через слот PCI-Express, а к самому контроллеру подключается корзина с жесткими дисками. И далее, начинается непосредственный процесс настройки.
Включаем сервер и дожидаемся появления сообщения Press Ctrl+A for Adaptec RAID Configuration Utility, т.е. нажмите Ctrl+A для запуска конфигурационной утилиты. Нажимаем, и выполняется запуск утилиты настройки RAID контроллера Adaptec.
После загрузки, запустим утилиту по настройке массива (Array Configuration Utility). Если RAID массивы уже создавались, то можно зайти в Управление массивами (Manage Arrays) и увидеть, какие массивы уже были созданы и нормально ли они функционируют. Как вы видите, у меня уже есть зеркальный массив с именем RAID1_Mr, по этому, я его удалю, чтобы настроить все с чистого листа. Для этого жмем Enter и выбираем пункт Delete. После чего, появляется сообщение, что ни одного массива не найдено.
Так как вся работа с жесткими дисками будет выполняться через внешний контроллер. Нужно, чтобы этот контроллер видел все диски, с которыми ему предстоит работать. По этому, первым делом нужно выполнить инициализацию жестких дисков, т.е. убедиться, что утилита видит все диски и может с ними работать. Для этого жмем в меню Initialize Drives, и если какой-то из жестких дисков не виден или не получается его выбрать при создании массива. То, из данного списка, выбираем его кнопкой Insert \ Enter, где можно будет выполнить проверку жесткого диска или выполнить низкоуровневое форматирование.
Теперь создадим наш зеркальный массив, для этого выбираем в меню Create Array (Создать массив) \ Кнопкой Insert выделяем нужные нам диски (так как я буду делать зеркальный RAID, то я выбираю жесткие диски одинакового размера) \ Enter \ RAID 1 \ Имя массива: Mirror_2Tb, все остальное оставляем по умолчанию \ Done. Стоит учесть, что вся информация с жестких дисков, объединяющихся в массив, будет удалена!!!
Если выбрать 3 жестких диска, то станет доступно создание RAID 5, но, мне это не нужно, я хочу создать два зеркальных массива и один обычный том. Поэтому я выделяю два других диска одинакового объема, выбираю так же RAID 1 и задаю имя Mirror_150Gb.
Ну и выбираю последний диск, это у нас будет обычный том, поэтому оставляем по умолчанию значение Volume, ну и имя Volume_300Gb.
Теперь мы видим в управлении массивами, что у нас три массива, два RAID1 и один обычный. Как вы видите, в меню установки операционной системы у нас видны 3 жестких диска, с которыми мы можем работать!!!
Скачать видеоурок и инструкцию
Содержание
LSI
Утилиты для управления контроллером LSI
-
LSI Storage Authority — новая версия
-
MegaRAID Storage Manager Application — устаревшая версия
Adaptec
Информация для серверов Skylark с аппаратными RAID контроллерами Adaptec 6405 или Adaptec 6805.
Настройка
Настройка контроллера производится через Adaptec RAID Configuration Utility (запускается при старте сервера) или утилиту Adaptec Stor manager (запускается через операционную систему Windows).
Вход в Adaptec RAID Configuration Utility осуществляется при старте сервера, нажатием комбинации Ctrl+A. На экране будет отображено сообщение: Adaptec RAID Configuration Utility will be invoked after initialization.
Проверка подключения
Начните с проверки правильности подключения каждого диска в меню: Disk Utilities→Диск_N→нажатие клавиши Enter→Identify Drive. Соответствующий диск будет отмечен миганием зеленого светодиода. Диски должны быть подключены последовательно слева направо.
Пример сопоставления для контроллера Adaptec 6805 с подключением 8-ми дисков по SATA.
| Location | Корзина в корпусе (начиная слева) |
|---|---|
| CH0 Dev 00 | 1 |
| CH0 Dev 01 | 2 |
| CH0 Dev 02 | 3 |
| CH0 Dev 03 | 4 |
| CH1 Dev 00 | 5 |
| CH1 Dev 01 | 6 |
| CH1 Dev 02 | 7 |
| CH1 Dev 03 | 8 |
Если диски установлены правильно, то можно перейти к созданию дискового массива.
Создание массива
Создание массива начинается с инициализации дисков в меню Array Configuration Utility→Initialize Drives. Убедитесь, что на дисках нет нужных данных, так как это действие сотрет все данные. Действие необратимо.
Затем приступайте к созданию массива: Array Configuration Utility→Create Array.
2268300R specifications
The Adaptec 2268300R is a robust and versatile RAID controller designed for enterprise-level storage needs. Ideal for environments demanding high availability, performance, and data protection, this controller provides organizations with the ability to manage large volumes of data while ensuring reliability.
One of the standout features of the Adaptec 2268300R is its support for various RAID levels, including RAID 0, 1, 5, 6, 10, 50, and 60. This flexibility allows users to choose the configuration that best suits their performance and redundancy requirements. By combining multiple drives into a single logical unit, the controller enhances data throughput and ensures data safety through redundancy.
The controller is built on a SATA and SAS architecture, allowing it to connect directly to both SATA and SAS drives. This broad compatibility is crucial for businesses looking to leverage existing hardware while also scaling their storage infrastructure. The Adaptec 2268300R is equipped with a powerful onboard processor that significantly boosts performance, driving down latency and increasing transaction speeds across connected drives.
Additionally, the Adaptec 2268300R features cache memory with a non-volatile option that enhances data integrity during unexpected power outages. This feature is essential for mission-critical applications where data loss can have severe repercussions. Moreover, the controller supports advanced caching algorithms, optimizing write and read performance to meet the demands of modern applications.
The controller also integrates seamlessly with Adaptec’s management suite, providing users with a graphical interface to monitor and manage their storage solutions effectively. The web-based management tool allows administrators to configure RAID settings, monitor disk health, and perform troubleshooting, all from a centralized platform.
Security is another critical aspect of the Adaptec 2268300R. The controller comes equipped with encryption capabilities, enabling users to secure sensitive data at rest—protecting information from unauthorized access. Furthermore, with features like hot-spare drive support and automatic rebuilds, the controller assures continued operation even in the event of a disk failure.
In conclusion, the Adaptec 2268300R is a powerful RAID controller that delivers significant advantages in performance, flexibility, and reliability. With its support for multiple RAID levels, SAS and SATA compatibility, robust caching, and advanced management tools, it stands out as an ideal solution for businesses needing to safeguard and manage their vast data assets efficiently. Whether for enhancing data security or optimizing storage performance, the Adaptec 2268300R remains a sound choice in today’s data-driven landscape.
Краткая инструкция по начальной настройке RAID контроллеров Adaptec.
Ниже представлена краткая инструкция по настройке RAID-контроллеров Adaptec (серии 3xxx, 5xxx). Все указанные действия нужно выполнять до установки операционной системы, когда на жестких дисках нет никаких нужных данных.
Во время старта сервера, при инициализации RAID-контроллера будет выведено приглашение нажать Ctrl-A для того, чтобы войти в BIOS контроллера. Через некоторое время после нажатия Ctrl-A, Вы попадете в утилиту управления контроллером, где и сможете осуществить все дальнейшие действия по настройке.
В первую очередь, нужно проинициализировать диски (все данные на них будут утеряны!) — в меню Array Configuration Utility -> Initialize Drives пробелом выбираете все диски и нажимаете Enter.
После этого можно приступать к созданию массивов. Обсуждения выбора уровня RAID, а также размеров логических дисков выходит за рамки данного документа — это должно быть сделано в момент планирования конфигурации.
Для создания RAID-массива следует выбрать пункт меню Array Configuration Utility -> Create Arrays, выбрать (пробелом) диски, которые Вы планируете включить в массив, и нажать Enter. В следующем меню нужно будет выбрать уровень RAID (Array Type); название массива (Array Label); размер массива (Array Size); размер страйпа (Stripe Size) — в данном случае рекомендуется оставить значение, предлагаемое по умолчанию; кэширование при чтении (Read Caching) — рекомендуется Yes; кэширование записи (Write Caching) — рекомендуется Enable when protected by battery; способ создания массива (Create RAID via) — рекомедуется выбрать режим Clear, хотя это потребуется длительного (особенно в случае с SATA дисками большого объема) ожидания создания массива, зато Вы будете избавлены от целого ряда других возможных проблем.
Если был выбран режим создания массива Clear, начнется процедура создания массива. Посмотреть текущий статус можно в меню Manage Arrays и нажав Enter на массиве — необходимо дождаться статуса Optimal (пока не окончился процесс создания массива в строке статуса будет написано Clearing: xx%).
Если Вы создали несколько массивов, то загрузочным будет самый первый из них (в списке Manage Arrays), поэтому, если требуется выбрать другой массив для установки ОС, нужно установить курсор на этом массиве и нажать Ctrl-B, после подтверждения загрузочный массив изменится.
Назначить Hot-Spare диск(и) можно также в меню Manage Arrays, нажав Ctrl-G — будет выведен список свободных дисков, из него пробелом можно назначить Hot-Spare диски (один или несколько). Затем нужно подтвердить сделанный выбор, нажав Enter. Пояснение: Spare диск не входит в состав ни одного RAID-массива, но в случае поломки какого-либо диска в массиве, автоматически займет его место (кроме случая RAID-0).
После этого можно выйти из BIOS контроллера (Esc) и сервер будет автоматически перезагружен.
Теперь можно начинать устанавливать на сервер операционную систему. Для установки Вам скорее всего потребуются драйверы (возможно, их потребуется записать на дискету). Драйверы можно взять с прилагаемого диска, но рекомендуется скачать последнюю версию с сайта Adaptec: http://www.adaptec.com/en-US/support/raid/#sas_raid (выбрав имеющийся контроллер и соответствующую ОС). Дальнейшие инструкции по установке драйвера следует искать в документации на используемую ОС.
После установки ОС настоятельно рекомендуется установить Adaptec Storage Manager (ASM). Это графическое приложение служит для мониторинга и модификации настроек RAID-контроллера и созданных массивов. В случае возникновения каких-либо проблем, Вы будете оповещены (на email или другим способом, который Вы выберете при настройке параметров). Более подробная документация (на английском языке) находится на сайте http://www.adaptec.com