

Remember the Active Directory Administrative Center? If you are like me, you didn’t really see many across the enterprise make use of the “next-generation” of Active Directory management. However, there is a new Active Directory Administrative Center that I would like to predict will be the next-generation of managing Active Directory domain resources and that is the Windows Admin Center New Active Directory Extension that is available for Preview in Windows Admin Center. Additionally, if you are looking for Active Directory Administrative Center Windows 10, this is the tool that most likely, will fill this need. Let’s take a look at the Windows Admin Center New Active Directory Extension and see how this new Active Directory extension is installed and used.
As you know, Windows Admin Center can be installed and used on Windows 10 as well as Windows Server operating systems. In fact, you can connect to and have access to many powerful tools in Windows Admin Center on your Windows 10 administrative workstation.
How do you access the Windows Admin Center Active Directory module?
Installing Windows Admin Center New Active Directory Extension
Be sure you are running the latest and greatest Windows Admin Center (1910 at the time of this writing). You can download it here: https://www.microsoft.com/en-us/cloud-platform/windows-admin-center
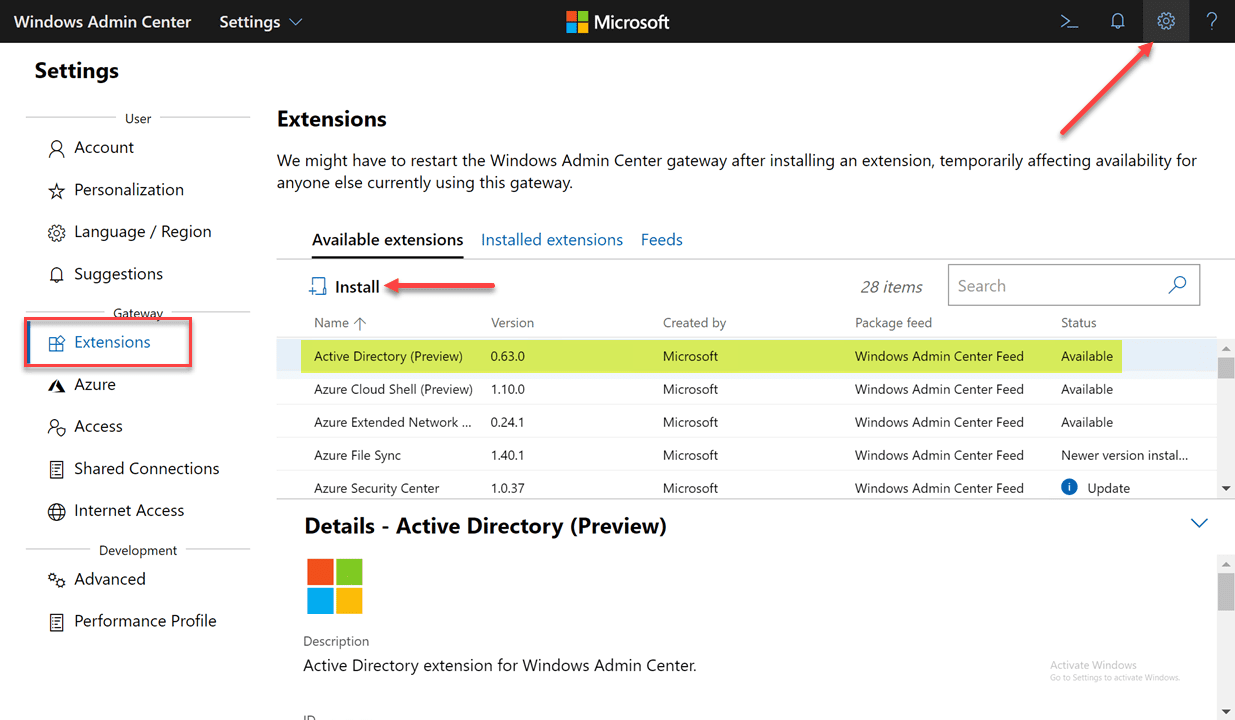
Once you have the latest Windows Admin Center, navigate to the Settings > Extensions screen. Under the Available extensions, you will see the Active Directory (Preview) listed. Highlight it, and then click the Install button.
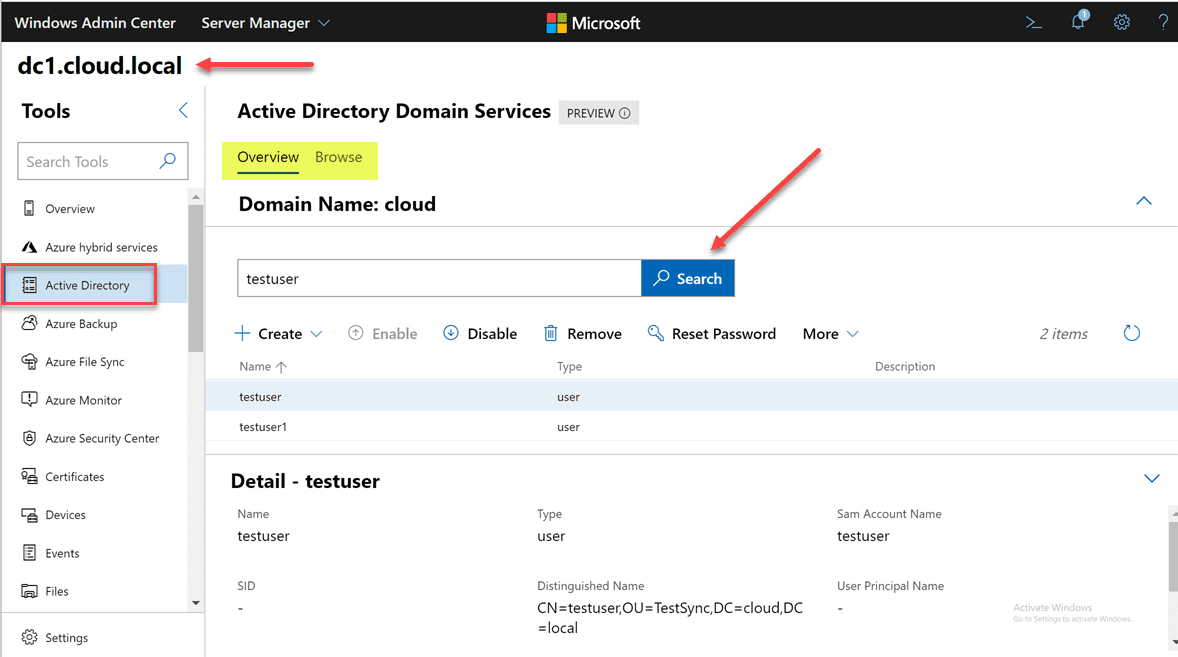
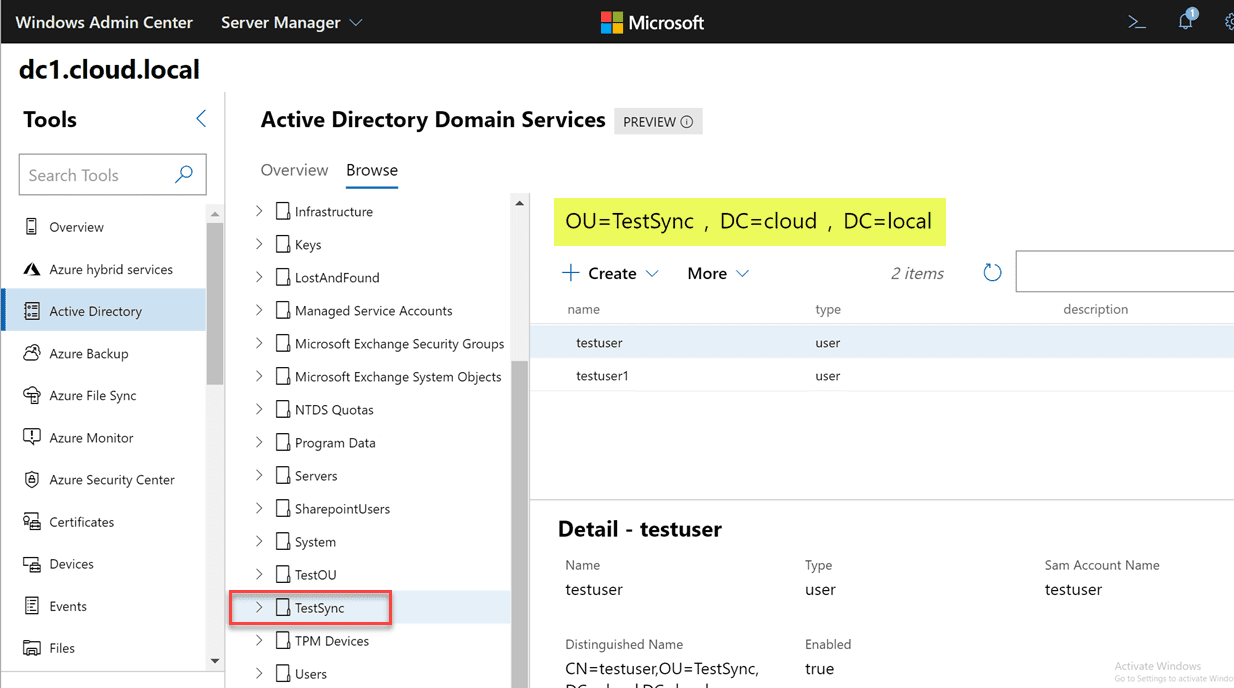
Once installed, Windows Admin Center will quickly reload the browser session. Then you will need to connect to a domain controller in your environment to manage. The Active Directory Domain Services only shows up in the context of managing a domain controller with Windows Admin Center. After connecting to a DC, you will see the Active Directory menu listed underneath Tools.
There are several things that stand out here. For one, the large search field allows easily finding objects.
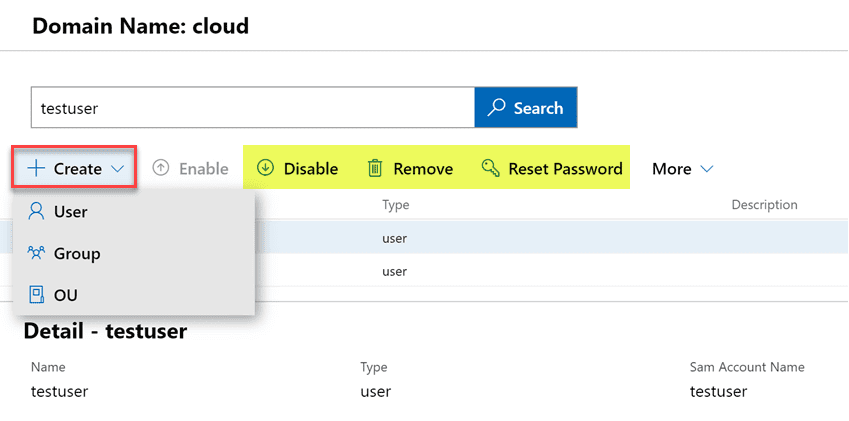
Zooming in a bit further, when we look at the various actions that can be performed, you will see under the Create menu, you can create users, groups, and OUs. Additionally, you have the ability to Disable, Remove, and Reset Password.
Under the More menu, you will notice two options – Properties and Locate.
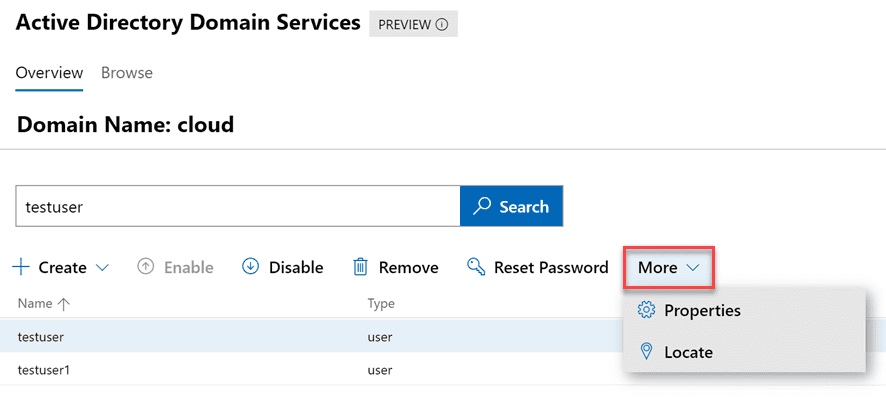
For one, I love the locate option. How many times have you performed a search in Active Directory Users and Computers and even though the search in ADUC returns the object you are looking for, you may need to see it where it is located. This is not achievable in the default ADUC tools. It is great to see an easy locate feature for any object so you can quickly be taken to the location where the object is housed.
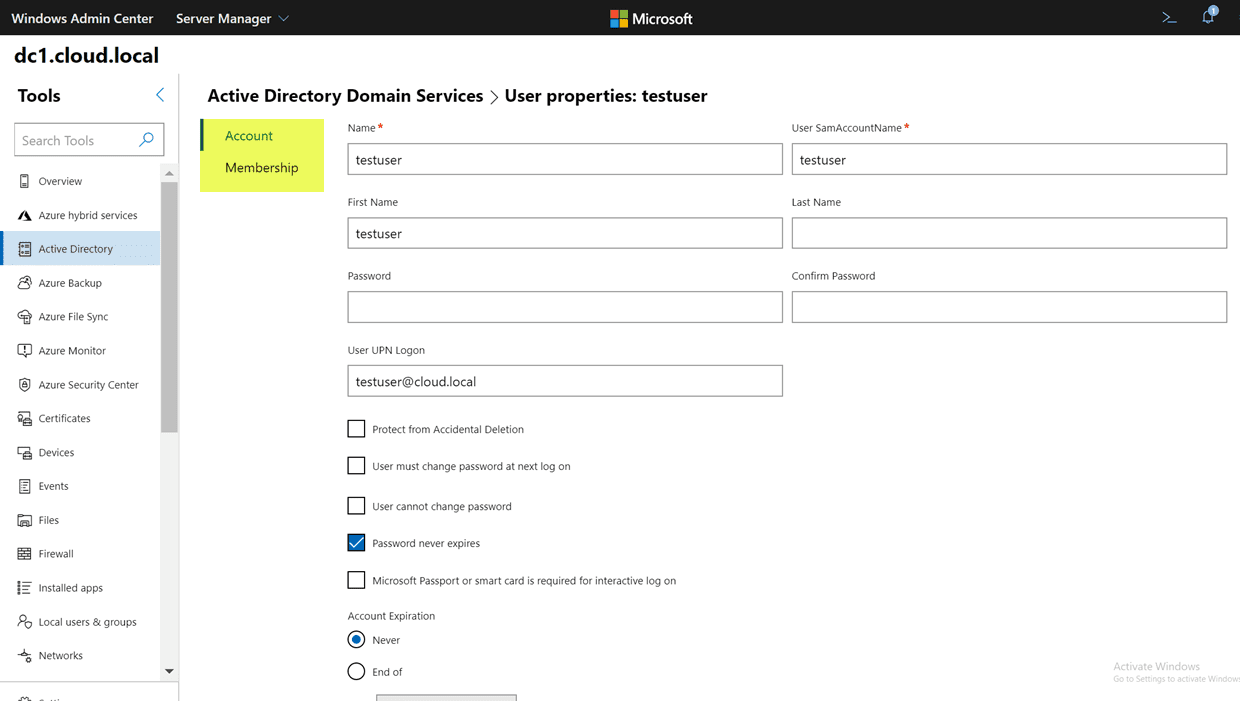
Additionally, if you look at the Properties screen, you will see a good bit of functionality here. You get the basic properties of the user that can be modified such as the typical name, SAMaccountname, UPN suffix, password options, account expiration and others.
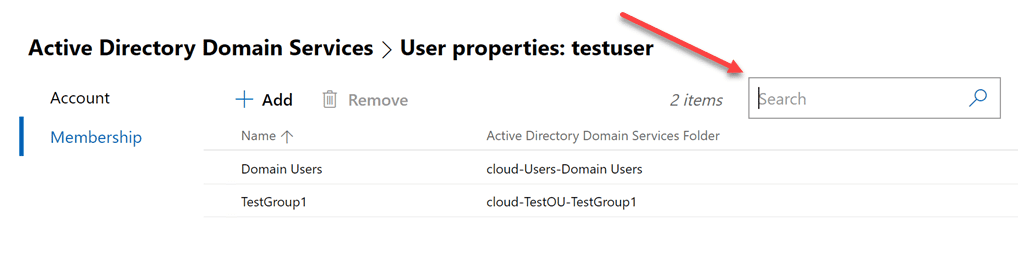
Also, if you look at the Membership menu, you will quickly get to see which groups the user object is a member of. Additionally, I really like the search menu that is found on these pages that allows quickly filtering down to see the exact object you are looking forward. Instead of having to scroll through a list of groups in the user properties like ADUC, you can quickly use the search menu and determine if the user is a member of a particular group or not.
Still in Preview
The Windows Admin Center New Active Directory Extension is a great new extension to be found for use with Windows Admin Center. Keep in mind this extension is still in Preview form as are many other Windows Admin Center extensions. Why should you still get excited about this new extension if you are an Active Directory administrator?
As you have no doubt noticed, Microsoft is going “all in” on Windows Admin Center and I can say that it has kept me pleasantly surprised. I think it is turning out to be great platform that has been introduced at the right time. It will certainly be the one tool that Microsoft settles on for day-to-day management of Windows Server environments, including Active Directory.
The seeming lack of features at this stage should not be alarming. It is not close to ADUC or other tools in its current form, however, you can expect to see this new Active Directory extension rapidly gain new features. I suspect Microsoft will also bring in the functionality of other consoles like Active Directory Domains and Trusts as well as Sites and Services eventually.
Concluding Thoughts
The Windows Admin Center New Active Directory Extension is certainly the new active directory administrative center with great new features no doubt to come. It is most definitely worth downloading and getting familiar with.
Expect it to rapidly gain features and functionality as Microsoft ramps up all of the Windows Admin Center tools to become viable replacements for all the legacy management consoles we have used for the past decade.
Brandon Lee is the Senior Writer, Engineer and owner at Virtualizationhowto.com, and a 7-time VMware vExpert, with over two decades of experience in Information Technology. Having worked for numerous Fortune 500 companies as well as in various industries, He has extensive experience in various IT segments and is a strong advocate for open source technologies. Brandon holds many industry certifications, loves the outdoors and spending time with family. Also, he goes through the effort of testing and troubleshooting issues, so you don’t have to.
What is Active Directory Administrative Center (ADAC)?
Active Directory Administrative Center (ADAC) is a Microsoft tool that admins can use to manage objects in Active Directory. ADAC is available in Windows Server 2008 R2 and higher.
ADAC is a graphical interface on top of Windows PowerShell. This means that every time an action is carried out through ADAC, Windows PowerShell cmdlets are executed in the background.
How is ADAC Different from Active Directory Users And Computers (ADUC)?
ADAC is superior to ADUC in many ways:
- ADAC is more task-oriented than ADUC, so it helps admins manage Active Directory tasks in fewer and simpler steps.
- ADAC supports enhanced management features that simplify the handling of multiple domains across the forest for administrators. For instance, ADUC does not allow admins to configure all user attributes when creating a new account, but with ADAC, admins can create users and add all their properties in one go.
- In ADAC, frequently used tasks like password reset and object search are available right on the landing page. These tasks are more tedious in ADUC; for example, to reset a password, you will have to locate the object, right-click it, select the password reset option and then type the new password.
How do I Install ADAC?
To install the Active Directory management tools on Windows Server 2019, take these steps:
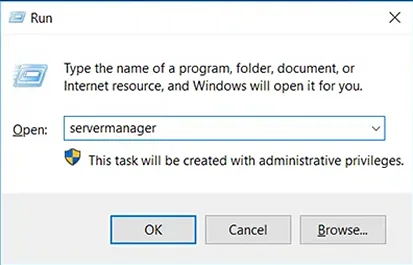
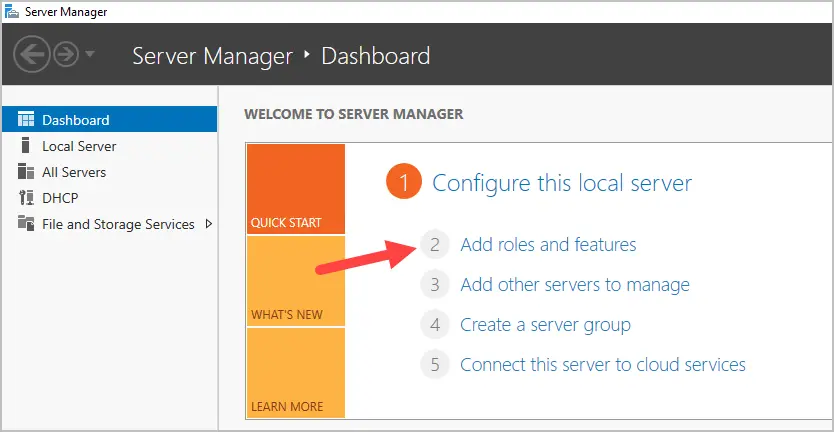
- Launch Server Manager: Press the Windows + R keys to launch the Run dialog box, type servermanager in the Open box and click OK.

- On the Server Manager dashboard, in the Quick Start panel, click Add Roles and Features.

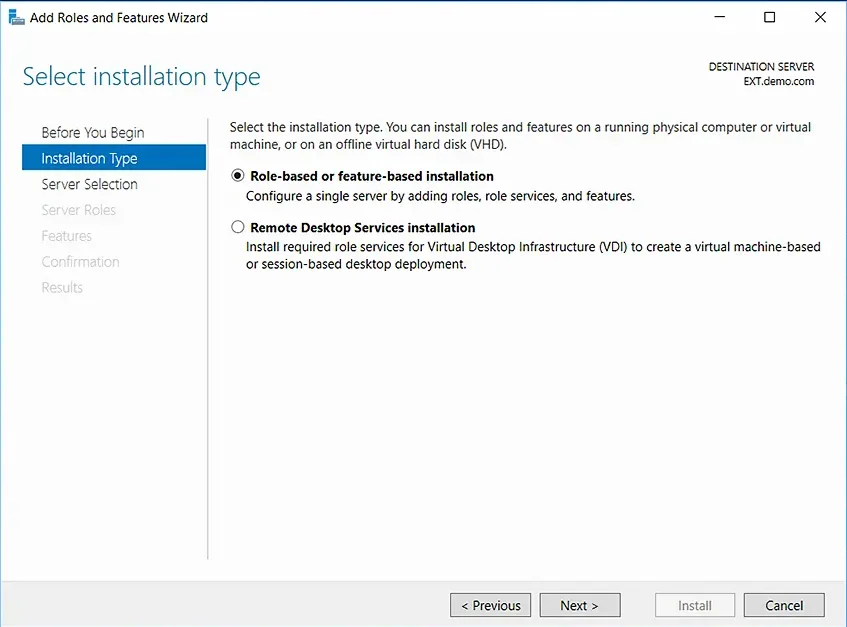
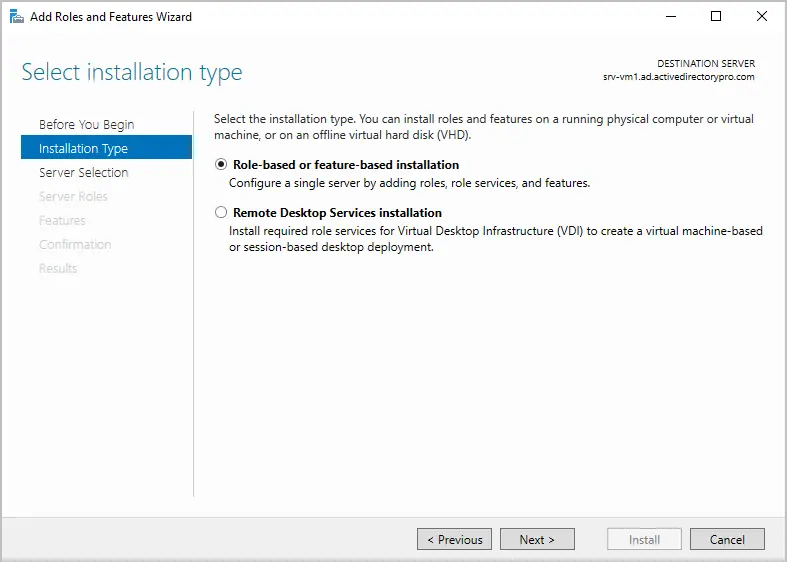
- In the Add Roles and Features wizard, go to the Installation Type panel on the left and select Role-based or feature-based installation. Then click Next.

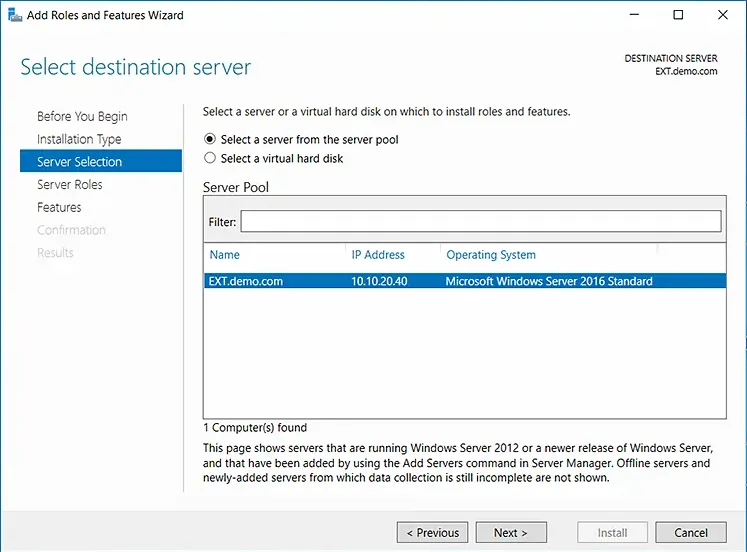
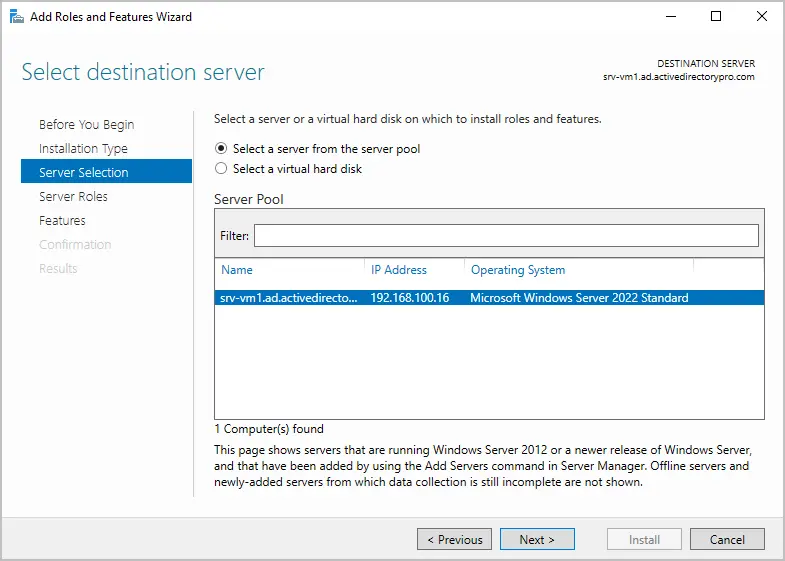
- On the Server Selection step, choose the Select a server from the server pool option. Then select the server on which you want to install the Active Directory management tools and click Next.

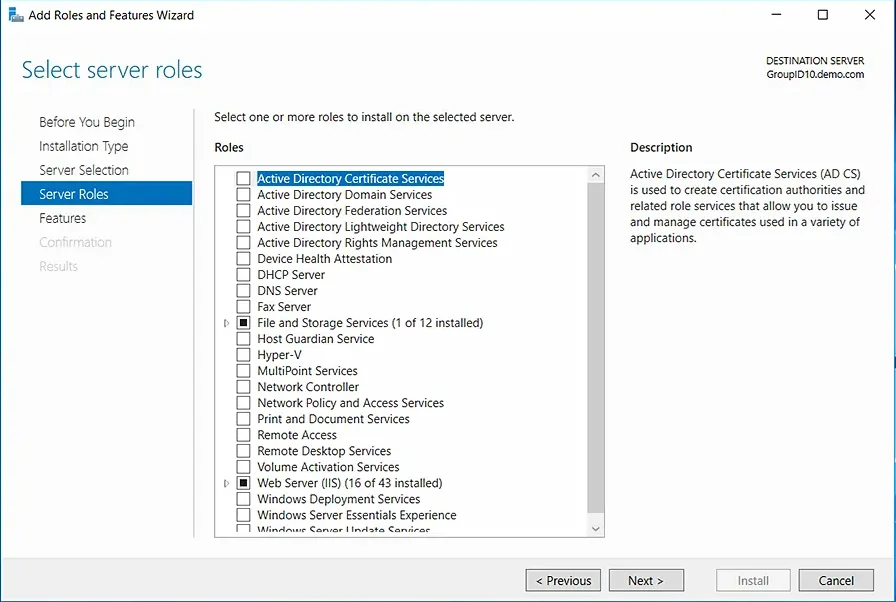
- On the Server Roles step, leave the settings at their defaults and click Next.

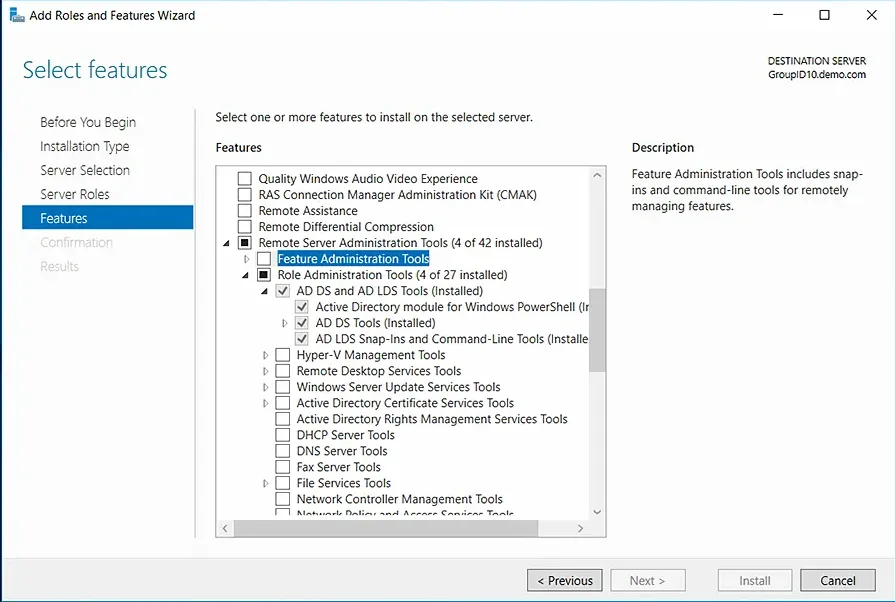
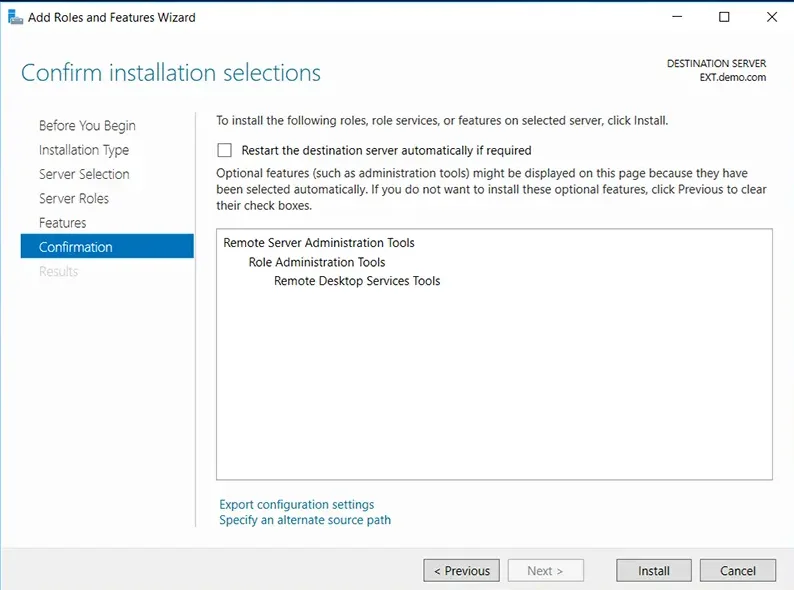
- In the Select Features step, expand Remote Server Administration Tools, then expand Role Administration Tools, and select the AD DS and AD LDS Tools checkbox. Click Next. If you are prompted to install any supporting roles, accept the defaults and continue with the installation.

- On the Confirmation step, review your selections and click Install to start the installation process.

You can monitor installation progress in the Results panel on the left.

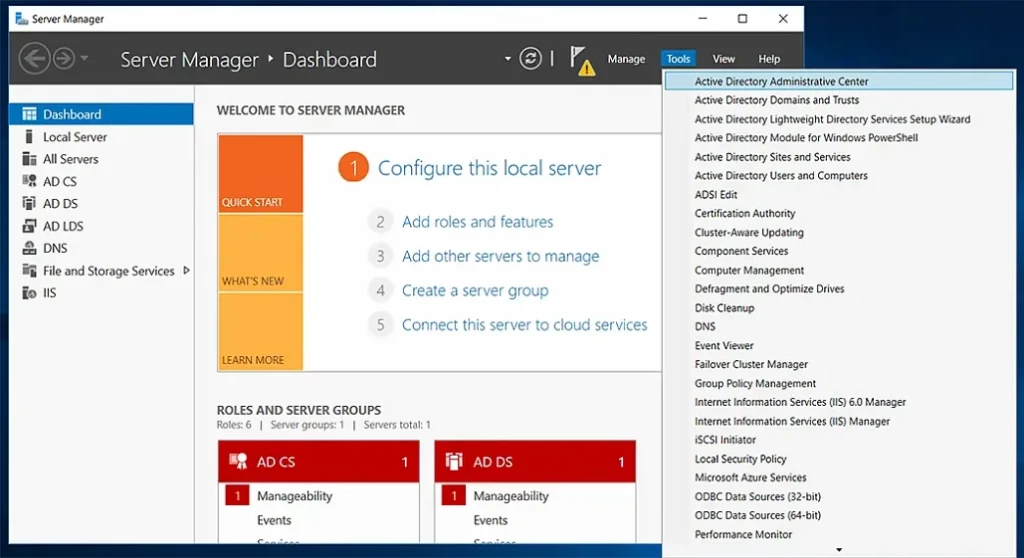
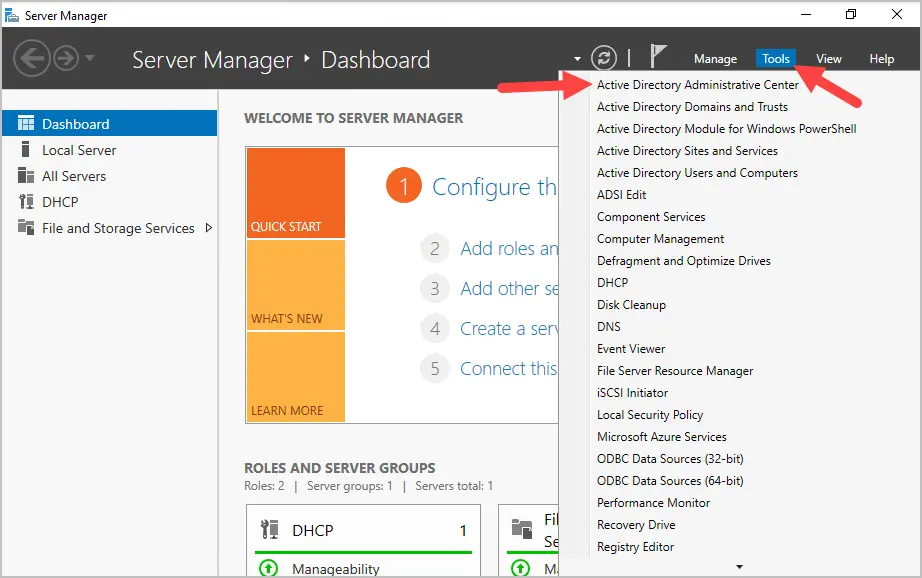
You do not need to restart the server after the installation is complete. You can see the Active Directory management tools under the Tools menu in Server Manager.
What features were introduced in ADAC?
ADAC introduced three management features:
- Active Directory Recycle Bin
- Fine-grained password policy
- Windows PowerShell History Viewer
Active Directory Recycle Bin
In Windows Server 2003, you could recover Active Directory deleted objects through tombstone reanimation. However, the attributes associated with the reanimated objects, like group memberships, could not be recovered. Therefore, IT administrators could not rely on tombstone reanimation for accidently deleted objects.
The Recycle Bin in ADAC is an enhanced version of the tombstone reanimation that enables admins to preserve as well as recover deleted objects in Active Directory. When you enable the Recycle Bin feature, all attributes of deleted objects are restored in the same logical state as they were before deletion. For example, when you restore users from the Active Directory Recycle Bin, they will automatically regain all the group memberships and access rights that they had before being deleted from the directory.
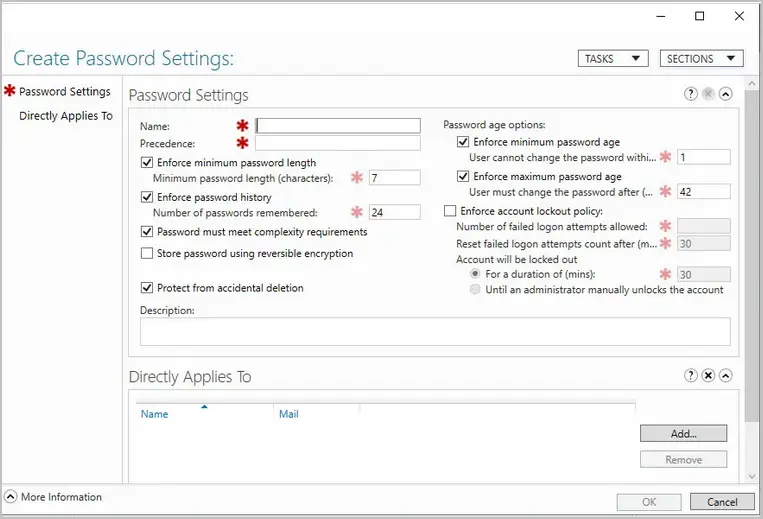
Fine-Grained Password Policy
Prior to Windows Server 2008, admins could set only one type of password and account lockout policy for all the users in the domain. The policy was specified in the Default Domain Policy for the domain. If an organization wanted to have different password and account lockout policies for different users, it would either have to create a password filter or deploy multiple domains, both of which are costly options.
With ADAC, admins can apply different password and account lockout policies for different users. For instance, you can apply strict policies for highly privileged accounts and set less stringent policies for less privileged user accounts, thereby balancing productivity and security.
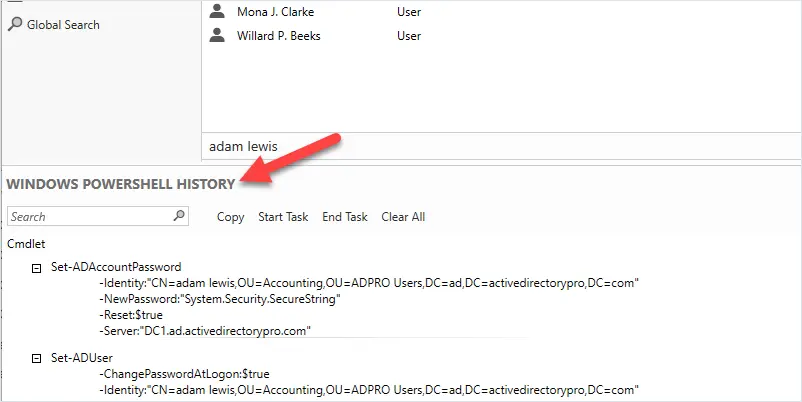
Windows Powershell History Viewer
Since ADAC is built on Windows PowerShell, every action that is executed in its user interface generates a PowerShell script that is shown in the Windows PowerShell History Viewer. IT administrators can use this feature to learn scripts, create automated commands and reduce repetitive tasks while increasing productivity.
How Do I Access ADAC?
To access ADAC, do the following:
- Launch the Run dialog box by pressing the Windows + R keys.
- Type dsac.exe in the Open box.
- Click OK.
How Do I Use ADAC?
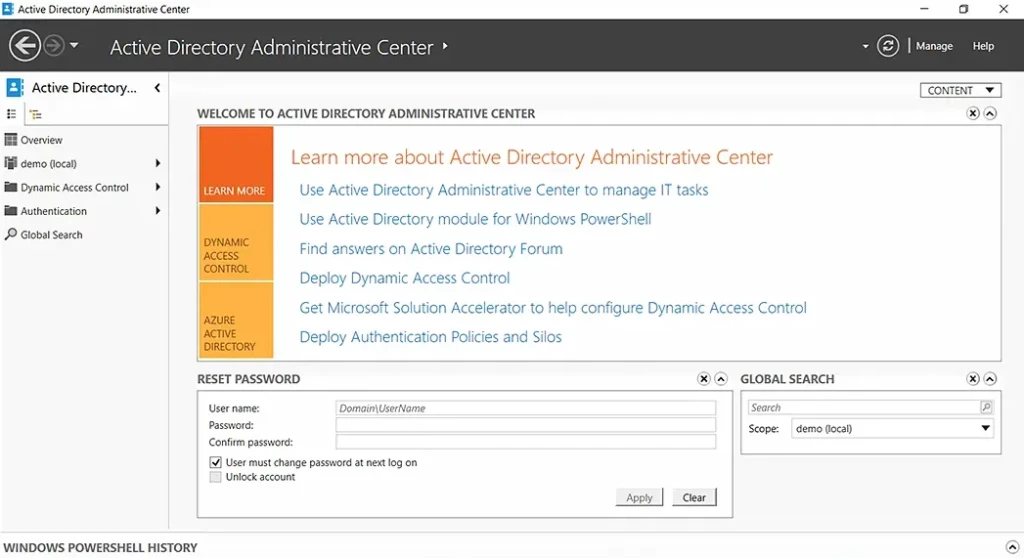
ADAC enables you to perform a variety of routine Active Directory tasks in an advanced and efficient way. When you launch the ADAC console, you will see the two most common tasks, Reset Password and Global Search, readily available on the lower part of the landing page.
You can perform the following actions through ADAC:
- Create an organizational unit (OU)
- Create a user in a particular OU
- Reset a user’s password
- Enable the Recycle Bin
- Delete a user from the directory
- Restore a deleted AD object
- View PowerShell history
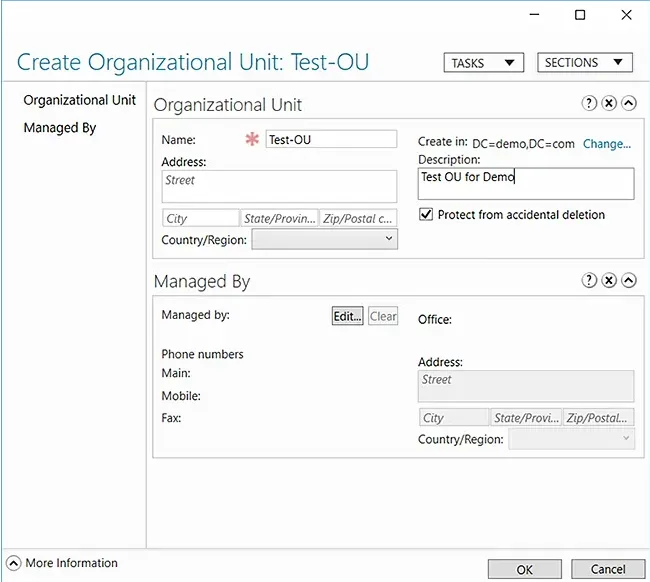
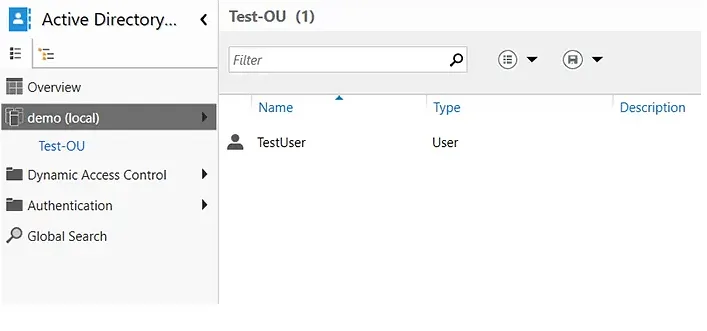
Create an OU
An organizational unit (OU) is a container in Active Directory that can hold users, computers, groups, and other AD objects. OUs help keep the directory neat and well-structured.
To create an organizational unit using ADAC, follow these instructions:
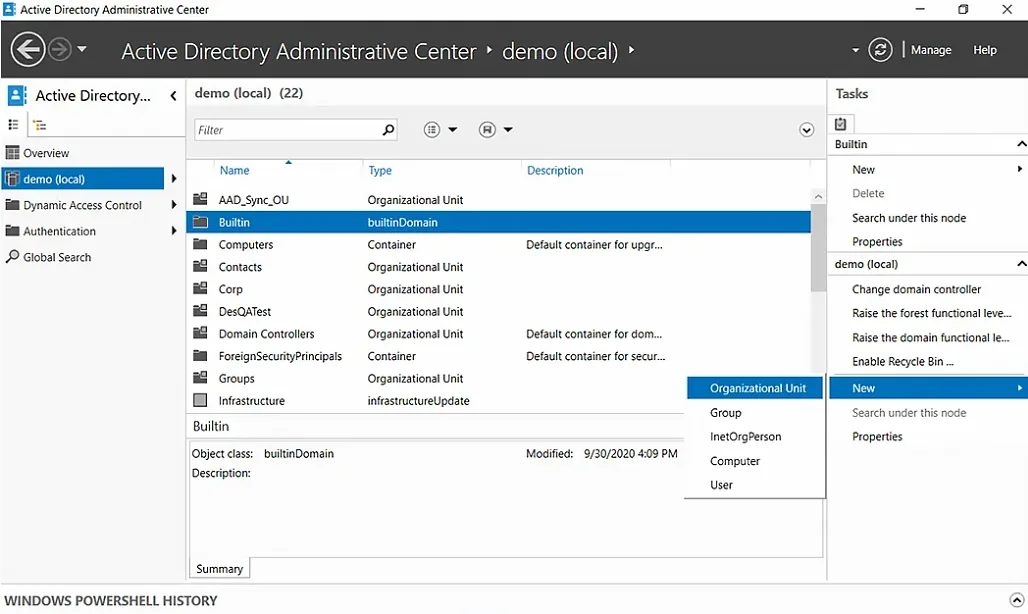
- In ADAC, select a domain from the left panel. Here, we have selected demo (local).
- Under the Tasks panel on the right, select New > Organizational Unit.

- In the Create Organizational Unit dialog box that appears, specify a name and description for the new OU. Here we have chosen Test-OU as the name and Test OU for Demo as the description.

- Click OK.
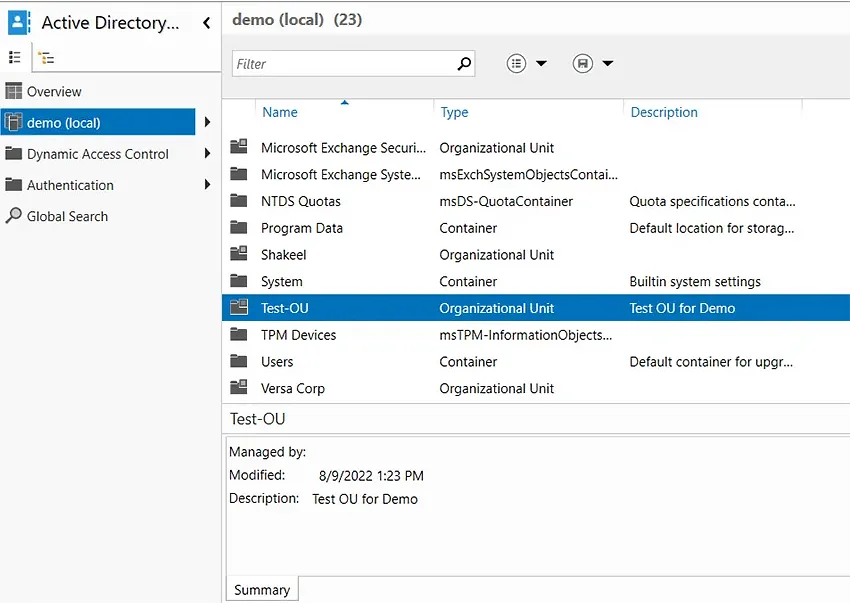
You can now check the domain and confirm the existence of the new OU.
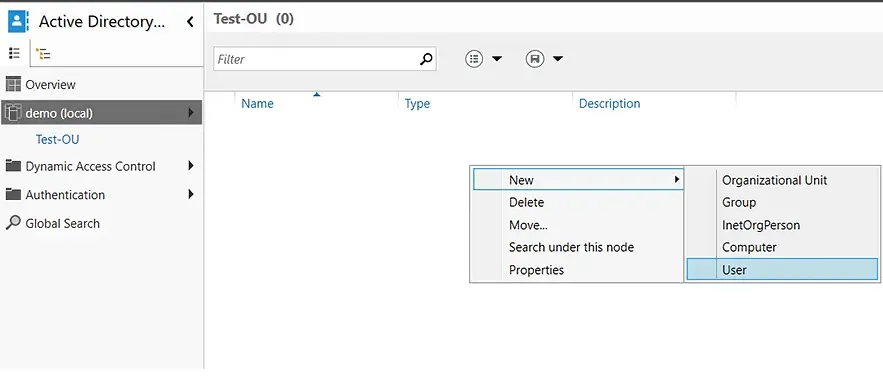
Create a User in a Particular OU
When new employees join a company, IT administrators have to create their user accounts so that they can access the company’s resources and start working. Here is how you can use ADAC to create a user account in a particular OU:
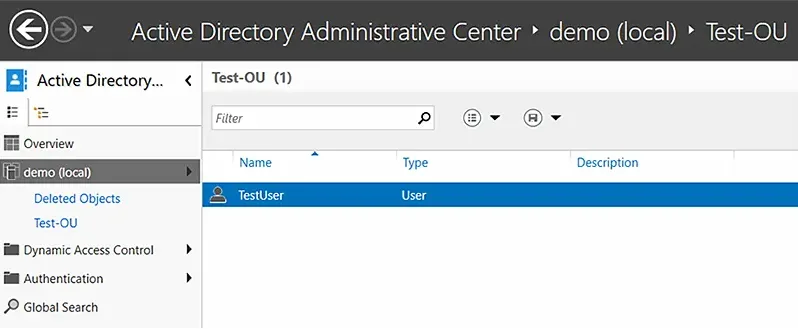
- Double-click the OU where you want to create a user account. In this case, we will be creating a new user account in the Test-OU container.
- Right-click in the blank area, hover over New, and select User.

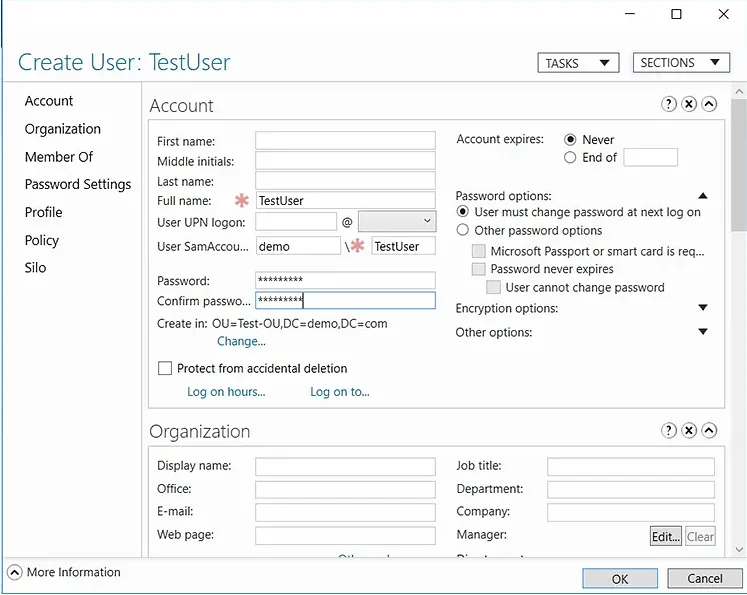
- Fill in the required fields and set a password for the new user account.

- Click OK to create the user in the selected OU.

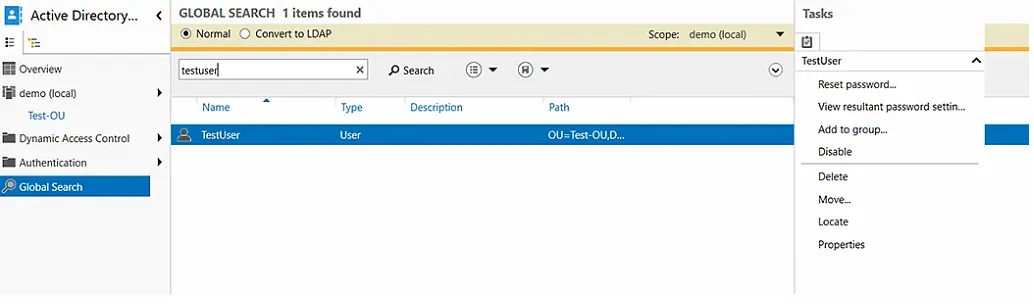
Reset a User’s Password
You can use ADAC to quickly reset a user’s password:
- In the left panel, select Global Search.
- Type the name of the user in the search bar. And in the Task panel on the right, select Reset password.

- Enter a new password that meets the requirements of your domain and check the User must change password at next log on checkbox.
- Click OK.
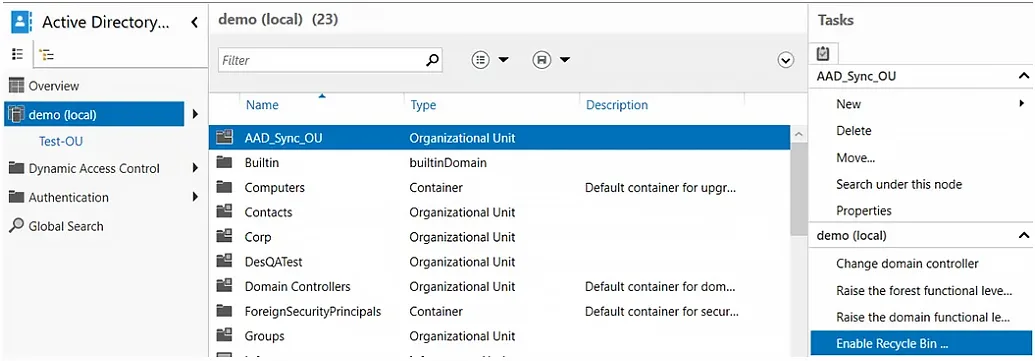
Enable the Recycle Bin to Quickly Restore Deleted AD Objects
If you accidentally delete an object from your directory, you can restore it — provided you have enabled the Recycle Bin feature. Here is how you can enable the Recycle Bin feature in ADAC:
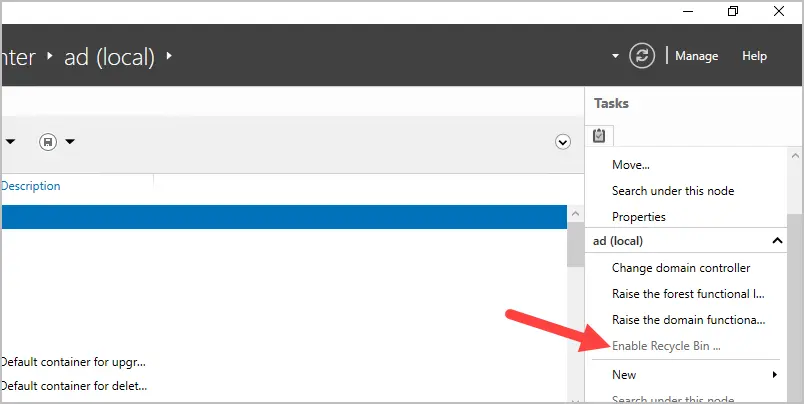
- In the left panel, select the domain for which you want to enable the Recycle Bin.
- In the Task panel on the right, select the Enable Recycle Bin option.

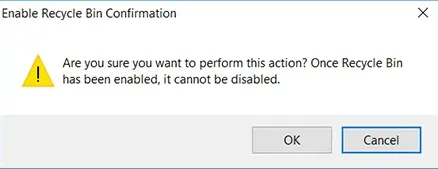
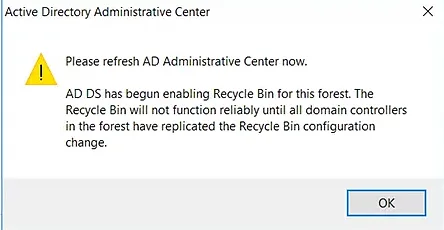
- When you are prompted to confirm your action, click OK.

- ADAC will ask you to refresh the console. Click OK again.

- Press the F5 key to refresh ADAC. You will notice that the Enable Recycle Bin option is now grayed out, which means that the feature is enabled for the domain.
Delete a User from the Directory
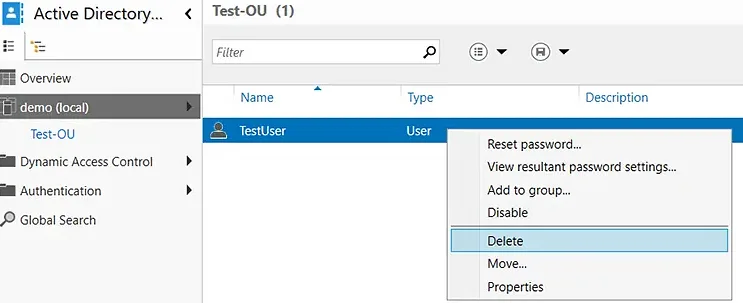
- Navigate to the desired domain and select the OU from which you want to delete a user.
- Right-click the desired user and select Delete.

- You will be prompted with a confirmation message. Click Yes.
Restore a Deleted AD Object
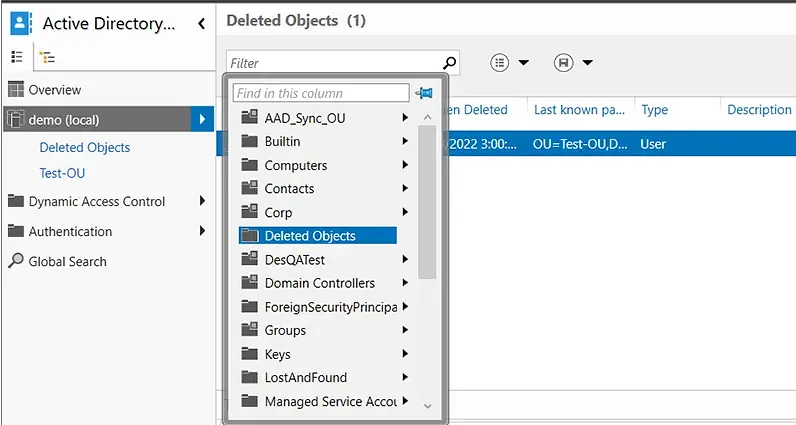
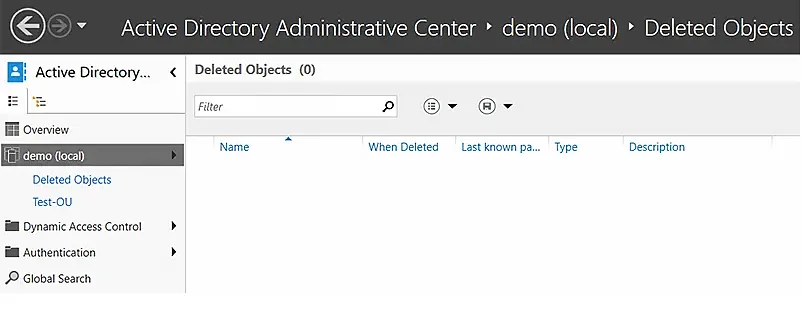
- In the left panel, click the arrow to the right of the user’s domain and select the Deleted Objects container.

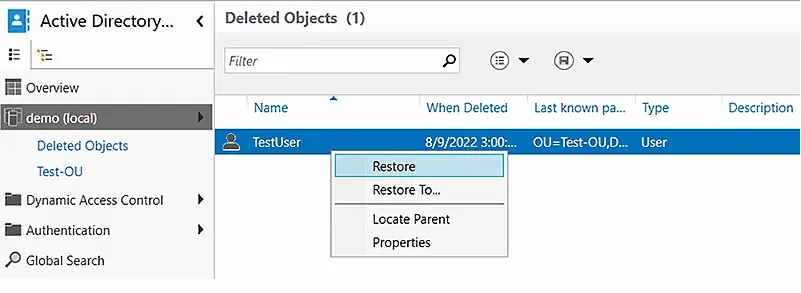
- Right-click the AD object you want to recover. To add the object to its original OU, select the Restore option. To restore it to a different OU, select the Restore To option and choose the desired container.

- Verify that the object has disappeared from the Deleted Objects container.

- Go to the OU where you restored the object and verify that it is there.

View Powershell History
The PowerShell history in ADAC is useful in multiple ways:
- Auditing and tracking — You can see all the changes that were made to the directory.
- Remediation — If an unauthorized modification was made, you can reverse it.
- Training and script creation — You can see the PowerShell cmdlets for all actions, which can help you build scripts to automate repetitive tasks and increase IT productivity.
To view the PowerShell history in ADAC:
Improving Active Directory Management with Netwrix Directory Manager
While ADAC offers some valuable functionality, many organizations prefer a comprehensive AD management tool: Netwrix Directory Manager. This easy-to-use solution enables you to perform all the tasks that you can with ADAC — and much more.
Here are some of the key capabilities you get with Netwrix Directory Manager:
- Seamless user provisioning and deprovisioning
- Powerful group management
- Restoration of deleted groups
- Simplified password management
- Controlled delegation
- Thorough reporting
Seamless User Provisioning and Deprovisioning
Keep your directory up to date by syncing it with data from an Excel file, HR database or other authoritative source. Netwrix Directory Manager reads new user records from the source and automatically creates user accounts in your Active Directory.
This feature makes user provisioning and deprovisioning extremely easy and reliable. New recruits are onboarded quickly and parting employees are offboarded promptly, revoking their access.
- Thorough reporting
Powerful Group Management
Netwrix Directory Manager enables you to manage your AD groups dynamically. Simply create a query for a group and it will be used to assess group membership. This enhances security with up-to-date group memberships.
Netwrix Directory Manager also manages the group lifecycle: Groups remain active for a specified period and owners are notified before a group will expire. If the owner does not renew the group, Netwrix Directory Manager automatically expires it and then deletes it.
Restoration of Deleted Groups
Netwrix Directory Manager enables administrators to restore deleted groups, which reinstates all group attributes, memberships and permissions. Groups are also restored to their original container.
Simplified Password Management
Netwrix Directory Manager empowers business users to do the following on their own:
- Reset their domain account passwords
- Change their passwords
- Unlock their accounts
Users can perform these operations after completing multifactor authentication (MFA).
Helpdesk teams can also reset passwords and unlock accounts for users. They also have access to dashboards and live updates to audit and examine the tasks carried out by business users.
Controlled Delegation
Netwrix Directory Manager enables administrators to delegate certain directory administration tasks to business users. Users can manage their profiles, accounts, groups, workflows and much more.
Thorough Reporting
Active Directory does not come with any reporting tools, so administrators are forced to scroll through the Global Address List (GAL) manually to look for records.
Netwrix Directory Manager offers hundreds of insightful reports on Active Directory users, computers, groups, and contacts, such as:
- Groups and their last modified time
- Groups without members
- Groups without owners
- Users and the objects they own
- Disabled users
- Users without managers
- Users who have never logged on
- Computers that have never logged on to the network
- Disabled computers and their operating systems
Since 2012, Jonathan Blackwell, an engineer and innovator, has provided engineering leadership that has put Netwrix GroupID at the forefront of group and user management for Active Directory and Azure AD environments. His experience in development, marketing, and sales allows Jonathan to fully understand the Identity market and how buyers think.

Недавно я шерстил Хабр и встретил комментарий от Inskin:

Я впервые познакомился в Windows Admin Center, когда в нем был только счетчик управления файлами и больше ничего. Сейчас все инструменты из RSAT потихоньку переезжают в Windows Admin Center.
Пока я не видел ни одного толковой русской статьи про настройку Windows Admin Center и решил написать ее сам. Под катом подробный обзор, две скрытые кайфовые фишки WAC, а также инструкции по установке и настройке.
Какие фичи реализованы на текущий момент?
Чуть больше года назад WAС был практически неюзабельным, в превью версии был только красивый дашборд и управление процессами.
Теперь, можно делать полноценный деплой новых серверов прямо из браузера.
- Диспетчер задач
- Управление сертификатами
- Управление устройствами
- Просмотр событий
- Проводник
- Брандмауэр
- Установка и удаление программ и служб и ролей
- Regedit
- Планировщик задач
А еще WAC может служить шлюзом для WinRM и RDP.
Кстати, для подключения, Windows Admin Center использует WinRM и общий runspace вместе с WSMan’ом, поэтому, если у вас подключены сетевые диски, то подключаться к серверам что хостят эти диски можно будет без ввода логина и пароля.
Попробуйте сделать Enter-PSSession без указания Credentials, если команда не попросит логин или пароль, то значит можно будет войти и через WAC без ввода логина и пароля.
Что вы могли упустить:
Часть функционала все еще скрыта за плагинами, поэтому, вы могли упустить две очень крутые фишки и одну не очень крутую.
Управление AD (превью):
Органы управления Active Directory тут похожи на что-то между ADAC и ADDC. Хорошо, что они переосмыслили интерфейс, в целом это выглядит даже удобнее, чем через RSAT. В еще одном вопросе можно целиком перейти на WAC.

Управление DNS (превью):
В WAC переехал полностью функционал управления DNS. Создание новых зон, PTR записей, теперь все это доступно через Windows Admin Center.

Управление Windows Defender (превью):
Пока что можно только управлять сканированием и отключать защиту в реальном времени. Отсутствуют все пункты защитника, плюс нельзя управлять защитой от программ-шантажистов.

Установка на Windows Server / Windows 10
По моему мнению, самая правильная установка это – установка на локальный компьютер. Сначала нужно скачать установочный файл по ссылке:
http://aka.ms/WACDownload
Установка очень проста, «далее, далее, готово», но пару рекомендаций дать нужно. Обязательно выберите пункт об автоматическом обновлении WAC, гарантирую, вам это пригодится, но по непонятным причинам, этот пункт по умолчанию снят.
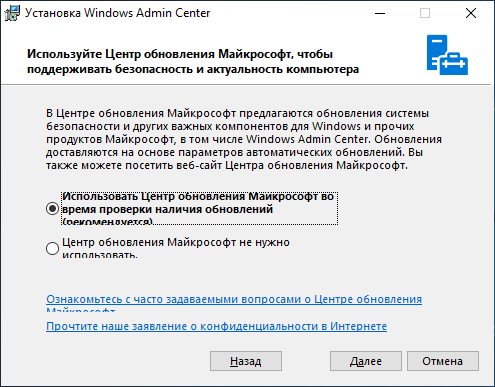
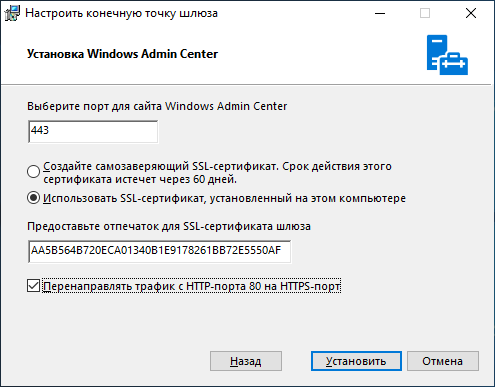
WinRM работает по HTTP протоколу, поэтому, чтобы Windows Admin Center не подключался к удаленным серверам по HTTP обязательно включите этот пункт. Он тоже снят по умолчанию.

Если вы используете WAC на домашней системе, рекомендую оставить самоподписанный сертификат. Он автоматически добавляется в доверенные и не доставляет неудобств, но если у вас есть свой собственный сертификат и вы хотите использовать его, то впишите его отпечаток в графу, как показано ниже:
Можно перейти в certmgr → Личное → Сертификаты, перейти в свойства сертификата и найти его отпечаток.
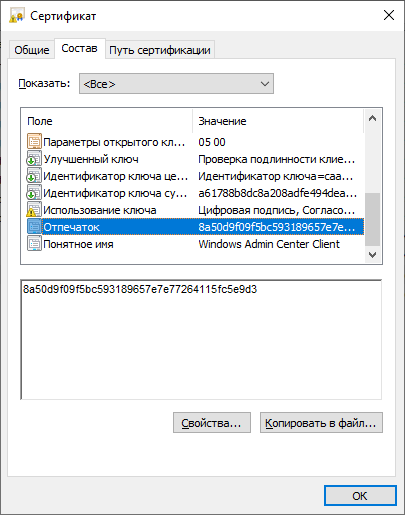
Тоже самое с помощью PowerShell:
Get-ChildItem -Path Cert:LocalMachine\MY | Select-Object FriendlyName, ThumbprintУстановка на Server Core

VPS с Windows Server Core можно взять прямо из маркетплейса
Чтобы использовать Windows Admin Center в качестве управляющего узла, обязательно нужна Active Directory. Войти в Windows Admin Center развернутую на Server Core можно только под административной ролью в AD.
Скачиваем WAC:
Start-BitsTransfer -Source http://aka.ms/WACDownload
-Destination C:\Users\Administrator\Downloads\wac.msi
Устанавливаем с самоподписанным сертификатом:
Start-Process -FilePath "C:\Users\Administrator\Downloads\wac.msi" -ArgumentList " /qn SSL_CERTIFICATE_OPTION=generate"Если у вас есть купленный сертификат или серитфикат от Let’s Encrypt, установленный в системной хранилище сертификатов, то впишите его Thumbprint в аргументы установщика.
Получить отпечаток сертификата можно вот так:
Get-ChildItem -Path Cert:LocalMachine\MY | Select-Object FriendlyName, Thumbprint
Вписать отпечаток нужно после SME_THUMBPRINT, как в примере:
Start-Process -FilePath "C:\Users\Administrator\Downloads\wac.msi" -ArgumentList " /qn SME_THUMBPRINT=AA5B564B720ECA01340B1E9178261BB72E5550AF SSL_CERTIFICATE_OPTION=installed"
Чтобы изменить сертификат, нужно будет еще раз запустить установщик, вписав в отпечаток нового сертификата.
Выводы
С каждой новой версией Windows Admin Center становится все функциональнее и функциональнее.
До полного счастья нужно разве что доделать все диспетчеры связанные с AD, добавить поддержку RRAS, IIS, перенести целиком проводник вместе с нормальным управлением SMB и Bitlocker, управление групповыми политиками и нормальный Windows Defender, и чтобы все диспетчеры, которые работают с файлами умели открывать и выбирать пути с диска машины, к которой ты подключен. А еще чтобы когда ты закрываешь WAC, нужно чтобы он закрывал PSSession и освобождал память на сервере, еще неплохо было бы, чтобы можно было ставить на Server Core без обязательного наличия AD, а когда закончат, можно перейти к MS SQL Server.
А в целом очень даже неплохо, очень рекомендую ознакомиться.

To manage servers and their users smoothly, a suitable tool is necessary, especially when managing a domain environment. The Active Directory Administrative Center (ADAC) is one of those tools that brings order to chaos, but setting it up on Windows 11 isn’t always straightforward. Let me guide you through the process, along with screenshots, from understanding what ADAC is to troubleshooting any installation issues that may arise along the way.
What Is Active Directory Administrative Center?Why Install ADAC on Windows 11?Can You Install Active Directory Administrative Center Directly on Windows 11?Prerequisites for Installing ADACInstalling ADAC through Windows 11 RSAT Tools PackageStep 1: Open SettingsStep 2: Add an Optional FeatureStep 3: Search for RSAT: Active Directory Administrative CenterStep 4: Launch Active Directory Administrative CenterA Quick Recap: Installation Steps at a GlanceInstall ADAC Using PowerShell (For the Command-Line Enthusiasts)Connecting to Your DomainCan I Install ADAC Without Administrator Rights?No, You Cannot install ADAC Without Admin PrivilegesTroubleshooting Common Installation Issues“Windows Features” Option Is Grayed OutPowerShell Command FailsADAC Is Installed But Won’t LaunchEnhancing Your ADAC ExperienceThe Future of Active Directory Management in WindowsConclusion
The Active Directory Administrative Center is Microsoft’s modern management console for managing domain environments. Launched initially with Windows Server 2008 R2, ADAC has come a long way. It bundles in cool extras, such as the PowerShell History Viewer (which shows you the PowerShell commands behind every click), and supports Fine-Grained Password Policies natively.
If you’re serious about managing a domain, installing ADAC on your Windows 11 machine is a no-brainer. Unlike older, somewhat fragmented management tools, ADAC provides a unified dashboard to handle your domain’s most common administrative tasks.
I’ve found that many IT professionals still cling to the classic Active Directory Users and Computers (ADUC) tool out of habit. Still, once you experience the streamlined workflows in ADAC, you’ll wonder how you ever managed without it.
Why Install ADAC on Windows 11?
Let’s talk about why you’d want ADAC on your Windows 11 system in the first place:
- Modern interface that aligns with Windows 11’s design language
- PowerShell integration for automating repetitive tasks
- Advanced search capabilities that make finding objects a breeze
- Fine-grained password policy management
- Efficient multi-selection for bulk operations
For everyday AD management tasks, ADAC is like upgrading from a flip phone to a smartphone – same core functions, but with an experience that makes you more productive.
Can You Install Active Directory Administrative Center Directly on Windows 11?
In short, yes, you absolutely can!
You need to enable the right features using RSAT (Remote Server Administration Tools), which Windows 11 thoughtfully provides as optional features.
No hunting for old download links or sketchy EXE files — everything you need is already built into Windows 11. You have to unlock it.
Suggestion: How to install Winget package manager in Windows 2022 Server
Prerequisites for Installing ADAC
Before we begin, let’s make sure you have everything needed:
- Windows 11 Pro, Enterprise, or Education edition
- Administrator privileges on your local machine
- Internet connection (to fetch the RSAT package)
- Sufficient storage space (approximately 100MB)
- Basic familiarity with Windows administrative tools
Pro Tip: If you plan to connect to a real domain, ensure your Windows 11 device is networked correctly. Otherwise, ADAC will not work.
The most straightforward approach to getting Active Directory Administrative Center on your Windows 11 system is through the Windows Features menu. Here’s how:
Step 1: Open Settings
- Press Windows + I to quickly open Settings.
- Click on Apps from the sidebar.
- Then, click Optional Features.

Step 2: Add an Optional Feature
- Scroll down a bit and click the View features button next to Add an optional feature.

Step 3: Search for RSAT: Active Directory Administrative Center
- In the search box, type RSAT: Active Directory Domain Services and Lightweight Directory Services Tools. It includes the Active Directory Administrative Center (ADAC) graphical tool.
- When you see it pop up, click Next and then the Add button.

Note:
The installation usually takes just a few minutes. You might will see a progress bar, so don’t worry.
Step 4: Launch Active Directory Administrative Center
Once installed, the message “Added, restart required” will be displayed on the screen.

- Press the Windows key, then type “Active Directory Administrative Center” in the search box.
- Click it — and you’re in!

Alternatively, you can find it under:
- Start > Windows Administrative Tools > Active Directory Administrative Center
- Start > All apps > Windows Administrative Tools > Active Directory Administrative Center
Pro tip: Right-click on ADAC and select “Pin to Start” or “Pin to taskbar” for quicker access in the future.
A Quick Recap: Installation Steps at a Glance
| Step | What to Do |
|---|---|
| 1 | Open Settings > Apps > Optional Features |
| 2 | Click Add a feature |
| 3 | Search for RSAT: Active Directory Administrative Center |
| 4 | Click Install and wait |
| 5 | Launch ADAC from the Start Menu |
Install ADAC Using PowerShell (For the Command-Line Enthusiasts)
Suppose you prefer not to follow the multiple steps of the graphical method we used previously to install the Active Directory Administrative Center on Windows 11. In that case, the command-line approach is the best option for you.
If you prefer working with PowerShell (as I often do), here’s a cleaner approach:
- Right-click on the Start button and select Windows Terminal (Admin).
- Ensure PowerShell is selected (not Command Prompt).
- Enter the following command:
Add-WindowsCapability -Online -Name Rsat.ActiveDirectory.DS-LDS.Tools~~~~0.0.1.0- Press Enter and wait for the installation to complete.
- Restart your computer to apply the changes.
PowerShell makes this process feel like sending a direct message to Windows rather than clicking through multiple dialog boxes. It’s beneficial if you’re setting up various machines or want to enable the ADAC on some remote Windows 11 system.
Connecting to Your Domain
When you first launch ADAC, it will typically try to connect to your current domain. If you need to connect to a different domain:
- In the navigation pane, right-click on Active Directory Administrative Center [YourCurrentDomain].
- Select Connect to Domain Controller.
- Enter the domain name or select it from the dropdown list.
- Click OK.
Think of this as setting your GPS destination before starting your journey – you need to tell ADAC where you want to go.
Can I Install ADAC Without Administrator Rights?
No, You Cannot install ADAC Without Admin Privileges
Installing ADAC requires administrator rights on your Windows 11 system. This is a security measure by Microsoft to prevent unauthorized users from installing administrative tools that could potentially be used to make significant changes to system configurations.
If you need ADAC installed but don’t have admin rights, you’ll need to contact your system administrator to install for you. This is a common scenario in corporate environments where standard users have restricted permissions.
Troubleshooting Common Installation Issues
“Windows Features” Option Is Grayed Out
If you find that the Windows Features option is grayed out:
- Ensure you’re logged in with administrator privileges.
- Verify if your Windows 11 edition supports RSAT tools (note that the Home edition does not).
- Run Windows Update to ensure your system is up to date.
- Try the PowerShell method instead.
PowerShell Command Fails
If the PowerShell command fails with an error:
- Verify that you’re running PowerShell as an administrator.
- Check your internet connection, as the command might need to download components.
- Try running the following command first to refresh your Windows Update catalog:
dism.exe /Online /Cleanup-Image /RestoreHealth- If problems persist, try the Windows Features method instead.
ADAC Is Installed But Won’t Launch
If ADAC is installed but crashes or won’t start:
- Ensure your computer is joined to a domain or has proper connectivity to the domain controller.
- Check that the Active Directory Web Services (ADWS) is running on the domain controller.
- Verify that your account has appropriate permissions to use ADAC.
- Reinstall the RSAT tools completely.
I once spent hours troubleshooting an ADAC launch issue only to discover that the domain controller’s firewall was blocking the necessary ports. Sometimes the most straightforward explanations are the correct ones!
Enhancing Your ADAC Experience
Once you have ADAC up and running, here are some tips to get the most out of it:
- Customize the navigation pane by right-clicking and selecting “Customize Navigation” to add frequently used containers.
- Create saved queries for tasks you perform regularly.
- Learn the PowerShell equivalents of your actions by clicking “Windows PowerShell History” in the bottom right.
- Use the search function – it’s significantly more potent than the search in older AD tools.
These enhancements are like adding custom shortcuts to your smartphone – they make a good tool even better for your specific needs.
The Future of Active Directory Management in Windows
As Microsoft continues to evolve its administrative tools, ADAC serves as the bridge between traditional Active Directory management and the cloud-based future with Azure AD. Learning ADAC now positions you well for managing hybrid environments.
The line between on-premises and cloud administration gets blurrier with each Windows update. Consider ADAC your training ground for this new reality – familiar enough to be immediately helpful, but modern enough to introduce concepts you’ll need going forward.
Conclusion
Installing the Active Directory Administrative Center on Windows 11 provides a more efficient and modern way to manage your domain environment. Whether you choose the Windows Features method, PowerShell command, or RSAT package installation, the result is the same: a powerful tool that streamlines administrative tasks.
Remember that ADAC doesn’t replace all the classic tools overnight – it’s fine to transition gradually as you become more comfortable with the interface and its capabilities. Many administrators, including myself, keep both the old and new tools handy, as each has its strengths.
Have you made the switch to ADAC, or are you still clinging to the classic tools? I’d love to hear about your experience managing Active Directory in Windows 11!
The Microsoft Active Directory Administrative Center (ADAC) is a tool to manage Active Directory users and computers. ADAC was first available with Windows Server 2008 R2 and additional features were added in Server 2012.
In this guide, I’ll show you how to install the Active Directory Administrative Center and compare its features to the Active Directory Users and Computers (ADUC) management console.
Table of Contents:
- Difference between ADAC and ADUC
- How to Download ADAC
- How to Install ADAC on Windows Server
- How to Install ADAC on Windows 10/11
- ADAC Alternative
Note: The following acronyms are used in this article:
- ADAC = Active Directory Administrative Center
- ADUC = Active Directory Users and Computers
- DAC = Dynamic Access Control
Difference between ADAC and Active Directory Users and Computers (ADUC)
ADAC and ADUC are both Active Directory Management tools that administrators use to manage users, computers, groups, and OUs.
Although both of these tools have similar functions, the Active Directory Administrative Center includes the following new features:
- Active Directory Recycle Bin
- Find Grained Password Policy
- PowerShell History Viewer
- Manage Dynamic Access Control
- Raise Forest and Domain Functional Levels
- Improved GUI
Active Directory Recycle Bin
The Active Directory Recycle Bin allows you to restore deleted Active Directory objects. For example, if the user “robert.allen” was deleted from Active Directory but later realized it was deleted by accident. You can use the Recycle Bin in Active Directory Administrative Center to restore the user account.
To manage the Recycle Bin you must install ADAC in Windows Server 2012. By default, the Recycle Bin is disabled. The forest functional level must be Server 2008 R2 or higher to enable it. Once the recycle bin has been enabled, you cannot disable it.
Fine Grained Password Policy
Fin grained password policies allow you to create multiple password policies within a single domain. For example, you could apply a more restrictive password policy to the accounts that are domain administrators. Before fine grained password policies, there was no option to have multiple password policies.
- You must use Active Directory Administrative Center on Server 2012 or higher to manage fine grained password policies.
- Find grained password policies only apply to global security groups and user objects.
- By default, only members of the Domain Admins group can manage fine grained password policies.
PowerShell History Viewer
The Active Directory Administrative Center console is built on top of PowerShell. The ADAC console will display the PowerShell commands of actions performed in the console. This can help you learn PowerShell and create scripts.
To use the history viewer you must be using Server 2012 or newer version of ADAC.
For example, I reset the password for a user account. Looking in the PowerShell history I can see the PowerShell commands used to reset the user’s password.
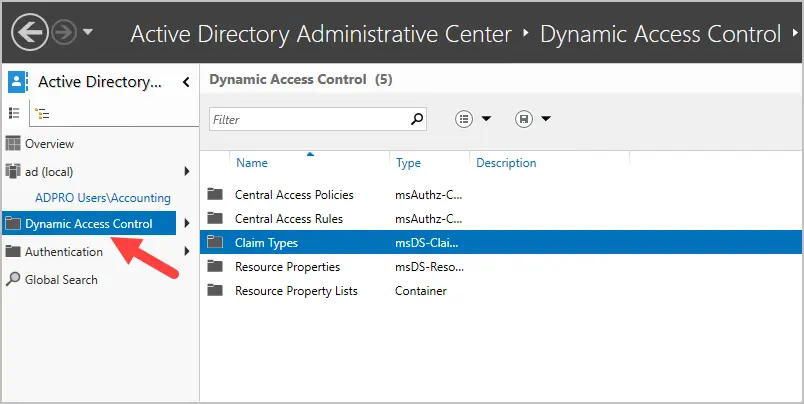
Manage Dynamic Access Control (DAC)
DAC allows you to define granular access control to NTFS folder shares. For example, you could define permissions based on the department attribute of a user account. If the user changes departments and the department attribute is updated the user’s NTFS access is automatically updated. Another example is you could give user access from their desktop but not their laptop or when connected remotely.
DAC requires Windows Server 2012 or higher.
The creation of the DAC rules is done through the ADAC console.
To learn more about DAC see the Microsoft article Dynamic Access Control Overview.
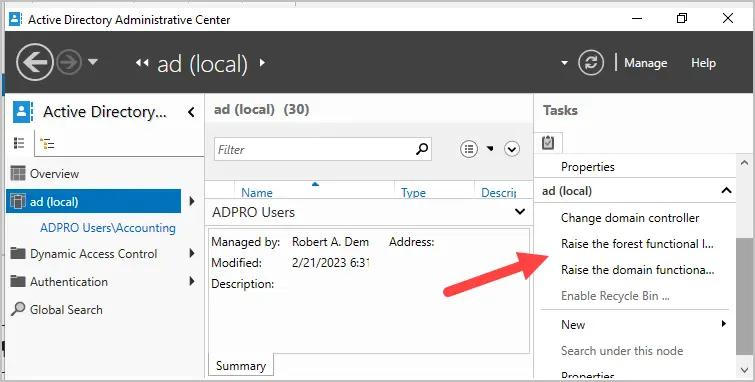
Raise Forest and Domain Functional Levels
You can raise the forest and domain functional level using ADAC. Prior to ADAC this could only be done by using the Domains and Trust management console.
These two options are listed under the tasks sidebar when you click on the root of your domain.
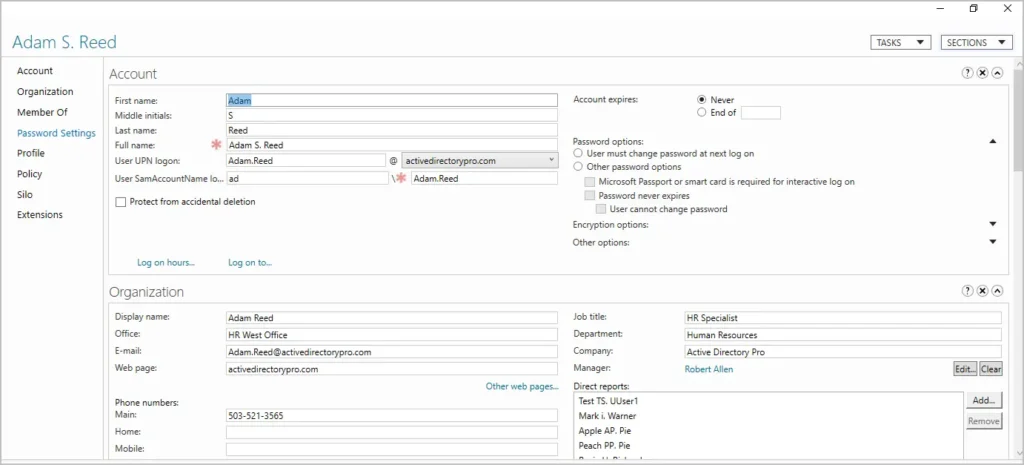
Improved GUI
When viewing objects ADAC displays more details on the page compared to the old ADUC. I don’t find this to be a huge improvement but staff that works with users and computers might find this useful.
Here is a screenshot of a user account. You can see it displays more information on one page. With ADUC you would have to click on multiple tabs to see these details.
Personally, it feels slow and clunky to me and I prefer using ADUC.
How to Download ADAC
Active Directory Administrative Center is included with the RSAT tools and does not need to be downloaded. Starting with Windows 10 October 2018 Update the RSAT tools are included with Windows. These tools are only supported on Windows Pro and Enterprise versions.
To install ADAC see the next section.
How to install ADAC on Windows Server
In this example, I will install Active Directory Administrative Center on Windows Server 2022. These same steps will also work on Windows Server 2016 and 2019.
Step 1. Open Server Manager
Click on start and then click the server manager icon.
Step 2. Click Add roles and features
From the server manager dashboard click on “Add roles and features”.
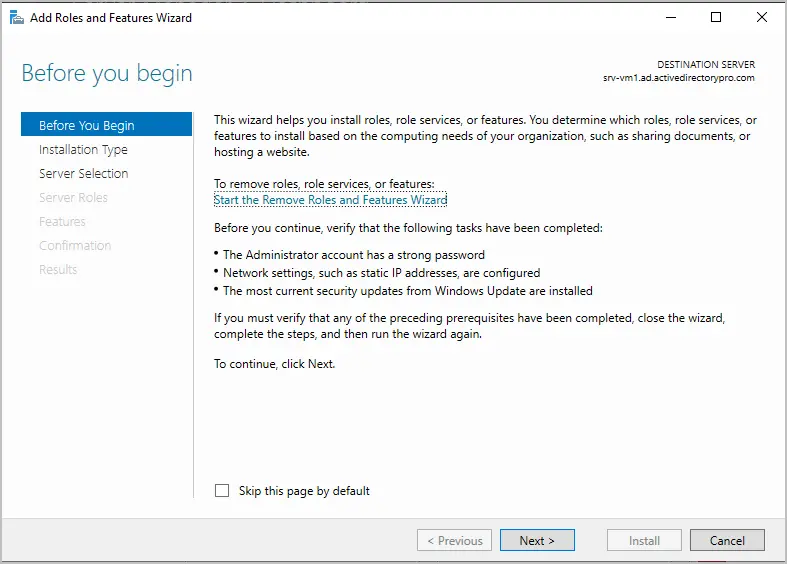
Click “Next” on the before you begin page.
Select “Role-based or featured-based-installation” and click “”Next”.
For the server selection make sure your local server is selected and click “”Next”.
On the server roles page, leave the settings at their defaults and click “Next”.
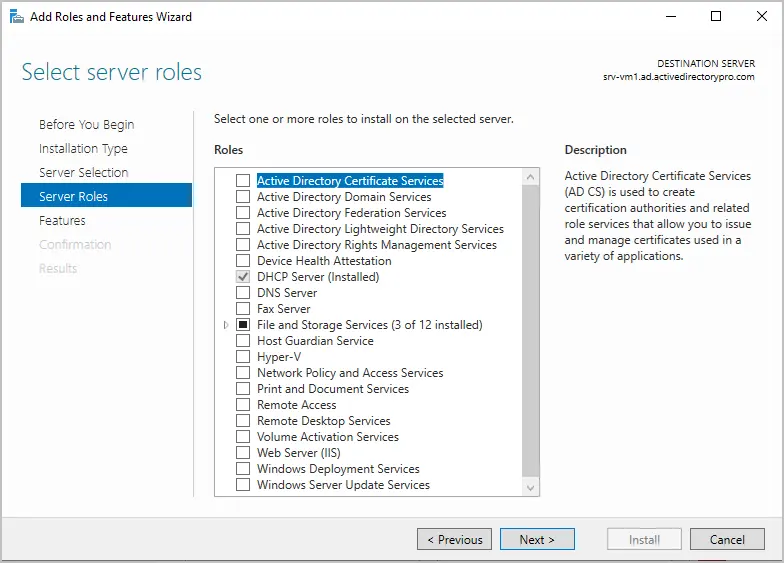
On the Select features page expand Remote Server Administration Tools, then expand Role Administration Tools and make sure AD DS Tools and AD LDS Tools are checked. Click “Next”.

On the confirmation page, review your selections and click “install”.
Step 3. Open ADAC
When the installation is complete you can access the Active Directory Administrative Center from the tools dropdown.
How to install Active Directory Administrative Center on Windows 10 or 11
To install ADAC on Windows 10 or 11 follow these steps:
1. Open Apps & Features and click on Optional Features
2. Click on add a feature
3. Type rsat and select RSAT: Active Directory Domain Services and Lightweight Directory Services Tools
4. Click install to start the installation.
When the installation is complete you can access ADAC from start -> Windows Administrative Tools.
Easily Management Active Directory Users with the AD Pro Toolkit
Both ADAC and ADUC are used to perform basic Active Directory administrative tasks. But they lack many features that administrators need such as automation, bulk updates, and reporting.
The AD Pro Toolkit simplifies AD Management by automating many administrative tasks, it also includes over 200 pre-built reports.
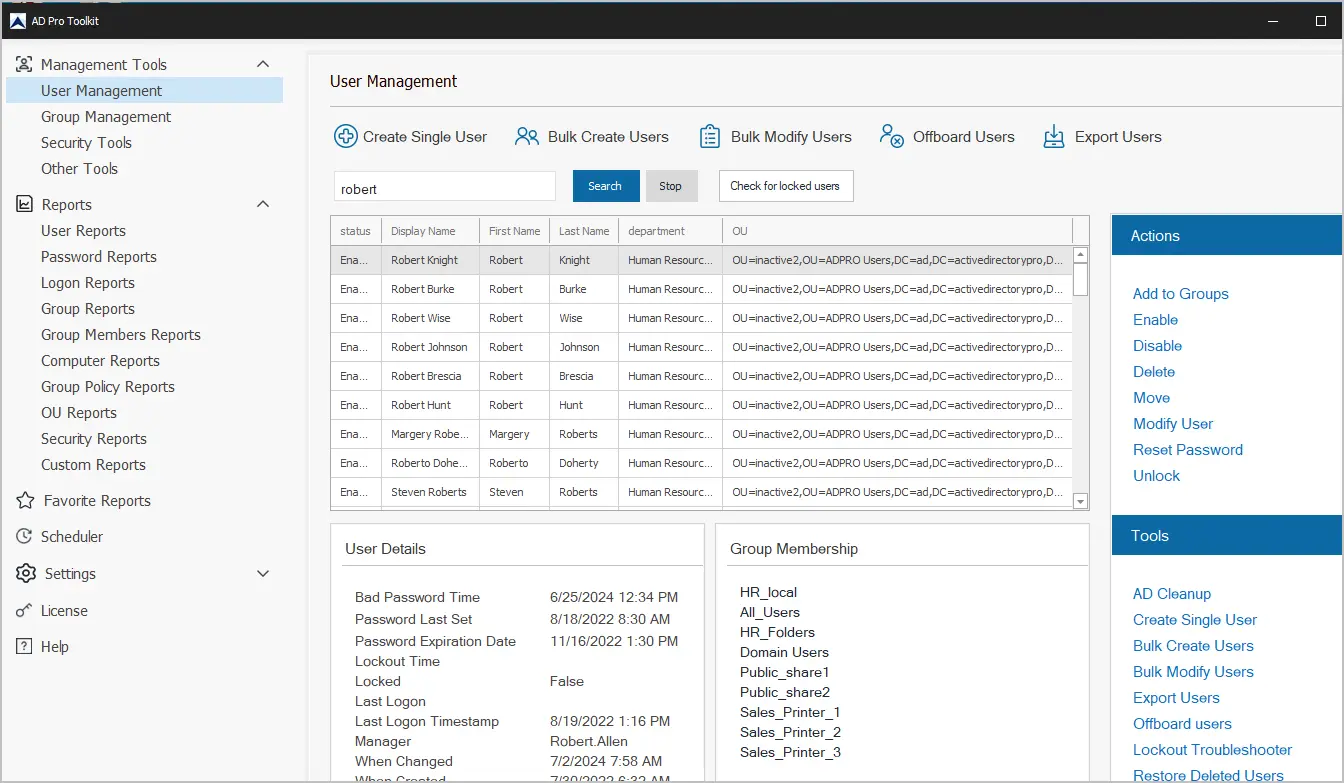
AD Pro Toolkit highlights:
- Bulk Import Users
- Bulk Update Users
- Easily export users to CSV or PDF
- Schedule automated reports
- Quickly find locked user accounts
- Bulk add or remove users from groups
- Audit password changes
Download AD Pro Toolkit and see how easy it is to management Active Directory.
Summary
In this article, I showed you how to install the Active Directory Administrative Center. I also showed you the new features it has compared to the Active Directory Users and Computers management console. For day to day stuff most Active Directory Administrators still use ADAC as simple things like unlocking accounts are not intuitive. It also feels very slow compared to ADUC and PowerShell. It does come in useful for things like recycle bin and fine grained password policies.