
Установим роль контроллера домена на Windows Server 2019. На контроллере домена работает служба Active Directory (AD DS). С Active Directory связано множество задач системного администрирования.
AD DS в Windows Server 2019 предоставляет службу каталогов для централизованного хранения и управления пользователями, группами, компьютерами, а также для безопасного доступ к сетевым ресурсам с проверкой подлинности и авторизацией.
Подготовительные работы
Нам понадобится компьютер с операционной системой Windows Server 2019. У меня контроллер домена будет находиться на виртуальной машине:
Установка Windows Server 2019 на виртуальную машину VMware
После установки операционной системы нужно выполнить первоначальную настройку Windows Server 2019:
Первоначальная настройка Windows Server 2019
Хочется отметить обязательные пункты, которые нужно выполнить.
Выполните настройку сети. Укажите статический IP адрес. DNS сервер указывать не обязательно, при установке контроллера домена вместе с ним установится служба DNS. В настройках сети DNS сменится автоматически. Отключите IPv6, сделать это можно и после установки контроллера домена.

Укажите имя сервера.
Было бы неплохо установить последние обновления, драйвера. Указать региональные настройки, время. На этом подготовка завершена.
Установка роли Active Directory Domain Services
Работаем под учётной записью локального администратора Administrator (или Администратор), данный пользователь станет администратором домена.
Дополнительно будет установлена роль DNS.
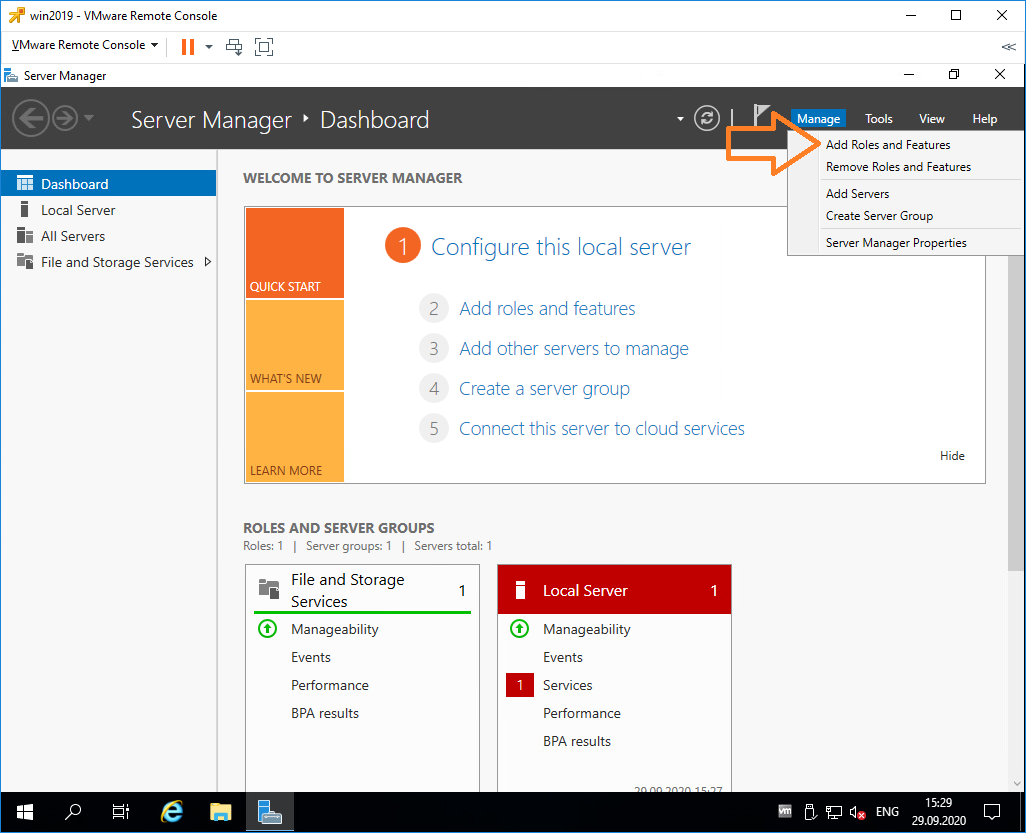
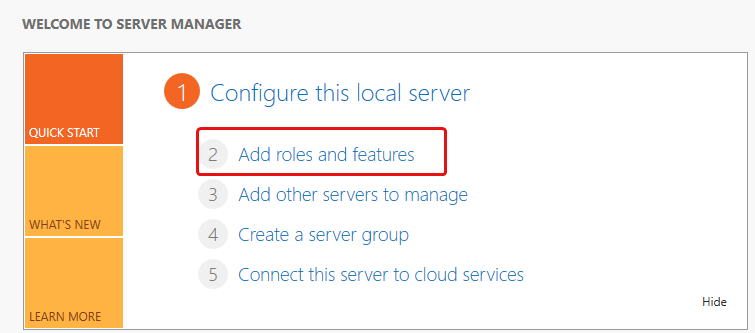
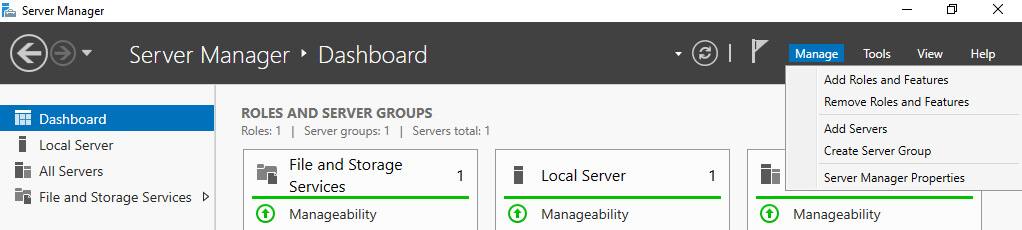
Следующий шаг — установка роли AD DS. Открываем Sever Manager. Manage > Add Roles and Features.
Запускается мастер добавления ролей.

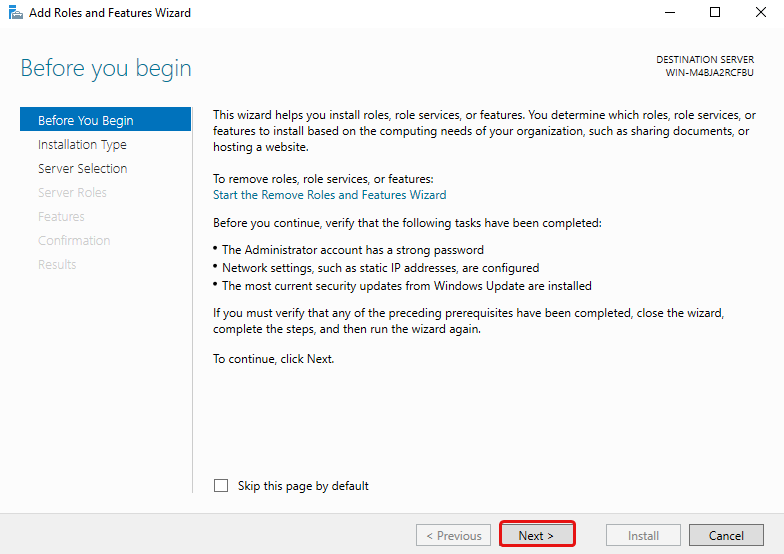
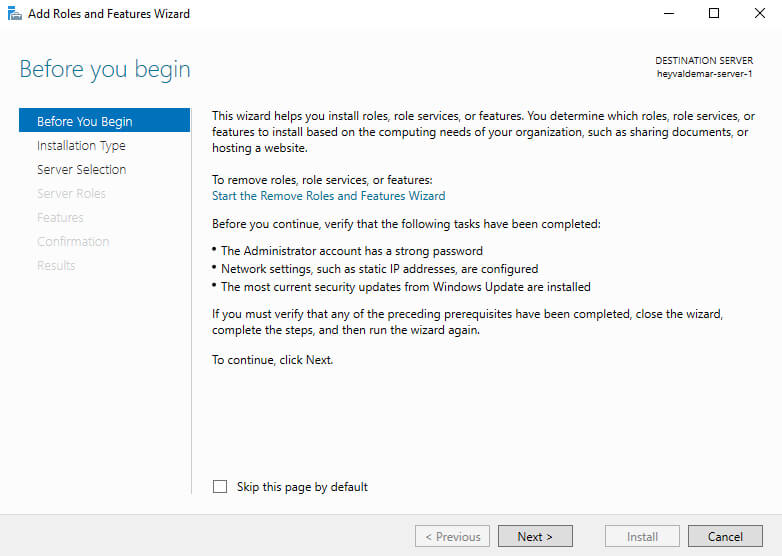
Раздел Before You Begin нас не интересует. Next.
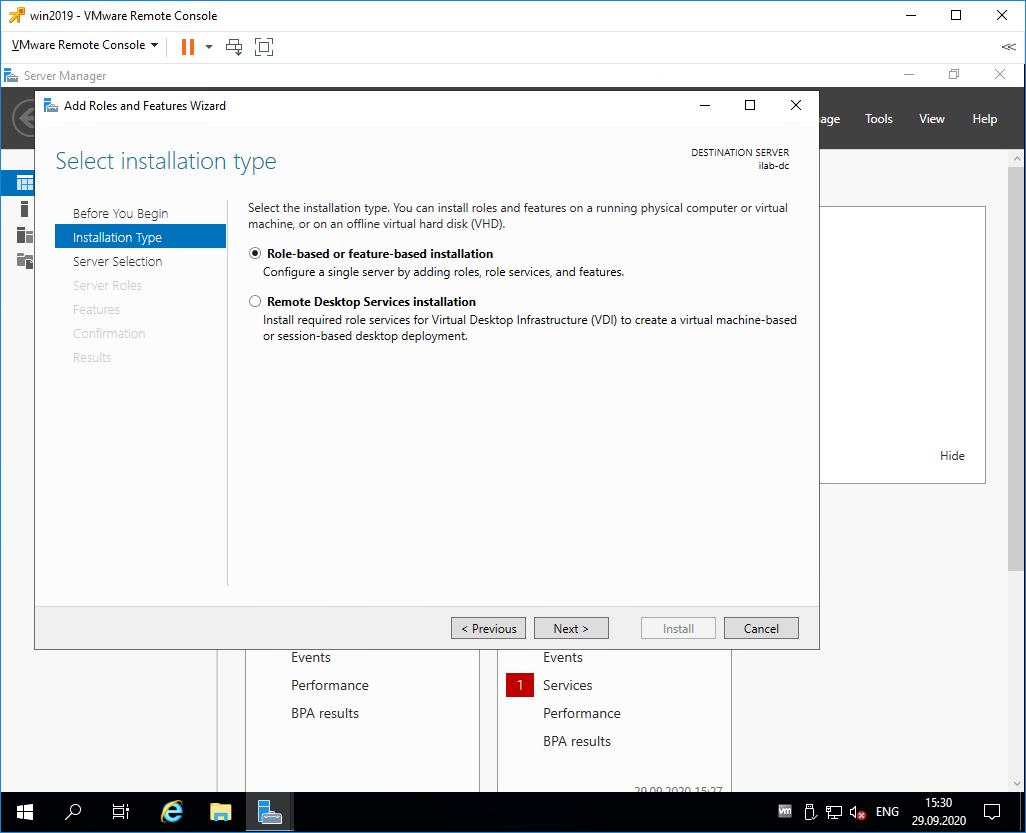
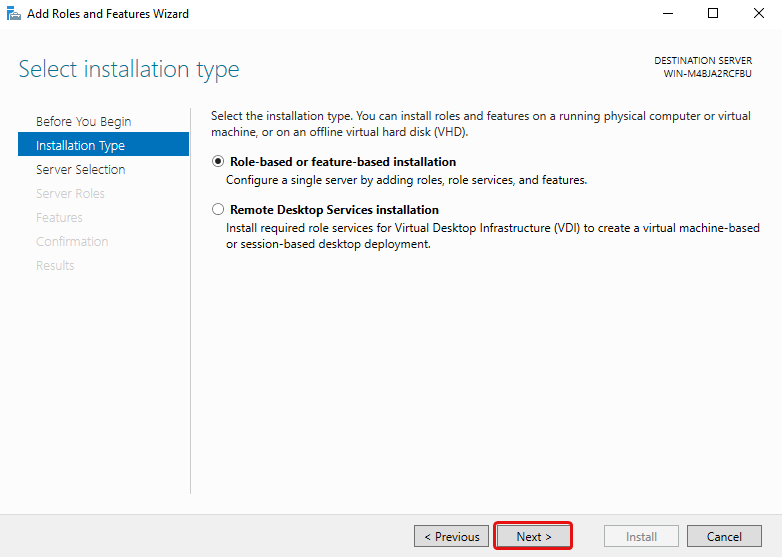
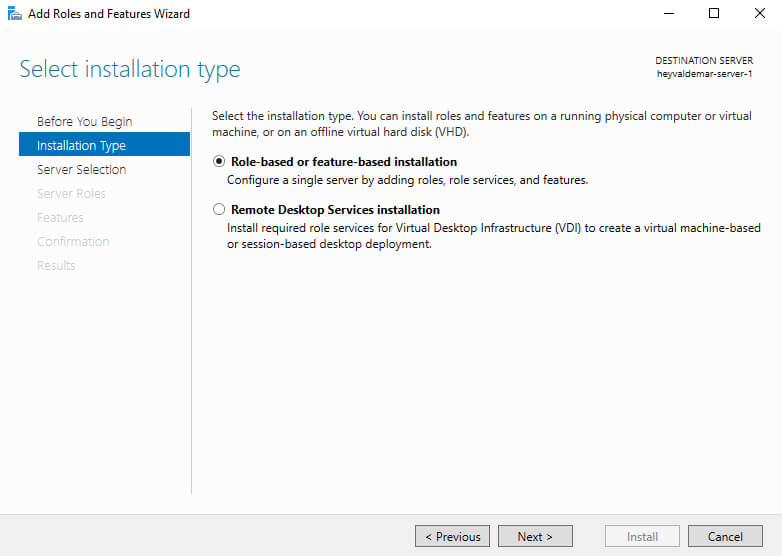
В разделе Installation Type выбираем Role-based or feature-based installation. Next.
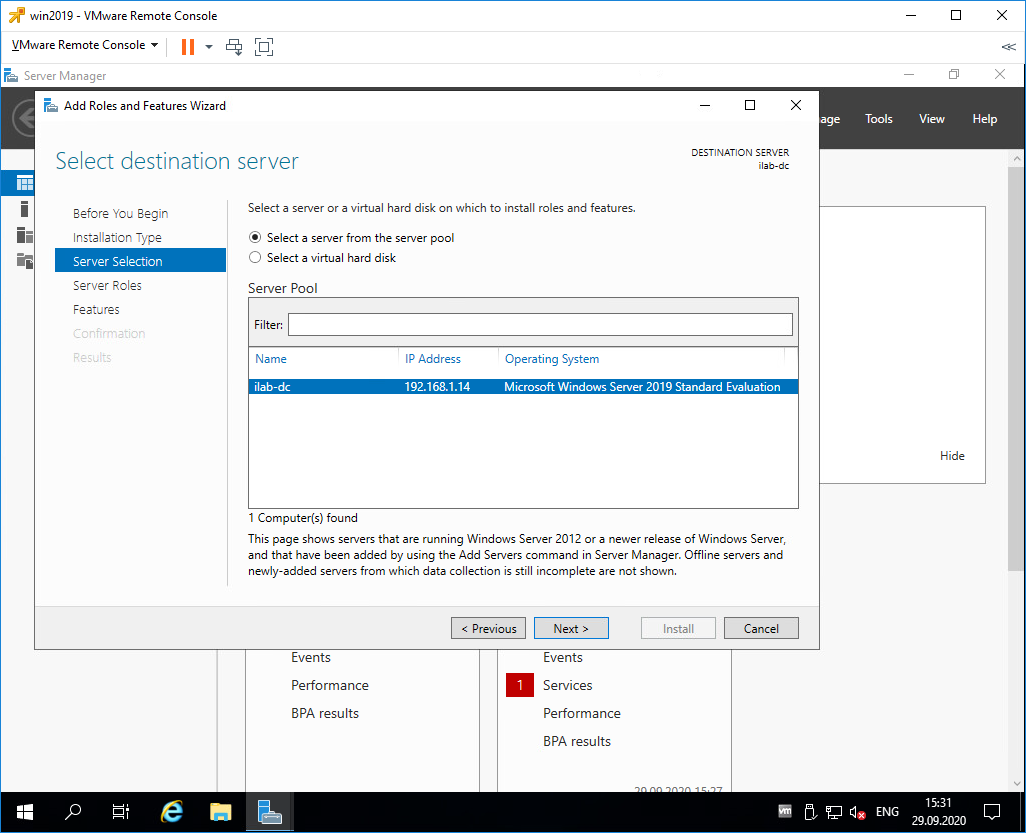
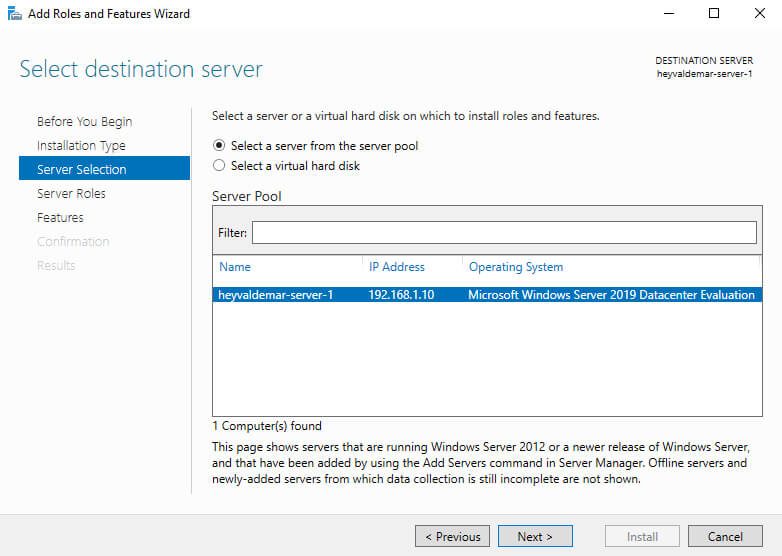
В разделе Server Selection выделяем текущий сервер. Next.
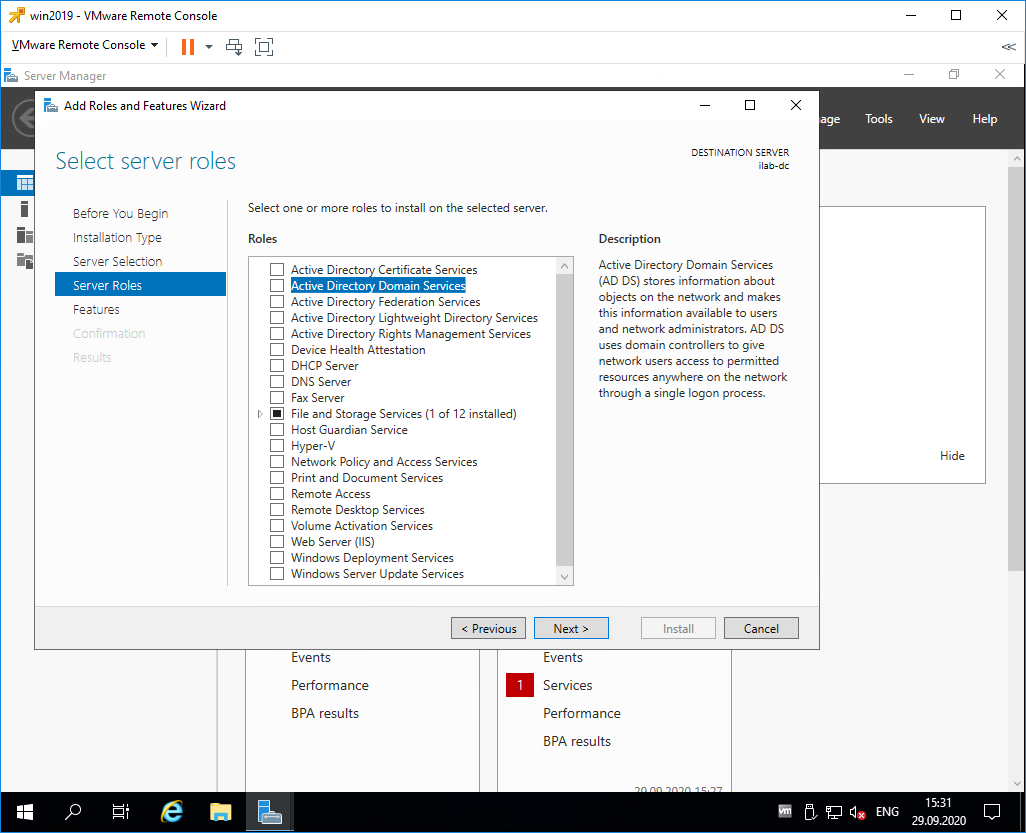
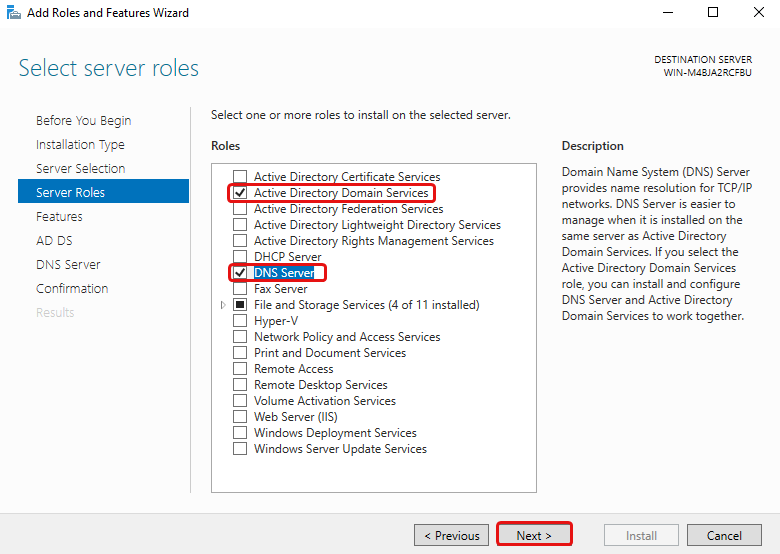
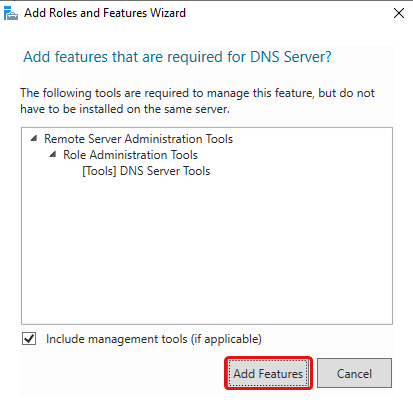
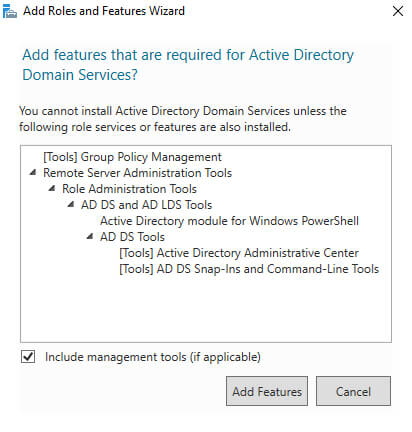
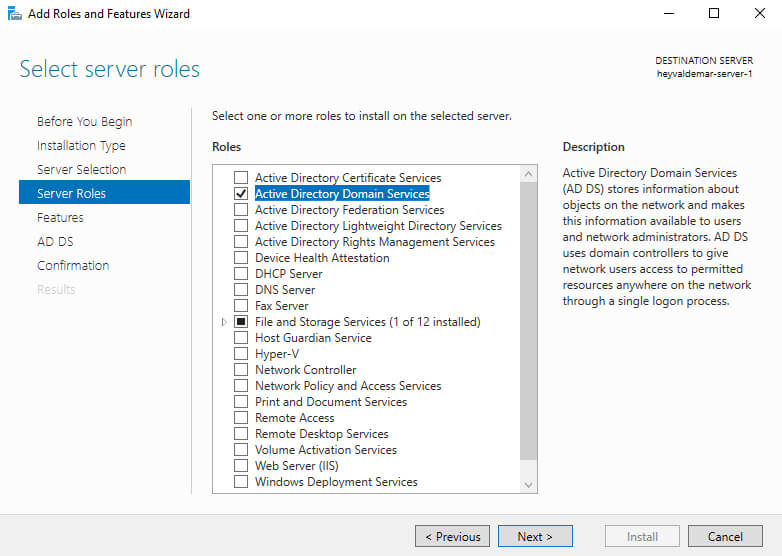
В разделе Server Roles находим роль Active Directory Domain Services, отмечаем галкой.
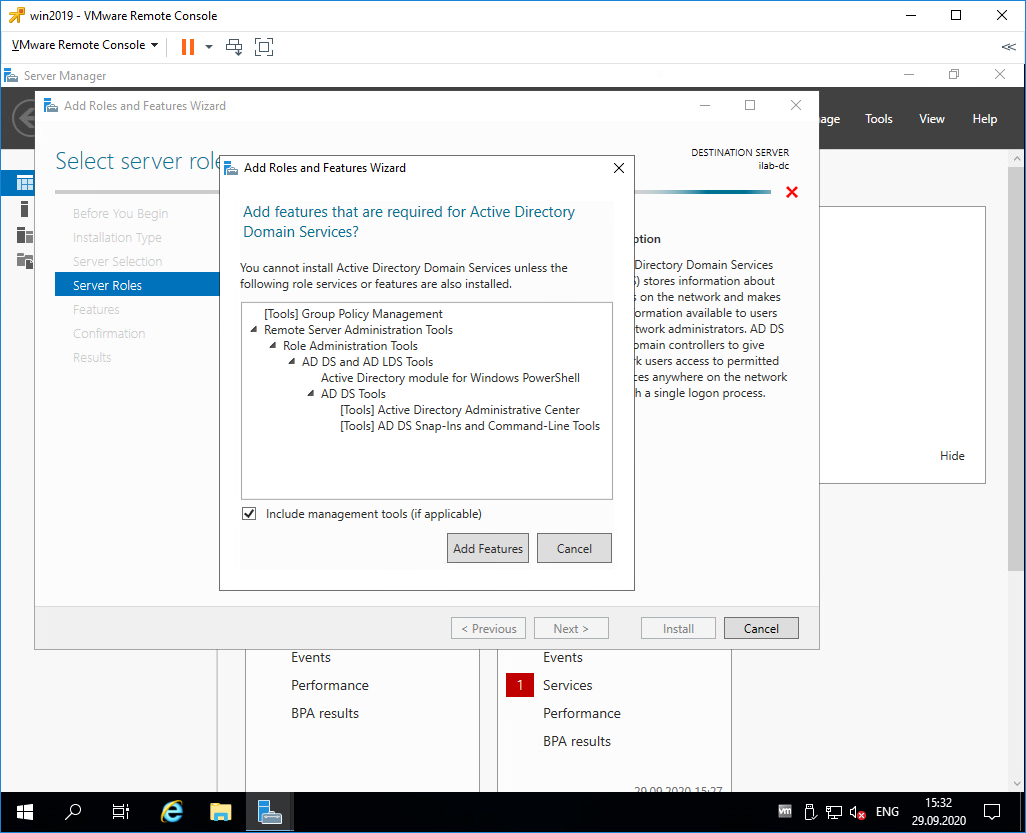
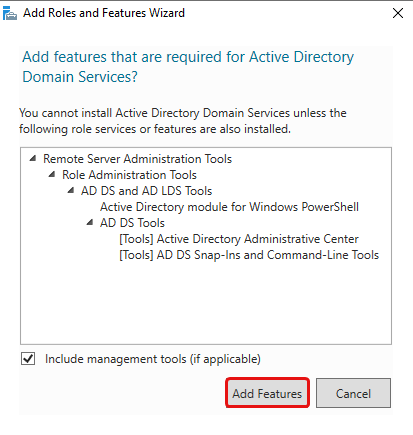
Для роли контроллера домена нам предлагают установить дополнительные опции:
- [Tools] Group Policy Management
- Active Directory module for Windows PowerShell
- [Tools] Active Directory Administrative Center
- [Tools] AD DS Snap-Ins and Command-Line Tools
Всё это не помешает. Add Features.

Теперь роль Active Directory Domain Services отмечена галкой. Next.
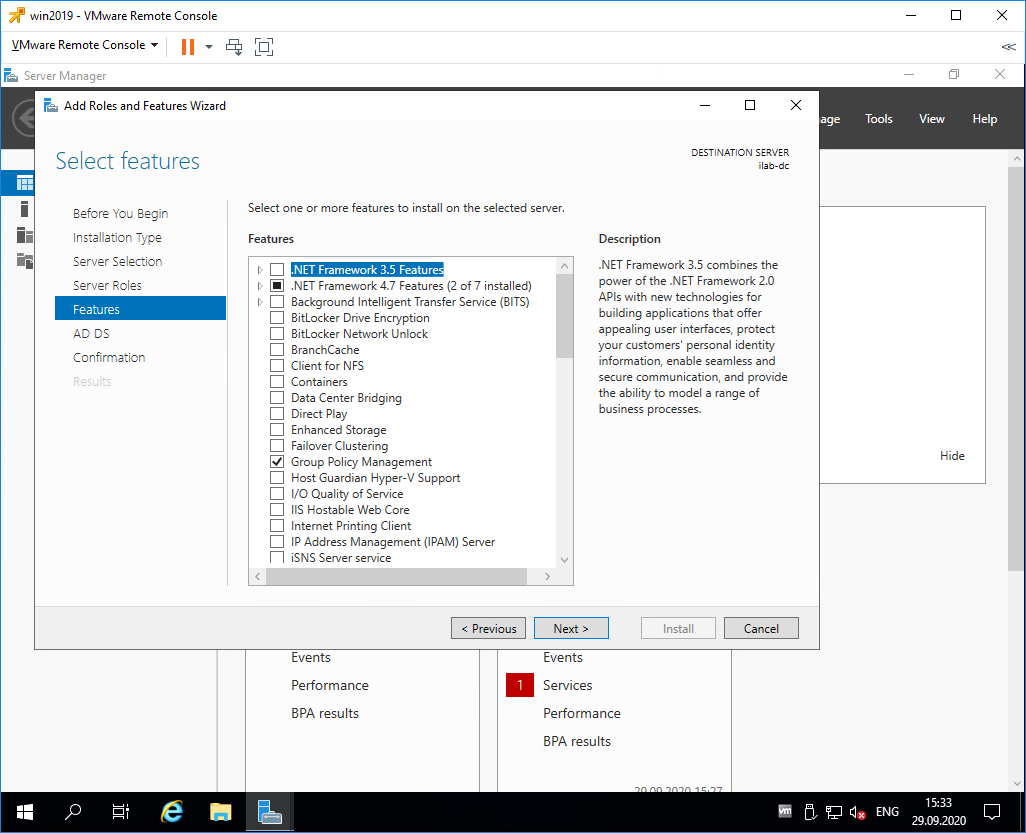
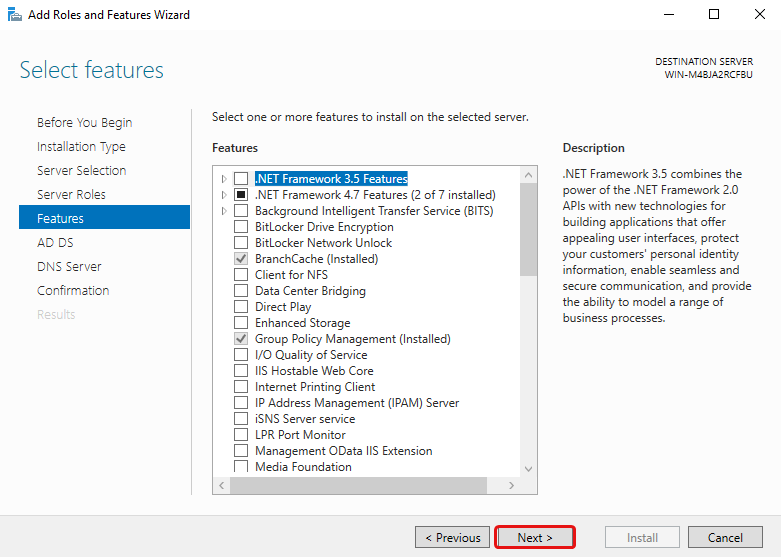
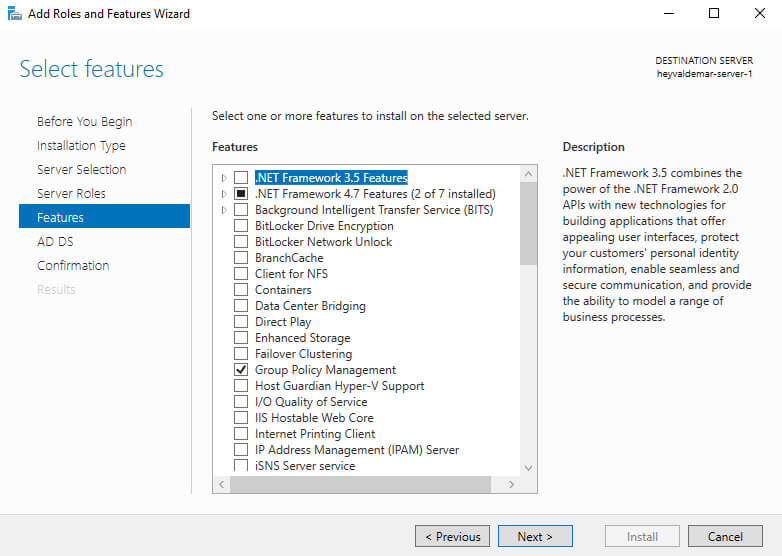
В разделе Features нам не нужно отмечать дополнительные опции. Next.
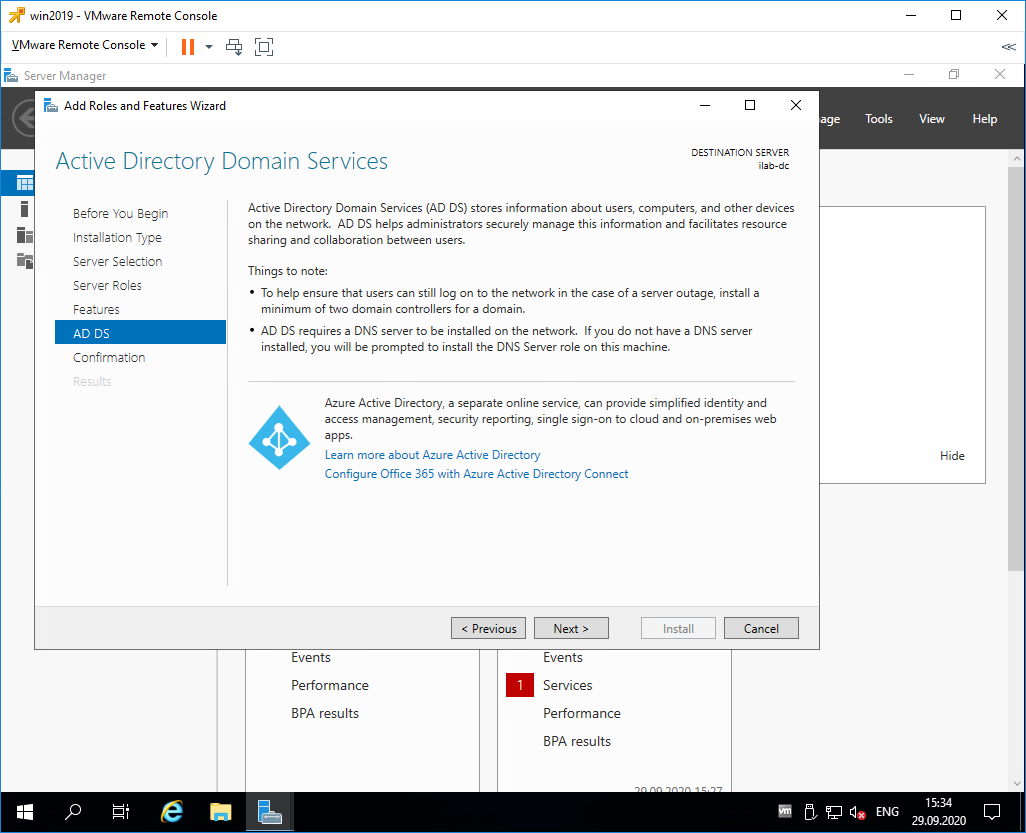
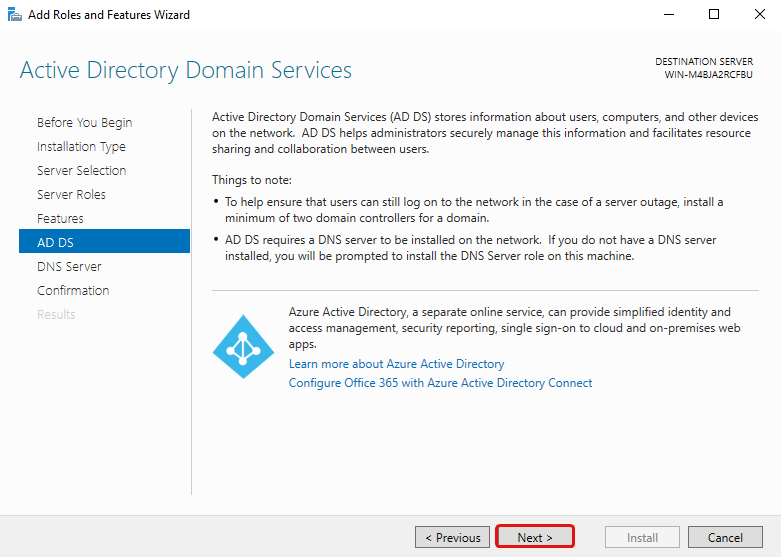
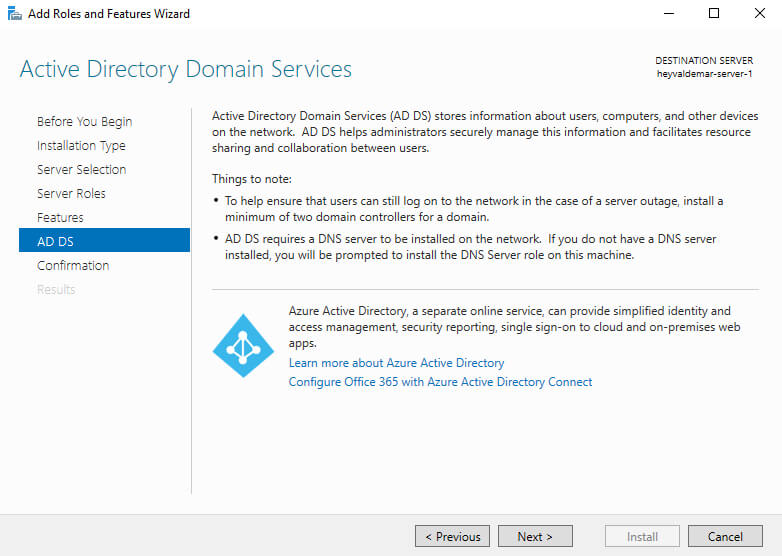
У нас появился раздел AD DS. Здесь есть пара ссылок про Azure Active Directory, они нам не нужны. Next.
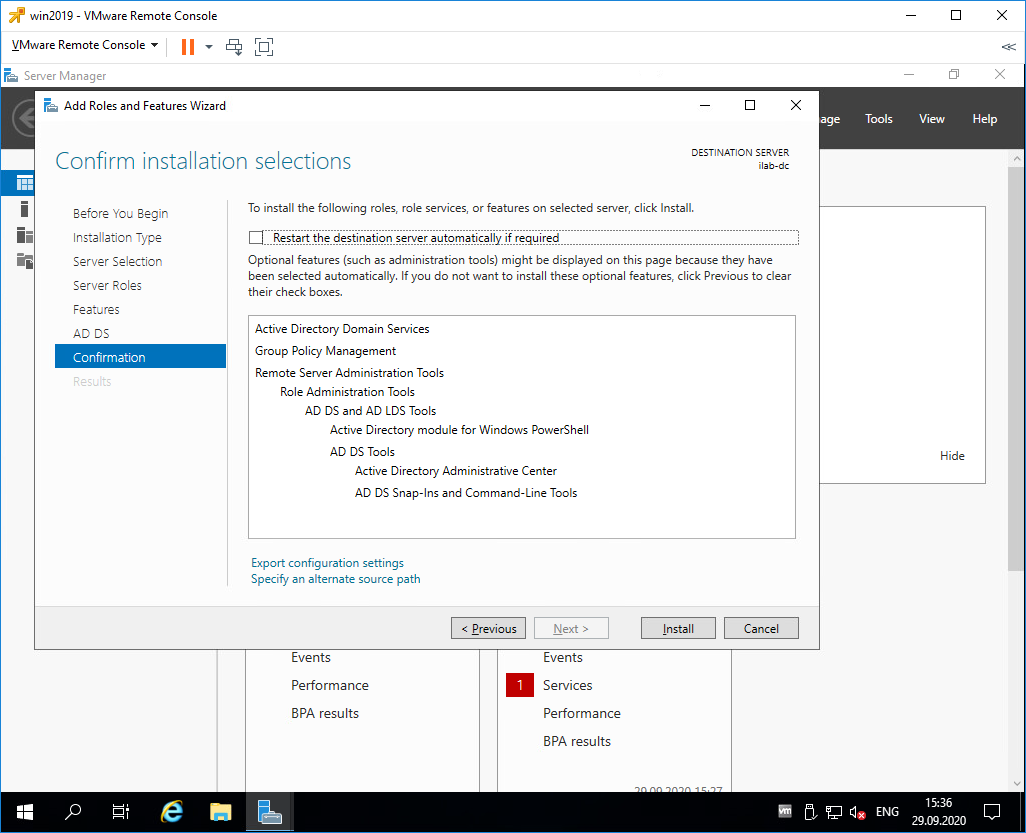
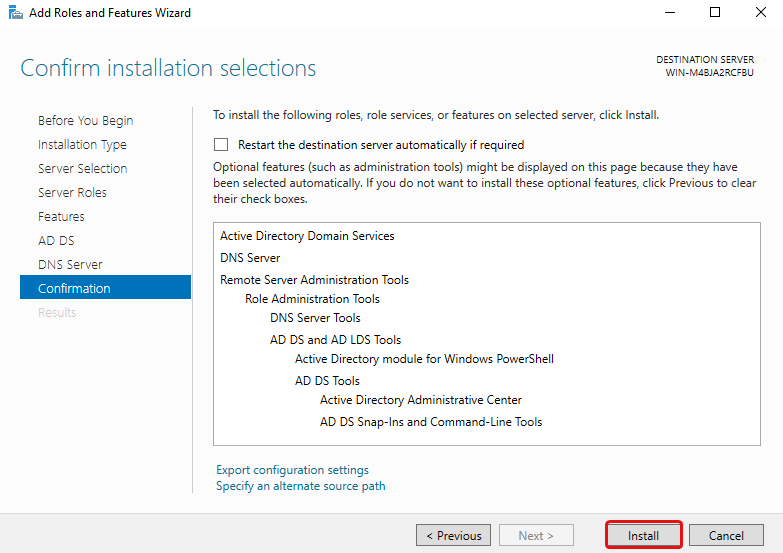
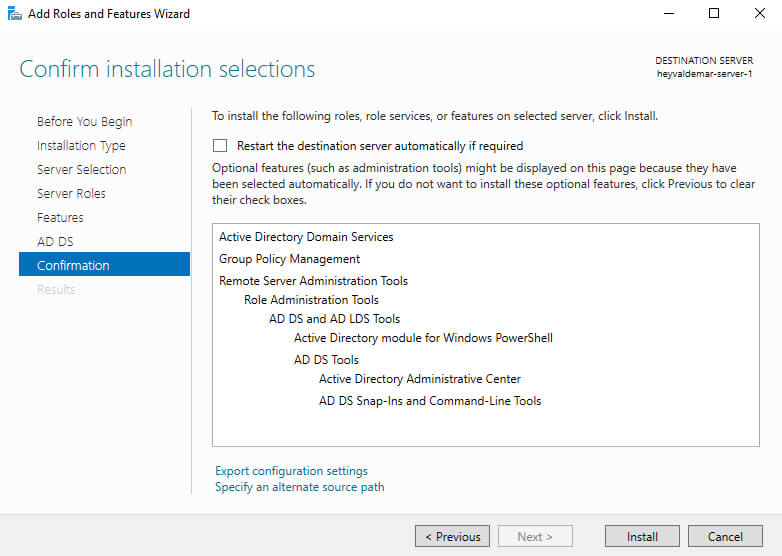
Раздел Confirmation. Подтверждаем установку компонентов кнопкой Install.
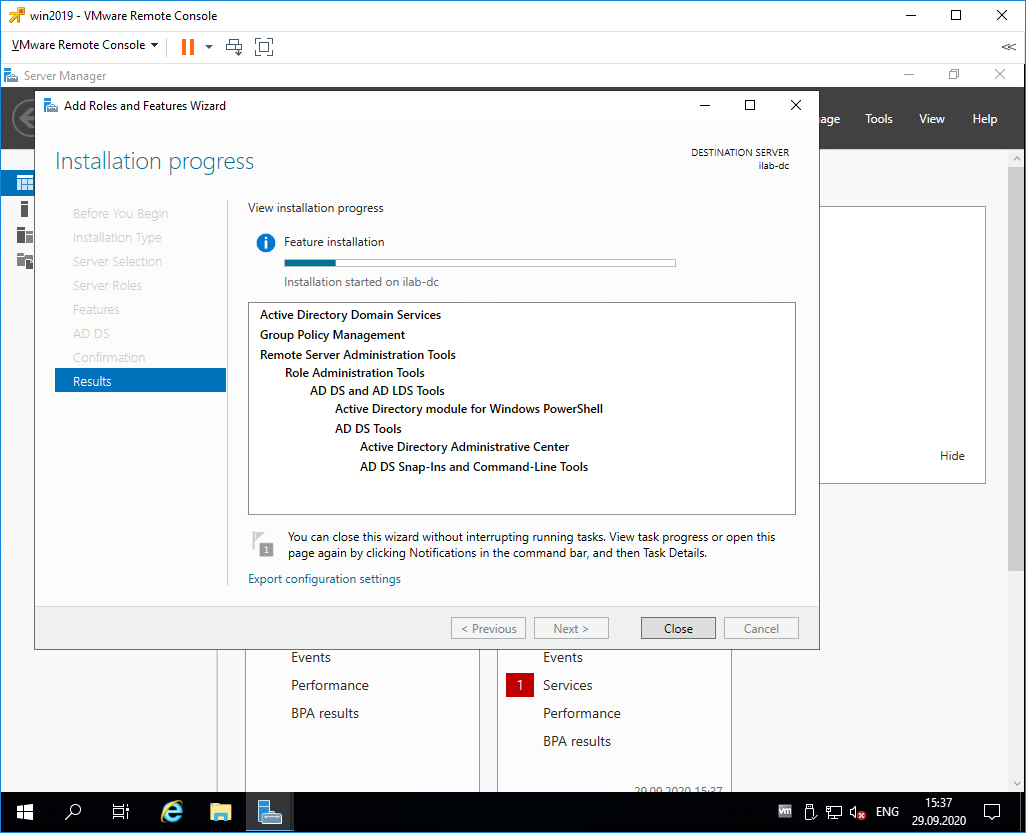
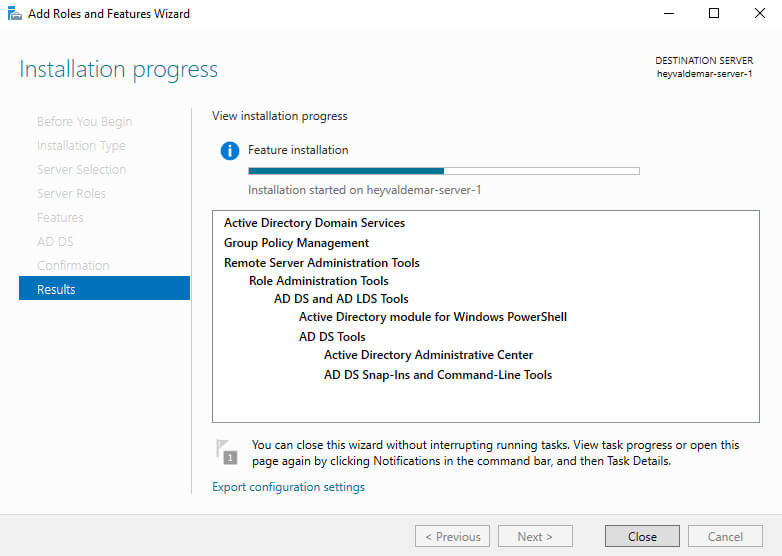
Начинается установка компонентов, ждём.
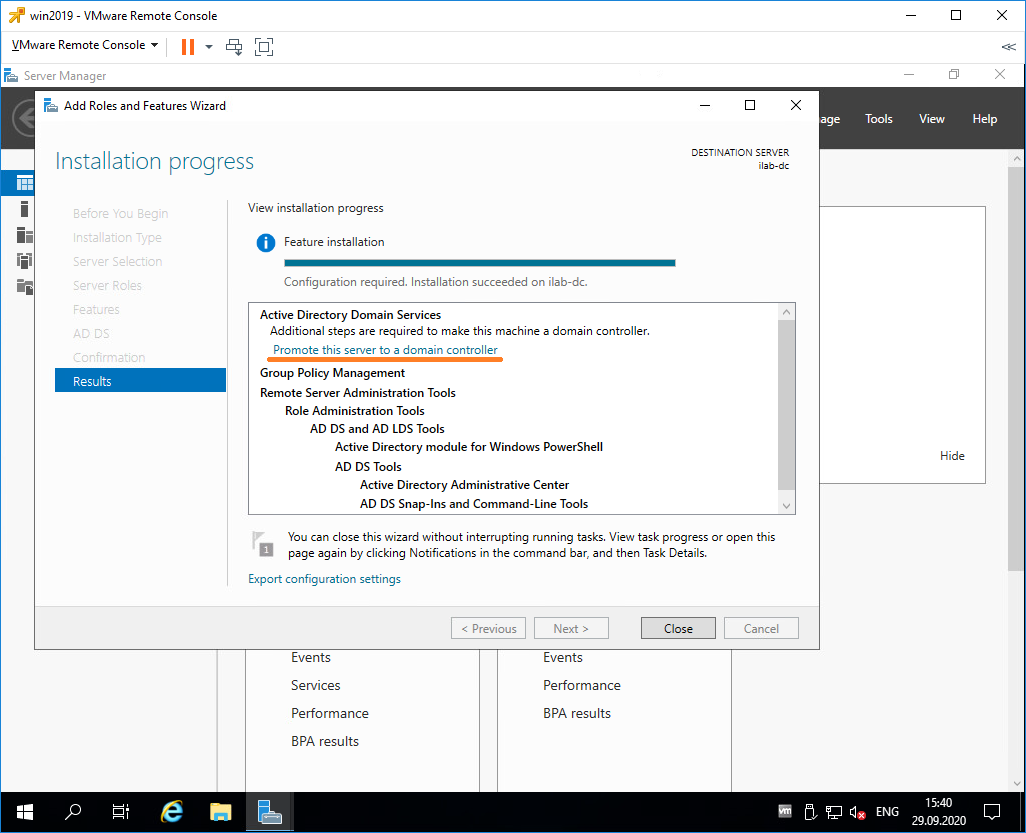
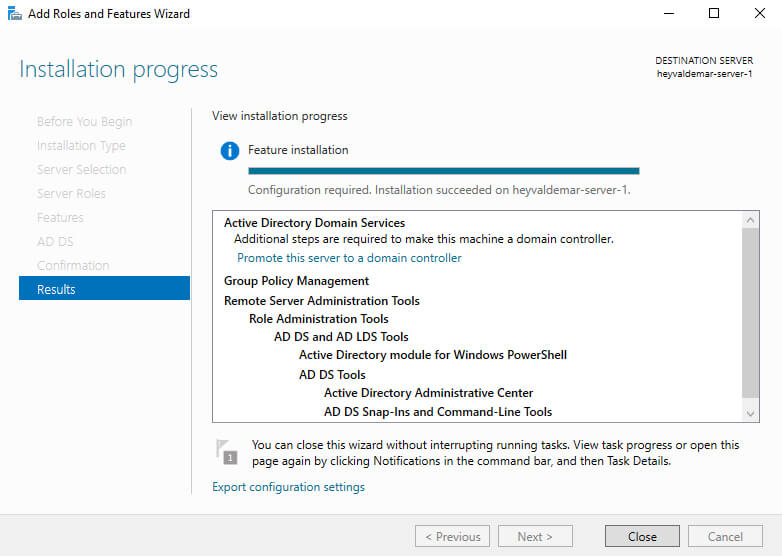
Configuration required. Installation succeeded on servername. Установка компонентов завершена, переходим к основной части, повышаем роль текущего сервера до контроллера домена. В разделе Results есть ссылка Promote this server to domain controller.
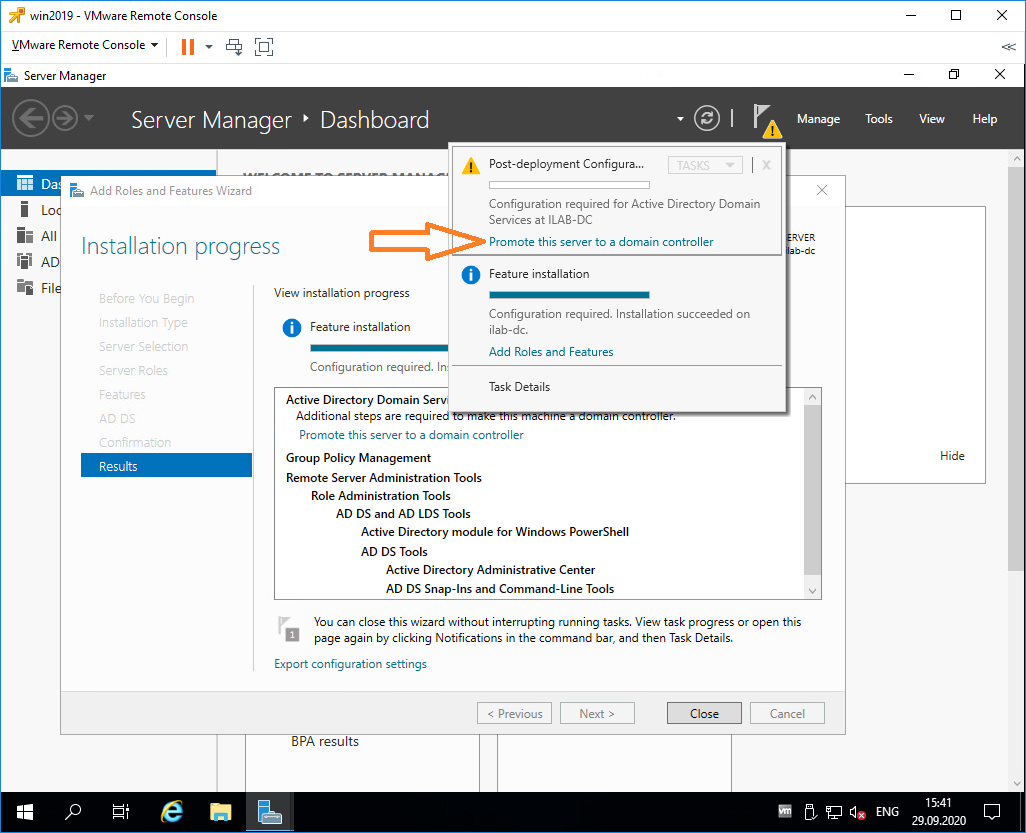
Она же доступна в предупреждении основного окна Server Manager. Нажимаем на эту ссылку, чтобы повысить роль сервера до контроллера домена.
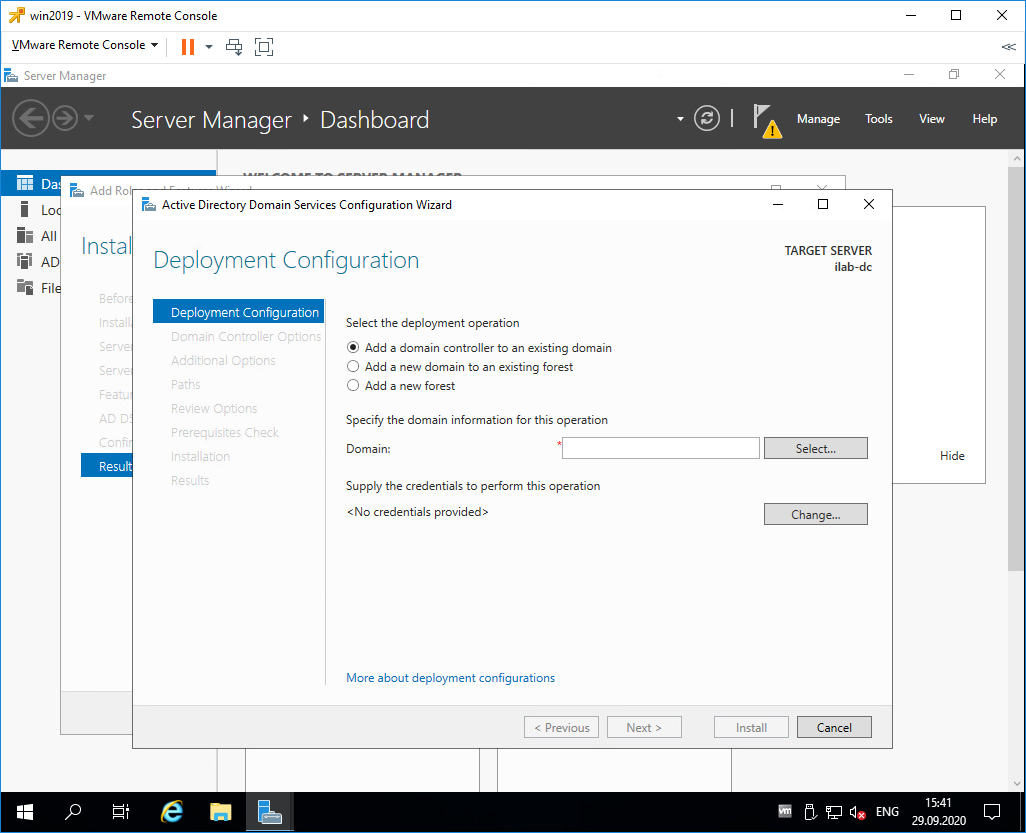
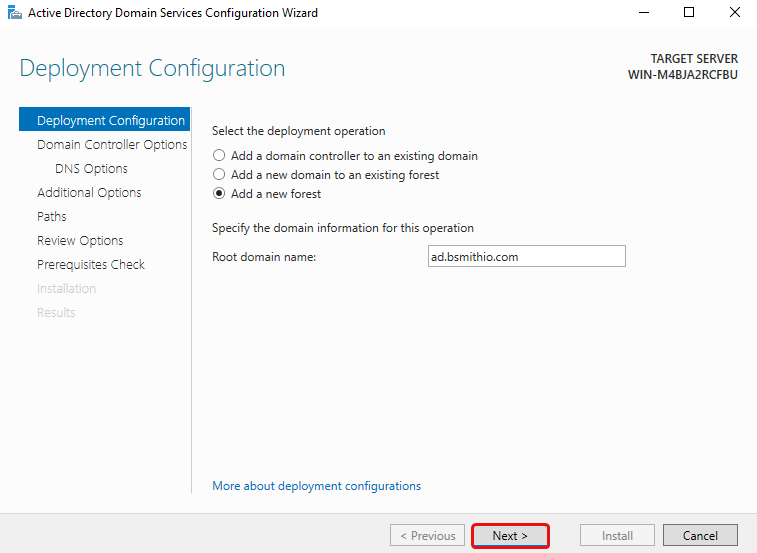
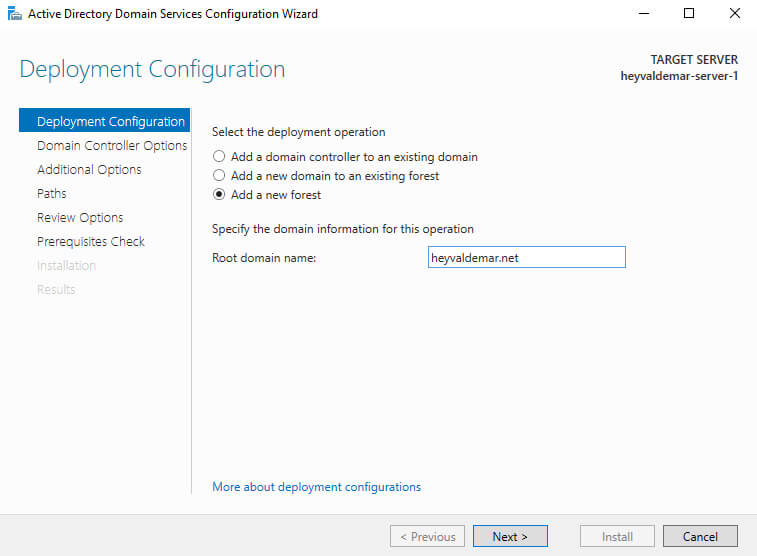
Запускается мастер конфигурации AD DS — Active Directory Domain Service Configuration Wizard. В разделе Deployment Configuration нужно выбрать один из трёх вариантов:
- Add a domain controller to an existing domain
- Add a new domain to an existing forest
- Add a new forest
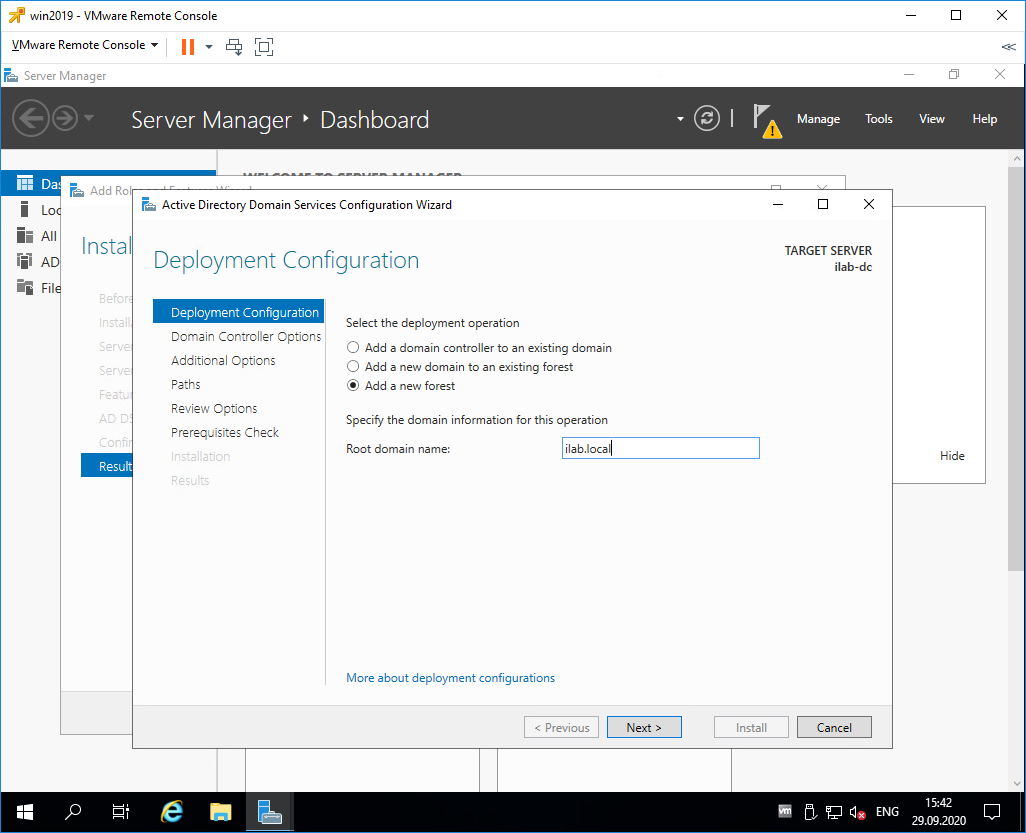
Первый вариант нам не подходит, у нас нет текущего домена, мы создаём новый. По той же причине второй вариант тоже не подходит. Выбираем Add a new forest. Будем создавать новый лес.
Укажем в Root domain name корневое имя домена. Я пишу ilab.local, это будет мой домен. Next.
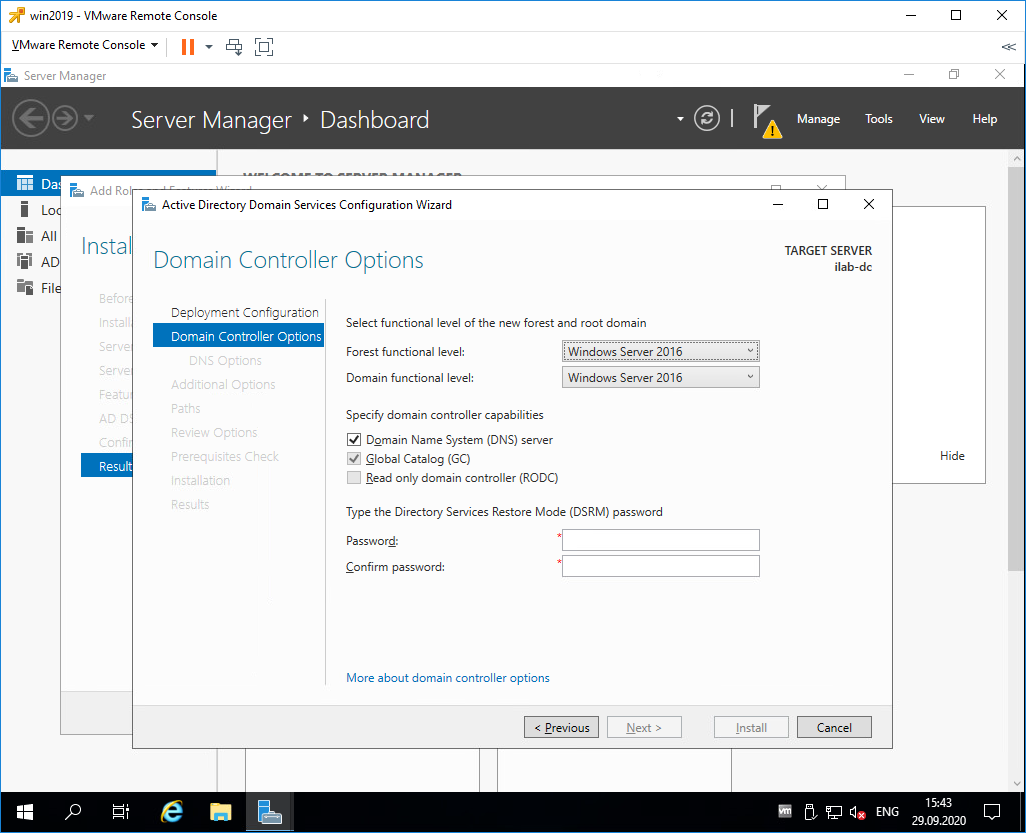
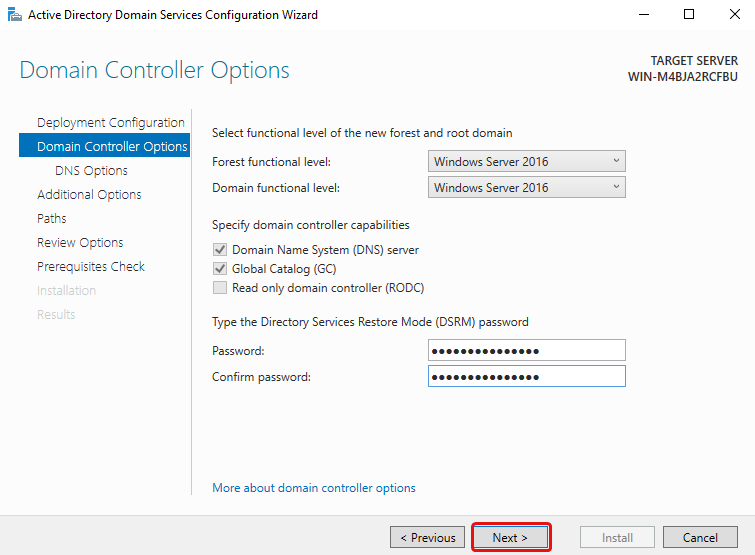
Попадаем в раздел Doman Controller Options.
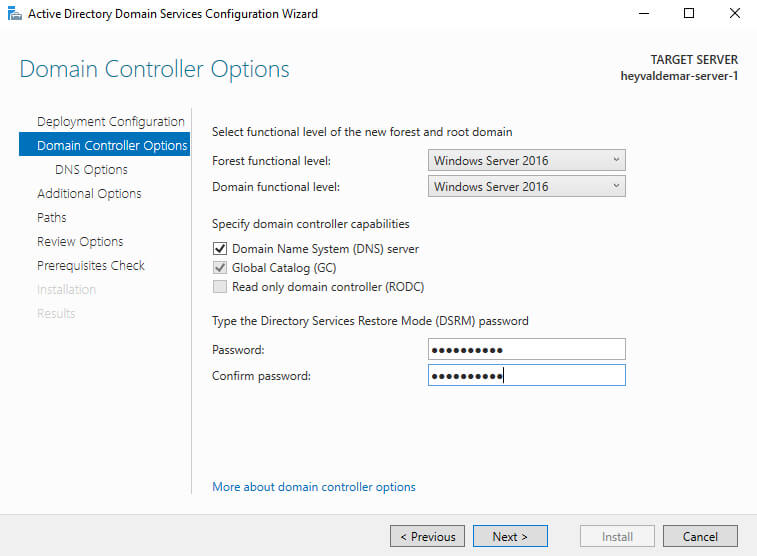
В Forest functional level и Domain functional level нужно указать минимальную версию серверной операционной системы, которая будет поддерживаться доменом.

У меня в домене планируются сервера с Windows Server 2019, Windows Server 2016 и Windows Server 2012, более ранних версий ОС не будет. Выбираю уровень совместимости Windows Server 2012.
В Domain functional level также выбираю Windows Server 2012.
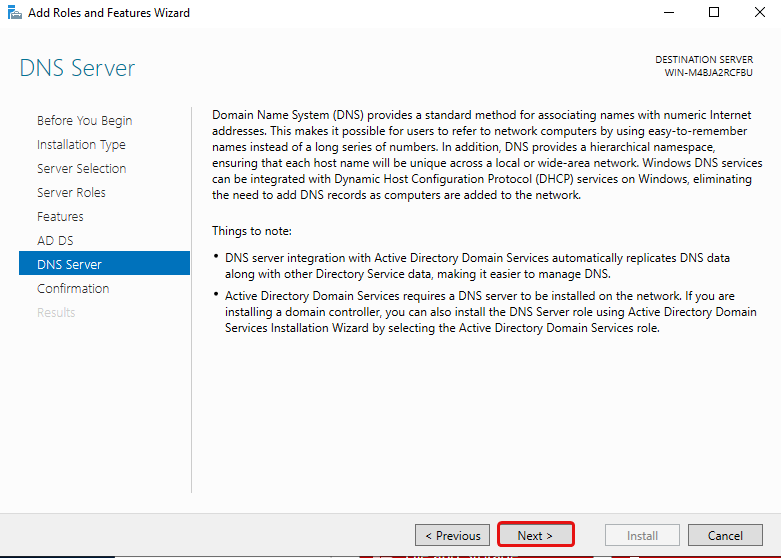
Оставляю галку Domain Name System (DNS) server, она установит роль DNS сервера.
Укажем пароль для Directory Services Restore Mode (DSRM), желательно, чтобы пароль не совпадал с паролем локального администратора. Он может пригодиться для восстановления службы каталогов в случае сбоя.
Next.
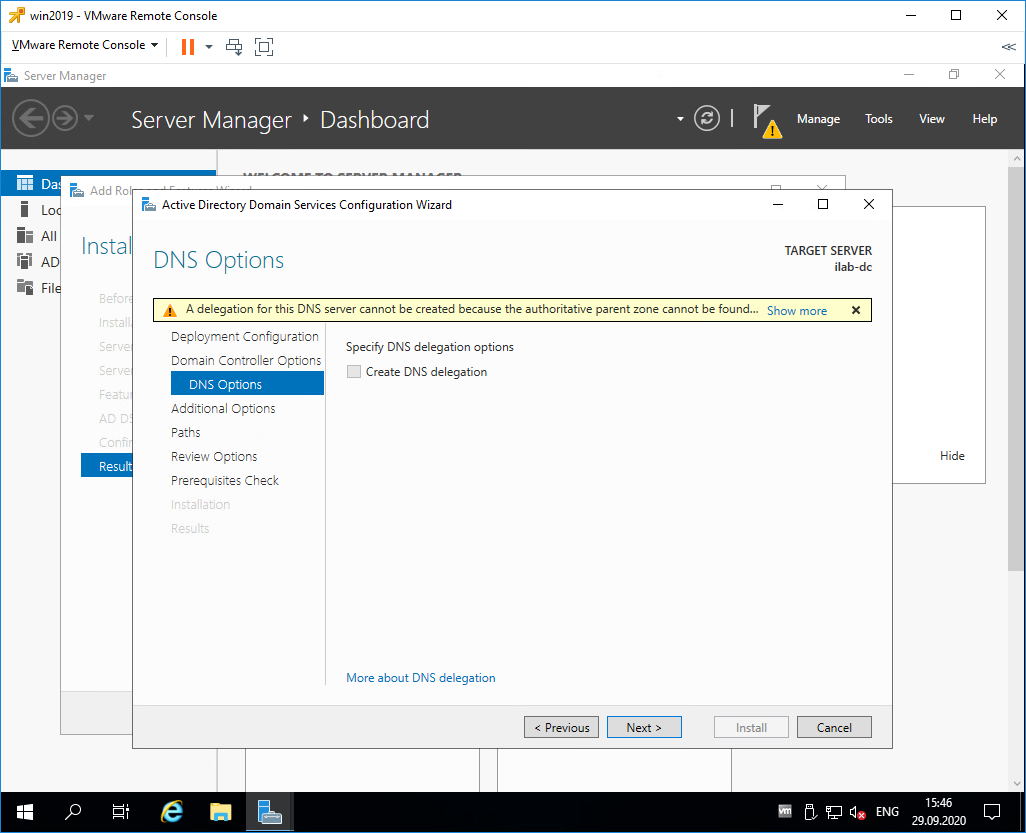
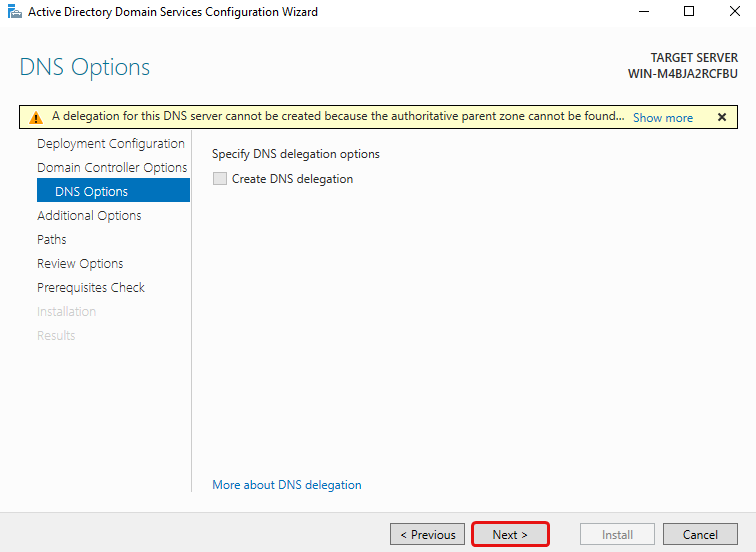
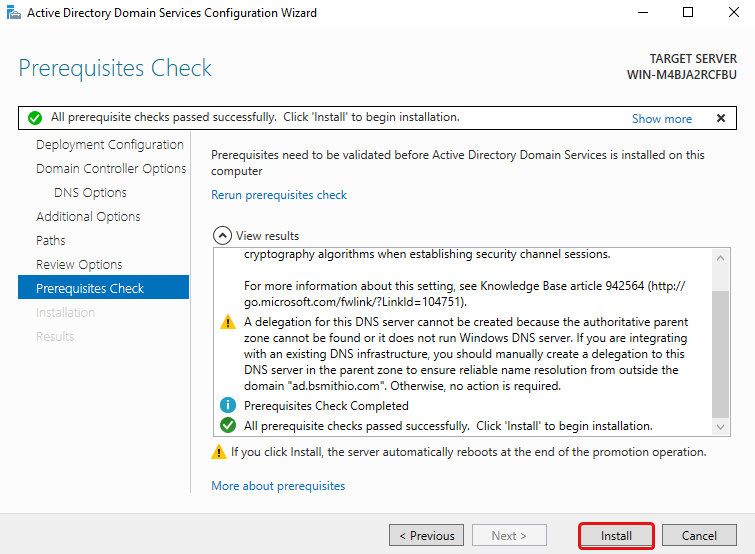
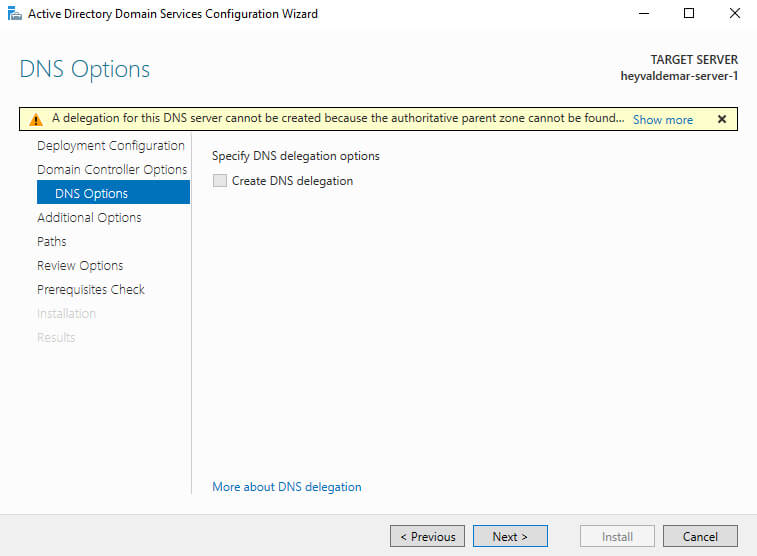
Не обращаем внимание на предупреждение «A delegation for this DNS server cannot be created because the authoritative parent zone cannot be found…». Нам не нужно делать делегирование, у нас DNS сервер будет на контроллере домена. Next.
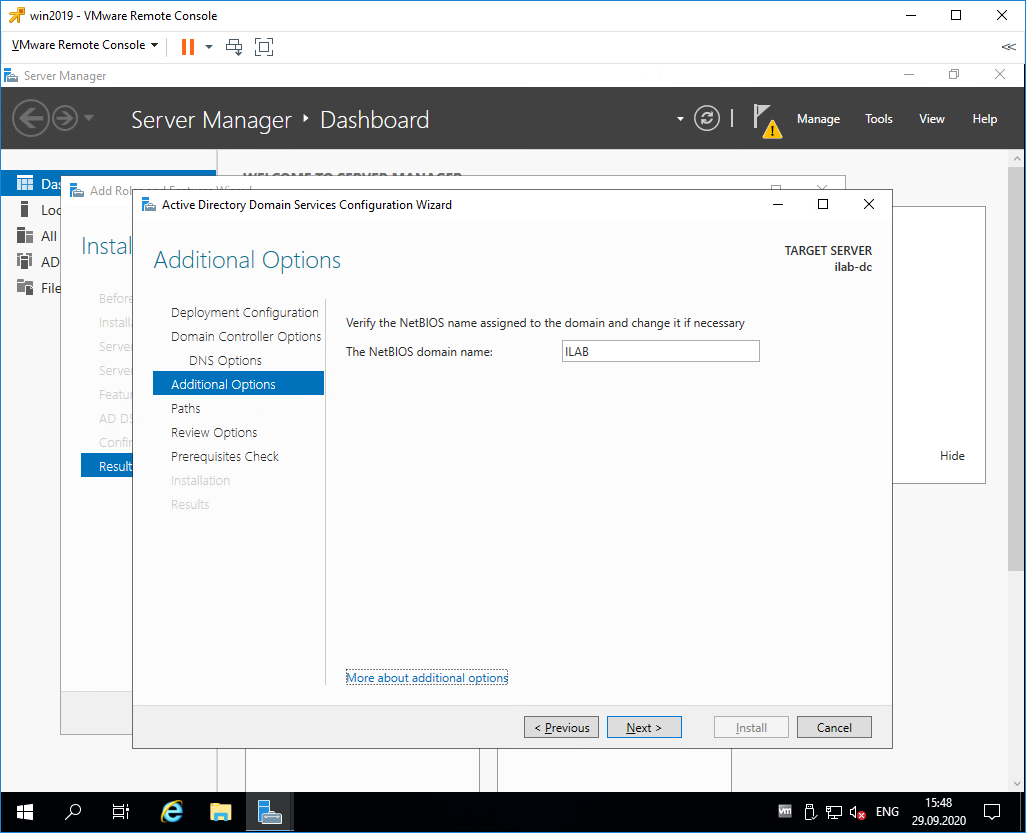
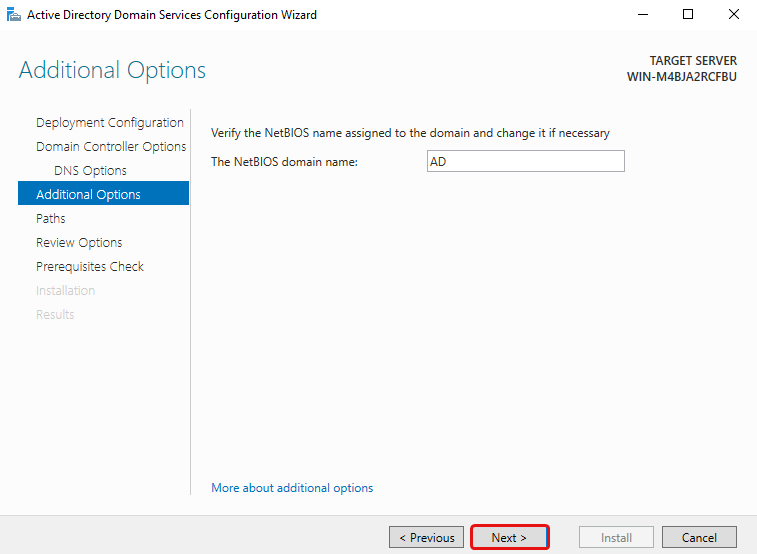
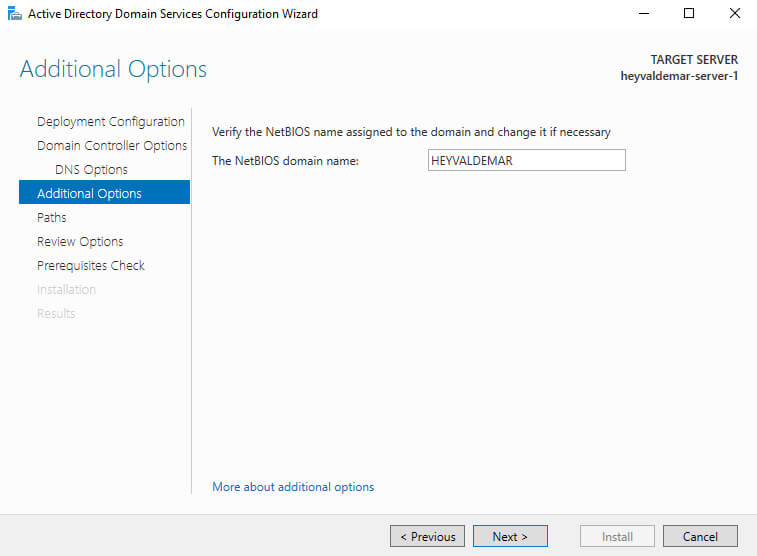
В разделе Additional Options нужно указать NetBIOS name для нашего домена, я указываю «ILAB». Next.
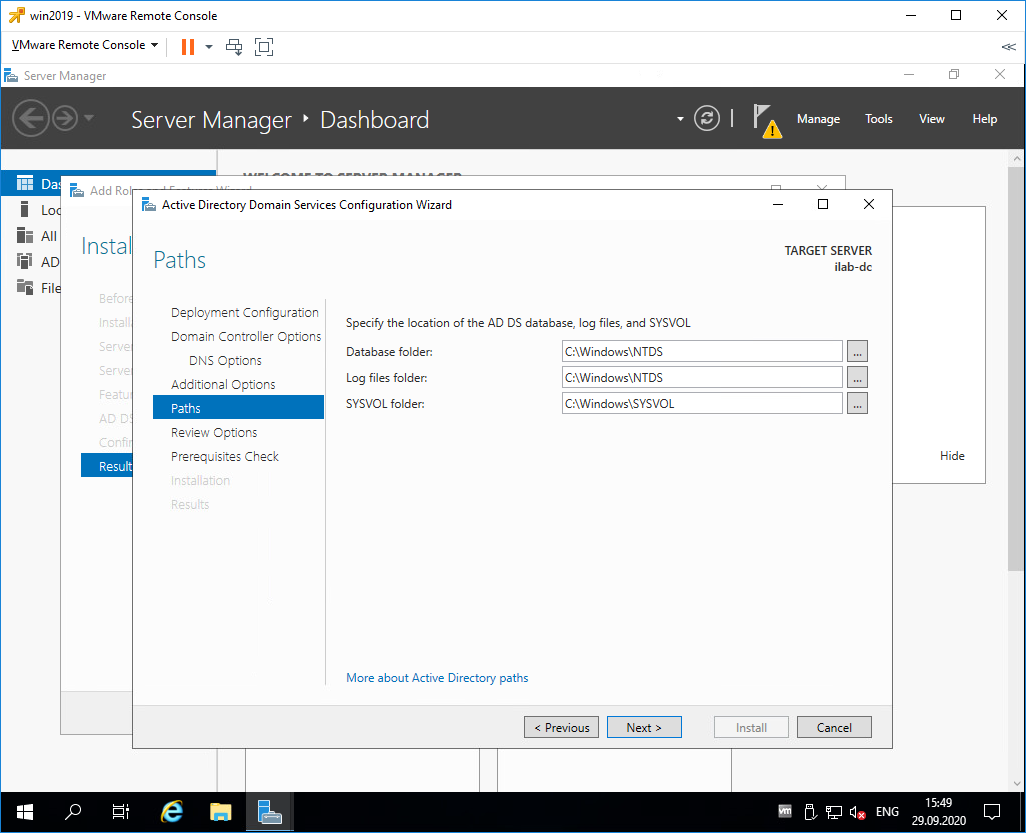
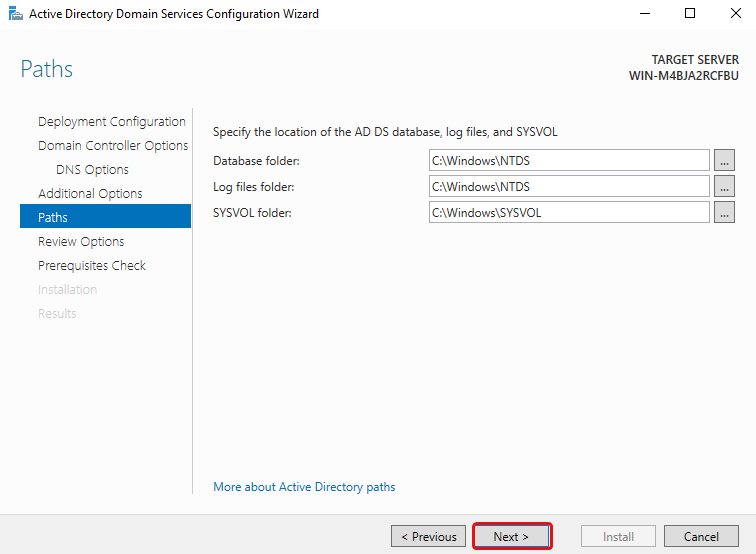
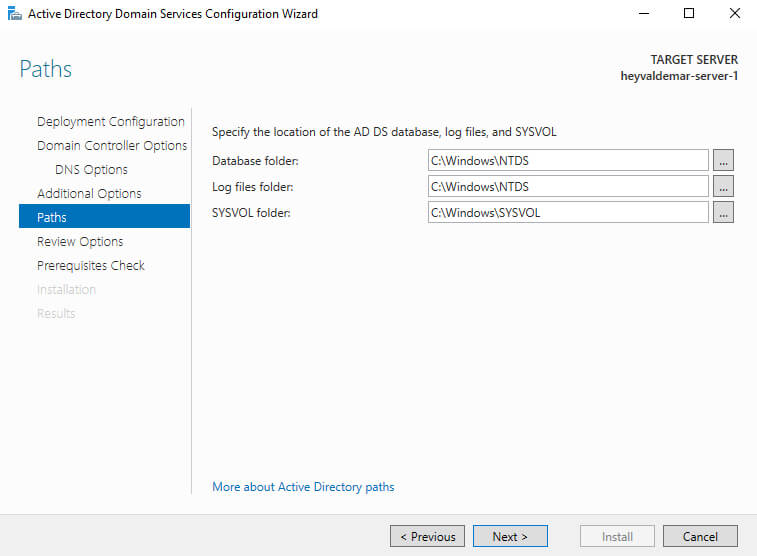
В разделе Paths можно изменить пути к базе данных AD DS, файлам журналов и папке SYSVOL. Без нужды менять их не рекомендуется. По умолчанию:
- Database folder: C:\Windows\NTDS
- Log files folder: C:\Windows\NTDS
- SYSVOL folder: C:\Windows\SYSVOL
Next.
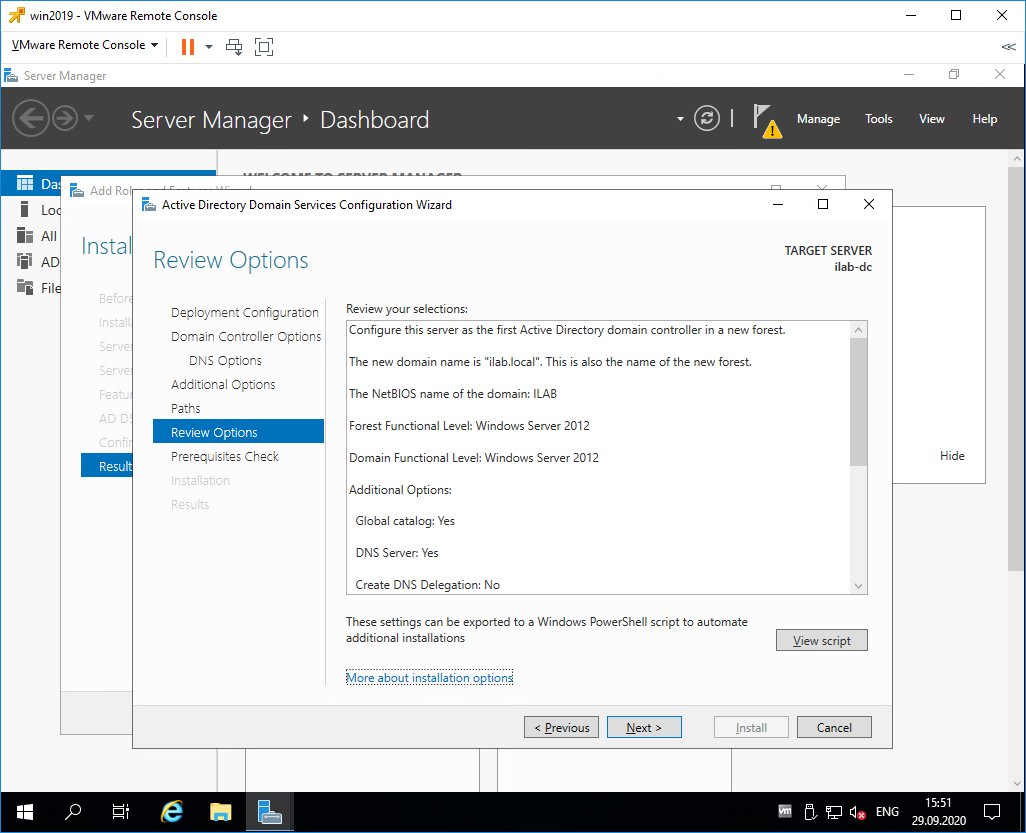
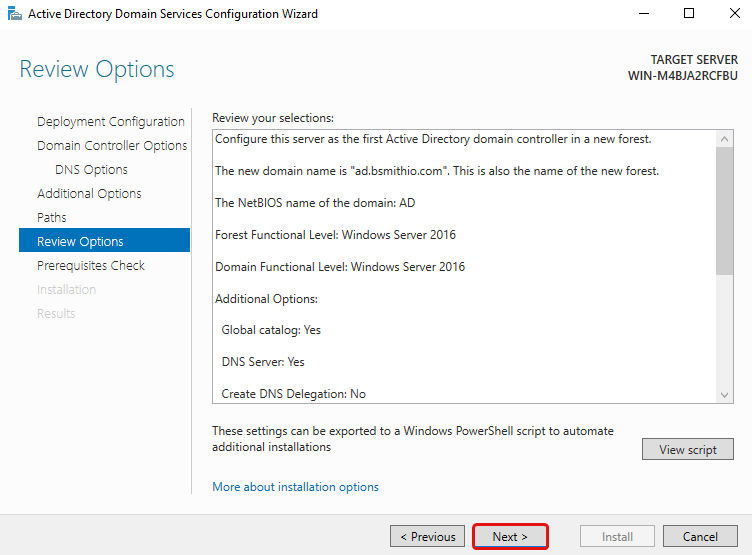
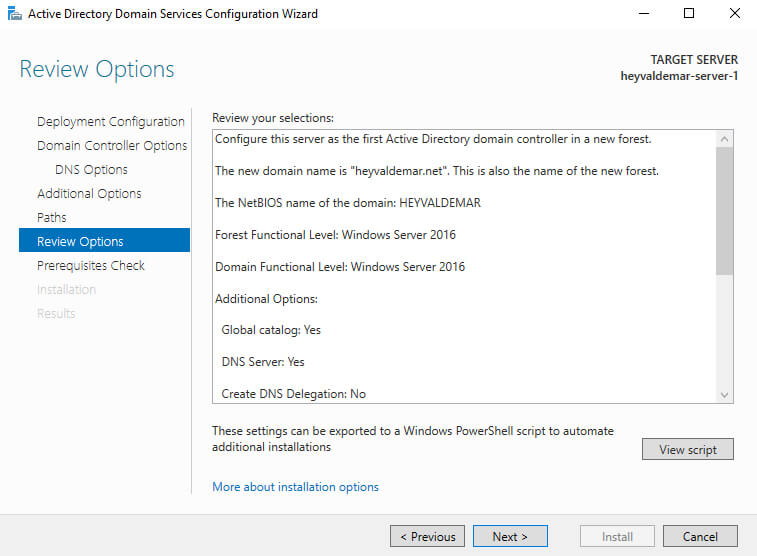
В разделе Review Options проверяем параметры установки. Обратите внимание на кнопку View script. Если её нажать, то сгенерируется tmp файл с PowerShell скриптом для установки контроллера домена.
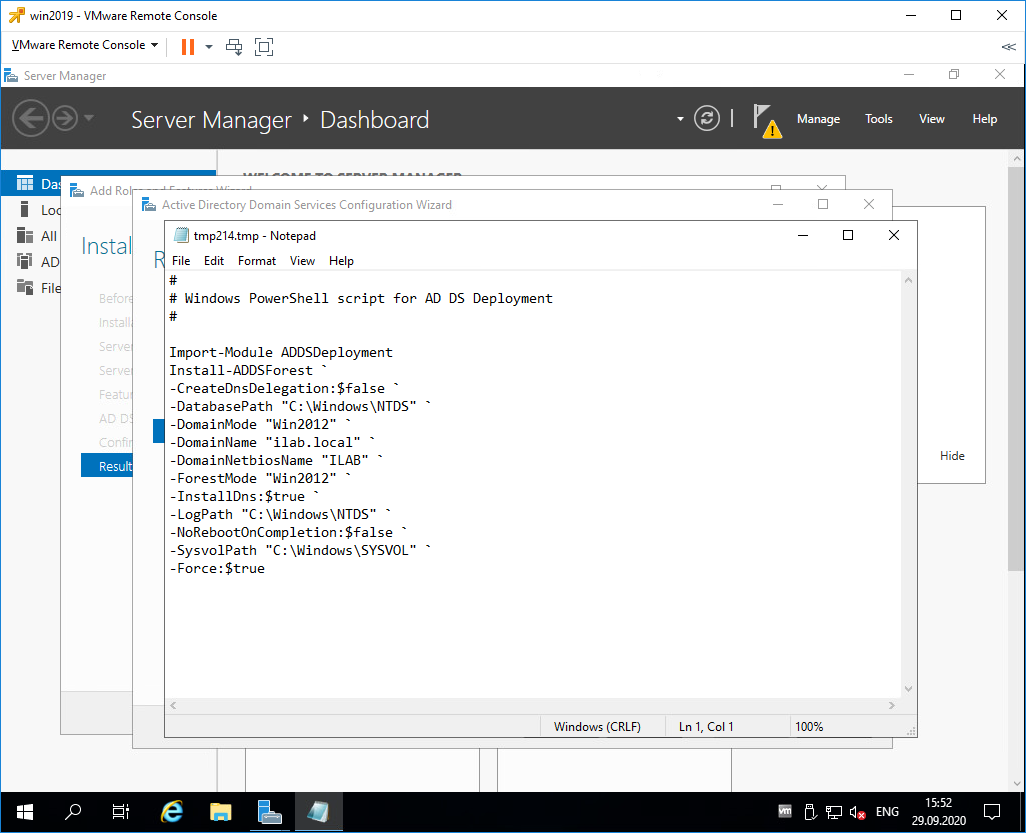
Сейчас нам этот скрипт не нужен, но он может быть полезен системным администраторам для автоматизации установки роли контроллера домена с помощью PowerShell.
Next.
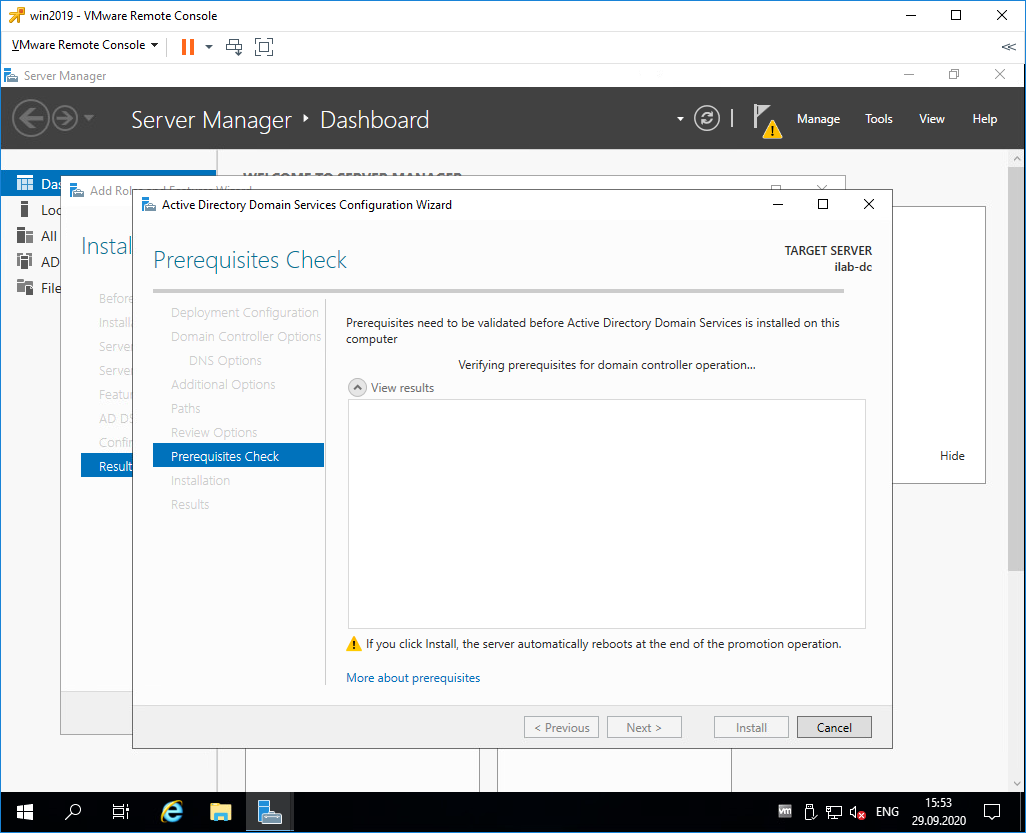
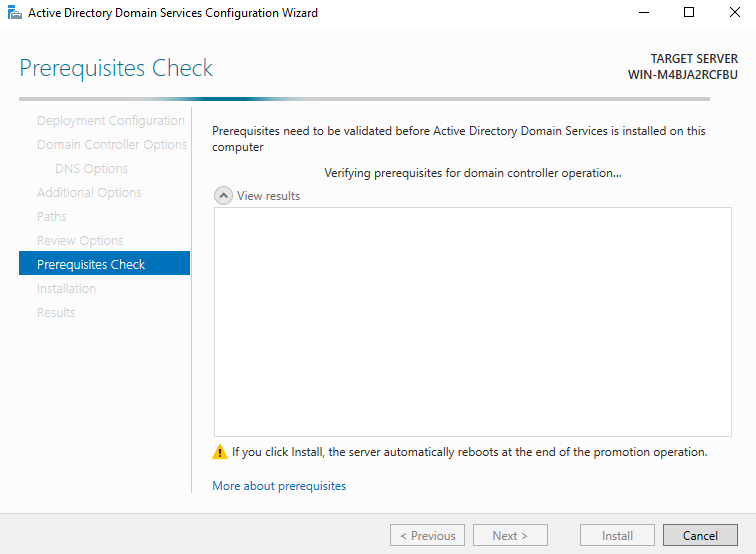
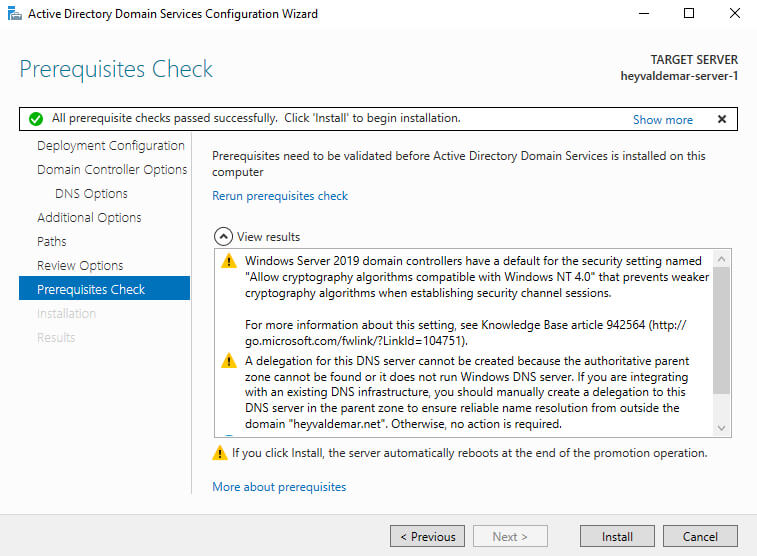
Попадаем в раздел Prerequisites Check, начинаются проверки предварительных требований.
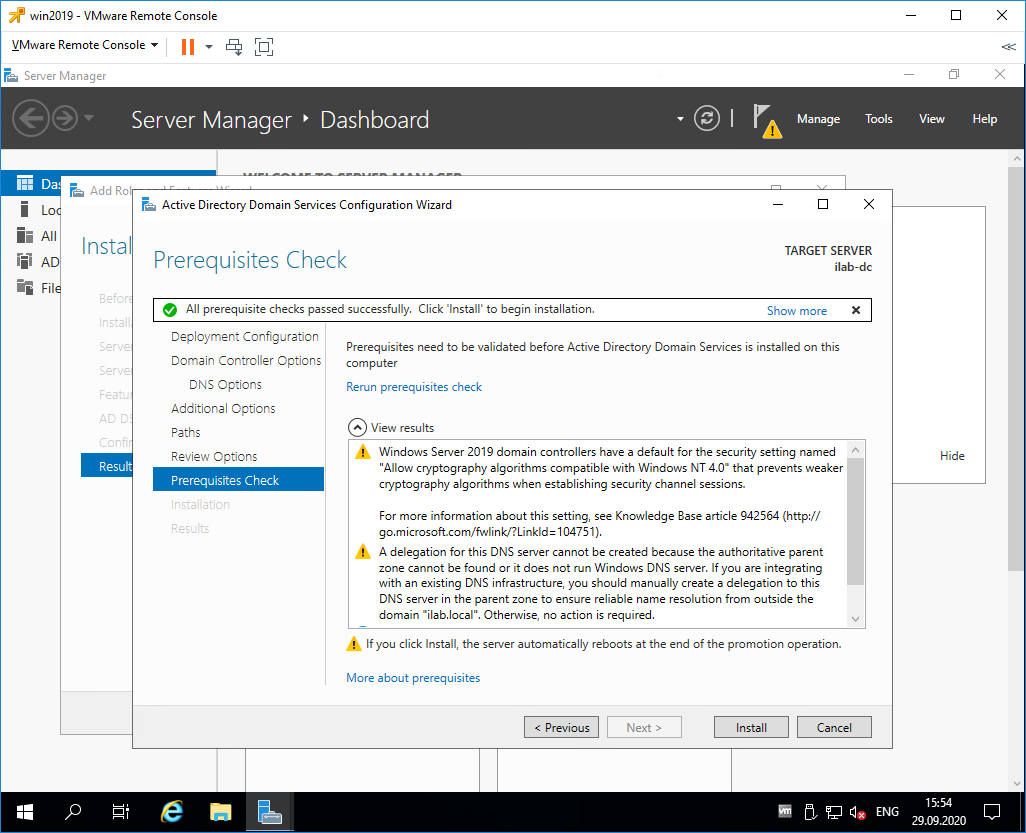
Проверки прошли успешно, есть два незначительных предупреждения про DNS, которое мы игнорируем и про безопасность, тож игнорируем. Пытался пройти по предложенной ссылке, она оказалась нерабочей.
Для начала установки роли контроллера домена нажимаем Install.
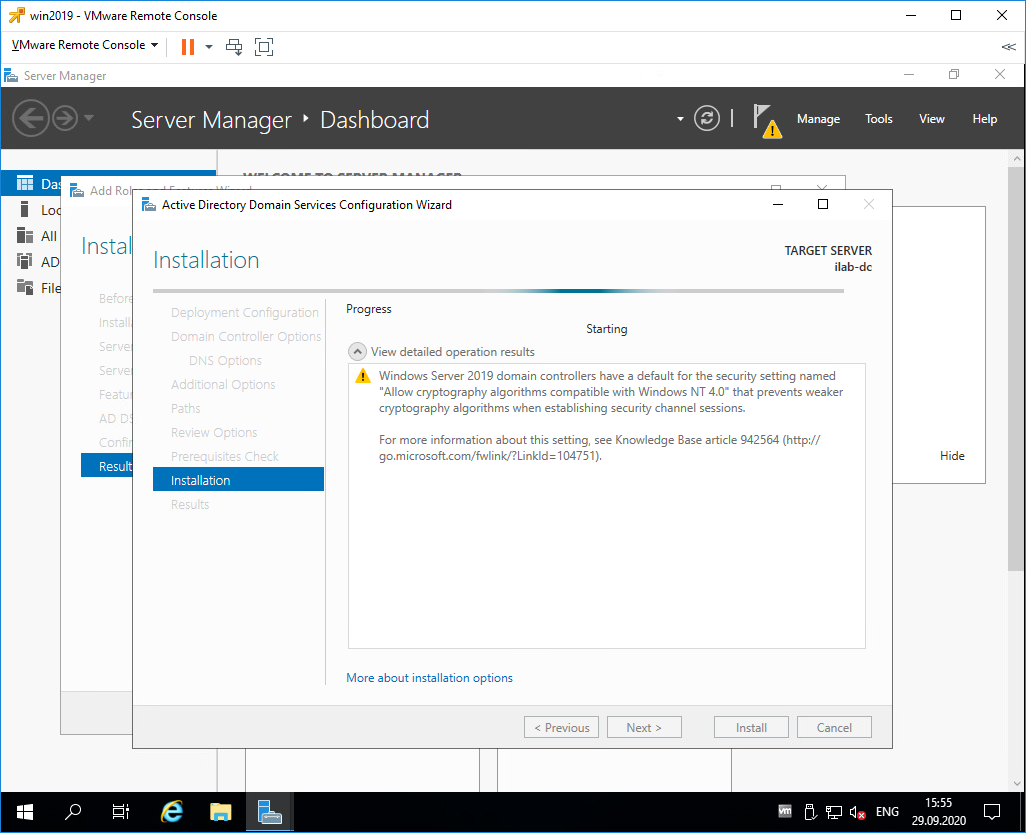
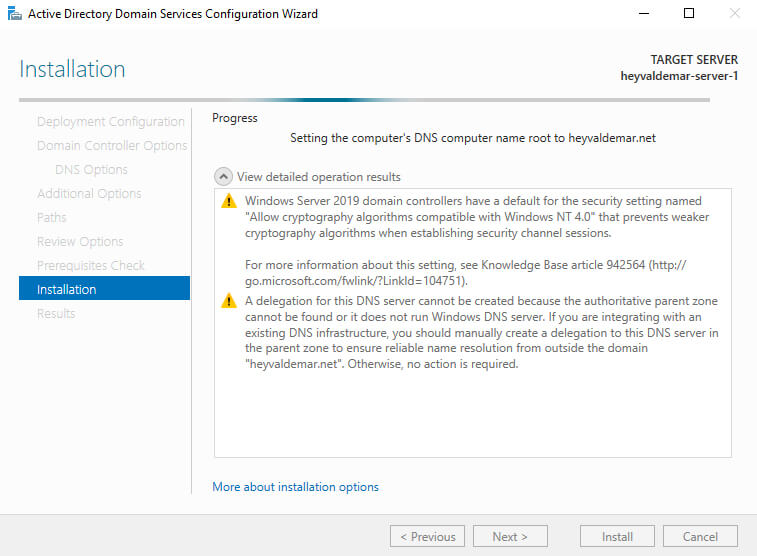
Начинается процесс установки.
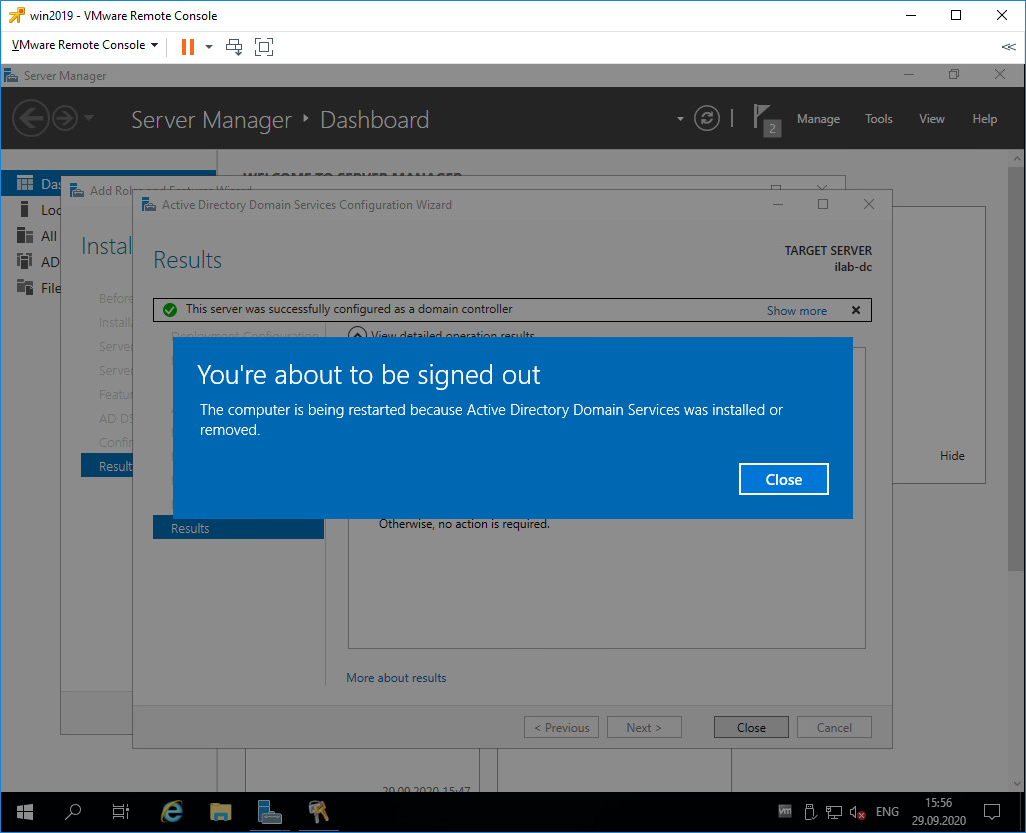
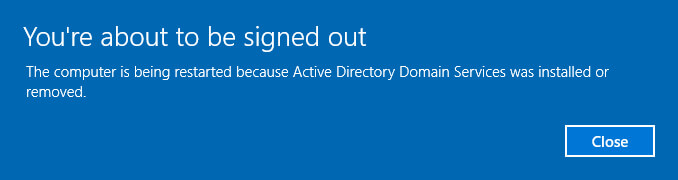
Сервер будет перезагружен, о чём нас и предупреждают. Close.

Дожидаемся загрузки сервера.
Первоначальная настройка контроллера домена
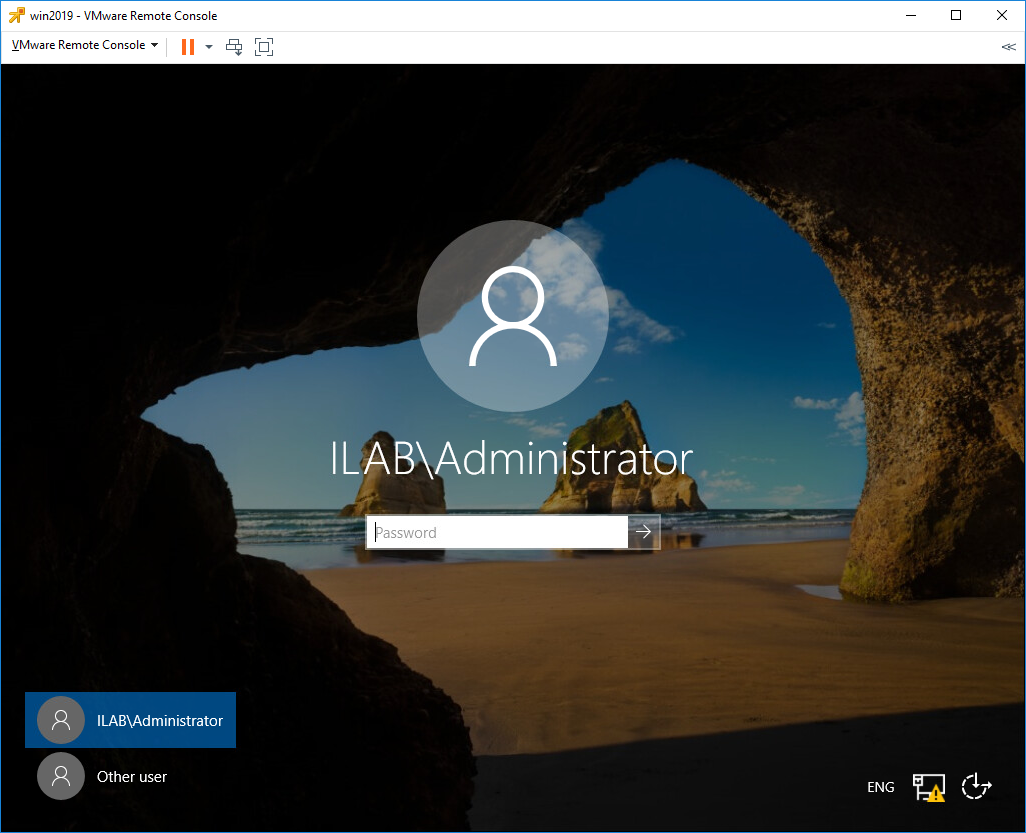
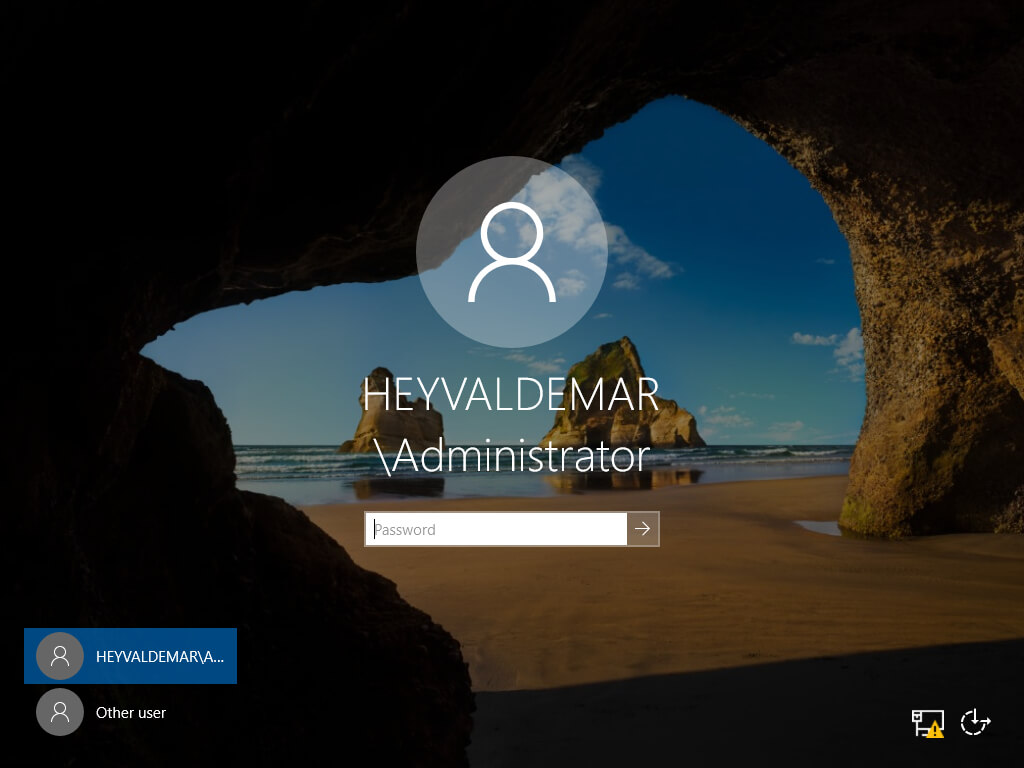
Наша учётная запись Administrator теперь стала доменной — ILAB\Administrator. Выполняем вход.
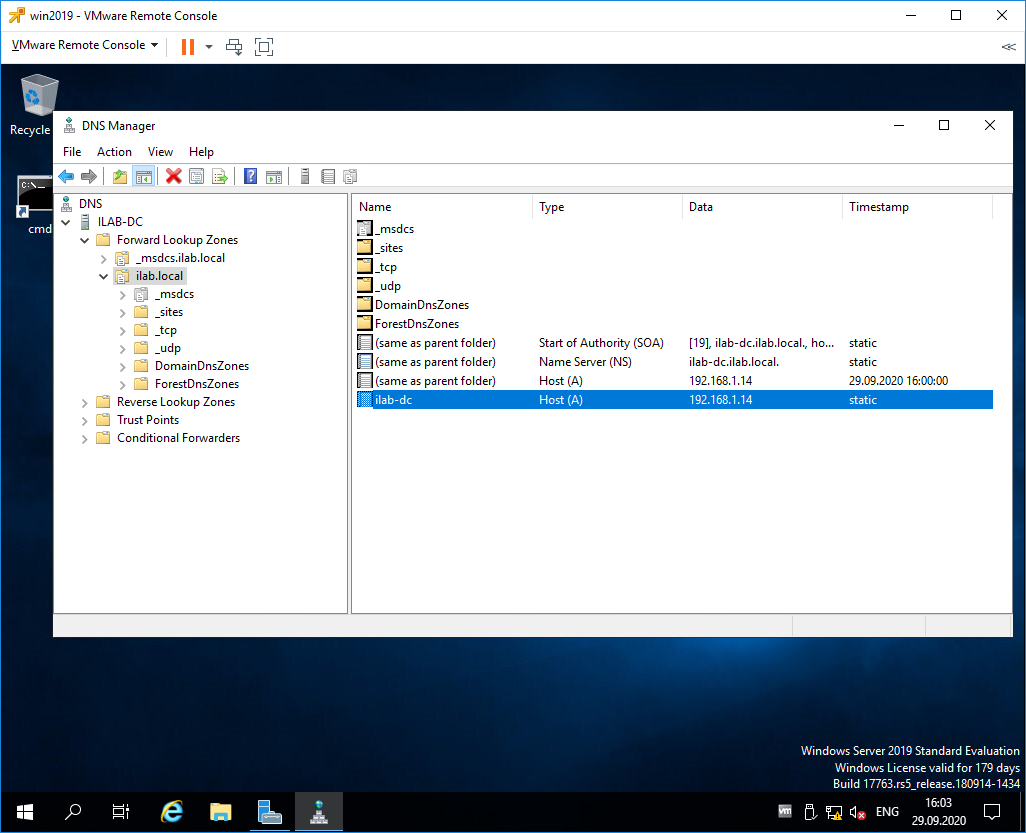
Видим, что на сервере автоматически поднялась служба DNS, добавилась и настроилась доменная зона ilab.local, созданы A-записи для контроллера домена, прописан NS сервер.
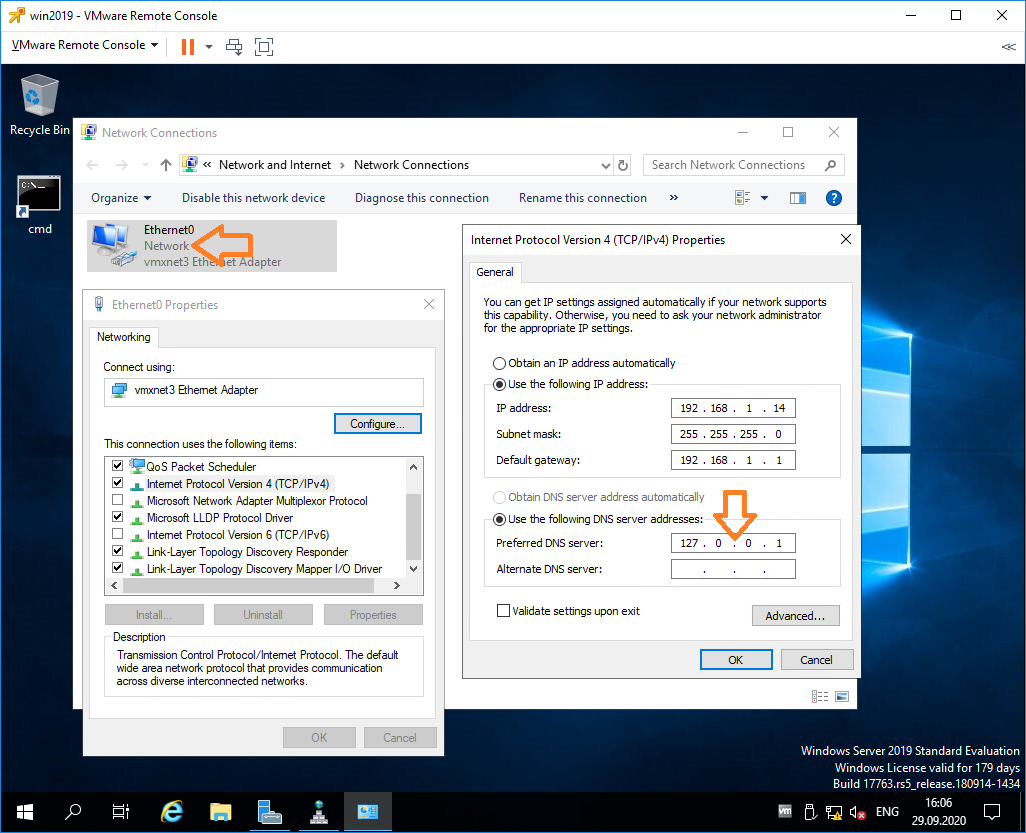
На значке сети отображается предупреждение, по сетевому адаптеру видно, что он не подключен к домену. Дело в том, что после установки роли контроллера домена DNS сервер в настройках адаптера сменился на 127.0.0.1, а данный адрес не обслуживается DNS сервисом.
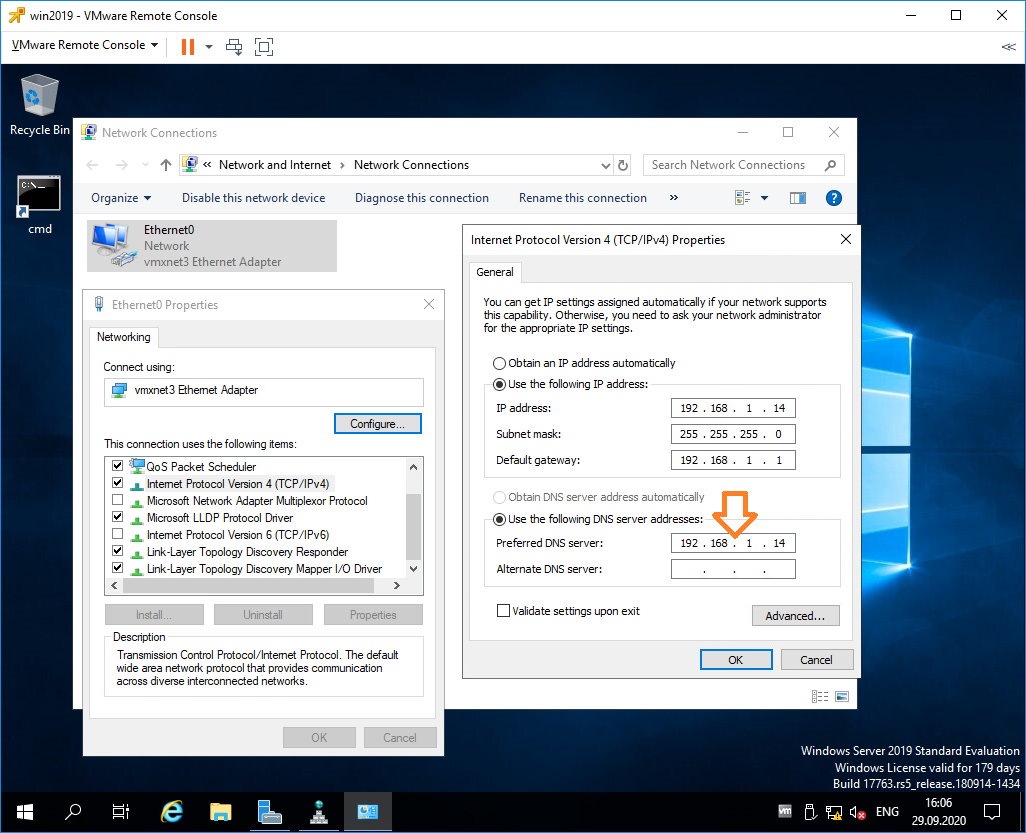
Сменим 127.0.0.1 на статический IP адрес контроллера домена, у меня 192.168.1.14. OK.
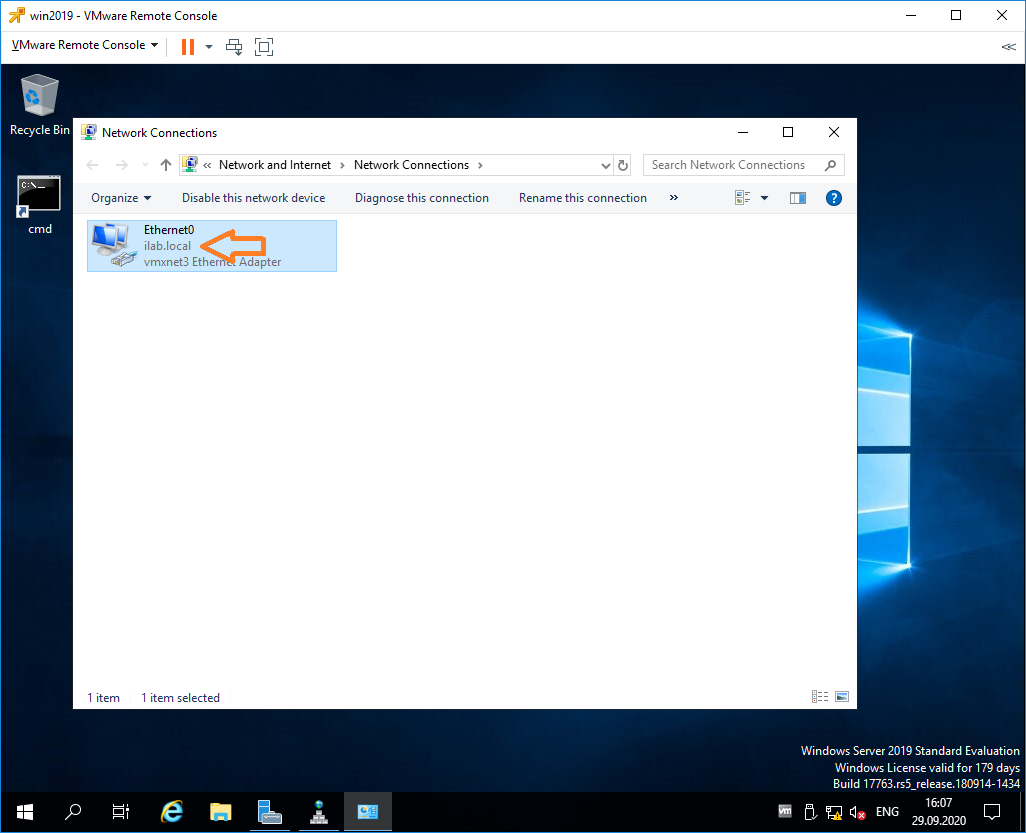
Теперь сетевой адаптер правильно отображает домен, предупреждение в трее на значке сети скоро пропадёт.
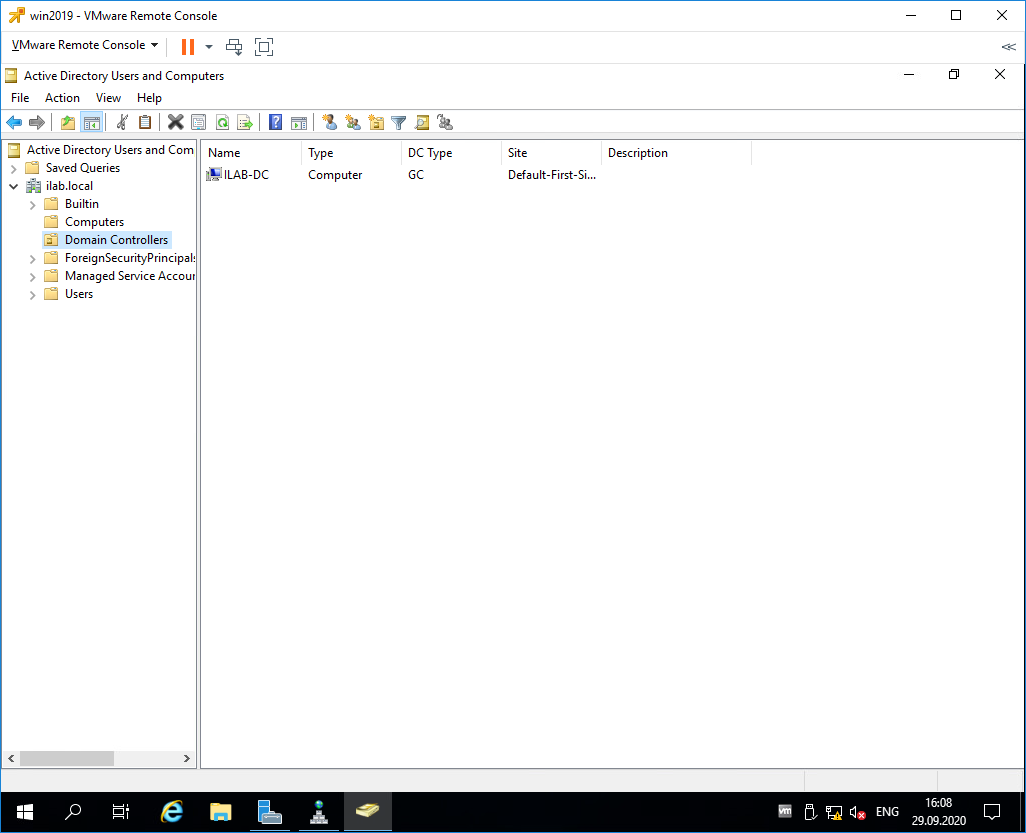
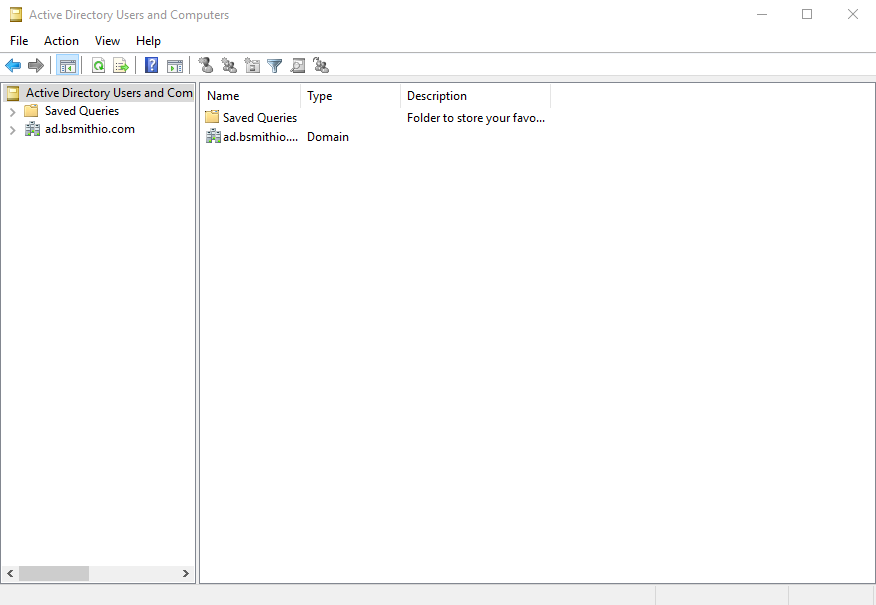
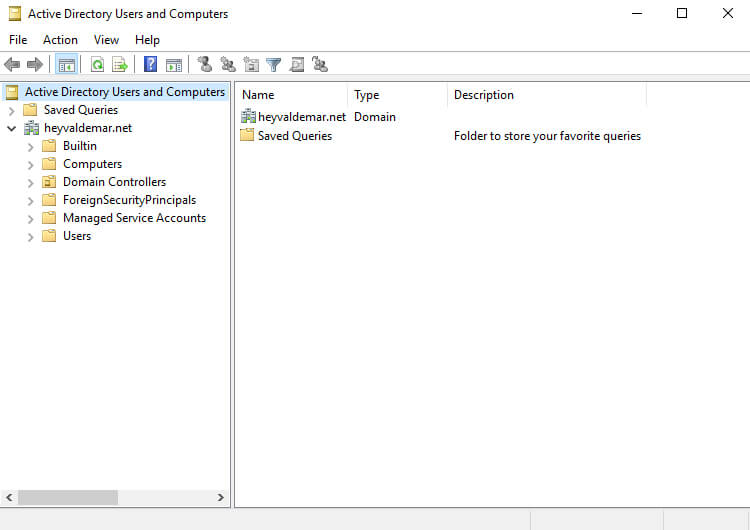
Запускаем оснастку Active Directory Users and Computers. Наш контроллер домена отображается в разделе Domain Controllers. В папкe Computers будут попадать компьютеры и сервера, введённые в домен. В папке Users — учётные записи.

Правой кнопкой на корень каталога, New > Organizational Unit.
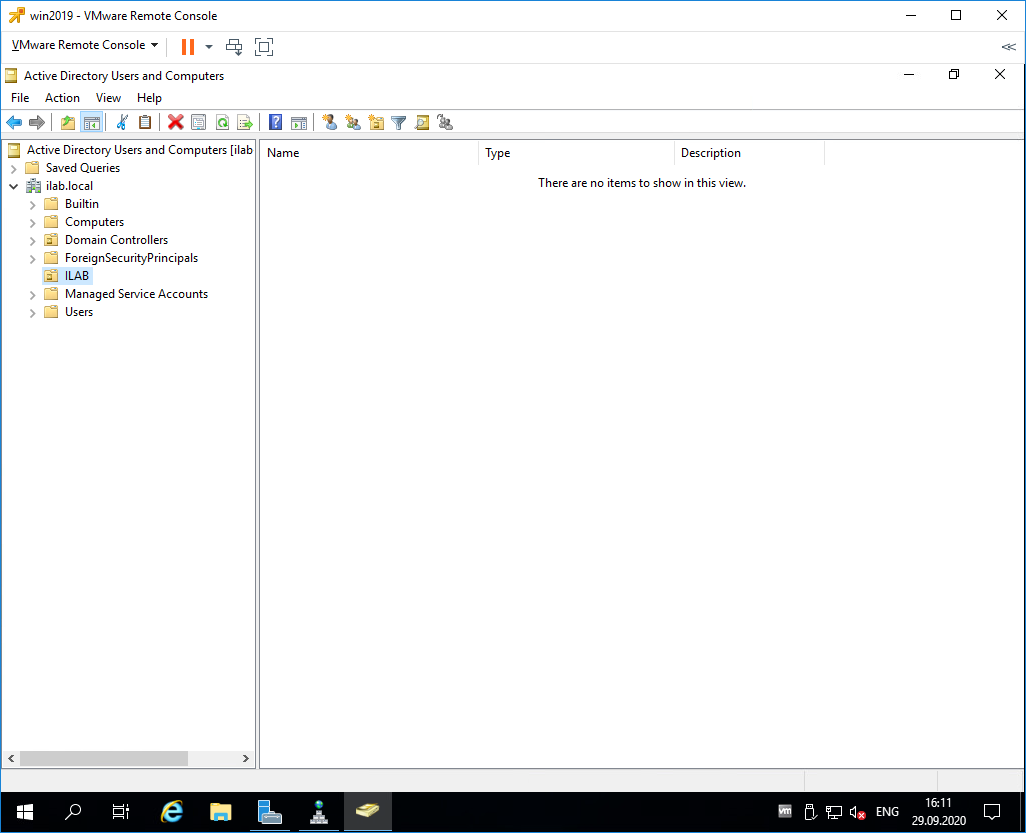
Создаём корневую папку для нашей компании. При создании можно установить галку, которая защищает от случайного удаления.

Внутри создаём структуру нашей компании. Можно создавать учётные записи и группы доступа. Создайте учётную запись для себя и добавьте её в группу Domain Admins.
Рекомендуется убедиться, что для публичного сетевого адаптера включен Firewall, а для доменной и частной сетей — отключен.
The Active Directory Management Tools have been with Windows Server since Windows Server 2000. On various versions of Windows the tools are sometimes included and sometimes they need to be downloaded from the Microsoft website and installed. In Server 2019 these tools are included as optional features and can be installed using the Add Roles and Features wizard in Server Manager; no download is required.
The following tools are included as part of the installation:
- Active Directory Administrative Center
- Active Directory Users and Computers Snap-in
- Active Directory Sites and Services Snap-in
- Active Directory Domains and Trusts Snap-in
- Active Directory Administrative Center Snap-in
- ADSI Edit Snap-in
- Active Directory Schema Snap-in (Not Registered)
- Active Directory Command Line Tools
- Active Directory Module for Windows PowerShell
Prerequisites for installing Active Directory Management Tools
You will require a Windows Server 2019 computer with the “Graphical Management Tools and Infrastructure” installed to install the Active Directory Management Tools using the Server Manager graphical user interface.
Instructions for installing Active Directory Management Tools
To install Active Directory Management Tools on Windows Server 2019 please follow these instructions.
- On the Windows Server 2019 open Server Manager. If Server Manager does not start by default press the “Windows + R” keys, Type “servermanager” in the “Open” field and press “Enter” or click the OK button.
- On the Server Manager main window, in the “Quick Start” panel, click “Add roles and features”.

- In the “Add Roles and Features Wizard” under “Installation Type” check the “Role-based or feature-based installation” radio button and click “Next”
- In the “Add Roles and Features Wizard” under “Server Selection” check the “Select a server from the server pool” radio button, select the server you want to install the Active Directory Tools on and click “Next”
- In the “Add Roles and Features Wizard” under “Server Roles” do not make any changes to the check boxes, click “Next”
- In the “Add Roles and Features Wizard” under “Features” expand “Remote Server Administration Tools”, expand “Role Administration Tools” and check “AD DS and AD LDS Tools”. Click “Next”. If prompted to install any supporting roles accept the defaults and continue.
- In the “Add Roles and Features Wizard” at the “Confirmation” page click “Install” to begin the installation of the AD Tools
- The installation of the Active Directory Management Tools will begin and the progress will be displayed. This installation should not require a restart of the server.
- The Active Directory Management Tools can now be found under the “Tools” menu in “Server Manager”.


This guide assumes that:
- You own a domain.
- You have Windows Server 2019 installed to a server.
Windows Server 2019
Set Static IP
It is best practice to configure your server to a static IP address instead of using DHCP. To do so follow the steps below.
Open a Command Prompt and run:
1control.exe /name Microsoft.NetworkAndSharingCenter
Network and Sharing Center should open. Now navigate to Change adapter settings, then right click on your network adapter and click Properties. Double click on «Internet Protocol Version 4 (TCP/IPv4)». Switch from Obtain an IP address automatically to Use the following IP address.
Change the IP address to one that is in the subnet that your server is connected to. For instance, my server is a part of the 192.168.10.0/24 subnet. My server IP address is set to 192.168.10.3 for simplicity.
Change your Subnet mask to the subnet mask of your subnet. E.g. 255.255.255.0 for me.
Change your Default gateway to your router’s IP that is on the same subnet. Mine is 192.168.10.2 in this instance.
Change your DNS server to any DNS server you wish, e.g. 1.1.1.1 for Cloudflare DNS.
Add Active Directory and DNS role
Now we will add the Active Directory Domain Services and DNS roles to the server.
Press the Windows key and type «Server Manager» and run it.
Click on Add roles and features
Click Next
Select «Role-based or feature-based installation».
Select your server then click Next.

Tick Active Directory Domain Services and DNS Server roles, follow the prompts for each role, then click Next.
Click Next
Click Next.
Click Next.
Click Install, then Close.
You can check the status of the role installation by clicking the flag icon.
Post-deployment Configuration
You should see a yellow triangle next to the flag icon, click it and then click Promote this server to a domain controller. You may need to click the refresh button for this to show up.
Select Add a new forest and specify your domain name for Active Directory, then click Next. A few popular choices for your Root domain name are: ad.example.com, corp.example.com and local.example.com. Replace example.com with your domain name.
Enter a password for DSRM, DSRM will allow an administrator repair or restore an Active Directory database, then click Next.
Click Next.
Click Next.
Click Next.
Review your selections, then click Next.
The wizard will then validate prerequisites.
Once it is done click Install, then the server will restart.
Add Users and Groups
Once your server has restarted, it will be a part of your AD domain. Log in and run Server Manager again. We will now add new users and groups to our AD domain.
Navigate to Tools -> Active Directory Users and Computers.
Add Users
Click the dropdown arrow next to your domain name, then click on users, and right click and select New -> User.

Fill in the details like so and click Next.
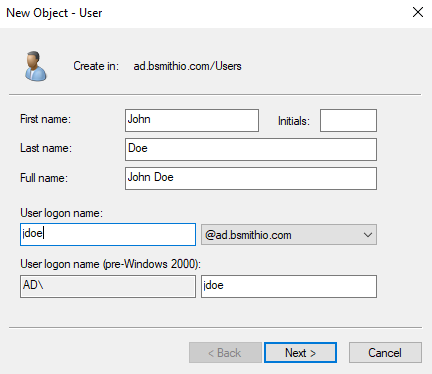
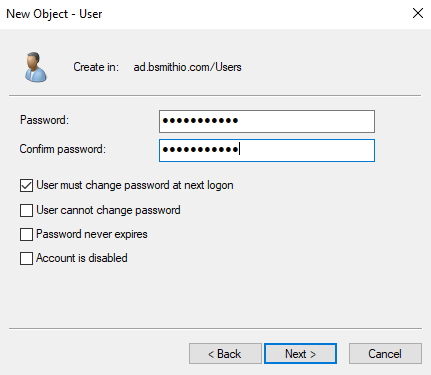
Enter a password, it must contain an upper-case, lower-case, and special character, then make sure User must change password at next login is ticked, this is best practice, then click Next and then Finish.
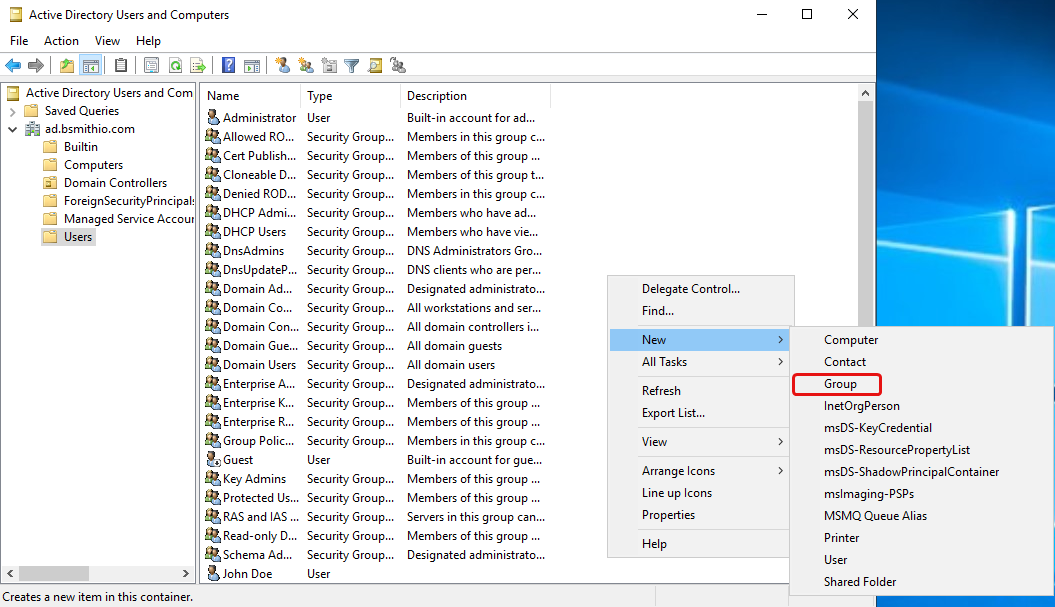
Add groups
Click the dropdown arrow next to your domain name, then click on users, and right click and select New -> Group.
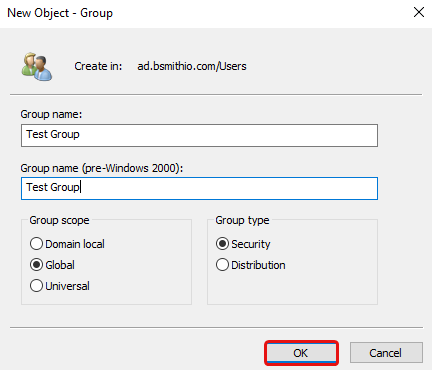
Fill in the details like so then click OK.
Windows 10 Client
Join Active Directory Domain
We will use a Windows 10 client to join our AD domain.
Set DNS Server
The first thing we need to do is change our DNS server to the IP address of our domain controller on our client. Preferably you’d want to set this as DHCP option on your DHCP server. For this demonstration we’ll just change it manually.
Open a Command Prompt and run:
1control.exe /name Microsoft.NetworkAndSharingCenter
Network and Sharing Center should open. Now navigate to Change adapter settings, then right click on your network adapter and click Properties. Double click on «Internet Protocol Version 4 (TCP/IPv4)». Switch «Obtain DNS server address automatically» to «Use the following DNS server addresses».
Change your DNS server the to domain controller’s IP address, e.g. 192.168.10.3
Create An Account to Join the Domain
Follow the Add Users section again with a new user but this time untick «User must change password at next login». We will use this account to join computers to the domain.
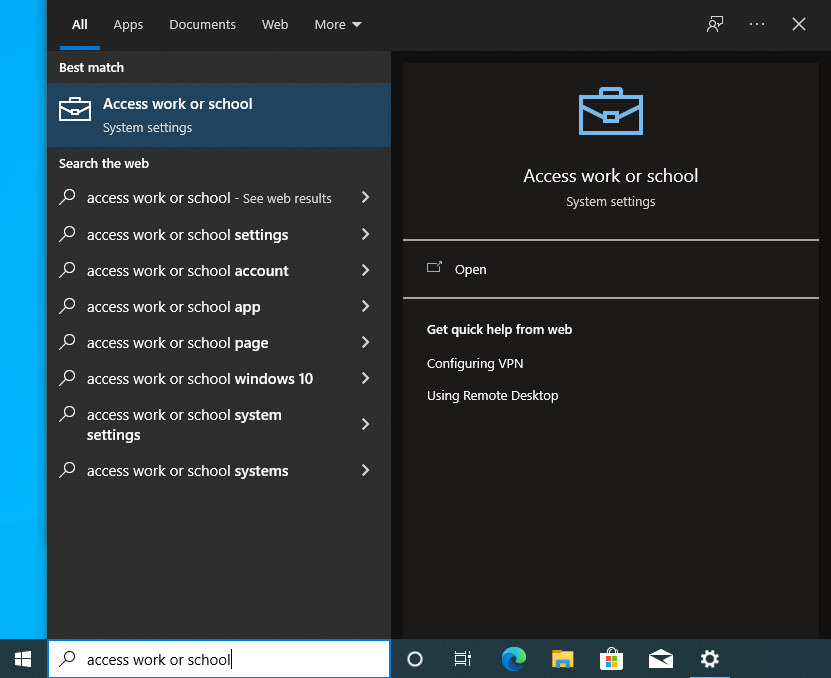
Join Domain
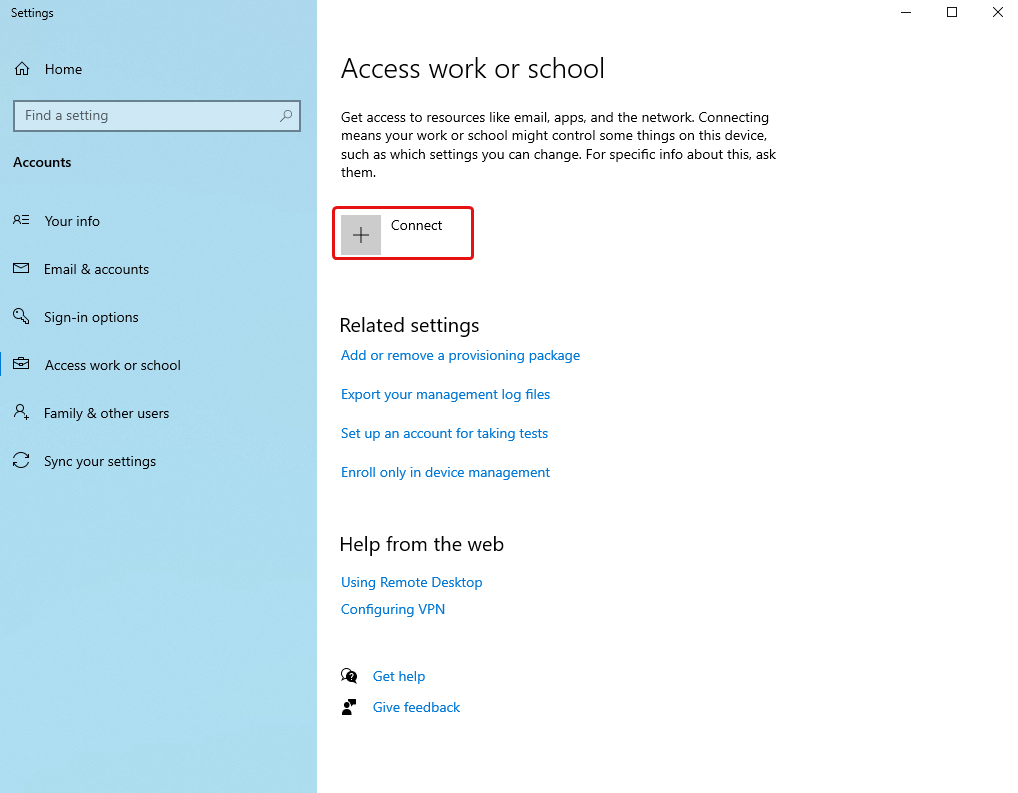
Press the Windows key then type «Access work or school» and hit enter.
Click Connect.
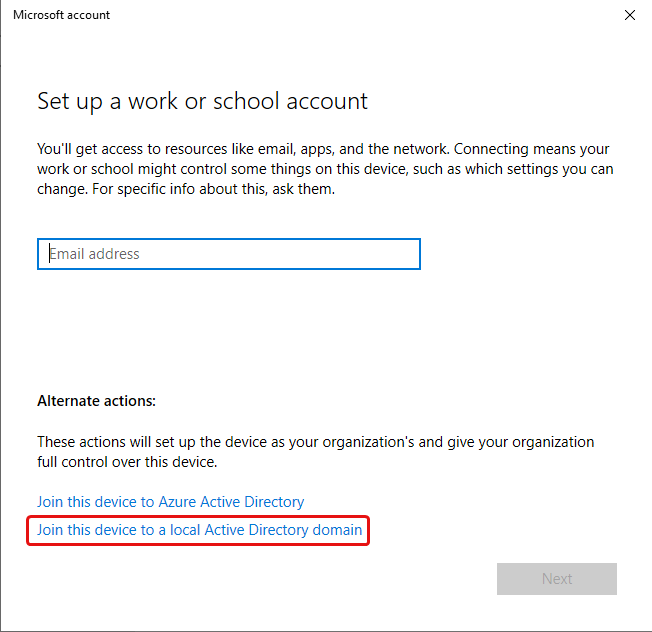
Click Join this device to a local Active Directory domain.
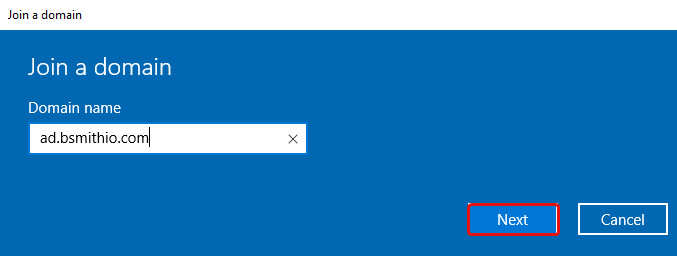
Type in your Active Directory domain name, then click Next.
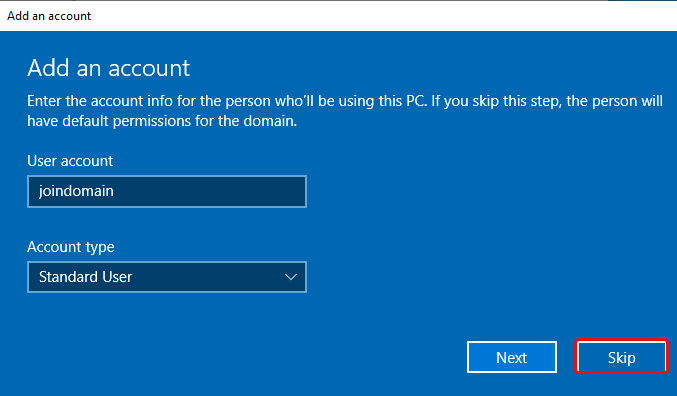
Enter your user credentials that you created above, then click OK.

Click Skip, then Restart Now.
Once your computer has restarted, click on Other user, then login with one of your AD user accounts.
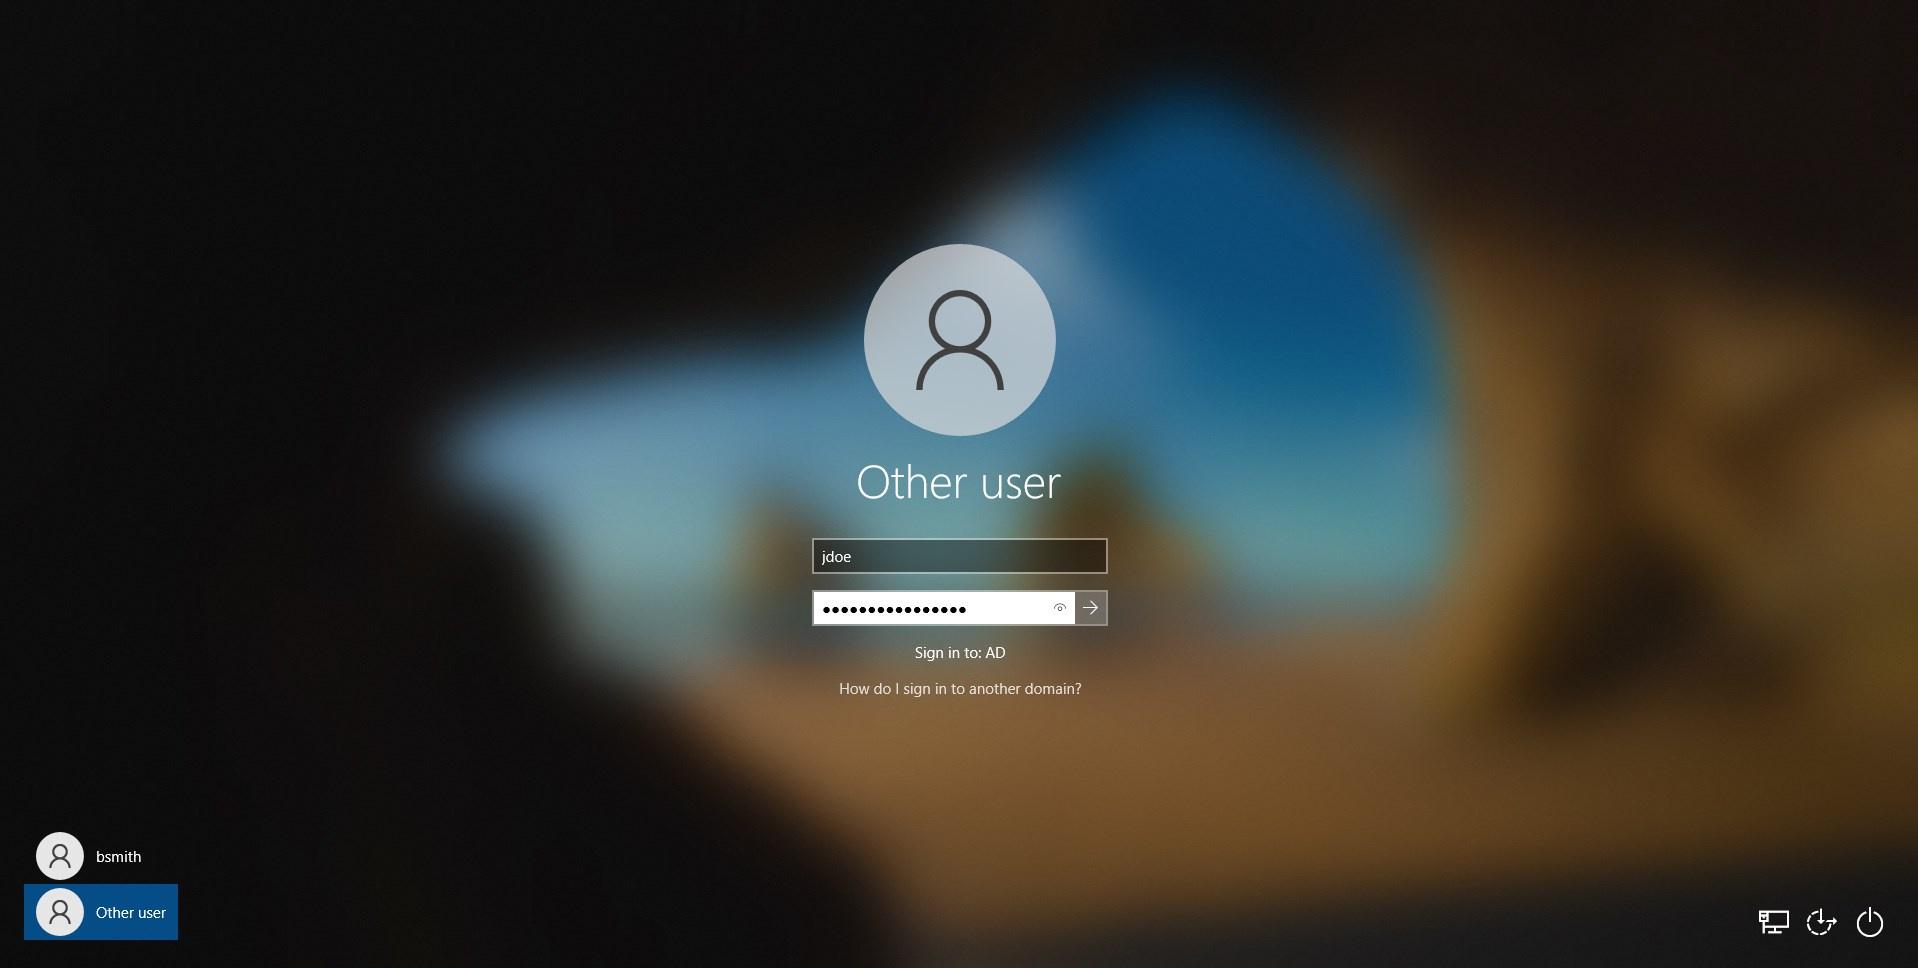
Since we had «User must change password at next login» ticked, we’ll get a prompt to change the password, click OK and fill in a new password.

Conclusion
You’ve successfully created an AD domain and joined a Windows 10 computer to the AD domain!
Данная статья предназначена для тех, кто искал подробное и понятное руководство о том, как установить роль Active Directory Domain Services на Windows Server 2019.
В этом руководстве мы будем рассматривать тот случай, когда у вас уже есть сервер с установленной на нем операционной системой Windows Server 2019.
Подробно о том, как установить Windows Server 2019, вы можете прочитать в моем руководстве “Установка Windows Server 2019”. Узнать о том, как установить Active Directory Domain Services на Windows Server 2019 Server Core без GUI, вы можете, прочитав “Установка Active Directory Domain Services на Windows Server 2019 Server Core”.
Рекомендую всегда использовать англоязычные издания Windows Server. Как показывает практика, оригинальные (английские) версии Windows работают стабильнее, к тому же вам будет проще общаться на одном языке с профессионалами в случае возникновения проблем или при желании обменяться опытом.
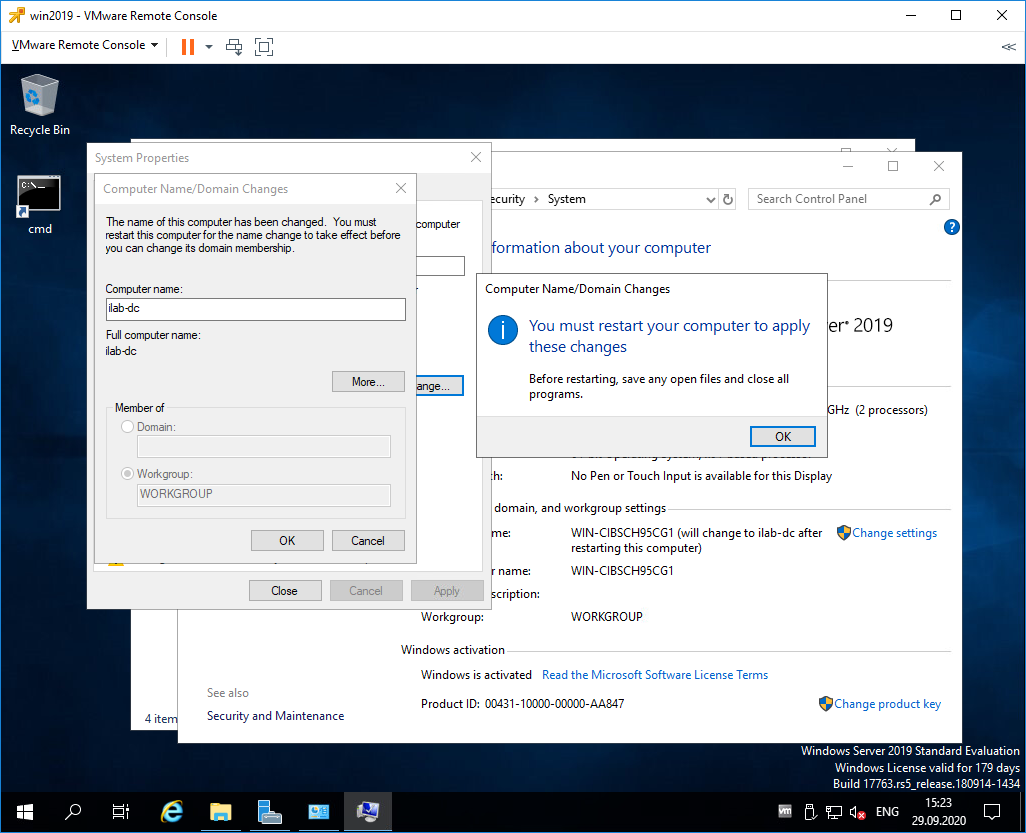
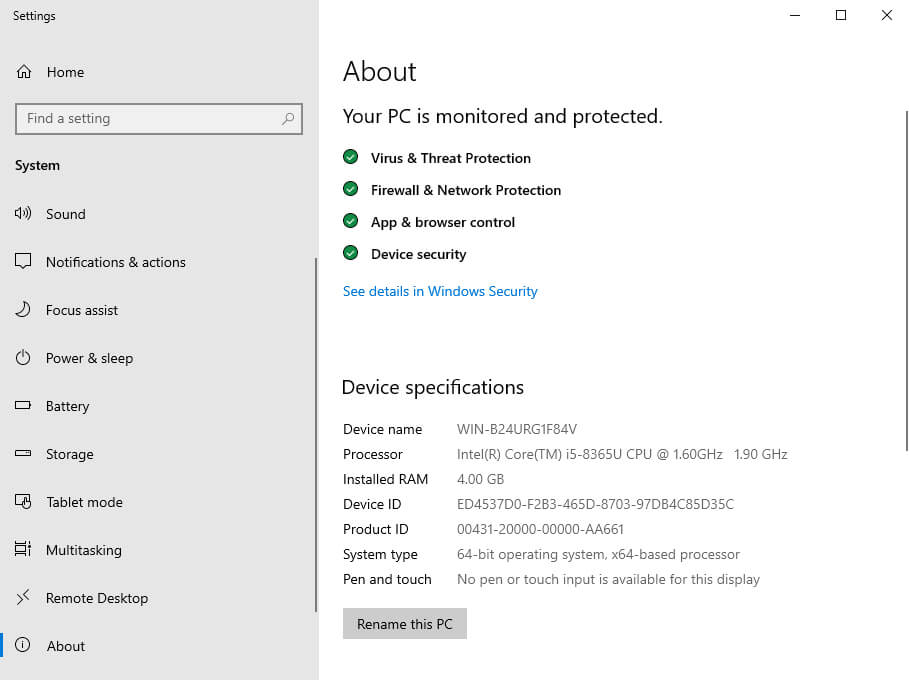
Перед началом установки роли Active Directory Domain Services необходимо присвоить серверу корректное имя в соответствии со стандартами вашей организации, а затем указать статический IP-адрес, маску подсети, шлюз и адрес сервера DNS.
Заходим в систему под учетной записью с правами администратора и на клавиатуре нажимаем сочетание клавиш “Win” и “X”, затем в открывшемся меню выбираем “System”.
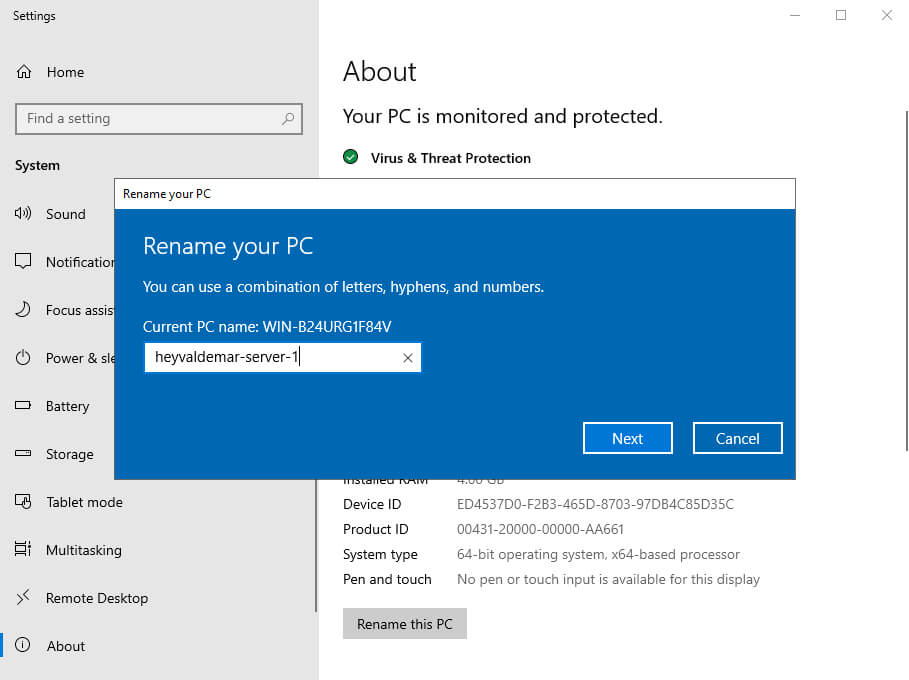
Выбираем “Rename this PC”.
Настоятельно рекомендую заранее продумать, как будут называться сервера в вашей организации.
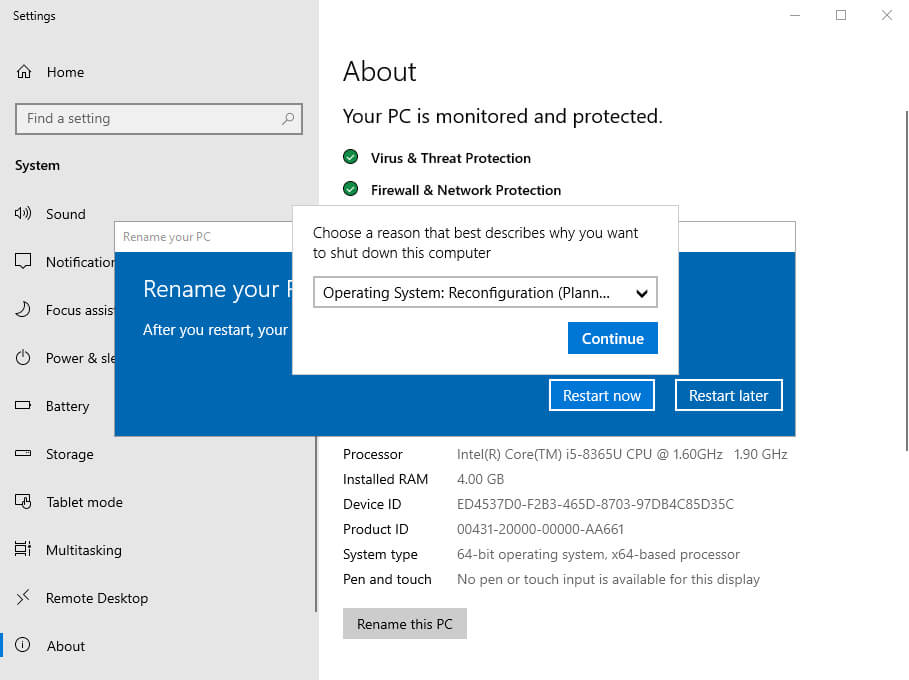
Далее указываем новое имя сервера и нажимаем на кнопку “Next”.
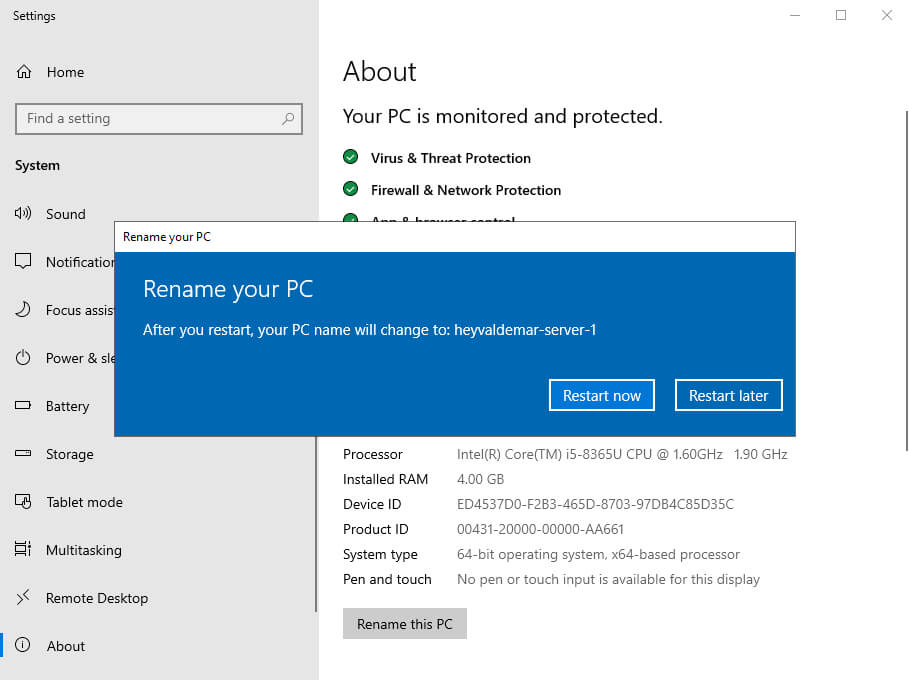
Теперь система предложит перезагрузить сервер для того чтобы новые настройки вступили в силу.
Нажимаем на кнопку “Restart now”.
Выбираем “Operating System: Reconfiguration (Planned)”, как причину перезагрузки сервера, и нажимаем на кнопку “Continue”.
Далее сервер начнет перезагружаться.
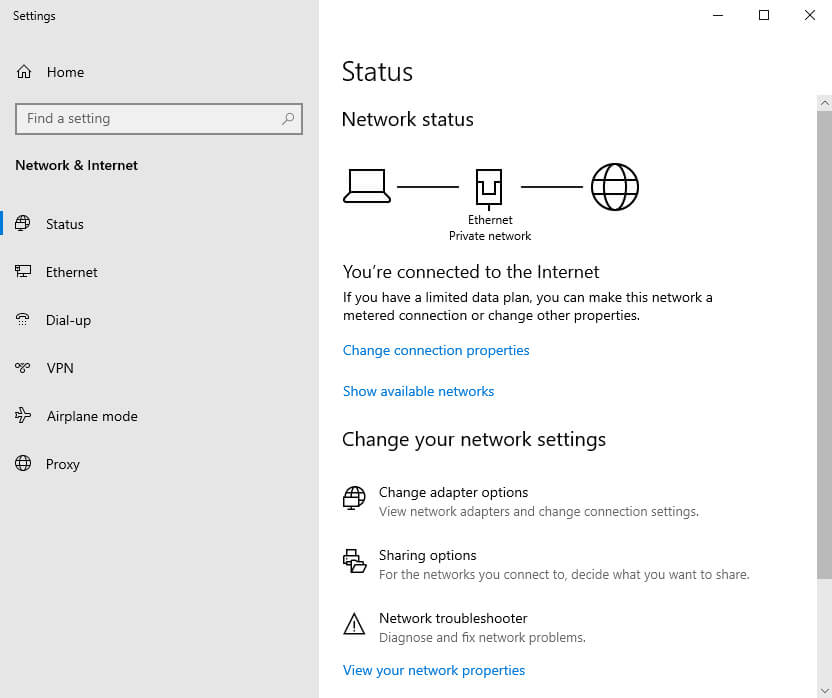
Теперь необходимо прописать статический IP-адрес в настройках сетевого подключения.
Заходим в систему под учетной записью с правами администратора и на клавиатуре нажимаем сочетание клавиш “Win” и “X”, затем в открывшемся меню выбираем “Network Connections”.
Далее выбираем “Change adapter options”.
Теперь нажимаем правой кнопкой мыши на сетевом подключении “Ethernet” и выбираем пункт “Properties”.
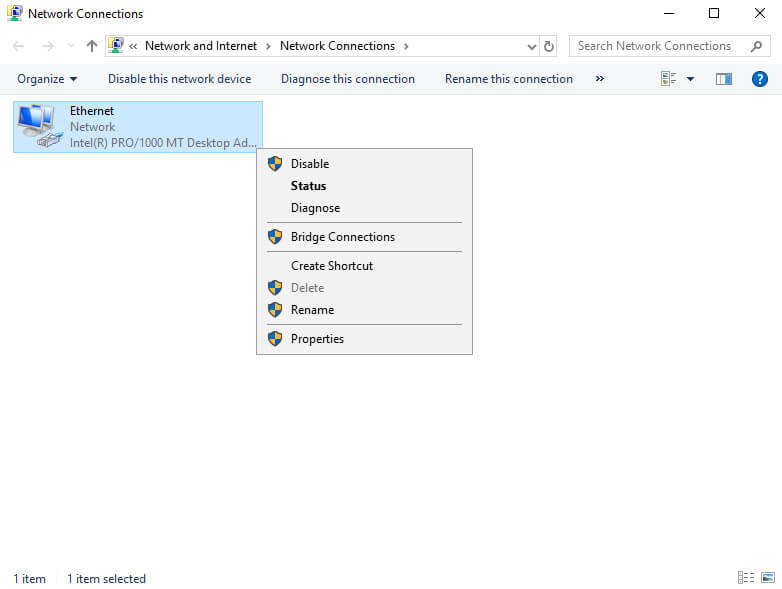
Выбираем “Internet Protocol Version 4” и нажимаем на кнопку “Properties”.
Далее выбираем пункт “Use the following IP address” и указываем свободный IP-адрес, маску подсети и шлюз. Обратите внимание, вы должны заранее понимать, как устроена ваша сеть и знать какие IP-адреса свободны.
В поле “Preferred DNS server” указываем IP-адрес этого сервера, так как на вашем сервере будет присутствовать роль “DNS Server”, которая устанавливается вместе с ролью “Active Directory Domain Services”.
Нажимаем на кнопку “OK”.
В окне “Ethernet Properties” нажимаем на кнопку “Close”.
Теперь можно приступить к установке роли “Active Directory Domain Services”.
Открываем “Server Manager”, нажимаем на кнопку “Manage” в правом верхнем углу экрана и выбираем “Add Roles and Features”.
Нажимаем на кнопку “Next”.
Выбираем тип установки “Role-based or feature-based installation” и нажимаем на кнопку “Next”.
Далее выбираем сервер, на который будет производиться установка роли.
Нажимаем на кнопку “Next”.
Выбираем роль “Active Directory Domain Services”.

На следующем этапе “Мастер установки ролей” предупредит, что для установки роли “Active Directory Domain Services” нужно установить несколько компонентов.
Нажимаем на кнопку “Add Features”.
На этом этапе выбирать роль DNS Server не обязательно. Она будет установлена позже.
Нажимаем на кнопку “Next”.
На этапе добавления компонентов оставляем все значения по умолчанию.
Нажимаем на кнопку “Next”.
Далее “Мастер установки ролей” предлагает ознакомиться с дополнительной информацией касательно роли “Active Directory Domain Services”.
Нажимаем на кнопку “Next”.
Для того чтобы начать установку выбранной роли, нажимаем на кнопку “Install”.
Началась установка выбранной роли и необходимых для нее компонентов.
Установка роли “Active Directory Domain Services” завершена.
Теперь нажимаем на кнопку “Promote this server to a domain controller”, для того чтобы повысить роль вашего сервера до уровня контроллера домена.
Настоятельно рекомендую заранее продумать какое доменное имя вы будете использовать при добавлении нового леса.
В данном руководстве рассматривается добавление нового леса, поэтому в окне “Active Directory Domain Services Configuration Wizard” выбираем пункт “Add a new forest” и в поле “Root domain name” указываем желаемое имя для корневого домена.
Нажимаем на кнопку “Next”.
На следующем шаге предлагается выбрать функциональный уровень нового леса и корневого домена. Если вы добавляете новый лес и планируете в дальнейшем использовать сервера на базе операционной системы Windows Server 2019, то можете не менять функциональный уровень леса и корневого домена.
Указываем пароль для DSRM (Directory Service Restore Mode — режим восстановления службы каталога) и нажимаем на кнопку “Next”.
На данном этапе “Мастер настройки AD DS” предупредит, что делегирование для этого DNS-сервера не может быть создано.
Нажимаем на кнопку “Next”.
Далее можно изменить NetBIOS имя которое было присвоено вашему домену. Рекомендую оставить значение NetBIOS по умолчанию.
Нажимаем на кнопку “Next”.
Теперь можно изменить пути к каталогам базы данных AD DS, файлам журнала и папке SYSVOL. Рекомендую оставить эти значения по умолчанию.
Нажимаем на кнопку “Next”.
На следующем шаге отображается сводная информация по настройке сервера.
Нажимаем на кнопку “Next”.
Далее “Мастер настройки AD DS” проверит все ли предварительные требования соблюдены и выведет отчет.
Сообщение “All prerequisite checks are passed successfully” означает, что все требования соблюдены.
Нажимаем на кнопку “Install”.
Начался процесс повышения роли сервера до уровня контроллера домена.
После того как роль вашего сервера будет повышена до уровня контроллера домена, сервер автоматически перезагрузится.
Перед тем как сервер начнет перезагружаться вы увидите предупреждение.
Повышение роли сервера до уровня контроллера домена завершено.
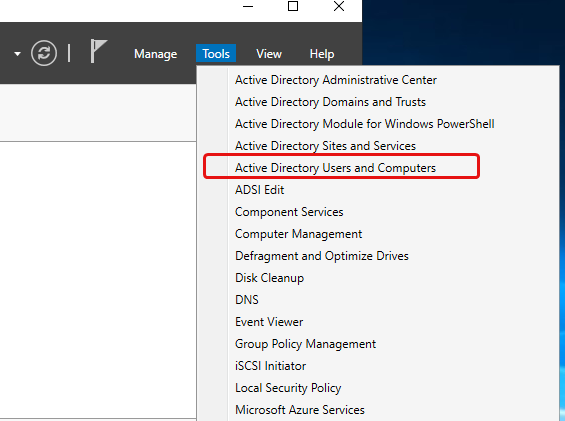
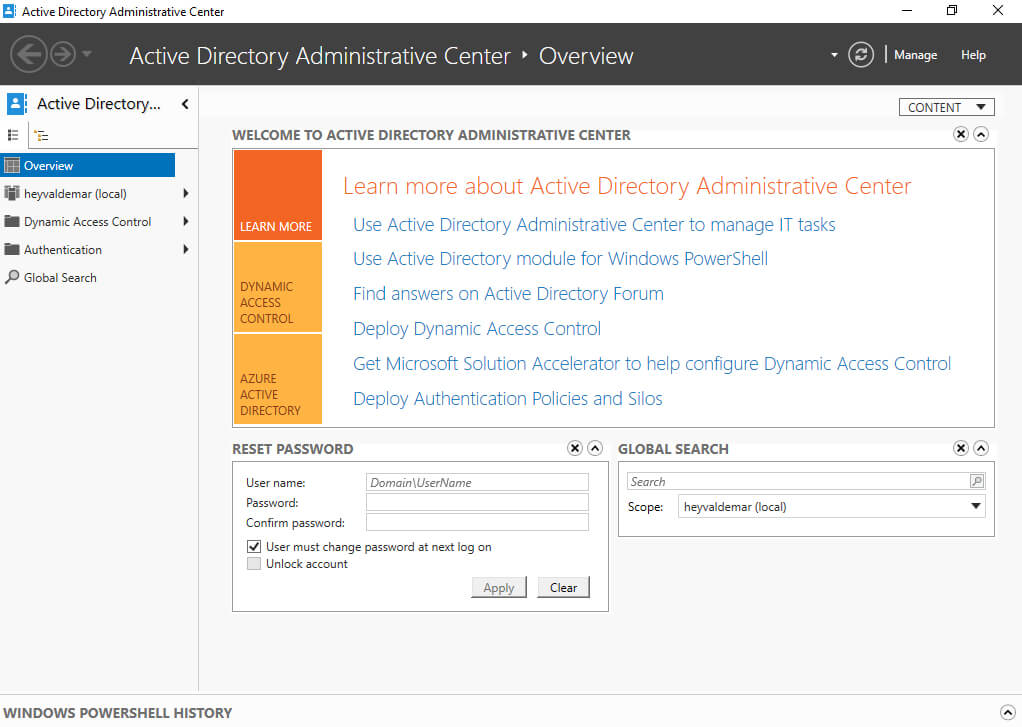
Для управления пользователями, группами и другими объектами каталога Active Directory можно использовать Active Directory Administrative Center или оснастку Active Directory Users and Computers.
Заходим в систему под учетной записью с правами администратора домена.
Открываем Server Manager, нажимаем на кнопку “Tools” в правом верхнем углу экрана и выбираем “Active Directory Administrative Center”.

Откроется Active Directory Administrative Center.
Также для управления пользователями, группами и другими объектами каталога Active Directory можно использовать привычную многим оснастку Active Directory Users and Computers.
В Server Manager, нажимаем на кнопку “Tools” в правом верхнем углу экрана и выбираем “Active Directory Users and Computers”.

Откроется оснастка Active Directory Users and Computers.
Подпишись
⭐ Telegram | Блог
🎬 YouTube
🐦 Twitter
🎨 Instagram
🐘 Mastodon
🧵 Threads
🎸 Facebook
🧊 Bluesky
🎥 TikTok
💻 LinkedIn
📣 daily.dev Squad
🧩 LeetCode
🐈 GitHub
Комьюнити IT-экспертов
🚀 Telegram | Чат
👾 Discord
Этот контент создан искусственным интеллектом?
Нет! Каждая статья — результат моей работы, наполненной страстью к Docker и десятилетиями опыта в IT. Я применяю ИИ для улучшения грамматики, чтобы обеспечить четкость технических деталей, однако все идеи, стратегии и рекомендации исключительно мои. Этот метод иногда может вызывать срабатывание детекторов ИИ, но можете быть уверены, что вся представленная информация и опыт — подлинно мои.
A Complete Guide to Managing Users and Groups in Windows Server 2019
The robust operating system Windows Server 2019 is capable of efficiently managing users and groups. Any organisation must manage users and groups in Windows Server 2019 because it improves security and resource management.
This guide will cover effective user and group management in Windows Server 2019.
Establishing Users and Groups
Creating new users and groups is the first step in managing users and groups in Windows Server 2019.
Follow these steps to create a new user:
- Launch the «Local Users and Groups» section of the Server Manager console.
- From the context menu, click «Users» and choose «New User.»
- Type the user’s name, full name, description, and password in the «New User» dialogue box.
- To create a new user, click «Create.»
The steps below should be followed to create a new group:
- Launch the «Local Users and Groups» section of the Server Manager console.
- From the context menu, click «Groups,» then choose «New Group.»
- Enter the group name, description, and group type in the «New Group» dialogue box.
- To create the new group, click «Create.»
Taking care of Users and Groups
The next step is to manage new users and groups efficiently after they have been created.
Various tools are available in Windows Server 2019 to manage users and groups.
These tools consist of:
- Active Directory Users and Computers: This application is used for Active Directory user and group management.
- Local Users and Groups: On a local computer, users and groups are managed using this tool.
- PowerShell: PowerShell is an effective scripting language that can be used to manage users and groups.
Active Directory Users and Computers User Management
Follow these steps to manage users with Active Directory Users and Computers:
- Launch the console for Active Directory Users and Computers.
- Locate the container labelled «Users.»
- Double-click the user whose account you wish to manage.
- You can change a number of attributes, including the user’s name, description, password, and group membership, in the user’s properties dialogue box.
- To save the changes, click «OK.»
Using Active Directory Users and Computers for Group Management
The steps listed below can be used to manage groups with Active Directory Users and Computers:
- Launch the console for Active Directory Users and Computers.
- Select the «Groups» container from the list.
- Double-click the group that needs management.
- You can change a number of attributes, including the group’s name, description, membership, and scope, in the group’s properties dialogue box.
- To save the changes, click «OK.»
Using PowerShell for User and Group Management
An effective command-line interface for managing users and groups is offered by PowerShell.
Follow these steps to manage users and groups using PowerShell:
- Launch the PowerShell console.
- Use the «Get-ADUser» and «Set-ADUser» cmdlets to manage users.
- Use the «Get-ADGroup» and «Set-ADGroup» cmdlets to manage groups.
- Use the appropriate parameters to change different user and group attributes.
Managing Permissions for Users and Groups
Enhancing security and resource management requires managing user and group permissions.
Various tools are available in Windows Server 2019 to manage user and group permissions.
These tools consist of:
- File Explorer: File Explorer can be used to control folder and file permissions.
- Security Configuration Wizard: You can set up security settings on servers and applications using the Security Configuration Wizard.
- Group Policy: Group Policy allows users and groups to have their security settings customised.
File Explorer’s User and Group Permissions Management
2. Select «Security» from the tabs.
3. To change the permissions, click the «Edit» button.
4. You can edit the permissions for users and groups in the «Permissions for [file or folder]» dialogue box by adding or removing them.
5. To save the changes, click «OK.»
Utilizing Group Policy to Manage User and Group Permissions
The steps listed below can be used to manage user and group permissions using Group Policy:
- Launch the console for Group Policy Management.
- Make changes to an existing Group Policy Object (GPO) or create a new one.
- Select «Computer Configuration> Policies> Windows Settings> Security Settings> Local Policies> User Rights Assignment.»
- Double-click the user right that needs to be changed.
- You have the option to add or remove users and groups in the user right properties dialogue box.
- Press «OK» to save the modifications.
Conclusion
In conclusion, optimising security and resource management in an organisation requires managing users and groups in Windows Server 2019.
In order to effectively manage users, groups, and resources, Windows Server 2019 offers a variety of features and tools.
Using tools like Active Directory Users and Computers, Local Users and Groups, and PowerShell, we covered how to create and manage users and groups in Windows Server 2019 in this guide.
We also covered the use of tools like File Explorer, Security Configuration Wizard, and Group Policy for managing user and group permissions.
You can effectively manage users and groups in Windows Server 2019 and improve resource management and security in your company by following the instructions provided in this guide.
FAQs
- How do I define Windows Server 2019?
The robust operating system Windows Server 2019 is made for servers, and it offers many features and tools for efficiently managing users, groups, and resources.
- In Windows Server 2019, what role does managing users and groups play?
Enhancing security and resource management in an organisation requires managing users and groups in Windows Server 2019.
It aids in maintaining data integrity and limiting access to resources.
- What tools are available in Windows Server 2019 for managing users and groups?
Active Directory Users and Computers, Local Users and Groups, PowerShell, and other tools are available in Windows Server 2019 to manage users and groups.
- In Windows Server 2019, how do I manage user and group permissions?
In Windows Server 2019, tools like File Explorer, the Security Configuration Wizard, and Group Policy can be used to manage user and group permissions.
- What advantages does Windows Server 2019’s management of user and group permissions offer?
In Windows Server 2019, managing user and group permissions improves resource management and security within an organisation. It aids in regulating resource access, preserving data integrity, and preventing unauthorised access.