Оснастка Active Directory Users and Computers (или ADUC) – это одна из наиболее часто используемых консолей управления объектами в домене Active Directory. Вы можете установить mmc оснастку ADUC как на Windows Server, так и на десктопные Windows 10 и 11. Консоль ADUC входит в состав набора компоненту администрирования Microsoft Remote Server Administration Tools (RSAT). В этой статье мы покажем, как установить и использовать консоль управление Active Directory Users and Computers в Windows.
Содержание:
- Установка оснастки RSAT Active Directory в Windows 10 и 11
- Как пользоваться консолью Active Directory?
- Подключение консоли ADUC к домену из рабочей группы
Установка оснастки RSAT Active Directory в Windows 10 и 11
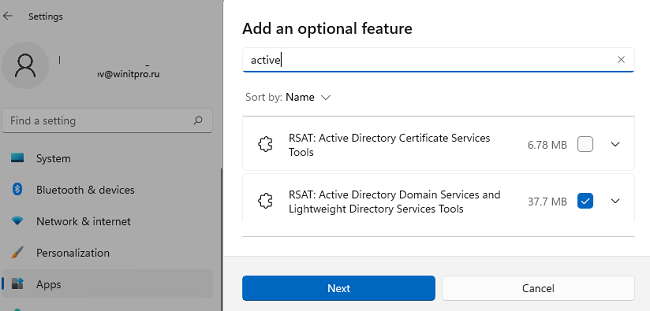
В современных версиях Windows 10 (начиная с билда 1809) и в Windows 11 инструменты администрирования RSAT устанавливаются онлайн в виде Features on Demand. Чтобы установить инструменты администрирования RSAT Active Directory в Windows 10/11, перейдите в Settings -> Apps -> Optional Features -> Add an optional feature (View features).
Наберите в поисковой строке Active Directory и выберите для установки компонент RSAT: Active Directory Domain Services and Lightweight Directory Services Tool.
Нажмите Next-> Install для начала установки.
Windows подключится к серверам Microsoft, скачает и установит набор инструментов для управления Active Directory (включает в себя графические консоли Active Directory, утилиты командной строки и модуль Active Directory PowerShell).
Либо вы можете установить набор компонентов администрирования AD с помощью PowerShell:
Add-WindowsCapability –online –Name Rsat.ActiveDirectory.DS-LDS.Tools~~~~0.0.1.0
В изолированных сетях, в которых нет доступа в интернет, вы можете установить инструменты RSAT Active Directory с помощью ISO образа Windows 10 Features on Demand (образ FoD можно скачать из кабинета лицензирования Microsoft).
Для установки инструментов Active Directory, из сетевого каталога с содержимым образа FoD выполните команду:
Add-WindowsCapability -Online -Name Rsat.ActiveDirectory.DS-LDS.Tools~~~~0.0.1.0 -LimitAccess -Source \\fs01\Distr\Windows10-FOD\
В предыдущих билдах Windows 10, а также в Windows 8.1, установить RSAT можно с помощью MSU обновления. Скачать RSAT можно здесь:
- RSAT для Windows 10 1803/1709 — https://www.microsoft.com/en-us/download/details.aspx?id=45520
- RSAT для Windows 8.1 — https://www.microsoft.com/en-us/download/details.aspx?id=39296
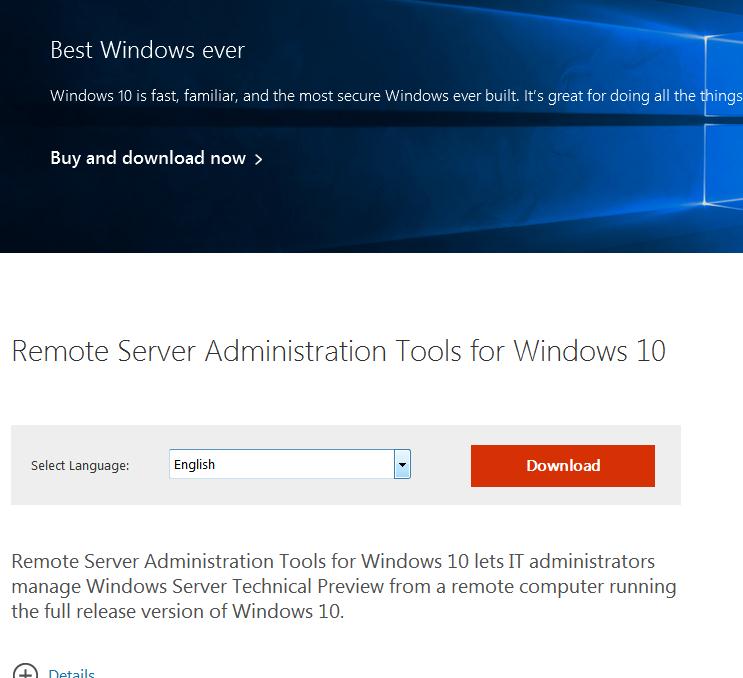
Скачайте версию файла RSAT в зависимости от разрядности вашей операционной системы и установите его. Дважды щелкните по файлу для начала установки:
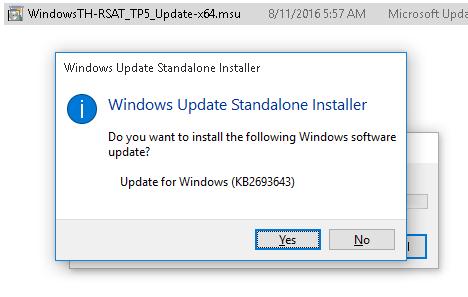
Или установите MSU файл RSAT из командной строки в «тихом» режиме:
wusa.exe c:\Install\WindowsTH-RSAT_TP5_Update-x64.msu /quiet /norestart
После окончания установки RSAT нужно перезагрузить компьютер.
Осталось активировать необходимый функционал RSAT. Для этого:
- Щелкните ПКМ по кнопке Start и выберите Control Panel (Панель управления)
- Выберите Programs and Features (Программы и компоненты)
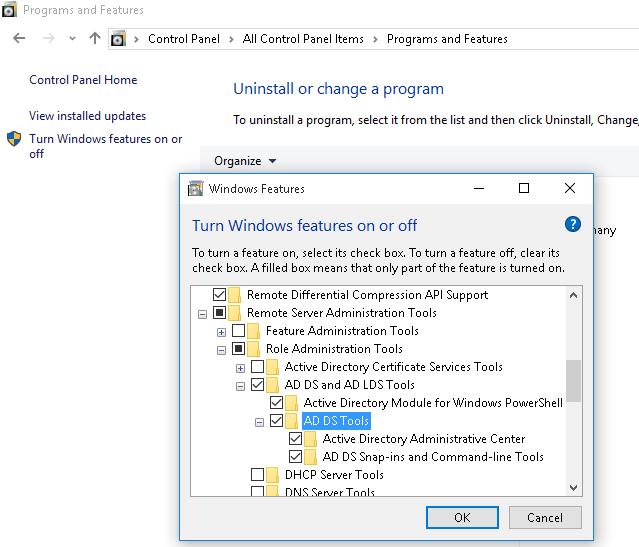
- В левой панели нажмите кнопку Turn Windows features on or off
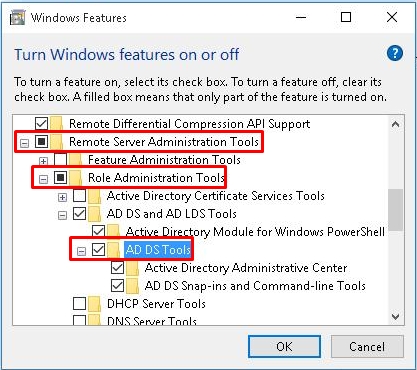
- В дереве компонентов разверните Remote Server Administration Tools-> Role Administration Tools -> AD DS and AD LDS Tools
- Отметьте раздел AD DS Tools и нажмите OK.

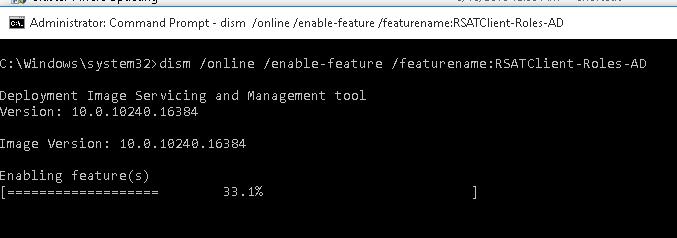
Установка оснастки ADUC также может быть выполнена из командой строки. Последовательно выполните 3 команды:
dism /online /enable-feature /featurename:RSATClient-Roles-AD
dism /online /enable-feature /featurename:RSATClient-Roles-AD-DS
dism /online /enable-feature /featurename:RSATClient-Roles-AD-DS-SnapIns
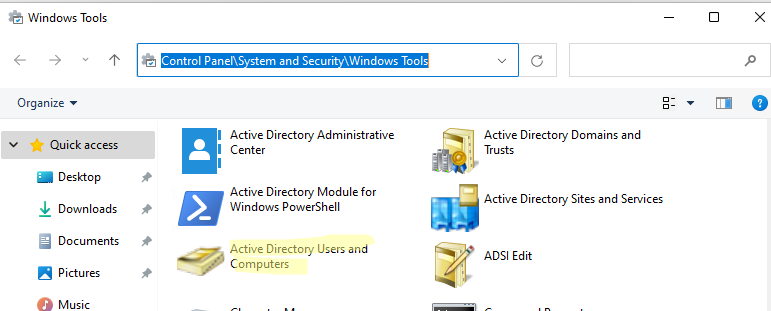
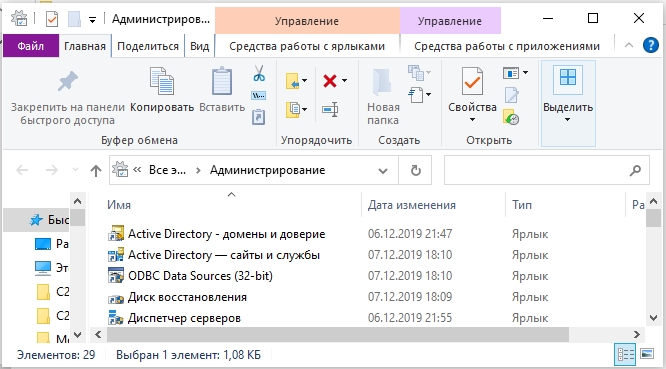
После установки оснасток управления, в разделе Administrative Tools панели управления (Control Panel\System and Security\Windows Tools) появится ссылка на консоль Active Directory Users and Computers.
Как пользоваться консолью Active Directory?
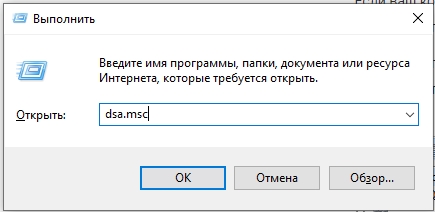
Чтобы запустить консоль ADUC, щелкните по ярлыку в панели управления или выполните команду:
dsa.msc
Все аутентифицированные пользователи домена могут использовать консоль ADUC для просмотра объектов Active Directory.
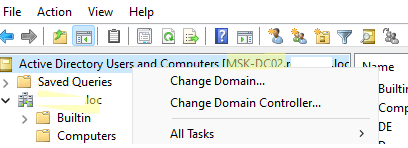
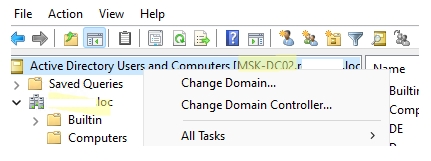
Если ваш компьютер состоит в домене Active Directory, то консоль ADUC подключится к контролеру домена, на основании текущего Logon сервера. Имя контроллера домена, с которого вы получаете информации указано в верху.
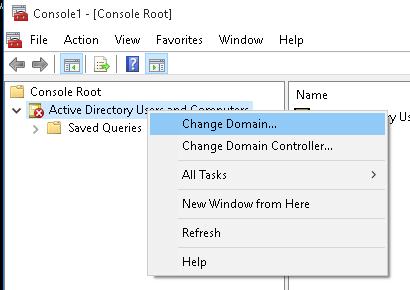
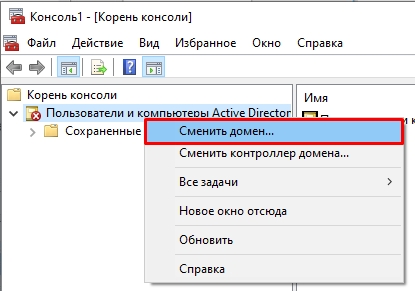
Вы можете подключиться к другому контроллеру домена AD или другому домену, щелкнув по корню консоли и выбрав пункт в контекстном меню.
В консоли Active Directory отображается древовидная структура организационных юнитов (Organizational Unit, OU) вашего домена (и отдельный раздел с сохраненными запросами/ Saved Queries AD).
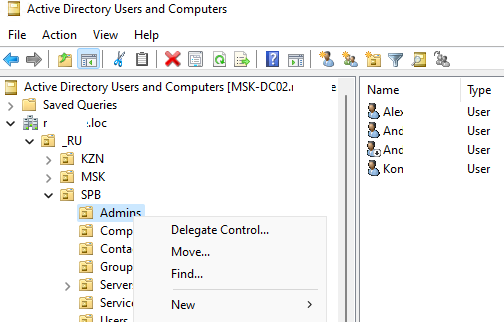
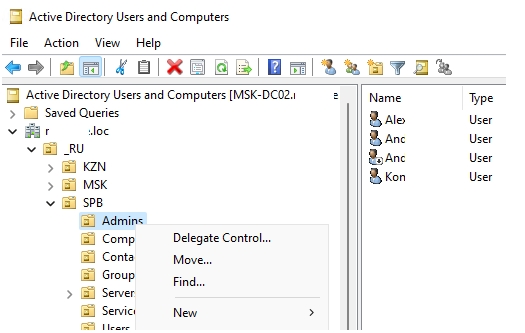
Администратор домена может создавать контейнеры (OU) в соответствии с физической или логической структуры предприятиями. С помощью контекстного меню можно создать новые объекты в AD (пользователей, группы, компьютеры, OU, контакты), переименовать, переместить или удалить объекты. В зависимости от типа объекта, который вы выбрали пункты контекстного меню могут отличаться.
Например, у пользователя есть опции на сброс пароля в AD или блокировку/разблокировку учетной записи.
Вы можете использовать контекстное меню Search для поиска объектов в AD.
Администратор может делегировать права на создание/редактирование/удаление объектов в Active Directory другим пользователям или группам.
С помощью меню View -> Add/Remove columns можно добавить атрибуты объектов, которые вы хотите отображать в консоли ADUC.
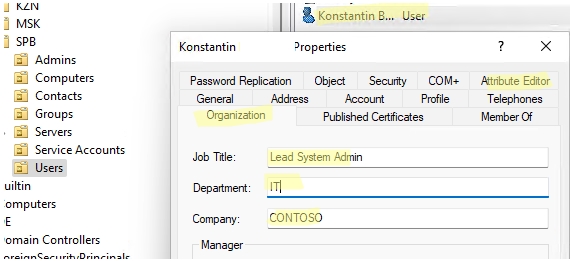
В консоли ADUC можно посмотреть или изменить свойства объектов домена. Например, можно открыть свойства пользователя и изменить его настройки. Часть свойств пользователя находится на соответствующих вкладках, а полный список атрибутов пользователя доступен на вкладке редактора атрибутов AD (Attribute Editor).
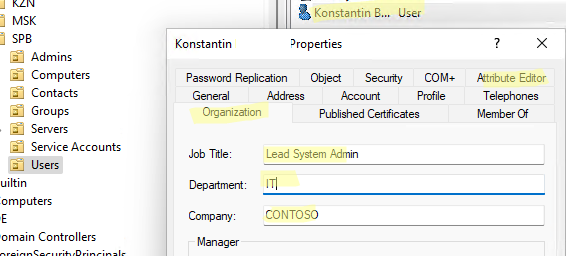
Можно добавить отдельную вкладку с фотографией пользователя AD.
Чтобы показывать системные контейнеры и свойства объектов в оснастке AD (по умолчанию скрыты), включите опцию View -> Advanced features.
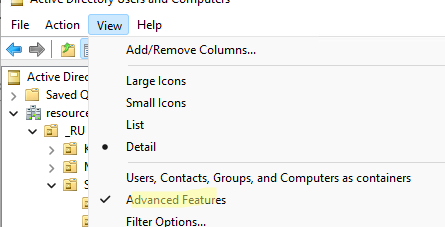
После этого у всех объектов появится ряд системных вкладок. Например, на вкладке Object можно получить каноническое имя объекта, дату создания учетной записи и включить опцию защиты от удаления (protect object from accidental deletion).
Подключение консоли ADUC к домену из рабочей группы
Если вы хотите подключится консолью ADUC к контроллеру домена с компьютера, который не включен в домен (состоит в рабочей группе), воспользуйтесь таким методом:
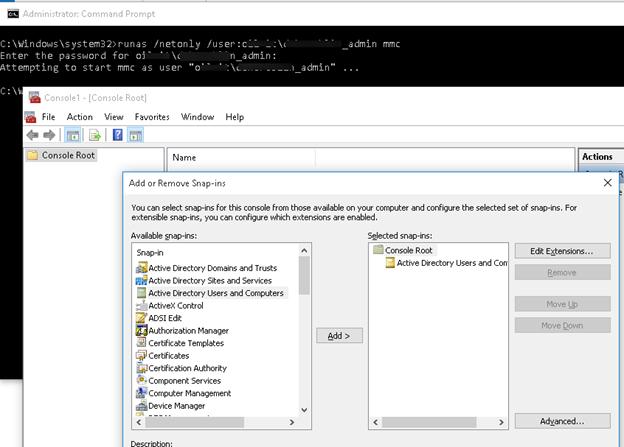
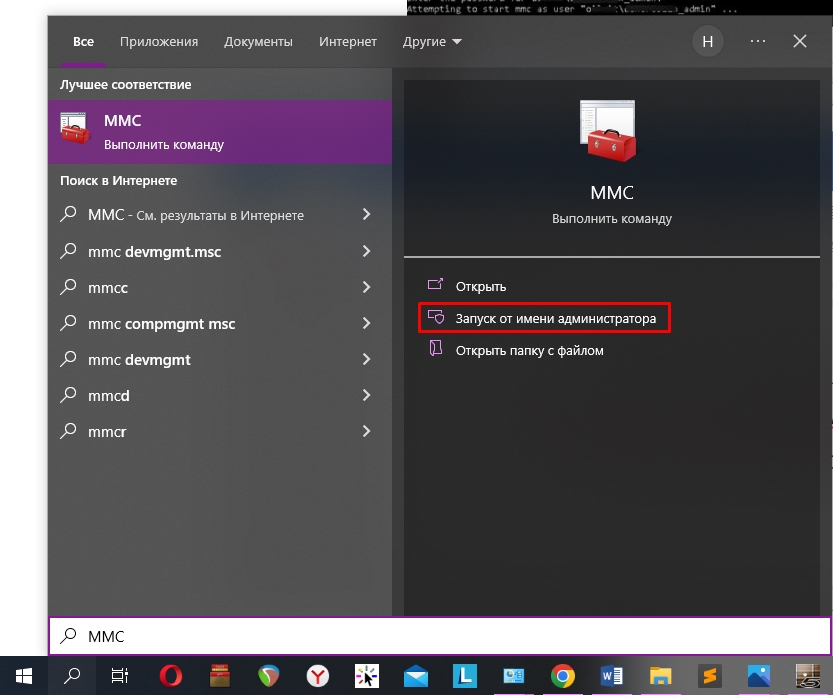
- Запустите командную строку и выполните команду запуска оснастки от имени другого пользователя:
runas /netonly /user:winitpro\aaivanov mmc - В пустой консоли MMC выберите File->Add/Remove Snap-In
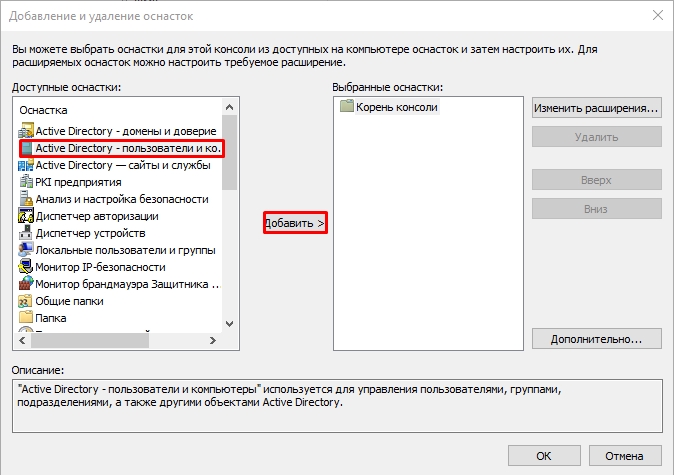
- Перенесите оснастку Active Directory Users and Computers в правую панель и нажмите Add;

- Чтобы подключится к домену, щелкните по корню консоли и выберите Change domain. Укажите имя домена.

В результате консоль ADUC подключится к контроллеру домена, получит и отобразит структуру контейнеров (OU) данного домена Active Directory.
The Microsoft Active Directory Administrative Center (ADAC) is a tool to manage Active Directory users and computers. ADAC was first available with Windows Server 2008 R2 and additional features were added in Server 2012.
In this guide, I’ll show you how to install the Active Directory Administrative Center and compare its features to the Active Directory Users and Computers (ADUC) management console.
Table of Contents:
- Difference between ADAC and ADUC
- How to Download ADAC
- How to Install ADAC on Windows Server
- How to Install ADAC on Windows 10/11
- ADAC Alternative
Note: The following acronyms are used in this article:
- ADAC = Active Directory Administrative Center
- ADUC = Active Directory Users and Computers
- DAC = Dynamic Access Control
Difference between ADAC and Active Directory Users and Computers (ADUC)
ADAC and ADUC are both Active Directory Management tools that administrators use to manage users, computers, groups, and OUs.
Although both of these tools have similar functions, the Active Directory Administrative Center includes the following new features:
- Active Directory Recycle Bin
- Find Grained Password Policy
- PowerShell History Viewer
- Manage Dynamic Access Control
- Raise Forest and Domain Functional Levels
- Improved GUI
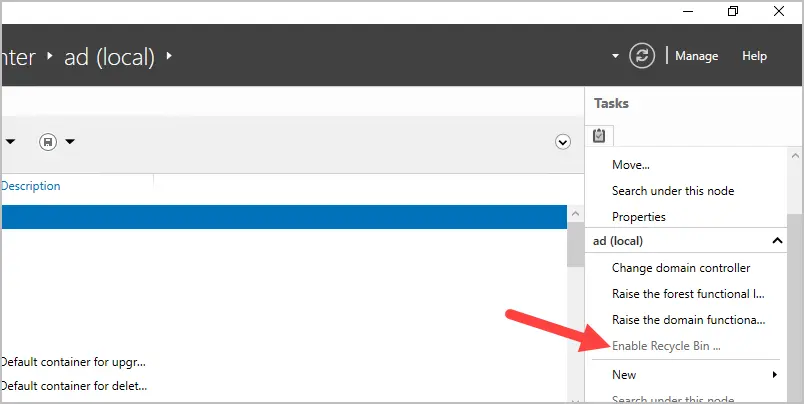
Active Directory Recycle Bin
The Active Directory Recycle Bin allows you to restore deleted Active Directory objects. For example, if the user “robert.allen” was deleted from Active Directory but later realized it was deleted by accident. You can use the Recycle Bin in Active Directory Administrative Center to restore the user account.
To manage the Recycle Bin you must install ADAC in Windows Server 2012. By default, the Recycle Bin is disabled. The forest functional level must be Server 2008 R2 or higher to enable it. Once the recycle bin has been enabled, you cannot disable it.
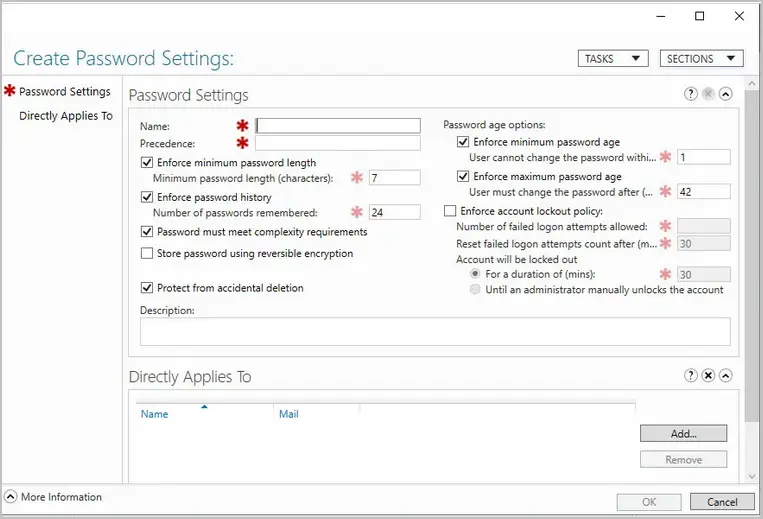
Fine Grained Password Policy
Fin grained password policies allow you to create multiple password policies within a single domain. For example, you could apply a more restrictive password policy to the accounts that are domain administrators. Before fine grained password policies, there was no option to have multiple password policies.
- You must use Active Directory Administrative Center on Server 2012 or higher to manage fine grained password policies.
- Find grained password policies only apply to global security groups and user objects.
- By default, only members of the Domain Admins group can manage fine grained password policies.
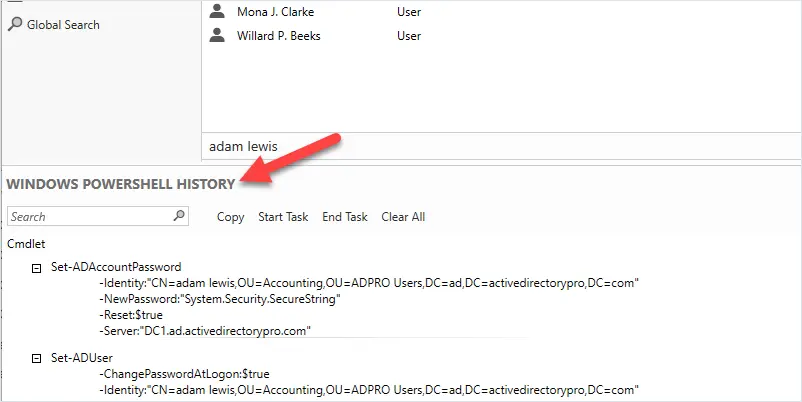
PowerShell History Viewer
The Active Directory Administrative Center console is built on top of PowerShell. The ADAC console will display the PowerShell commands of actions performed in the console. This can help you learn PowerShell and create scripts.
To use the history viewer you must be using Server 2012 or newer version of ADAC.
For example, I reset the password for a user account. Looking in the PowerShell history I can see the PowerShell commands used to reset the user’s password.
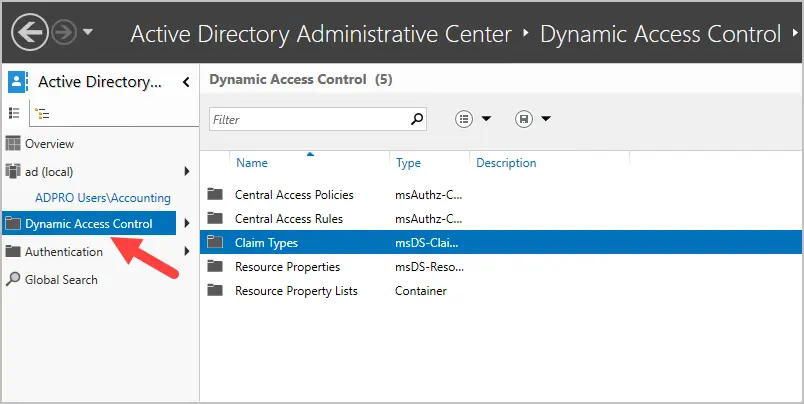
Manage Dynamic Access Control (DAC)
DAC allows you to define granular access control to NTFS folder shares. For example, you could define permissions based on the department attribute of a user account. If the user changes departments and the department attribute is updated the user’s NTFS access is automatically updated. Another example is you could give user access from their desktop but not their laptop or when connected remotely.
DAC requires Windows Server 2012 or higher.
The creation of the DAC rules is done through the ADAC console.
To learn more about DAC see the Microsoft article Dynamic Access Control Overview.
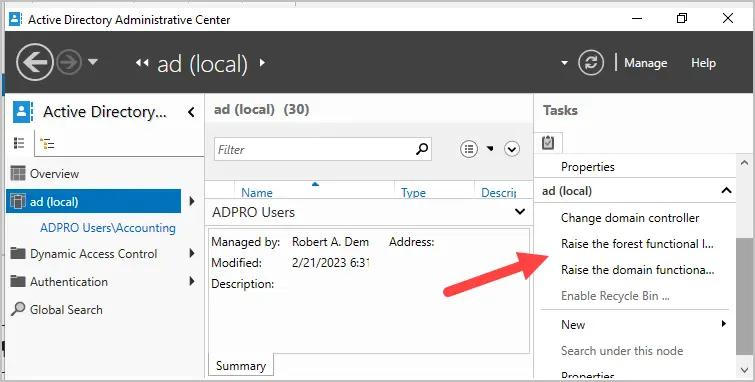
Raise Forest and Domain Functional Levels
You can raise the forest and domain functional level using ADAC. Prior to ADAC this could only be done by using the Domains and Trust management console.
These two options are listed under the tasks sidebar when you click on the root of your domain.
Improved GUI
When viewing objects ADAC displays more details on the page compared to the old ADUC. I don’t find this to be a huge improvement but staff that works with users and computers might find this useful.
Here is a screenshot of a user account. You can see it displays more information on one page. With ADUC you would have to click on multiple tabs to see these details.
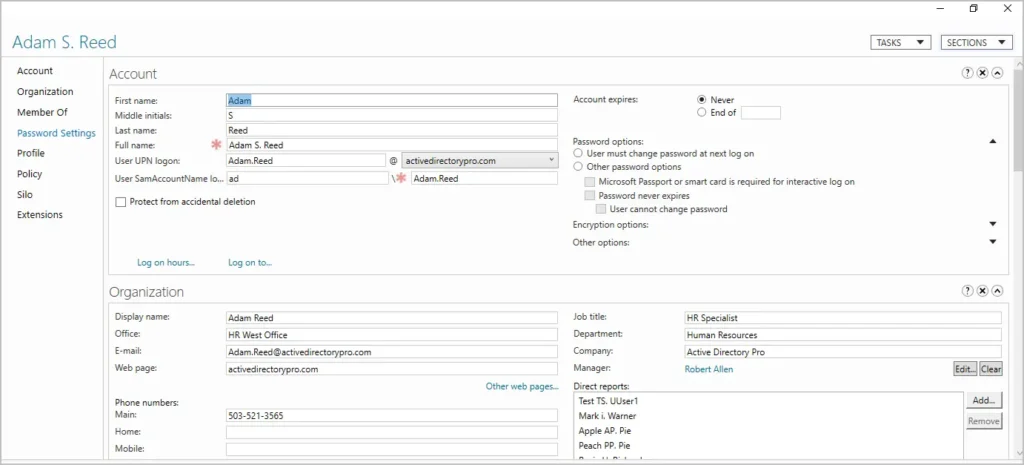
Personally, it feels slow and clunky to me and I prefer using ADUC.
How to Download ADAC
Active Directory Administrative Center is included with the RSAT tools and does not need to be downloaded. Starting with Windows 10 October 2018 Update the RSAT tools are included with Windows. These tools are only supported on Windows Pro and Enterprise versions.
To install ADAC see the next section.
How to install ADAC on Windows Server
In this example, I will install Active Directory Administrative Center on Windows Server 2022. These same steps will also work on Windows Server 2016 and 2019.
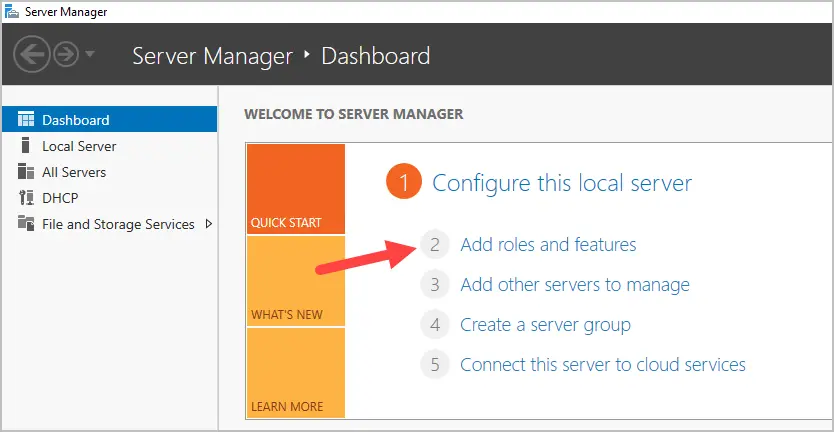
Step 1. Open Server Manager
Click on start and then click the server manager icon.
Step 2. Click Add roles and features
From the server manager dashboard click on “Add roles and features”.
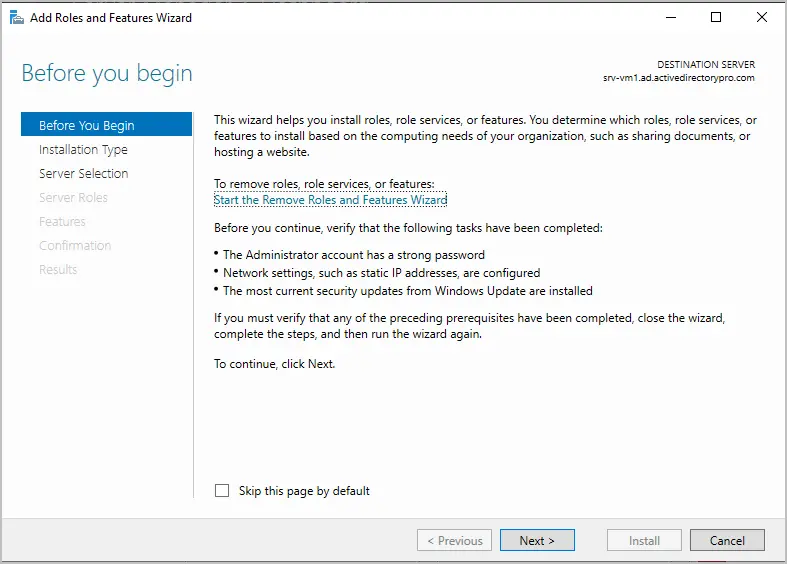
Click “Next” on the before you begin page.
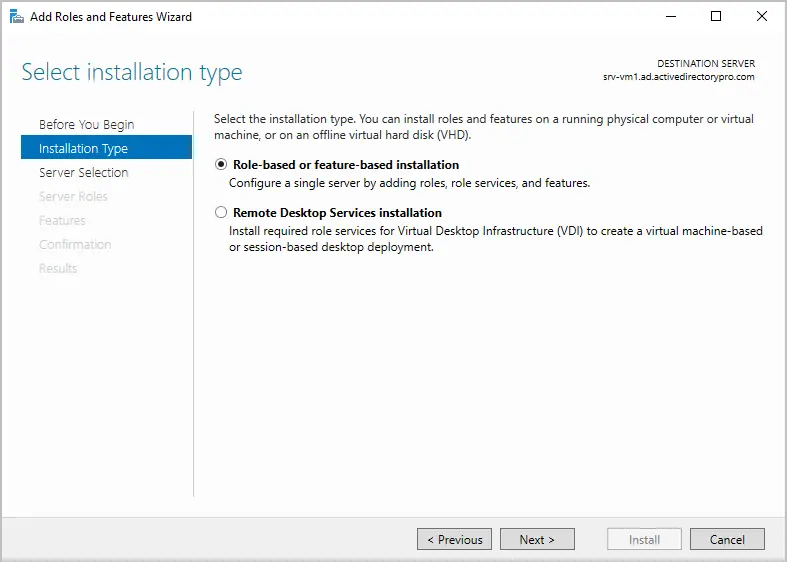
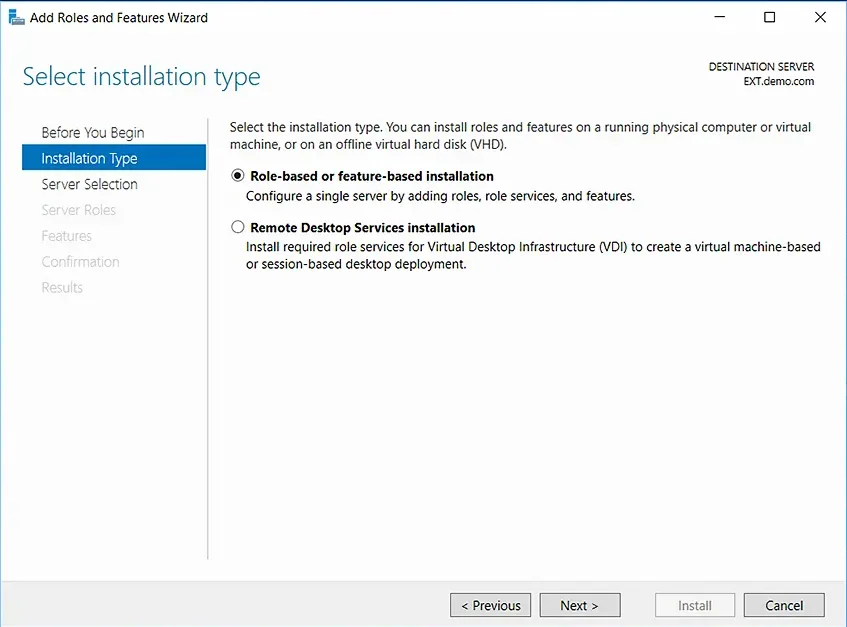
Select “Role-based or featured-based-installation” and click “”Next”.
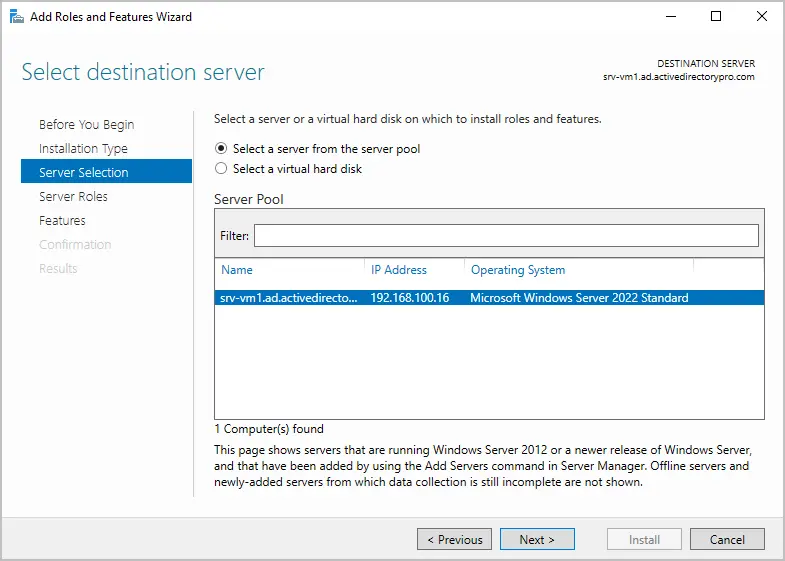
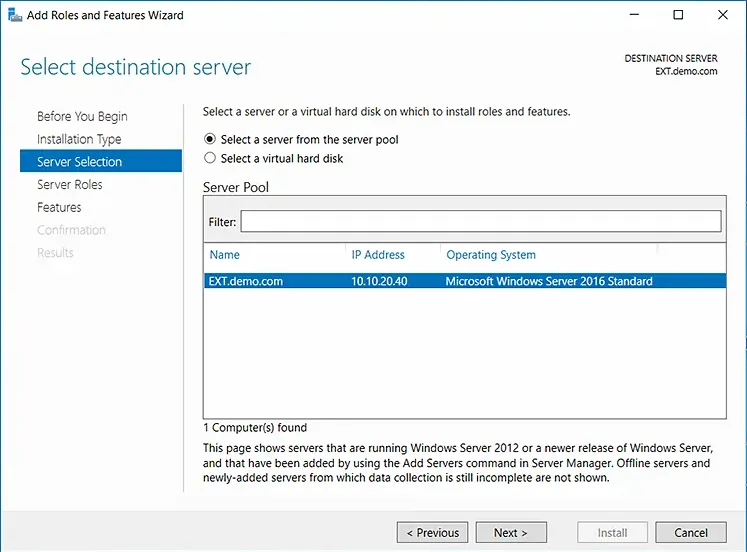
For the server selection make sure your local server is selected and click “”Next”.
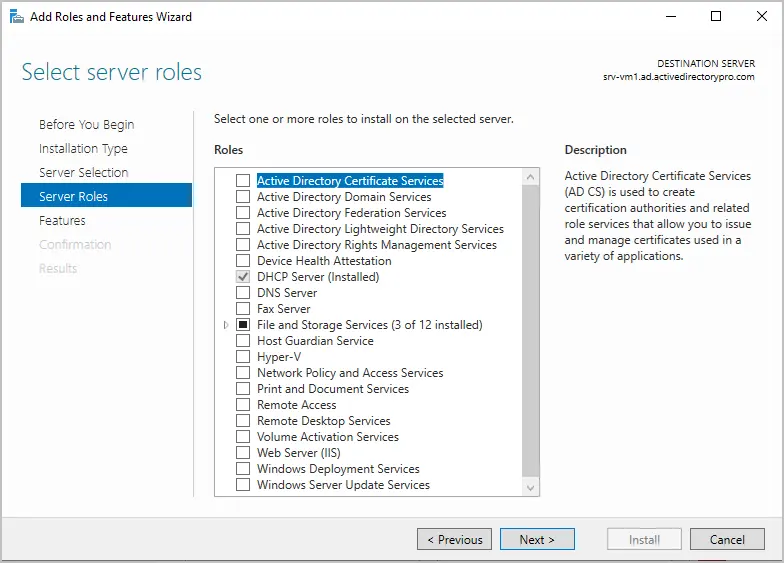
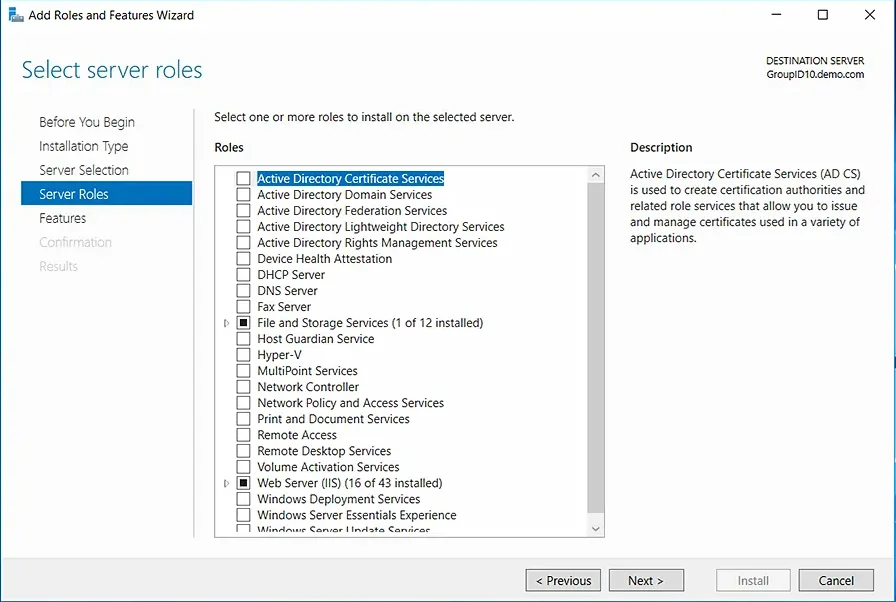
On the server roles page, leave the settings at their defaults and click “Next”.
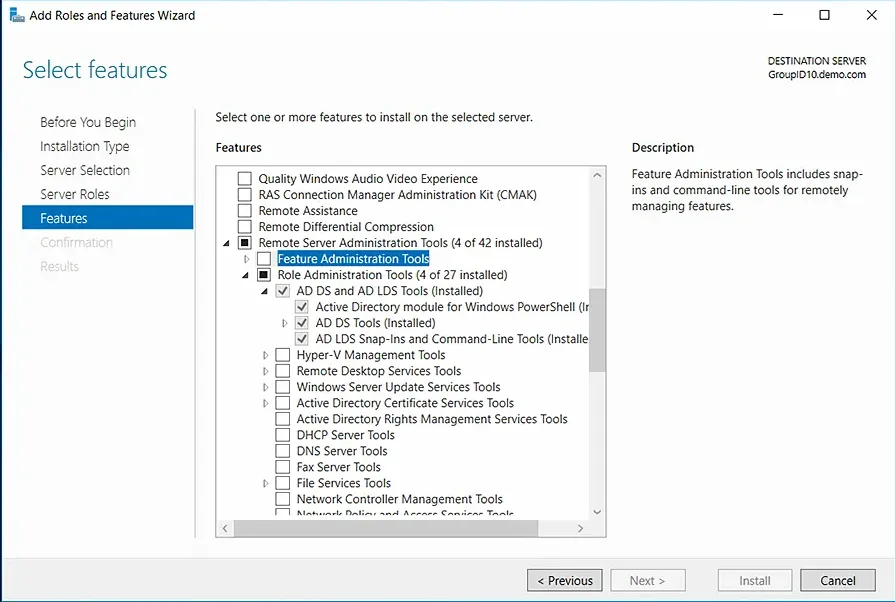
On the Select features page expand Remote Server Administration Tools, then expand Role Administration Tools and make sure AD DS Tools and AD LDS Tools are checked. Click “Next”.

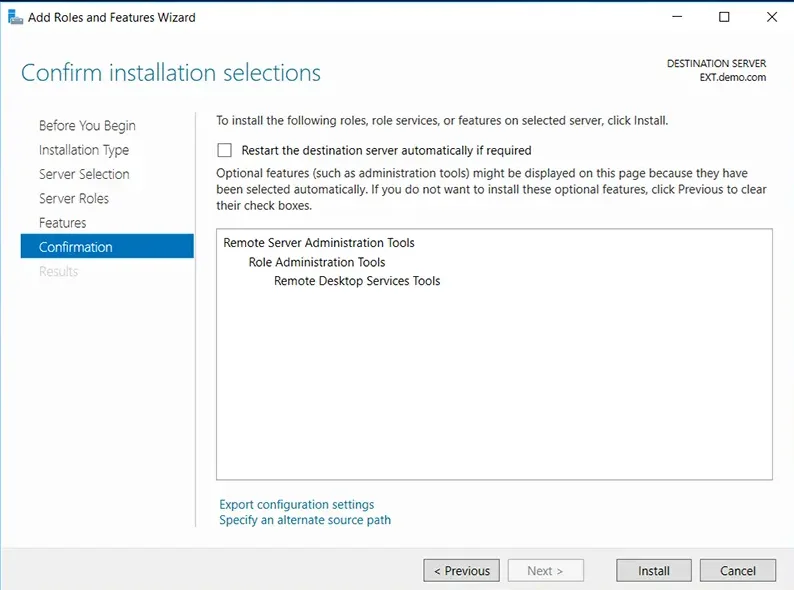
On the confirmation page, review your selections and click “install”.
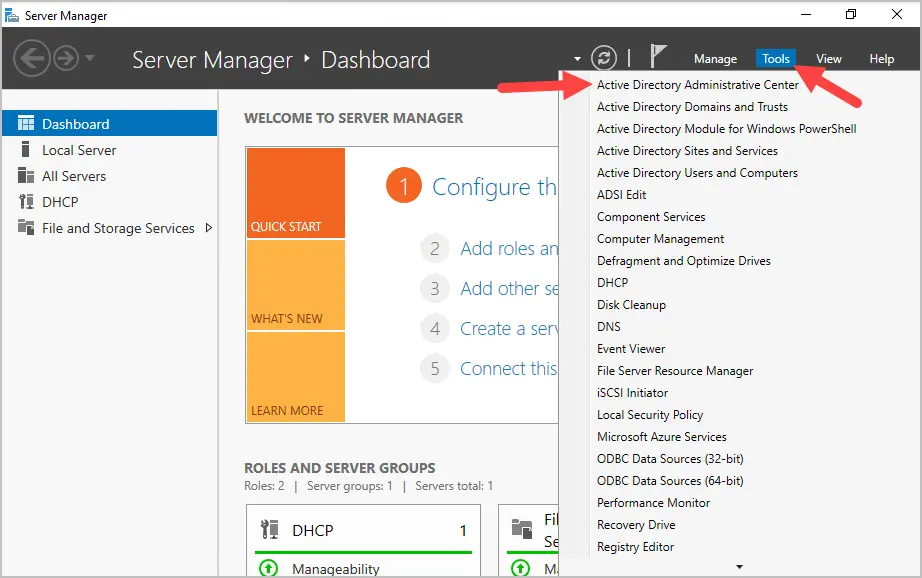
Step 3. Open ADAC
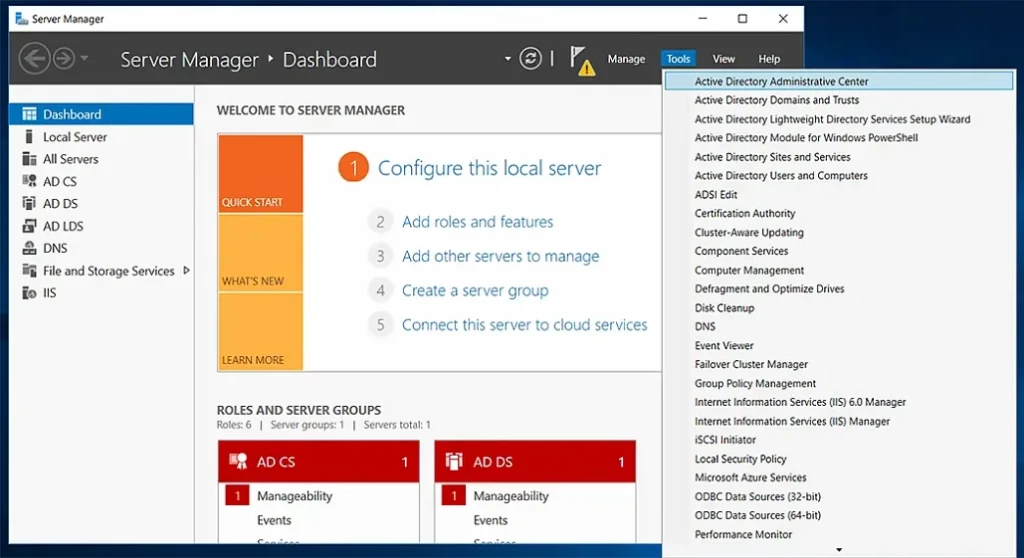
When the installation is complete you can access the Active Directory Administrative Center from the tools dropdown.
How to install Active Directory Administrative Center on Windows 10 or 11
To install ADAC on Windows 10 or 11 follow these steps:
1. Open Apps & Features and click on Optional Features
2. Click on add a feature
3. Type rsat and select RSAT: Active Directory Domain Services and Lightweight Directory Services Tools
4. Click install to start the installation.
When the installation is complete you can access ADAC from start -> Windows Administrative Tools.
Easily Management Active Directory Users with the AD Pro Toolkit
Both ADAC and ADUC are used to perform basic Active Directory administrative tasks. But they lack many features that administrators need such as automation, bulk updates, and reporting.
The AD Pro Toolkit simplifies AD Management by automating many administrative tasks, it also includes over 200 pre-built reports.
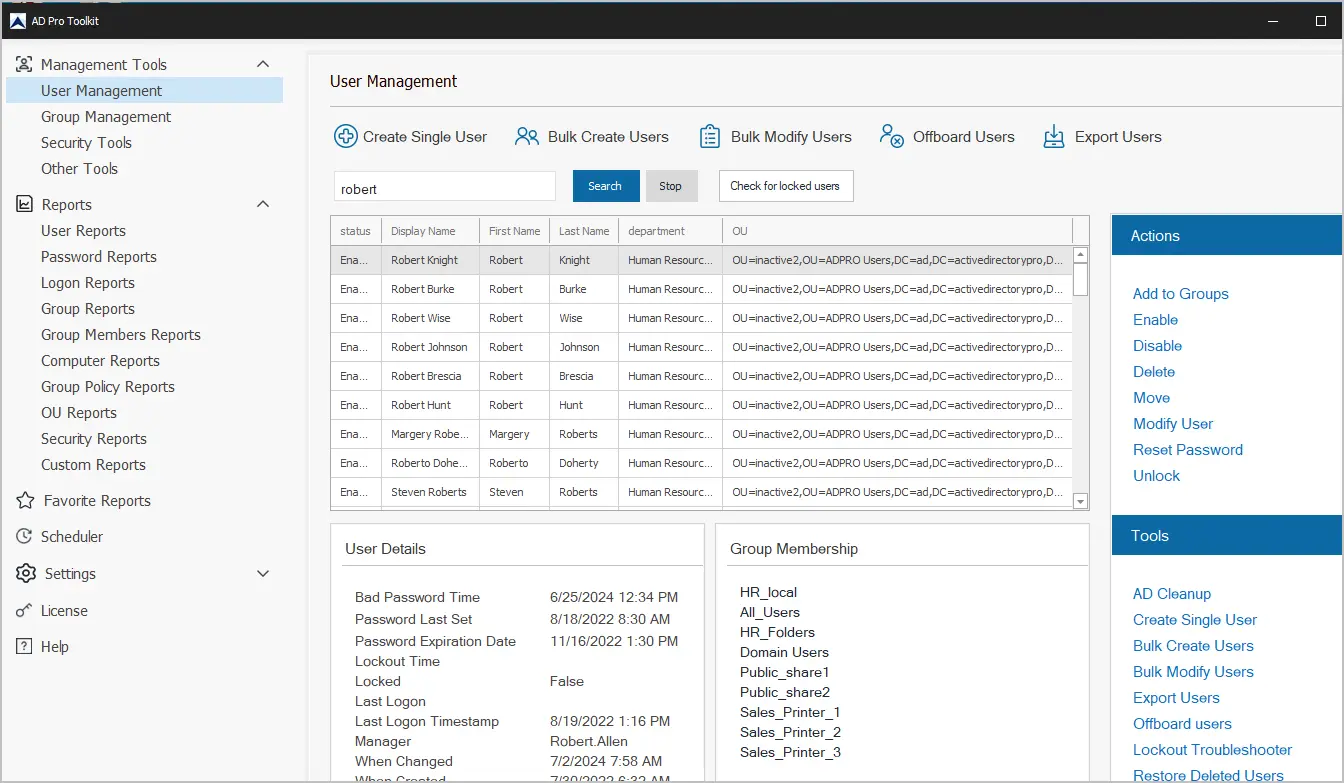
AD Pro Toolkit highlights:
- Bulk Import Users
- Bulk Update Users
- Easily export users to CSV or PDF
- Schedule automated reports
- Quickly find locked user accounts
- Bulk add or remove users from groups
- Audit password changes
Download AD Pro Toolkit and see how easy it is to management Active Directory.
Summary
In this article, I showed you how to install the Active Directory Administrative Center. I also showed you the new features it has compared to the Active Directory Users and Computers management console. For day to day stuff most Active Directory Administrators still use ADAC as simple things like unlocking accounts are not intuitive. It also feels very slow compared to ADUC and PowerShell. It does come in useful for things like recycle bin and fine grained password policies.
Всем привет! Сегодня мы поговорим с вами об оснастке и консоли управления доменами Active Directory – пользователи и компьютеры (ADUC). Данную оснастку используют для управления доменом Active Directory. Сама оснастка по умолчанию не установлена в системе Windows, но её можно инсталлировать несколькими способами. В статье я расскажу где скачать и как установить оснастку Active Directory для Windows 10, 11 и 8.1. Также я очень коротко расскажу, как работать с ней и как подключить компьютер к домену Active Directory из-под рабочей группы.
Содержание
- Установка в Windows
- Способ 1: Через параметры системы
- Способ 2: PowerShell
- Способ 3: Для Windows 10 1803/1709 (Более старых сборок) и Для Windows 8.1
- Как её пользоваться?
- Подключение к домену из рабочей группы
- Видео
- Задать вопрос автору статьи

Итак, в первую очередь нам нужно установить центр администрирования Active Directory. По умолчанию в Windows 10 и Windows 11 они не установлены в системе и являются дополнительными компонентами ОС. Есть несколько способов выполнить установку. Можете выбрать любой из представленных.
Способ 1: Через параметры системы
Вы можете скачать Active Directory для Windows 10 (сборка 1809 старше) и Windows 11 через меню системы.
ВНИМАНИЕ! Если у вас Windows 10 со сборкой до 1809 – смотрите 4 способ.
- Откройте меню «Пуск» и нажмите по шестеренке, чтобы открыть основные параметры ОС.
- Переходим в раздел «Приложения» (Apps).
- Вас сразу же перебросит во вкладку «Приложения и возможности». Далее в левом блоке найдите ссылку «Дополнительные компоненты» (Optional Features).
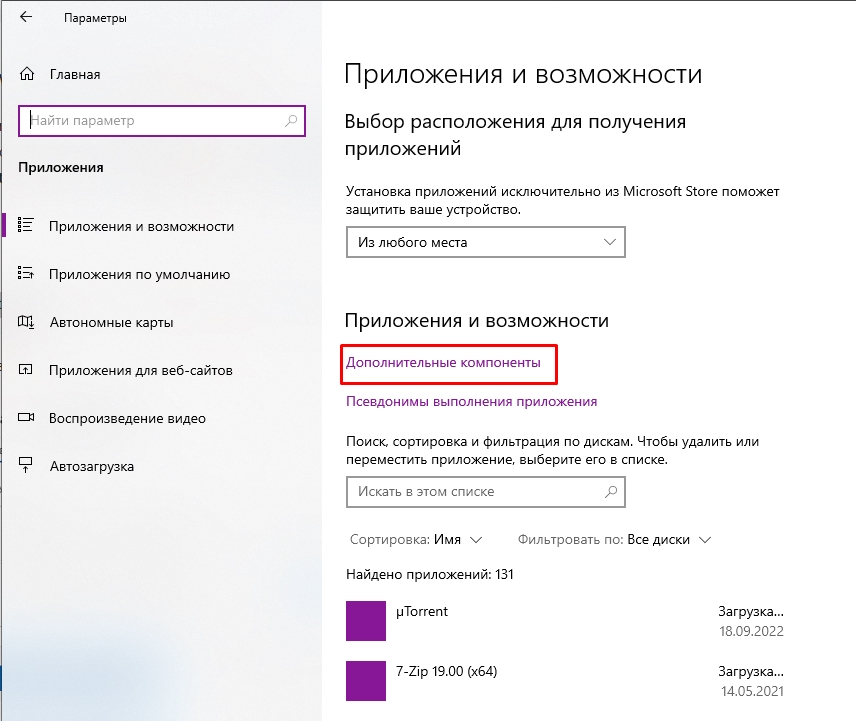
- Жмем по кнопке с плюсиком «Добавить компонент» (Add an optional feature (View features)).

- Дабы не искать их вручную вводим в поисковую строку запрос:
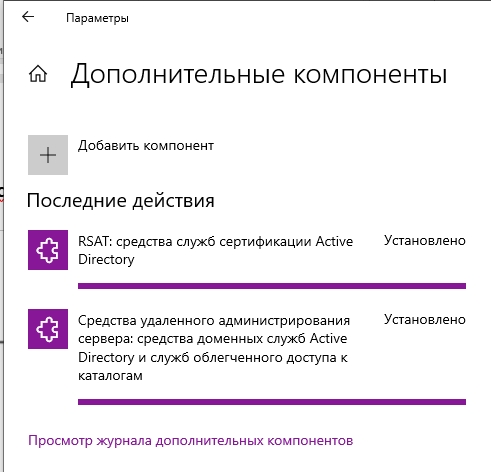
Active Directory
- Вы увидите два компонента. Первый – это RSAT или средства службы сертификации. Второй – инструменты для работы с удаленными администрированием и дополнительные службы. Устанавливаем обе галочки и жмем по кнопке «Установить».
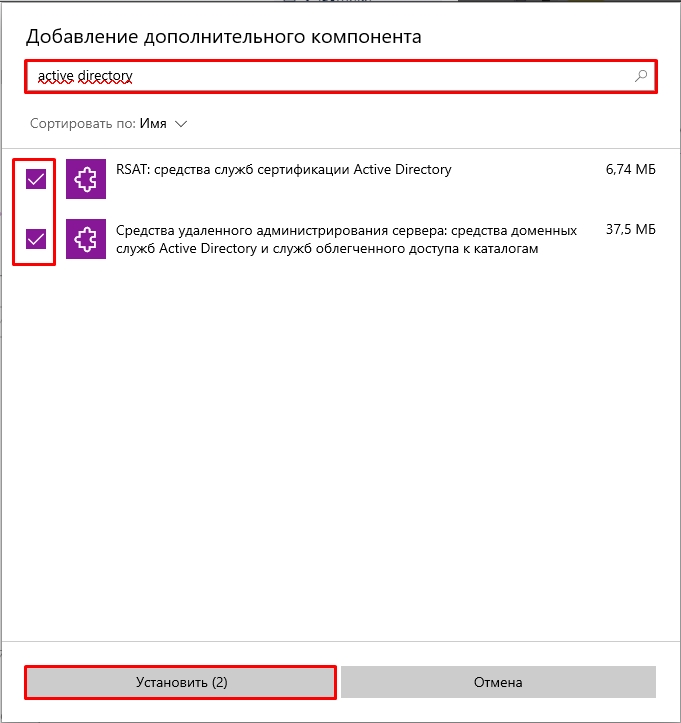
- Они будут скачены с интернета с серверов Microsoft, поэтому в данный момент нужно быть подключенным к глобальной сети. Подождите пока оба компонента установятся.
Способ 2: PowerShell
Запустите дополнительную консоль, нажав правой кнопкой мыши по меню «Пуск» и выбрав из контекстного меню нужную команду. Запускаем PowerShell с правами администратора.
Используем команду:
Add-WindowsCapability –online –Name Rsat.ActiveDirectory.DS-LDS.Tools~~~~0.0.1.0

Способ 3: Для Windows 10 1803/1709 (Более старых сборок) и Для Windows 8.1
Если у вас более старая версия Windows 10 или установлена Windows 8.1 – вам нужно скачать пакеты по ссылкам ниже. Скачиваем компоненты для своей разрядности (32 или 64 бита).
- Windows 10.
- Windows 8.1.
После этого просто устанавливаем пакет, дважды щелкнув левой кнопкой мыши. После установки компоненты нужно будет активировать.
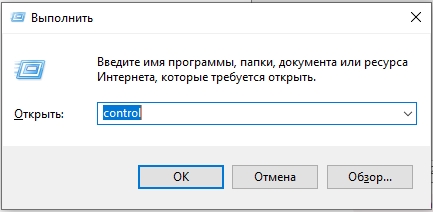
- Используем клавиши, нажав одновременно:
+ R
- Вводим команду, чтобы зайти в «Панель управления»:
control
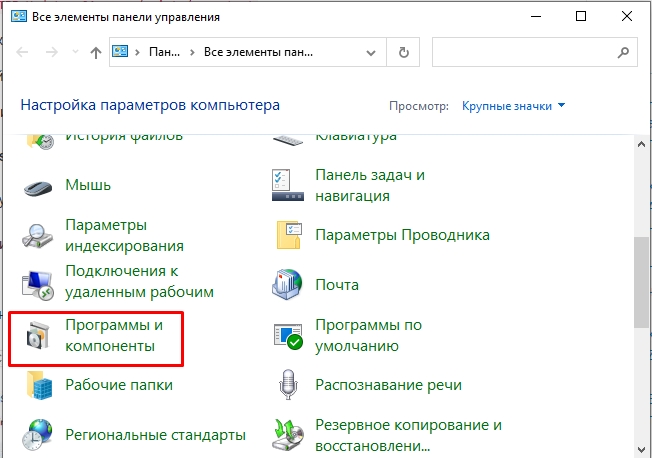
- «Программы и компоненты».
- «Включение и отключение компонентов Windows».
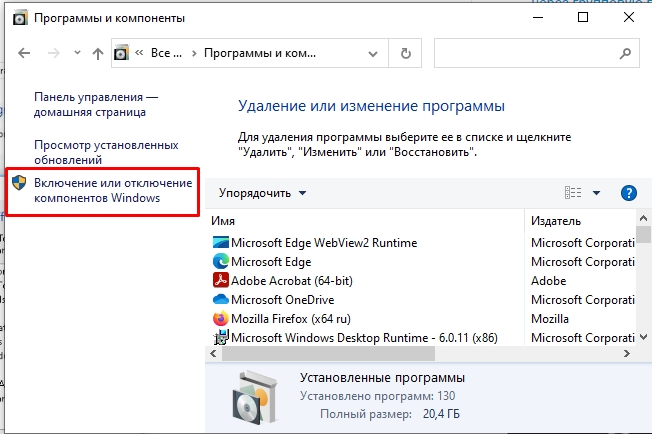
- Откройте основную папку «Remote Server Administration Tools», в ней раскрываем ветку «Role Administration Tools» и находим «AD DS and AD LDS Tools» – «AD LDS Tools» – ставим обе галочки и жмем «ОК».
Дополнительно нужно установить оснастку ADUC через командную строку – запускаем её с правами администратора. Используем команды:
dism /online /enable-feature /featurename:RSATClient-Roles-AD
dism /online /enable-feature /featurename:RSATClient-Roles-AD-DS
dism /online /enable-feature /featurename:RSATClient-Roles-AD-DS-SnapIns
В разделе администрирования в панели управления (control) можно будет увидеть две ссылки на консоли.
Как её пользоваться?
Чтобы запустить саму оснастку консоли, можно использовать команду:
dsa.msc
Второй вариант – это зайти в «Панель управления» – «Администрирования» – далее находим консоль там. Если ваш компьютер уже находится в домене Active Directory, то он автоматически подключится к серверу, который в свою очередь и будет являться контроллером домена. Имя сервера находится в самом верху в квадратных скобках. Если вы хотите изменить домен, кликните по нему правой кнопкой мыши и выберите соответствующую команду.
В качестве корня является сам домен организации. В каждом домене можно создать основные группы или подгруппы какой-то компании. Например, можно создать основную группу, которая будет филиалом в городе. Вы можете создавать новые объекты. Каждый объект может быть как целой группой, так и пользователем с определенными контактами.
Каждый объект можно создавать, перемещать и изменять его характеристики или свойства. Например, конечного пользователя можно добавить в определенную группу, выключить его аккаунт или сбросить пароль. После сброса пароля ему на рабочем месте придется придумывать новый ключ, который он будет использовать при аутентификации в системе (при входе на начальном экране).
Можно зайти в свойства пользователя и изменить некоторые атрибуты. Даже есть возможность добавить фото юзера. Я советую внимательно ознакомиться со всеми вкладками и возможностями.
Представим себе ситуацию, что ваш компьютер находится в рабочей группе, которая никаким образом не связана и не подключена к основному серверу управления домена ADUC.
- Запускаем стандартную командную строку винды с правами админа.
- Используем команду для запуска оснастки другого пользователя:
runas /netonly /user:wifigid\aaivanov mmc
- Теперь открываем MMC консоль – проще всего воспользоваться поиском системы.
- На панели жмем «Файл» – «Добавить или удалить оснастку». Или используем клавиши:
Ctrl + M
- В левом блоке выбираем «Active Directory – пользователи и компьютеры» и кликаем по кнопке добавления. После этого жмем «ОК».
- Кликаем правой кнопкой по созданному пункту, выбираем «Сменить домен». Далее останется ввести наименование домена и компьютер к нему подключится.
Видео
Remember the Active Directory Administrative Center? If you are like me, you didn’t really see many across the enterprise make use of the “next-generation” of Active Directory management. However, there is a new Active Directory Administrative Center that I would like to predict will be the next-generation of managing Active Directory domain resources and that is the new Active Directory extension that is available for Preview in Windows Admin Center. Additionally, if you are looking for Active Directory Administrative Center Windows 10, this is the tool that most likely, will fill this need. Let’s take a look at the new Active Directory Administrative Center Windows 10 via Windows Admin Center and see how this new Active Directory extension is installed and used.
Active Directory Administrative Center Windows 10
The reason we are calling this Active Directory Administrative Center Windows 10 is Windows Admin Center can be installed and used on Windows 10 as well as Windows Server operating systems. In fact, you can connect to and have access to many powerful tools in Windows Admin Center on your Windows 10 administrative workstation.
How do you access the Windows Admin Center Active Directory module?
Installing Windows Admin Center Active Directory
Once you have the latest Windows Admin Center, navigate to the Settings > Extensions screen. Under the Available extensions, you will see the Active Directory (Preview) listed. Highlight it, and then click the Install button.
Once installed, Windows Admin Center will quickly reload the browser session. Then you will need to connect to a domain controller in your environment to manage. The Active Directory Domain Services only shows up in the context of managing a domain controller with Windows Admin Center. After connecting to a DC, you will see the Active Directory menu listed underneath Tools.
There are several things that stand out here. For one, the large search field allows easily finding objects.
Zooming in a bit further, when we look at the various actions that can be performed, you will see under the Create menu, you can create users, groups, and OUs. Additionally, you have the ability to Disable, Remove, and Reset Password.
Under the More menu, you will notice two options – Properties and Locate.
For one, I love the locate option. How many times have you performed a search in Active Directory Users and Computers and even though the search in ADUC returns the object you are looking for, you may need to see it where it is located. This is not achievable in the default ADUC tools. It is great to see an easy locate feature for any object so you can quickly be taken to the location where the object is housed.
Additionally, if you look at the Properties screen, you will see a good bit of functionality here. You get the basic properties of the user that can be modified such as the typical name, SAMaccountname, UPN suffix, password options, account expiration and others.
Also, if you look at the Membership menu, you will quickly get to see which groups the user object is a member of. Additionally, I really like the search menu that is found on these pages that allows quickly filtering down to see the exact object you are looking forward. Instead of having to scroll through a list of groups in the user properties like ADUC, you can quickly use the search menu and determine if the user is a member of a particular group or not.
Still in Preview
This is a great new extension to be found for use with Windows Admin Center. Keep in mind this extension is still in Preview form as are many other Windows Admin Center extensions. Why should you still get excited about this new extension if you are an Active Directory administrator?
As you have no doubt noticed, Microsoft is going “all in” on Windows Admin Center and I can say that it has kept me pleasantly surprised. I think it is turning out to be great platform that has been introduced at the right time. It will certainly be the one tool that Microsoft settles on for day-to-day management of Windows Server environments, including Active Directory.
The seeming lack of features at this stage should not be alarming. It is not close to ADUC or other tools in its current form, however, you can expect to see this new Active Directory extension rapidly gain new features.
I suspect we will continue to see new releases of the extension on an aggressive schedule of releases along with many of the other extension updates.
Concluding Thoughts
The new Windows Admin Center Active Directory extension is certainly the new active directory administrative center windows 10 and is most definitely worth downloading and getting familiar with.
Expect it to rapidly gain features and functionality as Microsoft ramps up all of the Windows Admin Center tools to become viable replacements for all the legacy management consoles we have used for the past decade.
What is Active Directory Administrative Center (ADAC)?
Active Directory Administrative Center (ADAC) is a Microsoft tool that admins can use to manage objects in Active Directory. ADAC is available in Windows Server 2008 R2 and higher.
ADAC is a graphical interface on top of Windows PowerShell. This means that every time an action is carried out through ADAC, Windows PowerShell cmdlets are executed in the background.
How is ADAC Different from Active Directory Users And Computers (ADUC)?
ADAC is superior to ADUC in many ways:
- ADAC is more task-oriented than ADUC, so it helps admins manage Active Directory tasks in fewer and simpler steps.
- ADAC supports enhanced management features that simplify the handling of multiple domains across the forest for administrators. For instance, ADUC does not allow admins to configure all user attributes when creating a new account, but with ADAC, admins can create users and add all their properties in one go.
- In ADAC, frequently used tasks like password reset and object search are available right on the landing page. These tasks are more tedious in ADUC; for example, to reset a password, you will have to locate the object, right-click it, select the password reset option and then type the new password.
How do I Install ADAC?
To install the Active Directory management tools on Windows Server 2019, take these steps:
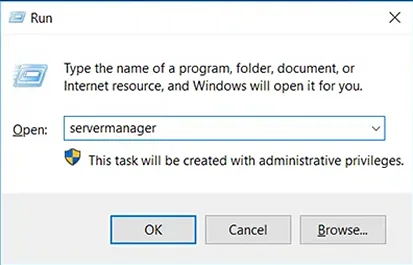
- Launch Server Manager: Press the Windows + R keys to launch the Run dialog box, type servermanager in the Open box and click OK.

- On the Server Manager dashboard, in the Quick Start panel, click Add Roles and Features.

- In the Add Roles and Features wizard, go to the Installation Type panel on the left and select Role-based or feature-based installation. Then click Next.

- On the Server Selection step, choose the Select a server from the server pool option. Then select the server on which you want to install the Active Directory management tools and click Next.

- On the Server Roles step, leave the settings at their defaults and click Next.

- In the Select Features step, expand Remote Server Administration Tools, then expand Role Administration Tools, and select the AD DS and AD LDS Tools checkbox. Click Next. If you are prompted to install any supporting roles, accept the defaults and continue with the installation.

- On the Confirmation step, review your selections and click Install to start the installation process.

You can monitor installation progress in the Results panel on the left.

You do not need to restart the server after the installation is complete. You can see the Active Directory management tools under the Tools menu in Server Manager.
What features were introduced in ADAC?
ADAC introduced three management features:
- Active Directory Recycle Bin
- Fine-grained password policy
- Windows PowerShell History Viewer
Active Directory Recycle Bin
In Windows Server 2003, you could recover Active Directory deleted objects through tombstone reanimation. However, the attributes associated with the reanimated objects, like group memberships, could not be recovered. Therefore, IT administrators could not rely on tombstone reanimation for accidently deleted objects.
The Recycle Bin in ADAC is an enhanced version of the tombstone reanimation that enables admins to preserve as well as recover deleted objects in Active Directory. When you enable the Recycle Bin feature, all attributes of deleted objects are restored in the same logical state as they were before deletion. For example, when you restore users from the Active Directory Recycle Bin, they will automatically regain all the group memberships and access rights that they had before being deleted from the directory.
Fine-Grained Password Policy
Prior to Windows Server 2008, admins could set only one type of password and account lockout policy for all the users in the domain. The policy was specified in the Default Domain Policy for the domain. If an organization wanted to have different password and account lockout policies for different users, it would either have to create a password filter or deploy multiple domains, both of which are costly options.
With ADAC, admins can apply different password and account lockout policies for different users. For instance, you can apply strict policies for highly privileged accounts and set less stringent policies for less privileged user accounts, thereby balancing productivity and security.
Windows Powershell History Viewer
Since ADAC is built on Windows PowerShell, every action that is executed in its user interface generates a PowerShell script that is shown in the Windows PowerShell History Viewer. IT administrators can use this feature to learn scripts, create automated commands and reduce repetitive tasks while increasing productivity.
How Do I Access ADAC?
To access ADAC, do the following:
- Launch the Run dialog box by pressing the Windows + R keys.
- Type dsac.exe in the Open box.
- Click OK.
How Do I Use ADAC?
ADAC enables you to perform a variety of routine Active Directory tasks in an advanced and efficient way. When you launch the ADAC console, you will see the two most common tasks, Reset Password and Global Search, readily available on the lower part of the landing page.
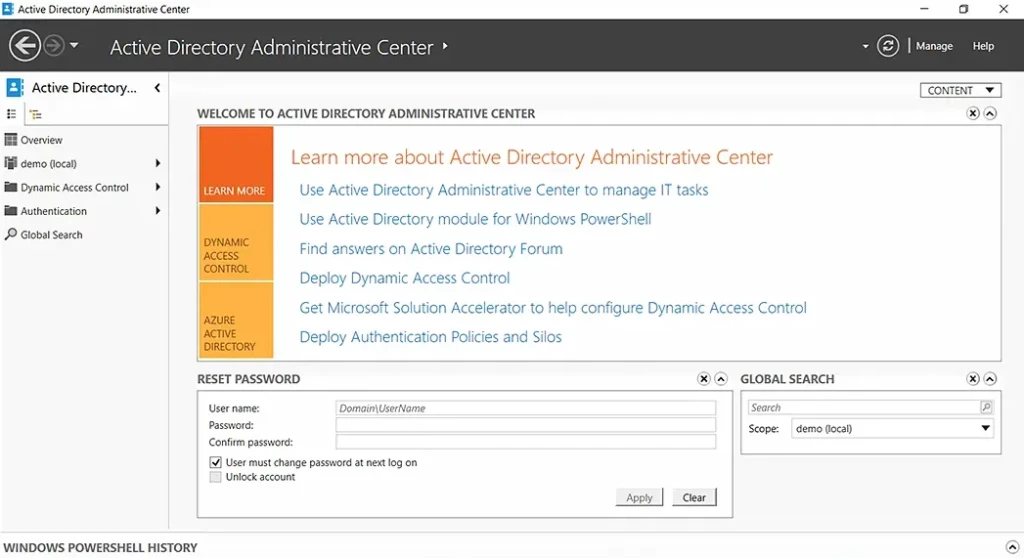
You can perform the following actions through ADAC:
- Create an organizational unit (OU)
- Create a user in a particular OU
- Reset a user’s password
- Enable the Recycle Bin
- Delete a user from the directory
- Restore a deleted AD object
- View PowerShell history
Create an OU
An organizational unit (OU) is a container in Active Directory that can hold users, computers, groups, and other AD objects. OUs help keep the directory neat and well-structured.
To create an organizational unit using ADAC, follow these instructions:
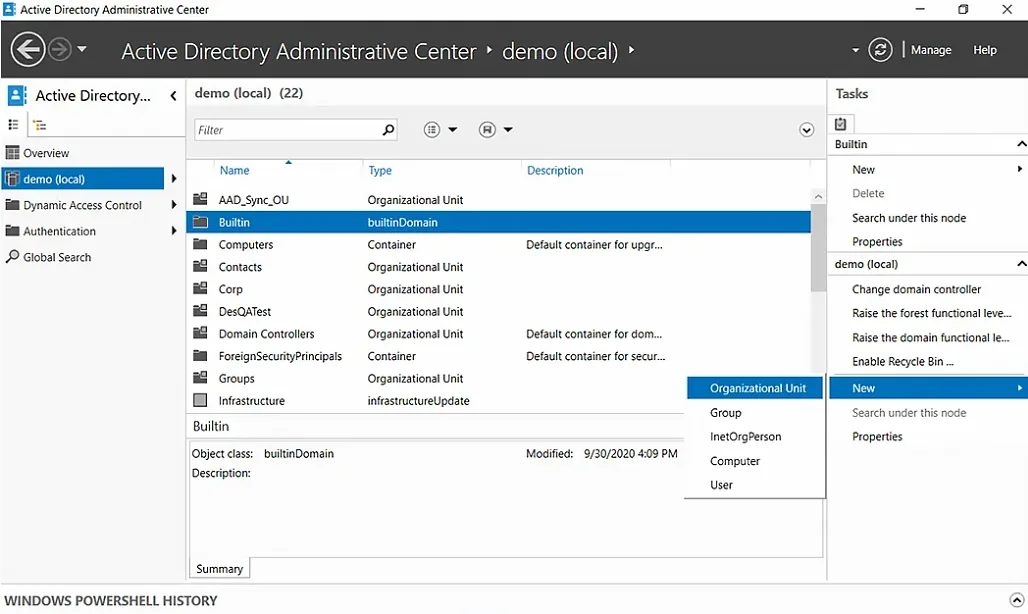
- In ADAC, select a domain from the left panel. Here, we have selected demo (local).
- Under the Tasks panel on the right, select New > Organizational Unit.

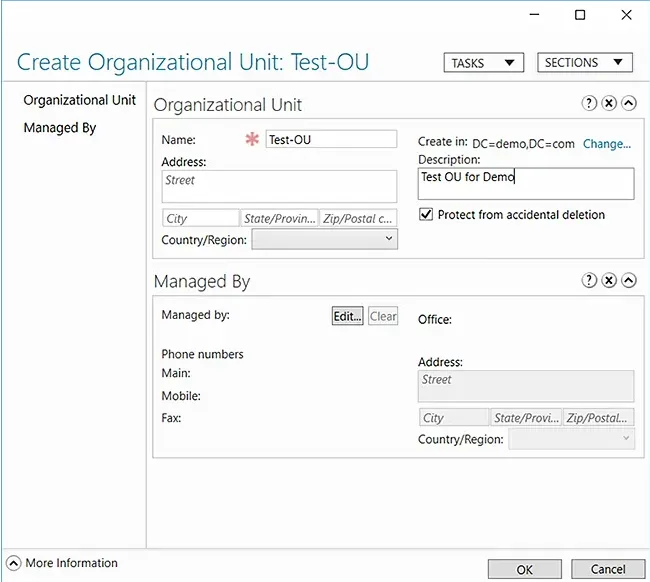
- In the Create Organizational Unit dialog box that appears, specify a name and description for the new OU. Here we have chosen Test-OU as the name and Test OU for Demo as the description.

- Click OK.
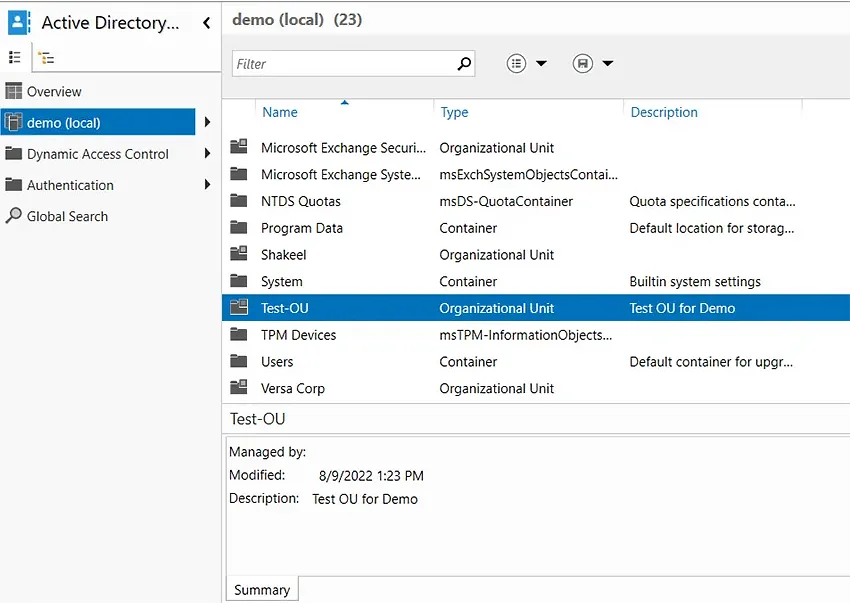
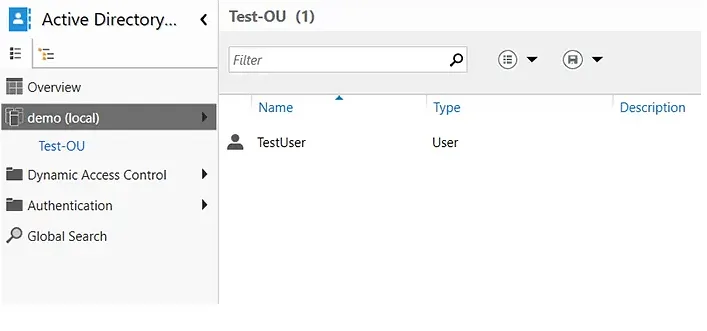
You can now check the domain and confirm the existence of the new OU.
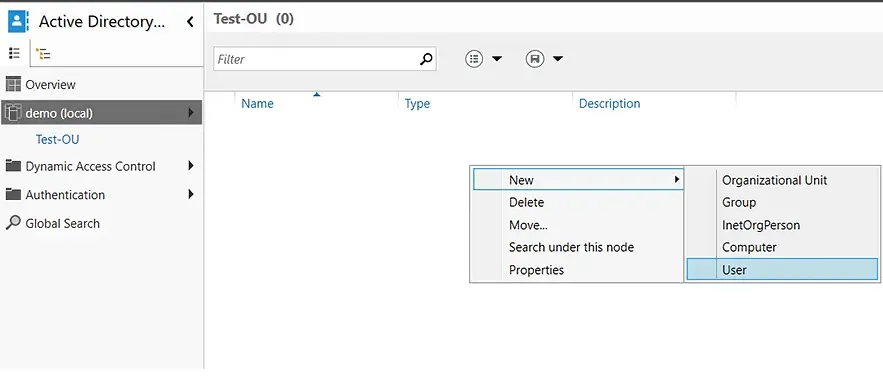
Create a User in a Particular OU
When new employees join a company, IT administrators have to create their user accounts so that they can access the company’s resources and start working. Here is how you can use ADAC to create a user account in a particular OU:
- Double-click the OU where you want to create a user account. In this case, we will be creating a new user account in the Test-OU container.
- Right-click in the blank area, hover over New, and select User.

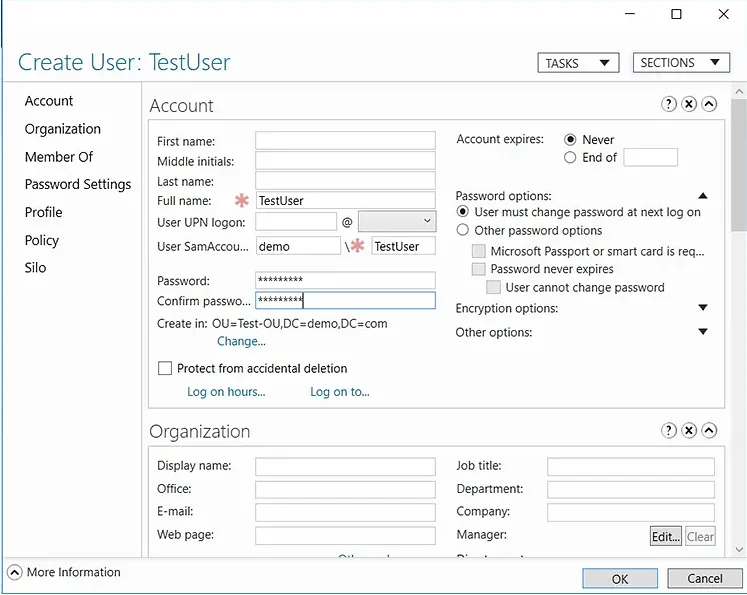
- Fill in the required fields and set a password for the new user account.

- Click OK to create the user in the selected OU.

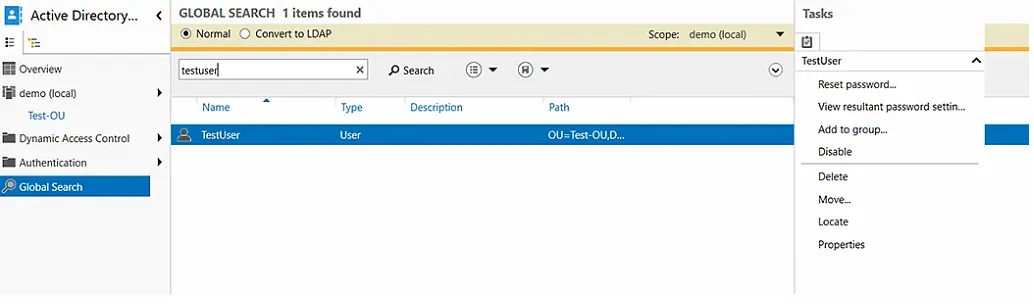
Reset a User’s Password
You can use ADAC to quickly reset a user’s password:
- In the left panel, select Global Search.
- Type the name of the user in the search bar. And in the Task panel on the right, select Reset password.

- Enter a new password that meets the requirements of your domain and check the User must change password at next log on checkbox.
- Click OK.
Enable the Recycle Bin to Quickly Restore Deleted AD Objects
If you accidentally delete an object from your directory, you can restore it — provided you have enabled the Recycle Bin feature. Here is how you can enable the Recycle Bin feature in ADAC:
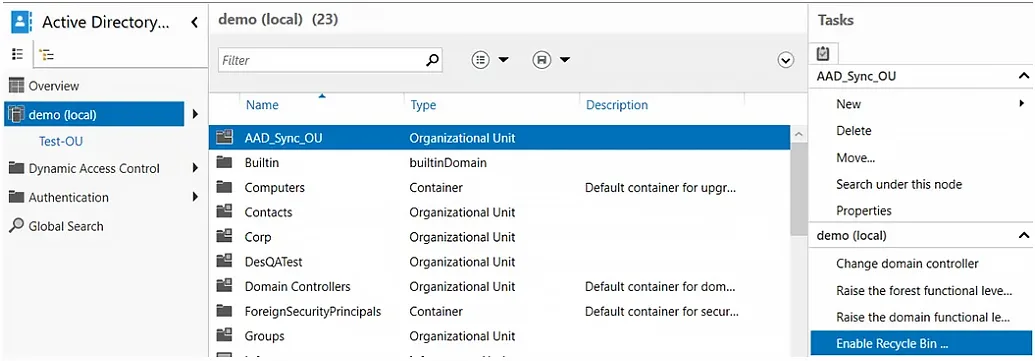
- In the left panel, select the domain for which you want to enable the Recycle Bin.
- In the Task panel on the right, select the Enable Recycle Bin option.

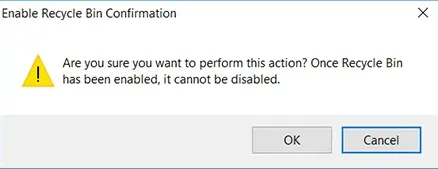
- When you are prompted to confirm your action, click OK.

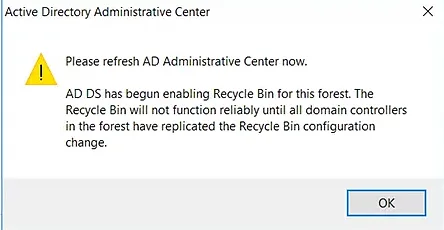
- ADAC will ask you to refresh the console. Click OK again.

- Press the F5 key to refresh ADAC. You will notice that the Enable Recycle Bin option is now grayed out, which means that the feature is enabled for the domain.
Delete a User from the Directory
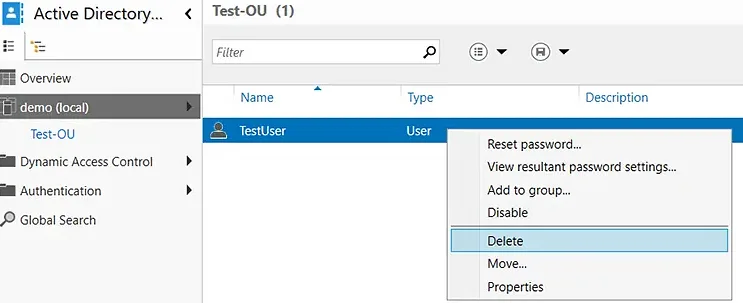
- Navigate to the desired domain and select the OU from which you want to delete a user.
- Right-click the desired user and select Delete.

- You will be prompted with a confirmation message. Click Yes.
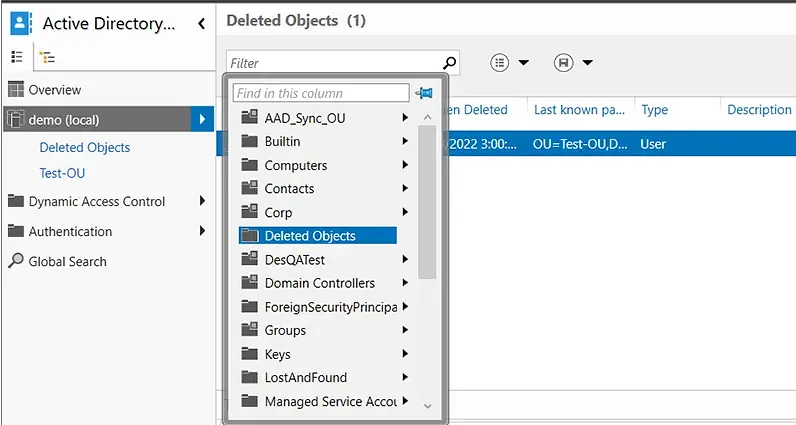
Restore a Deleted AD Object
- In the left panel, click the arrow to the right of the user’s domain and select the Deleted Objects container.

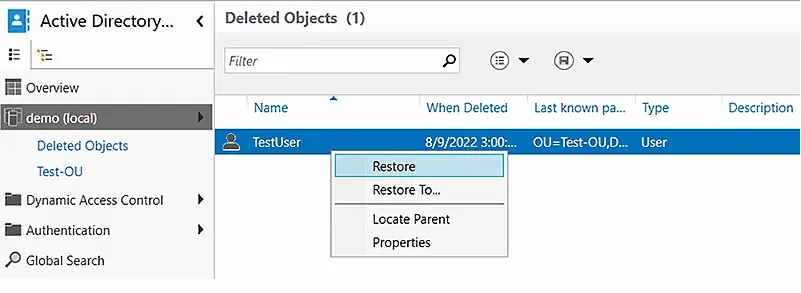
- Right-click the AD object you want to recover. To add the object to its original OU, select the Restore option. To restore it to a different OU, select the Restore To option and choose the desired container.

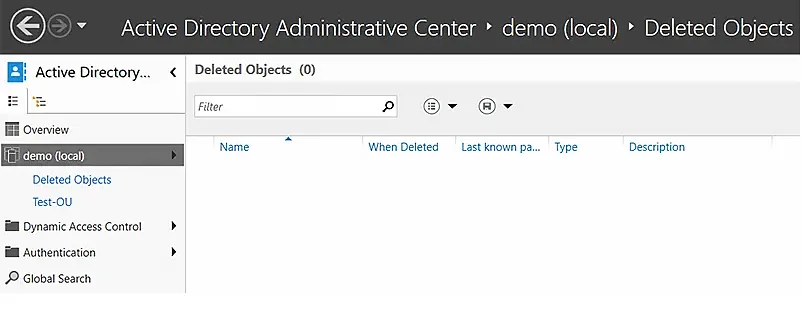
- Verify that the object has disappeared from the Deleted Objects container.

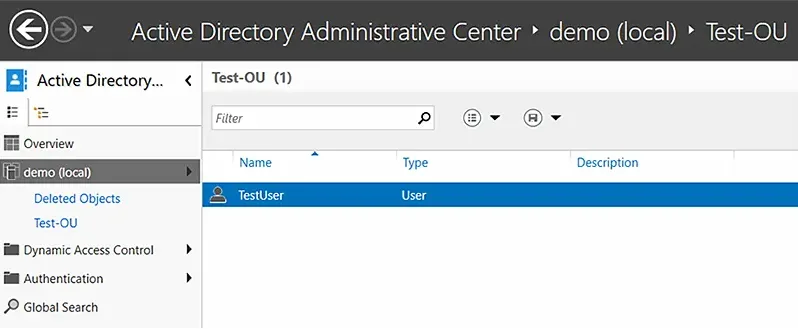
- Go to the OU where you restored the object and verify that it is there.

View Powershell History
The PowerShell history in ADAC is useful in multiple ways:
- Auditing and tracking — You can see all the changes that were made to the directory.
- Remediation — If an unauthorized modification was made, you can reverse it.
- Training and script creation — You can see the PowerShell cmdlets for all actions, which can help you build scripts to automate repetitive tasks and increase IT productivity.
To view the PowerShell history in ADAC:
Improving Active Directory Management with Netwrix Directory Manager
While ADAC offers some valuable functionality, many organizations prefer a comprehensive AD management tool: Netwrix Directory Manager. This easy-to-use solution enables you to perform all the tasks that you can with ADAC — and much more.
Here are some of the key capabilities you get with Netwrix Directory Manager:
- Seamless user provisioning and deprovisioning
- Powerful group management
- Restoration of deleted groups
- Simplified password management
- Controlled delegation
- Thorough reporting
Seamless User Provisioning and Deprovisioning
Keep your directory up to date by syncing it with data from an Excel file, HR database or other authoritative source. Netwrix Directory Manager reads new user records from the source and automatically creates user accounts in your Active Directory.
This feature makes user provisioning and deprovisioning extremely easy and reliable. New recruits are onboarded quickly and parting employees are offboarded promptly, revoking their access.
- Thorough reporting
Powerful Group Management
Netwrix Directory Manager enables you to manage your AD groups dynamically. Simply create a query for a group and it will be used to assess group membership. This enhances security with up-to-date group memberships.
Netwrix Directory Manager also manages the group lifecycle: Groups remain active for a specified period and owners are notified before a group will expire. If the owner does not renew the group, Netwrix Directory Manager automatically expires it and then deletes it.
Restoration of Deleted Groups
Netwrix Directory Manager enables administrators to restore deleted groups, which reinstates all group attributes, memberships and permissions. Groups are also restored to their original container.
Simplified Password Management
Netwrix Directory Manager empowers business users to do the following on their own:
- Reset their domain account passwords
- Change their passwords
- Unlock their accounts
Users can perform these operations after completing multifactor authentication (MFA).
Helpdesk teams can also reset passwords and unlock accounts for users. They also have access to dashboards and live updates to audit and examine the tasks carried out by business users.
Controlled Delegation
Netwrix Directory Manager enables administrators to delegate certain directory administration tasks to business users. Users can manage their profiles, accounts, groups, workflows and much more.
Thorough Reporting
Active Directory does not come with any reporting tools, so administrators are forced to scroll through the Global Address List (GAL) manually to look for records.
Netwrix Directory Manager offers hundreds of insightful reports on Active Directory users, computers, groups, and contacts, such as:
- Groups and their last modified time
- Groups without members
- Groups without owners
- Users and the objects they own
- Disabled users
- Users without managers
- Users who have never logged on
- Computers that have never logged on to the network
- Disabled computers and their operating systems
Since 2012, Jonathan Blackwell, an engineer and innovator, has provided engineering leadership that has put Netwrix GroupID at the forefront of group and user management for Active Directory and Azure AD environments. His experience in development, marketing, and sales allows Jonathan to fully understand the Identity market and how buyers think.