
HDMI, short for High-Definition Multimedia Interface, facilitates the seamless transmission of uncompressed audio and video data from a computer to external devices like TVs or monitors. It ensures consistent audio and video quality when connecting your PC to other devices.
However, HDMI might sometimes allow you to transfer a video but not its audio, which can be frustrating since you’ll just be forced to watch the video from your PC. If you are experiencing the same problem, then this article is for you. In this post, we will show you what to do about HDMI audio device not detecting in Windows 10/11.
Why Is the HDMI Audio Device Not Detecting in Windows 10/11?
You may experience the audio device not connected issue if:
- Your HDMI cable is faulty.
- You have connected the HDMI cable to the wrong port.
So, make sure you first verify these facts before trying other fixes. If everything is correctly set up, then you can now apply some troubleshooting methods.
How to Fix HDMI Audio Device Not Detecting in Windows 10/11
Below are several hacks you can try to help solve the audio problem. Ensure you follow them in order for better results.
Method 1: Reconnect Your TV or Monitor
As you may have witnessed before, reconnecting most devices, not just TVs and monitors, helps you resolve many issues. So, you could try unplugging the HDMI cable from both devices, and then plugging it back in and see if that helps.
If your TV or monitor has two HDMI ports, try connecting via the second one.
Method 2: Adjust the Monitor or TV Sound Settings
The volume might be low or even muted on your TV or monitor, making it impossible to hear anything from the video. Use the TV remote to increase the volume and see if that works. For the monitor, press the volume buttons either on the side or bottom, depending on its make. You could also check if you have muted your computer’s audio.
Method 3: Use the Windows Audio Troubleshooter
This tool allows you to check if your PC has issues that might be causing the audio not to be detected on your TV or monitor. Follow these steps to use the Windows Audio Troubleshooter tool on your Windows PC:
- Press the Windows + I shortcut keys to launch the Settings app.
- Go to Update & Security.
- Choose Troubleshoot on the left menu pane.
- Under the Recommended troubleshooting section on the right pane, select Additional troubleshooters.
- Choose Playing Audio, and then click the Run the troubleshooter button.
- Apply the indicated suggestions, if any.
Method 4: Set HDMI as the Default Audio Device
If you have set the computer speakers as the default audio device, you won’t get any audio on your TV or monitor. Here is how to change this setting to HDMI:
- Right-click on the sound icon in the bottom right corner of your desktop and choose Sounds.
- Switch to the Playback tab, and then click on Digital Output Service or HDMI.
- Choose Set Default on the dropdown list at the bottom, and then click OK.
If you don’t see the HDMI option, right-click on the empty space on the Playback tab and select Show disconnected devices. Right-click again and choose Show disabled devices. You can now follow the above steps to set HDMI as the default audio device.
Method 5: Restart the Windows Audio Service
Some users say that restarting the Windows audio service enabled them to solve the audio problem in Windows 10/11. These steps will guide you through doing the same:
- Use the Win + R combination to open the Run dialog box and type in “services.msc” (without quotes).
- Then click OK.
- On the next screen, scroll down the services list and right-click on Windows Audio. Then choose Restart.
- Repeat step 3 for Windows Audio Endpoint Builder.
Method 6: Update Your Audio Driver
If your audio driver is damaged or corrupted, you may experience the HDMI no sound issue. You can update the audio driver by following this simple guide:
- Press the Windows key, and then type in “device manager” (no quotes).
- Choose Open on the right menu pane.
- Double-click Sound, video, and game controllers to display the audio driver.
- Right-click on the driver, and then select Update driver.
- Click Search automatically for drivers.
- Restart your Windows PC after installing the updated driver.
The above method is quite simple, but you would be forced to always repeat it whenever you need to update any device driver, which can be exhausting. To avoid that, you could use a professional driver updater like Outbyte Driver Updater.
This unique tool scans your computer for missing, outdated, and corrupted drivers and automatically updates them. Outbyte Driver Updater is also user-friendly and only installs manufacturer-recommended drivers on your machine. So, you will never face compatibility issues after using this app. If this sounds like a useful tool that you’d want to install on your computer, then visit the Outbyte website and download it.
Conclusion
The above methods should help you remove the HDMI audio device not detected in Windows 10/11 issue. Which of the discussed workarounds worked for you? Please tell us in the comments section below. Also, consider checking out our blog for more useful Windows 10/11 guides such as this one.
Give us some love and rate our post!
Одна из проблем, с которой можно столкнуться, подключая ноутбук к ТВ по кабелю HDMI — отсутствие звука на телевизоре (т.е. он воспроизводится на ноутбуке или колонках компьютера, но не на ТВ). Обычно такая проблема легко решается и далее в инструкции — возможные причины того, что по HDMI нет звука и способы их устранения в Windows 10, 8 (8.1) и Windows 7. См. также: Как подключить ноутбук к телевизору, Плохое качество изображения по HDMI.
Примечание: в некоторых случаях (причем не очень редко) все далее описанные шаги по решению проблемы оказываются не нужны, а все дело в убавленном до нуля звуке (в плеере в ОС или на самом телевизоре) или случайно нажатой (возможно, ребенком) кнопкой Mute на пульте ТВ или ресивера, если он используется. Проверьте эти моменты, особенно если еще вчера всё работало исправно. Если при диагностике аудио устройства HDMI вы видите сообщение, что это устройство уже используется другим приложением, отдельное руководство по этой проблеме здесь: Это устройство уже используется другим приложением при выводе звука по HDMI.
Настройка устройств воспроизведения Windows
Обычно, когда в Windows 10, 8 или Windows 7 вы подключаете телевизор или отдельный монитор по HDMI к ноутбуку, звук автоматически начинает воспроизводиться на нем. Однако, бывают исключения, когда устройство воспроизведения не изменяется автоматически и остается прежним. Тут стоит попробовать проверить, имеется ли возможность вручную выбрать, на чем будет проигрываться аудио.
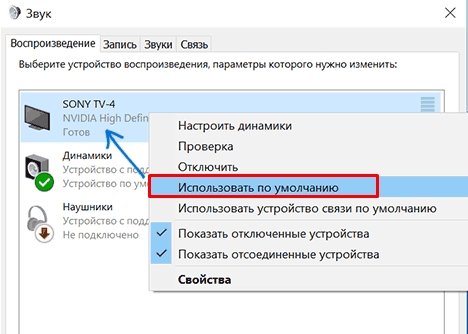
- Нажмите правой кнопкой мыши по значку динамика в области уведомлений Windows (справа внизу) и выберите пункт «Устройства воспроизведения». В Windows 10 1903, 1809 и 1803 чтобы попасть в устройства воспроизведения в меню выберите пункт «Открыть параметры звука», а в следующем окне — «Панель управления звуком», либо через Панель управления — Звук.
- Обратите внимание на то, какое из устройств выбрано в качестве устройства по умолчанию. Если это Динамики или наушники, но в списке также присутствуют NVIDIA High Definition Audio, AMD (ATI) High Definition Audio или какие-то устройства с текстом HDMI, нажмите по нему правой кнопкой мыши и выберите пункт «Использовать по умолчанию» (делайте это, когда телевизор уже подключен по HDMI).

- Примените сделанные настройки.
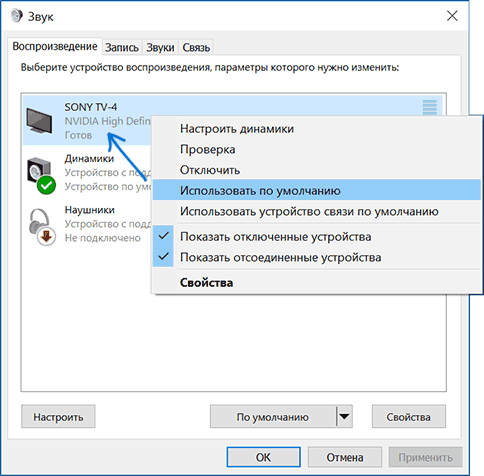
Вероятнее всего, этих трех шагов будет достаточно, чтобы решить проблему. Однако, может оказаться, что в списке устройств воспроизведения нет ничего похожего на HDMI Audio (даже если нажать правой кнопкой мыши по пустому месту списка и включить отображение скрытых и отключенных устройств), тогда, возможно, помогут следующие варианты решения проблемы.
Установка драйверов для HDMI аудио
Возможен вариант, что у вас не установлены драйверы для вывода аудио по HDMI, хотя драйверы видеокарты установлены (такое может быть, если при установке драйверов вы вручную задавали какие именно компоненты нужно установить).
Чтобы проверить, ваш ли это случай, зайдите в диспетчер устройств Windows (во всех версиях ОС для этого можно нажать клавиши Win+R на клавиатуре и ввести devmgmt.msc, а в Windows 10 также из меню правого клика по кнопке «Пуск») и откройте раздел «Звуковые, игровые и видеоустройства». Дальнейшие шаги:
- На всякий случай в диспетчере устройств включите показ скрытых устройств (в пункте меню «Вид»).
- Обратите внимание в первую очередь на количество звуковых устройств: если это единственная аудио-карта, то, судя по всему, драйверы на звук по HDMI действительно не установлены (об этом далее). Также возможен вариант, что устройство HDMI (обычно имеет в названии эти буквы, либо производителя чипа видеокарты) есть, но отключено. В этом случае, нажмите по нему правой кнопкой мыши и выберите пункт «Задействовать».

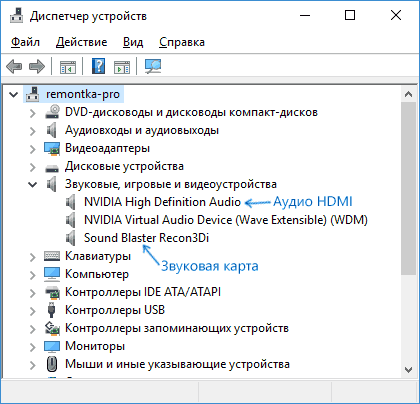
В случае, если в списке только ваша звуковая карта, то путь решения проблемы будет следующим:
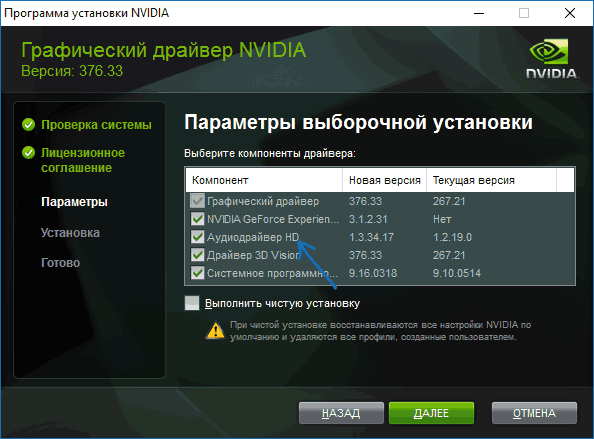
- Загрузите драйверы для вашей видеокарты с официального сайта AMD, NVIDIA или Intel, в зависимости от самой видеокарты.
- Установите их, при этом, если вы используете ручную настройку параметров установки, обратите пристальное внимание на то, что драйвер звука по HDMI отмечен и устанавливается. Например, для видеокарт NVIDIA он носит название «Аудиодрайвер HD».

- По завершении установки перезагрузите компьютер.
Примечание: если по той или иной причине драйверы не устанавливаются, возможно, дело в каком-то сбое текущих драйверов (и проблема со звуком объясняется тем же самым). В этой ситуации можно попробовать полностью удалить драйверы видеокарты, а затем установить их заново.
Если звук с ноутбука по HDMI все также не воспроизводится на телевизоре
Если оба способа не помогли, при этом в устройствах воспроизведения точно выставлен нужный пункт, рекомендую обратить внимание на:
- Еще раз — проверьте настройки ТВ.
- Если есть такая возможность, попробуйте другой кабель HDMI, или проверить, будет ли передаваться звук по этому же кабелю, но с другого устройства, а не с текущего ноутбука или компьютера.
- В том случае, если для подключения по HDMI используется переходник или адаптер на HDMI, звук может и не получиться заставить работать. Если используется VGA или DVI на HDMI, то точно нет. Если DisplayPort — HDMI, то должно работать, но на некоторых адаптерах по факту звука нет.
Надеюсь, вам удалось решить проблему, если же нет — опишите подробно, что и как происходит на ноутбуке или компьютере при попытке выполнить шаги из руководства. Возможно, мне удастся вам помочь.
Дополнительная информация
Программное обеспечение, поставляемое с драйверами видеокарт, также может иметь собственные настройки вывода звука по HDMI для поддерживаемых дисплеев.
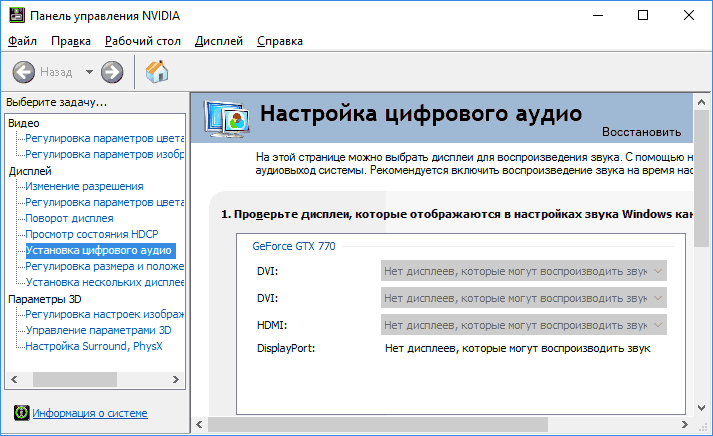
И хотя это редко помогает, загляните в настройки «Панель управления NVIDIA» (пункт находится в панели управления Windows), AMD Catalyst или Intel HD Graphics.
Всем привет! Сегодня столкнулся с одной проблемой, а точнее ошибкой: «цифровое аудио AMD HDMI Output – не подключено!». В общем думал и гадал я – что же делать, но все же у меня получилось эту проблему решить. И сегодня в статье я поведу, некоторые советы и действия, которые нужно сделать. Сначала, я расскажу, почему эта ошибка возникает.
AMD HDMI Output – это по сути аудио выход на HDMI кабеле и возникает ошибка чаще всего, при подключении ноутбука или компьютера к другому внешнему устройству. У меня она возникла при подключении телевизора. При этом изображение было, но вот звука нет. Иногда даже бывает, что ошибка вообще не отображается, а звукового сопровождения так и нет. Тогда проверьте, чтобы на ноуте или компе звук был не на нуле, то есть бегунок переведите в самый верх.
Также посмотрите, чтобы напротив динамика не было крестика. Если это не помогло, то идем дальше. Далее я буду рассказывать все возможные варианты решения. Если в процессе возникнут какие-то сложности, а быть может непредвиденные ошибки – то сразу же пишем в комментарии.
Содержание
- Звук по умолчанию
- Проблема с драйверами
- Способ установки драйверов по ID
- Второй способ установки драйвера
- Звука все равно нет
- Задать вопрос автору статьи
Звук по умолчанию
При подключении телевизора или другого устройства, компьютер должен автоматически переключить вывод звука на другое устройства. Но бывают сбои, когда это нужно сделать вручную.
- Найдите значок динамике в правом нижнем углу. Если он скрыт, то нажмите на стрелочку, которая указывает вверх. Далее щелкаем правой кнопкой и выбираем «Устройства» воспроизведения;
- Теперь найдите подключение. Иногда оно может иметь имя телевизора, или просто «HDMI» по каким-то номером. Но подключение будет активное, нажимаем также правой кнопкой и выбираем «Использовать по умолчанию».
- Не забываем нажать «ОК» и «Применить», если это кнопка есть.
Если вы вообще не видите, другого подключения, то возможно есть проблемы с драйверами или в конфликте программ. Идём к следующей главе.
Проблема с драйверами
Есть вероятность, что драйвера поломаны или вообще не установлены. Дело в том, что вместе с «дровами» на видео карту, также устанавливаются драйвера на тот самый «AMD HDMI Output», о котором мы говорили ранее. Именно поэтому вы и не можете вывести звук.
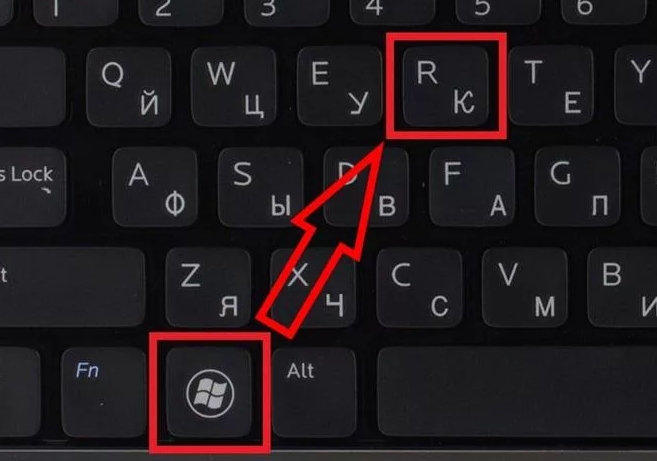
- Для начала давайте зайдем в диспетчер устройств и посмотрим, на не установленные драйвера. Нажмите одновременно на две клавиши и R.
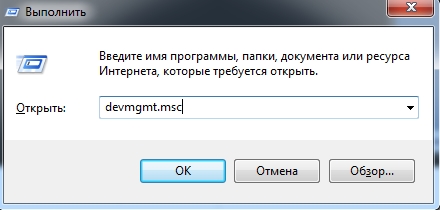
- Прописываем команду: «devmgmt.msc».
- Давайте на всякий случай нажмем «Вид» и «Показать скрытые устройства», чтобы мы увидели все.
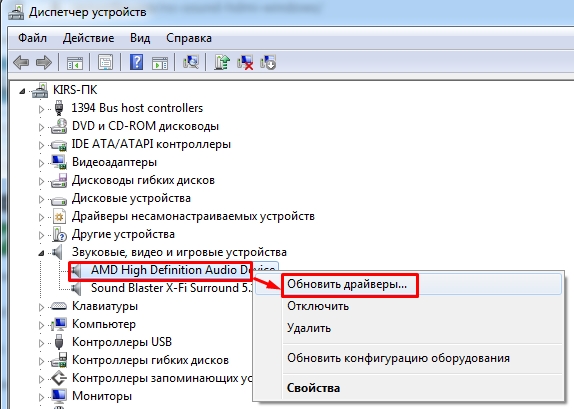
- Устройство должно быть в разделе «Звуковые, видео и игровые устройства» со значком динамика. У меня это «AMD High Definition Audio Device». В общем там должно быть хотя бы два слова «AMD» и «Audio» — значит это оно.
- Если оно у вас есть, то нажимаем правой кнопкой и выбираем «Обновить драйверы».
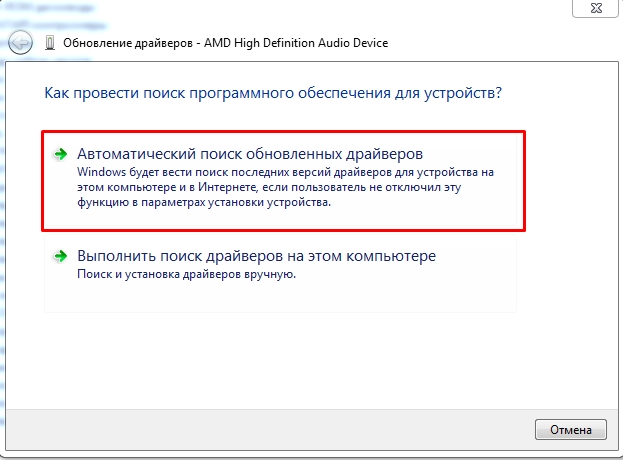
- Далее выбираем первый пункт, автоматического поиска и скачивания драйверов. Также убедитесь, что вы подключены к интернету. Если драйвера установились, пробуем подключить телевизор или что-то другое. Если у вас вылезло, окошко, что якобы драйвера не нуждаются в обновлении, не спешите радоваться, просто их на серверах Microsoft попросту нет, но их нужно установить.
Способ установки драйверов по ID

Если такого устройства нет, то зайдите в раздел «Другие устройства» и посмотрите, нет ли там каких-то аппаратов. В общем надо найти наш «AMD Audio», нажать правой кнопкой и зайти в «Свойства», а далее во вкладку «Сведения».
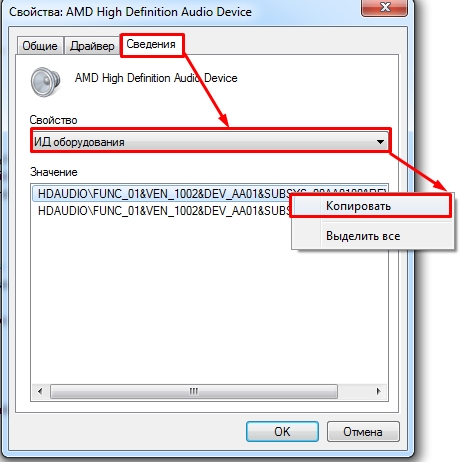
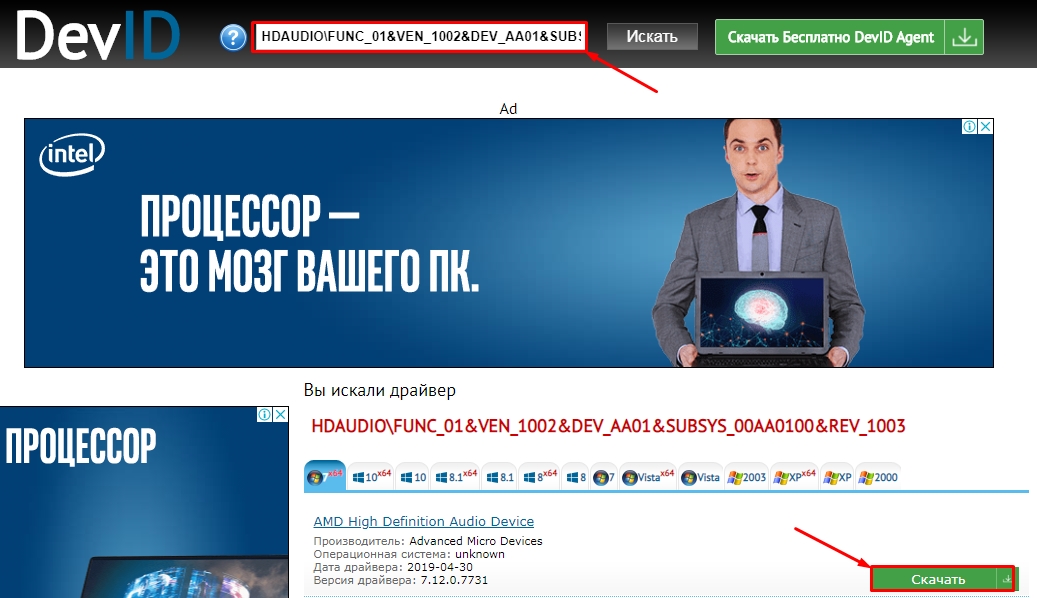
В «Свойствах» установите «ИД оборудования». Скопируйте верхнюю строчку. Далее переходим на сайт – devid.info. Вставляем в верхнюю строчку наш скопированный ID и нажимаем «Искать». Далее скачиваем подходящий драйвер и устанавливаем его на комп.
Второй способ установки драйвера
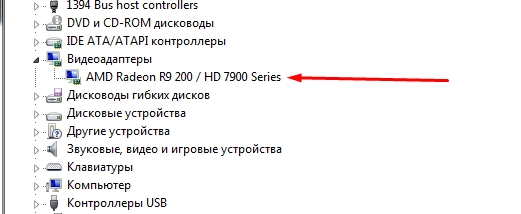
Этот способ самый надежный, так как мы будем скачивать дрова с официального сайта, производителя вашей карточки. Если вы знаете, название вашей видеокарты, отлично. Если вы не знаете полное название, то заходим там же в диспетчере устройств в раздел «Видеоадаптеры» и смотрим название.
- Теперь переходим на сайт https://www.amd.com/ru/support.
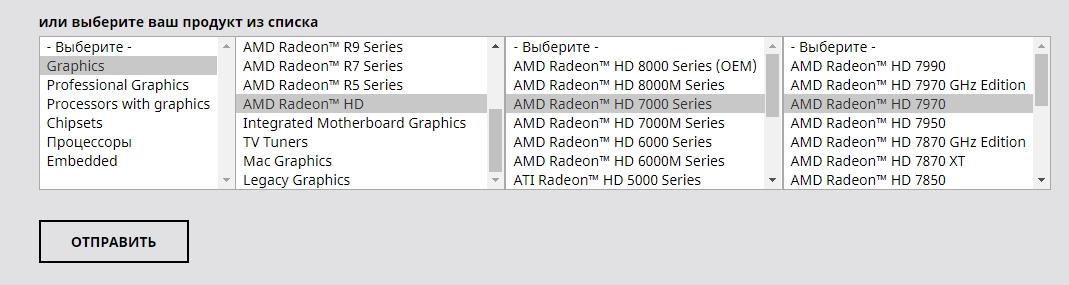
- Теперь сначала выбираем устройство «Graphics». Далее разновидность. Потом серию и номер. В самом конце нажимаем «Отправить».

- Теперь осталось выбрать свою операционную систему и нажать «Скачать». Если у вас будет там же «Auto-Detect and Install», то лучше скачайте его.
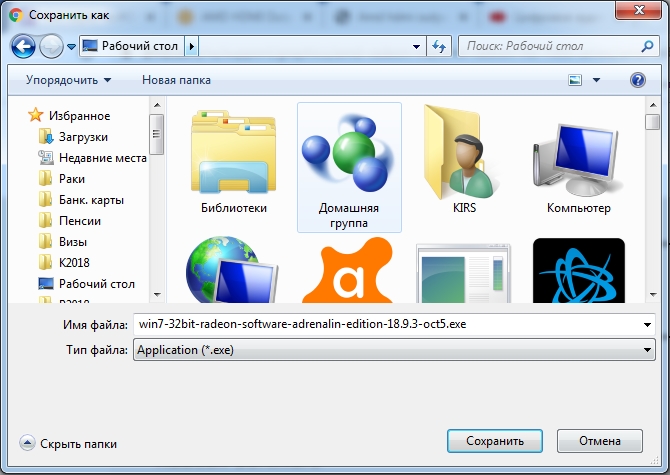
- Скачиваем «exe» файл в любое место – я скачал на рабочий стол. Далее запускаем его и ждем, когда установка закончится. Чтобы установка началась, нажмите «install». Если вы скачали «Auto-Detect and Install», то после запуска выберите «установить рекомендованный драйвер».
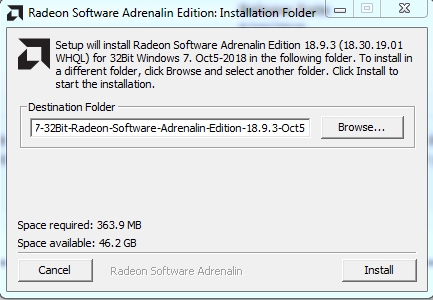
- После этого не забудьте перезагрузить компьютер.
Звука все равно нет
И так, возможно нужно изменить настройки AMD Catalyst Control Center – это программка, которая автоматически устанавливается с драйвером. Чтобы её открыть, нажмите правой кнопочкой на любое место на рабочем столе.
Далее слева в меню выбираем «Звук» – «Аудиоустройство по умолчанию».
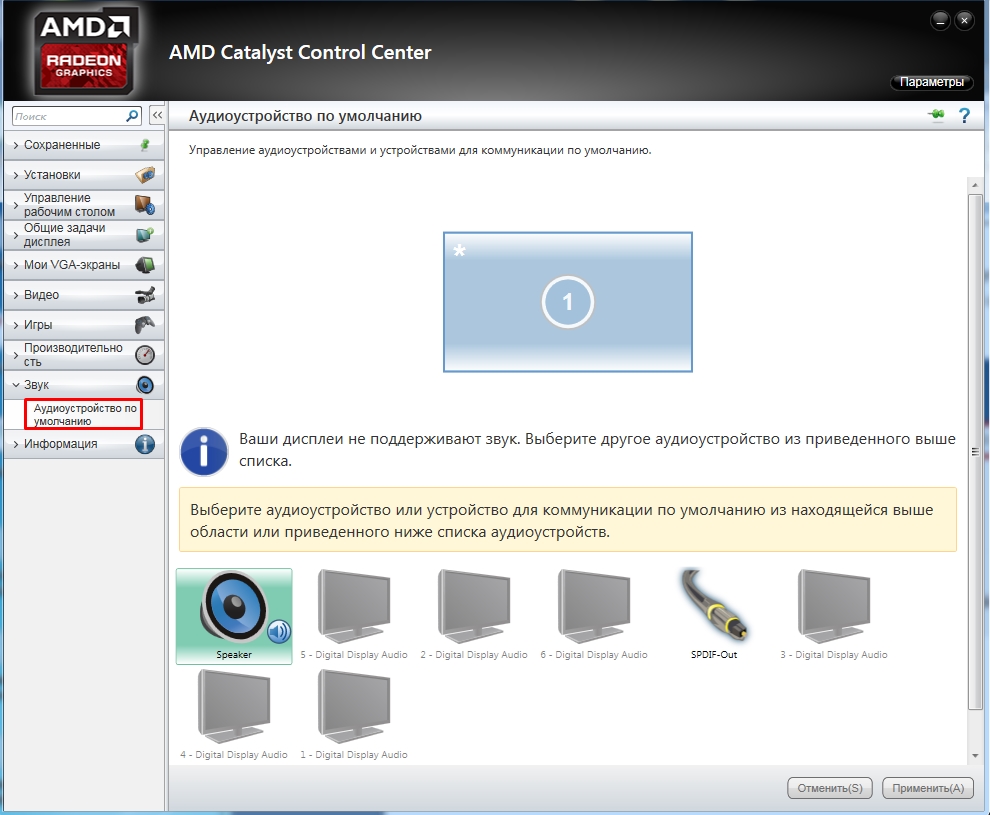
Теперь нужно выбрать наш телевизор и далее нажать «Применить». Если будет также отображаться данная ошибка, то проверьте, чтобы кабель плотно сидел в порту и не болтался. Ещё один момент – убедитесь, что вы подключили в нужный HDMI вход, который имеет значение «IN» или «PC». Можете просто попробовать все возможные HDMI порты на телевизоре и на видеокарте.
If you’re facing “HDMI No Sound in Windows 10” issue then don’t worry as today we are going to see a way to fix this issue. HDMI (High Definition Multimedia Interface) is a connector cable that helps transmit uncompressed video data and compressed or uncompressed digital audio between devices. HDMI replaces the old analogue video standards, and with HDMI, you get clear and sharper images.

There are several causes because HDMI Sound might not be working, such as outdated or corrupted sound drivers, damaged HDMI cable, no proper connection with the device, etc. So before moving forward, first check if the cable is working properly by connecting it to another device or PC. If the cable works, then you can follow the below guide. So without wasting any time let’s see How to Fix HDMI Sound Not Working in Windows 10 with the help of the below-listed tutorial.
Table of Contents
Make sure to create a restore point just in case something goes wrong.
Method 1: Set HDMI the default playback device
1. Right-click on Volume icon from the taskbar and select Sounds.
2. Make sure to switch to Playback tab then right-click on HDMI or Digital Output Device option and click on “Set as Default“.

3. Click Apply, followed by OK.

4. Reboot your PC to save changes.
Note: If you do not see HDMI option in the Playback tab then right-click in an empty area inside the playback tab then click on Show disconnected devices and Show disabled devices to checkmark it. This will show you HDMI or Digital Output Device option, right-click on it and select Enable. Then again right-click on it and select Set as default.
Method 2: Update your Sound Drivers
1. Press Windows Key + R then type devmgmt.msc and hit Enter to open Device Manager.

2. Expand Sound, video and game controllers and then right-click on “Realtek High Definition Audio” & select Update driver.

3. On the next window, click on “Search automatically for updated driver software“.

4. If you already have the updated driver, you will see the message “The best drivers for your device are already installed“.

5. If you don’t have the latest drivers, then Windows will automatically update Realtek Audio drivers to the latest update available.
6.Once finished, reboot your PC to save changes.
If you’re still facing the HDMI Sound Not Working Issue, then you need to update the drivers manually, follow this guide.
1. Again open Device Manager then right-click on Realtek High Definition Audio & select Update driver.
2. This time, click on ” Browse my computer for driver software.”

3. Next, select “Let me pick from a list of available drivers on my computer.”

4. Select the appropriate driver from the list and click Next.

5. Let the driver installation complete and then restart your PC.
Method 3: Enable Audio Controllers
1. Press Windows Key + R then type devmgmt.msc and hit Enter to open Device Manager.
2. Click on View from the device manager menu then select “Show hidden devices“.
3. Now Expand “System Devices” and find Audio Controller such as “High Definition Audio Controller“.
4. Right-click on High Definition Audio Controller then selects Enable.

Important: If above doesn’t work then right-click on High Definition Audio Controller then select Properties. Now under General tab click “Enable Device” button at the bottom.

Note: If the Enable button is greyed or don’t see the option, your Audio Controller is already enabled.
5. If you have more than one Audio Controller, you need to follow the above steps to Enable each of them separately.
6. Once finished, reboot your PC to save changes and see if you’re able to Fix HDMI Sound Not Working in Windows 10.
Method 4: Update Graphic Card Drivers
1. Press Windows Key + R then type devmgmt.msc and hit enter to open Device Manager.
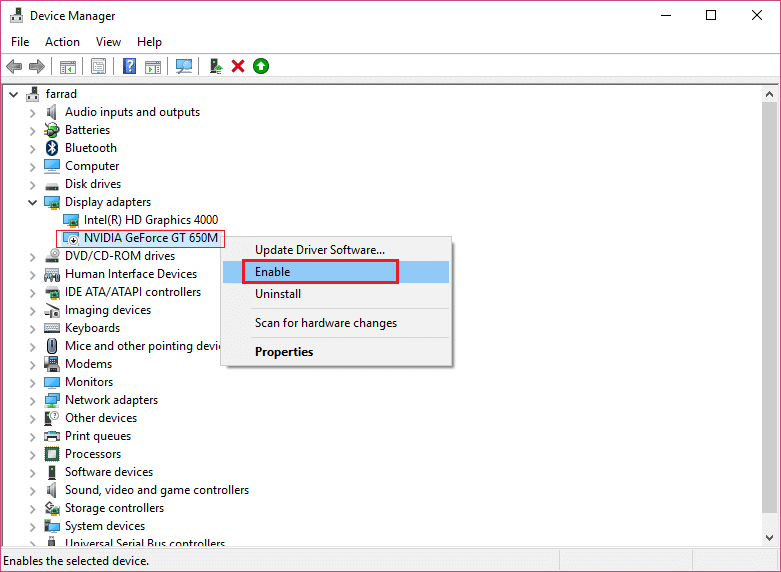
2. Next, expand Display adapters and right-click on your Graphics Card and select Enable.
3. Once you have done this again right-click on your graphics card and select “Update Driver“.
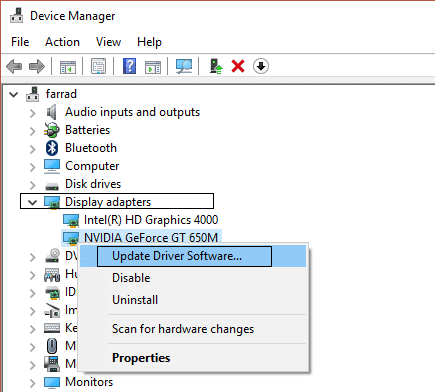
4. Select “Search automatically for updated driver software” and let it finish the process.
5. If the above steps helped fix the issue, then very good, if not then continue.
6. Again right-click on your graphics card and select “Update Driver” but this time on the next screen select “Browse my computer for driver software.”
7. Now select “Let me pick from a list of available drivers on my computer.”
8. Finally, select the latest driver from the list and click Next.
9. Let the above process finish and restart your PC to save changes.
Method 5: Rollback Graphic Drivers
1. Press Windows Key + R then type devmgmt.msc and hit Enter to open Device Manager.
2. Expand Display Adapter then right-click on your graphics card and select Properties.
3. Switch to Driver tab then click “Roll Back Driver“.
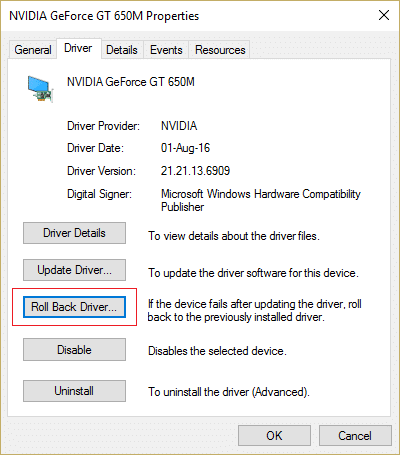
4. You will get a warning message, click Yes to continue.
5. Once your graphics driver is rolled back, reboot your PC to save changes.
If you’re able to Fix HDMI Sound Not Working in Windows 10 Issue, if not then continue with the next method.
Method 6: Uninstall Graphic and Audio Drivers
1. Press Windows Key + R then type devmgmt.msc and hit Enter to open Device Manager.
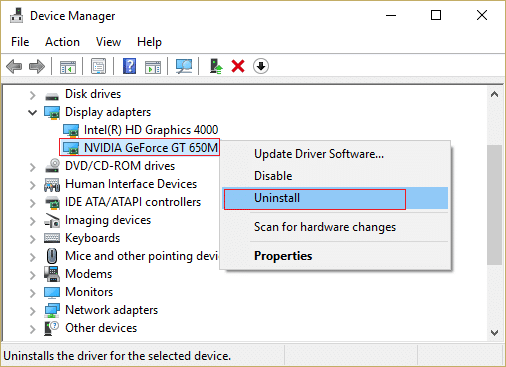
2. Expand Display Adapter then right-click on your graphics card and select Uninstall.
3. Click Yes to continue with the uninstallation.
4. Similarly, expand “Sound, video and game controller” then right-click on your Audio device such as “High Definition Audio Device” and select Uninstall.

5. Again click OK to confirm your actions.
6. Once finished, reboot your PC to save changes.
Recommended:
- 5 Ways to Fix No Sound on YouTube
- Youtube Not Working Issue on Chrome [SOLVED]
- Fix YouTube Running Slow On Your PC
- How to Reinstall Realtek HD Audio Manager [GUIDE]
That’s it you have successfully Fix HDMI Sound Not Working in Windows 10 but if you still have any questions regarding this tutorial then feel free to ask them in the comment’s section.
If you get HDMI no sound error in Windows 10, don’t worry. You’re not alone. Many Windows users have reported this issue. You can fix the error with one of the solutions below. You may not have to try them all. Just work your way down at the top of the list until you find the one that works for you.
Try these fixes, one at a time:
- Check if all hardware devices work properly
- Set HDMI Device as Default Device
- Update the Sound Driver
- Switch to ChromeOS
Solution 1: Check if all hardware devices work properly
Broken hardware devices probably cause HDMI not to work. So before moving on to other solutions, check if all hardware devices work properly:
1. Check if the cable has any problem. Use another HDMI cable to see if the problem resolves.
2. Check if the output port works fine. If your PC has multiple HDMI output ports, try different ports and see if the problem resolves.
3. Check if the monitor works properly. Make sure the monitor’s speaker volume is not turned down or muted. Then try connecting the monitor to another PC.
Solution 2: Set HDMI Device as Default Device
If the HDMI device is not set as default device, you cannot hear the sound from HDMI output. Follow steps below to set the HDMI device as Default Device:
- Right-click on the sound volume icon in the lower right corner of Windows. A context menu will pop up. Click Playback devices.
- In the Playback tab, select Digital Output Device or HDMI option. Click Set Default and click OK. Then the HDMI sound output will be set as default.
If you do not see the Digital Output Device or HDMI option in the Playback tab, right-click on the blank place, then click Show disconnected devices and Show disabled devices on the context menu. Then set it as the default device.
Solution 3: Update the Sound Driver
Your HDMI no sound problem can be caused by corrupt or missing audio driver issues. To fix the problem, you can try to update the sound driver.
There are two ways you can get the right drivers for your sound card: manually or automatically.
Manual driver update – You can update your sound drivers manually by going to the manufacturer’s website for your sound card, and searching for the most recent correct sound driver. Be sure to choose only drivers that are compatible with your variant of Windows 10.
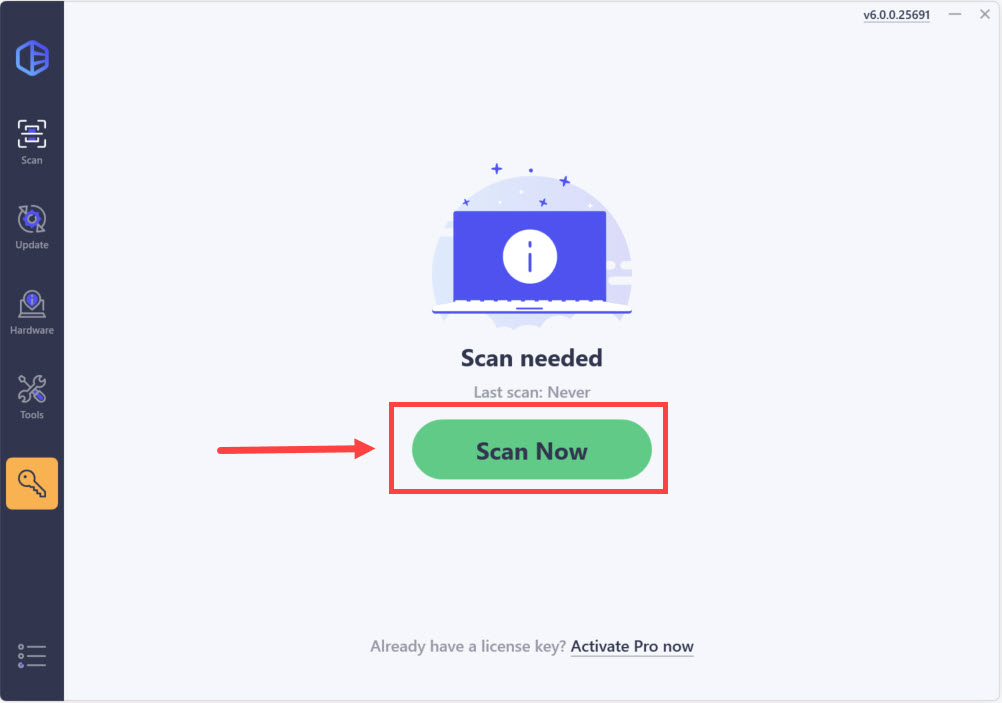
Automatic driver update – If you don’t have the time, patience or computer skills to update your audio drivers manually, you can, instead, do it automatically with Driver Easy. Driver Easy will automatically recognize your system and find the correct drivers for your sound card, and your variant of Windows 10, and it will download and install them correctly:
- Download and install Driver Easy.
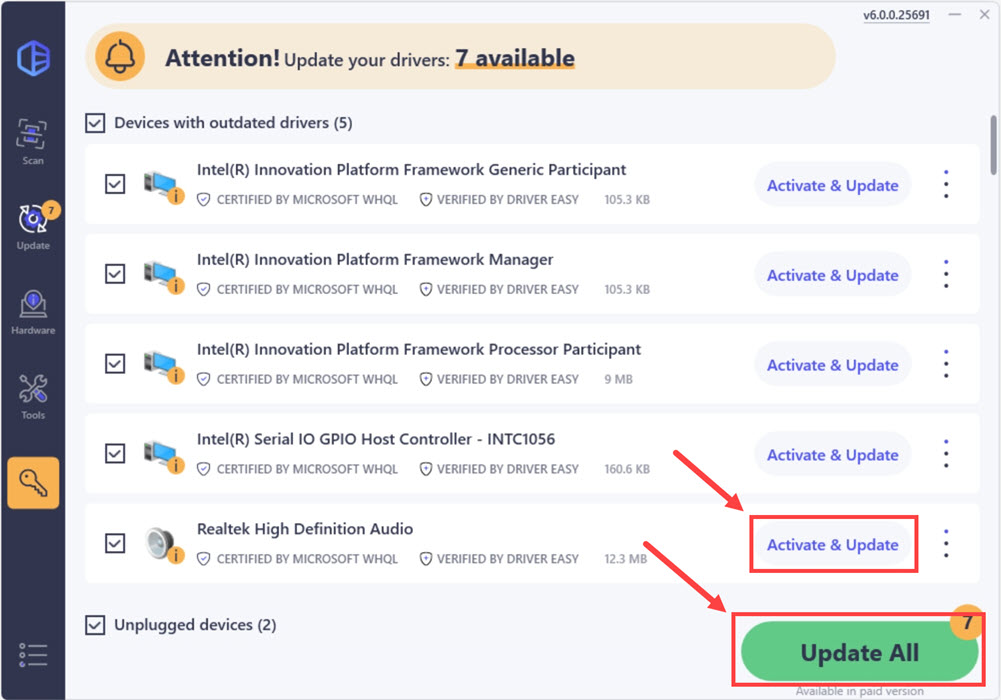
- Run Driver Easy and click the Scan Now button. Driver Easy will then scan your computer and detect any problem drivers.

- Click Update All to automatically download and install the correct version of all the drivers that are missing or out of date on your system.
(This requires the Pro version which comes with full support and a 30-day money-back guarantee. You’ll be prompted to upgrade when you click Update All. If you’re not ready to buy the Pro version, Driver Easy offers a 7-day free trial which includes access to all the Pro features such as high-speed download and one-click install. You won’t be charged anything until your 7-day trial has ended.)

- Restart your computer for the changes to take effect.
If you need assistance, please contact Driver Easy’s support team at support@drivereasy.com.
Solution 4: Switch to ChromeOS
Windows is a very old technology. Sure, Windows 10 is relatively new, but it’s still just the latest iteration of a decades-old operating system, designed for a bygone era (pre-internet).
Now that we have the internet, fast connection speeds, free cloud storage, and endless web apps (like Gmail, Google Docs, Slack, Facebook, Dropbox and Spotify), the entire Windows way of doing things – with locally installed programs and local file storage – is totally outdated.
Why is that a problem? Because when you’re constantly installing uncontrolled third-party programs, you’re constantly opening the door to viruses and other malware. (And Windows’ insecure permission system compounds this problem.)
Plus the way Windows manages installed software and hardware has always been a problem. If your computer shuts down unexpectedly, or a program installs, uninstalls or updates incorrectly, you can get ‘registry’ corruptions. That’s why Windows PCs always slow down and become unstable over time.
Also because everything’s installed and saved locally, it doesn’t take long before you run out of disk space, and your disk gets fragmented, which makes everything even slower and more unstable.
For most people, the simplest way to solve Windows problems is to ditch Windows altogether, and switch to a faster, more reliable, more secure, easier to use and cheaper operating system…
Google ChromeOS.
ChromeOS feels much like Windows, but instead of installing heaps of programs to email, chat, browse the internet, write documents, do school presentations, create spreadsheets, and whatever else you normally do on a computer, you use web apps. You don’t need to install anything at all.
That means you don’t have virus and malware problems, and your computer doesn’t slow down over time, or become unstable.
And that’s just the start of the benefits…
To learn more about the benefits of ChromeOS, and to see comparison videos and demos, visit GoChromeOS.com.
Hope the instructions above helps you resolve the problem. If you have any questions or ideas, please feel free to leave your comments. I’d love to hear of any ideas or suggestions.
314
314 people found this helpful
Available in other languages
Bekommen Sie nur das Bild aber kein Ton, nachdem Sie Ihren PC mit einem Fernseher per HDMI-Kabel verbunden haben? Keine Sorge. Hier finden Sie 4 Lösungen.