
Все способы:
- Устраняем ACPI_BIOS_ERROR
- Способ 1: Устранение конфликтов драйвера
- Способ 2: Обновление BIOS
- Способ 3: Настройки параметров BIOS
- Способ 4: Проверка RAM
- Заключение
- Вопросы и ответы: 0
Одной из самых неприятных ошибок, которые возникают на компьютере с операционной системой Windows, является BSOD с текстом «ACPI_BIOS_ERROR». Сегодня мы хотим познакомить вас с вариантами устранения данного сбоя.
Устраняем ACPI_BIOS_ERROR
Рассматриваемая неполадка возникает по ряду причин, начиная от программных сбоев вроде проблем с драйверами или нарушений в работе ОС, и заканчивая аппаратной неисправностью материнской платы или её компонентов. Следовательно, метод борьбы с ошибкой зависит от причины её проявления.
Способ 1: Устранение конфликтов драйвера
Самой вероятной программной причиной рассматриваемой ошибки будет конфликт драйверов: например, установлены две версии, подписанная и неподписанная, либо драйвера оказались по каким-то причинам повреждены. В такой ситуации следует найти виновника проблемы и удалить его. Обратите внимание, что процедура возможна, только если система загружается и некоторое время способна нормально функционировать. Если же BSOD «работает» постоянно, и получить доступ к системе не получается, стоит воспользоваться методами восстановления её работоспособности.
Процедуру проверки драйверов покажем на примере Виндовс 10.
- Загрузите систему в «Безопасном режиме», в чём вам поможет инструкция по ссылке ниже.

Подробнее: Как зайти в «Безопасный режим» на Windows
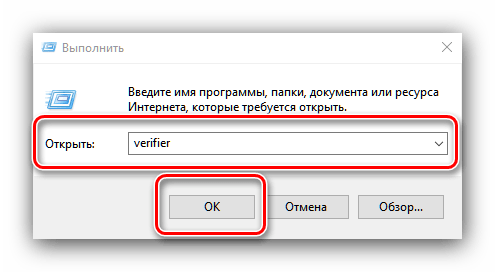
- Далее откройте окно «Выполнить» сочетанием клавиш Win+R, после чего пропишите в строке приложения слово verifier и кликните по кнопке «ОК».
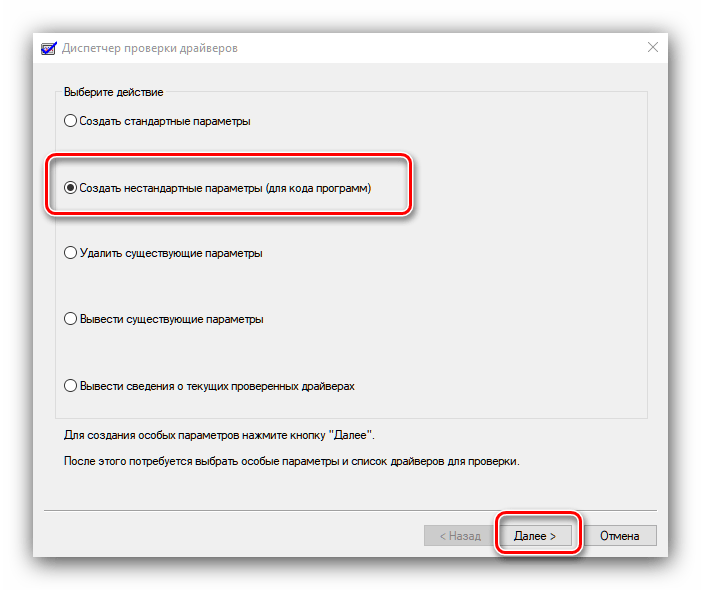
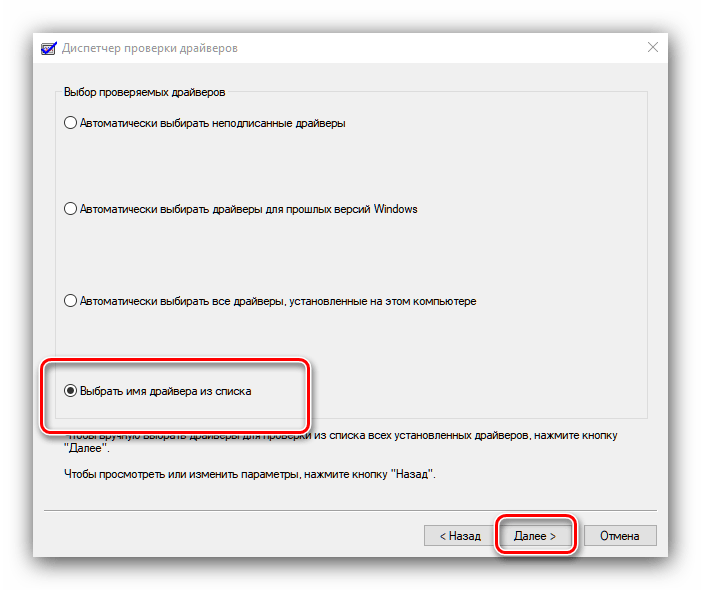
- Появится окошко инструмента проверки драйверов, отметьте в нём вариант «Создать нестандартные параметры…», затем нажмите «Далее».
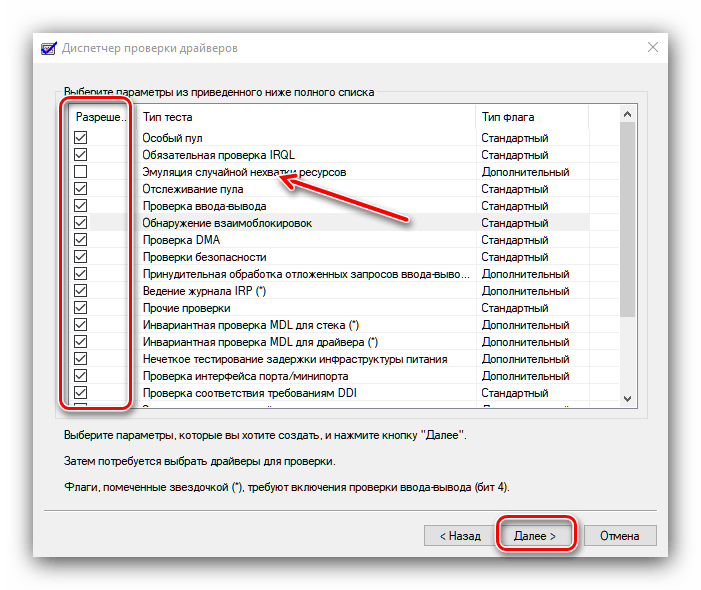
- Отметьте опции, за исключением пунктов «Эмуляция нехватки ресурсов», и продолжайте.
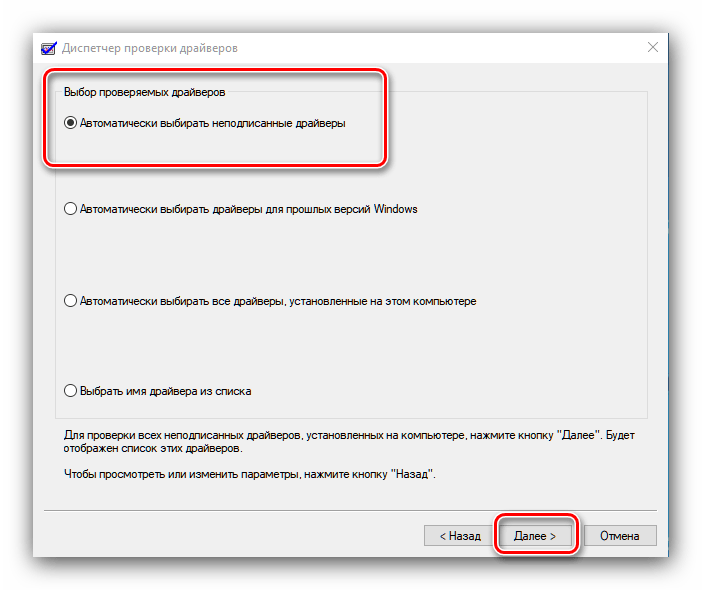
- Здесь выделите вариант «Автоматически выбирать неподписанные драйверы», кликните «Далее» и совершите перезагрузку машины.
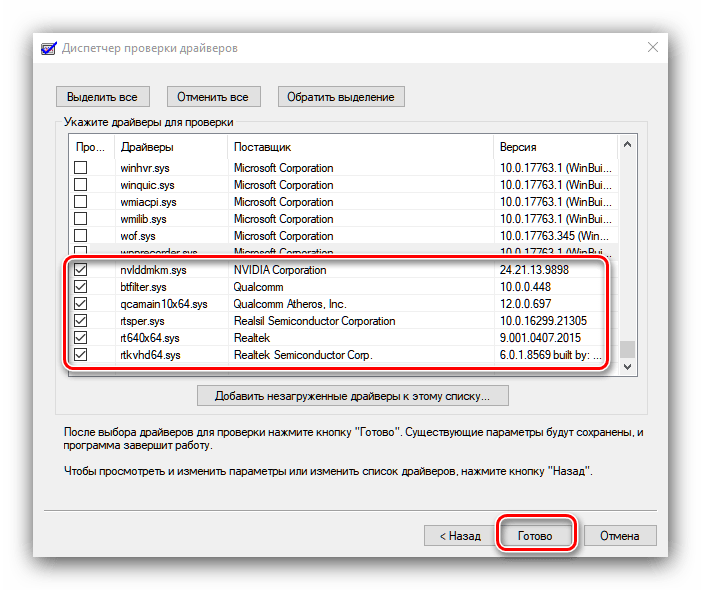
- В случае неполадок со служебным ПО появится «синий экран смерти», на котором будут указаны нужные данные для устранения проблемы (номер и наименование сбойного модуля). Запишите их и воспользуйтесь поиском в интернете для точного определения принадлежности неисправного ПО. Если BSOD не проявился, снова проделайте шаги 3-6, но на этот раз на 6 шаге отметьте «Выбрать драйвер из списка».

В перечне ПО поставьте галочку напротив всех позиций, где в качестве поставщика обозначена НЕ «Microsoft Corporation», и повторите процедуру проверки драйверов.
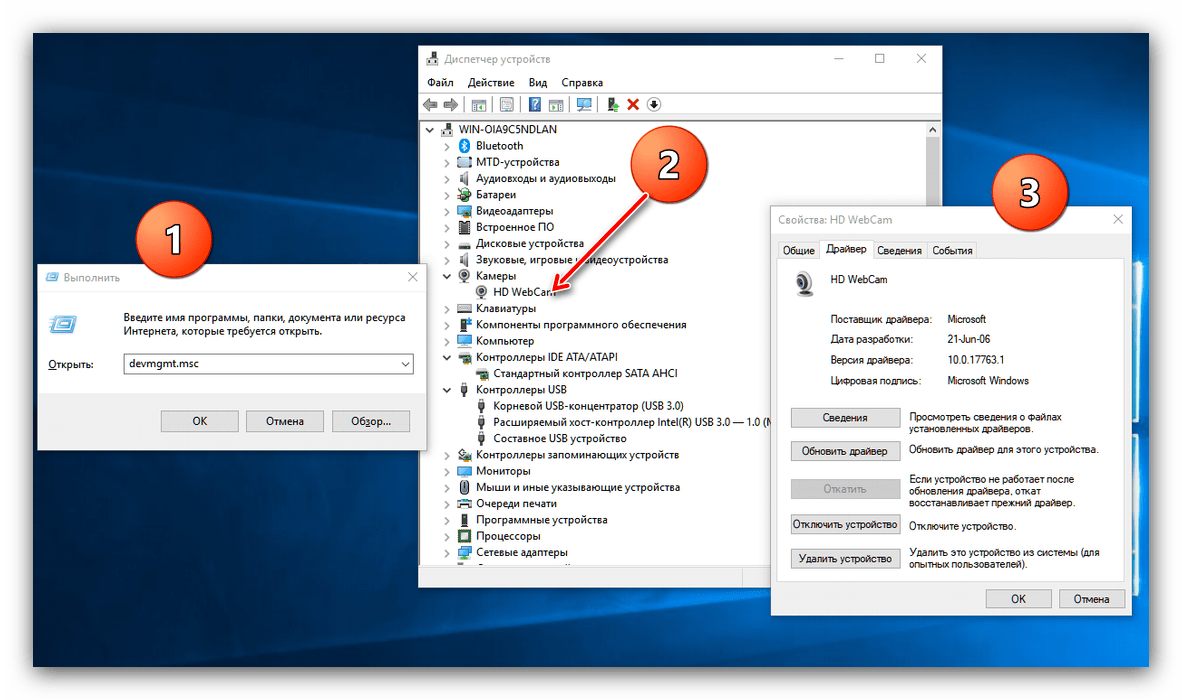
- Удалить сбойный драйвер можно через «Диспетчер устройств»: достаточно просто открыть эту оснастку, вызвать свойства нужного оборудования, перейти на вкладку «Драйвер» и нажать на кнопку «Удалить».

Если причиной проявления ACPI_BIOS_ERROR были неполадки с драйверами, указанные выше действия помогут их устранить. Если проблема наблюдается или проверка не показала сбоев – читайте далее.
Способ 2: Обновление BIOS
Нередко проблема вызвана самим БИОС – многие версии не поддерживают режим работы ACPI, отчего и возникает указанная ошибка. Микропрограмму материнской платы желательно регулярно обновлять, так как в новейших ревизиях ПО производитель устраняет ошибки и вводит новый функционал.
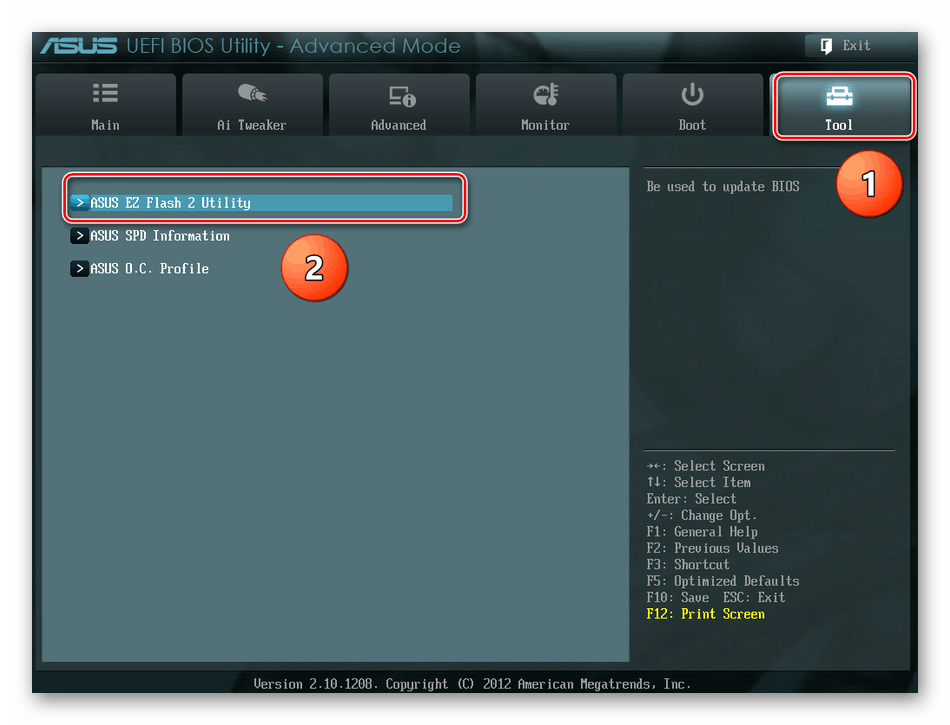
Подробнее: Как обновить BIOS
Способ 3: Настройки параметров BIOS
Также проблема нередко заключается в некорректных настройках ПО «материнки» – некоторые дополнительные опции питания при несоответствующих значениях вызывают проявление ACPI_BIOS_ERROR. Лучшим вариантом будет установка правильных параметров или сброс их значений к заводским. Инструкция по ссылке ниже поможет вам корректно проделать эту операцию.
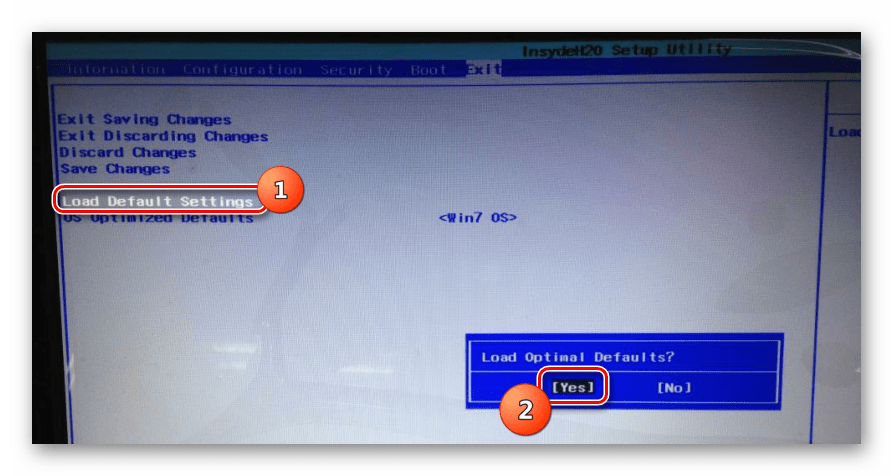
Подробнее: Как настроить BIOS для ACPI
Способ 4: Проверка RAM
Рассматриваемый сбой может появляться из-за проблем с модулями ОЗУ – возникновение ошибки часто оказывается первым признаком выхода из строя одной из планок. Для исключения этой проблемы оперативную память стоит проверить одним из методов, предложенных в руководстве далее.
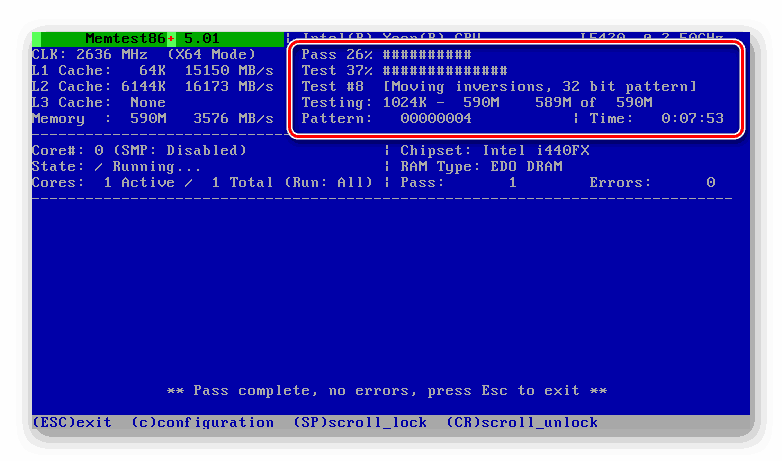
Урок: Как проверить оперативную память на ошибки
Заключение
Ошибка ACPI_BIOS_ERROR проявляется по нескольким разным причинам, программным или аппаратным, отчего нет универсального метода её устранения. В самом крайнем случае можно попробовать переустановку операционной системы.
Наша группа в TelegramПолезные советы и помощь
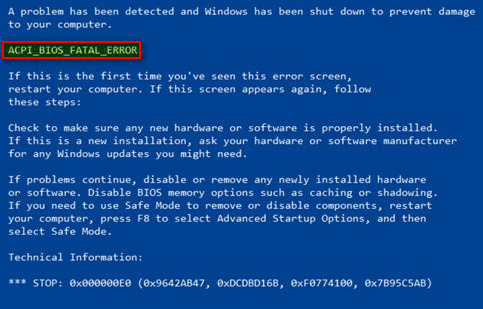
С начала 2021 года мы посвятили ошибкам BSOD несколько статей, в которых был произведён общий разбор причин появления этих ошибок. Следуя уже сформировавшейся традиции, мы продолжаем разбирать ошибки синего экрана смерти. Ошибка, о которой сегодня пойдёт речь, называется ACPI_BIOS_ERROR и имеет чаще всего код 0x000000A5. Её название недвусмысленно намекает на проблемы с интерфейсом управления конфигурацией и питанием ACPI, но, как и прочие ошибки BSOD, она может вызываться другими причинами. Сталкиваться с ней приходится нечасто, поэтому будем краткими, в двух словах обозначив предпринимаемые по её устранению действия.
{banner_google1}
Если компьютер всё ещё загружается, обновите драйверы ключевых компонентов — памяти, чипсета, жёсткого диска и прочего важного оборудования. Лучше всего использовать программы для обновления драйверов вроде Driver Booster, это избавит вас от необходимости искать драйвера в сети и устанавливать их в ручном режиме.
Если ошибка стала появляться после внесения изменений в настройки BIOS, следует восстановить исходные параметры или сбросить настройки BIOS, вытащив питающую CMOS-память батарейку на несколько минут (универсальный способ). Радикальное решение — обновление прошивки BIOS оставляем на потом, прибегнуть к нему можно тогда, когда все прочие способы не дали положительного результата.
Не самое разумное решение, стандарт ACPI необходим для автоматизации управления важными функциями питания аппаратных компонентов — материнской платы, процессора, кулеров и так далее. Отключение ACPI в BIOS возможно только перед переустановкой Windows, так как в работающей системе это приведёт к невозможности загрузки компьютера. Если ошибка появляется после выхода из режима сна, установите в BIOS для ACPI значение S1 (первый режим уменьшенного энергопотребления).
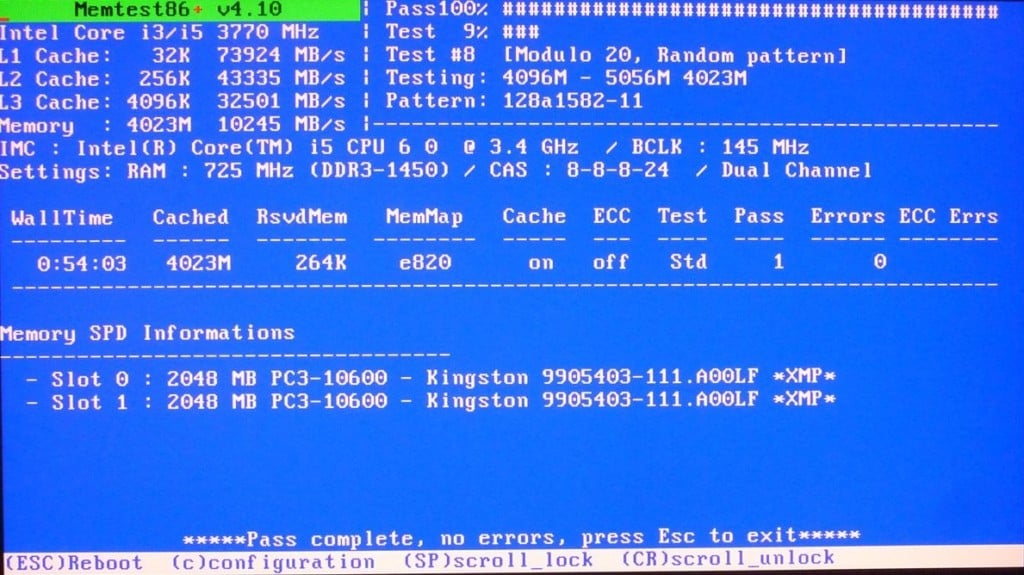
Ошибка ACPI_BIOS_ERROR в Windows 10 может быть вызвана неполадками в работе планок оперативной памяти. Проверьте состояние ОЗУ встроенными средствами системы или утилиты MemTest86, если до этого производился разгон памяти, восстановите исходные настройки.
Если вы заметили, что ошибка ACPI_BIOS_ERROR появляется сразу после выхода компьютера из гибернации, попробуйте удалить расположенный в корне системного диска файл Hiberfil.sys. Для этого в командной строке выполняем команду powercfg -h off, также файл гибернации может быть удалён из-под LiveCD.
Если у вас используется UEFI, попробуйте, наконец, переустановить систему в режиме Legacy и наоборот, если Windows установлена в режиме совместимости, попробуйте переустановить её в режиме UEFI. Если ничего не помогает, необходимо провести полную диагностику аппаратной части компьютера в сервисном центре, поскольку ACPI_BIOS_ERROR может быть вызвана неисправностями интегрированных в материнскую плату компонентов.
If the system you’re running has problems starting, you’ll receive the certain error messages during computer startup; it may prevent you from accessing system & hard drive as usual. This is known as a BIOS error. Today, my topic is how to deal with the ACPI_BIOS_ERROR when you see it on a blue screen of your computer.
What Is ACPI BIOS Error
There are a lot of people complaining that they run into a blue screen with an ACPI_BIOS_ERROR. They didn’t know what happened and want to know the useful solutions to fix the ACPI BIOS error. Noticing this, I decide to introduce such BSOD error (Blue Screen of Death error) first; then, provide the exact steps to fix it on a Windows PC.
MiniTool Solution is an expert in fixing such errors.
What Is ACPI
The full name of ACPI is Advanced Configuration and Power Interface. Released in December 1996, ACPI is actually the industry specification to handle the power consumption in both desktop and mobile computers. This open standard is very useful for the discovery and configuration of computer hardware components.
Basic functions of ACPI include:
- Decide the time for a device to turn on or off.
- Help to change to a lower-level of power consumption if the battery starts running low.
- Keep the essential programs and block the less important applications.
- Reduce the clock speed according to applications’ actual requirements.
- Reduce the power needs of the motherboard and peripheral device without activating devices in advance.
- Enable the modem power o receive any incoming faxes so as to keep the stand-by mode.
- ACPI is able to control your drive as soon as it is connected to PC properly.
In-depth Description of the ACPI_BIOS_ERROR
Many Windows 10 users reported that their PC ran into problem ACPI BIOS error on a blue screen. Yes, Windows 10 ACPI BIOS error is a typical and serious BSOD error that could be caused by a lot of reasons.
Common causes of ACPI_BIOS_ERROR Windows 10:
- The system drivers are configured improperly.
- The device drivers are too old or have been damaged.
- There’s a conflict of system drivers after the new hardware has been installed.
- The Windows registry database has been damaged as a result of the recent software change.
- The computer is attacked by virus/malware and the system related files are ruined afterwards.
- The bootable hard drive is damaged somehow. (How to recover data when the bootable hard drive is broken?)
- Changes (for instance, RAM change) have been made during the computing hibernation.
In fact, the popular stop code of such BSOD error is 0x000000A5.
To sum up, there are two root reasons for causing ACPI BIOS error Windows 10.
First, the Advanced Configuration and Power Interface (ACPI) Basic Input / Output System (BIOS) is not compliant with ACPI prompts the error message. There are obvious differences between the ACPI in the OS and BIOS; the differences will have an impact on the outcome of simultaneous read & write operations and the frequently used features, such as Plug and Play (PnP) and Power Management.
Second, users have added the Random Access Memory (RAM) to computer during hibernation; the operating system will detect this change while the file Hiberfil.sys is loaded.
The ACPI error may occur on your PC in the following situations:
- You’re installing Windows 10 or other operating systems: the ACPI BIOS error occurs usually when you try to install the system. When that really happens to you, you should check the BIOS configuration and change corresponding settings before starting to install Win10 again.
- You’re using Windows 8 and Windows 7: in addition to Win10, the users running other systems like Win8 and Win7 also reported the ACPI_BIOS_FATAL_ERROR.
- You’re resuming PC after a period of hibernation: if you have made some changes to your PC during the hibernation, for instance add RAM, you’ll receive the ACPI BSOD error after resuming it. At this time, please go to scan the RAM (check whether it is faulty) and remove the overclock settings to have a try.
- You’re starting the computer and seeing Acpi.sys BSOD: the name of the file that leads to the ACPI error will be provided on the screen; in this case, you’d better search for the driver or device that is related to the problematic file.
- You’re booting the PC and encounter restart loop: a blue screen may show up when you try to start your computer and it may force the PC to restart again and again. When you are in face of this, please try to end the loop by changing/updating the BIOS settings.
- You’re working on different brands of PCs: the ACPI_BIOS_ERROR is not exclusive to the computers of certain manufacturer. Indeed, I find this error affects a lot of PCs made by famous manufacturers, such as Dell, HP, Asus, Toshiba, Acer, Lenovo, Surface 2, and Sony Vaio.
Solved: PC Not Booting After BIOS Update – Recovery & Repair.
Here’s a true example of Windows 10 ACPI_BIOS_ERROR on Dell.
Dell 3147 “ACPI BIOS ERROR” on Windows 10 May 2019 update…
Hello, I recently installed the May 2019 update for Windows 10. I noticed that the Intel Trusted engine isn’t installed on that laptop. When I try to install the Intel Trusted Engine, I receive the BSOD saying “ACPI BIOS ERROR”. Will there be an update for this laptop so the missing drivers won’t cause this problem? I noticed under “device manager” that 2 devices are missing drivers. I wonder if Dell will give us an update for this BIOS or will give us the updated drivers for this OS. If someone can fix this or know a workaround to this, please feel free to contact me. P.S.: The BIOS I have is A12 William
Click to Tweet
How to Fix ACPI BIOS Error
In this part, my focus will be put on how to fix the ACPI related error. If you are one of the victims, please read the following methods with care and then try them yourself.
Update the BIOS Driver
If you have outdated or incompatible drivers on your computer, the ACPI BSOD error tends to appear during the PC startup process: the drivers are very useful for your OS to recognize and utilize the hardware; once they are outdated or not working well, the ACPI_BIOS_ERROR BSOD error will make your system crash.
Under such circumstances, the easy way to fix the error is updating the drivers.
- Reboot your PC.
- Visit the website of certain hardware manufacturer.
- Search for the corresponding models and download the latest drivers.
- Install the drivers properly.
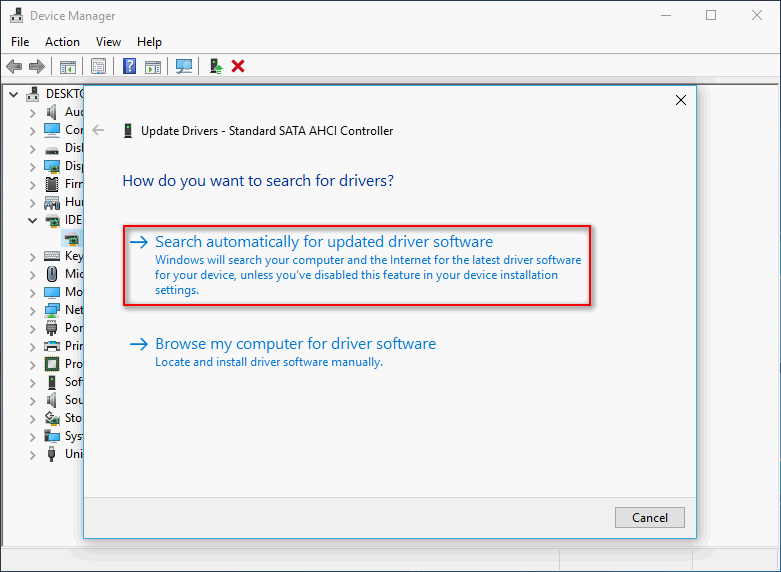
Please make sure you have updated all your drivers if you can’t confirm which driver leads to the problem. In addition, you can open Device Manager -> find the old driver and right click on it -> choose Update driver -> select Search automatically for updated driver software and wait.
System Backup & Restore
Restore system by using an earlier restore point (this method is only helpful when you have enabled the System Restore and created at least one restore point):
- Type Create a restore point into Windows search.
- Hit Enter.
- Click on the System Restore button under System Protection.
- Click Next.
- Select a restore point.
- Click Next.
- Read the information and click Finish to confirm.
- Wait for the restore to complete.
You can also use MiniTool ShadowMaker to restore your system to an earlier state when the ACPI error didn’t occur. (Similarly, this is only useful when you have backed up system using it in advance.)
How to back up system to local drive:
Step 1: find download the installation program (if you don’t trust it, you may get the Trial edition first).
MiniTool ShadowMaker TrialClick to Download100%Clean & Safe
Step 2: initialize the installation program and finish installing the software.
Step 3: launch the software and click Keep Trial.
Step 4: Go to the Backup tab and your system has been chosen by default, if you need to change it, please click on SOURCE.
Step 5: the software will select the destination path automatically; if you need to change it, please click DESTINATION. (You’d better choose external hard drive as the destination path.)
Step 6: click Back Up Now and wait. (You can also choose Back Up Later and set a time for the task in Manage page.)
How to restore the system:
- Get a license for MiniTool ShadowMaker (please make sure it includes a Media Builder).
- Launch MiniTool ShadowMaker and navigate to Media Builder.
- Create a bootable CD/DVD disc or USB drive by following the instructions. (You need to insert the compact disc or connect the USB drive to computer in advance).
- Connect the bootable disk to the PC runs into ACPI_BIOS_ERROR and restart it.
- Enter BIOS to set the bootable disk as the first boot device. Exit BIOS and save changes.
- Run MiniTool ShadowMaker in WinPE.
- Select Restore in the menu bar.
- Choose the proper image and click on the Restore button.
- Choose a backup version and click Next.
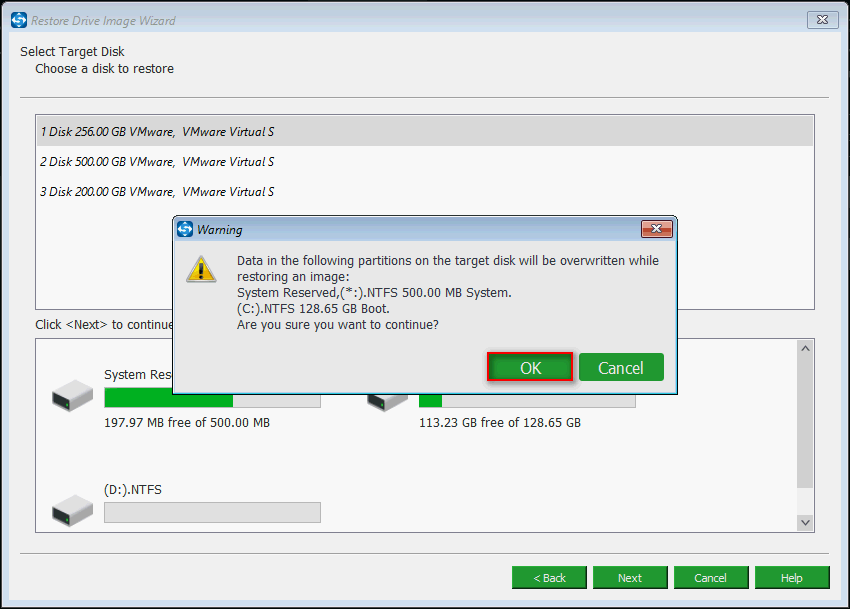
- Select a target disk and click Start.
- Click OK to continue in the Warning window.
- Wait for the restore process to complete.
- Change BIOS configuration and restart your PC.
Both the Files and Folders Sync of MiniTool ShadowMaker and the bootable version of MiniTool Power Data Recovery can help you recover data from the internal storage when the system can’t boot.
[SOLVED] Operating System Not Found Error – How To Recover Data?
Update BIOS
Similarly, if the BIOS on the computer is too old, the ACPI BSOD error will also appear. Thus, you should do the following to update computer BIOS:
- Confirm the BIOS version you’re using.
- Go to see the model of your motherboard.
- Go to the corresponding website to download the latest version.
- Extract the downloaded BIOS version (please read the readme file for instructions).
- Enter the BIOS directly or create a DOS USB drive/use Windows-based programs to update BIOS to the latest version.
- Restart your computer.

If you fail to get the latest BIOS update or the latest version is not ACPI compliant, you’ll need to try to fix the problem by turning off ACPI mode.
- When the system asks you to install storage drivers, please press F7 on the keyboard (the key may be different on other computers).
- The system will disable ACPI for you automatically. Then, you’re able to continue your installation.
Extended reading:
- Here’s how to disable ACPI in an HP.
- Also, you can try to solve the problem by resetting BIOS.
Uninstall Microsoft ACPI Compliant Driver
- Open Device Manager.
- Look for Microsoft ACPI Compliant Control method battery.
- Right click on it and select Uninstall device.
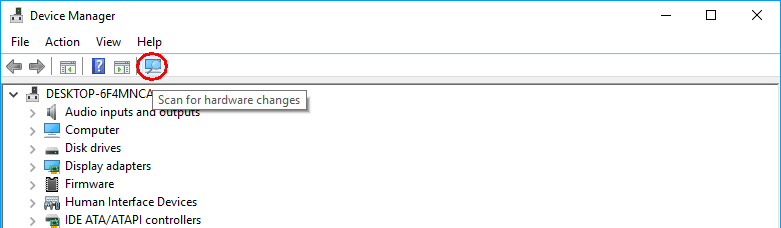
- Click on the Scan for hardware changes button and wait.
- Let Windows install the new drivers for you automatically.
- Restart the computer.
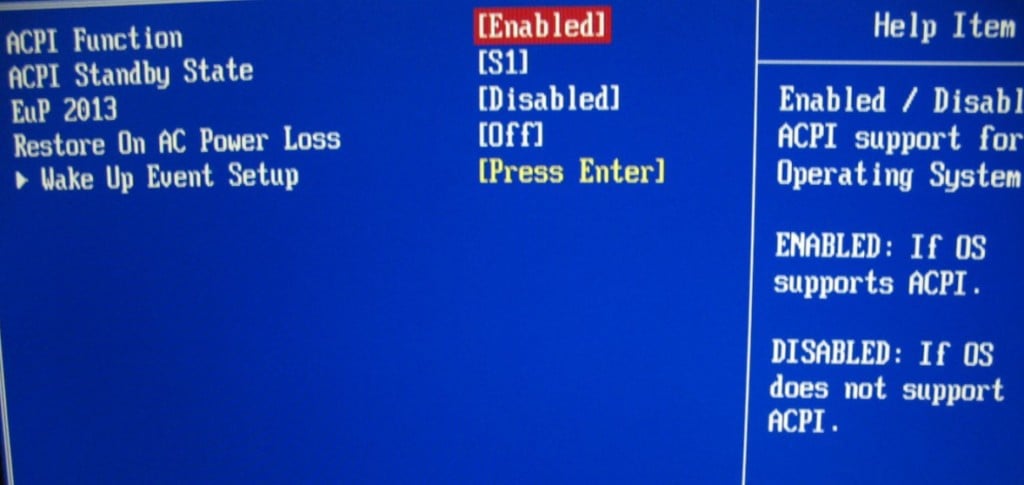
Set ACPI Mode to S1
Some users reported they have found the fact that ACPI_BIOS_ERROR Blue Screen of Death error showed up while they were waking up PC from sleep mode and they have fixed it by setting ACPI mode to S1 in BIOS.
- Reboot your computer and press certain button to open BIOS; please read the message on the screen quickly and carefully to know which button you should press (the common BIOS entry keys are F2, Del, Esc and F10).
- Go to BIOS Power Settings section by using the arrow keys (it may also be named as Advanced, Other or anything similar).
- Look for Advanced Power Management option (it may also be called APM, Power Savings, or other names).
- Use the arrow keys to select it and press Enter to confirm.
- Change the mode to S1.
- Exit BIOS and save changes.
Disable AHCI Mode
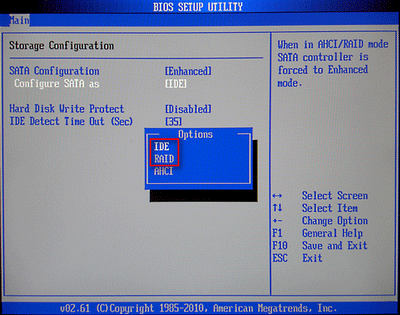
- Enter BIOS.
- Find Storage options or other items with similar name (the name varies from PC to PC).
- Select IDE or RAID to replace AHCI.
- Exit and save changes.
Please note: if the BIOS on your PC is corrupted, you should fix it ASAP!
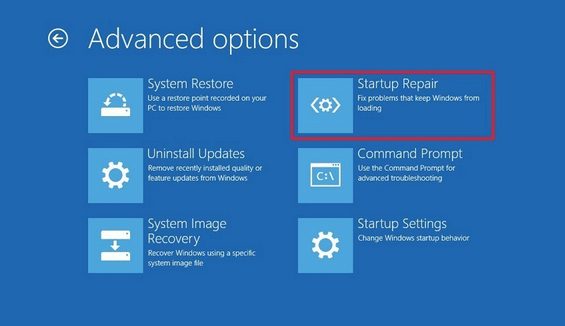
Make Use of Startup Repair
- Insert the Windows 10 installation DVD or connect the bootable USB to your computer.
- Restart your computer and click Next.
- Select Repair your computer option and choose Troubleshoot then.
- Click Advanced options and choose Startup Repair.
- Follow the instructions to complete the repair process.
Change OS image ID
- Enter your BIOS.
- Find Advanced and select System Component.
- Navigate to OS image ID and set it to Windows.
- Exit and save changes.
- Restart your PC.
If you have used any overclocking software to get better use of hardware, you should try to fix the ACPI BIOS error by removing all overclock settings.
If you are using the X9DAI motherboard, you still have another way to fix: disable jumper JPME1.
If all above methods failed, your trump card is to reinstall your Windows in UEFI mode.
Click to Tweet
Conclusion
Though ACPI BIOS error is popular and could happen to you anytime, you shouldn’t be so scared of it.
In the beginning of this article, I have introduced the causes and situations of ACPI_BIOS_ERROR BSOD error; you should know how to avoid it greatly. In the second part, I have introduced 11 useful ways (8 with exact steps) to fix the error yourself.
Hope you never meet the BIOS error; but even if you do, please stay calm and try to settle it down as quickly as you can.
«Синий экран смерти» с кодом ACPI BIOS ERROR может указывать на довольно сложные неполадки. Не особо положительный прогноз связан с тем, что в значительной части случае дело в аппаратных поломках. Однако часто проблема и в системных сбоях, которые можно попробовать исправить. По крайней мере попробовать устранить BSOD вручную – вы просто обязаны.
Причины ошибки ACPI_BIOS_ERROR
Первоисточников сбоя очень много, при чем они разносторонние:
- неправильная конфигурация BIOS;
- повреждение операционной системы;
- неисправность драйверов;
- нарушение работы жесткого диска;
- физическая поломка процессора или оперативной памяти.
Что характерно ошибке ACPI_BIOS_ERROR, так это мультиплатформенность. Она может появляться во всех версиях Windows, а также на Linux, Ubuntu. Ошибка может сопровождаться кодом 0x000000A5 или нет. Известны случаи, когда сбой проявлялся один раз и после перезагрузки исчезал, но бывает, что после каждого запуска появляется BSOD и не пускает в систему.
Как исправить BSOD ACPI BIOS ERROR?
Начнем решение из более простых в реализации способов. Их нужно попробовать всем. Если сработают, отлично, теперь вы знаете в чем была проблема. В случаях, когда они не помогают, можно сделать логический вывод о проблемах с оборудованием.
Обновить и переустановить драйвера
«Синие экраны смерти» с различными кодами часто появляются из-за проблем с драйверами. Поломки могут вызывать устаревшие, обновленные, но проблемные, и несовместимые драйвера устройств. Стоит обновить их. Если есть подозрение, что ошибка начала появляться после апдейта какого-то конкретного ПО или подключения нового устройства, стоит попробовать выполнить откат.
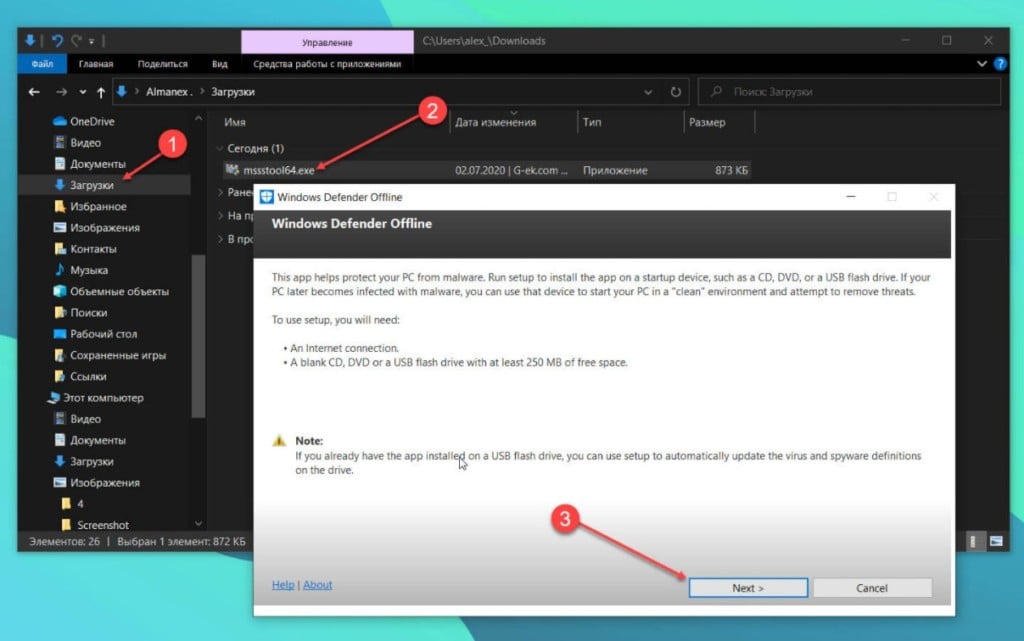
Автономное просканировать систему
Несколько пользователей положительно откликнулись о данном способе, им удалось исправить свой BSOD с помощью «Защитника Windows». Чтобы реализовать задуманное, нужно загрузить систему в «Безопасном режиме», открыть «Параметры» — «Безопасность» и выбрать «Сканировать в автономном режиме». Есть неплохая вероятность, что это сработает.
Восстановить систему
Еще один способ, получивший положительные отклик пользователей. Он применим к ноутбукам, в частности к Samsung-устройствам. Суть заключается в следующем:
- Выключить ноутбук и отключить накопитель.
- Запустить компьютер и перейти в «Режим восстановления» (чаще всего клавишей F4).
- Подключить SSD-накопитель и выбрать подходящий вариант восстановления.
- Запустить SW Update и обновить BIOS.
Удалить недавно установленные программы
Если в недавнем прошлом было установлено программное обеспечение, способное нанести вред BIOS, стоит его удалить. В общем-то стоит убрать все сомнительные программы, а также те, которые активно работают или управляют системными файлами.
Настроить ACPI и AHCI
Нужно предупредить, что стандарт ACPI на самом деле нужен Windows и его отключение нежелательно. Компьютер после этого не сможет загрузиться, так как ACPI автоматизирует управление электропитанием компонентов ПК. Однако нередко срабатывает переключение его в режим уменьшенного энергопотребления. Пункт ACPI можно найти в BIOS и установить для него значение S1. Это решение особенно актуально для тех, у кого ошибка появляется после выхода из спящего режима. Еще может сработать выключение AHCI тоже через BIOS.
Деактивировать внешнее оборудование
В момент запуска системы после появления BSOD ACPI_BIOS_ERROR к нему должно быть подключено минимум оборудования. Лучше отключить практически все постороннее и уже подключать после полного запуска. Будет установлено необходимое программное обеспечение, а ошибка появляться не должна.
Отключить разгон
В режиме повышенной частоты работы оперативной памяти, процессора или видеокарты «синие экраны смерти» могут стать нормой. Все зависит от модели комплектующих, некоторые плохо переносят разгон. Следует программным путем вернуть свое оборудование к заводским частотам работы.
Проверка состояния оперативной памяти
Выход из строя одной из планок ОЗУ может стать причиной проблемы. Лучше продиагностировать оперативную память, это можно сделать как встроенными инструментами операционной системы, так и утилитой MemTest86. Рекомендуется использовать второй вариант, создав флешку с автозагрузкой.
Переустановить операционную систему
Если ошибка ACPI BIOS ERROR появилась в результате попытки установки системы, стоит изменить режим. К примеру, если инсталляция проходила в режиме совместимости, стоит опробовать Legacy и наоборот.
Большинство из перечисленных выше действий применимы Windows, Linux, Ubuntu и др. Unix-системам, поэтому скорее всего сработают везде. Если же ничего из перечисленного не помогло улучшить ситуацию, ошибка ACPI BIOS ERROR вызвана выходом из строя какого-то комплектующего. Чаще всего пользователи сталкиваются с поломкой оперативной памяти и процессоров. Стоит их продиагностировать в сервисном центре.
In this fix guide, we’ll be talking about the nasty ACPI_BIOS_ERROR in Windows 10. It has got a bug-check value of 0x000000A5. This particular BSOD indicates some compliance issue of the ACPI or Advanced Configuration and Power Interface BIOS of the system with the ACPI specification.
There are several things that can potentially lead to this BSOD – missing files, obsolete driver, delay in a system update, missing DLL files, and more. The ACPI BIOS ERROR is somewhat different and it interrupts your work during the installation of new hardware or software. In this article, we have included the simpler workaround that even entry-level users can try. These are the effective workarounds and explore the respective methods easily –
ACPI_BIOS_ERROR BSOD in Windows 10 Solutions
Here is How to Fix ACPI_BIOS_ERROR BSOD in Windows 10 –
1] Install all the latest updates on your system
To have a smoothly functioning and troubleless PC, keeping the system updated would be a great idea. Many a time, users keep postponing updating the device and this leaves it with bugs and problems. Basically, the latest updates contain added security against potential threats and may contain the fix for the issues causing the ACPI_BIOS_ERROR as well. That’s exactly why updating Windows can be a good way to avoid moreover resolve many kinds of problems with the computer.
While you download and install the updates, it might be very helpful to have a high-speed internet connection. It will avoid troubles caused by incomplete or partial download and installation etc. Given are the steps to check for any pending download and install them –
Step-1: Enter the shortcut keys “Wind logo + I” on your keyboard to open Windows Settings app on your computer.
Step-2: After the interface shows up, you need to click on the Update & Security category. Then select Windows Update subsection that you see on the left-hand side.
Step-3: On the adjacent pane you would probably either view any pending update or the dialog “You’re up to date”. The latter indicates that your system doesn’t have any due updates. Just to be sure, click on Check for updates button. This will trigger a check for any due and new updates.
Step-4: After the update check is over, you can see if there is any new update. In case your system lists any available patches, click on the ‘Download’ button under them.
Step-5: Windows will carry out the rest of the process by itself. When prompted, allow the system to restart to apply the update fixes and changes.
This should resolve the issue in most cases if a delay in the update was causing the ACPI BIOS ERROR.
2] Disconnect additional Hardware Accessories and update hardware drivers
Users often face blue screen issues like ACPI_BIOS_ERROR as a result of some compatibility issues with some hardware. The situation can be quite a lot frustrating, but then you have an easy way out of the scenario. Simply disconnect the external device – it should resolve the situation. You will be able to reconnect the same soon after you see the problem resolved. Here is what you must do –
- If any external hardware item is connected to the device, disconnect and keep it safe.
- Just Restart Windows 10 PC. When the reboot completes, check if the issue is still there.
Also, we suggest you go to the hardware manufacturer’s website and look for any updates available for its driver.
3] Scan and clean malware to Fix ACPI_BIOS_ERROR
We don’t probably have to point out that any kind of malware which enter into the system can cause some kind of trouble for the PC and its users. It is important for you to make sure that you frequently scan for any kind of threats or malware in the system. Also, you must Clean Windows 10 PC on Malware or Virus attack. Some of their kind can be of serious harm to the functioning of the system. Moreover, disk corruption from malware attacks is one of the basic causes of ACPI BIOS ERROR BSOD.
Thankfully for us, Microsoft’s operating systems now have a default anti-malware and security tool, Windows Security (which as Defender). You can easily scan and erase any malware on the system with this security app. Here is what you need to do –
- Press Windows + S keys to launch a taskbar search.
- Type Security in the text typing area and load the results. Then, open Windows Security from the results
- In the app interface, choose the Virus & threat protection option. On its adjacent pane, click on the link ‘Scan options’.
- Now you are looking to select the radio beside the Full scan option. Finally, hit the Scan now button to initiate the detection.
- This process will search for viruses in every file in the system and the entire process might take several minutes.
- After the process ends, you will be able to see the scan result on the screen. In case any malware is discovered in the scan process, click on the Clean threats button.
- You might then be lead to a page where you will come across three more options, from which you must select Remove first and then hit Start actions to eradicate all the virus components.
4] Deal with system memory issues
Memory issues can cause a lot of troubles on a computer. Problems with the Random Access Memory (RAM) or any such memory problem can cause sloppy working as well as ACPI BIOS ERROR including other blue screen errors. The default Windows Memory Diagnostic Tool is the best utility to manage this kind of troubles. Here are the steps that you must follow along in order to use this utility –
- First of all, launch the Settings app with the shortcut keys Win + I.
- On its main interface, type memory in the search box. Then, from the results, select the option that says “Diagnose your computer’s memory problems”. This will instantly show up the “Windows Memory Diagnostic” tool on the PC screen.
- Thereafter, select “Restart now and check for problems (recommended)” option as displayed in the given figure.
- Of course, this will be followed by a restart. After your computer turns back on, a blue screen will be visible and it will scan memory problems.
After the scanning process completes, the system will reboot again automatically. You must be able to find the results of the scan after it restarts.
5] Uninstall the third-party anti-virus to resolve ACPI_BIOS_ERROR
Malware is a total package of problems and you already know that. Several users across the globe use different third-party top free Antivirus tools in order to safeguard the system. Anyway, given that we have Windows Security application (as discussed above) now, it wouldn’t be necessary to use those apps. More importantly, third-party anti-malware can sometimes cause conflicts giving way to ACPI BIOS ERROR. The ideal thing to do in such cases would be removing such third party programs as given below –
- Firstly, open the Run dialog box by pressing “Win+R” hotkeys.
- When the Run window opens, type appwiz.cpl in the text-box. Click on the Ok button you see.
- Programs and Features window would come up. There, find the third-party antivirus programs installed on your device.
- Select the application(s) and then click on the Uninstall button which you can see in the top ribbon.
- Then simply follow along the on-screen instructions to uninstall the program completely.
6] Update outdated drivers and fix ACPI BIOS ERROR BSOD
Update any badly functioning old driver – it can be a savior in the context of numerous types of errors and malfunctions in a computer. Outdated drivers can be the root of several errors including ACPI_BIOS_ERROR BSOD. That’s why every pro recommends keeping them up to date. You can check for old drivers and update through the Device Manager. In Windows, the outdated drivers are seen indicated with a yellow mark. Thus, finding the driver that needs an update isn’t too hard. Here are the steps you must follow to update the drivers for fixing ACPI BIOS ERROR –
- Open Cortana search, type in “devmgmt.msc” followed by a hit on the Enter key.
- The Device Manager window will open.
- Then you must check through to see if there is a yellow exclamation mark on any devices listed there. In case there happens to be any, expand that device by clicking on it.
- As the option expands, make a right-click on its drivers, one by one.
- From the menu that would appear, choose the option namely Update driver. Thereafter, simply follow along with the instructions coming on display. The system itself will take care of the rest and will get the update for the chosen driver.
- Do this for every old driver (or drivers with yellow marks).
Note that you shouldn’t tweak with every random driver. If something goes wrong, you may end up damaging some part of your system. Be careful while you update any drive- especially if you are a rookie computer user.
7] ACPI_BIOS_ERROR fixing by Booting the operating system in Safe Mode
Booting the computer in Safe Mode would enable you to keep operation to minimal and settings to the basic or default ones. This would mean that the default & basic settings and just the important files would be there in operation. Therefore, booting your operating system in a safe mode can help you find out whether the issue is still present while you are on the basic settings. If you find out that there is no problem when you are running in Safe Mode, then probably the issue is not with the primary settings. But it occurs with some of the settings or system changes you made or with some external files you have. Here is how you can proceed –
- Press the shortcut keys Windows + R in order to quickly open the Run window.
- When it opens, type msconfig in the text box. Then press the Enter key on your keyboard. This will open the System Configuration window.
- Navigate to the ‘Boot’ tab in the window.
- Once it shows up, click on the checkbox corresponding to ‘Safe boot’. Select ‘Minimal’ from the further boot options.
- Then, click on the OK button in order to save the changes you made.
- Thereafter, close the application. Now, you need to restart your device.
- As your system is restarting, press F8. Select ‘Safe boot’ from the Advanced boot menu.
- Then, enter Safe Mode and see if the ACPI_BIOS_ERROR persists.
8] Use Blue Screen Troubleshooter
One of the most proven ways of resolving the errors in your computer is troubleshooting. Even better, Windows comes with a special troubleshooter for BSOD issues. You don’t need to search for any extra tool from the Store or do any additional search. However, for Blue screen troubleshooter feature to be there, your system should be on Windows 10 Fall Creators Update or higher. Given below are the steps that you need to follow for using the Window Blue Screen Troubleshooter –
- Press Windows + I keys in order to open the Settings application on your PC. In there, navigate to the Update & Security category.
- When it opens, select the Troubleshoot subsection you see on the left-hand side panel.
- Now what you need to do is scroll down to the Blue Screen option and click on it. As you click on it, the option will expand. Finally, make a click on Run the Troubleshooter button. This will initiate the troubleshooter and will fix the ACPI_BIOS_ERROR in the device.
9] Clear the junk files to get rid of ACPI_BIOS_ERROR
Waste piles in the house can make our lives literally miserable, right? Piling up junk files in your computer system can do the same too. As you do various tasks on the PC and surf through the internet, lots of useless junk and temporary files gather up in the system storage unless you occasionally delete it. Well, most of us don’t clean the computer garbage up. As the cache files and temporary files accumulate, they occupy a lot of space. The result is a low disk space and system efficiency. This, in turn, can give way to a slow speed as well as the blue screen of death problems including ACPI_BIOS_ERROR.
To deal with this situation, you can utilize the Disk Cleanup tool. It can help free up some space occupied by the temporary and junk files. Cleaning up the junk files on the system is one of the proven ways to fix some BSOD issues. Given below are the steps you need to follow for using this utility –
- In the search box on the taskbar, type the word “cleanmgr”.
- When the results appear, double-click on the Disk Cleanup Desktop app to open it. A small popup window will appear, requiring you to select a Disk.
- Select the Disk Drive (for e.g. C:) you want to clean up.
- Then, in a few seconds (or minutes) your system will calculate and show the total junk-occupied space in your system which you will be able to retrieve through clean up. Hence, click Clean up system files button.
- In case you have some important files in the Download folder, uncheck it before proceeding ahead. (A better alternative is to move the important files to another folder beforehand so that you can delete the rest of trash)
10] Remove similar/duplicate applications from your PC
One of the causes of the ACPI_BIOS_ERROR is having duplicate or similar kind of apps. Similar apps can create a conflict if their requests collide. Blue screen errors like ACPI BIOS ERROR can be avoided by removing these duplicate apps from the PC. You can find and uninstall these apps very easily by following the given steps –
Step#1: Perform a right-click on Start and select Apps and features from the Win+X Menu.
Step#2: On the right pane of the subsequent page, find and select the applications which are similar and may create errors. Remove them from your PC by clicking on the Uninstall button on the expanded panel.
Step#3: The desktop will now show some guidelines to uninstall the application(s). Follow them and then reboot the PC.
11] Fix ACPI_BIOS_ERROR by Uninstalling any incomplete Windows update
Another reason your computer is facing issues might be because of the termination of Windows updates before completion. In general, updates install automatically and on their own. Therefore, a bad network connection may interrupt the process and can create trouble.
The best way to get rid of this problem is to uninstall any incomplete Windows update. This is how you can do it –
- Get access to the Settings app. The shortcut is to press Windows+I.
- Click on Update and Security. In the left section of the box, select Windows Update.
- Click on View update history.
- Underneath it, you will find the option Uninstall updates.
- On the Installed updates window, choose the latest installed patch. Hit Uninstall on the top ribbon.
12] Reducing computer fatigue by using Disk Checking
Running your system continuously for a long time may also cause blue screen errors like ACPI_BIOS_ERROR. Using computer continuously may tire the device which can result in many functional issues including the ACPI BIOS ERROR.
Disk Checking Utility can help you resolve this issue very easily. Try the following steps, if you have been using your computer for a long time and facing some issues –
- Go to the Search box and type ‘cmd’ in it. In the search results, you will find Command Prompt.
- Right click on it and then click on Run as administrator.
- The OS will prompt to confirm allowing the program to make changes. Click on Yes and grant the permission to make changes.
- The Elevated Command Prompt window will now open where you need to type the following syntax and click on Enter –
chkdsk C: /f/r/x
- This command will open the Disc Checking Utility and the process of disc checking will start. Wait till it completes.
- Restart the PC and check if the issue is fixed.
13] Restoring the system to any restore point
It is very much possible that any recent activity may have resulted in the blue screen error. In this case, you can always restore your system and undo all the recent activities. This option generally resolves the problems your PC is facing and brings your system back to error-free condition. However, the disadvantage of going for ‘System Restore’ is that it will also erase your recent work and files. So you need to remember this before choosing to restore your system. It would be better if you take a backup of your recent works.
To reset or restore your system follow the given steps –
- Go to the Search box in the taskbar and search for System Restore.
- From the search results, select System Restore. Enter the password, if any.
- Then, just choose a restore point and restore the system by going through the guidelines displayed on the screen.
14] Repair the corrupted Windows System components to fix ACPI_BIOS_ERROR
ACPI_BIOS_ERROR can also be due to missing DLL files and corrupted Windows components. But no worries, as we have a solution for this case as well. “System File Checker” can help us in recovering the missing DLL files and mend the corrupted Windows system.
Here’s how you can use the System File Checker –
- Right-click in an empty space in your taskbar. A menu will pop up. There, select Task Manager from the menu.
- Under the File menu, click on ‘Run a new Task‘.
- Checkmark the box saying “Create this task with administrative privileges”. In the text box type ‘cmd‘ and click OK.
- The Command Prompt with the admin rights will now open. Type the following command and press Enter –
Sfc /scannow
The scan for corrupted elements will start now. You may take a power nap as it can take some time. The System File Checker will find the faulty Windows components and repair them by itself. Also, any missing files would be put in place.
After the process is complete, reboot your system and check if the error is fixed.
15] Update BIOS after removing the SSD (in Samsung computers)
Many of the Samsung laptop users reported facing troubles in Windows 10 because of ACPI_BIOS_ERROR BSOD. As per what the suggested, what worked for them is removing the SSD drive and restoring the Windows 10. So if you are a Samsung user, facing ACPI BIOS ERROR BSOD, this workaround may work for you. In order to do that, follow along with these steps –
- Locate your SSD drive & safely disconnect it.
- Start your computer. You would probably see Samsung prompt requiring you to press F4 in order to start the Recovery Mode. Press F4.
- Quickly reconnect the SSD drive back.
- Select the option for restoring. The process may take a few seconds or minutes. Wait for it to complete.
- Finally, you need to run the SW Update software and then install the BIOS update.
Note: Installing BIOS isn’t recommended for beginner users as it is an advanced procedure. If any part of the update installation goes wrong, you will end up causing permanent damage to your PC. If you are performing the update, be sure to go through the motherboard manual thoroughly for detailed instructions and guidelines.
16] Prevent automatic shutdown/restart of your PC
It can be very annoying and irritating if your PC shuts down while you are working. A lot of important data can be lost. BSOD (Blue Screen of Death) errors can frequently cause automatic shutdowns or restarts and can cause loss of data.
If you face any issue or error, you can prevent these auto shutdowns by following the given steps –
- You need to save your work first. After saving it, close the application and go to the Desktop. If the system is not responding try pressing Windows +D to go to the Desktop.
- On the desktop, right click on This PC icon. From the fly-out menu, select Properties.
- The System Window will appear. Then, on the left section of the window, click on ‘Advanced System Settings‘.
- The System Properties window will appear now. In the bottom section of it, click on Settings under “Startup and Recovery”.
- You will see the Startup and Recovery window after the click. Under the ‘System Failure‘ section, uncheck the Automatically restart option.
- Finally, click on OK.
This will prevent your system to shut down automatically in case of any failure and you can save all your work before trying to fix the issue or error in your system.
Methods:
1] Install all the latest updates on your system
2] Disconnect additional Hardware Accessories and update hardware drivers
3] Scan and clean malware to Fix ACPI_BIOS_ERROR
4] Deal with system memory issues
5] Uninstall the third-party anti-virus to resolve ACPI_BIOS_ERROR
6] Update outdated drivers and fix ACPI BIOS ERROR BSOD
7] ACPI_BIOS_ERROR fixing by Booting the operating system in Safe Mode
8] Use Blue Screen Troubleshooter
9] Clear the junk files
10] Remove similar/duplicate applications from your PC
11] Uninstall any incomplete Windows update
12] Reduce computer fatigue by using Disk Checking
13] Restore the system to any restore point
14] Repair the corrupted Windows System components
15] Update BIOS after removing the SSD (in Samsung computers)
16] Prevent automatic shutdown/restart of your PC
That’s all!!