I recently upgraded one of my computers to Windows 10 and setup a shared folder so that I could easily transfer files from my MacBook Pro and Windows 7 machines to Windows 10 over the home network. I did a clean install of Windows 10, created a shared folder and attempted to connect to my shared folder from OS X.
Unfortunately, I was not able to connect and it took me a little time to figure it out. In this article, I’ll walk you through the steps to connect to a shared folder on Windows 10 from OS X.
Step 1 – Configure Windows 10 for Sharing
Obviously, the first thing you’ll need to do is create a shared folder on Windows 10. Right-click on the folder, go to Properties and click on the Sharing tab. Go ahead and share the folder and set the permissions to whatever you desire in terms of access.
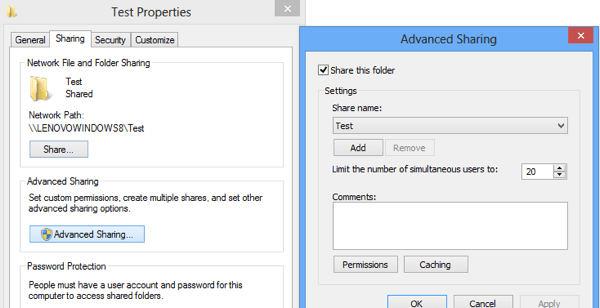
I suggest clicking on Advanced Sharing as you have more fine-grain control over everything. Check the Share this folder box and then give the share a name. Click on Permissions and then add groups or users that you want to give access.
If you want to make it easy and the folder doesn’t have sensitive data, just add the Everyone group and give them Full Control. This way, you’ll be able to access the folder from any computer or device without having to worry about entering credentials.
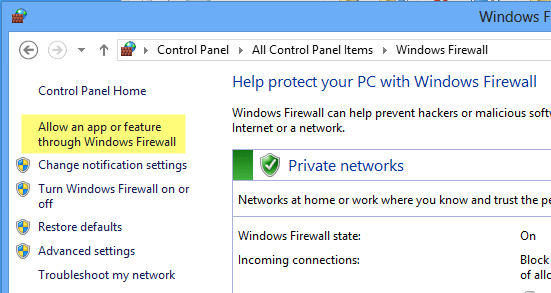
The next thing you need to do is make sure that File and Printer Sharing is turned on and allowed through the Windows Firewall in Windows 10. Go to Control Panel and click on Windows Defender Firewall. Then click on Allow an app or feature through Windows Firewall.
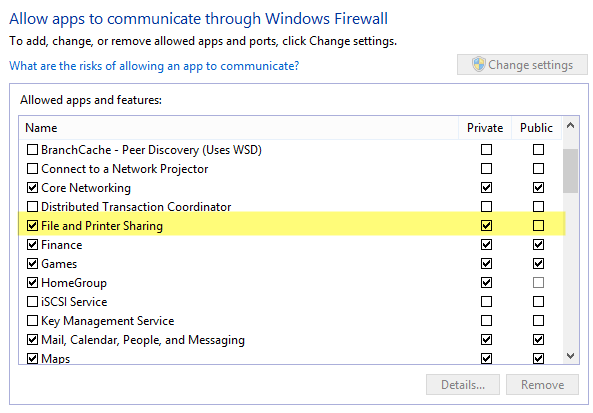
Scroll down until you see File and Printer Sharing and make sure that it is checked for the Private network. You may have to first click on the Change settings button at the top before you can select a box.
Lastly, you can decide how you want users to access the folder on Windows 10. By default, when connecting from another machine, you have to enter the username and password of an account that has access to that shared folder on Windows 10. If you setup a Windows 10 user account without adding a password, you won’t be able to connect to the shared folder.
You’ll first have to add a password and then you could connect. However, if you feel your home network is super secure, you can always turn off password protected sharing, which means anyone can connect to the shared folder without having to type in a username or password.
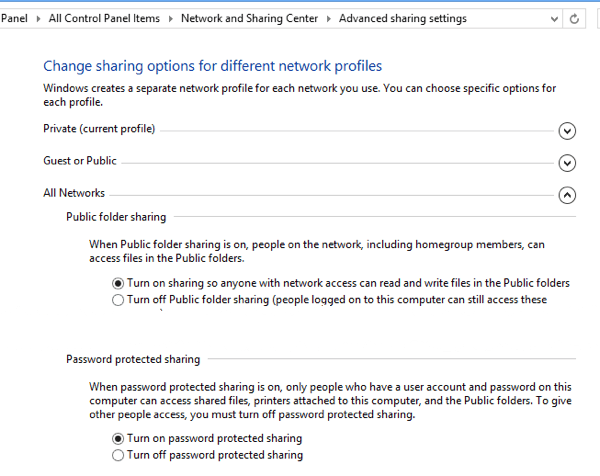
You can do that by going to Control Panel, Network and Sharing Center, Advanced sharing settings and then expanding All Networks. Here you will see an option called Password protected sharing, which you can turn off. I personally keep it turned on, but if you really hate having to type in a username and password to connect, this is an option.
Also, if you use Windows 10 without a password, this would save you from having to setup a password on your account. Note that even if you have a Windows account with a password, if you turn off password protected sharing, then people can still connect without typing any credentials.
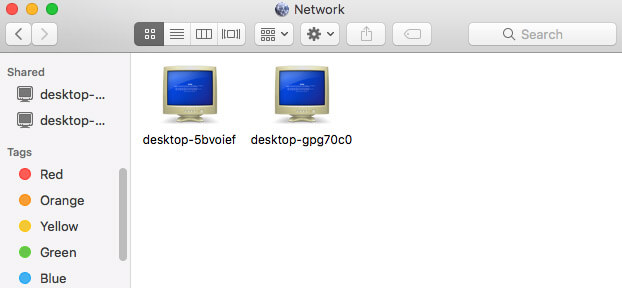
Finally, on the Mac, open Finder and look under the Shared section for the Windows 10 PC. If Shared is not in the sidebar, you have to add it. With Finder open, click on Finder and then Preferences at the top. Click on Sidebar and check all the items under Shared.
Now go back to Finder and wait till your computer shows up. Note that it can take a little while until the Windows 10 PC shows up. If it doesn’t show up after 5 minutes, try restarting the PC once.
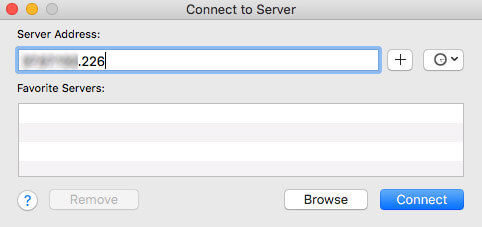
If your Windows PC refuses to show up in the Shared devices list in Finder, you can try connecting manually using SMB. To do that, open Finder and click on Go and then Connect to Server.
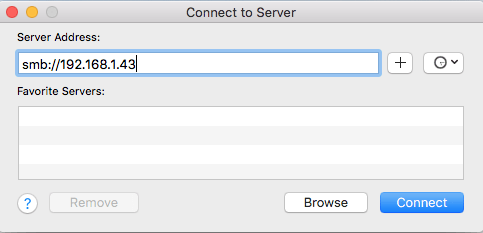
Now type in the following as shown, replacing the IP address below with the IP address of your Windows 10 PC.
smb://192.168.1.43
Click the Connect button and you’ll be asked to type in credentials again. If that is entered correctly, you’ll be asked which volume you want to mount.
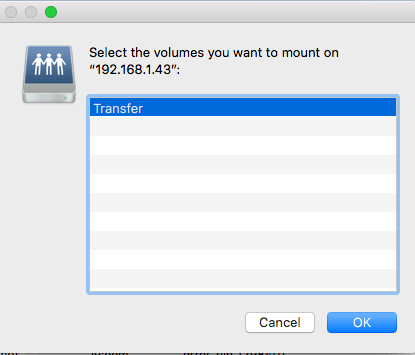
If you’re still not able to connect using SMB, then there is some issue on your Windows PC. You have to make sure the firewall is configured properly.
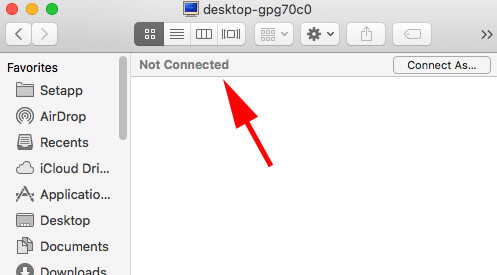
Once it shows up in the sidebar, go ahead and click on it. When you click on it, it will try to connect and you may get a message saying Connection Failed or Not Connected.
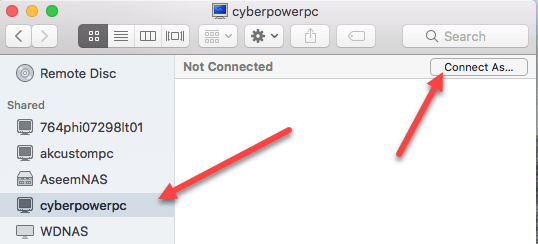
That’s OK! That’s where that password protected folder setting in Windows 10 comes into play. If it’s turned on, you need to connect using the Windows 10 account credentials. You can do that by clicking the Connect As button at the top right.
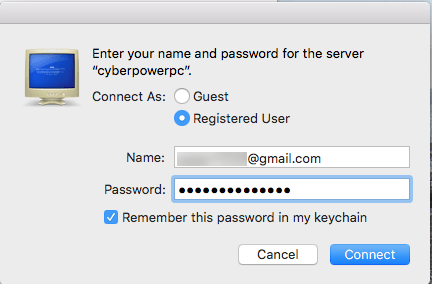
Go ahead and type in your credentials and then click OK. Note that if it’s a Microsoft account you have setup on Windows 10, you’ll need to type in the full email address and the same password that you use to login to your Microsoft account.
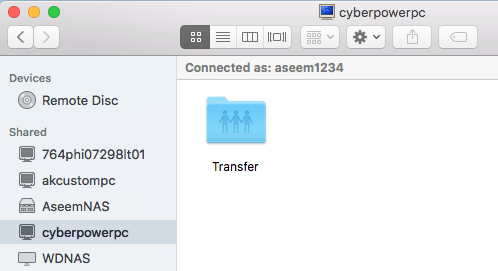
That’s about it! Now you should see the Windows 10 shared folders in Finder on your Mac. If you have any questions about connecting to Windows 10 PC from a Mac, post a comment here and I’ll try to help out. Enjoy!
Related Posts
- How to Connect Xbox Controllers to Your Mac
- How to Chromecast From Mac to Your TV
- How to Install and Run Linux on Mac
- How to Turn Off or Delete Siri Suggestions (iPhone and Mac)
- How to Take Pictures on Mac
Do you have a Windows PC at home or work and a brand new Mac as well? That’s great! That is until you need to access a Windows folder and have no idea how to make your Mac behave in a friendly manner.
The good news is that it’s not difficult to do as long as both devices are connected to the same local network. You don’t need to set up an SSH server any more or even an FTP because transferring files between a Mac and Windows computer is easy.
Let’s find out how you can share a Windows folder with a computer running Mac OS X or macOS.
Step 1: Configure a Shared Folder on Windows to Transfer Files
You need to enable the file-sharing options to set up a shared folder on Windows by performing the following steps.
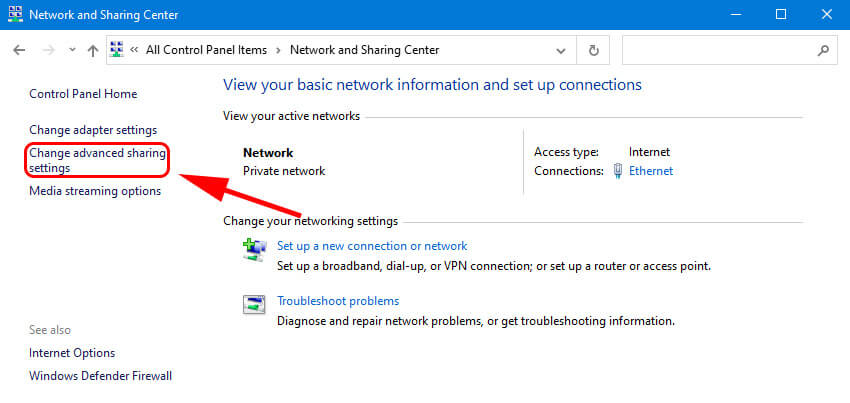
- Go to the Control Panel and select Network and Sharing. The Network and Sharing panel enables you to set up new network sharing connections. You can access all settings as well as troubleshoot problems that might arise during configuration.
- Navigate to Change Advanced Sharing settings in the left column. Here you will find all the network sharing settings in Windows.
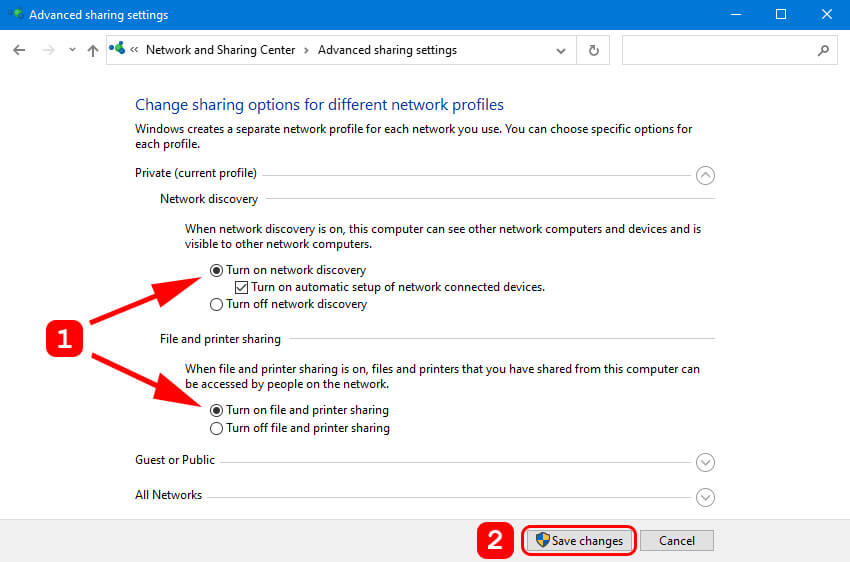
- Select network discovery and turn it on to allow other computers on the network to access the Windows PC.
- Once you enable network discovery, turn on File and Printer Sharing, and save changes.
Accessing the shared folder from Windows
Once you have set up the shared folder, access it from Windows. To do that, select the Network pane in Windows Explorer to see all the computers attached to your network.
In this window you will find the Mac computer you want to connect to and a list of other computers accessible on the network.
To share files between Mac and PC, you can easily connect to the Mac computer if you know the name or its IP address. All you need to do is type the computer’s name in the location bar of Windows Explorer and press Enter.
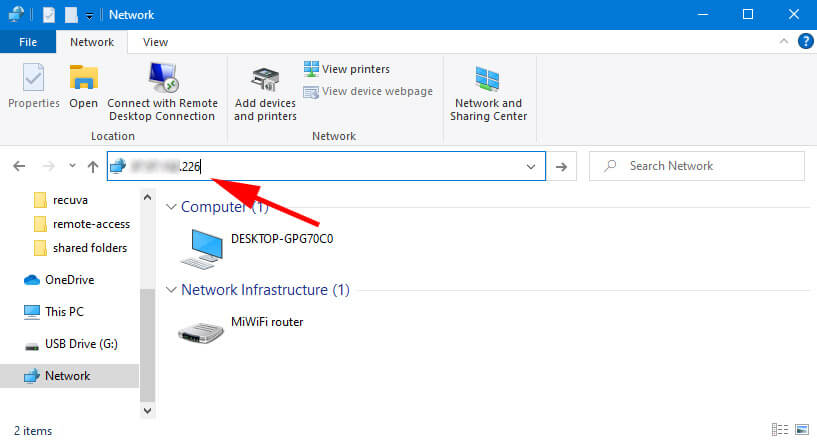
You can also enter the computer’s IP address if you do not know its name.
Step 2: Access the Windows Shared Folder From macOS
Now you need to access the shared folder from the Mac computer. Use the following steps to connect to the shared folder with macOS.
- Open Finder and navigate to the Shared section. Locate the Windows computer to which you want to connect.
- Click on the Windows PC. If you get a Connection failed message it may indicate that the shared folder is password protected. In that case, click the Connect As button, type the credentials, and click OK.
- If the Windows PC does not appear in the sidebar you can connect to it manually by selecting Connect to Server from within Finder. Provide the Windows computer’s IP address and click Connect.
At this point you can access the shared folder on the Windows machine from your Mac.
Reasons Why You Need to Access a Windows Shared Folder Using Mac
There are multiple reasons why you might need to access a shared Windows folder from your Mac:
- Transfer files from an old PC to a new Mac;
- Access files from a work machine on your home Mac computer.
- Directly share files with family members of colleagues on the same network.
FAQs
-
How to determine your PC’s or Mac’s IP address?
To determine your PC’s IP address, enter “ipconfig” on the command line. On a Mac, go to System Preferences and look in Network for the machine’s IP address.
-
Can I connect Windows shared folders directly via the IP address?
Yes, you can connect to Windows shared folders using the IP address. Click the WiFi connection button and then go to Properties of the connected network to access the shared folders.
-
Can I share and access an external hard drive or USB flash drive?
Yes, you can share to an external hard drive or USB flash drive, but you need to ensure that both machines support the storage media.
-
Can I share/use Microsoft Onedrive on Windows and Mac at the same time?
Yes, you can use Microsoft Onedrive on Windows and Mac simultaneously to share and transfer files.
Conclusion
Once you connect your Mac machine with your Windows computer, you will see the shared files every time to log in to your PC.
Now that you know how to access a Windows shared folder from Mac OS X, you can increase your productivity by easily sharing files across operating systems, it’s time for you to go and practice this unique skill.
Let’s say, you are using Windows PC and wanted to share a folder with your friend who is using Mac. Though emailing or using file transfer apps is an easy option, they have limitations of sharing limited file size. Similarly, using cloud storage services like OneDrive or iCloud also have limitations in size and syncing. The best option is to easily setup file sharing from Windows PC to Mac. This will allow sharing of files, folders, or the entire PC drive. The advantage is that you can quickly add additional folders for sharing or remove permissions instantly.
Here are the requirements for enabling file sharing from Windows and Mac.
- Correct username of your Windows PC
- Enable sharing for required folders in Windows
- Connecting Windows PC from Mac
- Accessing shared folders in Mac
Let us go through these steps in details so that you will not miss any detail. We will use Windows 11 and macOS 12.5 in this article. The process remains same if you are using Windows 10 or other macOS versions with some minor changes in the screen.
1. Getting Username in Windows 11
The first step is to find the username of your account in Windows PC.
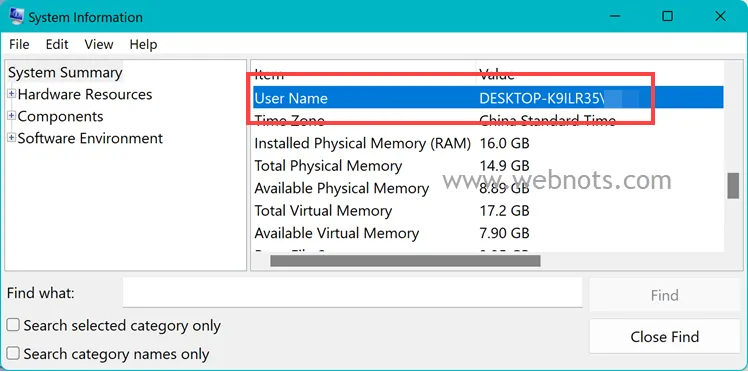
- Click on Windows Search icon in the taskbar and type “system information”.
- You will see System Information desktop app in the results and click on it to open the app.
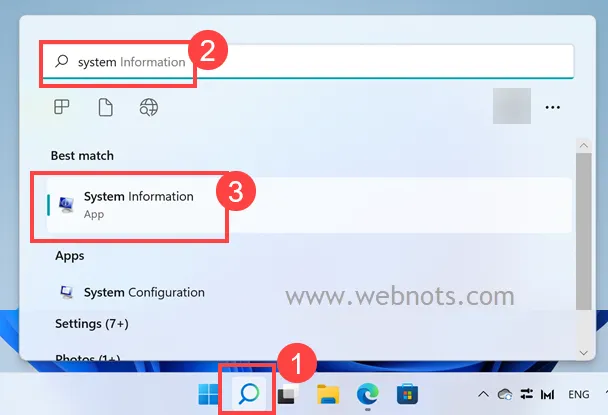
- Check the details on the right pane under “System Summary” section and find “User Name”.
- Alternatively, use the “Find what:” box to type “user name” and click on “Find” button. This will highlight the “User Name” item and note down the value.
2. Share Folders in Windows 11
Next step is to share the required folders on your Windows PC.
- Right-click on the folder that you want to share and select “Properties” option.
- Go to “Sharing” tab and click on “Share” button under “Network File and Folder Sharing” section.

- On the next screen, select the user account and change the permission level if required. if you set the permission to only “Read”, then you will not be able to edit the shared files on Mac. If you want to edit the shared files on Mac, make sure to select “Read/Write” permission or select “Owner” user for that folder. After selecting user and required permission level, click on “Share” button.

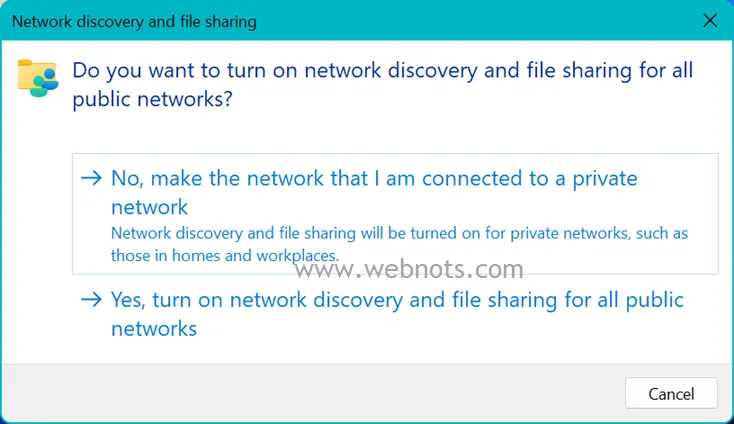
- If your computer’s network discovery turned off, then Windows will prompt you to enable it. Select the private network option to turn on file sharing option.
- You will see a success message “Your folder is shared” and the full path of the shared folder. Note down the full path which you need to use in different format on the Mac for connecting to this folder.

3. Connecting Windows Shared Folder from Mac
Now that you have a folder on Windows Pc, it’s time to access the folder from Mac.
- Go to your Mac and launch Finder app.
- Click on “Go” menu and then select “Connect to Server…” or press “Command + K” shortcut keys.

- Type the correct path of the Windows shared folder in the text box. Here you should type the path starting with smb: and use forward slash (or slash). This is different than the backslash used in Windows. Therefore, make sure to change the slashes and use correct format. Below is example of the paths of shared folder in Windows and Mac.
Windows Path - \\Windows_PC_Name\Users\Username\Desktop\Folder_Path
Mac Path - smb://Windows_PC_Name/Users/Username/Folder_Path
- After entering the correct folder path, click on “Connect” button. You will be prompted to enter the username and password of your Windows user account. Select “Registered User” option, enter the name/password, and click “Connect” button. Check “Remember this password in my keychain” option if you want the Mac to store password in iCloud. We recommend disabling this option unless you frequently connect Windows PC for file sharing.

- You will not see any success message, but Mac will connect the shared Windows folder in Finder app.
4. Access Shared Windows Folder in Mac
Check Finder app and you will see the name of Windows shared folder is mounted. Browse through the folder and copy the required files to Mac.

If you have setup read/write permissions, you can edit and save the files on the shared folder. However, we do not recommend edit Windows files on Mac as this may result in incompatibilities when you open the files again in Windows PC. It is also possible to add additional file in the shared folder from Mac with read/write permission. If you have only provided read permission, then you can neither edit nor add additional files to the shared folder. You will see permission error when trying to edit files.
Note: If you are connecting with Windows administrator account, it is possible to browse through entire PC from Mac though you share only one folder.

Other Sharing Options from Windows to Mac
As mentioned, there are few other options you can use to transfer files from Windows to Mac.
- Simply ZIP and send the folder through email if this is a one-time task.
- Install file transfer apps to send files.
- Use social apps like WeChat or WhatsApp for sending files. Apps like WeChat has a separate built-in File Transfer feature which you can use for sending file from Windows and them access on Mac or mobile.
- Use cloud storage options like OneDrive or iCloud for sharing files from Windows to Mac. For example, you can install OneDrive app on Mac and access synchronized file from all your devices. Similarly, you can use iCloud for Windows for sharing files across Windows and Mac computers.
If required, you can enable file sharing on Mac to share the folders from Mac to Windows PC.
Summary
- Setting up file sharing between Mac and Windows is fast and secure, and avoids the need to rely on internet-based cloud services.
- Configure network settings, enable file sharing on both Mac and Windows, then add shared folders and users for access.
- Access shared folders on Windows by navigating to Network, entering relevant credentials or access Windows shared folders on Mac via Finder.
Sharing files between Macs and Windows shouldn’t be a complicated matter and, with some simple settings changes, you can have your own mixed network up and running in a few minutes.
You might already know how to share files between your Mac and Linux machines or from one Mac to another.
Windows and Mac are the two dominant computer operating systems that most people use on a daily basis. So it’s only natural that you might have one or both in your own home. Sharing folders between the two on your own home network is fast and secure, and it avoids some of the nuisances and extra steps cloud and external storage bring to the table.
You will need to configure all your machines before you can share any files. This means verifying your network connections and setting up file sharing on macOS and Windows.
First, Check Your Network Settings
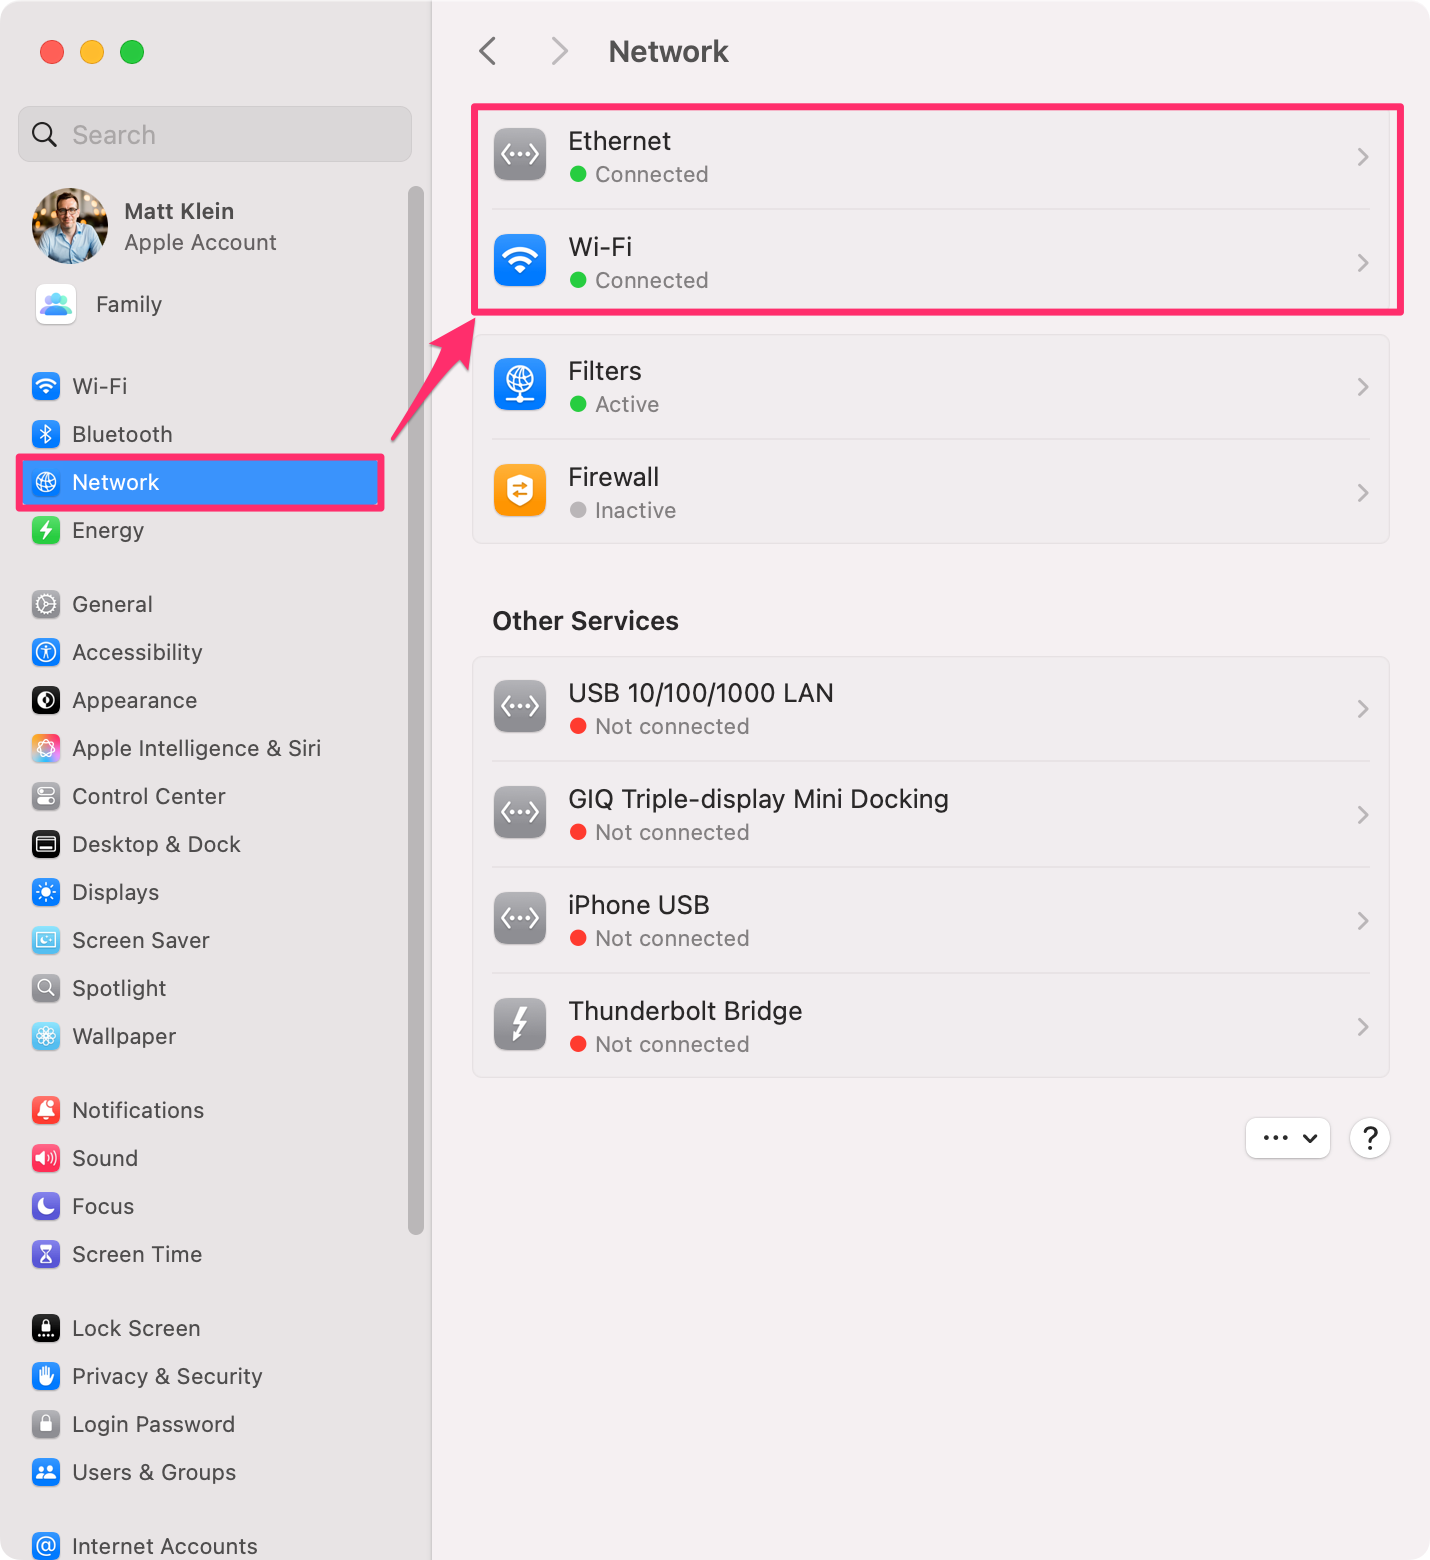
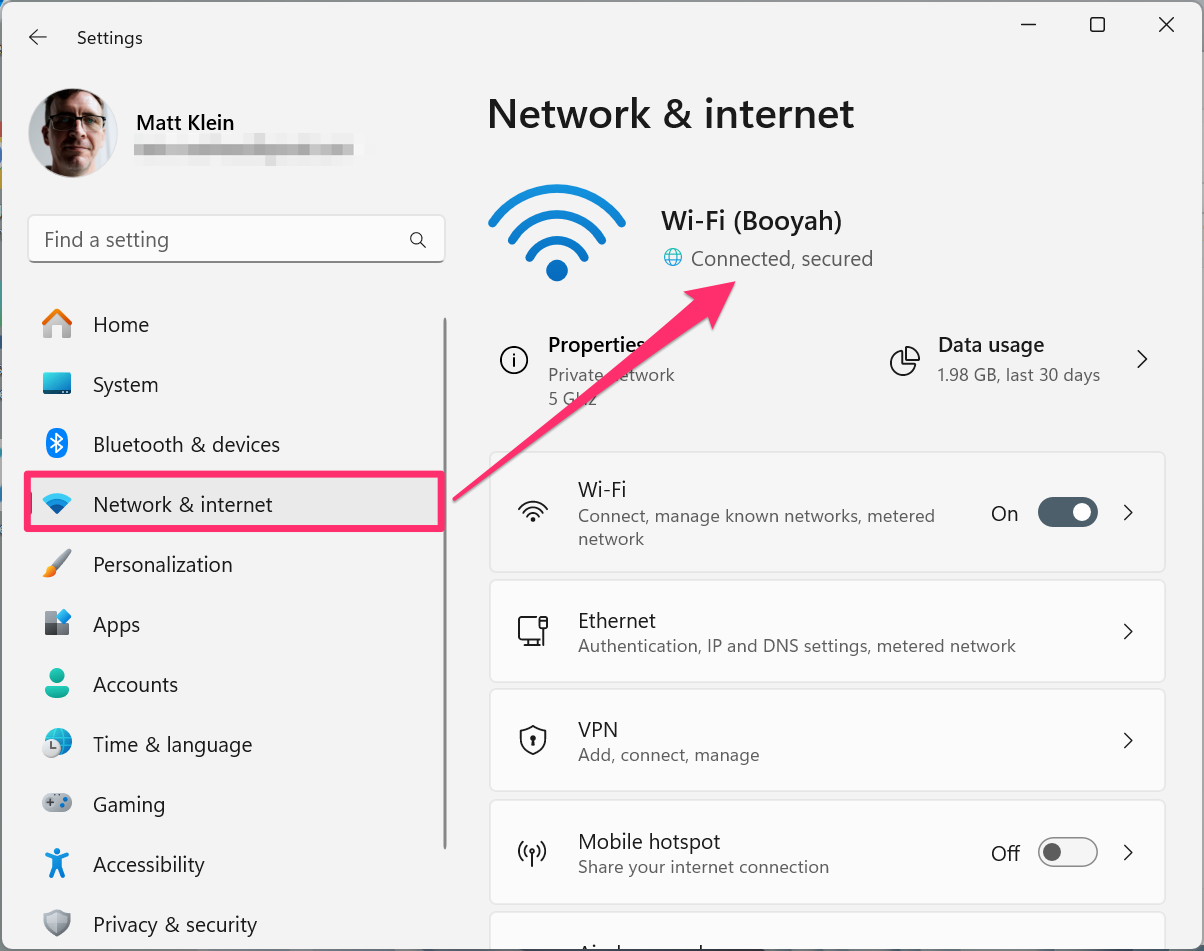
First, ensure both your Mac and Windows machines are connected to the same network by Wi-Fi or Ethernet.
On Mac, check the Wi-Fi status in the menu bar, or go to System Settings > Network to confirm connectivity.
On Windows, open Settings > Network & Internet, then confirm your network status under Wi-Fi or Ethernet.
Enable File Sharing on macOS
By enabling file sharing, your Mac can share files with other devices such as Windows and even Linux machines.
Open System Settings > General > Sharing and enable «File Sharing», then select the small icon to the right of the toggle to open the Shared Folders configuration window.
Select «Options» in the Shared Folders configuration window, verify SMB File Sharing is on, then enable your account for Windows File Sharing.
Select «Done» to go back to the Shared Folders window.
Add Shared Folders, New Users, and Configure Access
At this point in the process, your Mac is ready to share files and folders, but you need to first select them, and if necessary, add users and how they’ll access them.
Below the Shared Folder pane, click «+», select the folder, then select «Open». Configure access by selecting it, then selecting a user and setting access permissions such as «Read Only» for viewing and «Read & Write» for editing.
Click the «+» or «–» buttons at the bottom of the Users pane to add or remove users.
Accessing macOS shared folders on Windows is pretty straightforward. Open «File Explorer» and select «Network» from the navigation pane. Hopefully, you see the other device or devices on your network. Open the location you want to access, enter your credentials (optionally select «Remember my Credentials»), and you can now access your Mac’s shared folder or folders.
If you’re the only user on your Mac, you’ll need to enter your Mac username (e.g. «matt») and the password you use to log in to your Mac when your computer restarts.
If you don’t see your Mac show up as a network device, enter the IP address in the address bar, and it should prompt you for credentials.
To find your Mac’s IP address, head back to your Apple computer and hold the Option key on your keyboard then click Apple > System Information. Click on the «Network» heading and then look in the list of network devices under «IPv4 Address» to find your local IP.
If you want to see your devices in the Network view, then you can install something like wssd-native. This simple fix makes «your [macOS] machine visible in Network view of Windows Explorer on newer versions of Windows.»
Enable File Sharing from Windows
Next, you can enable file sharing on your Windows machine so you can easily access shared folders from your Mac.
First, open «Settings» (you can press Win+I), then go to Network & Internet > Advanced Network Settings. Select «Advanced Sharing Settings», then select «Network Discovery», and «File and Printer Sharing».
Finally, if you feel your private network is safe and secure, you can optionally «Turn Off Password-Protected Sharing».
Add Shared folders on Windows
Sharing folders on Windows is easy and only takes a minute. Open «File Explorer», right-select the folder you want to share, then select «Properties».
When the folder’s properties open, select the «Sharing» tab, then «Share». Next, select the user who can access this folder from other machines, then select «Share». Finally, on the last window, select «Done».
You can now access your share folder from other machines, including your Mac.
Access Windows Shared Folders on macOS
You should now be able to access your Windows machine’s shared home folder from your Mac. Open Finder, then select «Network» in the left pane. In the Network window, open your Windows machine, which will say «Connection Failed».
Select «Connect As» in the upper-right corner of the network window, then enter your network credentials.
You should now be able to access your shared Windows folders, with read and write privileges.
Congratulations! You’ve successfully set up file sharing between your Mac and Windows devices. With just a few simple steps, you’ve created a seamless home network connection to enhance productivity and simplify your workflow. Whether you’re sharing work documents, photos, or media, the process ensures your files are accessible from any device, without the need for cloud storage or external drives.
With your file-sharing setup in place, you’re now ready to make the most of your multi-device network. Keep exploring, and enjoy the ease of managing files across different systems with minimal effort. Check our LocalSend if you’re looking for a way to share wirelessly between Mac, Windows and more.
If you have to work on both a Windows PC and a Mac, you probably have to transfer files between the two. Here’s how to set up file sharing so you can view select folders on the other desktop over your network.
Mac users are unlikely to be sharing their network with just other Macs, and likewise for Windows PC users. In modern work environments and at home, you can generally expect there to be a need for the two to communicate in some way.
This is undoubtedly the case for power users who may have two desktops at home that they use for tasks. One could easily be a MacBook Pro for portable work while the other is a Windows desktop that stays at home.
Accessing the same files across different workspaces on a network has its benefits, including storage savings. Storing files elsewhere means you’re not consuming precious storage on your primary devices, which you could use for other data.
Though you could create a dedicated data store with a network-attached storage device, this could be expensive. A cheaper alternative is to use storage stored on another computer on the network.
This could be either an old computer used as if it’s a file server or if you use two or more computers in daily life, by setting up folders that can be shared and viewable by the other desktop.
Getting this set up can be a bit of a chore, but once done, it will become a valuable time and space-saver.
Regardless of whether you want the Mac or the PC to host the files, there are two phases to pass through. First, you set up the shared folders on the host, and then you set macOS or Windows on the other computer to view the files over the network.
Windows sharing to Mac
Of the two, it is a little harder to set up Windows file sharing to a Mac. Given our discussions with users, it’s also the likelier of the two scenarios you will run into.
Setting up Windows file sharing
First, ensure that Network Discovery is enabled on the Windows PC. To do this, click Start then Settings, followed by Network & Internet.
Click on Ethernet or Wi-Fi, depending on what is available, then Change Advanced Sharing Options.
Under the Private network section, ensure Network Discovery is turned on, with the «automatic setup of network-connected devices» also ticked. Under File and Printer Sharing, make sure that it is turned on, and click Save Changes.
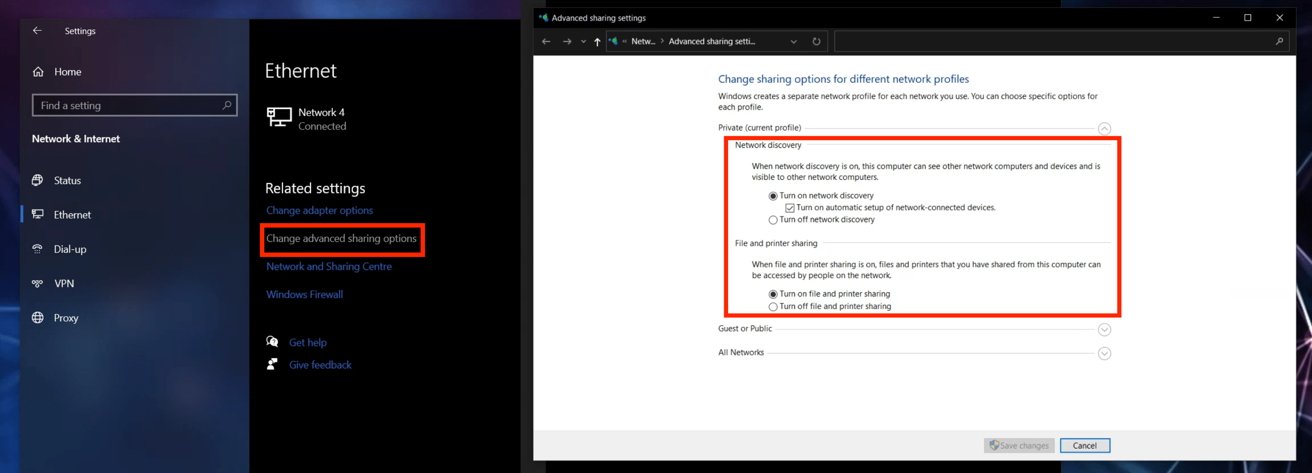
Make sure file sharing is set up on Windows before trying to share files.
Reminder: This is for the Private network profile. Do not do this to the Guest or Public profile.
You can close these windows down.
Open File Explorer and navigate to the folder that you want to share. If you need to create a new folder, right-click within File Explorer in the directory you want it located, and select New then Folder before giving that folder a name.
Right-click the folder and select Properties. Click Sharing, then under Network File and Folder Sharing, click Share.
Select user accounts for the Windows PC you want to share the folder with if required, then click Share and Done.
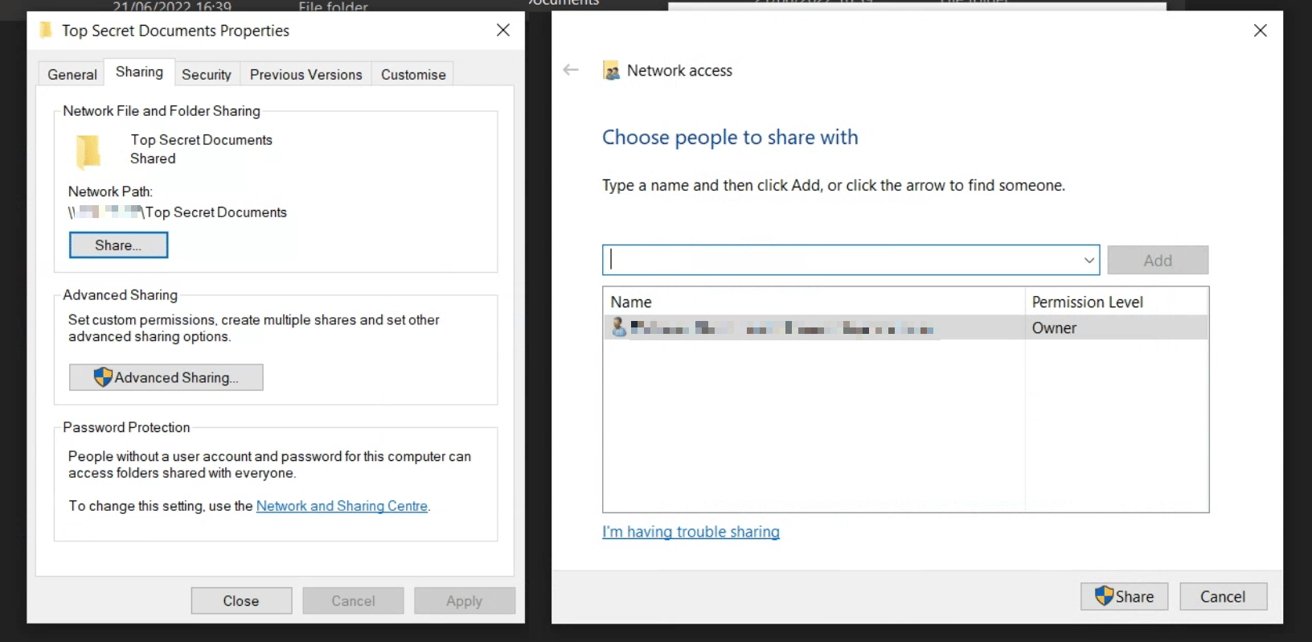
Setting up a folder in Windows to share to the Mac
You could use the Advanced Sharing options to make more advanced changes to the folder’s permissions, such as making it read-only for some users. If it’s just a share for your own usage, there’s no need to go into this section.
After getting the folders set up for sharing, the next bit is to get the other computer to access those folders over the network.
Accessing shared Windows folders in macOS
To open up the shared folders, you will need a few details from your PC first. This includes the IP address and Workgroup of the Windows PC, which can be found within the Network & Internet section of Settings.
You may also need your Windows account credentials.
On the Mac, open up Finder, then in the menu, select Go, then Connect to Server.
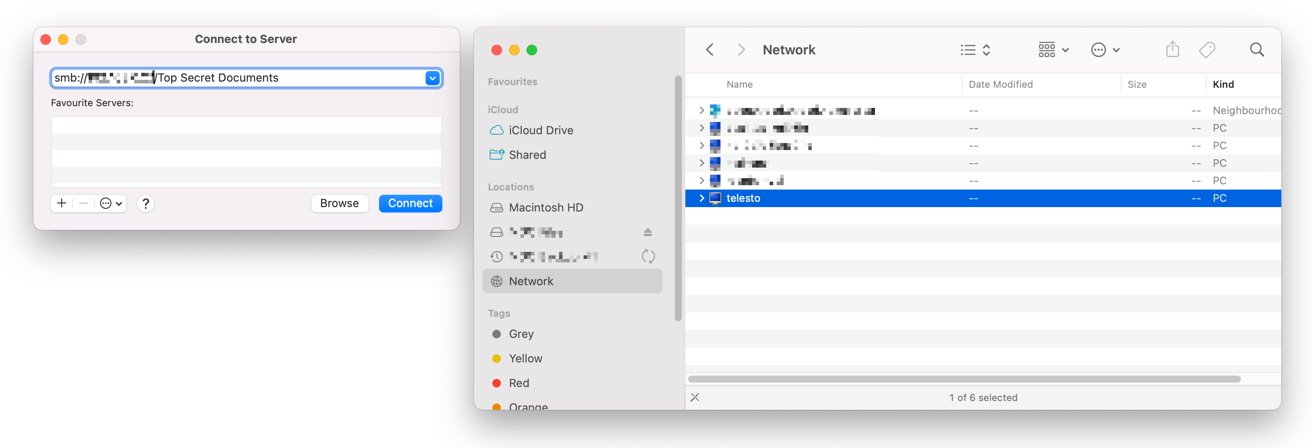
Once you connect, you can see shared folders from the Windows PC on the Mac.
From the Connect to Server screen, you can first try to find the folder by clicking Browse to bring up the Network window, then selecting the Windows PC name from the list, followed by the shared folder.
Alternately, in the Connect to Server dropdown box, type in smb:// then the DNS name of the Windows PC, then / followed by folder (smb://DNSname/folder) or smb:// then the IP address then / followed by the folder name (smb://IPaddress/folder) into the box, then Connect.
You may be asked for your credentials for the Windows PC to be able to access the folder, including the Workgroup name the PC uses and the account you use to log in.
Once authenticated, you can access the files stored in the folders.
Mac sharing to Windows
This is a little easier to get going, as setting up file sharing on the Mac is a bit simpler overall. Accessing it on the PC is a tiny bit tougher.
Setting up Mac file sharing
In macOS, click the Apple logo in the menu, System Preferences, and Sharing.
Click the tickbox next to File Sharing to enable it, then Options. Tick Share files and folders using SMB.
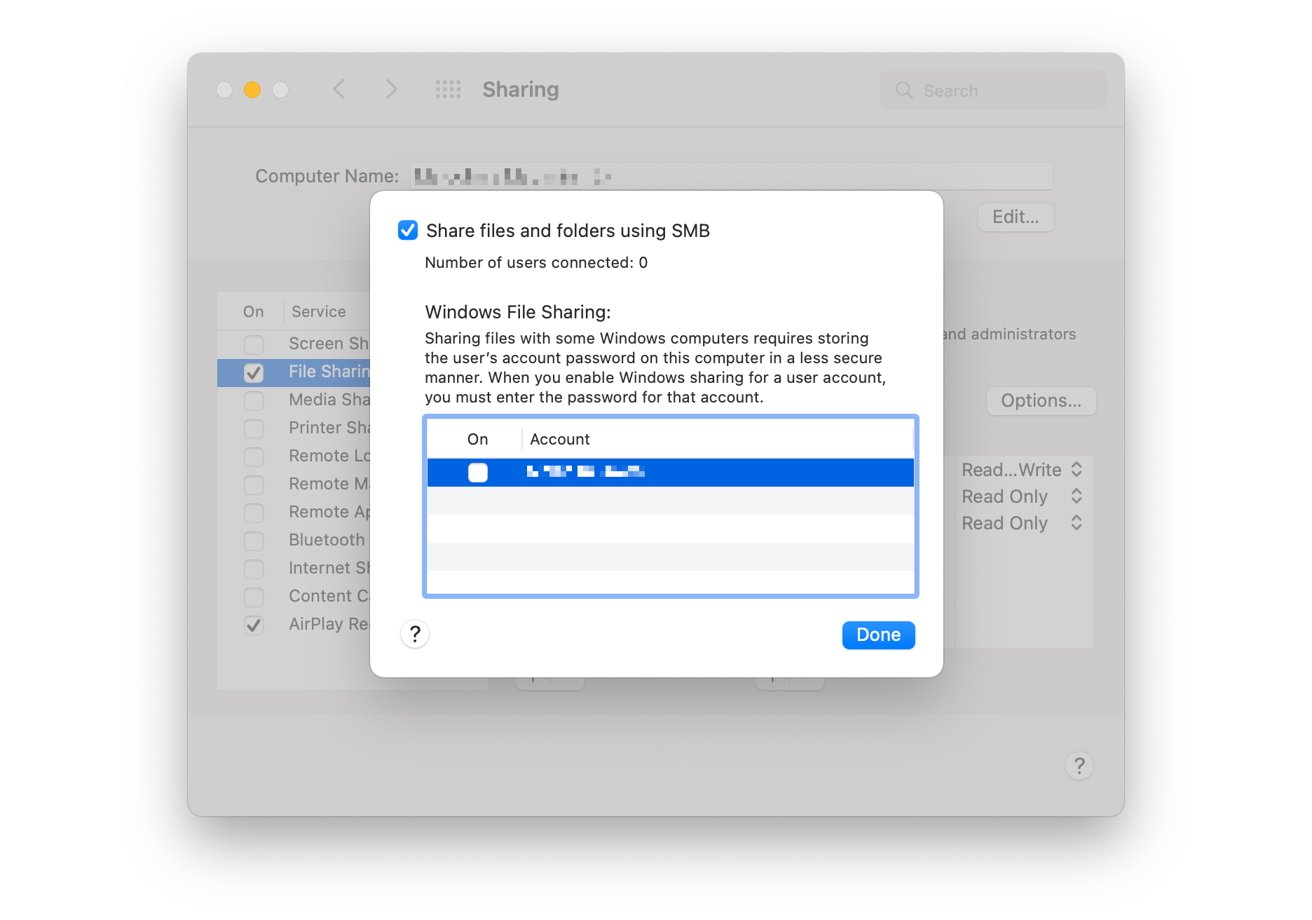
Enabling SMB for users in macOS
Tick the box next to the user account sharing files to the Windows PC. You will be asked to confirm the user account password. Once accepted, click Done.
Note the information on this page detailing the SMB address you will need in Windows to connect.
Click back to System Preferences, then Network. Select your active network connection, then Advanced.
Under WINS, click Workgroup then the workgroup name for the Windows PC. This will typically be either WORKGROUP or MSHOME by default but can be different for advanced networking setups or at work.
Click OK, then Apply.
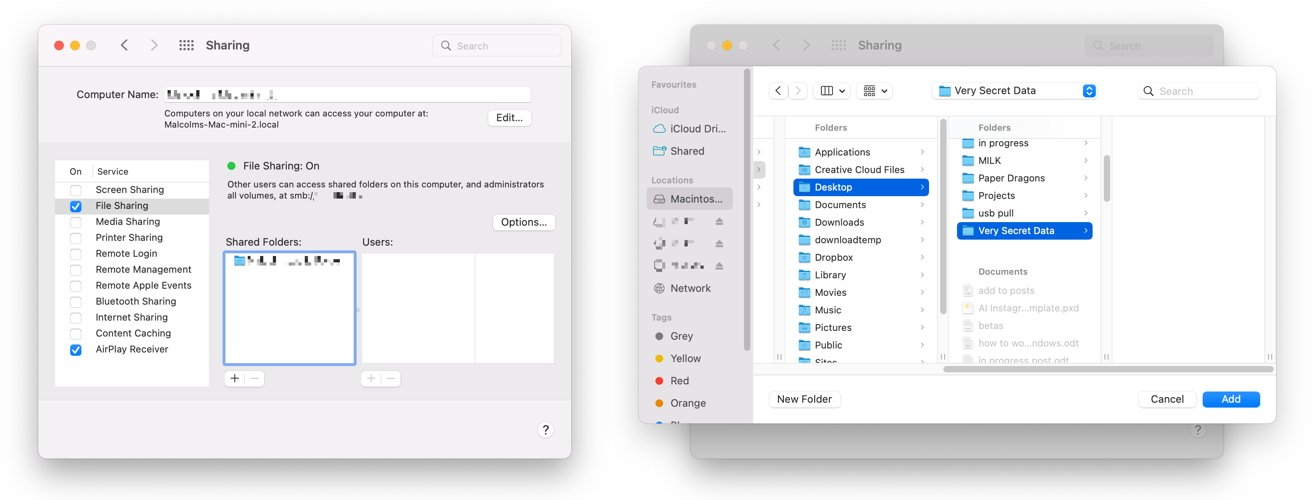
Setting up the shared folder in macOS
Head back to the Sharing menu and, under File Sharing, click the plus under Shared Folders. Navigate to the folder you want to share, then click Add.
You can change the settings for the folder under Users, including which users and groups can access the folder and what they can do with it. This includes reading and writing, read-only access, write-only access, and denying access.
Accessing shared macOS folders in Windows
Open File Explorer and select Network. The Mac should appear in that list. If so, click it and enter the Mac account name and password to access it.

Accessing the shared Mac folder in Windows
If it doesn’t appear, click the address bar, type in \\ followed by the for the Mac, and press Enter. Be aware that you must use backslashes, not forward slashes, for this to work. Under Enter Network Credentials, type in your Mac account credentials and confirm.

