
Download Windows Speedup Tool to fix errors and make PC run faster
When you run the built-in Windows DISM tool, if you receive error message codes like 87, 112, 11, 3, 87,1726, 1392, 1393, 1910, etc, then these general troubleshooting suggestions may help you fix the problem. The error code may be accompanied by a message :
- If the accompanying message is – The restore health option is not recognized in this context, An error occurred while processing the command, A Windows capability name was not recognized, The cleanup-image option is unknown, etc. it could indicate that the DISM command you use is not supported by the operating system version.
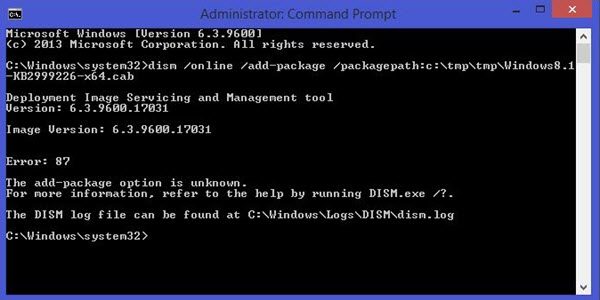
- If the accompanying message is – The add-package option is unknown, it could indicate that the option you use is not supported by the operating system version.
If a Windows image becomes unserviceable, you can use the Deployment Imaging and Servicing Management (DISM) tool to update the files and correct the problem. In the case of system inconsistencies and corruptions, corrupted Windows Update files, etc., you can run the DISM tool by using the Cleanup-Image functionality along with the available switches.
But if the effort fails, you may need to find out why this happened. Such errors are usually faced when you use the /restorehealth parameter – but it could appear when you use other parameters as well.
What does DISM stand for?
DISM stands for Deployment Image Servicing and Management. It is a command-line tool that helps users service a Windows image or prepare a Windows Pre-installation Environment (Windows PE). The DISM tool is also helpful when the System File Checker stops working or the Windows image becomes unserviceable.
Fix DISM Error on Windows 11/10
To fix DISM Errors 87, 112, 11, 3, 87,1726, 1392, 1393, 1910 on Windows PC, follows these suggestions:
1] Run offline ChkDsk scan
In an elevated CMD execute the following command:
chkdsk /offlinescanandfix
Restart Windows and proceed to the next action.
Read: System error 5 has occurred, Access is denied
2] Revert Pending Actions
Open an elevated command prompt window and execute the following command to refresh the DISM tool:
dism.exe /image:C: /cleanup-image /revertpendingactions
This will revert all pending tasks, including Windows Updates. It is recommended that you boot offline and then run it a recovery command prompt.
Related: The WOF Driver encountered a corruption in the compressed file’s Resource Table – DISM error.
3] Start Component Cleanup
Next, execute the following command:
dism.exe /online /Cleanup-Image /StartComponentCleanup
This will clean up the component store so that everything can run properly again.
Read: DISM /Apply-Image command fails with Error Code 5
4] Restore Health
Restart and then Run sfc /scannow in Safe Mode.
Restart your system and see if you can run the following command now:
dism.exe /online /Cleanup-Image /RestoreHealth
Read: Fix 0x800f082f DISM Remove Package error
How do you read DISM logs?
Windows saves the DISM logs inside the DISM folder on the C drive. The DISM folder is located at the following location:
c:\windows\logs\dism
On opening the DIS folder, you will see a text file with the name dism. Open this file to read the DISM logs.
This should help!
RELATED READS:
- Fix DISM Error 0x800f0906
- DISM Unable to access the Image Error 2
- Fix DISM Error 0x800f081f or 0x800f0906
- DISM Error 1009: The configuration registry database is corrupt
- Error 50, DISM does not support servicing Windows PE with the online option.
Anand Khanse is the Admin of TheWindowsClub.com, a 10-year Microsoft MVP (2006-16) & a Windows Insider MVP (2016-2022). Please read the entire post & the comments first, create a System Restore Point before making any changes to your system & be careful about any 3rd-party offers while installing freeware.
Wireless Display Fix I guess
A Lazy one click(kinda-sorta-ish) solution for the infamous:
Error: 87

A Windows capability name was not recognized.
problem you get when trying to add the «Wireless Display» feature on Windows 10 LTSC.
This happens because:
Microsoft-Windows-WirelessDisplay-FOD-Package requires Microsoft-Windows-RegulatedPackages-Package, which is excluded from LTSC.
According to abbodi1406.
This repo contains the necessary packages and a powershell script to fix just that.
I really should not be shipping UUP files so I highly recommend you getting them yourself from UUP dump or somewhere else:
https://uupdump.net/getfile.php?id=e2d7464a-c8cc-4779-ad1d-36699425f3d3&file=Microsoft-Windows-RegulatedPackages-Package.ESD
https://uupdump.net/getfile.php?id=e2d7464a-c8cc-4779-ad1d-36699425f3d3&file=Microsoft-Windows-RegulatedPackages-WOW64-Package.ESD
https://uupdump.net/getfile.php?id=e2d7464a-c8cc-4779-ad1d-36699425f3d3&file=Microsoft-Windows-Client-LanguagePack-Package_en-us-amd64-en-us.esd
After downloading them you should extract each of them to a different folder with 7-zip.
Then add them to your system with:
dism /Online /Add-Package /PackagePath:1\Microsoft-Windows-RegulatedPackages-Package~31bf3856ad364e35~amd64~~10.0.19041.1.mum

dism /Online /Add-Package /PackagePath:2\Microsoft-Windows-RegulatedPackages-wow64-package~31bf3856ad364e35~amd64~~10.0.19041.1.mum

dism /Online /Add-Package /PackagePath:3\update.mum
Or you can use this repo.
Instructions
- Download the whole repo
- Unzip the thing
- Run the powershell script as Administrator
- Reboot
- Run
DISM /Online /Add-Capability /CapabilityName:App.WirelessDisplay.Connect~~~~0.0.1.0as Administrator, or just simply add the feature from Windows setting.

Preamble
Windows is awful, nuff sed…
Installed a US version… then added Thai locale (location, keyboard, regional settings, etc.)… so far so good.
However, the Windows UI was still displayed in English and trying to change the UI to Thai was a nightmare.
In the Languages settings, the Windows display language menu could not be changed from English to Thai, even though the Preferred languages list contained both English and Thai.
The Thai setting, under the Preferred languages list, had the ominous warning “Your Windows license supports only one display language”
Simple option
This didn’t work for me, How to Fix Your Windows License Supports Only One Display Language on Windows 10
HKEY_LOCAL_MACHINE\SYSTEM\CurentControlSet\Control\Nls\Language
The setting for both Default and InstallLanguage was 0409 (en-US), changing to 041e (th-Th) did not work. The InstallLanguage key reverted back to US (0x0409) after a reboot.
However, in the powershell command I didn’t have Thai installed in the same manner as the Korean is shown in the video.
PS C:\Windows\system32> dism /online /get-intl

Deployment Image Servicing and Management tool
Version: 10.0.19041.844

Image Version: 10.0.19044.1288

Reporting online international settings.

Default system UI language : en-US
System locale : th-TH
Default time zone : SE Asia Standard Time
Active keyboard(s) : 041e:0000041e, 0409:00000409
Keyboard layered driver : PC/AT Enhanced Keyboard (101/102-Key)

Installed language(s): en-US
  Type : Fully localized language.

The operation completed successfully.
PS C:\Windows\system32>
I was missing
Installed language(s): en-US
  Type : Fully localized language.
Installed language(s): en-US
  Type : Partially installed language, MUI type.
  Fallback languages en-US

The operation completed successfully.
PS C:\Windows\system32>
Using powershell
From
How to Add or Change Language of Windows 10 Home Single Language to Spanish (Spain)
https://www.youtube.com/watch?v=K0QB_xAvZu8
To Spanish
mkdir %TEMP%\LP
if exist "%SystemRoot%\SysWOW64\" (set "Arch=x64") else (set "Arch=x86")
for /f "tokens=1-3" %a in ('reg query "HKLM\SOFTWARE\Microsoft\Windows NT\CurrentVersion" /v ReleaseID') do @set "Version=%~c"
curl -o %TEMP%\LP\es-es.cab "https://filedn.com/lOX1R8Sv7vhpEG9Q77kMbn0/Windows10/LanguagePacks/%Version%/%Arch%/es-es.cab"
dism /online /Add-Package /PackagePath:%TEMP%\LP\es-es.cab
reg add HKLM\SYSTEM\CurrentControlSet\Control\Nls\Language /v InstallLanguage /t REG_SZ /d 0c0a /f
reg add HKLM\SYSTEM\CurrentControlSet\Control\Nls\Language /v Default /t REG_SZ /d 3082 /f
rmdir /s /q %TEMP%\LP
powershell.exe Set-WinUILanguageOverride -Language es-es
powershell.exe Set-WinUserLanguageList es-es -Force
dism /online /Add-Capability /CapabilityName:Language.Basic~~~es-es~0.0.1.0
dism /online /Add-Capability /CapabilityName:Language.Handwriting~~~es-es~0.0.1.0
dism /online /Add-Capability /CapabilityName:Language.OCR~~~es-es~0.0.1.0
dism /online /Add-Capability /CapabilityName:Language.TextToSpeech~~~es-es~0.0.1.0
cd
To Thai
Change all occurrences of es-es to th-th and 0c0a to 041e and 3082 to 1054. Use the table linked below for other languages.
mkdir %TEMP%\LP
if exist "%SystemRoot%\SysWOW64\" (set "Arch=x64") else (set "Arch=x86")
for /f "tokens=1-3" %a in ('reg query "HKLM\SOFTWARE\Microsoft\Windows NT\CurrentVersion" /v ReleaseID') do @set "Version=%~c"
curl -o %TEMP%\LP\th-th.cab "https://filedn.com/lOX1R8Sv7vhpEG9Q77kMbn0/Windows10/LanguagePacks/%Version%/%Arch%/th-th.cab"
dism /online /Add-Package /PackagePath:%TEMP%\LP\th-th.cab
reg add HKLM\SYSTEM\CurrentControlSet\Control\Nls\Language /v InstallLanguage /t REG_SZ /d 041e /f
reg add HKLM\SYSTEM\CurrentControlSet\Control\Nls\Language /v Default /t REG_SZ /d 1054 /f
rmdir /s /q %TEMP%\LP
powershell.exe Set-WinUILanguageOverride -Language th-th
powershell.exe Set-WinUserLanguageList th-th -Force
dism /online /Add-Capability /CapabilityName:Language.Basic~~~th-th~0.0.1.0
dism /online /Add-Capability /CapabilityName:Language.Handwriting~~th-th~0.0.1.0
dism /online /Add-Capability /CapabilityName:Language.OCR~~~th-th~0.0.1.0
dism /online /Add-Capability /CapabilityName:Language.TextToSpeech~~~th-th~0.0.1.0
cd
Language packs – useful tables
Use the Language/Region tag, Language/Region ID (hex and decimal codes) from these tables
- Available languages for Windows – the best table
- 5 Appendix A: Product Behavior – omits the decimal values
Results
Despite the error messages, the UI was changed to Thai.
Microsoft Windows [Version 10.0.19044.1288]
(c) Microsoft Corporation. All rights reserved.

C:\Windows\system32>mkdir %TEMP%\LP

C:\Windows\system32>if exist "%SystemRoot%\SysWOW64\" (set "Arch=x64") else (set "Arch=x86")

C:\Windows\system32>for /f "tokens=1-3" %a in ('reg query "HKLM\SOFTWARE\Microsoft\Windows NT\CurrentVersion" /v ReleaseID') do @set "Version=%~c"

C:\Windows\system32>curl -o %TEMP%\LP\th-th.cab "https://filedn.com/lOX1R8Sv7vhpEG9Q77kMbn0/Windows10/LanguagePacks/%Version%/%Arch%/th-th.cab"
  % Total    % Received % Xferd  Average Speed   Time    Time     Time  Current
                                 Dload  Upload   Total   Spent    Left  Speed
100 23.2M  100 23.2M    0     0   768k      0  0:00:31  0:00:31 --:--:-- 1073k

C:\Windows\system32>dism /online /Add-Package /PackagePath:%TEMP%\LP\th-th.cab

Deployment Image Servicing and Management tool
Version: 10.0.19041.844

Image Version: 10.0.19044.1288

Processing 1 of 1 - Adding package Microsoft-Windows-Client-LanguagePack-Package~31bf3856ad364e35~amd64~th-TH~10.0.19041.1
[==========================100.0%==========================]
The operation completed successfully.

C:\Windows\system32>reg add HKLM\SYSTEM\CurrentControlSet\Control\Nls\Language /v InstallLanguage /t REG_SZ /d 041e /f
The operation completed successfully.

C:\Windows\system32>reg add HKLM\SYSTEM\CurrentControlSet\Control\Nls\Language /v Default /t REG_SZ /d 1054 /f
The operation completed successfully.

C:\Windows\system32>rmdir /s /q %TEMP%\LP

C:\Windows\system32>powershell.exe Set-WinUILanguageOverride -Language th-th

C:\Windows\system32>powershell.exe Set-WinUserLanguageList th-th -Force

C:\Windows\system32>dism /online /Add-Capability /CapabilityName:Language.Basic~~~th-th~0.0.1.0

Deployment Image Servicing and Management tool
Version: 10.0.19041.844

Image Version: 10.0.19044.1288

[==========================100.0%==========================]
The operation completed successfully.

C:\Windows\system32>dism /online /Add-Capability /CapabilityName:Language.Handwriting~~th-th~0.0.1.0

Deployment Image Servicing and Management tool
Version: 10.0.19041.844

Image Version: 10.0.19044.1288


Error: 87

A Windows capability name was not recognized.

The DISM log file can be found at C:\Windows\Logs\DISM\dism.log

C:\Windows\system32>dism /online /Add-Capability /CapabilityName:Language.OCR~~~th-th~0.0.1.0

Deployment Image Servicing and Management tool
Version: 10.0.19041.844

Image Version: 10.0.19044.1288


Error: 87

A Windows capability name was not recognized.

The DISM log file can be found at C:\Windows\Logs\DISM\dism.log

C:\Windows\system32>dism /online /Add-Capability /CapabilityName:Language.TextToSpeech~~~th-th~0.0.1.0

Deployment Image Servicing and Management tool
Version: 10.0.19041.844

Image Version: 10.0.19044.1288

[==========================100.0%==========================]
The operation completed successfully.

C:\Windows\system32>cd
MS Paint is one of the classic apps of Windows that serves a slew of purposes, such as image editing and creating new images. Paint comes preinstalled with the operating system ever since the oldest version of Windows and includes a decent number of features. Microsoft recently introduced a revamped version of the Windows Paint app by the name Paint 3D that lets you perform some advanced tasks without the need of using professional designing tools.
Both the offerings by Microsoft are pretty robust in terms of performance, but several users have been vary of frequent crashes and response issues with the Paint or Paint 3D app in Windows 11. If you are suffering from the same problem and looking for remedies to fix the Paint/Paint 3D app, you have landed in the right place. This exhaustive guide contains a list of tried and tested methods capable of fixing the issues with the Paint/Paint 3D app in Windows 11 effortlessly.
Here are the potential fixes that can get the Paint/Paint 3D app up and running on your Windows 11 system.
1. Quit the App
If the Paint or Paint 3D app freezes in the middle of use, you can quit the app process and then relaunch it on your PC. The complete procedure to quit the Paint app is discussed below.
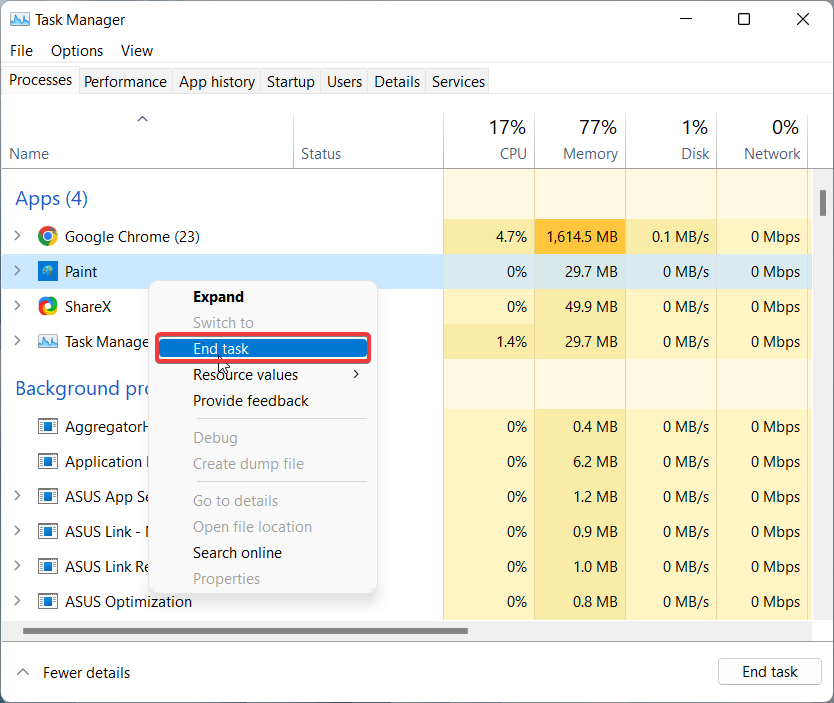
1. Launch the Task Manager using the Ctrl + Shift + Esc shortcut combination.
2. Look for the Paint or Paint 3D process listed in the apps section of the Processes tab.
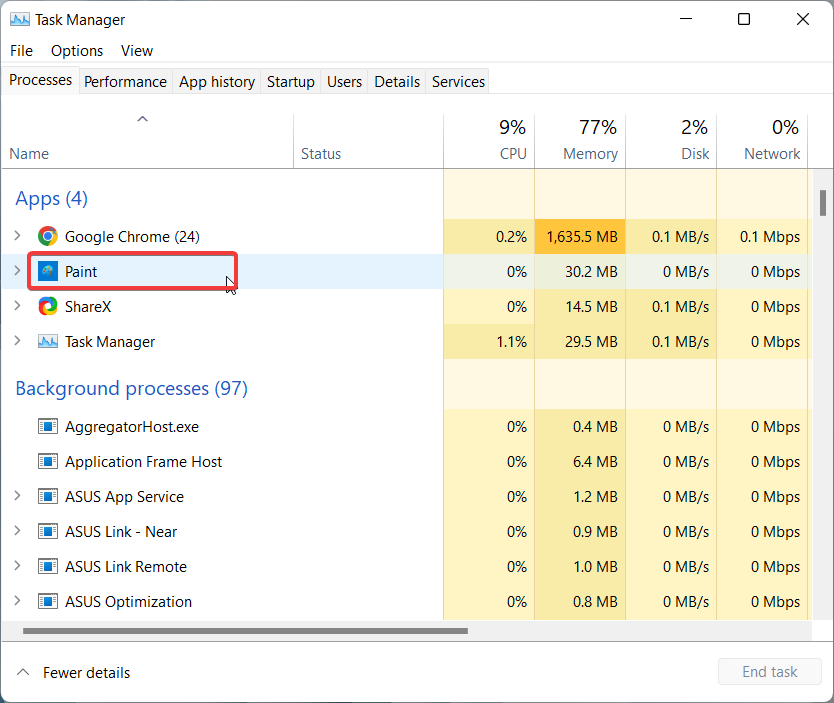
3. Now, right-click the Paint/Paint 3D app and choose the End task option from the context menu.
When the Paint app is closed, relaunch the Paint/Paint 3D app. Hopefully, the trivial issue will no longer bother you.
2. Run Paint App as Administrator
Several Windows apps struggle to work when they do not have sufficient permissions to operate successfully on Windows 11 devices. This can also be the reason why the Paint app is currently facing issues. To resolve the problem, we recommend that you launch the Paint app after assigning it administrative privileges. The process is an easy one.
1. Launch the Start Menu by pressing the Windows key on the keyboard. Type Paint in the search bar at the top.
2. Right-click Paint listed in the search results and choose the Run As Administrator option.
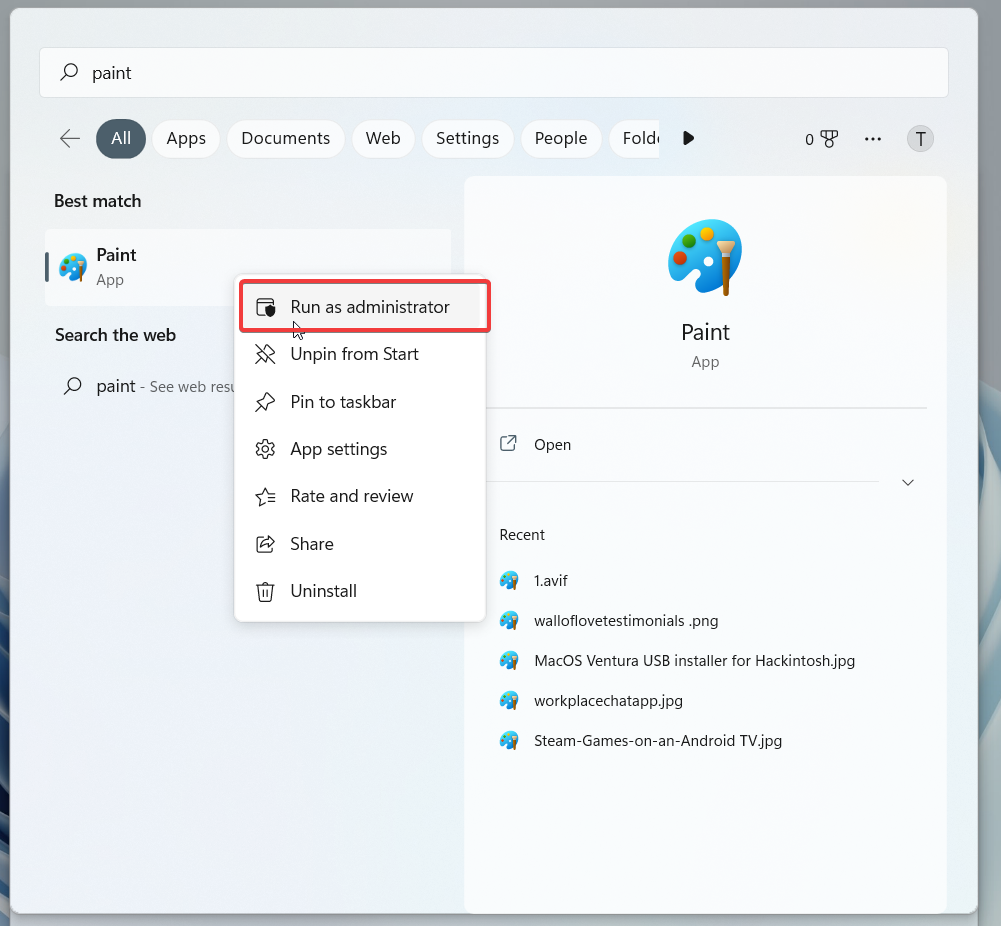
In the User Action Control window that pops up, press the Yes button.
3. Clear Microsoft Store Cache
Microsoft Store Cache is quite infamous for creating hindrances in the working of different Microsoft apps, including MS Paint. The cache files get corrupted when not deleted for a long time and give rise to weird problems. Thankfully, you can get rid of the Microsoft Store cache by executing a simple command. Let us proceed to do it.
1. Launch the Run dialog box using the Windows + R shortcut key.
2. In the textbox, enter the wsreset.exe command and press the Enter key.
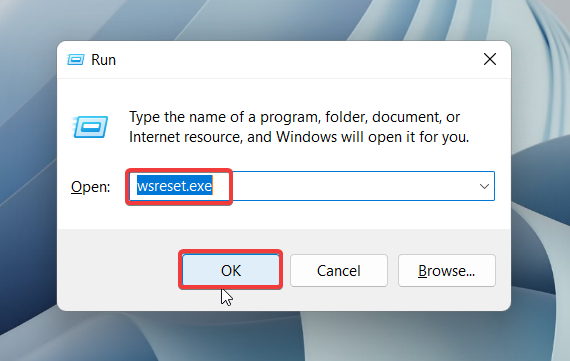
As soon as you will execute the command, the blank command prompt will appear on the screen. The screen will remain intact during the time of the Microsoft Store cache deletion process in the background. Once the cache files get deleted successfully, Microsoft Store will launch automatically. Now re-launch the Paint/Paint 3D app and see if it is functional now.
4. Uninstall Fonts
Several Windows users have mentioned that they began experiencing issues with the Paint app soon after installing Fonts from unknown or third-party resources. If you are someone who has recently installed fronts on their Windows 11 PC, we suggest that you uninstall them, especially if they belong to shady websites. If you are clueless about how to access the list of downloaded and installed fonts, this might help.
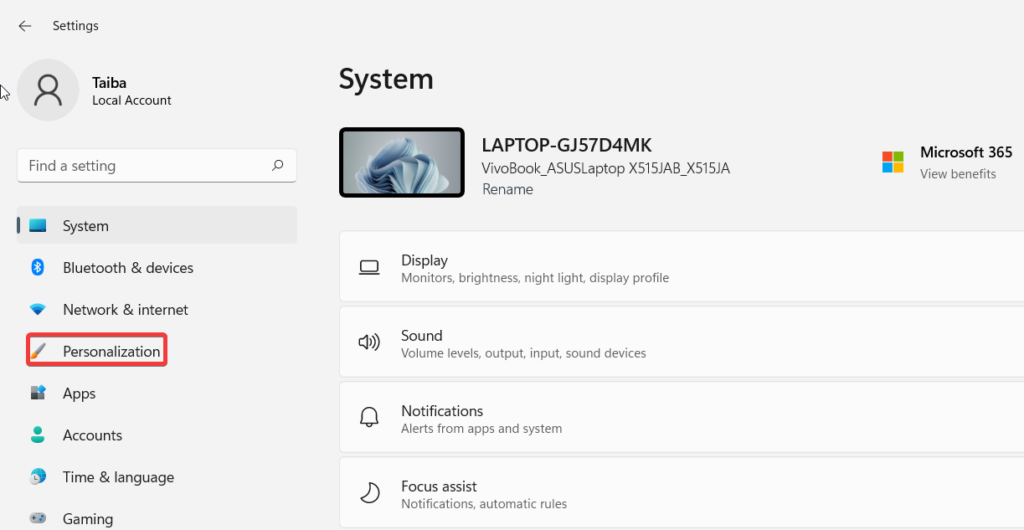
1. Launch the Windows Settings app using the Windows + I shortcut key.
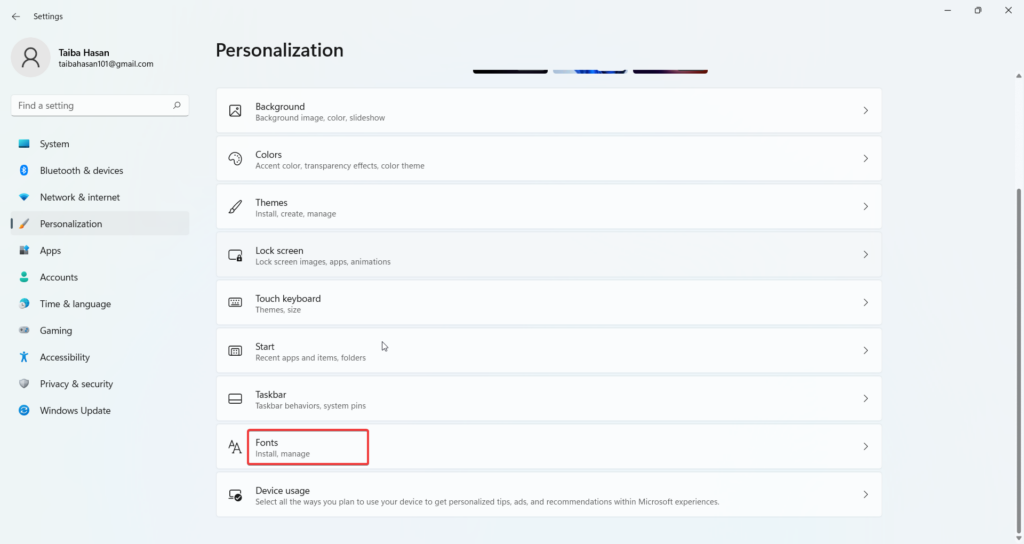
2. Select Personalization from the left sidebar.
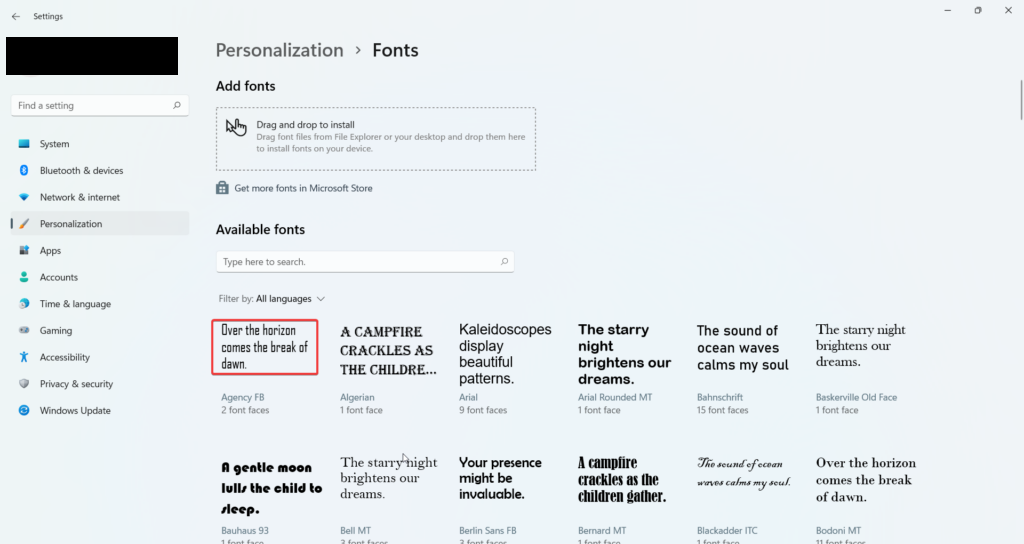
3. Scroll down and click Fonts.
4. The list of all the fonts currently installed on your PC will appear. Select the font you wish to get rid of.
5. Press the Uninstall button located on the next page.
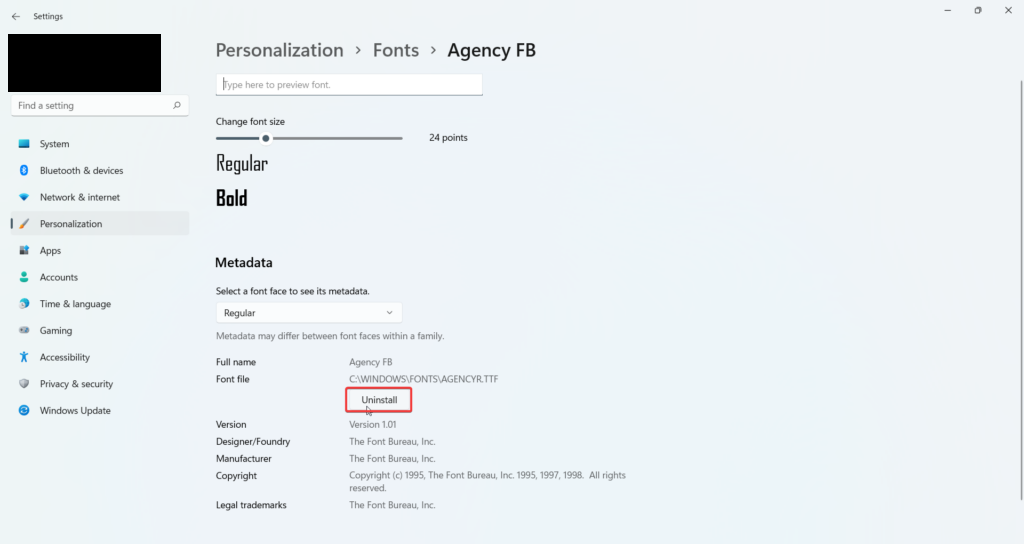
Follow the same process for all the fonts you wish to remove from your system. Once done, reboot your PC and try using the Paint/ Paint 3D app once again.
5. Run Windows Apps Troubleshooter
If none of the methods mentioned above could resolve the issue with the Paint/Paint 3D app, you should use the troubleshooter built into Windows to resolve the problems associated with the Windows apps.
The troubleshooter diagnoses the installed Windows apps, and if find any underlying problems, they will present the possible solutions for it. To run the Windows apps troubleshooter on your Windows PC, follow the step-by-step process given below.
1. Launch the Start Menu by pressing the Windows key.
2. Type Troubleshoot Settings in the search bar on top and press the Enter key.
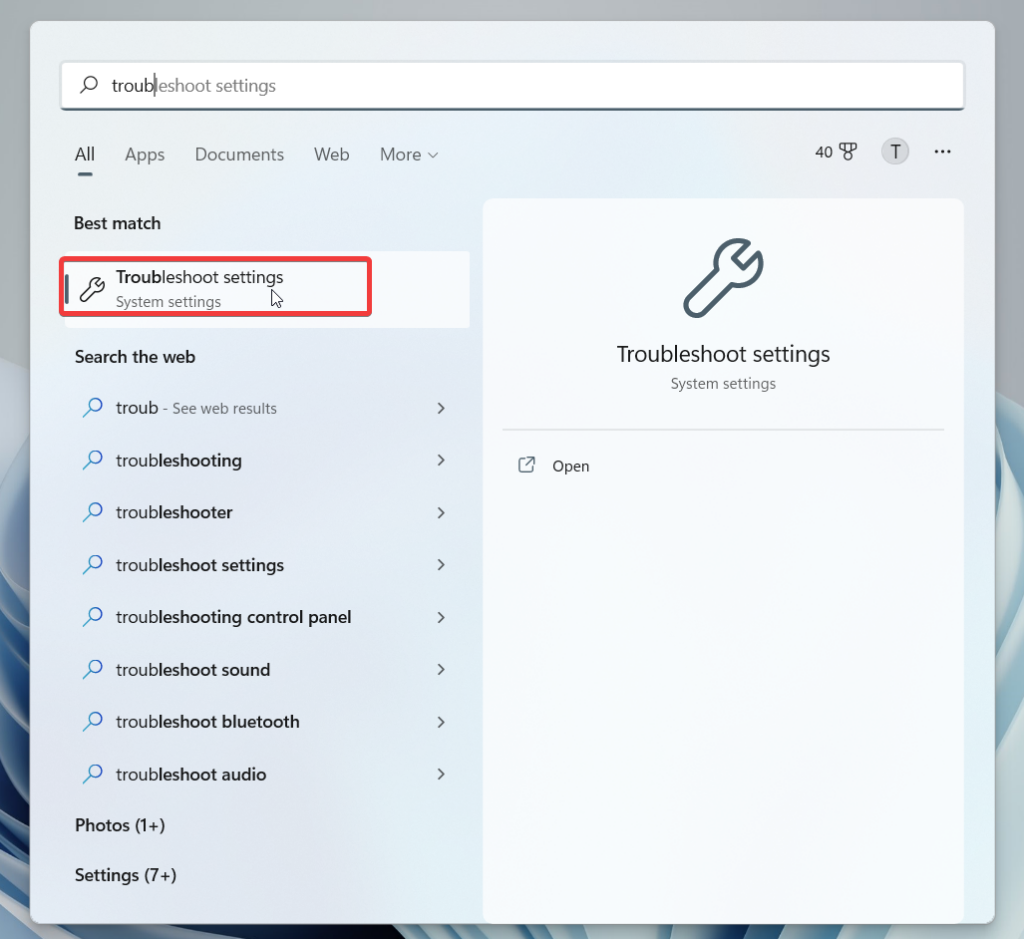
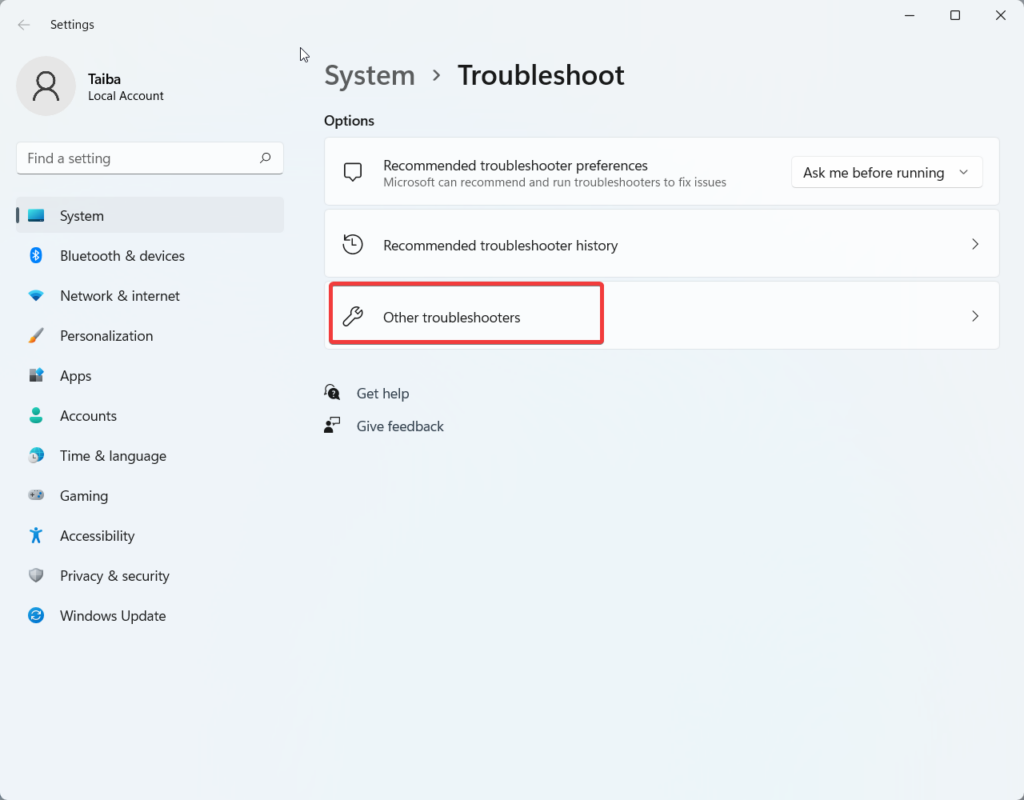
3. Now, select Other troubleshooters.
4. On the next page, you will see the list of all the troubleshooters. Find Windows Store Apps in the list and press the Run button next to it.
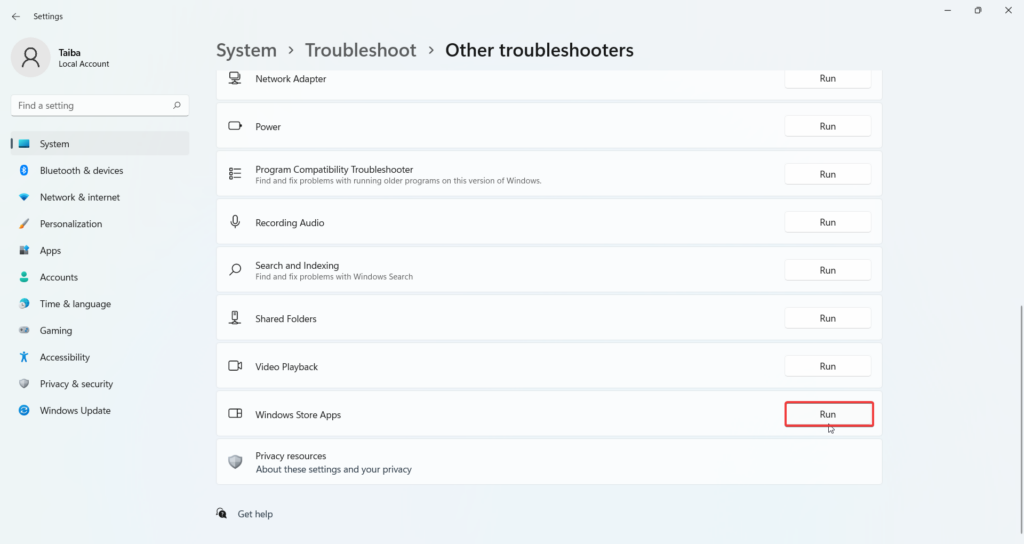
Wait until the troubleshooter detects the problems and presents the possible fixes to resolve them.
6. Run System File Checker
Corrupt system files can also lead to unpleasant problems like the one we are facing at the moment. Fortunately, we can use the System File Checker tool to scan the system files, identify the corrupt ones and fix them. Here is the step-by-step process to run the SFC scan.
1. Launch the Command Prompt in Administrator Mode from the Start Menu.

2. When the Command Prompt opens up, type or copy-paste the following command.
sfc/scannow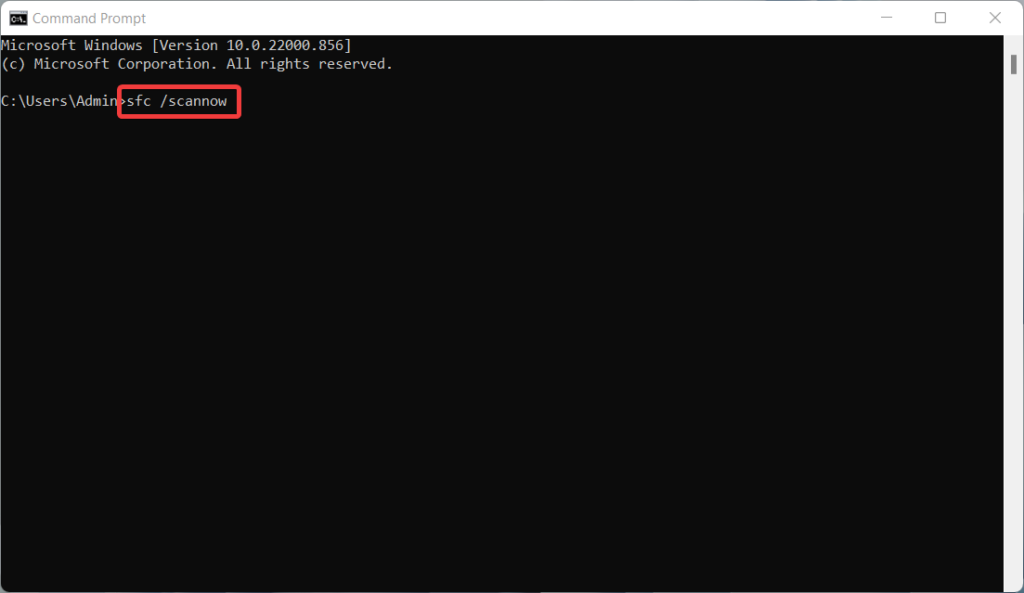
Once the scan gets completed successfully, reboot your device and see if the problem with the Paint app is resolved now.
7. Update Windows
Windows 11 is a relatively new operating system, and for the same reason, it is bug-ridden and very often suffers from performance issues. Microsoft regularly rolls out new updates as a mechanism to tackle such issues.
If your PC is running on an obsolete version of Windows 11, issues like the Paint app not responding or crashing are inevitable. Hence, you should ensure that Windows is running on the latest version available for your device. Here is how:
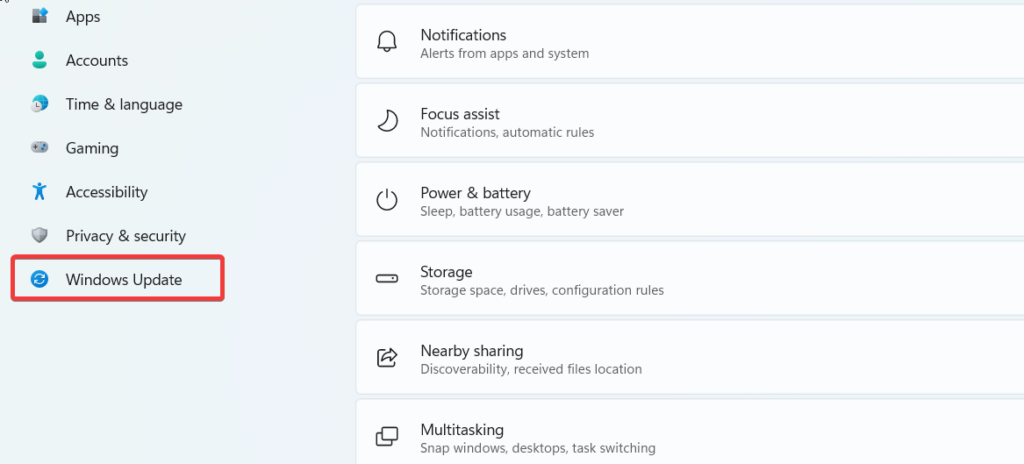
1. Bring up the Settings app on your PC using the Windows + I shortcut.
2. Choose Windows Update from the left sidebar.
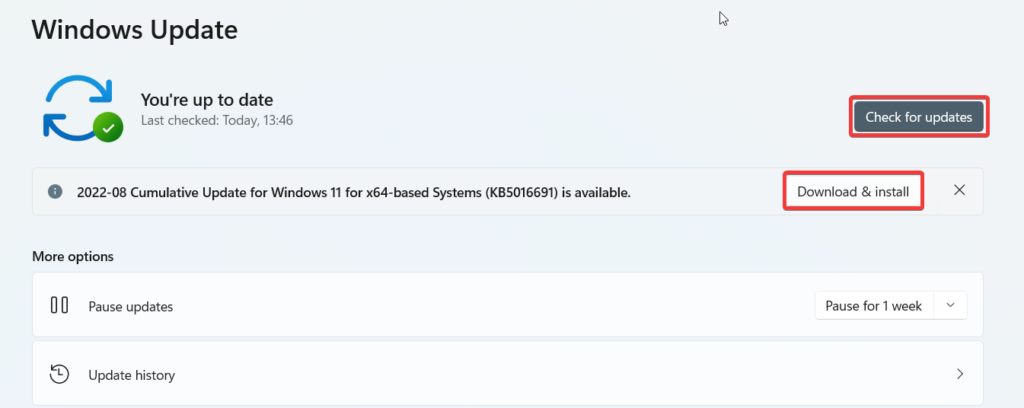
3. Press the Check for Updates button on the top right. If you find any available updates for your PC, press the Download and Install button.
8. Update Paint App
If you haven’t been successful in getting the Paint/Paint 3D app back to work, you should ensure that you are using the up-to-date version of the app and not an obsolete one. Microsoft regularly releases updates for apps like Paint/Paint 3D with added features, performance improvements, and patches. You can head to the Microsoft Store to download and install any new updates available.
9. Repair or Reset the Paint/Paint 3D App
If the Paint app is still not working for you, you need to repair the Paint/Paint 3D app to fix the corrupt app files. Using the repair option is an efficient and sure-shot method of resolving app-related issues without deleting the app data. You can repair the Paint/Paint 3D app in the following way.
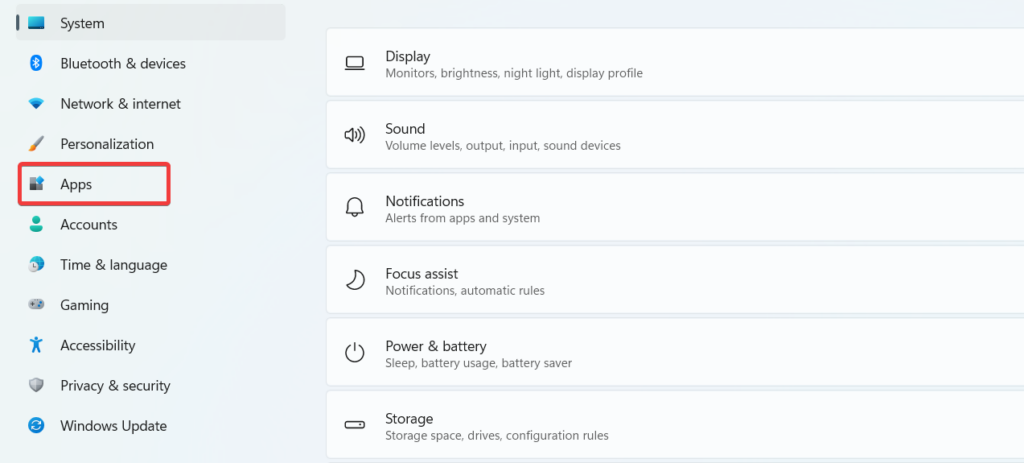
1. Bring up the Settings app using the Windows + I shortcut key.
2. Select the Apps option from the left sidebar.
3. Choose the Apps & Features option on the next page.
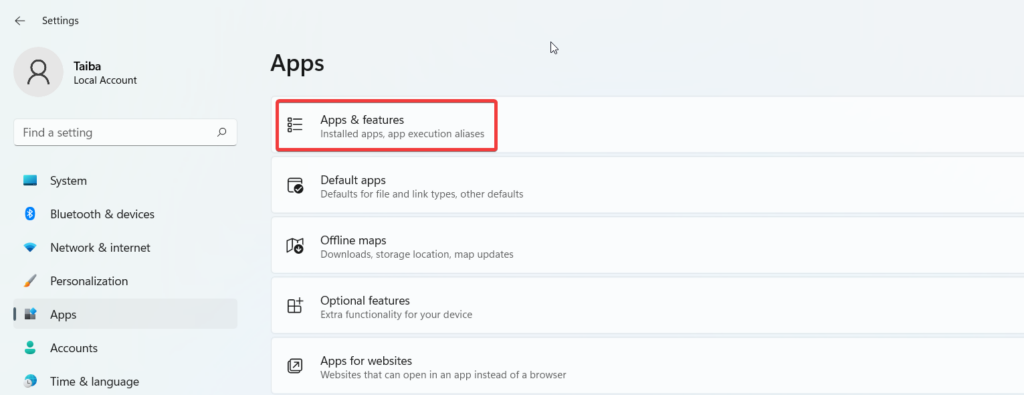
4. Look for Paint/Paint 3D in the app list section and click the ellipsis icon to reveal the hidden menu and select Advanced options.
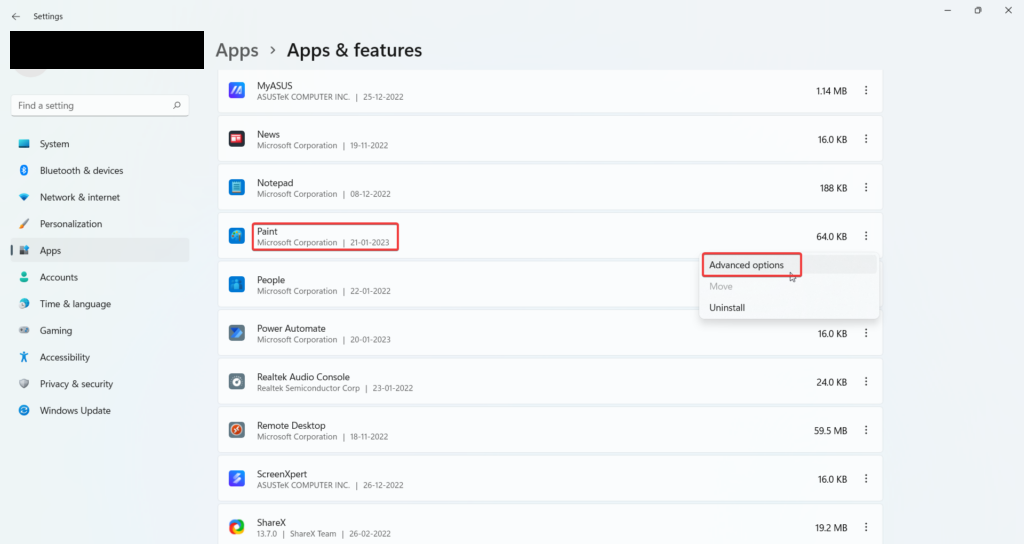
5. Press the Repair button on the next page without losing your data.
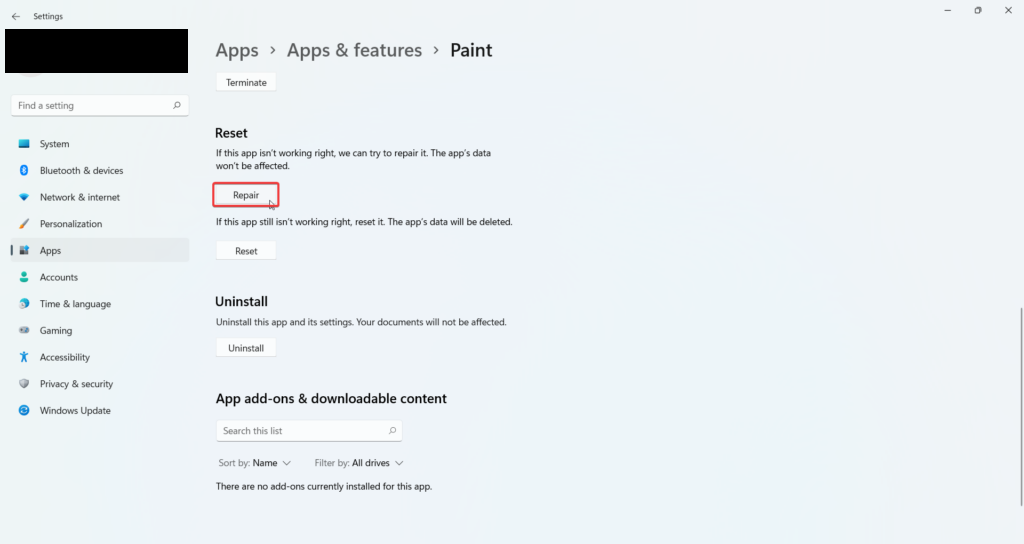
When the repair is complete, try using the app once again. We are positive that the app will work flawlessly now. If you still encounter problems, you can press the Reset button to clear all the data of the app and restore it to the factory version.
10. Reinstall the App
If nothing seemed to have worked until now, reinstalling the Paint/Paint 3D app is your last resort. Since Paint is a native app of Windows, uninstalling the app through the conventional method is not possible. Uninstalling the Paint app from your PC can be done by executing some commands on Command Prompt. The step-by-step procedure is given below.
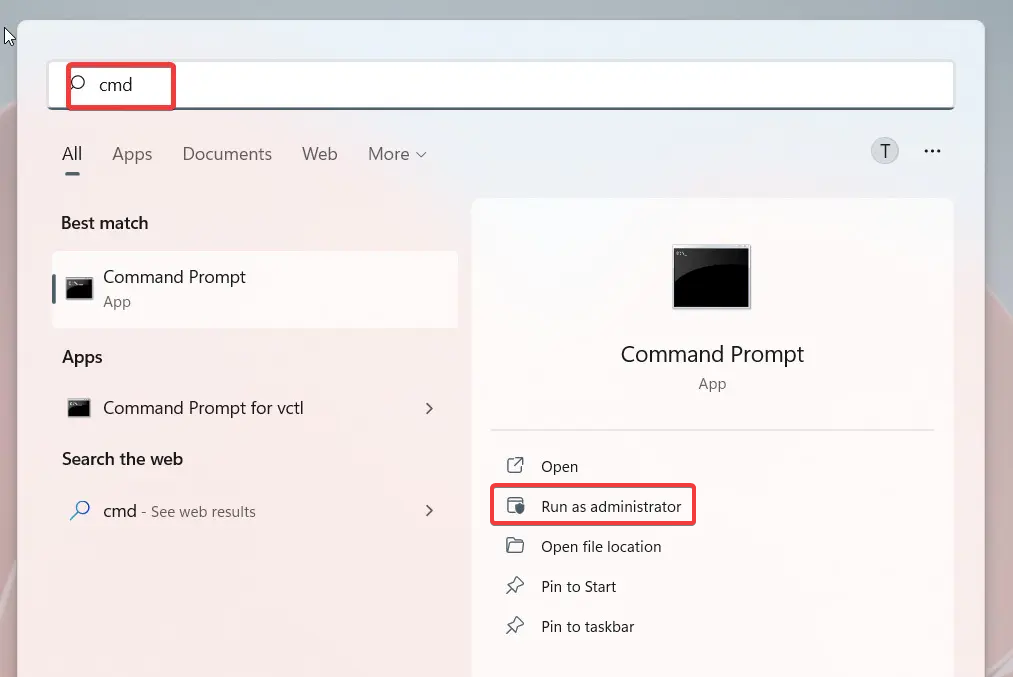
1. Click the Windows icon on the taskbar to launch the Start Menu.
2. Type Command Prompt in the search bar on the top and click the Run As Administrator option located on the right side.
3. Type or copy-paste the following command in the Command Prompt and press the Enter key.
dism /Online /Remove-Capability /CapabilityName:Microsoft.Windows.MSPaint~~~~0.0.1.0.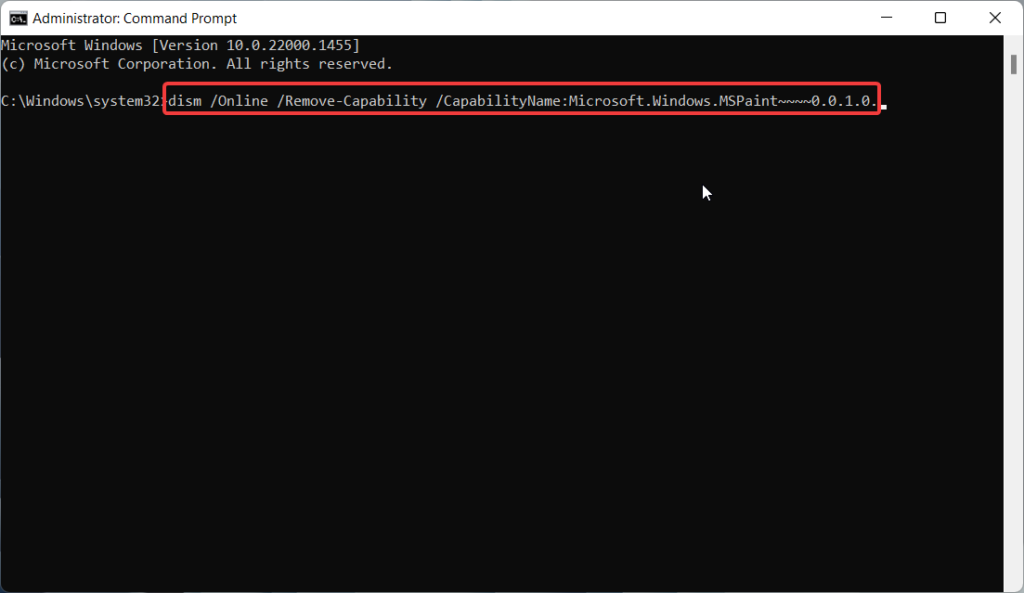
4. As soon as you will execute the above command, MS paint will be uninstalled from your Windows 11 device. To re-install the Paint app, you need to execute the following command.
dism /Online /Add-Capability /CapabilityName:Microsoft.Windows.MSPaint~~~~0.0.1.0.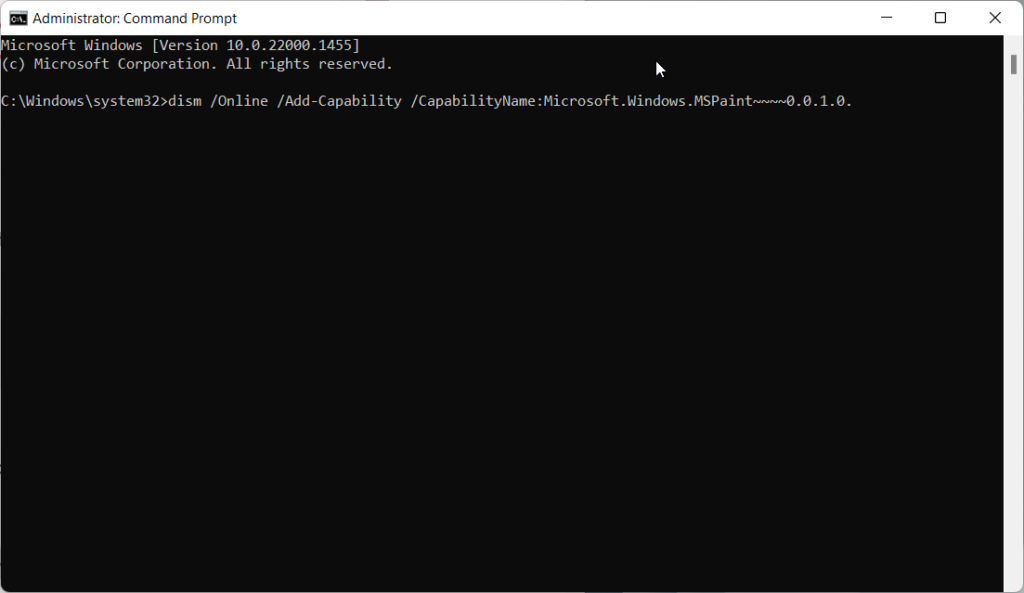
You will see that the Paint app is reinstalled on your device in no time. Use the Paint app now. You will no longer have to face any issues now.
Conclusion
Microsoft Paint is a handy tool for editing images or creating pieces of art, and being unable to use the app can hamper your work. Luckily, you can execute the troubleshooting methods described above to resolve the problems lurking in the Paint/Paint 3D app in Windows 11. Need any further assistance? Reach out to us in the comments section.
In this blog post I’ll explain how to install RSAT (Remote Server Administration Tools) on Windows 10. Previously, this was handled via an MSI installer, however with Microsoft Windows 10 version 1809 (October Update) and later, you must install RSAT using Features on Demand (or DISM) as the installer no long works. This will apply to all future Windows 10 releases.
Some of you may not be familiar with using the “Features on Demand” or “DISM” tool on Windows, so I decided to write up this little post to assist you in installing RSAT on the latest version of Windows 10.
Install RSAT on Windows 10 (1809 and higher)
To install RSAT on Windows 10 (version 1809 or later), open an elevated command and run the following command (as a single line):
DISM.exe /Online /add-capability /CapabilityName:Rsat.ActiveDirectory.DS-LDS.Tools~~~~0.0.1.0 /CapabilityName:Rsat.BitLocker.Recovery.Tools~~~~0.0.1.0 /CapabilityName:Rsat.CertificateServices.Tools~~~~0.0.1.0 /CapabilityName:Rsat.DHCP.Tools~~~~0.0.1.0 /CapabilityName:Rsat.Dns.Tools~~~~0.0.1.0 /CapabilityName:Rsat.FailoverCluster.Management.Tools~~~~0.0.1.0 /CapabilityName:Rsat.FileServices.Tools~~~~0.0.1.0 /CapabilityName:Rsat.GroupPolicy.Management.Tools~~~~0.0.1.0 /CapabilityName:Rsat.IPAM.Client.Tools~~~~0.0.1.0 /CapabilityName:Rsat.LLDP.Tools~~~~0.0.1.0 /CapabilityName:Rsat.NetworkController.Tools~~~~0.0.1.0 /CapabilityName:Rsat.NetworkLoadBalancing.Tools~~~~0.0.1.0 /CapabilityName:Rsat.RemoteAccess.Management.Tools~~~~0.0.1.0 /CapabilityName:Rsat.RemoteDesktop.Services.Tools~~~~0.0.1.0 /CapabilityName:Rsat.ServerManager.Tools~~~~0.0.1.0 /CapabilityName:Rsat.Shielded.VM.Tools~~~~0.0.1.0 /CapabilityName:Rsat.StorageReplica.Tools~~~~0.0.1.0 /CapabilityName:Rsat.VolumeActivation.Tools~~~~0.0.1.0 /CapabilityName:Rsat.WSUS.Tools~~~~0.0.1.0 /CapabilityName:Rsat.StorageMigrationService.Management.Tools~~~~0.0.1.0 /CapabilityName:Rsat.SystemInsights.Management.Tools~~~~0.0.1.0
*Please Note: If you are using WSUS, you may not be configured to download “optional features” from Windows Update (resulting in “cannot download”, or error “0x800F0954”). To resolve this, please follow the instructions at: https://www.stephenwagner.com/2018/10/08/enable-windows-update-features-on-demand-and-turn-windows-features-on-or-off-in-wsus-environments/
Additional Notes
You’ll notice that by using the command above, we are installing multiple “capabilities”. Below is a list of the capabilities that we install to include the full RSAT feature set:
- Rsat.ActiveDirectory.DS-LDS.Tools~~~~0.0.1.0
- Rsat.BitLocker.Recovery.Tools~~~~0.0.1.0
- Rsat.CertificateServices.Tools~~~~0.0.1.0
- Rsat.DHCP.Tools~~~~0.0.1.0
- Rsat.Dns.Tools~~~~0.0.1.0
- Rsat.FailoverCluster.Management.Tools~~~~0.0.1.0
- Rsat.FileServices.Tools~~~~0.0.1.0
- Rsat.GroupPolicy.Management.Tools~~~~0.0.1.0
- Rsat.IPAM.Client.Tools~~~~0.0.1.0
- Rsat.LLDP.Tools~~~~0.0.1.0
- Rsat.NetworkController.Tools~~~~0.0.1.0
- Rsat.NetworkLoadBalancing.Tools~~~~0.0.1.0
- Rsat.RemoteAccess.Management.Tools~~~~0.0.1.0
- Rsat.RemoteDesktop.Services.Tools~~~~0.0.1.0
- Rsat.ServerManager.Tools~~~~0.0.1.0
- Rsat.Shielded.VM.Tools~~~~0.0.1.0
- Rsat.StorageReplica.Tools~~~~0.0.1.0
- Rsat.VolumeActivation.Tools~~~~0.0.1.0
- Rsat.WSUS.Tools~~~~0.0.1.0
- Rsat.StorageMigrationService.Management.Tools~~~~0.0.1.0
- Rsat.SystemInsights.Management.Tools~~~~0.0.1.0
For more information on this change, you can visit the following URLS:
https://www.microsoft.com/en-ca/download/details.aspx?id=45520
https://docs.microsoft.com/en-us/windows-hardware/manufacture/desktop/features-on-demand-non-language-fod#remote-server-administration-tools-rsat
https://docs.microsoft.com/en-us/windows-hardware/manufacture/desktop/features-on-demand-v2–capabilities