Applies ToWindows Server 2012 R2 Datacenter Windows Server 2012 R2 Standard Windows Server 2012 R2 Essentials Windows Server 2012 R2 Foundation Windows 8.1 Enterprise Windows 8.1 Pro Windows 8.1 Windows RT 8.1
This article describes an issue that occurs after you install service packs or hotfixes in Windows RT 8.1, Windows 8.1, or Windows Server 2012 R2. A hotfix is available to resolve this issue. Before you install this hotfix, see the Prerequisites section.
Symptoms
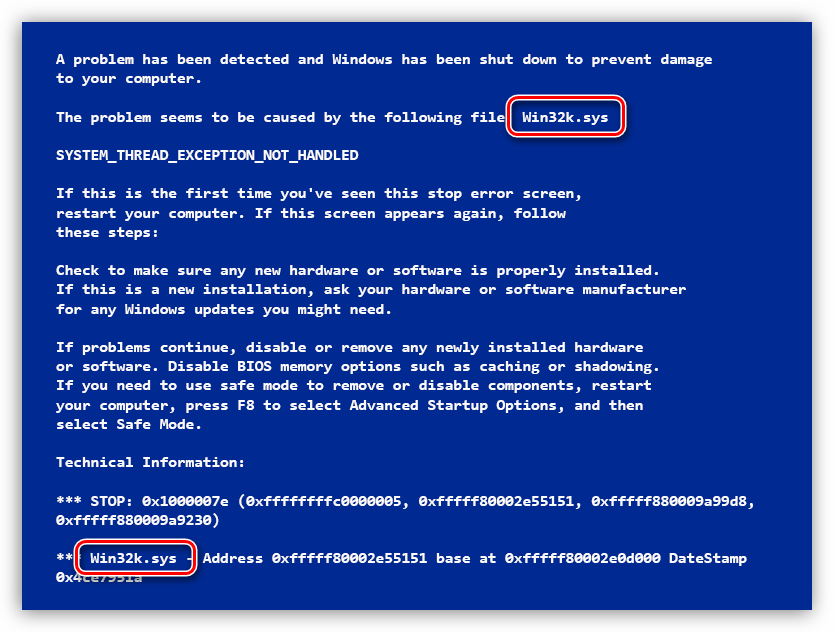
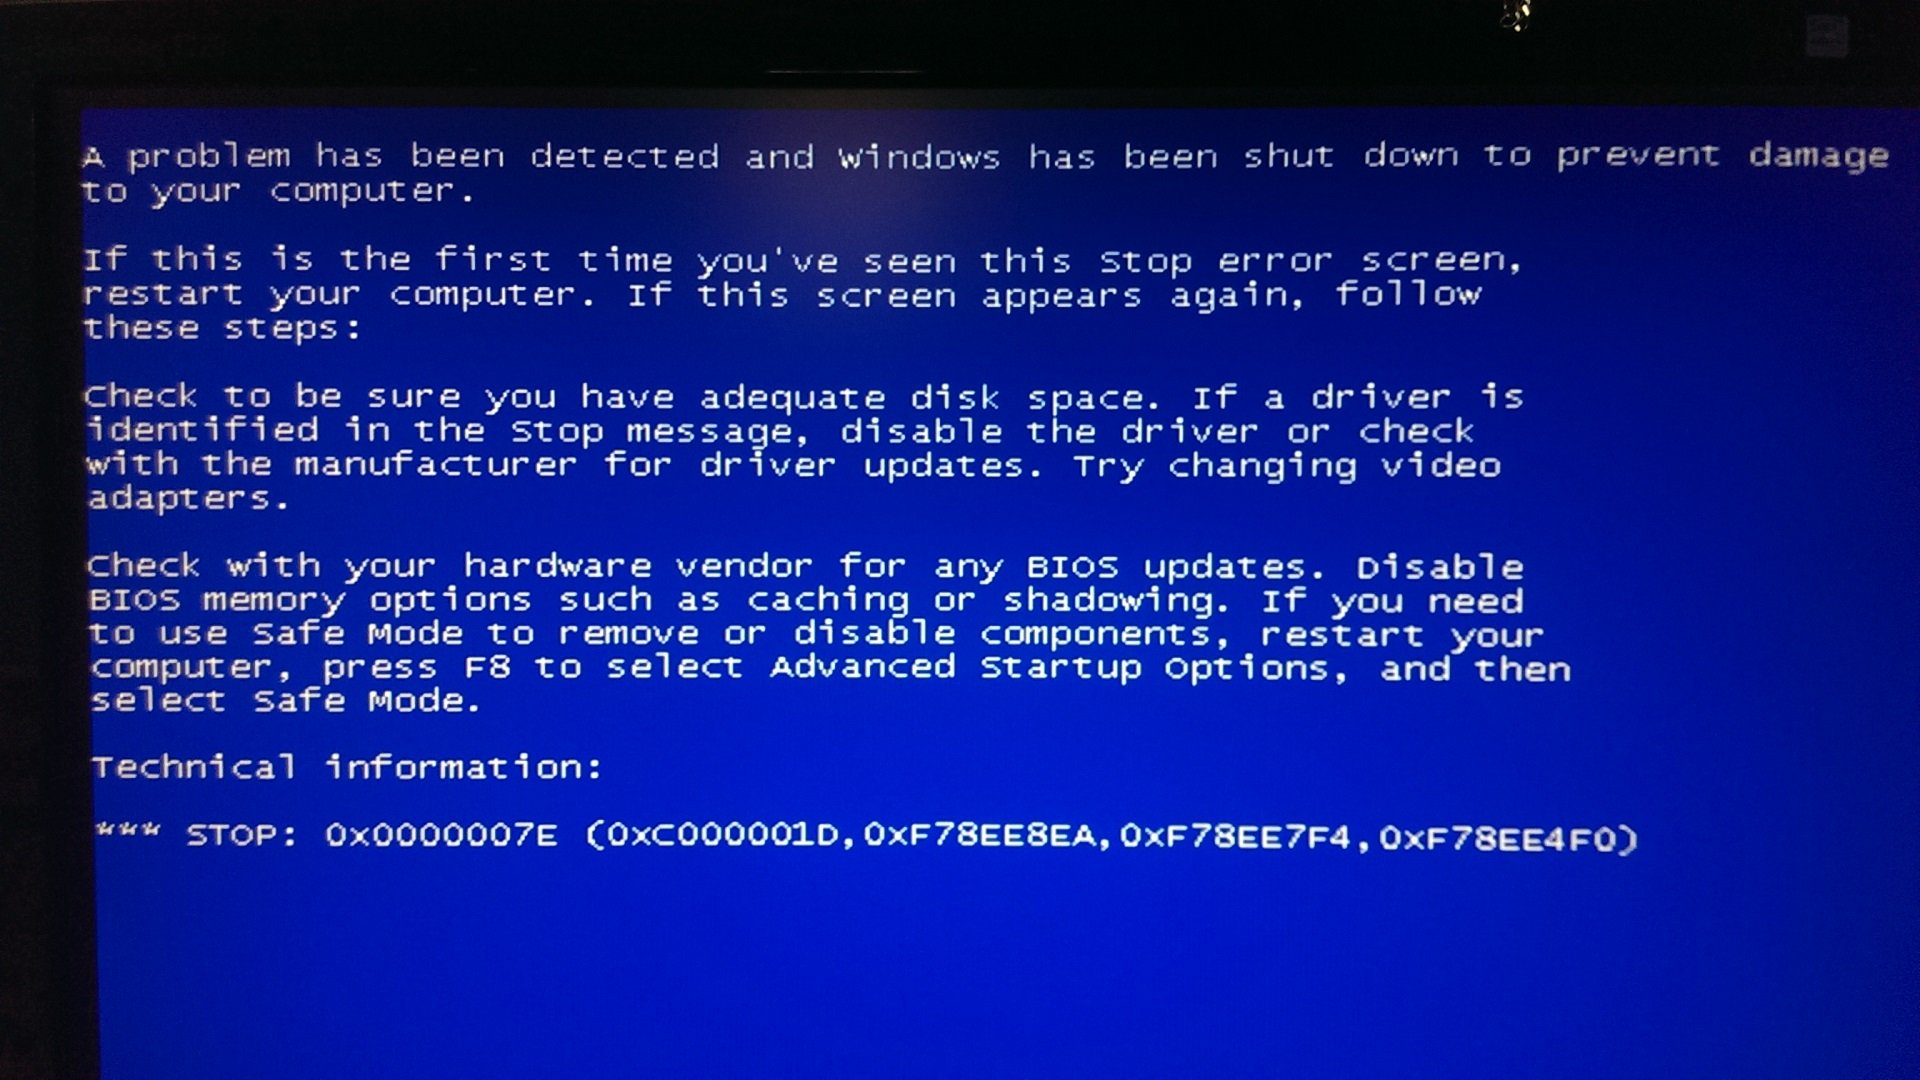
System crashes on restart, and you receive a Stop error message that resembles the following:
STOP: 0x0000007E ( parameter1, parameter2, parameter3, parameter4 )
Notes
-
This Stop error indicates a SYSTEM_THREAD_EXCEPTION_NOT_HANDLED issue.
-
The parameters in this Stop error message vary, depending on the configuration of the computer.
-
Not all «0x0000007E» Stop errors are caused by this issue.
Cause
This issue occurs because the driver directory is compressed after you install service packs or hotfixes. During system restart, the Windows software trace processor (WPP) causes uninitialized memory to be accessed, and then the system crashes.
Resolution
Hotfix information
Important If you install a language pack after you install this hotfix, you must reinstall this hotfix. Therefore, we recommend that you install any language packs that you need before you install this hotifx. For more information, see Add language packs to Windows.
A supported hotfix is available from Microsoft. However, this hotfix is intended to correct only the problem that is described in this article. Apply this hotfix only to systems that are experiencing this specific problem.
If the hotfix is available for download, there is a «Hotfix Download Available» section at the top of this Knowledge Base article. If this section does not appear, submit a request to Microsoft Customer Service and Support to obtain the hotfix.
Note If additional issues occur or if any troubleshooting is required, you might have to create a separate service request. The usual support costs will apply to additional support questions and issues that do not qualify for this specific hotfix. For a complete list of Microsoft Customer Service and Support telephone numbers or to create a separate service request, visit the following Microsoft website:
Prerequisites
To apply this hotfix, you must have update 2919355 installed in Windows 8.1 or Windows Server 2012 R2.
Registry information
To use the hotfix in this package, you do not have to make any changes to the registry.
Restart requirement
You may have to restart the computer after you apply this hotfix.
Hotfix replacement information
This hotfix does not replace a previously released hotfix.
The global version of this hotfix installs files that have the attributes that are listed in the following tables. The dates and the times for these files are listed in Coordinated Universal Time (UTC). The dates and the times for these files on your local computer are displayed in your local time together with your current daylight saving time (DST) bias. Additionally, the dates and the times may change when you perform certain operations on the files.
Windows 8.1 and Windows Server 2012 R2 file information and notes
Important Windows 8.1 hotfixes and Windows Server 2012 R2 hotfixes are included in the same packages. However, hotfixes on the Hotfix Request page are listed under both operating systems. To request the hotfix package that applies to one or both operating systems, select the hotfix that is listed under «Windows 8.1/Windows Server 2012 R2» on the page. Always refer to the «Applies To» section in articles to determine the actual operating system that each hotfix applies to.
-
The files that apply to a specific product, milestone (RTM, SPn), and service branch (LDR, GDR) can be identified by examining the file version numbers as shown in the following table:
Version
Product
Milestone
Service branch
6.3.960 0.17 xxx
Windows RT 8.1, Windows 8.1, and Windows Server 2012 R2
RTM
GDR
-
GDR service branches contain only those fixes that are widely released to address widespread, critical issues. LDR service branches contain hotfixes in addition to widely released fixes.
-
The MANIFEST files (.manifest) and the MUM files (.mum) that are installed for each environment are listed separately in the «Additional file information» section. MUM, MANIFEST, and the associated security catalog (.cat) files, are very important to maintain the state of the updated components. The security catalog files, for which the attributes are not listed, are signed with a Microsoft digital signature.
For all supported x86-based versions of Windows 8.1
|
File name |
File version |
File size |
Date |
Time |
Platform |
|---|---|---|---|---|---|
|
Wpprecorder.sys |
6.3.9600.17901 |
21,848 |
10-Jun-2015 |
12:06 |
x86 |
For all supported x64-based versions of Windows 8.1 and of Windows Server 2012 R2
|
File name |
File version |
File size |
Date |
Time |
Platform |
|---|---|---|---|---|---|
|
Wpprecorder.sys |
6.3.9600.17901 |
23,384 |
10-Jun-2015 |
12:02 |
x64 |
For all supported Windows RT 8.1
|
File name |
File version |
File size |
Date |
Time |
Platform |
|---|---|---|---|---|---|
|
Wpprecorder.sys |
6.3.9600.17901 |
22,368 |
10-Jun-2015 |
12:13 |
Not applicable |
Additional file information
Additional file information for Windows 8.1 and for Windows Server 2012 R2
Additional files for all supported x86-based versions of Windows 8.1
|
File property |
Value |
|---|---|
|
File name |
X86_610eb479082a039b4eb3d3c0df589680_31bf3856ad364e35_6.3.9600.17901_none_ce0b9d2d4e9815d2.manifest |
|
File version |
Not applicable |
|
File size |
699 |
|
Date (UTC) |
10-Jun-2015 |
|
Time (UTC) |
12:14 |
|
Platform |
Not applicable |
|
File name |
X86_microsoft-windows-wpprecorder_31bf3856ad364e35_6.3.9600.17901_none_aa2f5e162dbafcf5.manifest |
|
File version |
Not applicable |
|
File size |
2,049 |
|
Date (UTC) |
10-Jun-2015 |
|
Time (UTC) |
12:18 |
|
Platform |
Not applicable |
Additional files for all supported x64-based versions of Windows 8.1 and of Windows Server 2012 R2
|
File property |
Value |
|---|---|
|
File name |
Amd64_0d55c8a34895448b3551374e4c43fc5a_31bf3856ad364e35_6.3.9600.17901_none_fd685237cb8796ec.manifest |
|
File version |
Not applicable |
|
File size |
703 |
|
Date (UTC) |
10-Jun-2015 |
|
Time (UTC) |
12:14 |
|
Platform |
Not applicable |
|
File name |
Amd64_microsoft-windows-wpprecorder_31bf3856ad364e35_6.3.9600.17901_none_064df999e6186e2b.manifest |
|
File version |
Not applicable |
|
File size |
2,051 |
|
Date (UTC) |
10-Jun-2015 |
|
Time (UTC) |
12:21 |
|
Platform |
Not applicable |
Additional files for all supported Windows RT 8.1
|
File property |
Value |
|---|---|
|
File name |
Arm_e399afdcc2db7dacc3be8be98b77e837_31bf3856ad364e35_6.3.9600.17901_none_efeaf7c621114ae5.manifest |
|
File version |
Not applicable |
|
File size |
699 |
|
Date (UTC) |
10-Jun-2015 |
|
Time (UTC) |
12:14 |
|
Platform |
Not applicable |
|
File name |
Arm_microsoft-windows-wpprecorder_31bf3856ad364e35_6.3.9600.17901_none_aa31d06e2db81bbb.manifest |
|
File version |
Not applicable |
|
File size |
2,049 |
|
Date (UTC) |
10-Jun-2015 |
|
Time (UTC) |
12:14 |
|
Platform |
Not applicable |
Status
Microsoft has confirmed that this is a problem in the Microsoft products that are listed in the «Applies to» section.
References
See the terminology that Microsoft uses to describe software updates.
Need more help?
Want more options?
Explore subscription benefits, browse training courses, learn how to secure your device, and more.
The 0x0000007e error code may often pop up at a time when you least expect or know how to deal with it. This common Windows problem leaves many in a state of distress, and most times with a BSOD, it simply means your computer just crashed. This is an error indicating that your system has developed a problem that is out of its scope or capability to handle and is usually hardware, driver, or system resources. Now, let us show you what this error code actually means, why it actually occurs, and how you can easily fix it.
What is the 0x0000007e Error Code?
The 0x0000007e error, which is sometimes referred to as a Bugcheck or Stop Error, is among the many BSODs that interrupts your work to show that something is more fundamentally wrong inside your system. It often carries such messages as “The computer has rebooted from a bugcheck” or “stop 0x000000000000007e 0xffffffffc0000005.” Though it can happen with older versions of Windows, it still tends to appear rather frequently even with Windows 10 and 11.
Causes of the BSOD 0x0000007e Error
There are some of the reasons which can be responsible for the 0x0000007e error:
- Insufficient Hard Disk Space: Insufficient hard disk space may make the outer environment of your system unable to work properly.
- Corrupted or Outdated BIOS: The BIOS update sometimes gets interrupted or an older version may be the reason for the error.
- Outdated Drivers: The drivers of the system that may be related to your audio, video, or network devices should be updated against time.
- Compatibility Issues: Incompatible hardware or software with your version of Windows may also pose the problem.
- Malware Infection: These viruses and malicious software can also corrupt system files and create the 0x0000007e error code.
- The Wrong Driver Installation: If you happen to install an incorrect driver or incompatibility, then you stand a chance of confronting this 0x0000007e blue screen of death error. Make sure to download and install the correct, compatible driver in order not to be able to cause problems.
- Outdated audio and video drivers: Are you using any sort of external audio or video component? Yes, these need updated drivers too. Sometimes, if inappropriate drivers are kept associated with them, they tend to mislead the system and develop a lot of Windows and BSOD errors.
How to Fix the 0x0000007e Error
If you’re experiencing the BSOD with error code 0x0000007e, here are the steps you can follow to resolve it:
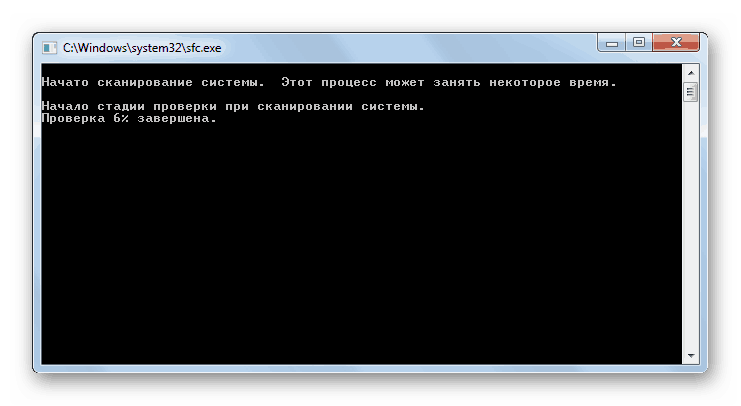
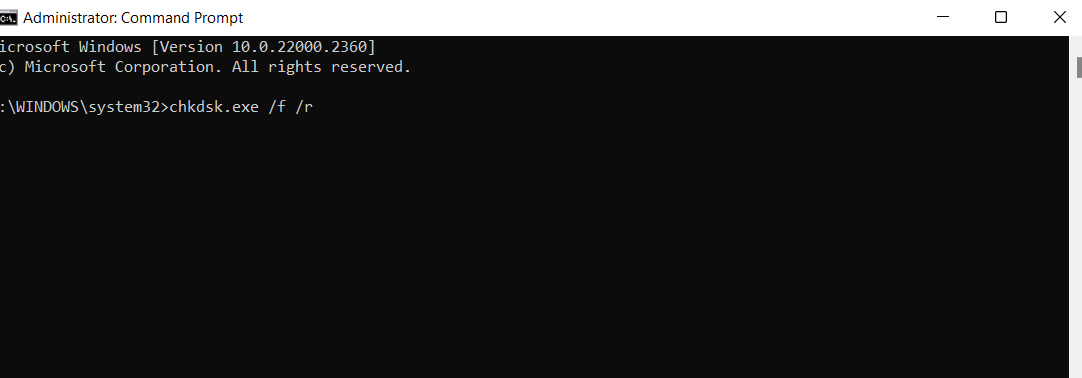
Scan Your Hard Drive Using CHKDSK
The problem can arise due to hard disk errors. You can run the CHKDSK built-in utility, which has the capability to check for issues and then fix them. Run the Command Prompt as an Administrator and type chkdsk /f; after that, follow the on-screen instruction to scan your hard disk.
Install Windows Updates
Keep your operating system up to date with the latest Windows update available. Check if it’s available from Settings Update & Security Windows Update, then click Check for Updates.
Update Your Device Drivers
This would avoid the occurrence of the 0x0000007e error, and for that, you should keep your device drivers updated. You easily can do this by using any third-party utility for updating drivers in an easy and error-free way.
You simply need to download and install a driver updater tool of your choice. Then launch it. After that, hit the Scan button. It should then show what drivers need to be updated. Finally, hit the Update button to update all the outdated drivers that have been found.
Consider using Outbyte Driver Updater to easily scan and update all outdated drivers on your computer.
In our Driver library you can find the most suitable Chipsets Drivers for your OS and a short guide on how to install it.
Free Up Disk Space
Freeing up space on your hard drive can resolve the issue. Delete unnecessary files using Disk Cleanup or manually clear your temporary files. Here are some things that we suggest you should do:
- Restart your system. – Doing this automatically removes and deletes any cached memory on your system, which has built up due to excessive and continuous usage.
- Use the Prefetch command. – For this, simply type the prefetch command on the Run applet. Then in the window that appears, select all files and delete them.
- Use the Cleanmgr command. – Alternatively, you can use the cleanmgr command via the Run applet. This will launch a dialog box where you must select all options and erase everything.
- Execute the Temp command. – For this option, input the temp command into the Run applet, select all files that you see and erase them.
Use a PC Repair Tool
Outbyte PC Repair can help optimize your system by detecting and fixing various issues, which might include the 0x0000007e error. This tool ensures your system runs smoothly by eliminating performance-related problems. When you encounter the BSOD error, you can use this kind of program to check if the issue is a result of device inefficiency. To ensure that you get the best result, make sure that the tool that you are using is also updated.
Scan for Malware
Malware entities, like viruses, Trojans, adware, and worms can modify critical Windows system files and processes. Also, they can cause serious damage to your Windows system, resulting in Windows errors or BSODs.
To ensure your computer is not infected by these entities, scan your system using a trustworthy malware removal tool. Perform a complete system scan by clicking the Scan button. Wait for the malware scan to complete and apply the recommended fixes.
Edit the Registry with RegEdit
If you believe corrupted registry entries are to blame, open the Registry Editor and correct the values associated with your drivers. Be cautious, as making incorrect changes here can harm your system.
- Start Windows in Safe Mode. Once in Safe Mode, go to the Start menu.
- Next, type run and hit Enter. This will open the Run utility.
- Type
regeditinto the blank field on the window that appears. Hit OK to proceed. - The Registry Editor will now appear. Now, find this registry entry:
HKEY_LOCAL_MACHINE\SYSTEM\ControlSet001\Services\Intelppm. - Then right-click on it and choose Modify. Input 4 and hit OK.
- Close the Registry Editor and reboot your Windows PC.
Check for Driver Issues
Ensure all drivers are compatible and up-to-date by opening Device Manager and updating or reinstalling problematic drivers.
Update the BIOS
Updating your BIOS can also resolve this error, but ensure you download the correct version for your motherboard from the manufacturer’s website.
Checking the Current BIOS version: Open and access the Start menu and input system information into the search field. Hit Enter. You should now see your current BIOS version.
Checking Your Motherboard Model via Command Prompt: Press the Windows + R shortcut key to access the Run applet. Then type cmd to open the Command Prompt window. Then input this command followed by the Enter key: wmic baseboard get the product, Manufacturer, version, serial number. You should now see your motherboard’s model number.
Since you have all information you need, go to the manufacturer’s website and download the latest BIOS version. Once you have it downloaded, run it to install it right away.
People Also Ask
Read about common Windows Errors:
0x00000050 error code
NETIO.SYS Blue Screen Error
Windows Error 0x80300024
Windows Error Code 0xc0000225
How to Fix The 0x80070780 Error Code on Windows 10/11?
FAQs
1. What does a 0x0000007e error mean?
It means a blue screen error-what happens when there is a system malfunction due to faulty hardware or problematic software.
2. How do I fix the error 0x0000007e?
Update your drivers, clean out some disk space, or use a repair tool such as Outbyte PC Repair.
3. Can malware cause this?
Yes, it can. Malware may damage some system files and, therefore, can cause a 0x0000007e error. Always perform a full system scan.
4. What should I do in case updating drivers doesn’t help?
Re-install drivers or scan hardware for problems if the update of drivers didn’t help.
5. How can I update BIOS?
From your mother board website, download the latest version available and follow the recommendations to install it.
Ошибка 0x0000007e может затронуть каждого, кто является владельцем операционной системы Windows, и неважно какая эта версия. Любой пользователь может стать жертвой этого довольно-таки внезапного события. Вы можете просто сидеть спокойно себе и работать над очередным, ну скажем, видео, которое долгое время монтировали. Копаетесь себе в редакторе и…все — на вашем экране мерцает синий экран смерти, у которого код ошибки 0x0000007e.
И проблема то в том, что на синем экране смерти ничего толкового вам не предоставляется, хотя, казалось, там всегда показывается довольно важная и полезная информация, которая всегда, обычно, там присутствует. Из полезного там есть разве что несколько потенциальных советов для решения ошибки 0x0000007e. Но, нужно признать, они порой действительно работают, хоть и редко.
Более того, нужно упомянуть, что данная ошибка может проявлять себя даже во время установки новенькой Windows. При установке новой Windows проблемы должны решаться, а не создаваться заново. Для начала, давайте обозначим возможные причины, из-за которых мог появиться синий экран смерти и прилагающиеся к нему код ошибки 0x0000007e.
Причины появления ошибки 0x0000007e
Причины у этой проблемы довольно сильно разбросаны по компьютеру, т.е. они могут укрываться как в железе, так и в программном обеспечении. В общем, вы, скорее всего, будете долговато разбираться с этой проблемой, что, в общем, естественно для Windows.
- Недостаточно свободного места на жестком диске компьютера. Ну тут все довольно просто и понятно. Вы постоянно, без остановки, загружали свой жесткий диск контентом. Неважно каким: программы, игры, аудиовидеофайлы и т.д. Скажем на вашем жестком осталось 100 мб свободного места или даже меньше. В этом случае не удивительно появление такой проблемы, как синий экран смерти.
- Недавняя замена аппаратной составляющей в компьютере. Идея состоит в следующем: вы поменяли некоторые составляющие вашей конфигурации, например, видеокарту. Но операционная система осталась той же и, соответственно, драйвера для видеокарты те же. То есть ОС пытается применить старые и несовместимые драйвера для новой видеокарты.
- Конфликт с установленным обновлением для операционной системы. После очередной установки обновления Windows вполне могла появиться ошибка 0x0000007e. После установок апдейтов от Microsoft всегда есть шанс того, что что-то пойдет не так.
- Несовместимая операционная система и BIOS. Крайне редкий вариант развития событий. В основном происходит из-за устаревшей версии BIOS. Порой пользователи даже и не задумываются о том, чтобы обновлять свой BIOS, пока, разумеется, и не происходят такие казусы. Во время установки новой ОС все и всплывает.
- Проблемы с какими-то драйверами в системе. В системе есть драйвера, которые по какой-то причине вошли в конфликт с операционной системой Windows.
- Проблема с загрузочным диском или флеш-носителем. Ошибка 0x0000007e может появляться также на почве неисправного носителя для устанавливаемой операционной системы, т.е. установочным диском или флешкой.
- Конфликт с подключенной периферией. Ошибка 0x0000007e может возникнуть даже из-за подключенных к системе сторонних устройств.
В общем, как мы и говорили, довольно широкий разброс мест, в которых может крыться причина синего экрана смерти. Теперь, после ознакомления с причинами проблемы, давайте рассмотрим методы решения.
Как исправить ошибку 0x0000007e
Методы исправления для синего экрана смерти, у которого код ошибки 0x0000007e, мы будет рассматривать в порядке расположения причин. Также практически все методы будут включать в себя Безопасный режим.
Метод №1 Освобождение места на жестком диске
Все довольно просто — вам нужно запустить операционную систему в Безопасном режиме, а затем очистить свой жесткий диск от лишних скоплений файлов. Для загрузки в Безопасном режиме сделайте следующее:
- Для начала перезагрузите свой компьютер.
- Во время процесса запуска нажмите на F8.
- Выберите пункт о Безопасном запуске. Система в этом режиме будет запущена только с самыми необходимыми компонентами, следовательно, никакой ошибки 0x0000007e появиться не должно.
- Теперь остается только лишь освободить на жестком диске место, и, желательно как можно больше. Хотя бы несколько гигабайт.
После этого запустите свою систему в обычном режиме и проверьте, исчез ли синий экран смерти. Если же нет, то идем дальше.
Метод №2 Установка подходящего драйвера
Как уже упоминалось в причинах, после замены какой-то аппаратной запчасти тоже могли начаться проблемы. Если быть точнее, то проблема заключается в использовании неподходящего драйвера.
Чтобы исправить эту ситуацию, вам снова необходимо запустить систему в Безопасном режиме. Затем нажмите правой кнопкой на Пуск и выберите из контекстного меню пункт «Диспетчер устройств». Далее все зависит от того, что вы заменили в своей конфигурации. Найдите в Диспетчере задач новую аппаратную составляющую, нажмите на нее правой кнопкой мыши и выберите «Обновить».
Затем перезагрузите свой компьютер и запустите его в обычном режиме. Ну что, все еще видите синий экран смерти и код ошибки 0x0000007e? Если да, то переходим к следующему методу.
Метод №3 Удаление конфликтного обновления для ОС Windows
Естественно, что если вы установили какое-то обновление вошедшее в конфликт с операционной системой, то от него следует в срочном порядке избавиться. Снова зайдите в систему с помощью Безопасного режима.
Затем пройдите следующим путем: Панель управления > Центр обновления Windows > Установленные обновление. Найдите самое последнее установленное обновление и удалите его, так как, скорее всего, именно из-за него и возникла проблема в лице ошибки 0x0000007e.
Метод №4 Обновление BIOS
Синий экран смерти и код ошибки 0x0000007e могли появиться в результате несовместимости операционной системы и версии BIOS. В этом случае, скорее всего, виновата именно устаревшая версия BIOS.
Существует три варианта обновления BIOS: непосредственно в самой Windows, через BIOS и через DOS. Какой именно способ нужен вам, зависит от вашей материнской карты. Зайдите на сайт ее производителя и поищите в разделе загрузок обновления для BIOS. В описании обновления вы должны будете найти инструкцию по обновлению BIOS.
Метод №5 Замена установочного диска или флеш-носителя
Как уже говорилось, синий экран смерти с ошибкой 0x0000007e может появиться даже во время установки новой Windows. В этом случае попробуйте заменить установочный диск и попытайтесь установить Windows с него. В большинстве помогает именно замена установочного диска.
Метод №6 Отключение периферийных устройств
Ходят слухи, что данная проблема, то есть ошибка 0x0000007e, может появляться при подключении периферийных устройств, например, принтера. Возможно, что проблема заключается в либо в драйверах устройства, либо же в самом устройстве.
Если загвоздка в первом варианте, то попросту зайдите в систему через Безопасный режим и обновите драйвера для устройства. Если же второй, то вам, к сожалению, придется искать другую периферию.
Table of contents
- How to Fix “A Problem Has Been Detected and Windows Has Been Shut Down…”
- Method 1: Checking your HDD
- Method 2: Inspect recently installed hardware
- Method 3: Updating your drivers
- Method 4: Resetting Windows 10
- A Problem Has Been Detected and Windows Has Been Shut Down: Solved
When a BSOD error shows up, it is likely that there is a serious issue behind it. That said, there is no reason to panic. In this post, we are going to teach you how to fix the “A problem has been detected and Windows has been shut down” error message. It is likely that the culprit is a faulty HDD, but there are various possible reasons why this problem occurs. Make sure you run through our solutions until you discover the one that works best for you.
How to Fix “A Problem Has Been Detected and Windows Has Been Shut Down…”
Method 1: Checking your HDD
When the Blue Screen of Death appears, it is usually accompanied by a Ntfs.sys error. This is an indicator that there is something wrong with your HDD. It is likely that Windows is unable to access a certain portion of the system partition. In most cases, this is caused by bad sectors in the HDD or corrupted system files.
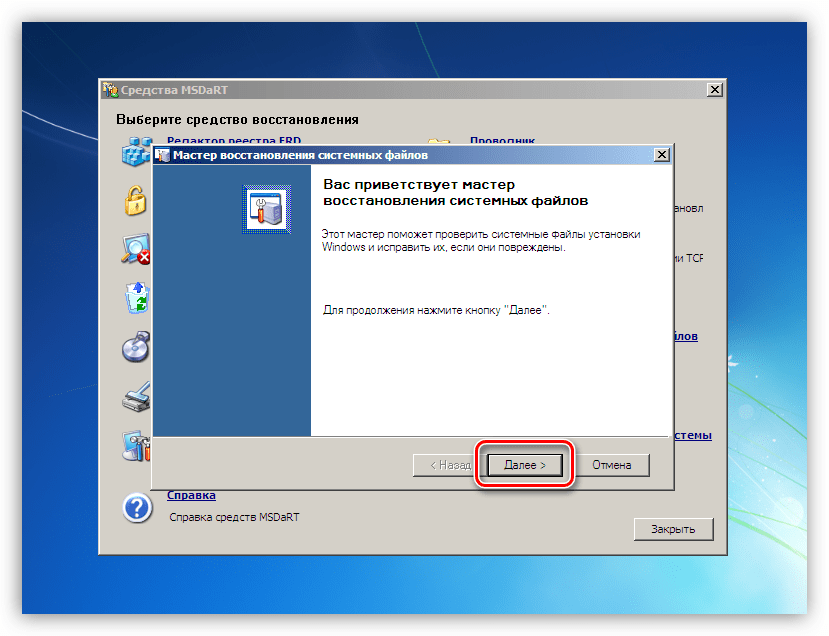
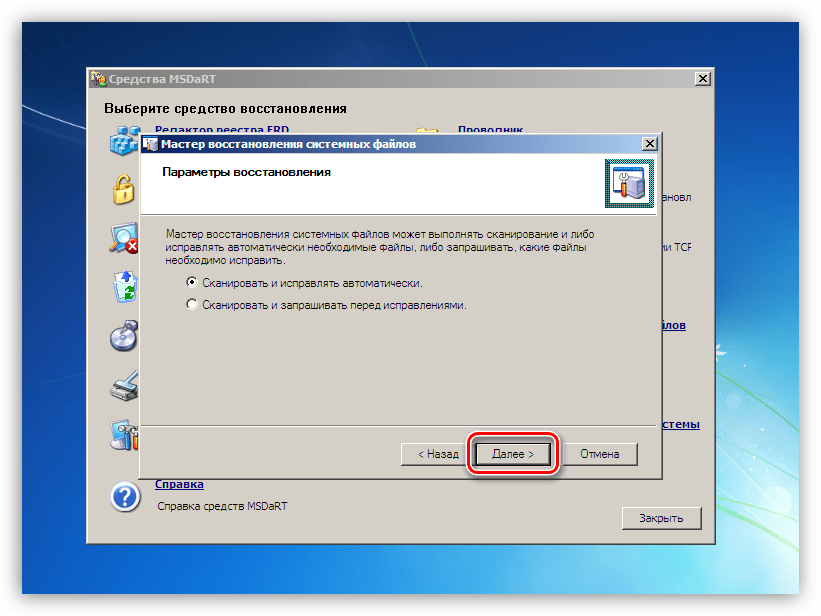
So, the first solution you should try is to check the condition of your HDD. If you find that the issue cannot be fixed, then you’ll need a replacement. Before we share the instructions, you need to create a Windows installation media. Once you have one, you can proceed to the steps below:
- Plug the Windows installation media into your PC.
- Restart your computer.
- Access the boot menu. Keep in mind that the key for accessing this varies depending on your motherboard. It is best that you check the owner’s manual to get the details.
- Select the Windows installation media.
- Hit
Enterto exit the boot menu. - Boot the Windows installation media by pressing any key.
- Go to the bottom-left corner, then select Repair your computer.
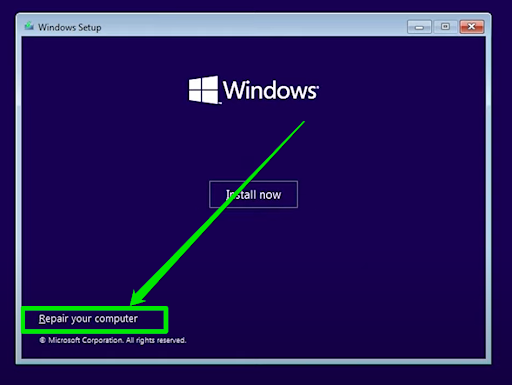
- From the menu, select Troubleshoot, then click Advanced options.
- Now, you need to open Command Prompt.
- Once Command Prompt is up, run the following command:
chkdsk /f C:
- Wait until the process is complete, then restart your computer.
If the BSOD error still appears, then you’ve confirmed that the HDD isn’t the issue. In this case, you should move on to the next solution.
Also read: How to Run Hard Drive Diagnostics on Windows PC?
Method 2: Inspect recently installed hardware
It is worth noting that almost every replaceable component in your computer can force your operating system to shut down to prevent further damage. You should know that when this happens, it does not necessarily mean that a piece of hardware is faulty.
After all, you will not be able to boot your PC in the first place if one of the critical components is malfunctioning. So, it is likely that there are compatibility issues rather than defects in your hardware components behind your problem.
If your motherboard does not support the GPU or CPU you installed, your OS will crash. This event will prompt the BSOD error to appear. In this case, what you have to do is check if the CPU or GPU you added is compatible with your motherboard. If it is, then try updating your motherboard and see if this fixes the problem.
Also read: How to Find Your PC’s Windows System Information?
You should also ensure that all the other hardware components are in their proper places. Shut down your computer, then check if the RAM is connected properly. Aside from that, you must check if your power supply unit (PSU) is not malfunctioning and that your PC is not overheating.
Method 3: Updating your drivers
When there are corrupted or outdated drivers on your computer, you will encounter a host of issues, including BSOD errors. In most cases, the issue has something to do with major devices and their corresponding drivers. However, even peripheral devices like printers can cause an operating system to crash.
If you want to learn how to fix the “A problem has been detected and Windows has been shut down” error message, you must learn the ideal method to update your drivers. In this solution, you will need to boot into Safe Mode to access the Device Manager. As an extra step, you need to prevent Windows 10 from installing and updating the drivers automatically. Most of the time, it only finds generic drivers that are not suitable for your devices. Once you’re ready, you can proceed to the steps below:
- Go to Microsoft’s support site, then download the Show or hide updates troubleshooter.
- Restart your computer, then repeatedly press
F8to access the Startup Settings menu. - Boot your computer in Safe Mode with Networking mode.
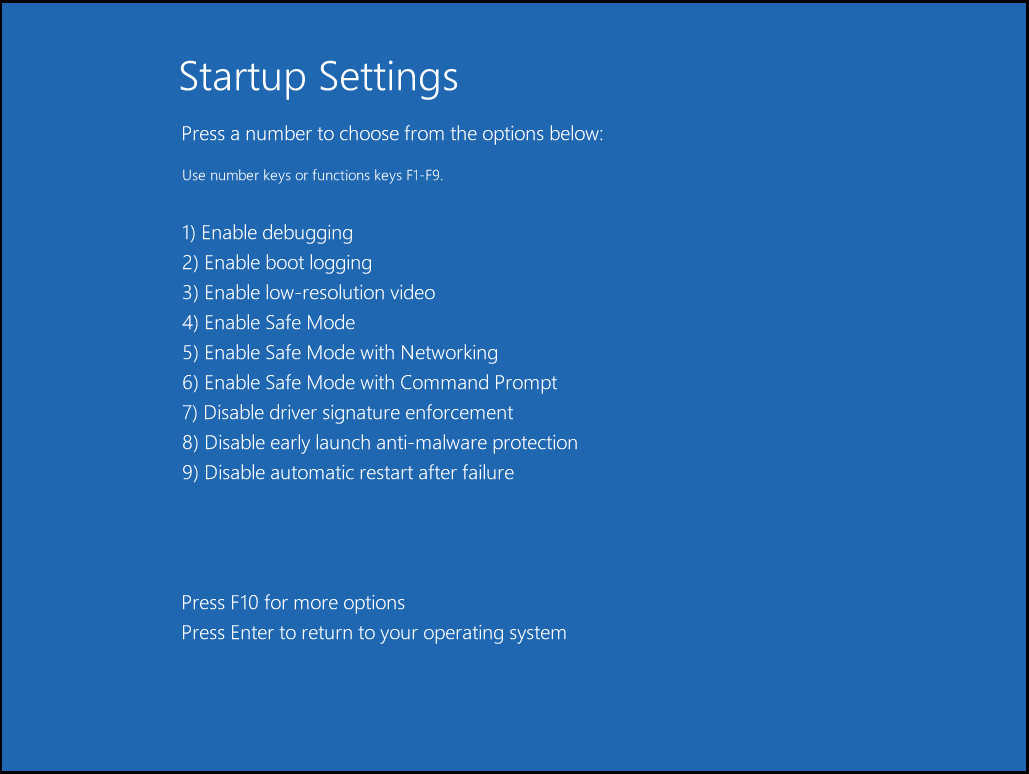
- Open the Device Manager, then update the drivers.
- Now, you need to run the Show or hide updates troubleshooter to keep your operating system from updating your drivers automatically.
- Restart your computer, then check if the error is gone.
PRO TIP
You have to know that updating your drivers via the Device Manager can be time-consuming.
Thankfully, there is an easier way to perform this task. With Auslogics Driver Updater, you can ensure that all your drivers will be updated to their latest versions. Moreover, you do not have to worry about compatibility issues because the tool will find the versions that are suitable for your operating system and processor.

Update drivers in one click with Auslogics Driver Updater
Method 4: Resetting Windows 10
If the BSOD error persists even after trying the solutions above, then there must be something wrong with your Windows 10 installation. If it is corrupted, it will cause your PC to crash. To resolve this problem, we suggest that you perform a Windows 10 reset. However, before you opt for this solution, you must know that it will delete all the files from your system. So, it is best that you create a backup first before resorting to this method of resolving the “problem has been detected” issue.
Further reading: Easily Reset Your PC: How to Factory Reset a Windows 10 & 11 Computer
A Problem Has Been Detected and Windows Has Been Shut Down: Solved
In conclusion, a BSOD error can be alarming, but with patience and the right steps, it can be resolved relatively quickly. Check your HDD, inspect hardware, update drivers, or reset Windows 10 to troubleshoot the issue. Remember, systematic troubleshooting is key. If you have more questions, feel free to ask in the comments. Happy computing!
Are there other BSOD errors you’d like us to resolve?
Please do not hesitate to ask your questions in the comments below!