
Approved By Ashwani Tiwari
Published On
February 26th, 2024
Reading Time 7 Minutes Reading
There are so many computer users who experience a hard disk problem is preventing Windows from starting , while they are working on it. Mainly, this issue occurs due to a hard disk issue. When this error appears at times, a desktop is restarted, before Windows begins to load and a message is displayed, i.e., Windows failed to start because of a problem with the hard disk.
However, this recommends an option to launch Startup Repair from a deviation of the Advanced Boot Options menu. So, we considered this and came up with this comprehensive article. Today! We are going to reveal the top techniques to resolve the most commonly asked query, such as how to fix a hard drive error that is preventing Windows from starting.
But, before proceeding ahead primarily, go through the below-outlined user’s real-time query. The following scenario is taken from the forum site, it will help you understand the problems with Windows:
User’s Real-Time Query
“Need help! One of my friend’s laptops is showing a fix for problems that are preventing Windows from starting continuously. I don’t know what to do next?. Please suggest any effective solution to resolve the hard drive error that prevents Windows from starting. Any suggestions would be surely gratifying. Thanks.”
Tips: Restore files from Hard Disk that Won’t Boot Windows
Root Causes Behind Windows Failed to Start Error
There are several reasons why Windows failed to start because of a problem with the hard disk. So, in this segment, we are going to discuss a few of them. Let’s have a look:
- Due to a corrupted boot partition
- Blue screen of death, ‘BSOD’ on startup
- Corrupted & damaged Boot Configuration Data ‘BCD’ settings
Note: How to Retrieve deleted CCTV footage from DVR HDD?
How to Fix a Hard Disk Problem is Preventing Windows from Starting Manually?
Here, we come up with a manual solution to fix problems that are preventing Windows from starting. Mainly, this free approach is obtainable in two ways. Both ways are disclosed comprehensively. You just have to follow any of them according to your requirements.

Method #1 To Fix Hard Disk Problem is Preventing From Starting Windows 7, 8, 10
In this segment, you get the directions to fix an infinite loop of startup repairs on Windows. Simply, follow all of them sequentially.
#1: Run the chkdsk Command on the Boot Volume
- First of all, insert your Windows installation CD or DVD into your local machine’s CD-ROM drive.
- Fully power down your system, and ensure that it is fully shut off.
Now, power up your system - Here, you can press any key when you see a message prompted, i.e., press any key to boot from a CD or DVD.
- Then, click on the link titled Repair your computer in the bottom-left corner.
- Afterward, wait for Startup Repair to scan your system for Windows installations. After that, choose your install from the list it presents.
- Select Command Prompt from the list of obtainable recovery options to proceed further.
- When the command prompt window is launched,. You have to enter the following to utilize the System File Checker:. This will check your installation for corrupted, invalid, or deleted system files. If the older page displayed that your Windows installation has a drive letter other than C:\, then, ensure that you utilize that below.
- Ultimately, the procedure of scanning will begin, it might fix all of your hard disk problems. Once the procedure is done, it will be reported to you.

Read More: How to Fix Out of Memory Error in Windows?
#2: Rebuild the “Boot Configuration Data” BCD
Mainly, rebuilding your system’s MBR, partition boot sectors, and BCD can repair several serious problems with the BOOTMGR bootloader. To do so, the Windows Recovery environment provides an in-built tool named bootrec.exe. With the help of this, you can easily rebuild the BCD. Now, follow the below-stated steps for the same:
- At first, you have to insert your Windows installation CD or DVD into your PC’s CD-ROM drive.
- Now, power up your system.
- Here, press any key when you view this Press any key to boot from a CD or DVD.
- Then, hit on the link titled Repair your computer in the bottom-left corner.
- Just wait for Startup Repair to scan your local machine for Windows installations. And then, choose your install from the list it shows.
- Select Command Prompt from the list of available recovery options to start.
- When the command line has loaded. You have to input the following commands in the command prompt wizard and hit Enter after every command. bootrec /fixmbr >> bootrec/fixboot >> bootrec/rebuildbcd
#3: Disable Automatic Startup to Fix Window Unable to Start Error
- Primarily, restart your desktop
- Now, wait for your BIOS to complete the POST
- Then, you have to quickly begin tapping the F8 key frequently until you view the list of boot options
- Here, select Disable automatic restart on system failure
- At last, press the Enter key and wait for a few minutes until your system boots.
Read More: Convert RAW to NTFS Files System without Formatting
Method #2 To Fix a Hard Disk Problem is Preventing Windows from Starting
Now, we are going to disclose the instructions for different ways to repair the Windows 8 automatic repair loop. You have to follow any of them as per the requirements:
#1: Run Bootrec in Windows to Fix Windows Unable to Start Error
This Bootrec utility is the most proficient one to rebuild the BCD. Once it is done, it might repair the error. To do so, follow the steps to run bootrec.exe on Windows 8 or 8.1:
- First of all, insert the original Windows 8/8.1 installation CD, DVD, or USB
- Then, click on Repair your computer
- Hit on Troubleshoot and choose Advanced options
- Click on Command Prompt when the command prompt wizard loads, and type the following commands: bootrec/fixmbr >> bootrec/fixboot >> bootrec/rebuildbcd
- You have to press the Enter key after each command
- Finally, when you input the last command bootrec/rebuildbcd after typing EXIT to finish up the procedure and then restart your local machine,.
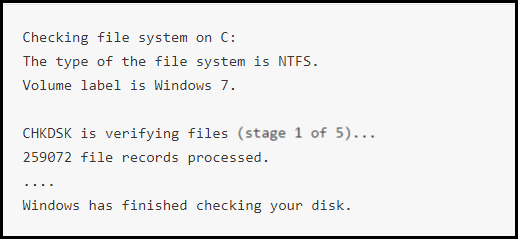
#2: – Run Check Disk “chkdsk” Command to Fix Windows Unable to Start
- Simply, hit on Troubleshoot>>Advanced options>>Command Prompt
- Now, input this (chkdsk /r) command, when the Command Prompt wizard loads properly. After that, press the Enter key.
#3: – Restore System Windows to Fix Windows Failed to Start
Initially, to access System Restore, follow the same steps as Run Bootrec to navigate the Advanced Options screen:
- Here, click Troubleshoot
- Then, click on System Restore
- Subsequently, follow the window directions to proceed with the procedure. Now, select a restore point before the date when the Automatic Repair Loop error is displayed.
#4: – Boot in Safe Mode to Fix Windows Unable to Start Error
- Firstly, insert the disc and reboot your system.
- Then, you can press any key to boot from the DVD.
- Now, click on Repair your computer at the Install Now display.
- Here, troubleshoot and then, click on the Advanced Options.
- Hit on Startup Settings, and after that, select Restart.
- Lastly, press the F4 key to boot into Safe Mode.
Extra Tips! Restore Lost Files!
A hard disk problem may lead to a data loss issue. At times, most users search for an instant solution to recover wiped data. With this computer data recovery software, you can easily recover permanently deleted Word documents from your hard drive.
Download Now Purchase Now
- Download the Hard Drive Recovery Tool.
- Select a partition and click the scan button.
- Preview the recovered data files.
- Finally, save all the recovered files.
This tool is programmed with enhanced features that provide an instant solution to recover files from corrupted hard disks. Moreover, any user, whether savvy or non-savvy, can utilize this amazing. Moreover, the utility will not fix the hard disk problem that is preventing Windows from starting Windows 7, 8, 10 and 11. More importantly, it will save your precious data files.
In Summation
This blog emphasizes the techniques to resolve a query, such as how to fix a Windows computer that failed to start because of a problem with the hard disk. Hopefully, you will get the best solutions for the same, and get rid of the problems that are preventing Windows from starting.
Все способы:
- Исправляем ошибку «Startup Repair Offline»
- Способ 1: Сброс настроек BIOS
- Способ 2: Подключение шлейфов
- Способ 3: Восстановление запуска
- Способ 4: «Командная строка»
- Заключение
- Вопросы и ответы: 18
Запуская свой компьютер, юзер может наблюдать ошибки, связанные с загрузкой операционной системы. Виндовс 7 предпримет попытку по восстановлению работы, но она может оказаться безуспешной, и Вы увидите сообщение о том, что невозможно выполнить решение этой проблемы, а также есть необходимость отправить информацию о неисправности в Microsoft. Нажав на вкладку «Показать подробности» отобразится имя данной ошибки – «Startup Repair Offline». В этой статье мы рассмотрим, как нейтрализовать эту ошибку.
Исправляем ошибку «Startup Repair Offline»
Буквально данная неисправность означает – «восстановление запуска не в сети». После перезапуска компьютера, система предприняла попытку по восстановлению работы (не подключаясь к сети), но попытка оказалась неудачной.
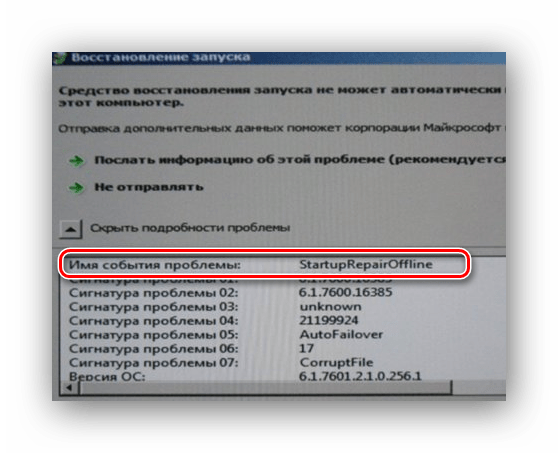
Неисправность «Startup Repair Offline» зачастую появляется из-за проблем с жестким диском, а именно из-за повреждения сектора, на котором находятся системные данные, отвечающие за правильный запуск Windows 7. Также возможны проблемы с поврежденными разделами реестра системы. Перейдем к способам исправления этой неполадки.
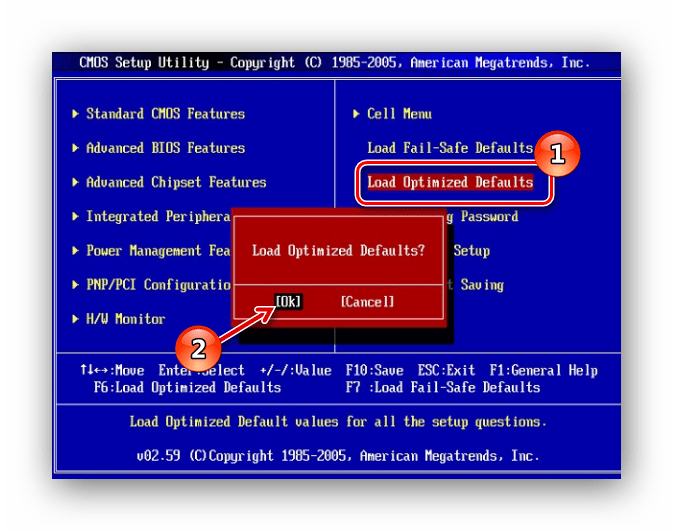
Способ 1: Сброс настроек BIOS
Переходим в БИОС (при помощи клавиш F2 или Del при загрузке компьютера). Производим загрузку настроек по умолчанию (пункт «Load optimized defaults»). Сохраняем сделанные изменения (нажав клавишу F10) и перезапускаем Виндовс.
Подробнее: Сбрасываем настройки BIOS
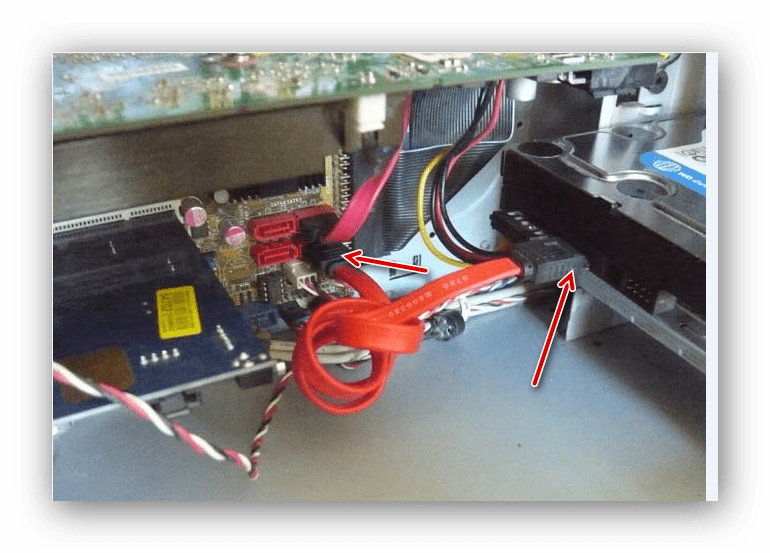
Способ 2: Подключение шлейфов
Необходимо произвести проверку целостности разъемов и плотность подключения шлейфов жесткого диска и материнской платы. Убедитесь, что все контакты подключены качественно и плотно. После проверки перезапускаем систему и проверяем на наличие неисправности.
Способ 3: Восстановление запуска
Так как обычный запуск операционной системы невозможен, рекомендуем воспользоваться загрузочным диском или флешкой с системой, которая является идентичной установленной.
Урок: Инструкция по созданию загрузочной флешки на Windows
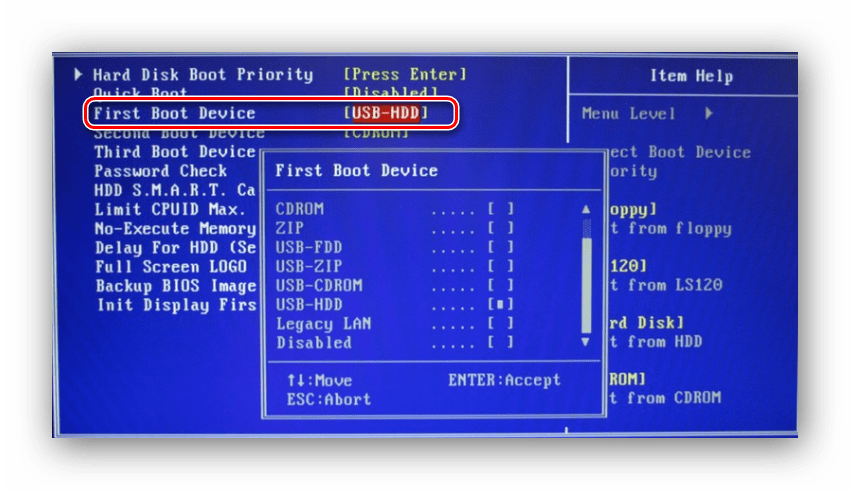
- Выполняем запуск с загрузочной флешки или диска. В БИОСе устанавливаем опцию запуска с диска или флеш-накопителя (устанавливаем в пункте «First Boot Device USB-HDD» параметр «USB-HDD«). Как это сделать на различных версиях BIOS, подробно описано в уроке, который представлен ниже.
Урок: Настраиваем BIOS для загрузки с флешки
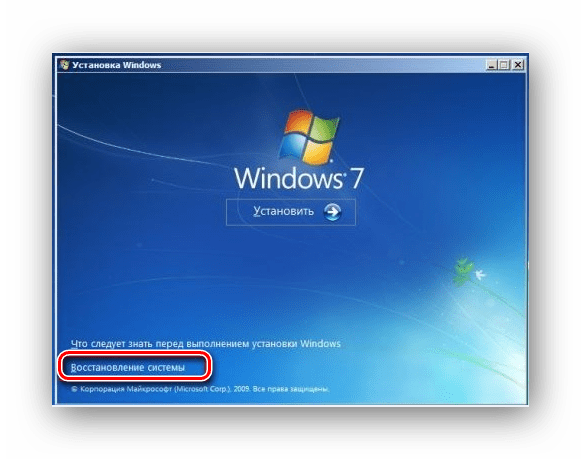
- В установочном интерфейсе выбираем язык, клавиатуру и время. Жмём «Далее» и на появившемся экране кликаем на надпись «Восстановление системы» (в англ. версии Windows 7 «Repair your computer»).
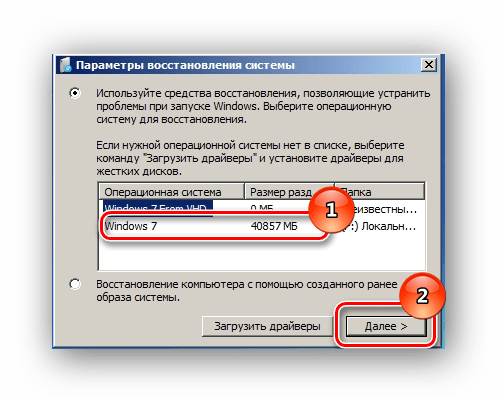
- Системой будет произведён поиск неполадок в автоматическом режиме. Жмём на кнопочку «Далее» в открывшемся окне, выбрав необходимую ОС.

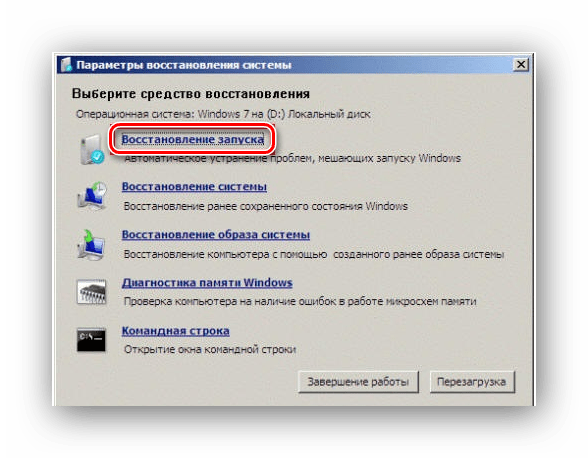
В окошке «Параметры восстановления системы» щелкаем по пункту «Восстановление запуска» и дожидаемся завершения проверочных действий и корректного запуска компьютера. После окончания проверки перезагружаем ПК.
Способ 4: «Командная строка»
Если приведенные выше способы не помогли устранить неполадку, тогда вновь запускаем систему с флешки или установочного диска.
Нажимаем клавиши Shift+F10 в самом начале установочного процесса. Попадаем в меню «Командной строки», где необходимо набрать поочередно определенные команды (после ввода каждой из них нажимаем Enter).
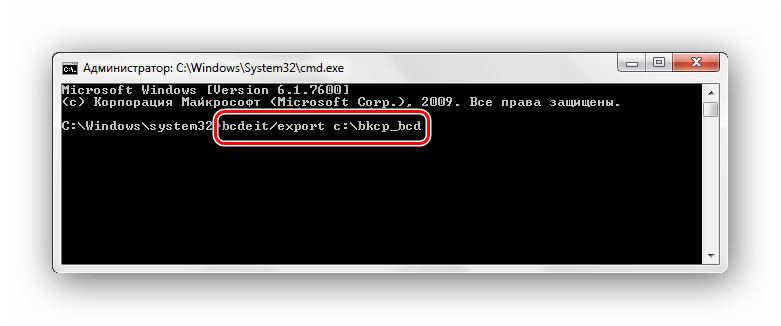
bcdedit /export c:\bckp_bcd
attrib c:\boot\bcd -h -r –s

ren c:\boot\bcd bcd.old

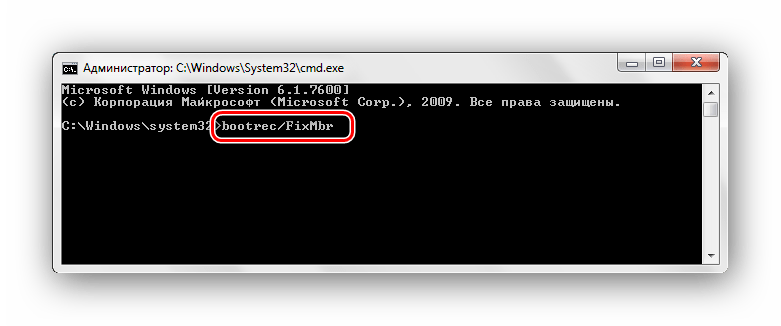
bootrec /FixMbr
bootrec /FixBoot

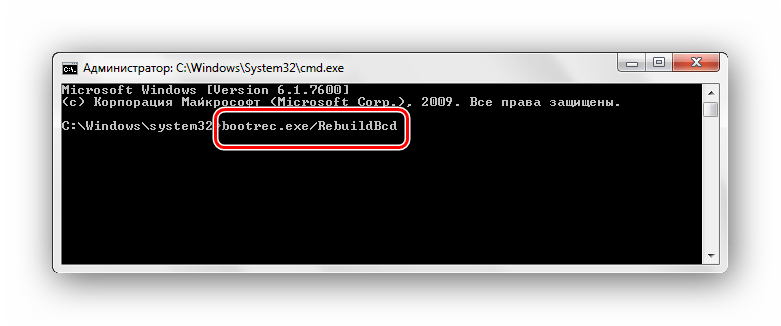
bootrec.exe /RebuildBcd
После того, как ввели все команды, перезапускаем ПК. Если Виндовс 7 не запустилась в работоспособном режиме, тогда в данных о неисправности может быть имя проблемного файла (например, библиотеки расширения .dll). Если было указано название файла, то необходимо попробовать совершить поиска данного файла в интернете и поместить его на ваш винчестер в необходимую директорию (в большинстве случаев, это папка windowds\system 32).
Подробнее: Как установить библиотеку DLL в систему Windows
Заключение
Итак, что же делать с неполадкой «Startup Repair Offline»? Самый простой и эффективный способ – это использование восстановления запуска ОС, применяя загрузочный диск или флеш-накопитель. Если способ с восстановлением системы не исправил проблему, то воспользуйтесь командной строкой. Также проверьте целостность всех соединений компьютера и настройки BIOS. Применение этих методов позволит устранить ошибку запуска Windows 7.
Наша группа в TelegramПолезные советы и помощь
Поставил windows — начали появляться сообщения «Windows обнаружила неполадки жесткого диска».
Потом винда перестала загружаться вообще, пробую переустановить — зависает процесс установки.
Далее загрузился с live cd ubuntu, вызвал «Disk utility» и тут же увидел, что имя моего hdd выделено красным и написано » DISK IS LIKELY TO FAIL SOON». Зайдя в пункт «Smart Data & disk tests» в таблице пункт «Reallocated sector count» стоит значение 2700 секторов и, соответственно статус «FAILING».
Что то можно сделать или нести на ремонт?
-
Вопрос задан
-
1697 просмотров
Если на винте нужных данных нет, то просто менять на новый.
«Reallocated sector count» стоит значение 2700 секторов
достиг придела сбойных секторов.
Из опыта, половина HDD как у вас лечилась убиранием окислений, на плате управления HDD (воспользуйтесь темно-серым, шершавым ластиком). Это в случае конечно если окисления есть, их легко видно по блестящим золотым контактам, если они не золотые а скажем ближе к медному или серому, хуже зеленоватые ), то открутите плату, переверните посмотрите где прикасаются контакты торчащие из корпуса HDD и почистите их. Надеюсь не сложно написал.
Приобрести новый SSD, поставить на него систему, пробовать снять данные со старого, вспомнить правило: «Если у данных нет резервной копии то они не считаются важными и восстановлению не подлежат»
Пригласить эксперта
Войдите, чтобы написать ответ
-
Показать ещё
Загружается…
Минуточку внимания
The main function of chkdsk is checking and repairing errors for NTFS and FAT file systems. Thus, if the error «Windows detected a hard disk problem» is caused by file system error, then the issue will be fixed after chkdsk. … DiskGenius is free partition manager, file recovery tool and system backup software.
- How do I fix Windows has detected a hard disk problem?
- How do I fix a hard disk error?
- How do I fix hard drive problem preventing Windows from starting?
- What are the symptoms of hard disk failure?
- Can laptop hard disk be repaired?
- What is the reason of hard disk failure?
- What is HDD test failure?
- Why is my HDD not reading?
- How do I check if my hard drive is repaired?
- How do I repair my hard drive Windows 10?
How do I fix Windows has detected a hard disk problem?
4 Fixes to ‘Windows Detected a Hard Disk Problem’ Error
- Use system file checker to fix hard disk error. Windows provides some basic tools to help repair errors, for example, the system file checker. …
- Run CHKDSK to fix the hard disk problem. …
- Use partition manager software to check and repair hard disk/drive errors.
How do I fix a hard disk error?
If you face a disk read error with your hard disk, there are several possible solutions:
- Check the boot order in the BIOS settings, and change the settings if necessary.
- Reset BIOS to default.
- Use a repair tool to repair the Master Boot Record (MBR) or Boot Sector.
- Check all cables and jumpers.
How do I fix hard drive problem preventing Windows from starting?
Method #1 To Fix Hard Disk Problem is Preventing From Starting Windows 7, 8, 10
- #1: – Run chkdsk Command on the Boot Volume.
- #2: – Rebuild the “Boot Configuration Data” BCD.
- #3: – Disable Automatic Startup to Fix Window Unable to Start Error.
- #1: – Run bootrec in Windows to Fix Windows Unable to Start Error.
What are the symptoms of hard disk failure?
Common HDD Physical Failure Signs
- Overheating.
- Strange noises.
- Blue Screen of Death errors.
- Stuck spindle motor.
- Inability for the device to boot.
- Bad sectors prevent data access.
Can laptop hard disk be repaired?
The best tools to check and repair your external or internal hard drive using Windows. Using Windows’ tools is generally the best method to check what state the drive is in; to use the tool CHKDSK from the control panel (Run menu). … If the hard drive is inaccessible, TestDisk is a program that can repair it.
What is the reason of hard disk failure?
Causes. There are a number of causes for hard drives to fail including: human error, hardware failure, firmware corruption, heat, water damage, power issues and mishaps.
What is HDD test failure?
When a hard disk short DST check fails, it usually means your hard drive has encountered one of the tested components. If the BIOS gives you a short DST failed error message, it’s a sign that your hard drive no longer works properly.
Why is my HDD not reading?
If the drive is not receiving power or receiving an incorrect level of power, it will not spin up. To check to see if this is the cause of the BIOS not detecting the hard drive, follow these steps: Power off the computer. Open the computer case and remove the data cable from the hard drive.
How do I check if my hard drive is repaired?
To do this, open up command prompt (click Windows key + X then select Command Prompt — Admin). In the command prompt window, type in CHKDSK then a space, then the name of the disk you wish to check. For example, if you wished to perform a disk check on your C drive, type in CHKDSK C then press enter to run the command.
How do I repair my hard drive Windows 10?
From Command Prompt
- Log into Windows 10.
- Press the Windows key to open the Start Menu.
- Select Search.
- Type-in cmd.
- Right-click on Command Prompt from the search results list.
- Click Run as administrator.
- Log in as an Administrator.
- When Command Prompt launches, type the command: chkdsk C: /f /r /x.
Summary: The error message Windows detected a hard disk problem is a more or less common problem that many users run into due to various causes. You can dismiss the message and later the computer still works fine. However, one of the disks is likely failing and the error can entail various and severe harms to the computer if you chose to ignore it. Hence, for users who are persistently annoyed by the problem, this article comprises the 7 useful solutions and the data recovery method for you to walk through.
WIN VERSION MAC VERSION
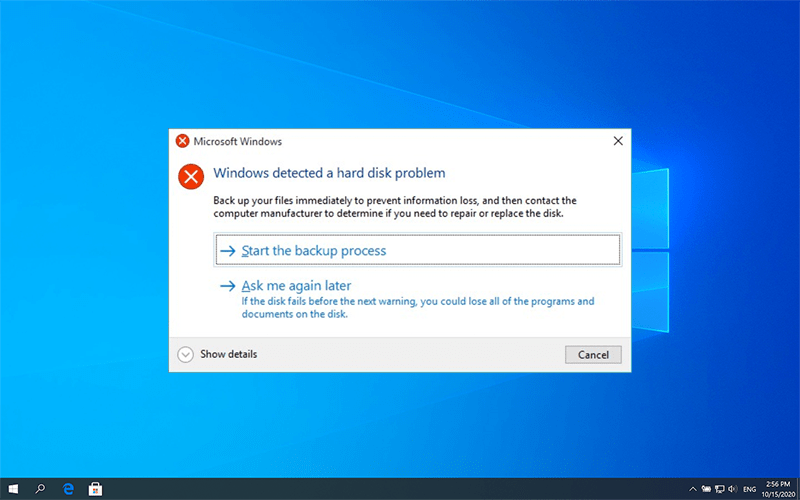
Table of Contents
Possible Reasons for the Error
Usually, hard drive failure is the main culprit. But it has been reported that other causes can generate the error. Below are a few examples:
- Hard disk/drive failure
- System file damage
- Virus attack
- Mechanical or logical error
- Bad sectors on the drive
- Improper human operations
Possible Consequences of the Error
If you encounter the error, below are a few consequences it could result in.
- Blue screen of death
- Computer freezes frequently
- Damage to the system files
- Data loss from the drive
How to tackle Windows detected a hard disk problem
After knowing the possible causes that encounter the Windows detected a hard disk problem error, then please read the solutions carefully and slowly and make sure you have backed up the important data before going through the steps described below.
Solution 1: Use System File Checker
System File Checker is one of the basic tools offered by Windows to help users fix errors. Its main purpose is to help users check system files and tackle integrity issues.
Step 1: Type in Command Prompt in the Search Bar and then choose Run as administrator.
Step 2: In Command Prompt, type sfc/scannow and press the Enter key.
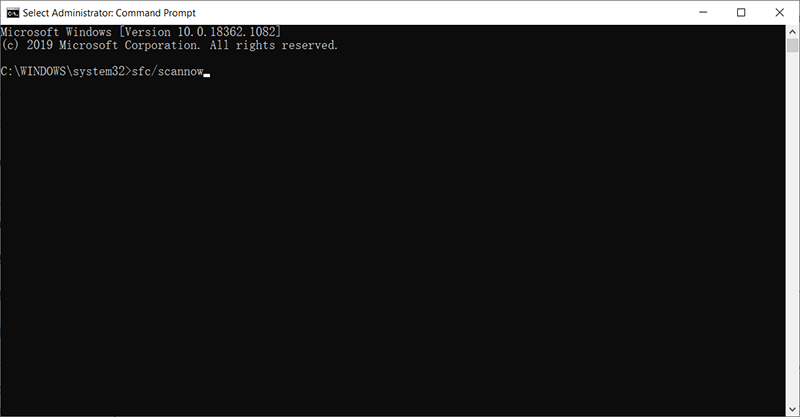
The scanning process should be fast, and the result tells whether there is a system file integrity issue. It scans system files and replaces corrupted ones with the backup stored in the cache. You shouldn’t close the window until the verification has been 100% complete.
Note: If the computer fails to find the system file in the cache, it will ask for a Windows installer to access the inaccessible system file. You can grant permission to allow it to do so.
Solution 2: Run DISM
When your computer is experiencing unexpected issues that you fail to tackle using the SFC command, the next best choice is to use DISM to fix the issues. Note: Before instructing Command Prompt to carry out DISM, you should do a full backup of the important files stored in the disk because the command may alter the data on it.
Step 1: Run the Command Prompt (Admin) from the Start Menu.
Step 2: Enter the following commands in order:
- Dism /Online /Cleanup-Image /CheckHealth
- Dism /Online /Cleanup-Image /ScanHealth
- Dism /Online /Cleanup-Image /RestoreHealth
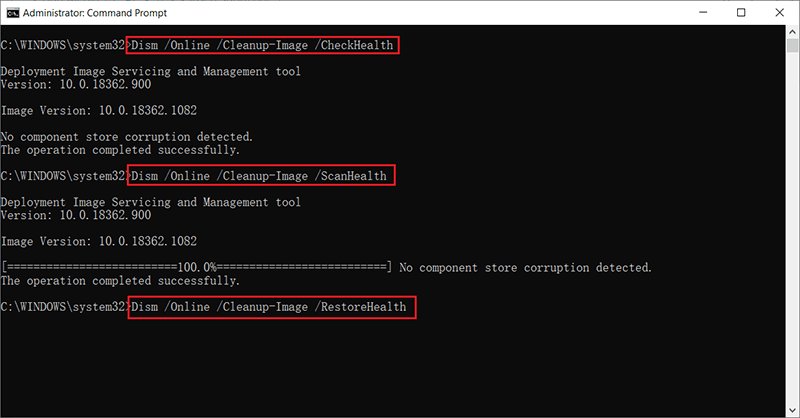
Step 3: After the completion of the process, reboot your computer to save changes.
Solution 3: Run CHKDSK
CHKDSK is a system tool that can be used to check and repair errors for NTFS and FAT file systems. To use the tool, refer to the following steps:
Step 1: Type in Command Prompt in the search bar, right-click on the application and select Run as administrator.
Step 2: Type in CHKDSK /F /R X: You should replace the X with the partition drive letter that you want to check.
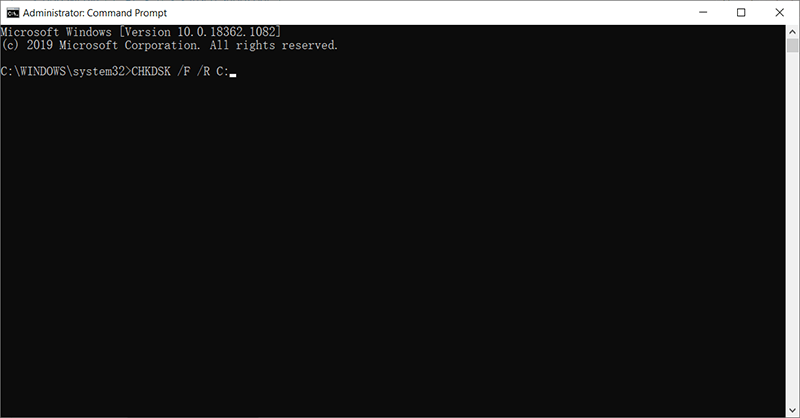
The tool will automatically fix the problem if it detects any issue. After the process has ended, restart the computer.
Note: You should back up those important files before using the command as running CHKDSK risks losing the data on the drive.
Solution 4: Change SATA Configuration
Step 1: Turn off your computer.
Step 2: Power on it and enter into the BIOS setup by pressing the BIOS key, which is set up by your computer’s manufacturer and could be F1, F2, F10, F12, or DEL.
Step 3: Look for the setting called SATA configuration.
Step 4: Click on the brackets next to Configure SATA, and then select AHCI.
Step 5: Press F10 to save the change and exit.
Recover Lost Data Using Bitwar Data Recovery
Many hard disk issues or system failures wind up causing serious data loss problems. So, if you are experiencing Windows detected a hard disk problem, in addition to trying all the solutions recommended above, doing a backup of your data is equally important. However, in case that the data has been lost and the hard drive has stopped working properly, use Bitwar Data Recovery to bring your files back.
First, you need to make sure the hard drive isn’t physically damaged in this way: Press Win + R and type in diskmgmt.msc, check whether the hard drive shows in the Disk Management or not; if yes, you need to follow the below steps as soon as you can to prevent the data from being overwritten by the new data. Reminder: Stop using your hard drive during the scanning!
Step 1: Go to the official website to download Bitwar Data Recovery for Win version and install it.
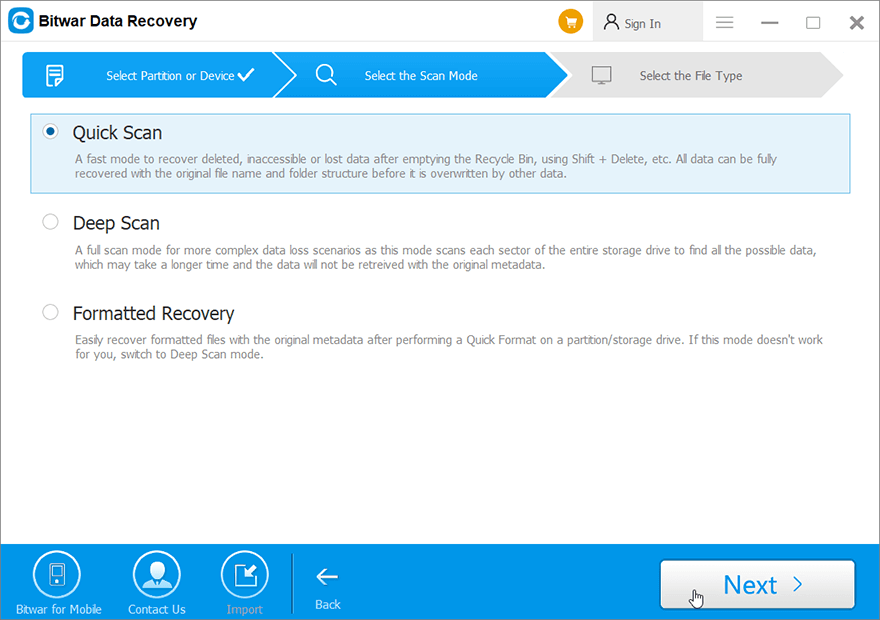
Step 2: Select the disk/partition where your lost files were deleted. Click Next.
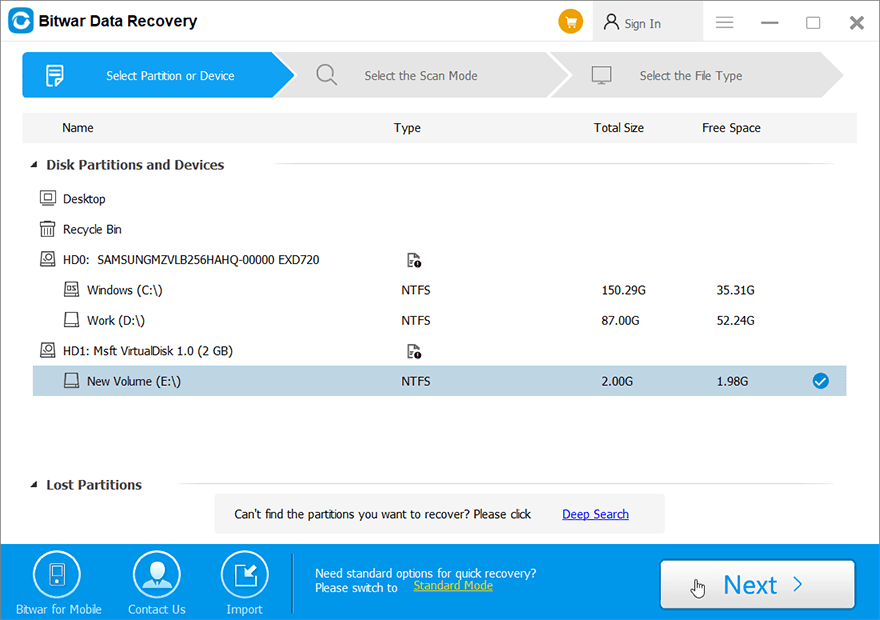
Step 3: Here, we should select a recovery mode. We strongly recommend Quick Mode, in which the whole disk can be scanned in a few minutes. However, if this scan mode doesn’t work on the drive, you can try Deep Scan next time.
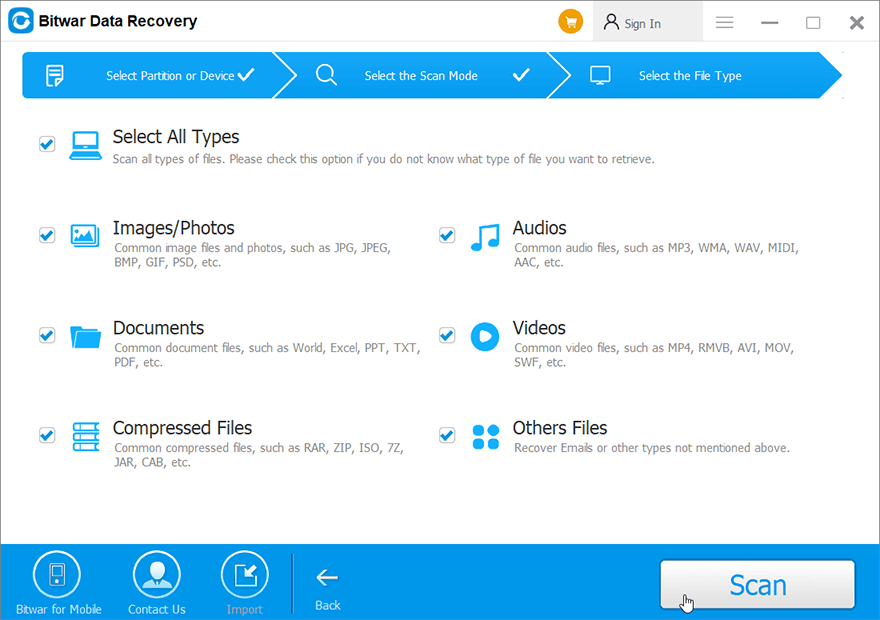
Step 4: Select file types and then click Scan.
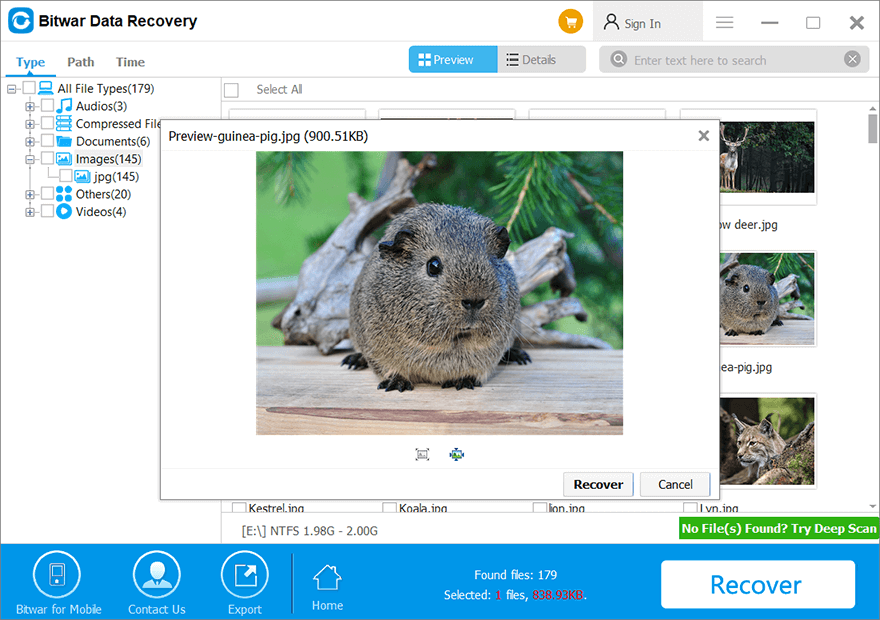
Step 5: Double-click on a file to preview it, and then select the wanted files to be recovered.
Other Workable Solutions Worth A Try
Solution 5: Run an Anti-Virus Program
Since one of the causes of the error is a virus attack, it’s sensible to try running anti-virus software to scan the drive and remove its malicious content and malware.
Solution 6: Check Bad Sectors for the Drive
If the attempts to repair the system and to root out malware fail, you can start to look into the health state of the hard drive. “bad sectors” is a common problem facing many computer users. There are two types of bad sectors, which are often divided into physical and logical bad sectors. To get a comprehensive view of your hard drive, download a reliable third-party tool that helps users check disk heath.
Solution 7: Reinstall Windows (Final Solution)
One of the easiest and outright ways to fix any intractable computer problem is to reinstall the operating system. Make sure that the partition where you are going to install the OS has enough space to store it and that you have backed up all the important files.
How to Disable the Error Message
If you have tried out all the solutions mentioned above and are sure that all your disks are healthy, you may want to disable the Windows detected hard disk problem message. Use the following steps to do so:
Step 1: Press Win + R to open the Run dialog box.
Step 2: Type in Gpedit.msc and click on OK.
Step 3: Navigate to Administrative Templates > System > Troubleshooting and Diagnostics > Disk Diagnostics.
Step 4: On the right page, double-click on the Disk Diagnostics: Configure execution level.
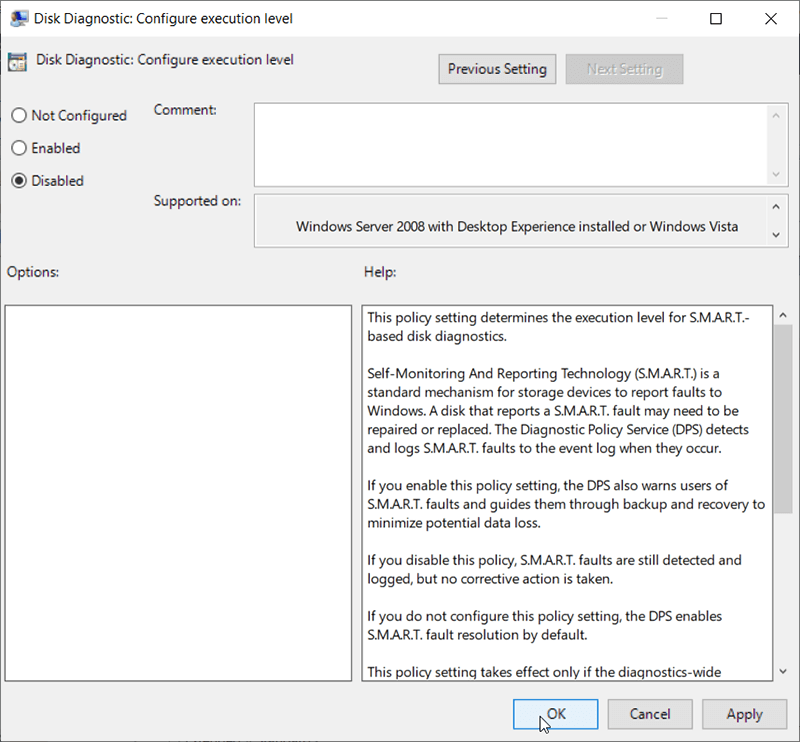
Step 5: Tick off Disabled and click on OK.
Note: In most cases, this is not a solution we would like to recommend because having a feature that warns users of potential drive risks is central to keeping your disk healthy. If your hard drive is experiencing an issue, disabling the error message will definitely worsen the situation. Make sure the error message is completely wrong before disabling it.
Conclusion
This article lays out how to tackle the error of Windows detected a hard disk problem and comprises everything that you need to know related to this error; however, we strongly recommend you not to hurry for fixing the hard disk error before making sure whether you have the important data stored on it, at least, retrieve the data before everything goes wrong. After that, use any solutions mentioned above to get everything right! Remember to backup your data first.