
Windows 10: A connection to the Windows Update service could not be established
Discus and support A connection to the Windows Update service could not be established in Windows 10 Installation and Upgrade to solve the problem; Hello,
I am running Windows 10 Pro 2004. It was freshly installed on this PC about a week ago. Since then, every time I check for updates, I receive…
Discussion in ‘Windows 10 Installation and Upgrade’ started by Capt. Timeter, Jul 9, 2020.
-
A connection to the Windows Update service could not be established
Hello,
I am running Windows 10 Pro 2004. It was freshly installed on this PC about a week ago. Since then, every time I check for updates, I receive a message that my Windows is up to date. I would not be worried otherwise, but today while looking through the Event viewer I found this kind of records see the attached screenshot. They are multiple and are present for every day in the journal.
I have tried the Windows Troubleshooter just in case, but it has found no problem with the Update. I have checked Services and the Windows Update service is running.
Could I be having problems with updates? How can I check?

Al
-
Windows Update can’t establish connection
After a long time I could finally find a solution to this problem!
Today I was reading some posts in Reddit about Windows 10 apps having problems establishing connection, and found a user that could solve all problems with a certain tool.
Here is the post with the solution:
Windows 10, Edge does not connect to the internet, Cortana does not connect to the internet, Windows store error 0x80072EE7 and cannot activate windows 10. : Windows10
And here is a link to the suggested tool in the above post:
Tweaking.com — Windows Repair Free/Pro
Download and install it, follow all 5 steps listed in the program, and then run the repairs in safe mode.
After doing the repair install 2 months ago no apps where able to connect (before that only Edge could connect).
Today, after running the above program, I opened the Store, Edge, and Windows Update, and to my surprise every app could connect succesfuly with no errors.
-
windows xp installation and dual core am
could someone please list the steps they follow to install windows with a dual core processor and windows xp service pack to. I’m reletively new to amd dual core and i feel i’m missing a step. All help will be appreciated. thanx
-
A connection to the Windows Update service could not be established
Error 702: A connection to the remote computer could not be established.
Hello,
See if suggestions mentioned here helps you:
[FIX] A Connection To The Remote Computer Could Not Be Established In Windows 10
Hope this helps, Good luck

A connection to the Windows Update service could not be established
-
A connection to the Windows Update service could not be established — Similar Threads — connection Update service
-
WSL not downloading on windows 11 A connection with the server could not be established
in Windows 10 Gaming
WSL not downloading on windows 11 A connection with the server could not be established: Typing this command does not work. I opened Terminal with admin rights and windows 11 is updated to the latest update as of todayhttps://answers.microsoft.com/en-us/windows/forum/all/wsl-not-downloading-on-windows-11-a-connection/fb947aaa-e4bb-4128-9936-2dd236857776
-
WSL not downloading on windows 11 A connection with the server could not be established
in Windows 10 Software and Apps
WSL not downloading on windows 11 A connection with the server could not be established: Typing this command does not work. I opened Terminal with admin rights and windows 11 is updated to the latest update as of todayhttps://answers.microsoft.com/en-us/windows/forum/all/wsl-not-downloading-on-windows-11-a-connection/fb947aaa-e4bb-4128-9936-2dd236857776
-
Connection not established
in Windows 10 Software and Apps
Connection not established: Hi,I have a problem with internet connection on my Windows 10 computer. On Ethernet icon right bottom I havemessage «Connection not established no available connections» but Internet working,The computer is on the domain and network settings are entered. The problem is with… -
Connection not established
in Windows 10 Network and Sharing
Connection not established: Hi,I have a problem with internet connection on my Windows 10 computer. On Ethernet icon right bottom I havemessage «Connection not established no available connections» but Internet working,The computer is on the domain and network settings are entered. The problem is with… -
Connection not established
in Windows 10 Gaming
Connection not established: Hi,I have a problem with internet connection on my Windows 10 computer. On Ethernet icon right bottom I havemessage «Connection not established no available connections» but Internet working,The computer is on the domain and network settings are entered. The problem is with… -
No connection could be established to the multiplayer game Farming Simulator error
in Windows 10 News
No connection could be established to the multiplayer game Farming Simulator error: [ATTACH]Some users are seeing No connection could be established to the multiplayer game in Farming Simulator. The error usually appears when trying to play a multiplayer game. In this article, we are going to see what’s causing the issue and what you can do to resolve it…. -
The underlying connection was closed: Could not establish trust relationship for the…
in Windows 10 Network and Sharing
The underlying connection was closed: Could not establish trust relationship for the…: So, I have an app that wants to download some content, but when I launch it, even though I’m connected to the Internet, I get this error. Any solutions?Here’s a screenshot for your reference-
[IMG]…
-
Connection could be established without network access!!
in Windows 10 Network and Sharing
Connection could be established without network access!!: Hi guys , I used to make a personal VPN account of my current windows VPS with softether VPN server manager.recently it couldnot be registered on the network anymore while I reinstalled a new fresh windows server 2008R2 with new softether VPN.I even used the following… -
VPN: A connection to the remote computer could not be established
in Windows 10 Network and Sharing
VPN: A connection to the remote computer could not be established: After i reseted the whole network, the VPN does not work anymore no matter how i configurated the VPN but it works in Virtual Machine. What i did was input these commands in cmd
Code: netsh winsock reset netsh int ip reset ipconfig /release ipconfig /renew ipconfig…
Fix: We Couldn’t Connect to the Update Service on Windows
Windows operating systems have made significant strides in enhancing user experience and system performance, thanks in large part to the regular updates they receive. However, it’s not uncommon for users to encounter issues while trying to download and install updates. One such common error is “We couldn’t connect to the update service.” This problem can be frustrating, especially when users need the latest features and security enhancements. If you’re facing this issue, don’t worry. In this article, we’ll explore the reasons behind this error and provide step-by-step solutions to resolve it.
Understanding the Problem
The “We couldn’t connect to the update service” error generally occurs when the Windows Update service is unable to establish a connection with Microsoft’s servers. This can happen due to various factors, including network issues, software conflicts, corrupt system files, or misconfigured Windows settings. Recognizing the root cause of the problem is crucial as it allows us to apply the most effective solution.
Common Causes of the Issue
Before diving into the solutions, it’s essential to understand why this problem might occur. Here are some common causes:
-
Internet Connectivity Issues: The most straightforward reason could be an unstable or disconnected internet connection.
-
Windows Update Service is Disabled: Sometimes, the Windows Update service may not be running, preventing updates from being downloaded.
-
Corrupted Windows Update Files: Occasionally, the files related to Windows Update can become corrupted due to improper shutdowns or software conflicts, leading to connection issues.
-
Firewall and Antivirus Settings: Overzealous firewall or antivirus settings might block Windows Update from accessing the internet.
-
Proxy Settings: Misconfigured proxy settings can also disrupt the connection to the update server.
-
Incorrect DNS Configuration: If your DNS settings are incorrect, they may prevent your system from resolving the update servers’ addresses.
-
Software Conflicts: Third-party software or even Windows updates themselves can sometimes conflict with the update service.
Step-by-Step Solutions
Now that we’ve discussed the potential causes of the “We couldn’t connect to the update service” error, let’s go through a series of solutions that you can try.
1. Check Your Internet Connection
Before attempting any advanced fixes, ensure that your PC is connected to the internet:
- Close and reopen your web browser to confirm you can access the internet.
- If using Wi-Fi, ensure that you are connected to your network and that the signal is strong.
- Try restarting your router or connecting via a wired Ethernet connection for more stability.
2. Restart Windows Update Service
Sometimes, simply restarting the Windows Update service can fix the issue:
- Press
Windows + Rto open the Run dialog. - Type
services.mscand hit Enter. - Scroll down and locate Windows Update in the list.
- Right-click on it and select Restart. If it’s disabled, select Start.
- Close the Services window and check for updates again.
3. Run Windows Update Troubleshooter
Windows has a built-in troubleshooter that can diagnose and fix update issues automatically:
- Go to Settings by pressing
Windows + I. - Navigate to Update & Security and click on Troubleshoot.
- Select Additional troubleshooters and then click on Windows Update.
- Run the troubleshooter and apply any fixes it suggests.
4. Clear the Windows Update Cache
Corrupted update files can cause connection issues. Clearing the update cache may resolve this:
- Press
Windows + R, typeservices.msc, and press Enter. - Find and stop the Windows Update service.
- Open File Explorer and navigate to
C:WindowsSoftwareDistributionDownload. Delete all files in this folder. - Go back to services.msc, right-click the Windows Update service, and select Start.
- Try to check for updates again.
5. Reset Network Settings
Resetting your network settings can help if there are any issues with your network configuration:
-
Open Command Prompt as an administrator. Right-click the Start button and select Command Prompt (Admin).
-
Enter the following commands one at a time, pressing Enter after each:
netsh int ip reset netsh winsock reset ipconfig /flushdns -
Restart your PC and try checking for updates again.
6. Check Firewall and Antivirus Settings
Sometimes, your firewall or antivirus settings can block Windows Update. It’s essential to check these settings:
- Open your firewall (such as Windows Defender Firewall) and check if there are restrictions on Windows Update.
- Temporarily disable your antivirus software and check if the issue persists. If the update works when the antivirus is disabled, consider adding an exception for Windows Update.
7. Adjust Proxy Settings
If you’re using a proxy to connect to the internet, you may need to ensure its settings are correctly configured:
- Press
Windows + Ito open Settings, then go to Network & Internet. - Click on Proxy on the left sidebar.
- Ensure that Automatically detect settings is turned on and that any manual proxy settings are correctly configured or turned off if not used.
8. Update DNS Settings
Incorrect DNS settings can lead to issues connecting to the update service:
-
Open Control Panel and select Network and Internet, then click Network and Sharing Center.
-
Click on Change adapter settings on the left.
-
Right-click on your active network connection and select Properties.
-
Select Internet Protocol Version 4 (TCP/IPv4) and click Properties.
-
Choose Use the following DNS server addresses and input the following:
- Preferred DNS server:
8.8.8.8(Google DNS) - Alternate DNS server:
8.8.4.4(Google DNS)
- Preferred DNS server:
-
Click OK, close the settings, and attempt to check for updates once more.
9. System File Checker and DISM
Corrupted system files can impede the update process. Utilizing System File Checker (SFC) and Deployment Image Servicing and Management (DISM) can help repair these files:
-
Open Command Prompt as an administrator.
-
Run the following command:
sfc /scannowThis may take some time to complete. Once done, restart your computer and try updating.
-
If the problem persists, run the following command:
DISM /Online /Cleanup-Image /RestoreHealthThis process also takes a while, so be patient.
10. Reset Windows Update Components Manually
If none of the above solutions work, you may need to reset the Windows Update components manually:
-
Open Command Prompt as an administrator.
-
Enter the following commands one by one, pressing Enter after each:
net stop wuauserv net stop cryptSvc net stop bits net stop msiserver -
Next, rename the software distribution and Catroot2 folders:
ren C:WindowsSoftwareDistribution SoftwareDistribution.old ren C:WindowsSystem32catroot2 Catroot2.old -
Restart the services you stopped earlier:
net start wuauserv net start cryptSvc net start bits net start msiserver -
Check for updates again.
11. Perform a Clean Boot
Sometimes third-party programs can interfere with Windows Update services. A clean boot can help eliminate software conflicts:
- Press
Windows + R, typemsconfig, and hit Enter. - Under the General tab, select Selective startup and uncheck Load startup items.
- Go to the Services tab, check Hide all Microsoft services, and click Disable all.
- Click OK and restart your computer.
After restarting, check if the error persists. If it doesn’t, you can re-enable the services one by one to identify the culprit.
12. Create a New User Account
In some cases, issues with your user profile can lead to problems with Windows Update. Creating a new user account can help:
- Open Settings (
Windows + I), go to Accounts, and then select Family & other users. - Click on Add someone else to this PC.
- Follow the prompts to create a new local account.
- Log in to the new account and check if you can access Windows Update without encountering the error.
13. Update Windows via Media Creation Tool
If none of the solutions work, consider using the Media Creation Tool to manually update your version of Windows:
- Go to the Microsoft’s Download Windows 10 page and download the Media Creation Tool.
- Run the tool and select Upgrade this PC now.
- Follow the prompts. This process will reinstall Windows while keeping your files intact.
Conclusion
Dealing with the “We couldn’t connect to the update service” error can be frustrating, but with the right approach, it can be fixed effectively. By following the steps outlined in this guide, you should be able to resolve the issue and get your Windows Update functioning smoothly again. It’s essential to periodically check for updates to keep your system secure and up-to-date. If you continue to experience issues, consider reaching out to Microsoft Support for further assistance. Remember to back up your files regularly, as unexpected problems can arise at any time during troubleshooting.
If you are trying to update your Windows 11/10 machine but receive a message We couldn’t connect to the update service, We’ll try again later, or you can check now, If it doesn’t work, make sure you’re connected to the internet here are a few things you could try to fix the issue. A similar message you could see is We couldn’t check for updates because you aren’t connected to the internet, Connect to the internet and try again.
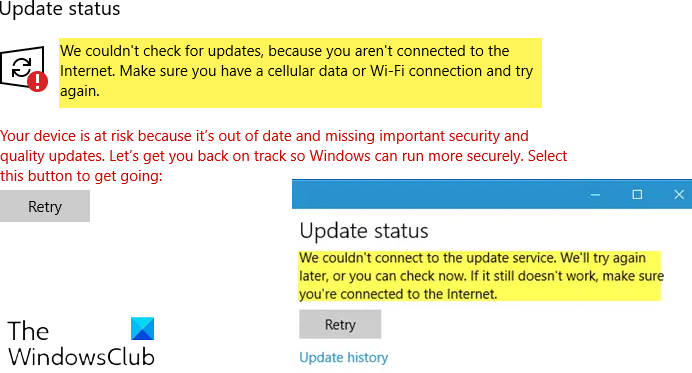
Although this problem mainly occurs when you do not have a valid internet connection, many times, it may also happen due to no reason at all. If you click on the “Retry” button, you will end up getting the same error on your screen.
To fix We couldn’t connect to the update service or We couldn’t check for updates because you aren’t connected to the internet errors, do the following:
- Run Windows Update troubleshooter
- Run Internet Connections troubleshooter
- Restart Windows Update service
- Change the DNS server
- Reset Windows Update components
- Reset catroot2 folder.
To learn more about these steps in detail, continue reading.
We couldn’t check for updates because you aren’t connected to the internet
1] Run Windows Update Troubleshooter
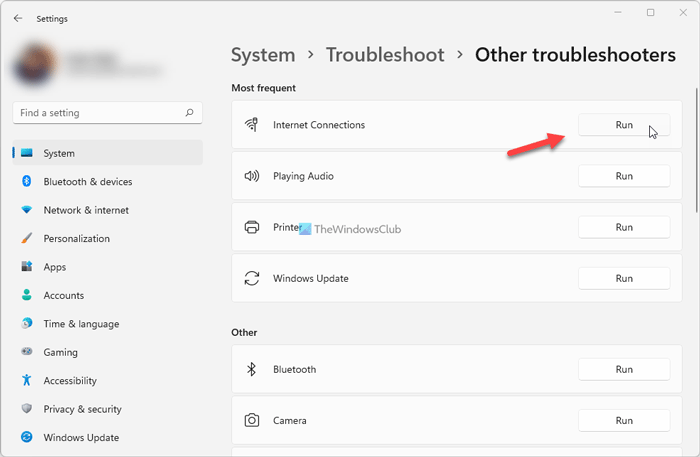
If you are using Windows 11, press Win+I to open Windows Settings and go to System > Troubleshoot > Other troubleshooters.

However, if you are using Windows 10, open Windows Settings > Update & Security > Troubleshoot. Microsoft has included on this page to fix various problems with your computer. You can run different Troubleshooters to fix different problems. Among them, you can find Windows Update Troubleshooter. Click on Run the troubleshooter button.
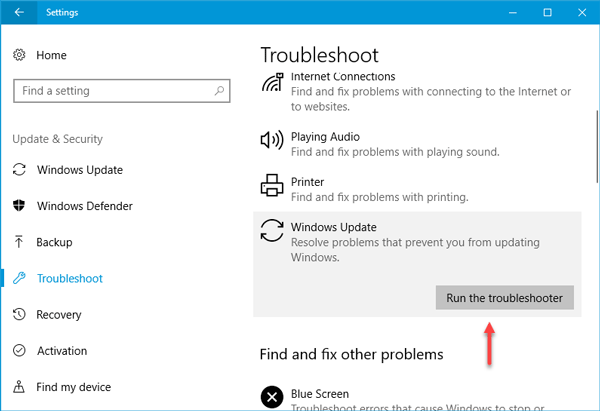
It will open a window, and you need to follow the on-screen instructions.
2] Run Internet Connections Troubleshooter
Make sure you have a valid internet connection. If you are not sure, try to open a webpage in any browser and see if the page loads. Next, open the same Troubleshooters Page in Windows Settings and run the Internet Connections Troubleshooter. It will try to fix all the problems related to your internet connection. If you think that you do not have any internet connection issue, but still Windows Update is showing error, you can try changing the internet connection as well.
3] Restart the Windows Update Service
Search for “Services” in the Taskbar search box. Open the Services Manager window and find out the Windows Update Service. Double-click on it to open its Properties box. You will see the status as either Running or Stopped.
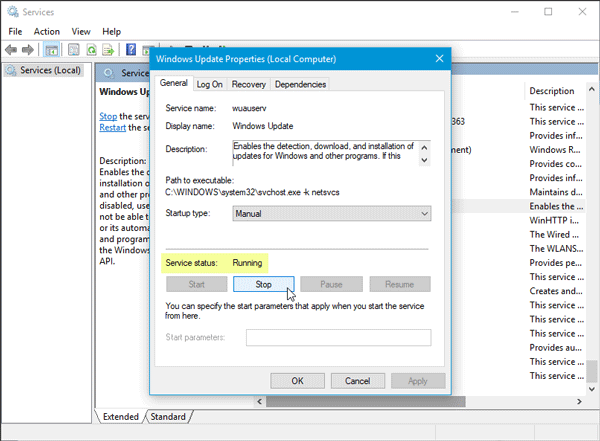
If it is Stopped, you need to click on Start button.
If it is Running, you need to click on Stop and the on the Start button to restart the service.
While here, make sure that the following Services are also running:
- Remote Procedure Call
- Background Intelligent Transfer Service.
4] Change the DNS server
Change the DNS server and see. To do that, follow these steps:
- Type ncpa.cpl in Search box and hit Enter. Right-click on your Network’s icon and select Properties.
- Select the Networking tab.
- Under This connection uses the following items, click Internet Protocol Version 4 (TCP/IPv4), and then click Properties.
- Click Advanced and select the DNS tab.
- If there are any DNS server IP addresses listed there, write them down for future reference, and remove them from this window.
- Click tthe OK button.
For Google Public DNS, select Use the following DNS server addresses. If there are any IP addresses listed in the Preferred DNS server or Alternate DNS server, write them down for future reference.
Replace those addresses with the IP addresses of the Google DNS servers: 8.8.8.8 and 8.8.4.4.
Restart the connection you selected above.
5] Reset Windows Update components
At times, your computer might show this error due to an internet conflict. The Windows Update components are accountable for this error. Therefore, you may need to reset the Windows Update components to get rid of this problem. If nothing helps, maybe you need to reset the Windows Update components and see if that works for you.
6] Reset catroot2 folder
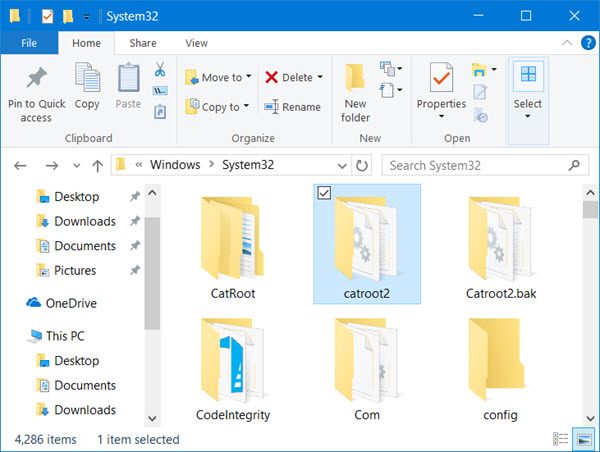
Clear the contents of the catroot2 folder and see. Open Command Prompt (Admin) and copy-paste the commands one at a time and press Enter after each time.
net stop wuauserv
net stop cryptSvc
net stop bits
ren C:\Windows\SoftwareDistribution SoftwareDistribution.old
ren C:\Windows\System32\catroot2 catroot2.old
net start wuauserv
net start cryptSvc
net start bits
exit
Now see!
Can’t connect to update server?
If you cannot connect to the Windows update server, you need to check the internet connection. Without a good internet connection, you cannot search for available updates and install them accordingly.
How do I fix a Windows Update error?
There are multiple ways to fix various Windows 11/10 update errors. However, the first thing you need to check is the Windows Update troubleshooter. You can find this troubleshooter in the Windows Settings > Troubleshoot section. Then, you can restart your computer and run the Internet Connections troubleshooter.
I hope something helps.
More here: Windows Update Fail To Install.
Windows Updates include essential security patches to protect your system from the latest security threats and vulnerabilities. Regular updates from Microsoft, address bugs and issues, enhancing system stability and minimizing unexpected errors. However at times, while trying to update your Windows 10 or 11 PC, you may encounter an error message that says “We couldn’t connect to the update service“. This error means that your PC is unable to communicate with the Microsoft servers that provide the latest updates for your system. This article explores what causes this error and how to fix Windows 11 Update error: We couldn’t connect to the update service.
Contents
- 1 Windows 11 cannot connect to update service
- 1.1 Check Your Internet Connection
- 1.2 Restart Your Computer
- 1.3 Run Windows Update Troubleshooter
- 1.4 Check Date and Time Settings
- 1.5 Check for Third-Party Antivirus Interference
- 1.6 Change DNS Address
- 1.7 Turn off the Automatic proxy setup
- 1.8 Restart Windows update Service (And its related services)
- 1.9 Run System File Checker Utility
- 1.10 Reset the Windows Update components
This error “We couldn’t connect to the update service” usually means that your PC is unable to communicate with the Microsoft servers that provide the latest updates for your system. Several factors can contribute to this issue, Some of the most common ones are:
- A stable internet connection is essential for the update service to communicate with Microsoft servers. Connectivity problems, such as a weak signal or issues with the internet service provider, can lead to this error.
- Incorrect date and time settings, VPN or proxy configurations, or issues with Windows Update components may disrupt the connection, resulting in the error.
- Third-party antivirus programs or security software might interfere with the update process. Temporarily disabling such software can help identify if they are causing the connectivity problem.
- Over time, the update cache and components may become corrupted, leading to connectivity issues. Manually resetting these components can often resolve the problem.
- Your device has a firewall or antivirus software that is blocking the connection to the update service.
Check Your Internet Connection
A stable internet connection is crucial for Windows Update to function properly. The update service requires a reliable connection to Microsoft servers to download and install updates. Make sure that your PC is connected to a stable and fast network.
- You can use a speed test tool to measure your connection speed and quality,
- You can try to restart your router or modem, or use a different network if possible.
- Verify that you can access other websites and online services without any problems.
- If using a Wi-Fi connection, try connecting via Ethernet to rule out any wireless connectivity issues.
Restart Your Computer
Sometimes, A simple restart can often resolve temporary glitches that might be affecting the update service. It clears the system’s memory and restarts essential processes.
- Save your work and close all open applications.
- Click on the Start menu, select the power icon, and choose “Restart.”
Run Windows Update Troubleshooter
The Windows Update Troubleshooter is a built-in tool designed to automatically detect and fix common issues that can prevent updates from being installed.
- Press Win + I to open the Settings menu
- Go to system then troubleshoot and click on Other troubleshoters
- Click Run next to the window update and follow on-screen instructions to diagnose and fix Windows update errors automatically.
This will attempt to identify if any problems exist which prevent your computer from downloading and installing Windows Updates.
Check Date and Time Settings
Incorrect date and time settings can interfere with Windows Update. Ensuring the correct date and time is crucial for the system to establish a secure connection with Microsoft servers.
- Open the Settings menu (Win + I), go to “Time & language.”
- Verify the date, time, and time zone settings.
Make sure that the option “Set time automatically” is turned on, or manually adjust the date and time to match your time zone.
Check for Third-Party Antivirus Interference
Some third-party antivirus programs may interfere with Windows Update. You can try to turn off your firewall or antivirus software for a while and see if the error goes away. Remember to turn them back on after you finish updating your PC.
- Open your antivirus software and disable real-time protection temporarily.
- Check if the Windows Update issue persists.
Change DNS Address
Domain Name System (DNS) makes it possible for you to open websites and access internet services. The DNS directs your computer to access a service, and problems with the DNS can make services such as Windows Update temporarily unavailable. And you can fix this “we couldn’t connect to the update service error” by changing the DNS settings on your PC. You can switch to Google DNS or Cloudflare’s privacy-focused DNS to address the Windows Update issues.
To change the DNS settings on your Windows 10 device, do the following:
- Press Windows + R, type ncpa.cpl and ok
- This will open the network connections window,
- Right-click the network interface which is in use.
- For example: right-click the connected ethernet adapter displayed on the screen. Select Properties.
- Double-click on Internet Protocol Version 4 (TCP/IPv4) from the list to get its properties window.
- Here select the radio button Use the following DNS server addresses
- Preferred DNS server 8.8.8.8
- Alternate DNS server 8.8.4.4
- Click on validate settings upon exit and ok
- Now check for updates, there is no more Update service error
Turn off the Automatic proxy setup
If you are using a proxy server, it might be causing the update issue. Disabling proxy settings ensures a direct connection to Microsoft servers.
- Press Windows key + I to open windows settings
- Select Network & Internet then Click on Proxy
- Here turn off Automatically detect settings.
- Now press Windows + R, type inetcpl.cpl and ok.
- Move to the Connections tab, click LAN settings.
- uncheck, Use a proxy server for your LAN
- And make sure the Checkmark on Automatically detect settings
Restart Windows update Service (And its related services)
- On the Start menu search type services.msc and hit enter key to open Windows services.
- Here look for Windows update service,
- If it’s running state simply right-click on it and select restart.
- If it’s not running then right-click and select start the service.
- Now double click on Windows update service to get its properties.
- Here change its startup type is set to automatic.
- Now switch to the Dependencies tab, and make sure the dependency services listed here are running.
- In this case, the dependency service is the Remote Procedure Call service.
- So ensure it is Running and has Automatic Startup type.
Also Check whether windows update-related services (Background Intelligent Transfer Service, Superfetch) are running or restart these services.
Run System File Checker Utility
Corrupted system files may be the possible cause of why you’re unable to get an update. Simply Run the System file checker utility to check and restore if any missing corrupted system files causing the issue. To do this
- Open the command prompt as administrator,
- Type sfc /scannow and hit the enter key.
- This will check for missing corrupted system files
- If found any the utility will restore them from %WinDir%\System32\dllcache.
- Wait until 100% complete the scanning process After that restart windows and check for updates.
Also if the SFC scan fails to restore corrupted system files, simply run the DISM command which repairs the system image and enables SFC to do its job.
Reset the Windows Update components
If nothing seems to solve the problem, you can try to reset the Windows Update components, and manually clear the Windows Update cache that fixes Windows Update download and installation issues. Before clearing the cache, first, we need to stop the Windows update service and its related service.
- To do this Open Command prompt as Administrator
- Perform the command below to Stop the Background Intelligent Transfer Service (BITS), Windows Update service, and Cryptographic service.
- net stop bits
- net stop wuauserv
- net stop cryptsvc
- And minimize the command prompt window (we use the same later)
Now to clear the Windows update cache
- Press “Windows + R,” enter the below path and press the Enter button.
- C:\Windows\SoftwareDistribution\
- This folder has all the files related to Windows updates.
- Open the “Download” folder, select all the files and delete all the files.
Now again open the Command prompt window and perform the command below to Reset the network configurations that might be part of the problem.
netsh winsock reset
netsh winsock reset proxy
And then perform the command below to restart the BITS, Windows Update, and Cryptographic services that we previously stopped.
net start bits
net start wuauserv
net start cryptsvc
That’s all now close every window and restart your system.
On the next login check for updates from settings -> update & Security -> Windows update And check for updates.
Also, Read
- Solved: Potential Windows update database error detected on Windows 10
- Windows 10 Scanner Not Working “Cannot communicate with the scanner”
- How To Fix Windows Update Error 0x80070057
- Windows 10 Photos app not working File system error -2147219196
You may sometimes end up with some error messages like We couldn’t connect to the update service, We’ll try again later, or you can check now, If it doesn’t work, make sure you’re connected to the internet prompt when you update your Windows 10 PC. This is a common issue and there is nothing to be worried about this problem. Although this error occurs when you do not have a proper internet connection, there are so many factors contributing to the problem. This guide will be addressing the issue with effective troubleshooting methods. So, continue reading!

Table of Contents
There are a few reasons that contribute to the discussed problem in your Windows 10 PC. They are listed below.
- Any external plugged-in devices are preventing your updates from being installed
- Unstable internet connection
- Few essential Windows services are not running on your computer
- Antivirus program or firewall is protecting the updates from being installed, considering them as threat files
- Conflicting DNS addresses
- Presence of malware
- There is not enough space on your PC to install the new updates
- Misconfigured files on PC
Now, you know the reasons that cause the discussed error. Follow the below-mentioned troubleshooting methods to fix the same.
Method 1: Basic Troubleshooting Methods
Here are a few basic troubleshooting methods to fix the issue.
1. Unplug External Devices
When you face We couldn’t connect to the update service. We’ll try again later Windows 10, check if you have connected any external peripheral devices or USB devices. If so, you are advised to remove them to avoid any electromagnetic interference contributing to the problem. Follow as instructed.
1. Firstly, unplug all the external USB devices connected to your computer.

2. Then, disconnect the webcam devices, printer, and other peripherals and leave the most extremely necessary devices connected.
3. Finally, check if you have fixed We couldn’t connect to the update service. We’ll try again later Windows 10 issue or not.
2. Check Network Speed
To ensure everything runs properly, you must make sure the internet connection is in stable condition. Sometimes, the Wi-Fi connection may not be fast enough, so in this case, you have to restart your router or check the network speed. Try running a SpeedTest to check the optimum level of network speed required for the proper connection.

Check if your Windows 10 PC satisfies the below criteria.
- Find the signal strength of your network and if it is very low, clear all the obstructions in between the way.
- Avoid too many devices connected to the same network.
- Always use a modem/router verified by your Internet Service Provider (ISP) and they are free of conflicts.
- Do not use old, broken, or damaged cables. Replace the cables if necessary.
- Make sure the wires from the modem to the router and the modem to the wall are stable and out of disturbance.
If there are any internet connectivity issues, check our guide How to Troubleshoot Network Connectivity Problems on Windows 10 to troubleshoot the same.
Also Read: Fix Windows Update Error Code 0x80070017
3. Run Windows Update Troubleshooter
If there are any bugs and problems in your computer, you cannot update your Windows PC. Windows built-in troubleshooter helps you fix network connectivity issues, corrupt registry keys, and corrupt Windows components contributing to We couldn’t connect to the update service. We’ll try again later Windows 10 error can also be fixed by this tool. Follow the steps instructed in our guide How to Run Windows Update Troubleshooter.

Perform as demonstrated and thereby resolve the problems identified by the troubleshooter.
Method 2: Restart Essential Windows Services
Some essential Windows services like Windows Update and Background Intelligent Transfer services must be enabled on your computer to avoid couldn’t connect to the update service issue. The Background Intelligent Transfer services use available bandwidth to install any latest updates so that your computer installs any update only if there is no other installation in progress. If these services are disabled in your system, you are more likely to face the discussed error. Hence, restart essential Windows services as instructed below.
1. Press the Windows key, type Services and click on Run as administrator.

2. Now, scroll down and double-click on Background Intelligent Transfer Service.

3. Now, select the Startup type to Automatic, as depicted.
Note: If the Service status is Stopped, then click on the Start button. If the Service status is Running, click on Stop and Start it again.

4. Click on Apply > OK to save the changes. Check if you can install the latest updates.
5. Repeat all these steps for other Windows services like Cryptographic, MSI Installer, and Windows Update Services.
Also Read: Fix Windows 10 Update Error 0x80070103
Method 3: Modify Windows Update Service
If you have ensured Windows Update services are running but you still face we couldn’t connect to the update service. We’ll try again later Windows 10, then there is another simple workaround to fix update problems. Firstly, stop the Windows Update service and delete the SoftwareDistribution folder in your File Explorer. Then again start Windows Update services. Follow as instructed below.
1. Launch the Services app as administrator.

2. Now, scroll down the screen and right-click on Windows Update.

3A. If the Status is not set to Running, skip to Step 4.
3B. If the Status is Running, click on Stop as shown.

4. Wait for 2 to 3 seconds on the prompt screen, Windows is attempting to stop the following service on Local Computer…

5. Now, open the File Explorer by clicking Windows + E keys simultaneously. Now, navigate to the following path.
C:\Windows\SoftwareDistribution\DataStore
6. Now, select and right-click on all the files and folders and click on the Delete option.

7. Similarly, navigate to the given path and Delete all the files and folders.
C:\Windows\SoftwareDistribution\Download

8. Again, switch to the Services window and right-click on the Windows Update, and select the Start option.

9. Wait for 3 to 5 seconds in the prompt, Windows is attempting to start the following service on Local Computer…

Finally, you have restarted your Windows Update services thereby deleting the contents in the Software Distribution folder. Check if you can install the latest updates on your Windows 10 PC.
Method 4: Repair System Files
If your system has any corrupt files, you must repair them first before installing any updates. To resolve We couldn’t connect to the update service issue, you are advised to run SFC/DISM utilities on your Windows 10 computer as instructed in our guide How to Repair System Files on Windows 10.

Once you have completed the scanning process, check if you can install the latest updates.
Also Read: How to Fix Windows Update Error 80072ee2
Method 5: Disable Antivirus Temporarily (If Applicable)
The antivirus suite may sometimes prevent any new latest updates from being installed on your PC. Antivirus software like Norton and Avast may prevent any latest Windows update and you are advised to disable any inbuilt or third-party antivirus software temporarily to resolve the same. Read our guide on How to Disable Antivirus Temporarily on Windows 10 and follow the instructions to disable your Antivirus program temporarily on your PC.

After fixing We couldn’t connect to the update service. We’ll try again later Windows 10 on your PC, make sure to re-enable the antivirus program since a system without a security suite is always a threat.
Method 6: Disable Windows DefenderFirewall (Not Recommended)
Sometimes, Windows Defender Firewall in your computer might prevent updating the device, for some security reasons. If in case, updates have been blocked by Windows Defender Firewall, you have to enable it or disable the Firewall securities temporarily from your computer. If you do not know how to disable Windows Defender Firewall, our guide on How to Disable Windows 10 Firewall will help you do so. You can also allow the app by following our guide Allow or Block Apps through the Windows Firewall

After updating your device, make sure you enable the Firewall suite again since a computer without a security program is always a threat.
Also Read: Fix Windows Update Error 0x800704c7
Method 7: Use Google DNS
Some users have suggested that changing the DNS addresses has helped them fix We couldn’t connect to the update service. We’ll try again later Windows 10. Here is our simple guide on How to change DNS settings in Windows 10 that will help you change your DNS addresses on your computer. You can also switch to any Open DNS or Google DNS on your Windows 10 computer by following our guide on How to Switch to OpenDNS or Google DNS on Windows. Follow as instructed and check if you can install updates on your PC.
Method 8: Run Malware Scan
Several Microsoft experts suggest that scanning a PC will help you maintain your computer threat free. If there are any viruses or malware intrusions on your PC, you cannot use external and internal hardware devices. Hence, you are advised to scan your computer as instructed in our guide How do I Run a Virus Scan on my Computer?

Also, if you want to remove malware from your computer, check our guide How to Remove Malware from your PC in Windows 10.
Also Read: 26 Best Free Malware Removal Tools
Method 9: Uninstall Recent Updates
Any previous incompatible updates in your Windows 10 PC might not allow new updates to be downloaded in it. Hence, you are advised to uninstall the recent updates that are being installed on your computer to resolve We couldn’t connect to the update service. We’ll try again later Windows 10. It is very easy to do the task and the steps are demonstrated as follows.
1. Hit the Windows key and type Control Panel. Then, click on Open as shown.

2. Now, click on Uninstall a program option under the Programs menu as depicted.

3. Now, click on View installed updates in the left pane as shown.

4. Now, search and select the most recent update by referring to Installed On the date and clicking on Uninstall option as shown below.

5. Finally, confirm any prompt and restart your computer. Check if you can fix the update problem in Windows 10.
Method 10: Extend System Partition
If there is insufficient space in the system partition, you cannot install any new updates on your Windows 10 PC. Although there are many third-party tools to increase the system reserved partition, we prefer manually doing it by following our guide How to Extend System Drive Partition (C:) in Windows 10.

Also Read: Fix Windows 10 Update Error 0XC1900200
Method 11: Clear Drive Space
If your PC does not have any drive space to install any new updates from Microsoft, you will face We couldn’t connect to the update service. We’ll try again later Windows 10 error prompt. Hence, firstly check the drive space and clean the temporary files if necessary.
Step I: Check Drive Space
To check the drive space in your Windows 10 PC, follow the below-mentioned steps.
1. Press and hold Windows + E keys together to open File Explorer.
2. Now, click on This PC from the left pane.
3. Check the disk space under Devices and drivers as shown. If they are in red, consider clearing the temporary files.

Step II: Clear Temporary Files
If there is minimum available space in your computer contributing to couldn’t connect to the update service problem, follow our guide 10 Ways to Free Up Hard Disk Space On Windows which helps you clear all unnecessary files in your computer.

Method 12: Reset Windows Update Components
An effective way to fix couldn’t connect to the update service is resetting Windows update components if no other options have helped you. All the Windows update files are stored on your computer and if it is corrupt or incompatible, you must face several frustrating problems. To fix the corrupt Windows Update components in your computer, follow our guide on How to Reset Windows Update Components on Windows 10.

This simple process involves running a set of commands in the command prompt so that all the essential Windows services are restarted on your Windows 10 PC. After executing all the commands, check if you can install pending updates.
Also Read: Fix Windows Update Taking Forever in Windows 10
Method 13: Manually Install Updates
If all other solutions in this guide fail to work for you, still you can manually download the required update. The Windows 10 update history webpage has all history of updates released for your Windows computer. Follow the below-listed instructions to install the updates forcefully.
1. Press and hold the Windows + I keys simultaneously to open Settings.
2. Now, click on Update & Security.

3. Now, select the View update history option as highlighted below.

4. In the list, make sure the KB number is pending to be downloaded due to conflicting errors.
5. Here, type the KB number in the Microsoft Update Catalog search bar.

6. Finally, click on Download corresponding to your latest update and follow the on-screen instructions to complete the process.

After installing the updates in your Windows 10 PC, check if the issue We couldn’t connect to the update service. We’ll try again later Windows 10 is fixed.
Method 14: Update via Media Creation Tool
If you cannot install the update manually, you can try installing it using the Media Creation Tool. This is the official download platform recommended by Microsoft to fix any update errors in your Windows 10 PC. Follow the below-mentioned steps to do the same.
1. Launch any browser and then open the official download page of the Media Creation tool.
2. Now, click on the Download tool now button under Create Windows 10 installation media.

3. Run the setup file and click on Yes in the User Account Control (UAC) prompt if any.
4. Now, click on Accept button in the Windows 10 Setup window as shown.

5. Wait for the scanning process to be complete and select the Upgrade this PC now option and then click on the Next button.

6. Wait until the Windows ISO is downloaded to your PC and click on Accept.
Note: You have to wait until all the pending updates in your computer are installed on your PC so the Media Creation Tool can update your Operating System to the most recent version.
7. Finally, click on Install to complete the process.
Also Read: 20+ Best Rufus Alternatives for Windows, Linux and macOS
Method 15: Tweak Windows Registry
Next, you are advised to clean the Windows Registry path corresponding to the Windows update download path to fix we couldn’t connect to the update service. We’ll try again later Windows 10 issue. You must always be careful in handling the Windows registry, else you may end up losing your files. Follow the below-mentioned steps to tweak registry keys thereby fixing We couldn’t connect to the update service. We’ll try again later Windows 10 error.
1. Press the Windows key, type Registry editor, then click on Run as administrator.

2. Now, navigate to the following folder path into the Registry Editor.
HKEY_LOCAL_MACHINE\SOFTWARE\Policies\Microsoft\Windows\WindowsUpdate

3. In the right pane, search for WUServer and WIStatusServer.
3A. If you cannot find them, you cannot remove the Windows update download path. Move ahead to the next troubleshooting method.
3B. If you can find the entries, right-click on them and click on Delete.

4. Finally, restart your computer and check if you have fixed the discussed issue.
Method 16: Perform System Restore
If you are not satisfied with any of these methods, then the only option left is to restore your computer to its previous version. To do so, follow our guide on How to use System Restore on Windows 10 and implement the instructions as demonstrated. In the end, your computer will be restored to a previous state where it does not face any errors at all.

After restoring your Windows 10 PC, check if the issue We couldn’t connect to the update service. We’ll try again later Windows 10 is fixed.
Also Read: How to Add Create Restore Point Context Menu in Windows 11
Method 17: Reset PC
If your computer deals with severe corrupt Windows components, an efficient way to clean all these corrupt components and boot your data is to repair the PC as instructed in our guide How to Reset Windows 10 Without Losing Data. Follow as instructed in this article and at the end, you would have fixed the discussed error.

Recommended:
- How to Change Skin in Minecraft PC
- Fix Configuration System Failed to Initialize on Windows 10
- Fix Windows Update Service Could Not be Stopped
- Fix Update Error 0x80070bcb Windows 10
We hope that this guide was helpful and you could fix We couldn’t connect to the update service in Windows 10. Let us know which method worked for you the best. Also, if you have any queries/suggestions regarding this article, then feel free to drop them in the comments section.