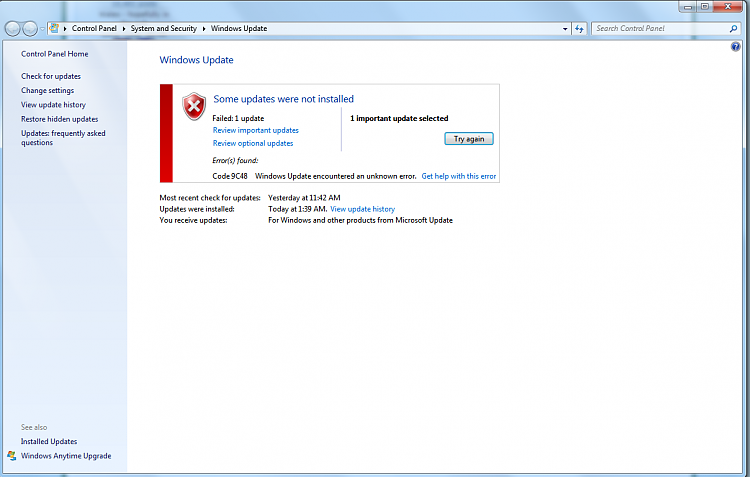
Владельцы Windows сталкиваются с ошибкой 9c48, когда пытаются установить обновление для системы. Некоторые пользователи утверждают, что данный код возникает во время установки определенных обновлений для браузера Internet Explorer или Edge. Ошибка 9c48 способна проявляться на всех версиях ОС Windows, начиная от Windows 7 и заканчивая последними сборками Windows 10.
Что вызывает ошибку 9c48?
- Типичный баг в работе Центра обновления Windows.
- Чрезмерно «заботливый» сторонний антивирус.
- Установщик модулей Windows отключен.
- Незавершенная установка Internet Explorer.
- Поврежденные системные файлы.
Методы решения ошибки 9c48
Метод №1 Запуск средства устранения неполадок
Верно, средство устранения неполадок не так уж и часто помогает в решении «неполадок», возникших в системе, тем не менее время от времени оно все же способно разрешить проблему. Чтобы запустить средство устранения неполадок, нужно сделать следующее:
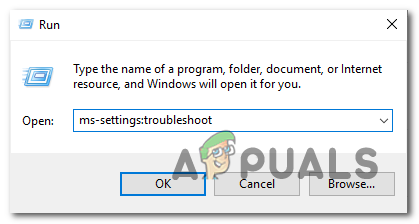
- нажмите Windows+R;
- копируйте в пустую строчку значение «ms-settings:troubleshoot» и нажмите Enter;
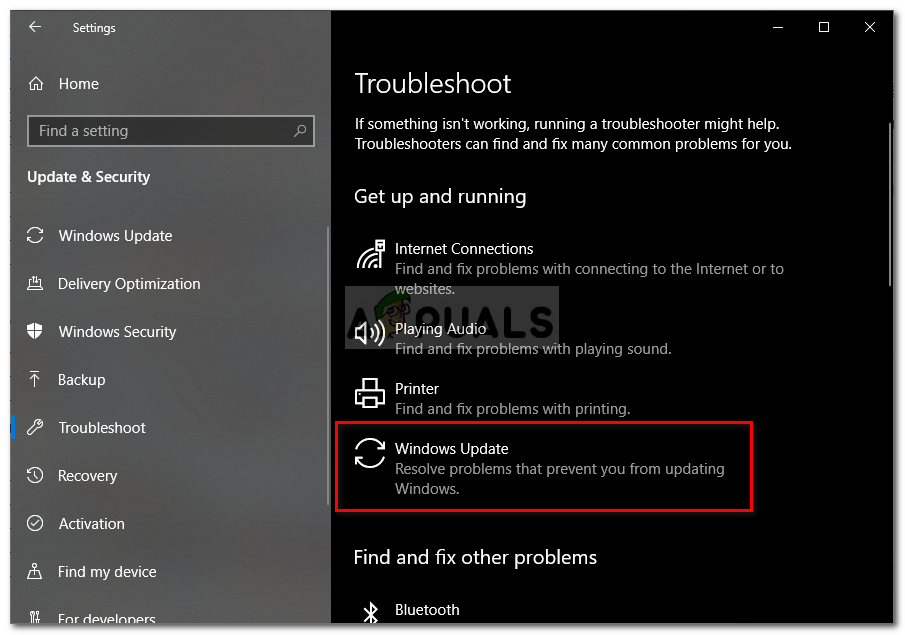
- кликните на пункт «Центр обновления Windows» и кнопку «Запустить средство устранения неполадок»;
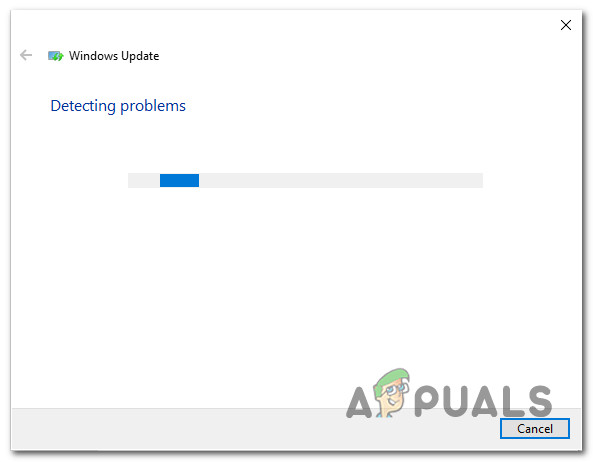
- подождите пару-тройку минут и нажмите кнопку «Применить это исправление»;
- перезагрузите компьютер.
Пробуем обновить свою Windows еще раз. Ошибка 9c48 могла исчезнуть с вашего компьютера. Если же нет, то давайте двигаться дальше.
Метод №2 Отключение активной защиты антивируса
Как правило, антивирус — невероятно полезная вещь на компьютере любого пользователя. Тем не менее порой антивирус может стать чересчур «заботливым», блокируя направо-налево любой компонент в Windows, системный он или нет.
Мы рекомендуем вам попробовать отключить активную защиту своего стороннего антивируса и посмотреть, что из этого выйдет. Отключить защиту того или иного антивируса можно по разному — например, через трей в панели задач системы.
Метод №3 Включение установщика модулей Windows
Оказывается, ошибка с кодом 9c48 может возникать из-за отключенного установщика модулей Windows. Данная служба ответственна за установку, изменение и удаление обновлений Windows, а также дополнительных компонентов, важных для системы.
Разумеется, вы не сможете обновиться, если эта служба деактивирована. Чтобы включить установщик модулей Windows, вам нужно сделать следующее:
- нажмите Windows+R;
- вставьте в пустую строчку значение «services.msc» и нажмите Enter;
- найдите в списке службу «Установщик модулей Windows» и дважды кликните на нее ЛКМ;
- выберите значение «Автоматически» в настройках типа запуска службы;
- сохраните изменения и перезагрузите компьютер.
Если установщик модулей Windows был деактивирован в вашей ОС, то этот метод должен был избавить вас от ошибки 9c48.
Метод №4 Возврат к Internet Explorer 10 (только для Windows 7)
Некоторые пользователи смогли избавиться от обговариваемой ошибки, просто откатившись к Internet Explorer 10 — более старой версии браузера от Майкрософт. Если у вас Windows 7 и вы сталкиваетесь с такой же проблемой, то попробуйте сделать следующее:
- убедитесь, что Internet Explorer закрыт;
- нажмите Windows+R;
- пропишите значение «cmd» и нажмите комбинацию Ctrl+Shift+Enter;
- впишите команду «FORFILES /P %WINDIR%\servicing\Packages /M Microsoft-Windows-InternetExplorer-*10.*.mum /c «cmd /c echo Uninstalling package @fname && start /w pkgmgr /up:@fname /norestart»» (без кавычек по краям);
- после завершения операции перезагрузите компьютер.
Пытаемся обновить Windows 7 и смотрим, исчезла ли ошибка 9c48 или нет.
Метод №5 Восстановление системы
Ничего не получилось? Тогда пора приниматься за выполнение более изощренных методов. Мы предлагаем вам воспользоваться точкой восстановления, созданной в системе автоматически, чтобы попытаться избавиться от ошибки 9c48. Это не гарантированное решение, но попытаться все же стоит.
Итак, восстановление системы при помощи точки восстановления выполняется следующим образом:
- нажмите комбинацию «rstrui» и нажмите Enter;
- кликните на кнопку «Далее» в появившемся перед вами окошке;
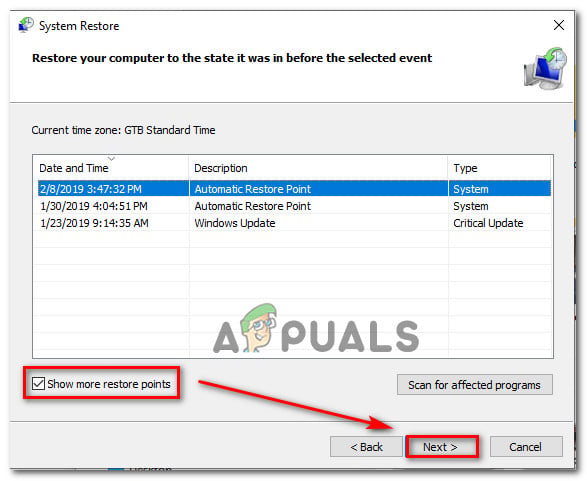
- поставьте галочку возле опции «Показать больше точек восстановления»;
- выберите подходящую вам точку для восстановления из списка и нажмите кнопку «Далее»;
- кликните на «Завершить», дабы начать процесс восстановления системы;
- после запланированной перезагрузки компьютера попробуйте обновить свою Windows.
Метод №6 Возврат ПК к исходному состоянию
Что же, если и вышеуказанный метод не смог вам помочь, то можно попробовать вернуть компьютер к исходному состоянию. Проще говоря, переустановить Windows, не теряя при этом своих личный данных.
Чтобы запустить этот процесс, сделайте следующее:
- нажмите Windows+I;
- перейдите в раздел «Обновление и безопасность»;
- пройдите во вкладку «Восстановление»;
- нажмите на кнопку «Начать» в самом верху окна;
- далее выберите пункт «Сохранить мои файлы»;
- кликните на кнопку «Сброс».
Все, процесс сброса компьютера начался. Подождите окончания сброса и, как только войдете в систему, проверьте наличие ошибки 9c48 при обновлении Windows.
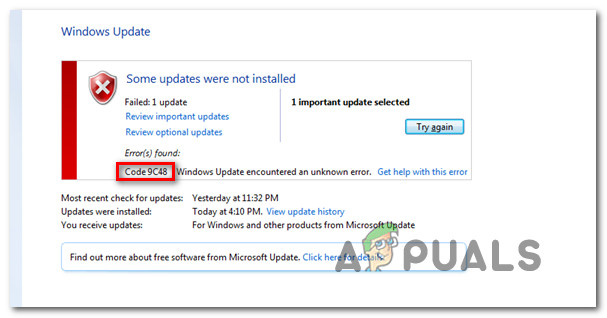
Several Windows users have been reaching us with questions after getting the Error Code 9c48 whenever they try to install a particular update. Most affected users are reporting that the issue only occurs with a particular Internet Explorer 11 or Edge update that defuses to be installed. The issue is not specific to a certain Windows version since it’s encountered on Windows 7, Windows 8.1 and Windows 10.
What’s causing the Windows Update Error Code 9c48?
We investigated this particular issue by looking at various user reports and by trying out the different fixes that are currently recommended by other users that managed to fix this problem. As it turns out, several different scenarios will produce this scenario. Here’s a shortlist of culprits that are known to cause this issue:
- Generic WU glitch – A machine interruption during the update can produce what is commonly referred to as a generic Windows update glitch that might end up affecting future updates. If this scenario is applicable, you should be able to resolve the issue by running the Windows Update troubleshooter and applying the applicable repair strategy.
- Overprotective 3rd party AV suite – As it turns out, there are several different AV suites that are known to interfere between the connection of WU and the official Microsoft server (this ends up producing various error codes, including this one. In this case, the only fixes around the issue are to disable the real-time protection while the update is installed or to uninstall the 3rd party suite from the machine.
- Windows Module Installer is disabled – As reported by various users, this error code can also occur in instances where a critical process (Windows Module Installer) is disabled (either by manual user intervention or by a resource manager software). In this case, you can resolve the issue by accessing the Services screen and re-enabling the Windows Module Installer service.
- Incompatible Internet Explorer installation – A lot of users have started encountering this problem after installing IE11 on a Windows 7 computer using an executable (manual installation). As it turns out, the installation will succeed even if the IE version is not fully compatible. In this case, you can resolve the issue by rolling back to Internet Explorer 10 using an elevated Command Prompt.
- System file corruption – Corruption inside the system files can also be responsible for this error message. Several users that were also encountering this issue have managed to get the issue resolved by using a previously stored snapshot to return the machine to a healthy state or by performing a repair install or a clean install to refresh every Windows component.
Method 1: Running the Windows Update Troubleshooter
There are several different common reasons why this particular error will appear. But instead of trying out each fix, you can save a lot of time by using Windows Update Troubleshooter – a built-in Microsoft utility that contains fixes for the majority of common issues that are known to produce error codes during the installation of a Windows Update.
Several affected user has reported that they managed to resolve the issue indefinitely simply by running this utility. After identifying the problem, the Windows Update Troubleshooter recommended a viable repair strategy that was automatically applied and ended up fixing the problem.
Here’s a quick guide on running the Windows Update troubleshooter:
- Open up a Run dialog box by pressing Windows key + R. Next, type “ms-settings:troubleshoot” and press the Enter key to open up the Troubleshooting tab of the Settings app.
Opening the Troubleshooting tab of the Settings app via a Run box - Once you manage to get inside the Troubleshooting tab, move over to the right-hand section of the screen and locate the Get up and running section. When you see it, click on Windows Update, then click on Run the troubleshooter from the newly appeared extended menu.
Running Windows Update Troubleshooter - The utility will start and although it might look like it freezes, do not close the window until the initial scan is complete. This part of the analysis will determine if any of the repair strategies included with the utility is applicable to your current situation.
Detecting problem with Windows Update - If a suitable fix is identified, you will see a window in which you can click on Apply this fix, to apply the applicable repair strategy. In some cases, you might also need to follow some manual instructions to apply the repair strategy.
Apply this fix - Once the recommended repair strategy is applied, restart your computer and see if the issue is resolved at the next startup.
If you’re still seeing the Error Code 9c48 when you try to install a particular Windows update, move down to the next method below.
Method 2: Disabling Real-time protection or Uninstalling 3rd party antivirus
Another culprit that is known to interfere with the installation of certain Windows updates is an overprotective AV suite. As it turns out, there are several security scanners (with real-time protections) will stop the connection between WU and the external server that is used to download the update files. Sophos, McAfee, AVAST, and Comodo are all reported to cause this problem.
If you’re currently using a 3rd party suite (even if it’s not included in the list above) it may be responsible for the apparition of the Error Code 9c48 when you’re trying to install a particular update.
To verify if this claim is true, you should disable the real-time protection and see if the update installs successfully while the 3rd party security suite is disabled. If the installation completes without issue while your 3rd party antivirus is disabled, it’s clear that it was previously interfering with the WU (Windows Update) component.
But keep in mind that the process of disabling the real-time protection will be different depending on the 3rd party suite that you’re using. However, you can typically do it by using the tray bar icon.
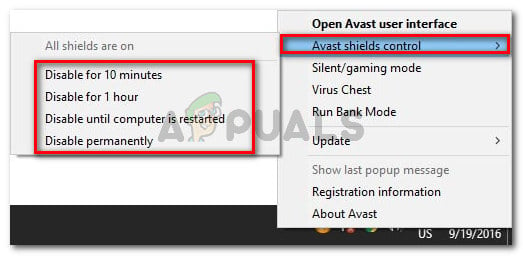
After you disable the real-time protection, try to install the update again and see if the process is successful without the apparition of the Error Code 9c48.
If the installation is successful, you might want to ensure that the 3rd party AV suite isn’t interfering with other updates of your Windows components – The most efficient way of doing this is to replace the current security solution with a different 3rd party program or to migrate to the built-in solution (Windows Defender).
If you are prepared to go this route, follow this article (here) to uninstall your current 3rd party suite and ensure that you’re not leaving behind any leftover files.
If you’ve installed your antivirus and you’re still encountering the issue or this scenario didn’t apply to you, move down to the next method below.
Method 3: Enabling the Windows Module Installer service
As it turns out, the Error Code 9c48 can also occur due to a critical Windows update services that were disabled by manual user intervention or by a 3rd party optimization program that disabled the service to free up system resources.
Several users that were also encountering this problem have reported that once they re-enabled this service (by setting the Startup Type to Automatic) and restarting the computer the Error Code 9c48 stopped occurring during the installation of Windows updates.
Here’s a quick guide on enabling the Windows Module Installer service:
- Press Windows key + R to open up a Run dialog box. Then, inside the text box, type “services.msc” and press Enter to open up the Services screen.
Running Services from a Run box - Once you manage to get inside the Services screen, move over to the right-hand section and scroll down through the list of installed services until you locate the Windows Module Installer service.
- When you identify the service, right-click on it and choose Properties from the newly appeared context menu.
Accessing the Properties screen of the Windows Modules Installer services - Inside the Properties screen of these services, select the General tab and change the Startup Type to Automatic.
Changing the startup type of the Windows Module Installer service to Automatic - Click Apply to save the changes, then attempt to re-install the Windows update that was previously failing with the Error Code 9c48.
If the same problem is still occurring, move down to the next method below.
Method 4: Rolling back to Internet Explorer 10 (Windows 7 Only)
Several users that were also struggling to resolve the Error Code 9c48 have finally managed to fix the issue indefinitely by rolling back to IE10 (Internet Explorer 10). As it turns out, this has served as an effective fix for a lot of users that we’re encountering the issue on Windows 7, after previously installing the latest IE version manually.
Here’s a quick guide on rolling back to IE10 manually from an elevated Command Prompt:
- Make sure that any instance of Internet Explorer is completely closed.
- Press Windows key + R to open up a Run dialog box. Inside the text box, type “cmd” and press Ctrl + Shift + Enter to open up an Elevated Command Prompt. Once you see the UAC (User Account Control), click Yes to grant administrative privileges.
Running Command Prompt - Inside the elevated Command Prompt, type/paste the following command and press Enter to run it:
FORFILES /P %WINDIR%\servicing\Packages /M Microsoft-Windows-InternetExplorer-*10.*.mum /c "cmd /c echo Uninstalling package @fname && start /w pkgmgr /up:@fname /norestart"
- Don’t be alarmed if you get Operation failed errors. It’s normal to see them since you will not have permissions to edit all items.
- Once the operation is complete, restart your computer and see if the issue is resolved at the next startup sequence.
Method 5: Doing a System Restore
If none of the potential fixes above have helped you in resolving the Error Code 9c48, chances are you’re dealing with some time of system file corruption that is interfering with the installation of some pending Windows Updates.
In situations like this, one damage-limiting fix is to use the System Restore. This built-in utility is capable of dealing with serious issues of this kind by restoring the entire Windows installation to a healthy state in which the circumstances that are currently causing the issue didn’t exist.
But in order for this method to work, it needs to have previously created snapshot that it can use to restore your operating system to a previous point in time where the problem wasn’t occurring. Fortunately, unless you modified the default behavior, Windows is configured by default to constantly save Snapshots (after every installed update).
However, going this route and using a system restore snapshot means that any system changes (including app installation, changed user settings and anything else) will be reverted. If you are prepared to accept this risk, here are step by step instructions with the process of performing a System Restore from a previously created snapshot:
- Press Windows key + R to open up a Run dialog box. Inside the text box, type “rstrui” and press Enter to open up the System Restore menu.
Opening the System Restore wizard via Run box - Once you’re inside the System Restore window, click Next to advance to the next screen.
Using System Restore - Once you manage to get to the next screen, start by checking the box associated with Show more restore points. Next, look at the dates carefully and select a system restore point that is dated before the apparition of the Error Code 9c48. After you manage to select the correct snapshot, click on Next to advance to the next menu.
Restoring your system to a previous point in time - Now that everything is ready to go, click on the Finish button to initiate the process. After several seconds, your machine will restart and during the next startup sequence, the old machine state will be mounted.
- After the boot sequence is complete, repeat the action that was previously causing the Error Code 9c48 and see if the issue is now resolved.
If the same error code is still occurring when you try to install a particular WIndows update, move down to the next method below.
Method 6: Performing a repair install
If none of the methods above have allowed you to resolve the issue, chances are you’re dealing with a more severe system file corruption issue that cannot be resolved conventionally. In this case, the only viable fix that will resolve this issue in the vast majority of cases is to reset every Windows component that might end up causing the Error Code 9c48.
There are two different methods that will allow you to do this: the radical solution (a clean install) or the damage-limiting solution (a repair install).
A clean install is very efficient, but the major downside is that it will also remove any personal data including documents, media, games and any other application.
If you want the less-destructive approach of resetting every Windows components, go for a repair install (in place install). On top of allowing you to keep your personal data, you will also be allowed to keep some user preferences.
Issue
Windows Server 2008R2 fails to install KB2999226 (Internet Explorer 11) update with error 9C48. IE11 is already present on the system and seems to be functioning fine. All other updates install with no issues.
Windows system logs record Event ID 20 Error:
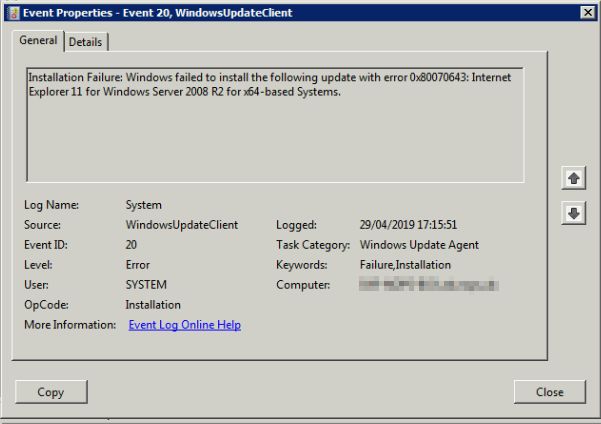
Installation Failure: Windows failed to install the following update with error 0x80070643: Internet Explorer 11 for Windows Server 2008 R2 for x64-based Systems.
Resolution
The credit for this resolution goes to the following TechNet post: https://social.technet.microsoft.com/Forums/azure/en-US/dd892178-5800-43f2-a0b4-9d4e63e603ee
April 2019
Windows Server 2008R2

-
Microsoft Support & Malware Removal
-
Windows Update
You should upgrade or use an alternative browser.
[SOLVED] Windows 7 x86 IE11 Update keeps failing to install with error code 9C48
-
Thread starter
Thread starterjambles
-
Start date
Start date
- Joined
- Sep 10, 2018
- Posts
- 43
-
-
#1
I’m having trouble installing Internet Explorer 11 Update on Windows 7 x86 with error code 9C48.
Please see link to CBS folder zip:
https://www.dropbox.com/s/sodkucbcjh2c2gs/CBS.zip?dl=0
Please see below SFCFix.exe log:563:55 PM 24/10/2018543:55 PM 24/10/2018 SFCFix version 3.0.0.0 by niemiro.
Start time: 2018-10-24 15:52:30.562
Microsoft Windows 7 Service Pack 1 — x86
Not using a script file.
AutoAnalysis::
WARNING: Failed to get store name from identity name with return code 2 for component Desktop_Shell-GettingStarted and file OobeFldr.dll. File is reported as corrupt by SFC.
CORRUPT: OobeFldr.dll of component Desktop_Shell-GettingStarted.
WARNING: Failed to get store name from identity name with return code 2 for component Desktop_Shell-Search-SrchAdmin and file srchadmin.dll. File is reported as corrupt by SFC.
CORRUPT: srchadmin.dll of component Desktop_Shell-Search-SrchAdmin.
WARNING: Failed to get store name from identity name with return code 2 for component Desktop_Shell-Search-SrchAdmin.Resources and file srchadmin.dll.mui. File is reported as corrupt by SFC.
CORRUPT: srchadmin.dll.mui of component Desktop_Shell-Search-SrchAdmin.Resources.
WARNING: Failed to get store name from identity name with return code 2 for component Desktop_Shell-GettingStarted.Resources and file oobefldr.dll.mui. File is reported as corrupt by SFC.
CORRUPT: oobefldr.dll.mui of component Desktop_Shell-GettingStarted.Resources.
SUMMARY: Some corruptions could not be fixed automatically. Seek advice from helper or sysnative.com.
CBS & SFC total detected corruption count: 4
CBS & SFC total unimportant corruption count: 0
CBS & SFC total fixed corruption count: 0
SURT total detected corruption count: 1652
SURT total unimportant corruption count: 0
SURT total fixed corruption count: 0
AutoAnalysis:: directive completed successfully.
Successfully processed all directives.
SFCFix version 3.0.0.0 by niemiro has completed.
Currently storing 4 datablocks.
Finish time: 2018-10-24 15:53:20.062
———————-EOF————————
- Joined
- Oct 9, 2014
- Posts
- 741
-
-
#2
- Joined
- Sep 10, 2018
- Posts
- 43
-
-
#3
- Joined
- Oct 9, 2014
- Posts
- 741
-
-
#4
- Joined
- Sep 10, 2018
- Posts
- 43
- Joined
- Oct 9, 2014
- Posts
- 741
-
-
#6
SFCFix Script
Warning: this fix is specific to the user in this thread. No one else should follow these instructions as it may cause more harm than good. If you are after assistance, please start a thread of your own.
- Download SFCFix.exe (by niemiro) and save this to your Desktop.
- Download the file below, SFCFix.zip, and save this to your Desktop. Ensure that this file is named SFCFix.zip — do not rename it.
- Save any open documents and close all open windows.
- On your Desktop, you should see two files: SFCFix.exe and SFCFix.zip.
- Drag the file SFCFix.zip onto the file SFCFix.exe and release it.
- SFCFix will now process the script.
- Upon completion, a file should be created on your Desktop: SFCFix.txt.
- Copy (Ctrl+C) and Paste (Ctrl+V) the contents of this file into your next post for me to analyse please — put
tags around the log to break up the text.
Dropbox — SFCFix.zip
Afterwards, run SURT again and attach CheckSUR.log.
- Joined
- Sep 10, 2018
- Posts
- 43
- Joined
- Oct 9, 2014
- Posts
- 741
-
-
#8
- Joined
- Sep 10, 2018
- Posts
- 43
-
-
#9
I am running the SURT now.
- Joined
- Sep 10, 2018
- Posts
- 43
-
-
#10
Last edited by a moderator:
- Joined
- Oct 9, 2014
- Posts
- 741
-
-
#11
- Joined
- Sep 10, 2018
- Posts
- 43
-
-
#12
Please let me know if you require any further information to analyse this issue.
- Joined
- Oct 9, 2014
- Posts
- 741
-
-
#13

SFCFix Script
Warning: this fix is specific to the user in this thread. No one else should follow these instructions as it may cause more harm than good. If you are after assistance, please start a thread of your own.
- Download SFCFix.exe (by niemiro) and save this to your Desktop.
- Download the file below, SFCFix.zip, and save this to your Desktop. Ensure that this file is named SFCFix.zip — do not rename it.
- Save any open documents and close all open windows.
- On your Desktop, you should see two files: SFCFix.exe and SFCFix.zip.
- Drag the file SFCFix.zip onto the file SFCFix.exe and release it.
- SFCFix will now process the script.
- Upon completion, a file should be created on your Desktop: SFCFix.txt.
- Copy (Ctrl+C) and Paste (Ctrl+V) the contents of this file into your next post for me to analyse please — put tags around the log to break up the text.
Dropbox — SFCFix.zip
Afterwards, run SURT again and attach CheckSUR.log.
- Joined
- Sep 10, 2018
- Posts
- 43
- Joined
- Oct 9, 2014
- Posts
- 741
-
-
#15
SFCFix Script
Warning: this fix is specific to the user in this thread. No one else should follow these instructions as it may cause more harm than good. If you are after assistance, please start a thread of your own.
- Download SFCFix.exe (by niemiro) and save this to your Desktop.
- Download the file below, SFCFix.zip, and save this to your Desktop. Ensure that this file is named SFCFix.zip — do not rename it.
- Save any open documents and close all open windows.
- On your Desktop, you should see two files: SFCFix.exe and SFCFix.zip.
- Drag the file SFCFix.zip onto the file SFCFix.exe and release it.
- SFCFix will now process the script.
- Upon completion, a file should be created on your Desktop: SFCFix.txt.
- Copy (Ctrl+C) and Paste (Ctrl+V) the contents of this file into your next post for me to analyse please — put tags around the log to break up the text.
Dropbox — SFCFix.zip
Afterwards, run SURT again and attach CheckSUR.log.
- Joined
- Sep 10, 2018
- Posts
- 43
- Joined
- Oct 9, 2014
- Posts
- 741
- Joined
- Sep 10, 2018
- Posts
- 43
- Joined
- Oct 9, 2014
- Posts
- 741
- Joined
- Sep 10, 2018
- Posts
- 43
-
-
#20
Link is fixed.
Has Sysnative Forums helped you? Please consider donating to help us support the site!
-
Microsoft Support & Malware Removal
-
Windows Update
Error 9c48 windows update IE11 is a Windows update error that shows up when the user tries to update Windows or install Internet Explorer particularly on Windows 7 and 10. Users have reported having this same issue on windows server 2008. The potential reasons for this error include the corruption of windows update-related files and the necessary components of Internet Explorer. Users become unable to use or update their Internet Explorer due to this error. There are workarounds to this problem, such as trying a few utilities to recover the corrupted files or simply installing Internet Explorer 11 manually.
9c48 Windows update ie11 troubleshooter
Running the Windows troubleshooter is a great way to deal with problems and errors in windows. In this case, running the windows update troubleshooter might help eliminate error 9c48 windows update ie11. The troubleshooter detects the issues automatically and suggests the best possible ways to eradicate the problem. The following steps guide the troubleshooting process.
- Right click on the start menu.
- Open Settings.
- In the Settings go to Update & Settings.
- In the left hand side click on troublehooter tab.
- Select Windows update.
- Click on Run the Troubleshooter.

- A troubleshooting windows would appear.
- Let the troubleshooter detect for issues.
- If any issue is found resolve accordingly.


Run an SFC scan
SFC is short for System File Check. It is a Windows system utility program that scans for corrupted system files and then restores them. If the error 9c48 windows update, ie11 is caused by the corrupted system files in your system, running an SFC scan might help eliminate the update error. SFC is a command-line utility program that requires administrative privileges to run. Follow the given steps to perform an SFC scan on your system.
- Right click on start menu.
- Click on Windows PowerShell (Admin).
- Type sfc /scannow in the shell.
- wait for the process to finish.

9c48 windows update ie11 Antivirus issue
If you have any Antivirus software installed on your system, chances are it might have been causing the update issue. Antivirus software is a great way to protect your system from threats such as malware, ransomware, trojans, etc. But sometimes, the antivirus software itself gets overprotected and prevents the installation or updating of programs. If you face error 9c48 and have antivirus software installed in your system, disable the antivirus and try to do the installation process again.
Installing Internet Explorer 11 Manually
If Internet Explorer 11’s installation faces errors, 9c48 windows update ie11 during the windows update process. Try to install the browser manually. Go to Microsoft’s official website for IE11 and download the executable installer from there. Before running the installation process, make sure to disable antivirus software. Follow the given steps to download and install Internet Explorer 11 manually.
- head to this official webpage to download the IE11 offline installer.
- Download the appropriate package as per your Operating system and architecture.
- If you have any recent or previous version of the Internet Explorer, Uninstall it from the control panel.
- Now run the installer that you downloaded.
- Wait throught the installation process.

Reset windows update component
If the problem persists with the 9c48 windows update ie11 error, try resetting the windows update component. Administrative privilege is required for this process. This process might actually resolve all the update-related issues. Follow the given steps to reset the windows update component.
- Right click on the start menu.
- Open Windows PowerShell (Admin).
- Type the following command one at a time.
- First command would stop the windows update services.
- Second command would reset the update components.
- Thrid command would restart the windows update services.
net stop wuauserv
rd /s /q %systemroot%\SoftwareDistribution
net start wuauserv
After successfully resetting the windows update components using these commands, the 9c48 windows update ie11 error should be resolved.
Which is the latest version of Internet Explorer?
Internet Explorer 11.0 is indeed the latest version of IE.
Is Internet Explorer depreciated now?
Microsoft will officially drop the support for Internet Explorer on 15th June 2022.
Is Microsoft Edge based on Internet Explorer?
No, Edge is based on an open-source Chromium codebase.
Conclusion
We saw that error 9c48 is a window update error most probable to appear in windows 7 64bit and windows server 2008. Due to this error, the user cannot update windows or install Internet Explorer 11. Troubleshooting, running an SFC scan, resetting windows update components are a few ways to deal with this issue. Users are also suggested to keep their operating system up to date with the latest rollouts and security patches to avoid errors like 9c48 windows update ie11. If for some reason, the problem remains, there is also a manual way to install Internet Explorer 11, as details are provided in this article.
Trending Now
-
The Best Popup Builders in 2025: Boost Engagement and Conversions
●February 22, 2025
-
Fixing Xtools XToolkit Installation Error
by Dharam Nath Jha●March 3, 2023
-
Troubleshoot DeepMotion Preview Not Working: Tips and Tricks
by Dharam Nath Jha●March 3, 2023
-
Getting Virtwifi has No Internet Access? Here’s What to Do!
by Dharam Nath Jha●February 16, 2023

