
У одного из заказчиков столкнулся с интересной проблемой установки обновлений на клиентах с Windows 7. Обновления распространяются посредством сервера WSUS, интегрированного в среду System Center Configuration Manager. На SCCM сервере используется Windows Server 2008 R2, версия WSUS соответственно — WSUS 3.0 SP2. Должны обновляется клиентские ПК с Windows 7 SP (порядка 2000 компьютеров).
Клиентские компьютеры не могут получить обновления с Software Update Point, в журналах при этом фиксируется ошибка 0x80244022.
На клиентской стороне журнал WUAhandler.log содержит ошибки:
OnSearchComplete - Failed to end search job. Error = 0x80244022.
Scan failed with error = 0x80244022.
В журнале службы Windows Update WindowsUpdate.log тоже множество ошибок вида:
2017-08-09     11:02:04:371   612     4858    Setup   WARNING: SelfUpdate check failed to download package information, error = 0x80244022
2017-08-09     11:02:04:371   612     4858    Setup   WARNING: SelfUpdate check failed to download package information, error = 0x80244022
2017-08-09     11:02:04:371   612     4858    Agent    * WARNING: Skipping scan, self-update check returned 0x80244022
2017-08-09     11:02:04:371   612     4858    Agent    * WARNING: Exit code = 0x80244022
2017-08-09     11:02:04:371   612     4858    Agent  WARNING: WU client failed Searching for update with error 0x80244022
2017-08-09     11:02:04:371   612     4abc    AU        # WARNING: Search callback failed, result = 0x80244022
2017-08-09     11:02:04:371   612     4abc    AU        # WARNING: Failed to find updates with error code 80244022

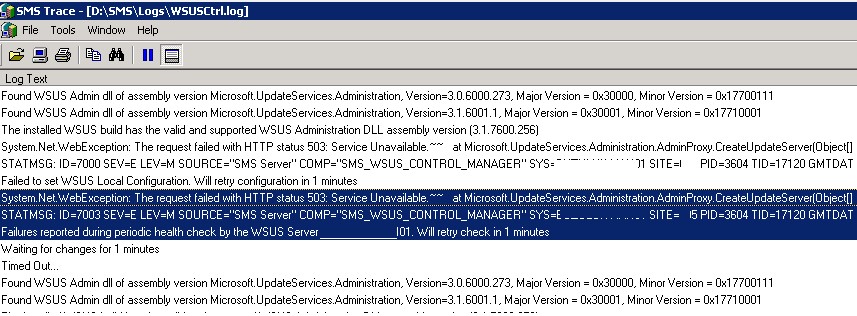
На стороне сервера при этом в логе WSUSCtrl.log есть ошибка:
request failed with HTTP status 503: Service Unavailable
Failures reported during periodic health check by the WSUS Server SPB-MAN1. Will retry check in 1 minutes
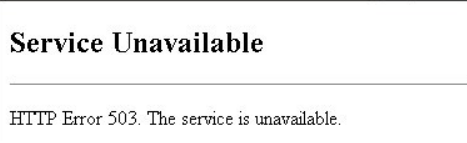
Т.е. по логу видно, не отвечает сайт WSUS отвечает. Действительно, если открыть URL адрес WSUS Administration (http://SCCM-Srv1:8530), появляется ошибка:
HTTP Error 503. The service is unavailable
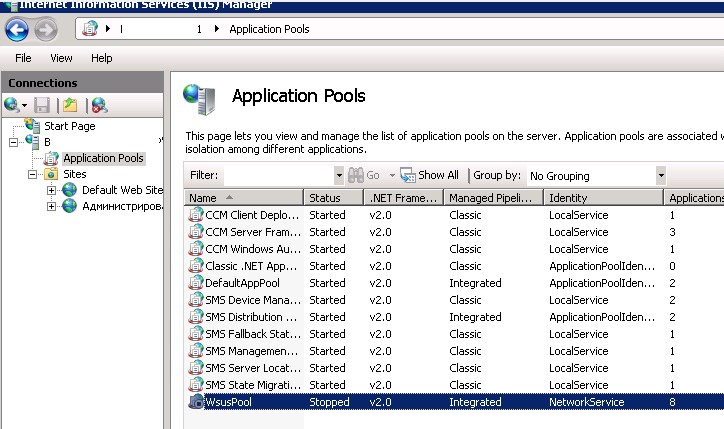
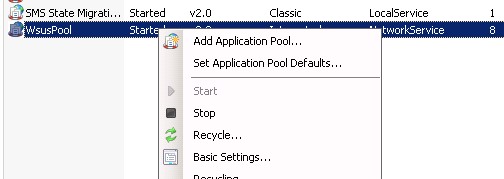
Открыв консоль управления IIS Manager, я увидел что пул, отвечающий за работу WSUS (WsusPool) находится в отключенном состоянии.
После ручного запуска пула, через 20-30 минут он опять падет. В журнале системы при этом обнаружилось интересное сообщение Event ID 5117 WAS с текстом:
A worker process serving application pool ‘WsusPool’ has requested a recycle because it reached its private bytes memory limit

По умолчанию в системе лимит используемой памяти для пула WsusPool
ограничен 1,8 Гб. При превышении этого значения (а это может запросто случится при большом количестве клиентов WSUS, особенно при первом сканировании), пул сбрасывается. Чтобы понять сколько памяти использует ваш пул WSUS, достаточно посмотреть за процессом w3wp.exe. При превышении лимита 1,8 Гб, процесс перезапускается. Таким образом для решения проблемы нужно увеличить объем выделяемой памяти.
Примечание. Проблема отчасти напоминает рассмотренный ранее кейс с ошибкой 0x8024401 при получения обновлений c в Windows 10.
Сделать это можно из консоли IIS Manager, выбрав Application Pools -> ПКМ WsusPoll -> Recycling, увеличив значение в поле Private memory usage (in KB).
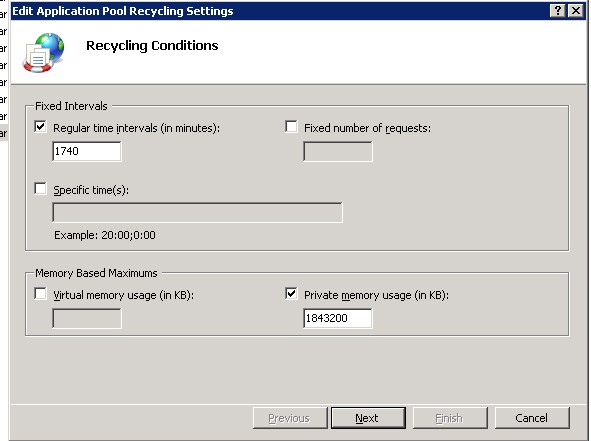
Насколько увеличить, решайте сами, рекомендую начать с 3-4 Гб. В моем случае для 2000+ клиентов WSUS, оказалось достаточно 6 Гб памяти.
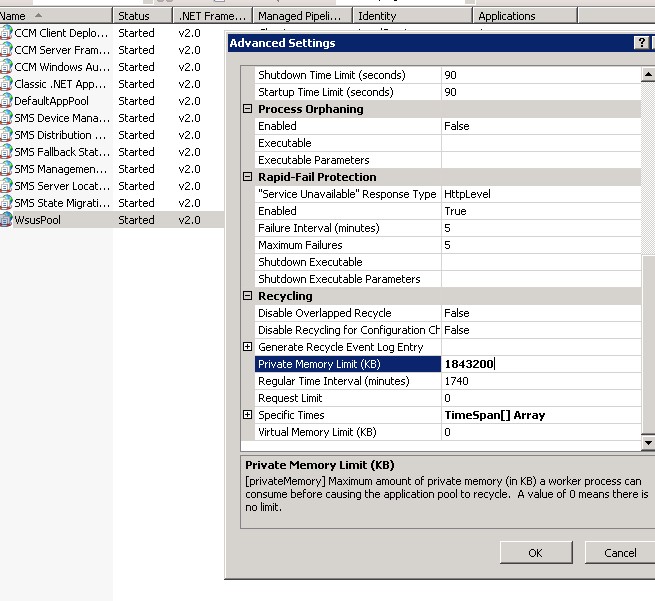
Размер выделяемой памяти также можно изменить и из раздела расширенных настроек пула (Advanced Settings), увеличив значение в поле Private memory usage (KB).
Осталось перезапустить пул через кнопки Start/Stop или Recycle.
После чего процесс w3wp.exe перестал потреблять более 3 Гб RAM. А на следующий день на компьютерах стали закачиваться обновления.
Совет. При большом количестве клиентов WSUS, получающих обновления с SCCM Software Update Point (особенно получающих обновления впервые), в расширенных настройках пула можно увеличить следующие параметры:
- Queue Length с 1000 до 25000
- “Service Unavailable” Response Type — c HttpLevel на TcpLevel
- Failure Interval (minutes) – с 5 до 30
- Change ‘Maximum Failures’ – с 5 to 60
Кроме того, рекомендуется установить на WSUS 3.0 SP2 под Windows Server 2008 R2 следующие обновления:
- KB2720211
- KB2734608
На WSUS 4.0 на Windows Server 2012 R2 такие:
- KB2919442
- KB2919355
- KB3095113
- KB3159706
Several users running on 23H2 or other versions reported encountering a nagging error code when trying to install Windows update. As a result, the process fails and upgrading or updating the system becomes impossible. The error code is 0x80244022. Main reason for this error is faulty connection between Microsoft update server and your local computer. Furthermore, the update server might be unreachable at times. However, you should also check whether system files are not corrupted and third-party programs or proxies are not interfering with the update process.
No need to fret, though. When 0x80244022 error occurs, first of all, give your system a reboot and try updating later. If that doesn’t do the trick, let’s get hands-on. Start by resetting the Windows Update service, toggle off proxy settings, and double-check your date and time settings. Sometimes, it’s just a matter of mixed signals between your device and the update server. Now, Windows 11 hiccups are part and parcel of the deal but fear not. Manually installing updates, running an SFC scan, or letting the troubleshooter work its magic usually solves the puzzle.
Windows Update Error 0x80244022
Here is how to fix Windows Update Error 0x80244022:
Change DNS Settings
Since the issue is likely to appear due to unreachable update server you may change the DNS server addresses and then give a try. Follow the steps:
- Press Winkey+R and type ncpa.cpl.
- Hit Enter to launch the Network connections window.
- Right-click on the running adapter and select Properties.
- Check the item Internet Protocol (TCP/IPV4).
- Click on Properties.
- Select the option “Use the following DNS server addresses”.
- Check the following addresses in Preferred and Alternate DNS server respectively:
8.8.8.8 and 8.8.4.4

1.1.1.1 and 1.0.0.1

94.140.14.14 and 94.140.15.15
- Keep in mind to restart the system after changing.
- Go to Settings > Windows Update > Check for updates.
See: How to Fix Windows Update Error 0x80188309
Troubleshoot the System
Troubleshooting your system can be the key to resolving the pesky Error Code 0x80244022. Check out the steps mentioned below to fix the issue and get your Windows Update back on track effortlessly:
- Download the Windows Update Troubleshooter.
- Extract the files and launch wu.diagcab file.
- Follow the troubleshooting steps to fix the issues.
Run DISM via Command Prompt
DISM is a Windows application for repairing the Windows image, which includes Windows Setup, Windows Recovery Environment, and Windows PE. By following the method, you may be able to overcome error code 0x80244022 and ensure a more seamless Windows Update experience:
- Click on Search and type cmd.exe.
- Select Run as administrator.
- Enter the following commands sequentially:
DISM /Online /Cleanup-Image /CheckHealth
DISM /Online /Cleanup-Image /ScanHealth
DISM /Online /Cleanup-Image /RestoreHealth- Restart the computer and check if the Windows update problem is solved.
- If 0x80244022 still persists then again launch the command prompt (admin).
- Type:
sfc /scannowand hit Enter. - Exit Command Prompt, then retry Windows Update.
Manually download and install the Update
You might be able to fix the error by doing things yourself. Downloading the Windows update manually and installing it is a straightforward and effective way.
- Go to “Settings > Windows Update > Update history”.
- Find the KB causing the trouble.
- Visit the Microsoft Update Catalog, enter the KB code, and hit Enter.
- Find the supported file and click Download.
- Select the link to the Standalone package and save it to your computer.
- Open the downloaded patch to initiate the update.
Adjust Date & Time Settings
Don’t underestimate the impact of correct Date and Time settings in resolving the aforementioned Windows Update error as ensuring accurate synchronization can be the key to a smooth Windows Update experience.
Learn how a quick check on your Date and Time settings can play a crucial role in troubleshooting and potentially resolving this common issue:
- Click on Start and select Settings.
- Choose Time & language from the left menu.
- Select Date & time.
- Go to the Additional settings section and click on Sync now.
- Reboot your PC, and check the Date and Time.
Try Resetting Windows Update Components
Resetting Windows Update components is a potent solution for Error Code 0x80244022. However, proceed with caution as it involves tweaking Windows Registry entries. Therefore, creating backups is a good idea to ensure a safety net in case of any unforeseen hiccups during the process:
- Launch Command Prompt as Admin.
- Stop BITS, Windows Update, Cryptographic, and MSI Installer services with specific commands:
net stop bits
net stop wuauserv
net stop appidsvc
net stop cryptsvc- Then, use
Del “%ALLUSERSPROFILE%\\Application Data\\Microsoft\\Network\\Downloader\\qmgr*.dat- Execute
cd /d %windir%\system32. - Re-register BITS and Windows Update files using the provided commands:
regsvr32.exe atl.dll
regsvr32.exe urlmon.dll
regsvr32.exe mshtml.dll
regsvr32.exe shdocvw.dll
regsvr32.exe browseui.dll
regsvr32.exe jscript.dll
regsvr32.exe vbscript.dll
regsvr32.exe scrrun.dll
regsvr32.exe msxml.dll
regsvr32.exe msxml3.dll
regsvr32.exe msxml6.dll
regsvr32.exe actxprxy.dll
regsvr32.exe softpub.dll
regsvr32.exe wintrust.dll
regsvr32.exe dssenh.dll
regsvr32.exe rsaenh.dll
regsvr32.exe gpkcsp.dll
regsvr32.exe sccbase.dll
regsvr32.exe slbcsp.dll
regsvr32.exe cryptdlg.dll
regsvr32.exe oleaut32.dll
regsvr32.exe ole32.dll
regsvr32.exe shell32.dll
regsvr32.exe initpki.dll
regsvr32.exe wuapi.dll
regsvr32.exe wuaueng.dll
regsvr32.exe wuaueng1.dll
regsvr32.exe wucltui.dll
regsvr32.exe wups.dll
regsvr32.exe wups2.dll
regsvr32.exe wuweb.dll
regsvr32.exe qmgr.dll
regsvr32.exe qmgrprxy.dll
regsvr32.exe wucltux.dll
regsvr32.exe muweb.dll
regsvr32.exe wuwebv.dll
netsh winsock reset
net start bits
net start wuauserv
net start appidsvc
net start cryptsvc
Proxy Deactivation
Disabling proxy settings may help you resolve the error Code during Windows Update. Moreover, proxy settings can occasionally create a communication barrier between your device and the update server, resulting in a glitch.
Discover how a simple change in proxy settings may pave the way for a more seamless updating procedure, ensuring your system remains up-to-date and error-free. Here are the steps to follow:
- Press Win + R, type inetcpl.cpl, and Enter.
- Click on the Connections tab.
- Open LAN Settings.
- Tick Automatically detect settings.
- Unmark the Proxy server box.
- Click on OK and close the wizards.
Adjust Windows Update Service Settings
If you are still battling with this issue, then, you might want to tune up your Windows Update Service settings with these below-mentioned simple steps to potentially overcome this error 0x80244022. By ensuring the correct configuration, specifically setting the startup type to Manual, you pave the way for a smoother update process:
- Press Win key+R, type services.msc, and Enter.
- Right-click Windows Update and select Properties.
- Ensure Manual startup type.
- Click on the Service status Start.
- Click Apply, then OK.
- Exit the program.
- Retry the installing the update.
- After that, Restart your PC.
Methods:
Change DNS Settings
Troubleshoot the System
Run DISM via Command Prompt
Manually download and install the Update
Adjust Date & Time Settings
Try Resetting Windows Update Components
Proxy Deactivation
Adjust Windows Update Service Settings
That’s all!!
Stuck with the ‘windows error 0x80244022’? We can help you fix it.
Here at Bobcares, we have seen several such Windows-related errors as part of our Server Management Services for web hosts and online service providers.
Today we’ll take a look at the causes for this error and see the fix.
What causes ‘windows error 0x80244022’ to occur
Usually, you come across some errors while updating any software. One such error is the ‘Windows error 0x80244022’ which is associated with a dedicated software update issue. It normally arises when a connection problem occurs in the middle of the update operation.
This error arises during the installation of updates. Also, it appears in the logs.
How we fix ‘windows error 0x80244022’
Here are the different fixes our Support Engineers provided to our customers to resolve this error.
1. Increasing the WsusPool memory
One of our customers approached us with the 0x80244022 issue. The below error was present in the Client-side WUAhandler.log.
OnSearchComplete - Failed to end search job. Error = 0x80244022.
Scan failed with error = 0x80244022.
The below error was present in the Server-side WSUSCtrl.log.
The request failed with HTTP status 503: Service Unavailable
Failures reported during periodic health checks by the WSUS Server SCCM-SRV1. Will retry check-in 1 minutes
This happens when the WSUS site does not respond. Also, on opening the WSUS Administration URL address (http://SCCM-Srv1:8530), you can see the below error.
Here, in this case, we found the pool responsible for WSUS (WsusPool) was stopped after opening the IIS Manager.
Even though after starting it manually, it was falling again in 20-30 minutes. Then in the system log, the below entry was found.
A worker process serving application pool ‘WsusPool’ has requested a recycle because it reached its private bytes memory limit.
To resolve this error in this case, our Support Engineers provided the below resolution.
The limit of WsusPool memory is 1.8 GB by default. In case, if it exceeds (it happens if there are a lot of WSUS clients, particularly, at the first scan), the pool resets. In order to find the memory usage of your pool, you can look at the w3wp.exe process. If the limit of 1.8 GB is exceeded, the process is restarted. Thus, to resolve this problem, you need to increase the allocated memory value.
For that, go to IIS Manager, select Application Pools and right-click WsusPool >> Recycling, then enlarge the value in the Private memory usage (in KB) field. Then you can increase it according to your requirement. However, we recommend starting from 3-4 GB.
Moreover, you can change the size of the allocated memory in the Advanced Settings of the pool by increasing the value in the Private memory usage (KB) field.
Finally, restart the pool using Start/Stop or Recycle buttons.
2. Verify the date and the time
Another fix is to verify the date and time. This fix is mostly not considered. However, if the Date and Time are not set correctly then the updates cannot be done on your computer.
3. Install the updates manually
This is quite a tough one as it is time-consuming. However, you can try to install the update packages manually.
For that, you would need to note down the version number for each update file. To do so, access the Update History and locate the latest Windows KBs; then write down the KB numbers.
Lastly, access the official Microsoft Update Catalog and search the KB codes noted down earlier. Then download each update package and install it manually on your Windows device.
4. Repair system errors causing Windows Update issues
If the system files are missing or if something corrupts during other processes, you will not be able to receive and apply further updates. So, you must run a dedicated troubleshooting command.
- Firstly, open the elevated command prompt: right-click on the Windows Start icon and choose Command Prompt (Admin).
- Next, run the first command ‘DISM.exe /Online /Cleanup-image /Restorehealth’.
- Press Enter and wait for the process to complete.
- After that, enter and run the ‘sfc /scannow’ command.
- Once the troubleshooter ends you should initiate the update process again.
[Need any further assistance in fixing Windows errors? – We are here to help you]
Conclusion
In short, this error occurs while updating any software. Today, we saw the solution provided by our Support Engineers.
PREVENT YOUR SERVER FROM CRASHING!
Never again lose customers to poor server speed! Let us help you.
Our server experts will monitor & maintain your server 24/7 so that it remains lightning fast and secure.
GET STARTED
var google_conversion_label = «owonCMyG5nEQ0aD71QM»;
Several users reported encountering an error code 0x80244022 when they were opening Microsoft Store on their PCs. A few others reported receiving this error code when they were trying to install or update some applications over the Store app. Since you are here, you must also be encountering this error code and are looking for ways to fix it on your PC.
In this post, we have discussed what possibly could have caused this issue along with three working solutions for this. The same error code might also appear when you are updating Windows. If you receive this error during the update process, follow this article instead.

If you are encountering an error code 0x80244022 while opening Microsoft Store, follow the below suggestions one after another.
1] Troubleshoot Windows Store Apps
Troubleshooting Windows Store Apps is the most effective way to resolve an error occurring on it. Follow the below steps on how to perform this task on Windows –
- Press Windows + I to launch Settings.
- Go to System > Troubleshoot > Other troubleshooters next.
- When this expands, scroll down to Windows Store Apps and click the Run button available beside it.

- Wait for the troubleshooter to launch and follow the on-screen instructions.
- This tool will run and diagnose the underlying causes within your system. If this finds any issues with your Store app, the same will be resolved automatically.
After this is over, restart your PC and check if the error 0x80244022 resolves afterward. In case the error persists even after this, attempt the fixes provided below.
2] Repair and Reset Microsoft Store
Another effective method to resolve an error code in Microsoft Store is by either repairing or resetting this system app. Follow the below instructions on how to carry out this process –
- Press Windows + X and select “Installed apps” from the Power Menu. If you are on older versions of Windows 10, you may select “pps & Features from the Power Menu instead.
- The system will redirect you to the
Apps > Installed apps / Apps & featuressection. - Scroll down and locate Microsoft Store. When found, click the three dots available on its right end and select “Advanced options.”
- On the next screen, scroll once again to the Reset section and hit the Repair button. Repairing Microsoft Store will remove internal conflicts or glitches within the application. Wait for a few seconds and then check if you can launch the Store app normally now.

- If not, re-visit the Reset section, and this time, hit the Reset button. Do note that the resetting Microsoft Store will remove any data associated with the installed app. As a result of this, you must sign back into your official account again on Microsoft Store.
- Restart your PC and check if the Store error 0x80244022 resolves this way.
If you find the above code tiresome, you may open PowerShell as administrator and execute the following codes on it –
WSReset.exe

This tool will reset Microsoft Store to its default state. After this is over, Windows Store will load automatically.
3] Reinstall Microsoft Store using PowerShell
If neither of the above fixes helps to resolve this error code 0x80244022 on Windows, you should reinstall Microsoft Store. Since there is no direct way to uninstall a system app on Windows, you may take the help of PowerShell. Follow the below instructions on how to reinstall the Store app from your Windows PC –
- Press Windows + X, and select Terminal (Admin).
- The UAC window will prompt next asking if you really want to authorize opening the terminal as administrator. Click on the Yes button and the terminal launches into Windows PowerShell.
- In the PowerShell window, copy and paste the following command and press Enter to uninstall the Microsoft Store:
Get-AppxPackage -allusers Microsoft.WindowsStore | Remove-AppxPackage

- Wait for the uninstallation to complete and when this is over, you may reinstall Microsoft Store by executing the below command on the same prompt –
Get-AppxPackage -allusers Microsoft.WindowsStore | Foreach {Add-AppxPackage -DisableDevelopmentMode -Register "$($_.InstallLocation)\AppXManifest.xml"}
- After this command runs successfully, the Store app will launch automatically.
You may now try installing new applications or updating the existing ones over Microsoft Store. Hopefully, this system app works perfectly fine now.
Learn how to resolve Windows Update error 0x80244022 with our step-by-step troubleshooting guide. Fix update issues and get your system running smoothly again.

Windows Update error 0x80244022 is a frustrating issue that prevents your system from downloading and installing necessary updates. This error can arise from various causes, including firewall interference, network issues, or misconfigured settings. Fortunately, this blog post will walk you through troubleshooting steps to resolve the error and get your Windows updates working smoothly again.
Why Is the Firewall Blocking Update 0x80244022?
A firewall can block the Windows Update process if it mistakenly identifies update-related traffic as a potential threat. This is particularly common in corporate or secure environments where additional layers of protection are applied. Firewalls may prevent the communication between your system and Microsoft’s update servers, triggering the 0x80244022 error.
To resolve this issue, you may need to temporarily disable or reconfigure your firewall settings. Here’s how:
- Check Firewall Settings: Ensure that the firewall is not blocking Windows Update traffic. You may need to adjust the firewall rules to allow updates.
- Disable Antivirus Firewalls Temporarily: If you’re using third-party antivirus software with an integrated firewall, disable it briefly to check if it’s causing the issue.
- Restart the Computer: After modifying the firewall settings, restart your PC to allow the changes to take effect.
If you’re unsure of how to disable the firewall, you can follow the steps in Windows Security or your antivirus software’s settings menu. Remember to re-enable it after completing the updates.
How to Solve Windows Update Error 0x80244022: Configure DNS in Windows 10 and 11
Sometimes, the issue may lie with your DNS (Domain Name System) settings. If your system is unable to connect to Microsoft’s update servers, changing your DNS configuration can help resolve the error.
Here’s how to configure DNS in Windows 10 and 11:
Windows 10:
- Open Network Settings: Go to Start > Settings > Network & Internet.
- Select Change Adapter Settings: In the left sidebar, click on “Change adapter settings.”
- Right-Click on Active Network: Select the network connection you’re using (Wi-Fi or Ethernet), right-click it, and choose Properties.
- Select Internet Protocol Version 4 (TCP/IPv4): Scroll down, select Internet Protocol Version 4 (TCP/IPv4), and click Properties.
- Enter DNS Server Addresses: Select Use the following DNS server addresses and enter Google’s DNS servers:
- Preferred DNS: 8.8.8.8
- Alternate DNS: 8.8.4.4
- Save and Exit: Click OK to save your changes, then restart your computer.
Windows 11:
- Open Settings: Go to Start > Settings > Network & Internet.
- Click on Advanced Network Settings: Scroll down and click on Advanced network settings.
- Modify Network Properties: Select the network you’re using, then click Edit next to the DNS settings.
- Set DNS Servers: Change the DNS to 8.8.8.8 and 8.8.4.4 for Google’s DNS.
- Apply Changes: Click Save and restart your PC.
By using Google’s DNS, your system should have more reliable access to Microsoft’s update servers, which can resolve the 0x80244022 error.
Disable Proxy Server for Windows Update
A proxy server might be misconfigured, blocking Windows Update requests and triggering the error. Disabling the proxy server could help resolve this issue.
Here’s how to disable the proxy server on Windows:
- Open Settings: Press Win + I to open Settings.
- Navigate to Network & Internet: Go to Network & Internet > Proxy.
- Disable Proxy: Under Manual proxy setup, toggle off the option to Use a proxy server.
- Save Changes: Once disabled, close the Settings window and try running Windows Update again.
If your system uses a network-managed proxy, consult your IT department or administrator before making changes.
Step-by-Step Solutions for Error Code 0x80244022 in Windows 10/11
1. Run the Windows Update Troubleshooter
The built-in Windows Update Troubleshooter can automatically detect and fix many common update issues, including error 0x80244022.
- Go to Settings > Update & Security > Troubleshoot > Additional troubleshooters.
- Select Windows Update and click Run the troubleshooter.
- Follow the on-screen instructions to resolve any detected issues.
2. Clear the SoftwareDistribution Folder
Corrupted update files stored in the SoftwareDistribution folder can cause errors. To resolve the issue, you can clear the folder manually:
- Stop the Windows Update Services:
- Open Command Prompt as administrator (right-click and select Run as administrator).
- Type the following commands one by one and press Enter after each: arduinoCopyEdit
net stop wuauserv net stop bits
- Delete the SoftwareDistribution Folder:
- Navigate to
C:\Windows\SoftwareDistribution\Downloadand delete all files in the folder.
- Navigate to
- Restart Windows Update Services:
- In Command Prompt, type: sqlCopyEdit
net start wuauserv net start bits
- In Command Prompt, type: sqlCopyEdit
3. Run System File Checker (SFC) and DISM
Corrupted system files can also lead to update errors. To fix this, use the SFC and DISM tools:
- Run SFC:
- Open Command Prompt as administrator.
- Type
sfc /scannowand press Enter. - Let the scan finish, then restart your computer.
- Run DISM:
- In the same Command Prompt window, type: swiftCopyEdit
DISM /Online /Cleanup-Image /RestoreHealth - Press Enter and wait for the process to complete.
- In the same Command Prompt window, type: swiftCopyEdit
These steps will scan and repair any corrupted system files that may be preventing the update.
How to Manually Install Updates for 0x80244022
If Windows Update continues to fail, you can manually download and install the updates:
- Visit the Microsoft Update Catalog: Go to Microsoft Update Catalog.
- Search for the Update: Enter the KB number of the update you need (e.g., KB5006670) in the search bar.
- Download the Update: Click on the appropriate update version for your system (32-bit, 64-bit, ARM).
- Install the Update: Once downloaded, run the installer and follow the on-screen instructions.
Manually installing updates bypasses the need for Windows Update, which can be particularly helpful if the error is preventing automatic updates from installing.
Conclusion: Solution for 0x80244022 wSUS
Windows Update error 0x80244022 can be caused by various factors, such as firewall restrictions, DNS misconfigurations, or proxy issues. By following the solutions outlined above, you should be able to resolve the error and restore your system’s ability to download and install updates.
Visit Our Post Page: Blog Page