
Error code 0x80244018 indicates your computer failed to install the latest Windows updates. Keeping your computer up-to-date is crucial if you want to access the latest features and keep threats at bay. If you get error code 0x80244018, wait for a few minutes, restart your computer, and try again. Maybe the update servers are too busy and can’t process your request. If the error persists, pursue the troubleshooting steps below.
Contents
- 1 How Do I Fix Update Error 0x80244018 on My Windows PC?
- 1.1 Run the Update Troubleshooter
- 1.2 Repair Your System Files
- 1.3 Restart the Windows Update Service
- 1.4 Restart the Update Service and Rename the SoftwareDistribution Folder
- 1.5 Delete the ThresholdOptedIn Registry Entry
- 1.6 Run the Windows Update Assistant
- 1.7 Disable Your Download Manager and Antivirus
- 1.8 Conclusion
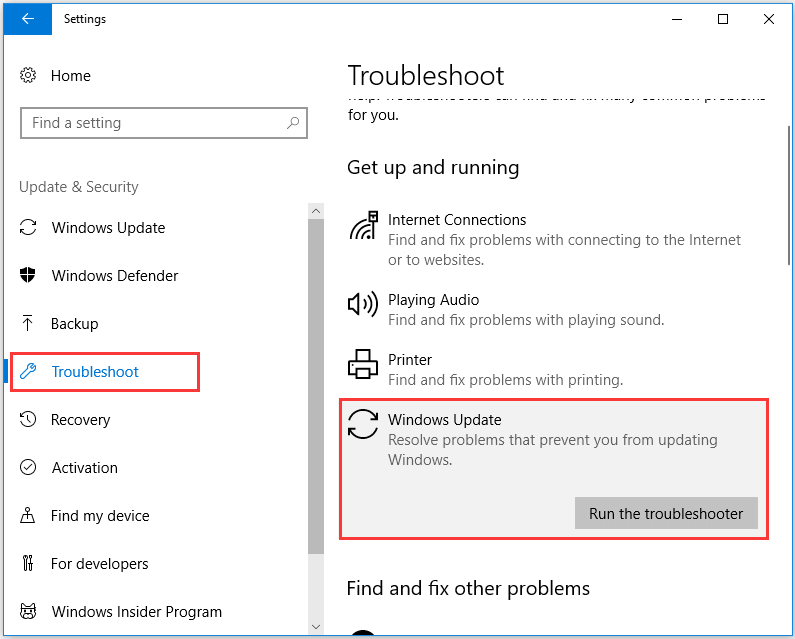
Run the Update Troubleshooter
Windows 10 comes with a built-in update troubleshooter that you can run every time your machine fails to install the latest updates. The troubleshooter automatically detects and fixes the issues preventing you from updating your computer. Hopefully, it can fix error 0x80244018 as well.
Go to Update and Security, click on Troubleshoot in the left-hand pane, and select Additional troubleshooters. Then run the Update troubleshooter and check the results.
Repair Your System Files
Error code 0x80244018 indicates your system files could be damaged or corrupted. Repair them and check if you can install the latest updates.
- Press the Windows and X keys on your keyboard and select Command Prompt (Admin).
- Run the following commands one by one:
DISM /Online /Cleanup-Image /ScanHealthDISM /Online /Cleanup-Image /RestoreHealthsfc /scannow
- Restart your computer, and check if the update error persists.
Restart the Windows Update Service
Make sure the Windows Update service is running in the background. Try restarting it and check the results.
- Type services in the Windows search bar and double-click on the Services app.
- Scroll down to the Windows Update service.

- Right-click on it and restart it.
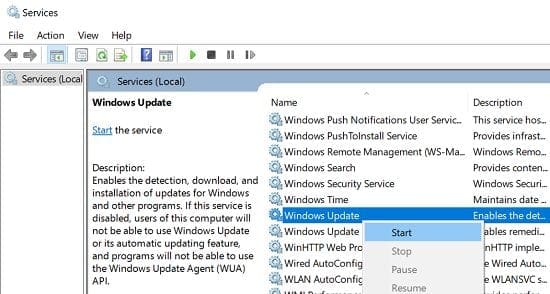
Repeat the same steps for the Background Intelligent Transfer Service, and the Cryptographic Service.
Restart the Update Service and Rename the SoftwareDistribution Folder
Launch Command Prompt with admin privileges again and run the following commands hitting Enter after each one:
net stop wuauservnet stop cryptSvcnet stop bitsnet stop msiserverren C:\Windows\SoftwareDistribution SoftwareDistribution.oldren C:\Windows\System32\catroot2 catroot2.oldnet start wuauservnet start cryptSvcnet start bitsnet start msiserver
Wait for the processes to complete, and then check for updates again.
Delete the ThresholdOptedIn Registry Entry
Launch the Registry Editor and navigate to Computer\HKEY_LOCAL_MACHINE\SOFTWARE\Microsoft\WindowsSelfHost\Applicability. Then remove the ThresholdOptedIn entry if it’s available on your computer.
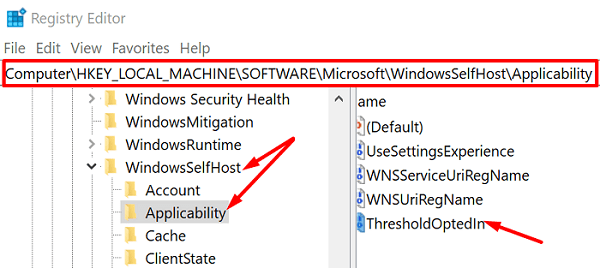
Restart your machine and check for updates again.
Run the Windows Update Assistant
If 0x80244018 is preventing you from installing a major feature update, use the Windows Update Assistant instead of running the built-in Windows Update service. Go to Microsoft’s official website and download the Update Assistant. Then run the executable and follow the onscreen steps to complete the update process.
Disable Your Download Manager and Antivirus
Are there any download managers installed on your computer? If there are, disable or uninstall them. As a quick reminder, download managers can sometimes interfere with the Microsoft Baseline Security Analyzer (MBSA). They can even prevent the analyzer from downloading the security update of Mssecure.cab.
Additionally, if you’re using a third-party antivirus, disable it while you’re updating your computer. Third-party security solutions may sometimes mistakenly flag your update files as “suspicious” and block them. Don’t forget to re-enable your antivirus when you’re done installing the updates.
Conclusion
If error code 0x80244018 is preventing you from updating your Windows computer, first run the Update Troubleshooter. Then run SFC and DISM to repair corrupted system files. If the issue persists, restart the Windows Update Service, and rename the SoftwareDistribution folder. Additionally, disable third-party download managers and antivirus tools.
Which of these solutions worked for you? Share your feedback in the comments below.
What causes the error 0x80244018? How to fix the Windows update error 0x80244018? This post from MiniTool will show you how to fix the Windows error 0x80244018? In addition, you can visit MiniTool to find more Windows update errors and solutions.
What Causes the Windows Update Error 0x80244018?
Some Windows users complain that they encounter the error 0x80244018 when trying to apply the Windows update. The error 0x80244018 also comes with the error message WU_E_NO_USERTOKEN.
The error code 0x80244018 may be caused by various reasons. The Windows error 0x80244018 may be caused by the following reasons.
- The third-party application interferes the Windows update.
- The Windows Update is blocked by the VPN or proxy.
- The Background Intelligent Transfer Service is disabled.
- Windows Update component service is
- The system files are corrupted.
Hence, in the following section, we will show you how to fix the error 0x80244018.
6 Solutions to Windows Update Error 0x80244018?
In this section, we will show you the solutions to fix the Windows Update error 0x80244018.
Solution 1. Use Windows Update Troubleshooter
To fix the error 0x80244018, you can run Windows Update Troubleshooter first.
Now, here is the tutorial.
- Press Windows key and I key together to open Settings. Then choose Update & Security to continue.
- In the pop-up window, go to the Troubleshoot tab and scroll down to choose Windows Update.
- Then click the Run the Troubleshooter to continue.
After that, Windows Update troubleshooter will begin to detect problems on your computer. It may take some. If there is any problem on your computer, Windows Update Troubleshooter will detect them and repair them.
After all steps are finished, reboot your computer and run Windows update again to check whether the error 0x80244018 is solved.
If this solution is not effective, try other solutions.
Related article: 7 Fixes to Windows Update Error 0x80070002[Step-by-Step Guide]
Solution 2. Uninstall Third-Party Antivirus Software
The Windows Update error 0x80244018 also may be caused by the third-party antivirus software. So, in order to fix this Windows error 0x80244018, you can choose to uninstall the third-party antivirus software.
Now, here is the tutorial.
- Type Control Panel in the search box of Windows and choose the best-matched one.
- Then enter the main interface of Control Panel.
- In the pop-up window, choose Uninstall a program under Programs section.
- In the pop-up window, select the third-party antivirus software and right-click it. Then choose Uninstall to continue.
When the process is finished, you have uninstalled the third-party antivirus software. Then you can reboot your computer and run Windows Update again to check whether the error 0x80244018 is solved.
Solution 3. Force Starting the BITS Service
In order to fix the Windows Update error 0x80244018, you can choose to enable the Background Intelligent Transfer Service.
Now, here is the tutorial.
- Press Windows Key and R key together to open Run dialog, then type services.msc in the box and click OK to continue.
- In the pop-up window, scroll down to find the Background Intelligent Transfer Service.
- Right-click it to choose Properties.
- In the pop-up window, change the Startup type to the Automatic (Delayed Start) and change the Service Status to Running.
- Then click Apply and OK to confirm the changes.
When all steps are finished, reboot your computer and run Windows Update again to check whether the error 0x80244018 is solved.
If this solution does not take effect, try other solutions.
Solution 4. Disable Proxy Server or VPN Service
As we have mentioned in the above part, the Proxy server or VPN service may also cause the Windows error 0x80244018. So, in order to fix this Windows update error 0x80244018, you can choose to disable the Proxy server or VPN service.
Now, here is the tutorial.
- Press Windows key and R key together to open Run dialog, then type ms-settings:network-proxy in the box and click OK to continue.
- In the pop-up window, navigate to the Manual Proxy Setup and then change the toggle to Off under Use a proxy server.
When it is finished, reboot your computer and check whether the Windows update error 0x80244018 is solved.
Solution 5. Reset Windows Update Components
In order to fix the Windows error 0x80244018, you can choose to reset Windows Update components.
Now, here is the tutorial.
1. Type Command Prompt in the search box of Windows and choose the best-matched one. Right-click it to choose the Run as administrator.
2. In the pop-up window, type the following commands and hit Enter after each command.
- net stop wuauserv
- net stop cryptSvc
- net stop bits
- net stop msiserver
- ren C:\Windows\SoftwareDistribution SoftwareDistribution.old
- ren C:\Windows\System32\catroot2 catroot2.old
- net start wuauserv
- net start cryptSvc
- net start bits
- net start msiserver
After that, close the command line window and reboot your computer and check whether the Windows update error 0x80244018 is solved.
Solution 6. Run SFC and DISM Tools
If there are corrupted system files, you may also encounter the error 0x80244018. Hence, you can run SFC and DISM tools to check and repair corrupted system files on your computer.
Now, here is the tutorial.
- Open Command Prompt as administrator.
- In the Command Line window, type the command sfc /scannow and hit Enter to continue.
If the System File Checker cannot fix the corrupt system files, you can run DISM tool again.
- Open Command Prompt as administrator.
- Type the command dism /online /cleanup-image /restorehealth and hit Enter after each command.
When it is finished, reboot your computer and check whether the Windows update error 0x80244018 is solved.
Final Words
To sum up, this post has introduced what the error 0x80244018 is and how to fix it with 6 solutions. If you encountered the same Windows error, you can try these solutions. If you have any better solution to fix this Windows update error 0x80244018, you can share it on the comment zone.
0x80244018 Windows Update Error is kind of or similar to HTTP status 403 issue. This stop code means server receives the request but fails to proceed and send the files. This issue commonly occurs while installing an update or a feature upgrade. However, to fix this problem is not a complex task. Following guideline will solve Windows Update error code 0x80244018 easily.
0x80244018 Windows Update Error in Windows 11/10 Solutions
Solution-1: Remove Antivirus tools
Since the 0x80244018 Windows Update error might be caused by third-party antivirus tools mostly, we need to step up to disable them first. If disabling doesn’t work then delete it. You should keep in mind that, only uninstallation will not solve the error permanently. You need to use the clean tool from the manufacturers’ website to remove traces. In the same way, the Proxy VPN is equally harmful, therefore, uninstall if your computer has any. Windows 10 has its own Windows Defender as a built-in feature. This is probably the best security practice rather than any other third party tool. Many users inform that when they remove Avira Security suite the error goes. Restart the computer after dealing with this third-party tools and try updating again. The error should be fixed in this way, in case, exists, proceed to the next method.
Solution-2: Disable Windows Defender Firewall
The main function of Windows Defender Firewall is to block harmful applications and network but sometimes it creates problems for updates that end up with the 0x80244018 error message. So the system will receive update normally when you disable this protection tool. In order to turn Off Firewall, follows:
Step-1: Go to the Search Box near the Start button on the taskbar and type Firewall and press Enter.
Step-2: Click the link “Turn Windows Defender Firewall on or off” in the left pane. Reach out to the Private network settings section and check the option Turn Off Windows Defender Firewall (“not recommended”). Select OK.
Step-3: Move on to the next, Public network settings section and do the same as above step.
Now try to download the update and if you accomplish successfully, then turn this On the Firewall again use the same procedure. If the error even doesn’t go in this way, you need to follow the next process.
Solution-3: Ensure BITS running on your device
BITS is an important component of Windows which delivers the updates. Errors 0x80244018 Windows Update Error appears when a malfunction occurs in this. Too ensure BITS is running properly, follow the below steps:
Step-1: Press Win+X and select run from the list of options. On the space of run, Type the text services.msc and click OK.
Step-2: From the list, look for the Background Intelligent Transfer Service in the Name column. Once you find out, put a right click on it and select Properties option.
Step-3: On a popup window, the system will show the properties of the service. In “Startup type” part, click on the dropdown and select “Automatic (Delayed Start)“.
Step-4: Move on to the Service status section and set it to Start.
Restart the computer and check for the existence of this error again. It persists see the next method to configure the proxy.
Solution-4: Checking the proxy server settings
Microsoft is releasing updates every now and then with an intention to make this one more productive as well as free from bugs. Unfortunately, users are being stumbled with so many errors. 0x80244018 Windows Update Error is one these that come across in recent days. Proxy server is an important cause to lead this type of problem. So disable it with the procedure below –
Step-1: Type inetcpl.cpl in Cortana search and press Enter.
Step-2: Click on the Connections tab and move on to the Local Area Network (LAN) settings portion.
Perform a click on LAN settings button to quickly open a pop up.
Step-5: In Proxy Server part on the same pop up, uncheck the dialog box entitled with Use a proxy server for your LAN.
Step-6: Now clock on the Ok button from the bottom of this page before closing it.
Therefore, the 0x80244018 Windows Update Error should be fixed using this resolution method.
Conclusion
Updating in Windows 11 and 10 is necessary as to improve the functionality as well as to experience the excellent features. But some of the issue like 0x80244018 Windows Update Error limits the users from downloading the updates. We have discussed some very effective solutions for the sake of resolving this annoying error. Hope you can solve your case using any one of these.
Windows 10, Windows 11, Windows 7, Windows 8
- 11.11.2022
- 4 237
- 0
- 6
- 6
- 0
- Содержание статьи
- Описание ошибки 80244018
- Причины возникновения ошибки 80244018
- Исправление ошибки 80244018
- Проверка интернет соединения
- Перезапуск служб
- Отключение использования прокси
- Наличие установленных криптопровайдеров
- Добавить комментарий
Описание ошибки 80244018
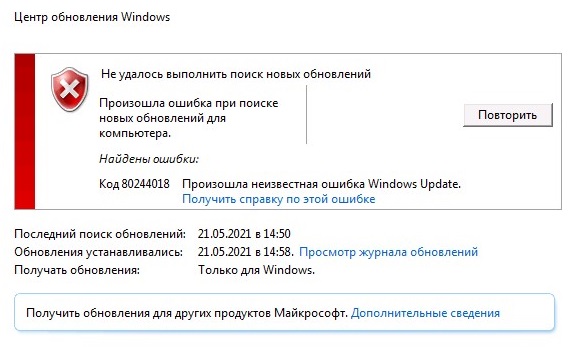
В процессе поиска обновлений Центром обновления Windows, может возникнуть ошибка 80244018 со следующим сообщением:
Найдены ошибки:
Код 80244018: Произошла неизвестная ошибка Windows Update
Причины возникновения ошибки 80244018
Не смотря на то, что в описании ошибки написано, что это «неизвестная ошибка» — значение данного кода и его причины хорошо известны. Код 80244018 обозначает, что Центр обновления не может установить соединение с серверами, содержащими данные для загрузки обновлений.
Причины, которые приводят к возникновению данной ошибки можно условно разделить на две группы:
- Проблемы с интернет соединением
- Проблемы с программной конфигурацией компьютера
Исправление ошибки 80244018
Проверка интернет соединения
Проверить интернет соединение достаточно легко — нужно всего лишь запустить интернет браузер на устройстве, где возникла ошибка, и проверить доступность сайтов в интернете. Так же, вполне возможно, работу Центра обновлений Windows блокируют защитные программы, вроде антивируса или фаирвола — для проверки не лишним будет их временно отключить.
Перезапуск служб
В процессе обновления Windows, используются три службы, некорректная работа которых в некоторых случаях может привести к подобной ошибке. Для её исправления, нужно запустить командную строку с правами администратора, и в ней выполнить следующие команды:
sc config BITS start= auto
sc start BITS
sc config CryptSvc start= auto
sc start CryptSvc
sc config wuauserv start= auto
sc start wuauserv
Отключение использования прокси
Существует вероятность того, что ваш компьютер по какой-то причине пытается использовать прокси-сервер, из-за чего не может установить соединение с серверами обновления. В таком случае, следует попробовать отключить его использование в настройках системы.
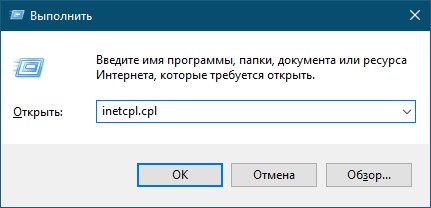
- Зажимаем поочередно клавиши Win + R, и в появившемся окне программы «Выполнить» вводим команду
Inetcpl.cpl, после чего нажимаем кнопку «ОК», или клавишу Enter.
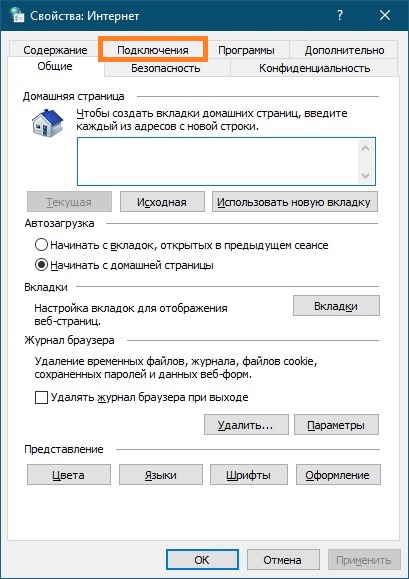
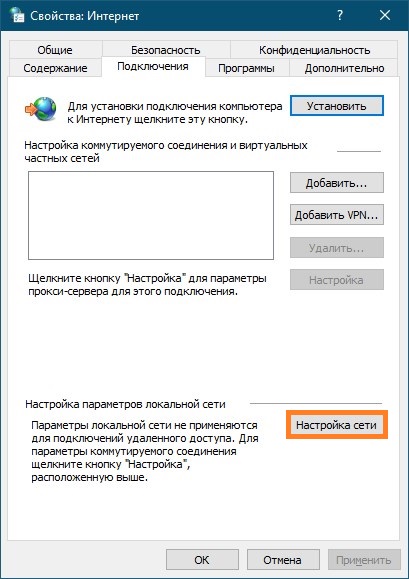
- В открывшемся окне переходим на вкладку «Подключения«.

- На данной вкладке, в самом низу находим кнопку «Настройка сети«, и нажимаем на неё.
- В следующем окне, снимаем галочки у пунктов «Автоматическое определение параметров» и «Использовать прокси-сервер для локальных подключений«, и закрываем все открытые окна с помощью кнопок «ОК».
Наличие установленных криптопровайдеров
С подобной ошибкой можно столкнуться, используя криптопровайдеры ViPNet CSP 3.Х и КриптоПро CSP 3.6. Стоит пересмотреть необходимость использования данных программ на компьютере, и либо обновить их (данные версии уже малоактуальны на сегодняшний день), либо же вообще удалить с компьютера.
Windows Update plays an important role in any operating system. The program keeps your PC up-to-date with the latest security patches, so you can keep using it without worrying about potential threats.
However, sometimes Windows Update may not work as expected and will instead throw an error saying «There were problems installing some updates.» If you encounter error code 0x80244018 when updating Windows, it means something is interfering with the process.
What Causes the Windows Update Error 0x80244018?
Windows Update Error 0x80244018 occurs when the update service can’t connect to the update server. This can be caused by a number of things, including:
- The update server is down or unavailable.
- You’re not connected to the internet.
- There is a third-party antivirus on your computer that blocks Windows Update.
- There might be corrupt or missing files on your computer that prevents Windows Update from working properly.
You may also have this problem if your VPN or proxy blocks Windows Update, or if some type of communication interference is between the client and server.
As you now know what this error code is and why it occurs, let’s explore the solutions
How to Fix Windows Update Error 0x80244018
If you’ve been experiencing Windows Update Error 0x80244018, there are a few things you can do to resolve the issue. First, restart your computer, which is normally what users recommend when they are experiencing Windows Update errors.
If the problem persists after restarting your computer, it’s time to get a little more technical.
1. Run Windows Update Troubleshooter
Windows OS comes with a built-in feature called Windows Update Troubleshooter. It allows you to troubleshoot update problems during the installation process. This tool identifies the problem preventing Windows Updates and fixes it automatically.
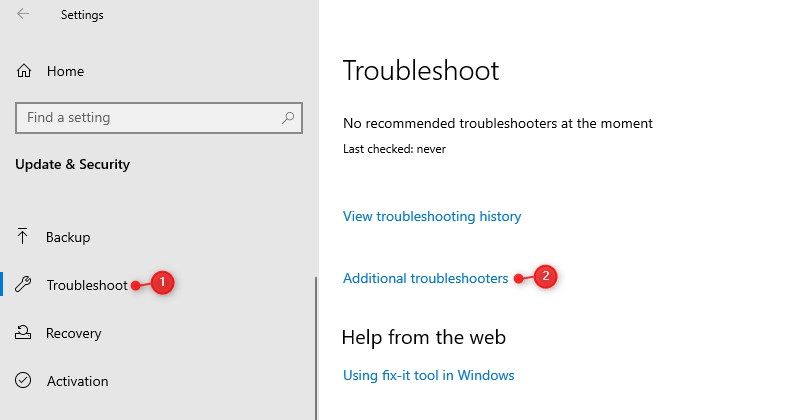
- Press the Win + I keys to open Windows Settings.
- Select the Update & Security category from the Settings menu.
- Choose Troubleshoot from the left navigation bar.
-
Then go to the right pane and click on Additional troubleshooter.

- Scroll down and select Windows Update on the next page.
-
Then click on Run the troubleshooter.


It may take some time to complete the troubleshooting, so don’t worry if the process seems to take a long time. When you have completed the above steps, go to Windows Update and see if it solves the error code.
2. Disable or Remove Any Third-Party Antivirus Programs
If you’re having trouble updating Windows, it might be because you have a third-party antivirus program installed. In this case, you may want to try uninstalling your antivirus program and then updating your Windows. Here is how to do this:
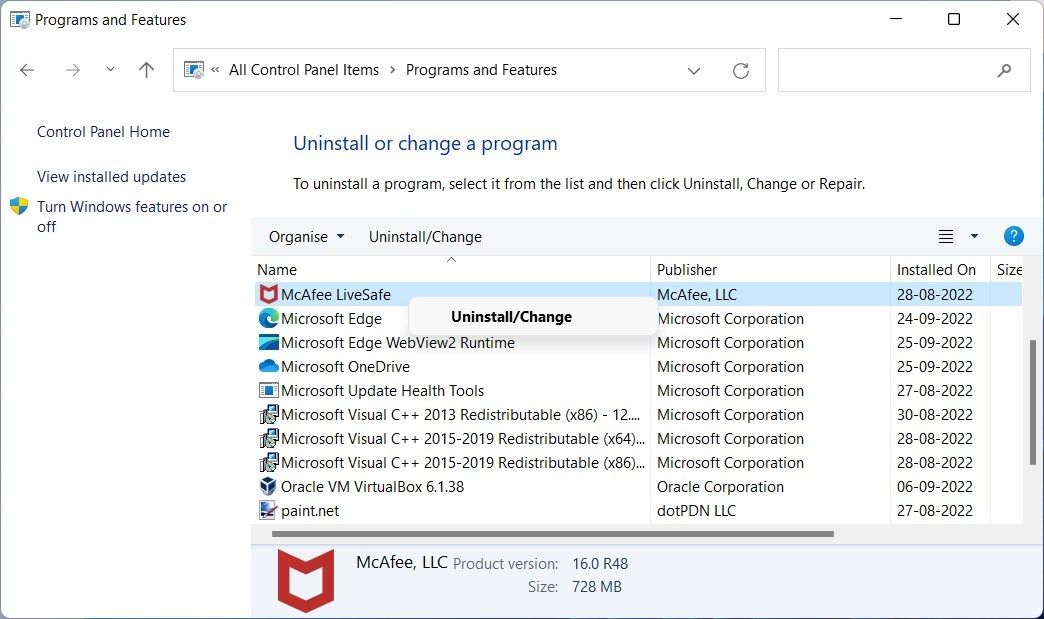
- Open the Run Command dialog box.
- Type Control Panel in the text box and press Enter to launch the Control Panel.
- Select Large icons under View by drop-down menu in the Control Panel window. It will display a complete list of all items.
- On the next page, click the Programs and Features option.
- Right-click on the antivirus program you wish to remove in the pop-up.
-
Next, select Uninstall from the context menu.

- If the UAC window pops up, select Yes to continue.
- You will then see a confirmation dialog; click the Uninstall button again.
When the process is complete, restart your computer and check Windows Update to make sure it solves the error code. If that doesn’t work, you can scan for viruses without buying antivirus software to remove any malicious programs that the tools find.
3. Restart Important Windows Services
Services like the Windows Update Service, Background Intelligent Transfer Service, and Cryptographic Services all play a crucial role in making updates run smoothly. When any of these services are stopped or disabled, updates may not work correctly. To restart a service, follow the below steps.
- Click on the Start menu and type Services into the search box.
- The Services app will appear in the search results; select it.
- Scroll down to the Windows Update service in the Services window.
- Click twice on it to open its properties.
- Set the Startup type to Automatic in the Properties window.
-
Now click Start under Service status.

- After you have made the changes, click Apply and then OK.
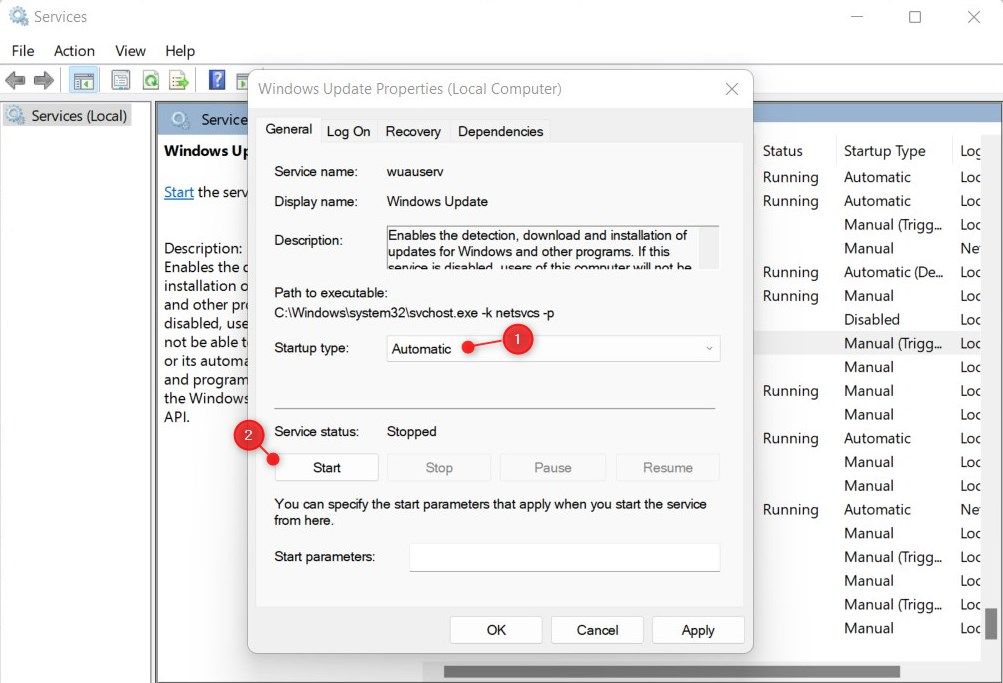
After completing the above steps, continue to perform the above steps with some other services on your computer. These services are:
- Background Intelligent Transfer Service.
- Cryptographic Service.
- DCOM Server Process Launcher.
- RPC Endpoint Mapper.
- Windows Installer.
- Windows Update Medic Service.
4. Disable the Proxy Settings
If you’re still having trouble, it’s likely due to a problem with your proxy settings. In such a case, you can simply turn off the proxy server and run Windows Update again to see if the error is resolved. Here’s how it works:
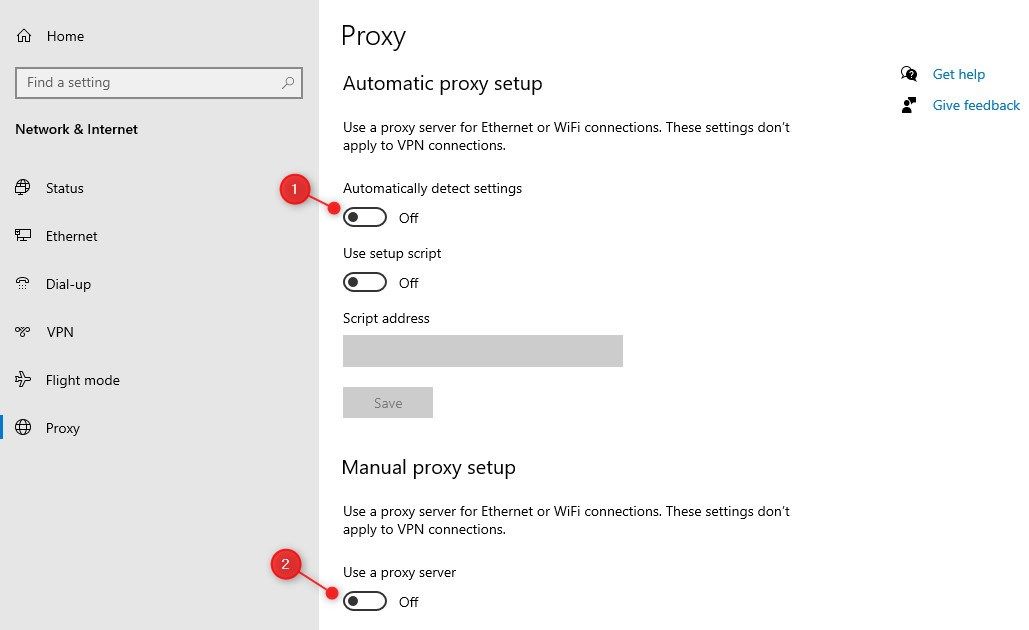
- Right-click on Start and select Settings from the menu list.
- Select Network and Internet on the next screen.
- From the left pane, click on Proxy.
-
Under Automatic proxy setup, toggle off the option for Automatically detect settings.

- Go to Manual proxy setup and disable the toggle for User a proxy server.
5. Troubleshoot in a Clean Boot
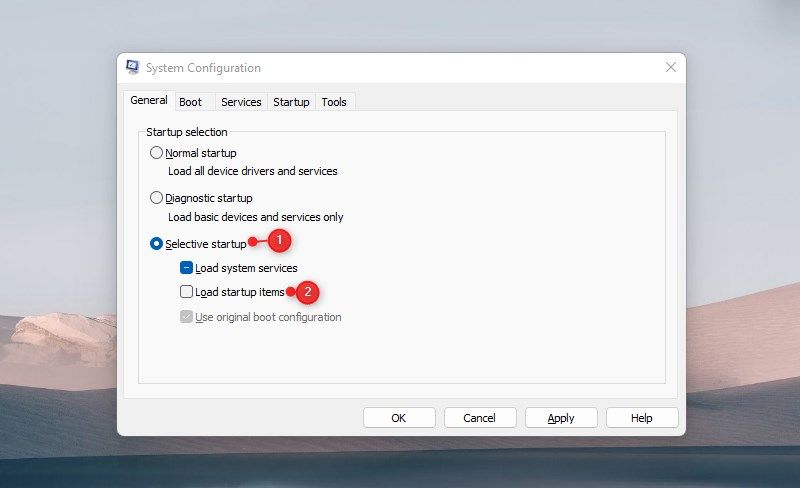
In case Error 0x80244018 persists, you should perform a clean boot. This will help to rule out any third-party applications that may be causing the problem. Follow these steps to take.
- Search for System Configuration and select it from the search result.
- In the dialog box, type msconfig and press Enter.
- Go to the General tab in the System Configuration window.
-
Put a checkmark next to Selective startup.

- Uncheck the Load startup items box.
- Now go to the Services tab.
-
Select Hide all Microsoft services, then click Disable all.

- To save the changes, click the Apply button.
- Switch to the Startup tab and select Open Task Manager.
- When you are on the Startup tab, right-click each service and disable it.
- Click OK to save the changes.
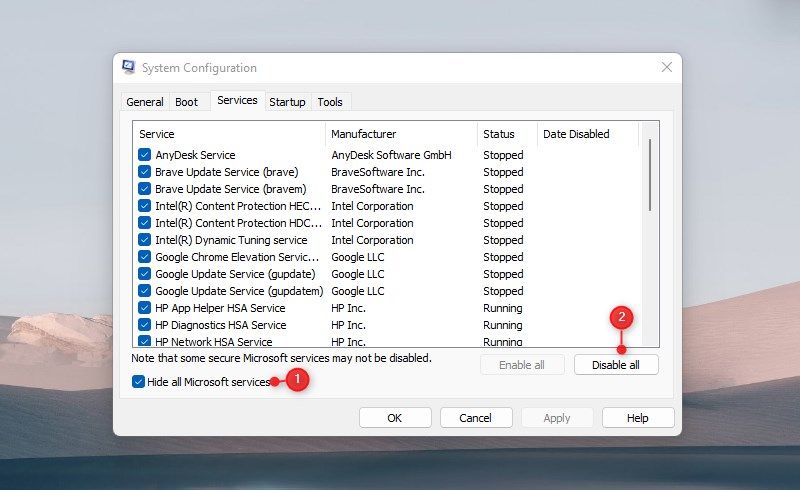
Once you have finished editing System Configuration, restart your computer and try updating Windows.
Resolving the Windows Update Error 0x80244018
It is likely that the information in this article has helped you resolve Windows Update Error 0x80244018. There are a few things that you can try to fix this error, such as disabling the proxy settings. You can also try removing all security software and the firewall, and running Windows Update Troubleshooter. In case none of these work, try restoring the system.