
Encountering the error code 0x80242016 during a Windows Update can be a frustrating roadblock for users who want to keep their systems secure and up to date. This error indicates that Windows encountered an issue while attempting to install updates, which could be due to corrupted update files, insufficient disk space, or conflicts with system files or software.
To effectively address this error, a clear understanding of the underlying causes is required, as well as the implementation of targeted solutions. This article aims to provide a comprehensive guide to resolving the 0x80242016 error, allowing users to successfully complete Windows Updates while maintaining system integrity.
How to solve the 0x80242016 error in Windows
The error code 0x80242016 in Windows usually appears during the update process, indicating that Windows Update encountered an issue and was unable to complete an operation. This problem can be caused by a variety of factors, such as corrupted system files, incomplete installation of previous updates, or conflicts with software or services running in the background.
Here are some effective ways to address and resolve the error 0x80242016:
Solution 1: Clear the Windows Update Cache
Clearing the update cache can resolve issues by removing previously downloaded update files that may have been corrupted.
- Open Command Prompt as Administrator.
- Stop the Windows Update service by typing
net stop wuauservand press Enter. - Type
del %windir%\SoftwareDistribution\DataStore\*.* /qand press Enter to delete the update cache. - Restart the Windows Update service with
net start wuauserv.
Solution 2: Check for Disk Space
Ensure there is enough disk space for the update. Lack of sufficient space can cause update failures.
- Free up space by deleting unnecessary files or using the Disk Cleanup tool.
- Consider using external storage or cloud services to move files if needed.
You can also use Microsoft PC Manager from Microsoft Store.

Solution 3: Perform a Clean Boot
Performing a clean boot starts Windows with a minimal set of drivers and startup programs, which can help identify if background processes are interfering with the update process.
- Type
msconfigin the Start search box and open System Configuration. - Under the Services tab, select Hide all Microsoft services and then click Disable all.
- Go to the Startup tab and click Open Task Manager. Disable all startup items, then restart your computer.
Solution 4: Use System File Checker (SFC) and DISM Tools
Corrupted or missing system files can cause update issues. The System File Checker and DISM tools can repair Windows system files.
- Open Command Prompt as Administrator.
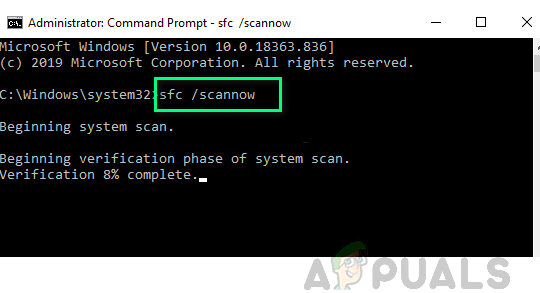
- Run the System File Checker tool:
sfc /scannow.
- After SFC completes, run the DISM tool:
DISM /Online /Cleanup-Image /RestoreHealth.


Solution 5: Manually Install the Update
If automatic updates fail, manually downloading and installing the update from the Microsoft Update Catalog can bypass the error.
- Note the KB number of the failed update from the Windows Update history.
- Visit the Microsoft Update Catalog website, search for the KB number, and download the appropriate update for your system version and architecture.
- Run the downloaded file to manually install the update.
Solution 6: Temporarily Disable Antivirus and Firewall
Sometimes, security software can inadvertently block the update process. Temporarily disabling your antivirus and firewall might resolve the issue.
- Disable your antivirus software and Windows Firewall temporarily.
- Attempt to run Windows Update again.
- Remember to re-enable your security software afterward.

Resolving the error code 0x80242016 in Windows Update necessitates a methodical approach to troubleshooting, ranging from running built-in troubleshooters and clearing the update cache to ensuring sufficient system resources and manually installing updates.
Each solution presented here addresses specific aspects of the update process that can cause failures, providing a path to overcome these obstacles. By systematically applying these fixes, users can resolve the issues that are causing this error, paving the way for a smooth and successful update process.
Keeping Windows updated is critical for system security and performance, and overcoming obstacles such as the 0x80242016 error is an important step toward ensuring your PC runs efficiently and securely.
Not every update is helpful though – and in some cases, they can cause more problems than they solve. Windows Update error 0x80242016 is one such error message that has been reported when trying to install certain feature updates on a Windows computer.
In this guide, we’ll provide some potential solutions that could help you get back up and running quickly.
What Causes Windows Update Error 0x80242016?
There are a number of potential causes for the Windows Update error 0x80242016. Some of them include:
- Third-Party security software may conflict with the Windows Update process.
- If there are corrupted or faulty system files, it could lead to this error code.
- Slow or unreliable internet connection.
- There might be outdated or incompatible drivers.
Now we know what causes this error code, so let’s move on to the solutions.
1. Restart Your Computer
Sometimes all you need to restart your computer, and it will do the trick without any extra work necessary. Actually, restarting the computer clears the temporary files and resets certain components which can help to get rid of the error.
So, before trying any other solution, restart your computer and check if that resolves the issue.
2. Check Your Internet Connection
If you’ve encountered this error message, it might be due to an unreliable or slow internet connection. Take a moment and visit a website that lets you check your internet speeds. Is your speed consistent? If not, then try entering another network and check if that solves the issue.
3. Run the Windows Update Troubleshooter
The Windows Update Troubleshooter is a powerful built-in tool that can recognize and resolve certain dilemmas with the Windows Update process. Consequently, if you’re still experiencing error 0x80242016 in regard to your Windows update, running this efficient tool may be just what you need for a solution.
To run this tool, follow these steps:
- Press Win + I on your keyboard to open the Settings window. For more information, check out our guide on how to open the Settings window.
- Go to System > Troubleshoot > Other troubleshooters.
-
Next to Windows Update, click the Run option.

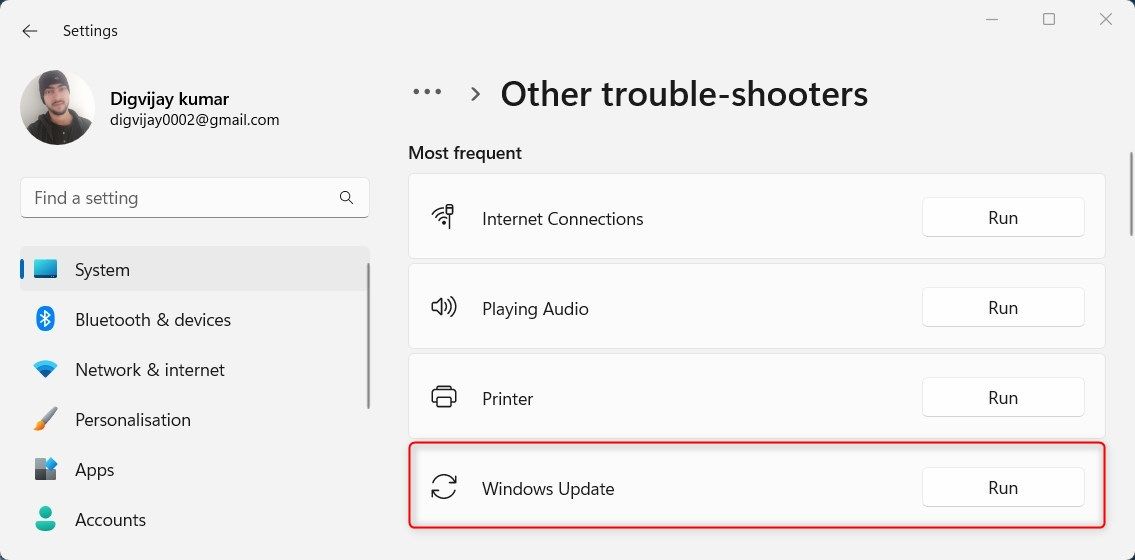
After you complete the troubleshooting process, check to see if it solves the error.
4. Temporarily Disable Security Software
Sometimes third-party security software can interfere with the Windows Update process, which may result in error 0x80242016. To rule this out, you can temporarily disable the security software and then try to install the update again.
Usually, your antivirus will come with an option to temporarily disable its shields. If you’re not sure how to do this, check out the documentation for your antivirus for instructions. If you’re using Windows’ built-in antivirus, check out how to turn off the Windows Defender firewall on Windows for in-depth steps.
Once you have done this, restart your computer and try installing the update again.
5. Run the SFC and DISM command
If the above solutions didn’t solve the issue, it may be worth running Windows’s in-built System File Checker which scans your system for any missing or corrupted files and replaces them where needed.
To run both, check out our guide on the difference between CHKDSK, DISM, and SFC for instructions on how to use these tools.
6. Clear the Software Distribution Folder
In order to install updates and avoid issues with error messages, the Software Distribution Folder needs to be cleared. This folder stores temporary files that are utilized while Windows is performing its updates; however, if this folder becomes corrupted, it can prevent you from successfully installing them.
Therefore, cleaning out this important folder will help resolve any installation problems and allow your system to operate smoothly again. Here’s how to do it:
- Open the Run command dialog box (see how to open the Run command box for instructions on how to do this).
- Type cmd and hit Enter to launch the Command Prompt.
-
In the command line, type the following command and press Enter after each one:
        net stop wuauserv
net stop bits
net stop cryptSvc
net stop msiserver
Running the above command will stop the services like BITS, Cryptographic, MSI Installer, and Windows Update.
- Now open the File Explorer and navigate to the path:
-
C:\Windows\SoftwareDistribution
- Inside the SoftwareDistribution folder, select all the files (Ctrl + A) and hit Delete.
-
Next, open the Command Prompt window again and run the following command:
        net start wuauserv
net start bits
net start cryptSvc
net start msiserver
Once you complete the process, restart your computer and check Windows Update to make sure it solves the error code.
7. Manually Download and Install the Updates
Another solution to try if the above fixes do not work is to download and install the updates manually. Check out how to update Windows updates manually for more information.
Resolving the Windows Update Error 0x80242016
Windows Update keeps your device up-to-date with the latest and greatest features — but sometimes these updates can cause issues and throw an error message like 0x80242016. Thankfully we have some easy solutions that may help you fix this error code on your Windows PC.
Readers help support Windows Report. We may get a commission if you buy through our links.
Read our disclosure page to find out how can you help Windows Report sustain the editorial team. Read more
If you fail to install 0x80242016, then you are not alone. Users often get such update errors while installing Windows updates on their computers. Luckily the issue can be fixed using simple methods.
This guide will walk you through the steps to fix the issue right after discussing the causes. Let’s get started!
What causes the failed to install 0x80242016 error?
There are a few reasons for the installation error to happen. Some of the popular ones are mentioned here:
- Wrong Registry values – If the values on your Registry Editor are corrupt, your computer might not work correctly. Hence you get an installation error when updating.
- Damaged system files – You can get this error if your system files are damaged or corrupt. To fix it, you need to run an SFC scan.
- Corrupt update component files – If the Windows update component is missing files or becomes corrupt, then it might trigger the error.
- Corrupted temp files – Whenever you install updates, some temporary files are created on your PC. If these files get damaged, then you might see the error.
- Computer infected with virus or malware – If your computer is infected with malware or virus, it might interfere with the update process, hence the issue.
- Not enough disk space – Before installing the update, you must check for sufficient hard disk space, as insufficient space could result in an error.
What can I do to fix Windows Update error 0x80242016?
Before engaging in advanced troubleshooting steps, you should consider performing the following checks:
- Remove all the peripherals except the essential ones.
- Disable Firewall.
- Ensure you have a stable internet connection.
- Check the date and time mentioned on the computer because an incorrect date and time can cause this issue.
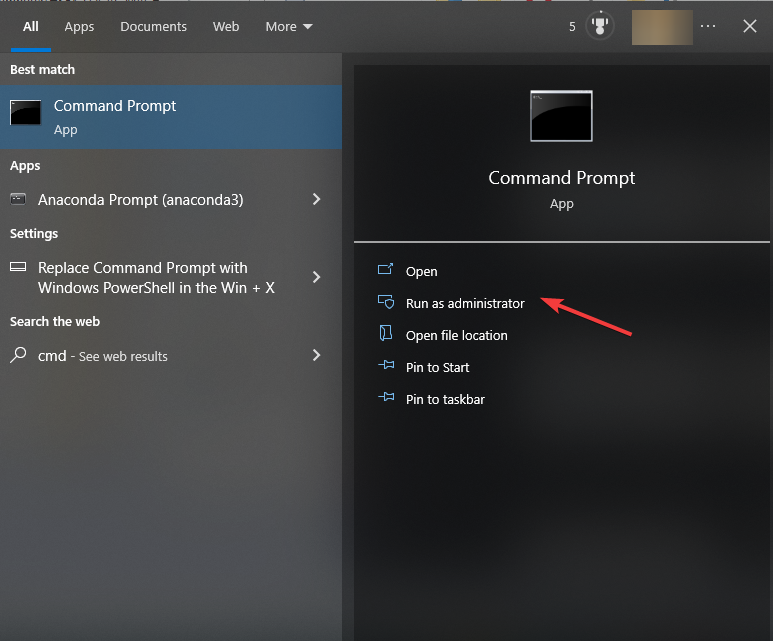
1. Rename the Software Distribution folder & reset Windows Update components
- Go to the Search bar, type CMD and click Run as administrator.

- Copy and paste the following command to stop the Windows Update service and press Enter. You might have to do it a couple of times to ensure it is not running:
taskkill /f /fi "SERVICES eq wuauserv" - Type the following commands one after the other and press Enter after each command:
net stop cryptSvcnet stop bitsnet stop appidsvcnet stop msiservernet stop wuauservren C:\Windows\SoftwareDistribution SoftwareDistribution.oldrmdir C:\Windows\SoftwareDistribution\DataStorermdir C:\Windows\SoftwareDistribution\DownloadRen C:\Windows\System32\catroot2 Catroot2.oldnet start wuauservnet start cryptSvcnet start appidsvcnet start bitsnet start msiserver - Close the Command Prompt window and restart your PC when the process is complete.
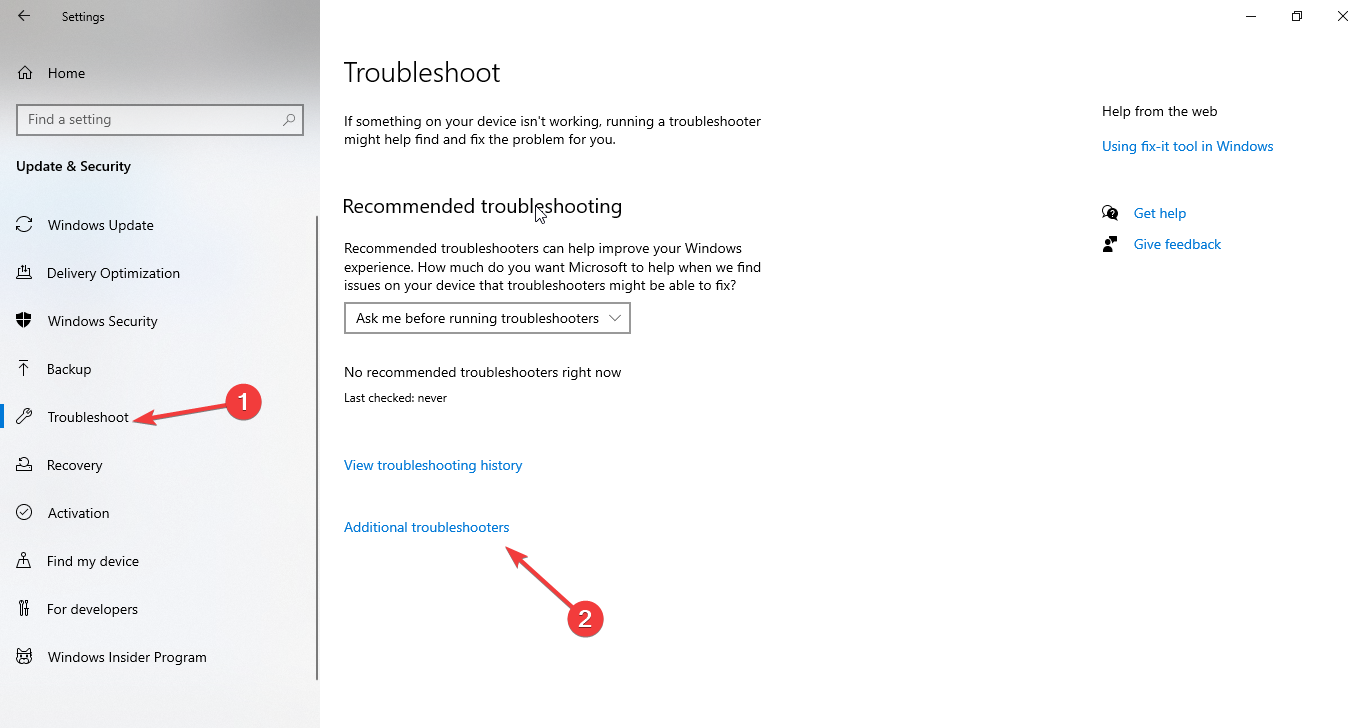
2. Run Windows Update troubleshooter
- Press Windows + I to open Settings.
- Go to Update & Security.

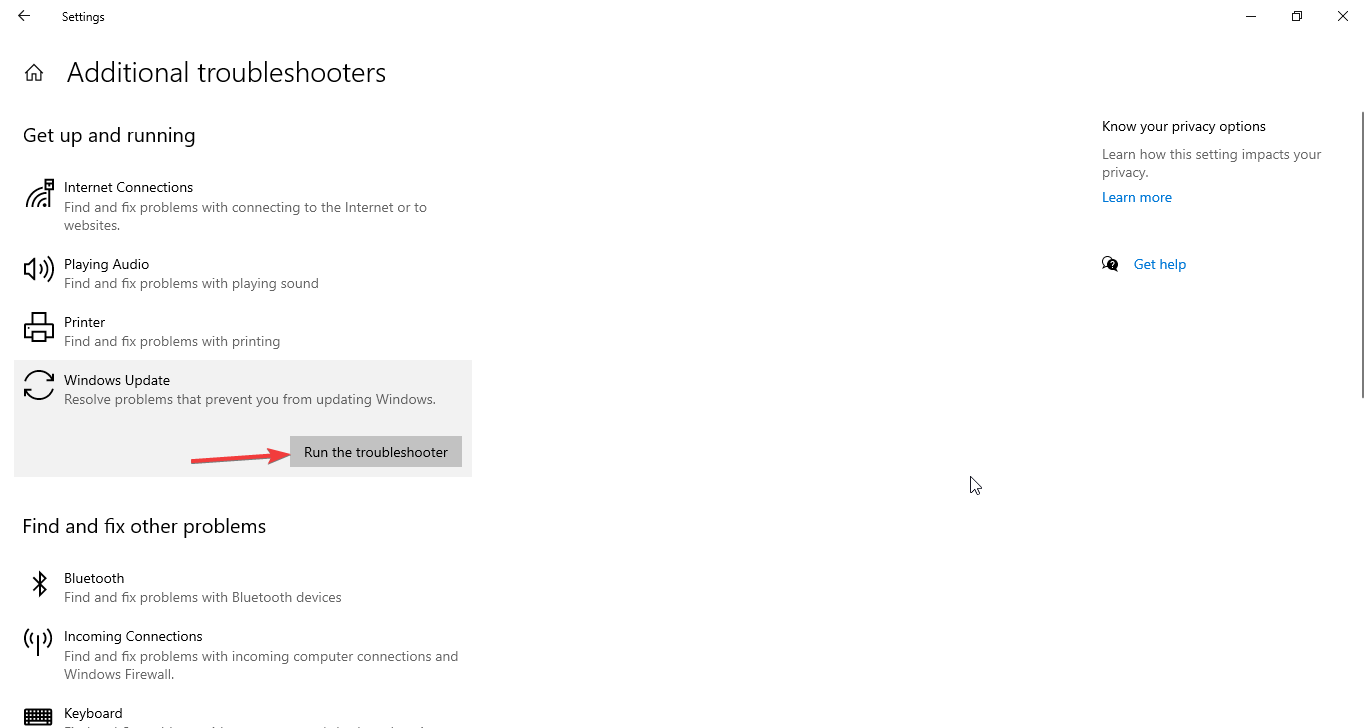
- Now go to Troubleshoot from the left pane, and click the Additional troubleshooters link.
- On the next page, select Windows Update and click Run the troubleshooter button.
- Follow the on-screen instructions to complete the process.
- WSUS blocks downloading Windows 11 24H2 update on 23H2 & 22H2 devices, leaving 0x80240069 error
- Microsoft updates Copilot app with guided tour for new users
- Recent Windows 11 update lets you disable profanity filter in voice typing
3. Run the SFC and DISM commands
- Open Command Prompt using the steps mentioned in Method 1.
- Type the following commands and press Enter after every command:
sfc/scannowdism /online /cleanup-image /scanhealthdism /online /cleanup-image /checkhealthdism /online /cleanup-image /restorehealth - Once complete, reboot your computer.
4. Disable the Windows Search service
- Press Windows + R to open the Run window.
- Type services.msc and press Enter to open Services.
- Locate and double-click the Windows Search service.

- Select Startup type as Automatic.

- Click Apply and OK to confirm the changes.


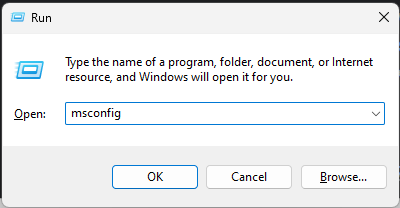
5. Run Windows in a Clean boot environment
- Press Windows + R to open the Run window.

- Type msconfig and press Enter.
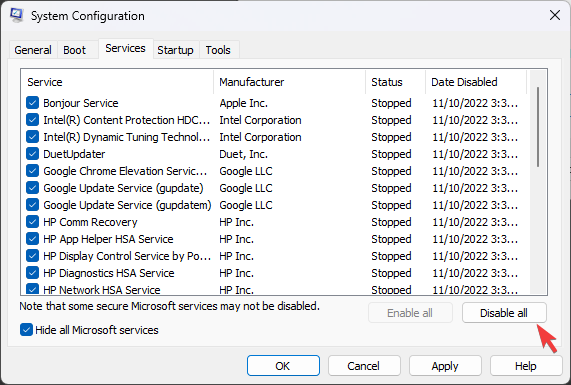
- On the System Configuration window, go to the Services tab, place a checkmark next to Hide all Microsoft services, then click Disable all.

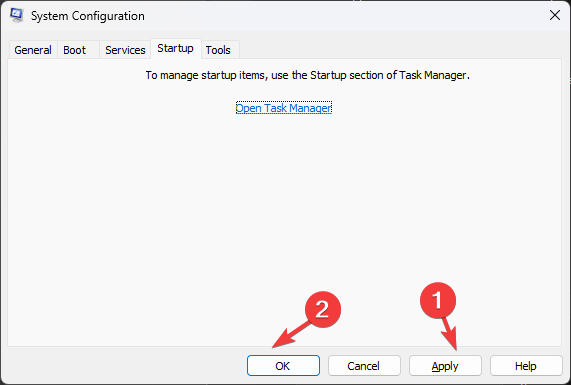
- Go to the Startup tab, and click Open in Task Manager.
- Right-click on all Enabled items one by one and select Disable.

- Click Apply and OK to confirm.
- Select Restart. Once restarted, try to install updates again.


So, these are methods that you can use to fix installation error code 0x80242016. If nothing has helped you, you must consider resetting Windows to resolve the issue.
If you have any questions or concerns about the process, feel free to let us know in the comments section below.
Vlad Turiceanu
Windows Editor
Passionate about technology, Windows, and everything that has a power button, he spent most of his time developing new skills and learning more about the tech world.
Coming from a solid background in PC building and software development, with a complete expertise in touch-based devices, he is constantly keeping an eye out for the latest and greatest!
Lately, there’s been a huge influx of Windows users encountering the 0x80242016 error when attempting to install certain Feature Updates through Windows Update. This issue is reported to occur on both Windows 10 and Windows 11.
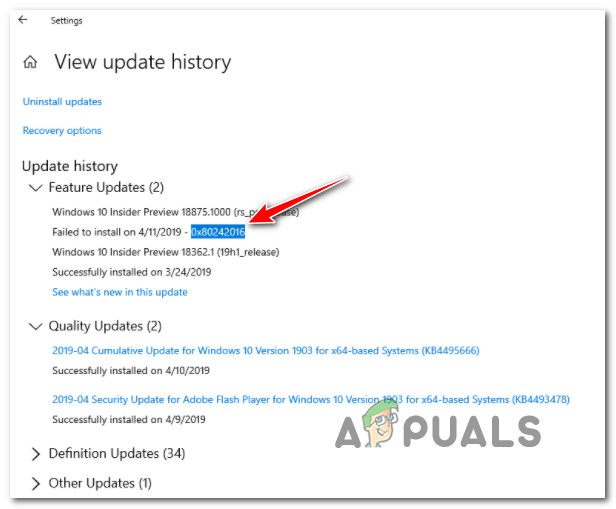
After checking this particular issue thoroughly, it turns out that there are several different underlying issues that might be causing this behavior on Windows 10 and Windows 11. Let’s go through some of the most common scenarios that might trigger the 0x80242016 error code:
- Common component inconsistency – There are a couple of common scenarios with the potential of breaking the Windows Update component. Fortunately, Microsoft is aware of most of them and has already packed a series of automated fixes in a utility called Windows Update Troubleshooter. Start by running it to check if your PC is capable of fixing the issue automatically.
- WU service dependency is Disabled – Windows update has a few service dependencies that are absolutely crucial. If you’re using a performance-optimizing tool, it’s possible that some WU dependencies have been disabling and that’s the main cause of this error code. To fix the issue in this particular scenario, you will need to force start every WU service dependency from an elevated CMD prompt.
- Corrupted Temporary WU files – Temporary files generated by WU whenever a new update is available can also be responsible for the apparition of this error. It’s fairly uncommon to see this error code because of corrupted files present in the SoftwareDistribution and Catroot2 folders. In this case, you can fix the issue by forcing your operating system to disregard the folders where the corrupted temp files are being stored.
- System File corruption – Under more serious circumstances, you can expect to see this particular issue due to some kind of system file corruption that is affecting the Windows Update component. If you find yourself in this scenario, you should start by running DISM and SFC scan in quick succession and work your way to a repair install or clean install if the first options fail.
- Windows Search bug – If you’re using an insider build, there’s also a possibility where an update recently installed to Windows Search ends up forcing the installed to roll back the latest feature update. In this case, you should prevent this behavior from occurring by disabling the main Windows search service.
Now that you have familiarized yourself with every potential scenario that might cause this issue, follow the verified methods below as different troubleshooting guides capable of fixing this issue.
Run the Windows Update Troubleshooter
Before you start following any of the methods below, the ideal place to start is by checking if your operating system is not capable of fixing the issue automatically.
The automated troubleshooter for WU (Windows Update Troubleshooter) has gotten a lot better in recent years, to the point where the vast majority of issues related to an inconsistent update (interruption, AV interference, etc.) can be handled automatically without the need for user intervention.
So, before doing anything else, our advice is to start by running the Windows Update Troubleshooter and applying the recommended fix (if any).
If you’re looking for instructions on running the Windows Update Troubleshooter on your Windows PC, follow the instructions below:
Note: These steps will work on every recent Windows version, but Windows Update Troubleshooter is most competent on Windows 10 and Windows 11.
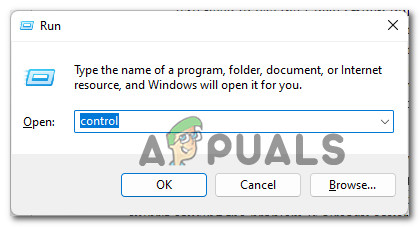
- Press Windows key + R to open up a Run dialog box. Next, type ‘control’ and hit Enter to open up the classic Control Panel interface.

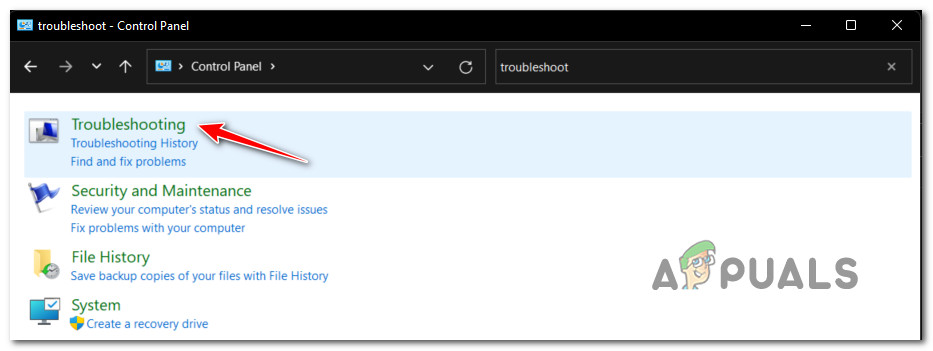
Accessing the Classic Control Panel interface - Inside the Control Panel window that just appeared, use the search function (top-right corner) to search for ‘troubleshoot’.
- Next, from the list of results, click on Troubleshooting.

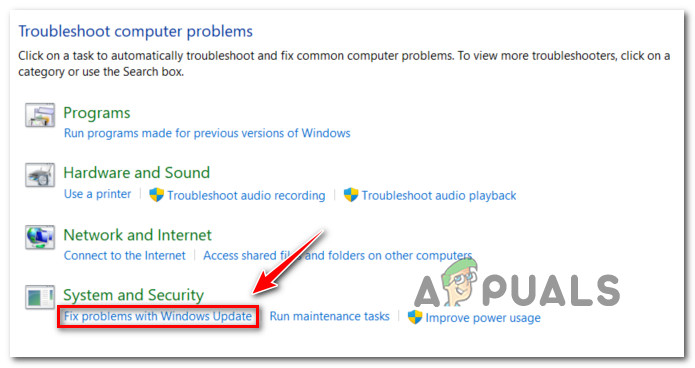
Accessing the Troubleshooting tab - Next, go under System and Security and click on Fix problems with Windows Update.

Accessing the Windows Update Troubleshooter - At the first Windows Update troubleshooter prompt, click on Next and wait for the initial scan to complete.
- If a problem is identified, click on Apply this fix to enforce the recommended fix.

Applying the recommended fix Note: Depending on the type of fix that gets recommended, you might need to perform a series of manual steps. Follow the on-screen instructions.
- Once the fix is successfully applied, restart your Windows PC and attempt to install the failing update once again after the next startup is complete.

If the same 0x8024201 error is still occurring, move down to the next potential fix below.
Start every WU Service dependency
Contrary to what most people believe, Windows Update has a lot of services that it’s dependent on. These services need to be configured in a way that allows being called whenever the WU component needs them.
If you’re using some kind of performance-optimizing tools, some of these service dependencies might have been adjusted to remain disabled in order to improve the performance of your system.
To ensure that Windows Update has everything it needs to complete the installation of available feature updates, you need to ensure that the following services are set to AUTO:
- BITS (Background Intelligent Transfer Service)
- CryptSvc ( Cryptographic Services)
- TrustedInstaller
By using an elevated Command Prompt to ensure that the startup type of each of these services is set to Auto, you’re essentially ensuring that every WU service dependency is accessible.
Follow the instructions below to change the behavior of these services to AUTO in order to fix the 0x80242016:
Note: The method below will work on every recent Windows version including Windows 11.
- Press Windows key + R key to open up a Run dialog box. Next, inside the run prompt that just appeared, type ‘cmd’ and press Ctrl + Shift + Enter to open up an elevated Command Prompt window.
Opening an elevated CMD prompt - When you’re prompted by the User Account Control prompt, click Yes to grant admin access.
- Once you’re inside the elevated CMD prompt, type or paste the following commands and press Enter after each one to change the startup type of each required dependency:
SC config wuauserv start=auto
SC config bits start=auto
SC config cryptsvc start=auto
SC config trustedinstaller start=auto
- Once every command has been processed successfully, restart your computer normally and try installing the failing update once the next startup is complete.

In case your attempt at installing the problematic feature update ends with the same 0x80242016 error, move down to the next potential fix below.
Reset every Windows Component
If you ensured (using the method above) that every service dependency is enabled and correctly configured, the next potential culprit that you should investigate is a potential corruption issue affecting the temp files generated by Windows Update.
These temporary files (update files, logs, etc.) are stored in two folders: SoftwareDistribution and Catroot2.
However, you can’t really delete the contents of these folders since they’re protected under Windows. So the way to get around this issue is to add the .old extension to the name of both – this will force your operating system to disregard them and generate a new folder from scratch (one that doesn’t contain corrupted files).
Doing this will force your Windows OS to re-download the failing update files and hopefully eliminate the 0x80242016.
However, before you can add the ‘.old’ extension to both of these folders, you’ll need to stop the services that make use of it:
- wuauserv
- cryptSvc
- bits
- msiserver
You can do this manually, or (even better) do it all at once from an elevated Command Prompt.
Follow the instructions below to reset every WU component and clear the temp files associated with it from an elevated CMD prompt to fix the 0x80242016:
- Press Windows key + R to open up a Run dialog box. Next, type ‘cmd’ in the newly appeared Run prompt, then press Ctrl + Shift + Enter to open up an elevated Command Prompt.
Open up a CMD prompt - When you’re prompted by the User Account Control prompt, click Yes to grant admin access.
- Once you’re inside the elevated CMD prompt, type or paste the following commands in the same order and press Enter to get there instantly:
net stop wuauserv
net stop cryptSvc
net stop bits
net stop msiserver
Ren C:\Windows\SoftwareDistribution SoftwareDistribution.old
Ren C:\Windows\System32\catroot2 Catroot2.old
net start wuauserv
net start cryptSvc
net start bits
net start msiserver
- Once every command has been processed successfully, restart your PC and check if the issue is fixed once the next startup is complete by attempting to install the failing update once again.
In case you’re still dealing with the same kind of issue, move down to the next potential fix below.
Run DISM and SFC scans
If you followed the methods above already, you’ve made sure that the issue is not occurring due to a WU dependency. However, it’s also possible to see the 0x80242016 error due to some kind of system file corruption that is affecting the auto-updating function of your Windows Installation.
In situations like this one, the best course of action is to run utilities like SFC (System File Checker) and Deployment Image Servicing and Management (DISM) in quick succession in order to maximize your chance of eliminating every corrupted element.
Important: SFC and DISM share a lot of similarities under the hood, but they do things differently enough to justify running both of them in quick succession.
Start with a simple SFC scan and wait until the operation is complete.
Note: Opposed to DISM, SFC is a 100% local tool – it works by using a locally cached folder to replace any corrupted system file during the initial scan.
Once the SFC operation is complete, reboot your computer and wait for the next startup to complete.
After your Windows PC boots back up, go ahead and deploy a DISM scan.

Note: Before you start this type of scan, ensure that you have stable access to the Internet. This is necessary because DISM relies on a subcomponent of Windows Update to download the healthy equivalents for the corrupted system files that need to be replaced.
After the DISM scan is complete, reboot your PC one final time and check if the 0x80242016 error is fixed by attempting to install the failing update once again.
Disable Windows Search Properties (if applicable)
If you’re using an Insider Preview build, you are prone to facing issues that will not make it to a public release. This is the case with the latest outbreak of the 0x80242016 error caused by the improvements brought about to the Windows Search feature.
This sort of issue is exclusive to Microsoft Insider’s users and it’s brought about by the main Windows Search service crashing and forcing the installer to roll back the recent upgrade.
Fortunately, a few tech-savvy Windows users have discovered a solution. All you need to do is take a trip to the Services menu and changing the Startup type behavior of Windows Search to Manual.
If you’re looking for step by step instructions on how to fix this particular scenario, follow the instructions below:
- Press Windows key + R to open up a Run dialog box. Next, type ‘services’msc’ inside the text box and press Enter to open up the Services screen.
Opening up the Services screen Note: When you’re prompted by the User Account Control (UAC) prompt, click Yes to grant admin access.
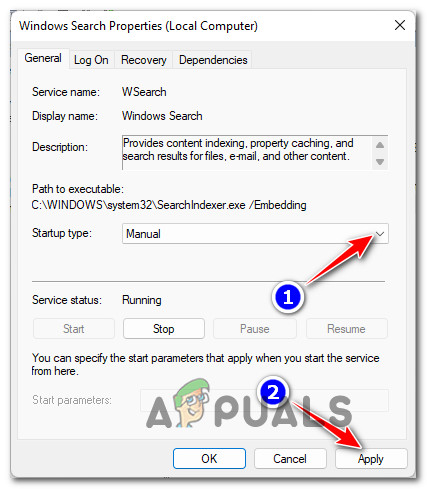
- Once you’re inside the Services utility, use the right-hand pane to scroll down through the list of available services until you find the entry named Windows Search.
- After you find the correct listing, right-click on it and choose Properties from the context menu.
Accessing the Properties screen - Once you’re inside the Windows Search Properties screen, access the General tab from the menu at the top.
- Inside the General tab, change the Startup type drop-down menu to Manual, then click on Apply to save the changes.

Change the behavior of the Windows Search service - Restart your PC and repeat the behavior that was previously causing the 0x80242016.
If the same kind of issue is still occurring, move down to the final potential fix below.
Perform a Repair Install / Clean install
If you’ve followed every potential fix above and you’re still dealing with the same error code, there’s a big chance you’re dealing with a serious system file corruption issue that you won’t be able to fix conventionally.
In situations like this one that you’re facing, the best course of action would be to refresh every system file component that might be preventing Windows Update from installing the pending feature updates.
When it comes to achieving this goal, you have two available options:
Clean install:
- Clean install Windows 10
- Clean install Windows 11
Repair install (in-place repair)
- Repair install Windows 10
- Repair install Windows 11
Note: If possible, our recommendation is to go for a repair install procedure since it will allow you to fix the issue without any sort of data loss – you get to keep personal files, apps, documents, and even some user preferences that are stored on the OS partition.
Updating your PC regularly ensures that your PC runs smoothly. But many users have reported Windows update failed with error 0x80242016. So, if you are also facing the discussed problem, you are on the right page. In this guide, we will tell you the reasons for Windows 11 update errors and how to troubleshoot that Windows 11 0x80242016 error. So, keep reading until the end to learn more!

Table of Contents
Let us first discuss the reasons for Windows update failed with error 0x80242016:
- Poor internet connection
- Corrupted faulty system files
- Conflict with third-party software
- Corrupt software distribution folder
Now, you know the reasons. So, let us learn how to fix Windows 11 update error.
Method 1: Basic Troubleshooting Methods
Before utilizing the advanced and complex methods to fix the Windows 11 0x80242016 error, first, try out the basic troubleshooting methods mentioned in the following sections.
1A. Restart PC
Restarting your PC or laptop is the first possible method to resolve the Windows 11 update error. Rebooting your PC will remove temporary data and resets some components, both of which can assist in fixing Windows update failed with error 0x80242016 problem. Therefore, restart your computer. We know that you can do it by yourself, but you can learn some more tricks in our guide on 6 Ways to Reboot or Restart a Windows 10 Computer.
1B. Fix Slow Internet Connection
An unstable and unreliable internet connection can also cause the Windows 11 0x80242016 error. So, first, go and check the internet speed on your computer by running a Speedtest.
On the other hand, if it is slow and inconsistent, you will have to fix your internet connection. Let’s see the steps for that:
1. Click on the Windows icon from the taskbar on your Windows 11 PC/laptop and type Troubleshoot settings in the search bar.
2. Click on Open.
3. Then, click on Other troubleshooters.

4. Click on Run from the Internet Connections section.

5. Now, click on Troubleshoot my connection to the Internet.

Also Read: Why is Windows 11 Suddenly So Slow and How to Fix It?
Method 2: Run Windows Update Troubleshooter
You can take the assistance of Windows 11 inbuilt Windows Update Troubleshooter, as it can resolve the issues related to Windows 11 update error. Read the below-mentioned steps to run the Windows Update Troubleshooter:
1. First, press Windows + I keys together to open Settings.
2. Click on System > Troubleshoot.

3. Click on Other troubleshooters.

4. Now, click on the Run option for the Windows Update field.

5. Wait till the troubleshooter detects problems.

6. Procced as per the onscreen instruction.
7. Restart the PC and check if the issue is resolved.
Method 3: Repair System Files
If corrupt files are present on your device, it can lead to Windows 11 0x80242016 error. So, we suggest you repair the system files. System File Checker (SFC command) is a tool you can use to check for and repair faulty files on your computer. Moreover, Deployment Image Servicing and Management (DISM) can be used to fix Windows OS issues.
1. Type Command Prompt in the Windows search bar and click on Run as administrator.

2. Type the following command and hit the Enter key.
DISM /Online /Cleanup-Image /RestoreHealth

3. Wait for some time until the process ends. DISM will now restore the files that need to be repaired in the current installation.
4. Once the process gets over, execute the following command.
sfc /scannow

After the process gets over, the files will be repaired.
Also Read: Fix Windows Update Service Could Not be Stopped
Method 4: Disable Windows Search Properties
Some users have reported that modifying Windows Search Startup type behavior to Manual can resolve the problem. The steps for the same are given below:
1. Open the Run dialog box by pressing Windows + R keys simultaneously.
2. Now, type services.msc and press the Enter key.

3. After that, scroll down and right-click on Windows Search.

4. From the context menu, click on Properties.

5. In Windows Search Properties (Local Computer) window, click on the General tab.

6. Click on the Startup type drop-down field.
7. From the drop-down menu, select Manual.

8. Next, click on Apply to save the changes.

9. Restart the PC and check whether the discussed issue is resolved.
Also Read: How to Fix Windows 11 Update Stuck
Method 5: Disable Antivirus Temporarily (If Applicable)
The third-party Antivirus installed on your computer can cause the Windows update failed with error 0x80242016 because it can occasionally interfere with the Windows update procedure. So, you can briefly turn off the security software and then try installing the update once again. Read and follow our guide on How to Disable Antivirus Temporarily on Windows 10 to learn how to do it.
Method 6: Manually Download and Install Updates
You can use the Microsoft Windows Update Catalog to download and install the updates on the operating system manually.
Note: Know the KB number of the update before you download the update on your computer.
1. Open Settings by pressing Windows + I keys together.
2. After that, click on Windows Update from the left pane.

3. Note down the KB number for the update that has failed.

4. Next, visit the Microsoft Update Catalog page on your browser.

5. In the search box, type the noted KB number and click on Search.

6. After that, click on the Download option for the respective file.

7. In the window that appears, right-click on the hyperlink and select the Save the linked content as… option.

8. Choose the desired location to save the installer with the .msu extension and click on Save.
9. Now, press Windows + E keys simultaneously to open File Explorer and locate the Downloaded file.
10. Double-click on the .msu file.
11. Click on Yes in the installer prompt.
Note: It may take a few minutes for the installation to be completed and after that, you will receive a notification regarding the same.
12. Restart the PC/laptop after saving your unsaved data.
Also Read: 14 Ways to Clear Cache in Windows 11
Method 7: Clear Windows Update Cache
Clearing Windows updates cache can help you to fix Windows 11 update error 0x80242016 by making more space for new updates. To clear Windows update cache:
1. Press Windows + X keys together to open the Quick Link menu.
2. Select Task Manager from the menu, as shown.
3. Click on File > Run new task from the menu bar on the top.

4. Type wt.exe. Then, check the box marked Create this task with administrative privileges and click on OK.

5. Press the Ctrl + Shift + 2 keys together to open Command Prompt in a new tab.
6. Type net stop bits and press the Enter key.

7. Type net stop wuauserv as shown and press the Enter key.

8. Type net stop cryptsvc and hit Enter.

9. Then, press the Windows + R keys together to open the Run dialog box.
10. Type C:\Windows\SoftwareDistribution\Download and click on OK, as depicted below.

11. Press Ctrl + A keys to select all files and folders present in the said folder. Then, press Shift + Del keys together to delete them permanently.
12. Click on Yes in the Delete Multiple Items confirmation prompt.
13. Go to the SoftwareDistribution folder by clicking on it in the address bar at the top.

14. Open the DataStore folder by double-clicking on it.

15. Once again, use Ctrl + A keys and then hit Shift + Del keys together to select and delete all files and folders, as illustrated below.
Note: Click on Yes in the Delete Multiple Items confirmation prompt.

16. Switch back to the Windows Terminal window.
17. Type net start bits and press the Enter key.

18. Then, type the command: net start wuaserv and press the Enter key.

19. Type the command: net start cryptsvc and hit Enter to restart update related services.

20. Close all windows and restart the PC.
Let’s see another method to fix the Windows update failed with error 0x80242016.
Also Read: 16 Settings You Should Change to Protect Your Privacy in Windows 11
Method 8: Restart Windows Update Service
In the software distribution folder, temporary files are stored. These temporary files are used while the PC performs its update. When the software distribution folder gets corrupted, Windows 11 0x80242016 can occur. So, clean the discussed folder and then restart the Windows update service. The steps to clean and restart the Windows update service are given below:
1. First, press the Windows key on the keyboard.
2. After that, type cmd in the search box and select Open.
3. Type the following command and press Enter key.
net stop wuauserv

4. Next, execute the below-mentioned command to stop the update and background intelligent transfer service.
net stop bits

5. Now, navigate to the below-mentioned folder location path:
This PC > Windows (C:) >Windows > SoftwareDistribution

6. After that, delete all the content by selecting it.
7. Now, run the command mentioned below and press the Enter key.
net start wuauserv

8. Next, run the following command.
net start bits

Recommended:
- Top 10 Best Blue Light Filter App for PC
- Fix ERR_HTTP2_PROTOCOL_ERROR in Google Chrome
- Fix Windows 11 Update Error 0x800f0988
- Complete List of Windows 11 Run Commands
So, we hope you have understood how to fix the Windows update failed with error 0x80242016 with the detailed methods to your aid. You can let us know any queries or suggestions about any other topic you want us to make an article on. Drop them in the comments section below for us to know.