
Updated May 2025: Stop error messages and fix your computer problem with this tool. Get it now at this link
- Download and install the software.
- It will scan your computer for problems.
- The tool will then fix the issues that were found.
This error occurs due to corrupted/missing files. If you are facing this issue while updating windows update then don’t worry about it. We have come up with some simple solutions to fix this problem. These methods work perfectly fine even if you are running Windows 7 or 8.1. So, let us see how to fix this error.
Step 1: First of all, open the command prompt window. To do this, press Win + R keys together and type cmd into the box that appears. Then hit Enter key.
Step 2: Now, run the following commands one by one in order to fix this error. Type each command separately and hit Enter after every step.
cd %systemroot%\windowsupdate
wusa /uninstall /kb:KB3134708 /quietlogfilec:\windowsupdate.txt
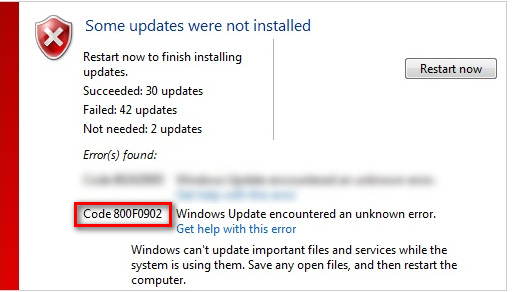
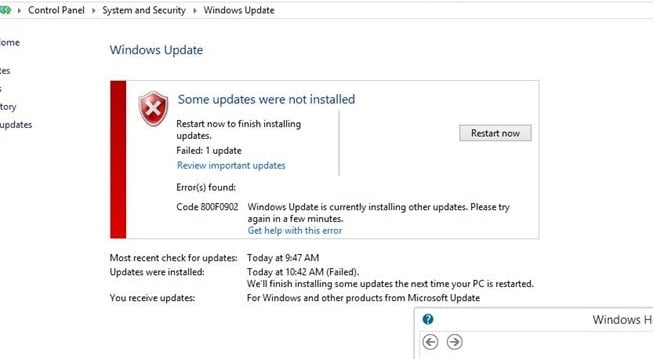
Reasons for error 800F0902 when updating Windows 7
The following errors occur when you try to upgrade to Windows 10.
1. Error Code 800F0902 – “Windows Update encountered an unknown error during the installation process.”
2. Error Code 800F0E00 – “An unexpected error occurred while checking for updates.”
3. Error Code 800F0701 – “A network related or instance specific error occured.”
4. Error Code 800F0801 – “Unable to retrieve some information about your PC.”
5. Error Code 800F0806 – “There was an error downloading files from Microsoft.”
6. Error Code 800F0000 – “This operation requires additional configuration settings.”
How to fix Windows 7 error code 800F0902
Error code F occurs when there is a problem with the system files of Windows operating systems. This error code usually appears while installing or updating software programs. To resolve this issue, it is important to check whether the registry entries related to the application are damaged. If the damage is severe, then you must repair the registry manually. You can use RegCure Pro tool to fix this error code.
Solution #1: Renaming Software Distribution Folder
To rename the software distribution folder, you must stop the Windows Update Service first. Now, change the name of the folder and save changes. Restart the computer. Find the account used to run the Windows Update service and delete it. Check the box next to Delete Account. Reboot the PC.
Now, start the Windows Update Service again.
After renaming the software distribution directory, check whether there are any errors messages or not.
If everything goes well, you’re done.
Updated: May 2025
We highly recommend that you use this tool for your error. Furthermore, this tool detects and removes common computer errors, protects you from loss of files, malware, and hardware failures, and optimizes your device for maximum performance. This software will help you fix your PC problems and prevent others from happening again:
- Step 1 : Install PC Repair & Optimizer Tool (Windows 11, 10, 8, 7, XP, Vista).
- Step 2 : Click Start Scan to find out what issues are causing PC problems.
- Step 3 : Click on Repair All to correct all issues.
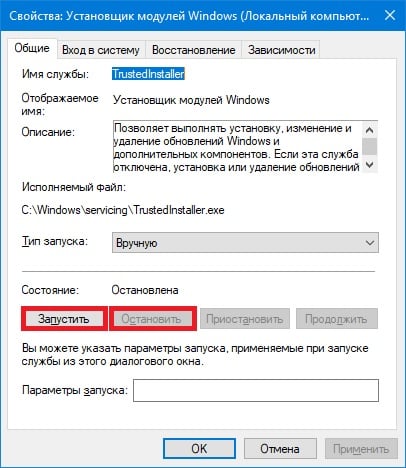
Solution #2 : Restarting Windows Module installer Service
In case you are facing issues while updating Windows 10 Anniversary Edition, here is another solution. You can simply restart the Windows Module Install Service. This will help you to fix the error without having to uninstall and reinstall Windows 10.
To start, open the Start Menu and type “Services”. Then go to the bottom of the screen and find the Windows Module Installer. Double-click it and choose “Start”. Now, close the window and reboot your PC.
If the above mentioned steps don’t work, follow the instructions given below.
1. First, download the latest version of MSI from Microsoft’s website.
2. Unzip the downloaded file and run the setup program.
3. Follow the prompts to complete the installation process.
4. Once done, restart your system.
5. If everything goes well, you’ll see the updated version of Windows 10 installed successfully.
6. Enjoy!
Solution #3: Scanning for Corrupt System files.
If you’re getting “The system cannot find the file specified” errors while trying to run Windows 10 apps, it might be because one or more of your system files are corrupt. To fix this issue, follow these steps:
1. 2. On the left side of the window, select Troubleshoot.
3. Under Advanced options, select Reset this PC.
4. After resetting your computer, restart it.
5. If the problem persists, try Method #3: Scanning For Corrupt System Files.
METHOD 3: SCANNING FOR CORRUPT SYSTEM FILES
RECOMMENATION: Click here for help with Windows errors.
Frequently Asked Questions
How do I make sure that my device restarts when I want it to so I can install updates?
Your device will need to restart to finish installing an update. When you aren’t using your device, Windows will try to restart it. If it can’t, you’ll be asked to set up a better time for the restart. Or, you can make a reservation at any time by doing these steps:
Start, go to Settings, and then click Windows Update.
Select Set a date and time for the restart that works for you.
What if I don’t have enough space on my hard drive to do the update?
Try getting rid of files you don’t need, uninstalling apps you don’t use, or moving files to another drive, like an external USB drive or OneDrive. See Free up drive space in Windows for more ways to free up disk space.
Error 800f0902 is a transient error. In most cases, it appears because the update installer (Trusted Installer) is busy processing requests from another client. Because it handles important OS files, Trusted Installer cannot be interrupted until it finishes the task at hand. This issue is usually seen when installing Windows OS updates. Typically, the error code appears after the user checks for updates or after an automatic update fails. It’s known to happen frequently on machines that have a lot of updates to catch up to.
If a busy TrustedInstaller is causing the 800f0902 error, waiting a while before installing the faulty update will most likely solve the problem. However, sometimes a corrupt update installation will end up causing this issue. In that case, you’ll have to go through the trouble of resetting the Software Distribution folder.
Another possible scenario for your 800f0902 error is that the updates that are failing we’re already replaced by newer updates via installing. In this case, your OS will look at the failing updates as “not applicable” and will display the 800f0902 error. However, the issue could also be server-side, so if possible, wait a few hours and see if the issue resolves by itself.
Below you have a collection of methods that have successfully helped Windows users eliminate the 800f0902 error. Please follow each method in order until you find a fix that works.
Note: Before you start with the methods below, make sure your network connection is working properly. In addition, check to see if you don’t have any proxy settings that are coming into play when Windows tries to perform an update. If you use proxy or VPN, disable the services and try to install the failing updates again.
Method 1: Initializing Interner Explorer
The 800f0902 error is often linked with incomplete installs of IE (Internet Explorer). Some users successfully eliminated the error after opening IE and allowing it to initialize. If you use a 3rd party browser like Chrome or Firefox, try opening Internet Explorer and then closing it again. Next, return to Windows Update an try to execute the update. If it’s still failing, move to Method 2.
Note: This solution is only applicable if you don’t normally use IE and/or you didn’t open it after the update failed.
To open Internet Explorer: Hold the Windows Key and Press R, type iexplore.exe and Click OK
Method 2: Restarting Windows Module Installer service (trustedinstaller.exe)
TustedInstaller is an executable used by a service called Windows Module Installer. Its purpose is to install Windows system modules – this includes Windows updates and automatic updates, and hotfixes. TrustedInstaller.exe is known to be a memory hog and has the potential to glitch out on Windows 7 and prevent the updates from installing. Some users have managed to solve the 800f0902 error by restarting the service and rebooting their system. Here’s what you need to do:
Note: Before you go ahead and restart the service, you need to make sure that it’s not currently processing an update. To do this, open Task manager (Ctrl + Shift + Esc), go to Resource Monitor and check whether TrustedInstaller.exe is currently using physical memory. If it’s using system resources, wait for the update to finish before following the guide below.
- Press Windows key + R to open a Run window. Then, type services.msc and hit Enter.
- Once you’re in the Services window, scroll down and find Windows Modules Installer.
- Right-click on Windows Modules Installer and select Properties.

- Next, select the General tab and click on the Stop button. Once the service has been stopped, click the Start button to restart it. Finally, hit Apply to confirm and close the Services window.

- Try to install the update that was previously failing.
Note: If the update fails again with the 80080005 error code, restart your computer and follow Method 3. If the error code displayed is still 800f0902, move straight to Method 4.


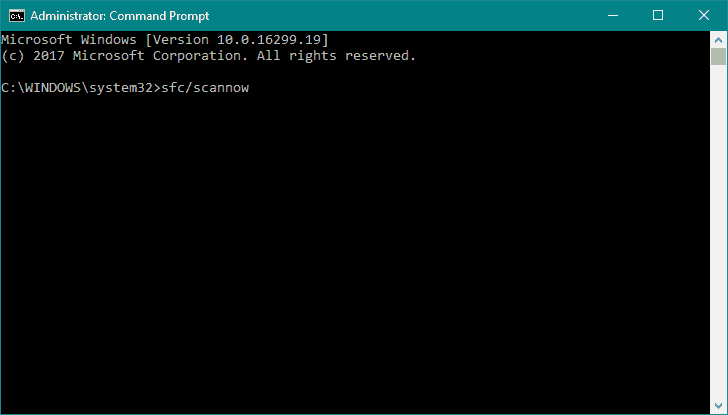
Method 3: Scanning for System errors with SFC
Corrupt Windows system files can also lead to the 800f0902 error. This will typically happen when the download or the installation of a Windows Update is interrupted. This can be triggered by a sudden power source or a network failure. If following the method above has changed the error to an 80080005 code, follow the steps below on running SFC (System File Checker).
Windows has a built-in tool that is capable of scanning and fixing most issues related to system file corruption, including the error at hand. Follow the fixes below to perform a system-wide scan and repair your files of corruption:
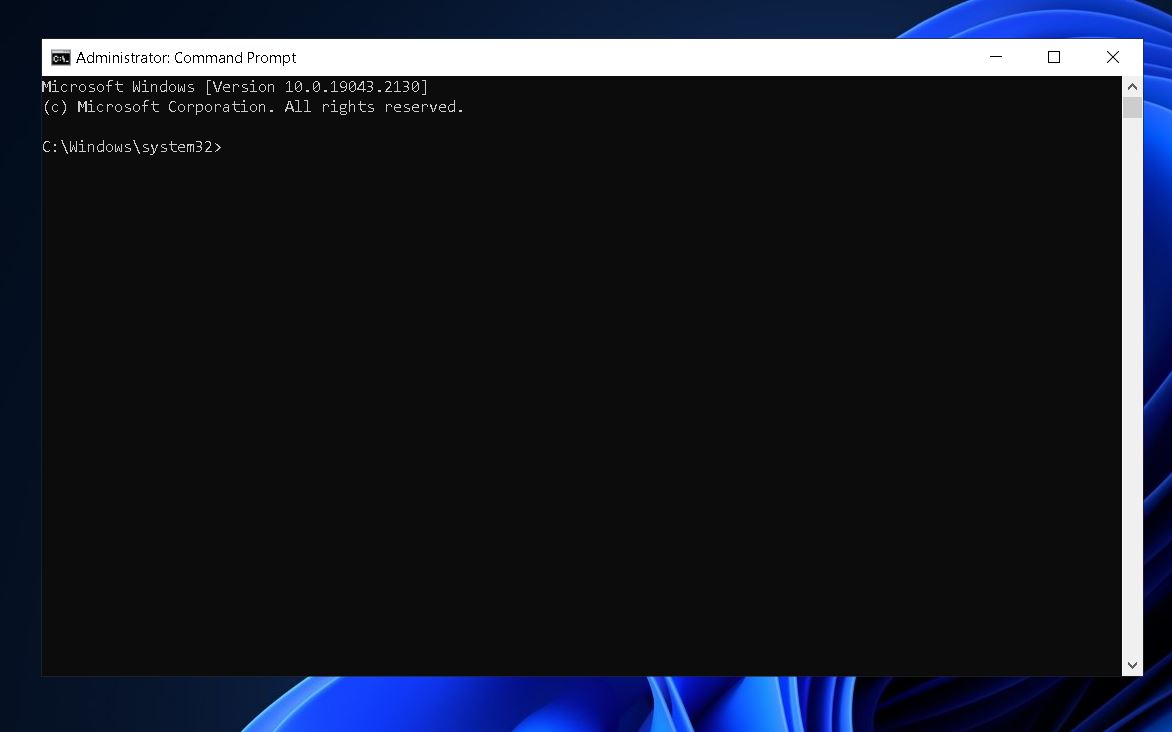
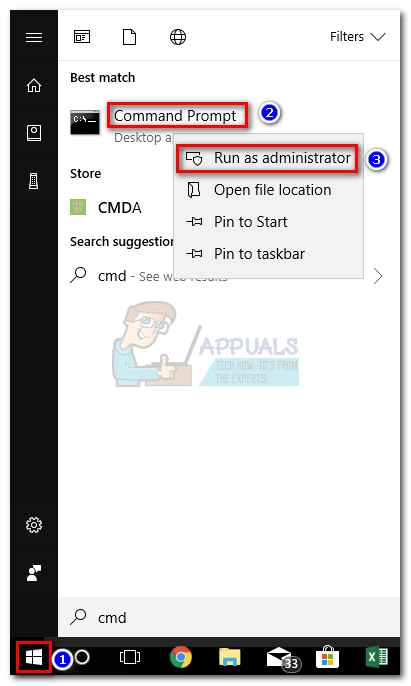
- Click the Windows start bar icon in the bottom-left corner and search for “cmd“. Then, right-click on Command Prompt and click on Run As Administrator.

- Once Command Prompt is opened as Administrator, tap sfc /scannow and press Enter. This will trigger a system-wide scan that will take a while to complete. If the tool manages to find corrupted files, you will need to press the Y key at the next prompt to have the corrupted files repaired.
- When the process finishes, restart your machine and attempt to install the updates again.
Method 4: Resetting the Software Distribution folder
The Software Distribution folder in Windows maintained by the WUAgent. The folder is responsible for storing temporary files required by Windows Update. Under normal circumstances, there’s no need to ever interact with this folder. However, if Windows updates are still failing after following the methods above, renaming the folder might eliminate the issue. This method is effective in those situations where Windows sees the updates as “Non-applicable” because newer updates were already installed.
You can find the Software Distribution folder under C:\ Windows \ SoftwareDistribution. If you notice that the size of this folder is considerably large (over 700MB), then there’s a high chance that this method will eliminate the 80080005 error.
Note: Performing the steps below are safe and will not hurt your system. This procedure will reset the contents of the Software Distribution folder, forcing Windows to recreate the WU components and re-download the drivers.
Here’s a step-by-step guide to resetting the software distribution folder:
- First, disconnect your machine from the internet. This could either mean turning off the Wi-Fi or physically unplug the wired connection.
Note: If you skip this step, Windows might indicate that some files are in use and the commands below will not work. - Click the Windows start bar icon in the bottom-left corner and search for “cmd“. Then, right-click on Command Prompt and click on Run As Administrator.
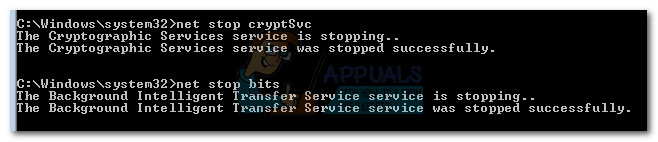
- First, we’ll need to stop BITS, Cryptographic, MSI INstaller and the Windows Update Services. To do this, insert the following commands into Command Prompt and press Enter after each of them:
net stop wuauserv
net stop cryptSvc
net stop bits
net stop msiserver
- Now, we’ll need to rename the SoftwareDistibution folder and the Catroot2 folder. This will force Windows to recreate the Windows Update components and download the updates again. To do this, insert the following commands into Command Prompt and hit Enter after each one:
ren C:\Windows\SoftwareDistribution SoftwareDistribution.oldren C:\Windows\System32\catroot2 Catroot2.old
- Now that we renamed the folders, let’s restart the services we previously disabled. Proceed by inserting the following commands and hit Enter after each one:
net start wuauserv
net start cryptSvc
net start bits
net start msiserver - Close Command Prompt and restart your computer. After the restart, the updates should automatically start. But if they don’t, make your way to Windows Update and start them from there.
Kevin Arrows
Kevin Arrows is a highly experienced and knowledgeable technology specialist with over a decade of industry experience. He holds a Microsoft Certified Technology Specialist (MCTS) certification and has a deep passion for staying up-to-date on the latest tech developments. Kevin has written extensively on a wide range of tech-related topics, showcasing his expertise and knowledge in areas such as software development, cybersecurity, and cloud computing. His contributions to the tech field have been widely recognized and respected by his peers, and he is highly regarded for his ability to explain complex technical concepts in a clear and concise manner.
What is Error 800F0902?
Error 800F0902 is a kind of Runtime error that is found in the Microsoft Windows operating systems. The file can be found for Windows 7. Windows 7 Error 800F0902 has a popularity rating of 1 / 10.
Errors
This tutorial contains information on Error 800F0902 or otherwise known as Windows 7 Error 800F0902. Errors such as Windows 7 Error 800F0902 indicate your machine has faulty hardware or software that should be fixed when possible. Below is information on how to repair Error 800F0902 and get your computer back to normal.
Signs of Error 800F0902:
- When your computer freezes or locks up at random.
- When your computer crashes when you are running Windows 7.
- If Windows 7 Error 800F0902 pops up and causes a program to shutdown or your computer to crash.
- Your computer is running slow, taking a long time to boot up, and you suspect Error 800F0902 by Windows 7 is the cause.
What Causes Runtime Errors Like Error 800F0902?
There are several causes of runtime errors like Windows 7 Error 800F0902, such as viruses, out of date drivers, missing files or folders, incomplete or poor installation, and registry errors. They can also occur due to an issue with the computer’s memory, which may often be due to a hardware problem. In some cases there was an issue installing Windows 7 and an error occurred.
How to Fix Windows 7 Error 800F0902
Follow the step by step instructions below to fix the Error 800F0902 problem. We recommend you do each in order. If you wish to skip these steps because they are too time consuming or you are not a computer expert, see our easier solution below.
Step 1 — Uninstall and Reinstall Windows 7
If the Windows 7 Error 800F0902 is a result of using Windows 7, you may want to try reinstalling it and see if the problem is fixed. Please follow these steps:
Windows XP
- Click “Start Menu”.
- Click “Control Panel”.
- Select the “Add or Remove” program icon.
- Find the Error 800F0902 associated program.
- Click the Change/Remove button on the right side.
- The uninstaller pop up will give you instructions. Click “okay” or “next” or “yes” until it is complete.
- Reinstall the software.
Windows 7 and Windows Vista
- Click “Start Menu”.
- Click “Control Panel”.
- Click “Uninstall a Program” which is under the “Programs” header.
- Find the Error 800F0902 associated program.
- Right click on it and select “Uninstall”.
- The uninstaller pop up will give you instructions. Click “okay” or “next” or “yes” until it is complete.
- Reinstall the software and run the program.
Windows 8, 8.1, and 10
- Click “Start Menu”.
- Click “Programs and Features”.
- Find the software that is linked to **insert file name**.
- Click Uninstall/Change.
- The uninstaller will pop up and give you instructions. Click “okay” and “next” until it is complete.
- Restart your computer.
- Reinstall the software and run the program.
Step 2 — Remove Registry Entry related to Error 800F0902
WARNING: Do NOT edit the Windows Registry unless you absolutely know what you are doing. You may end up causing more trouble than you start with. Proceed at your OWN RISK.
- Create a backup of registry files.
- Click “Start”.
- Type regedit, select it, and grant permission in order to proceed.
- Click HKEY LOCAL MACHINE>>SOFTWARE>>Microsoft>>Windows>>Current Version>>Uninstall.
- Find the Windows 7 Error 800F0902 software from the list you wish to uninstall.
- Select the software and double click the UninstallString icon on the right side.
- Copy the highlighted text.
- Exit and go to the search field.
- Paste the data.
- Select Okay in order to uninstall the program.
- Reinstall the software.
Step 3 – Ensure Junk Isn’t Causing Windows 7 Error 800F0902
Any space that isn’t regularly cleaned out tends to accumulate junk. Your personal computer is no exception. Constant web browsing, installation of applications, and even browser thumbnail caches slow down your device and in the absence of adequate memory, can also trigger a Windows 7 Error 800F0902 error.
So how do you get around this problem?
- You can either use the Disk Cleanup Tool that comes baked into your Windows operating system.
- Or you can use a more specialized hard drive clean up solution that does a thorough job and flushes the most stubborn temporary files from your system.
Both solutions may take several minutes to complete the processing of your system data if you haven’t conducted a clean up in a while.
The browser caches are almost a lost cause because they tend to fill up quite rapidly, thanks to our constantly connected and on the go lifestyle.
Here’s how you can run the Window’s Disk Cleanup Tool, without performance issues or surprises.
- For Windows XP and Windows 7, the program can be ran from “Start” and from the “Command Prompt”.
- Click “Start”, go to All Programs > Accessories > System Tools, click Disk Cleanup. Next choose the type of files you wish to remove, click OK, followed by “Delete Files”.
- Open up the Command Prompt, type “c:\windows\cleanmgr.exe /d” for XP and “cleanmgr” for Windows 7. Finish by pressing “Enter”.
- For Windows 8 and Windows 8.1, the Disk Cleanup Tool can be accessed directly from “Settings”. Click “Control Panel” and then “Administrative Tools”. You can select the drive that you want to run the clean up on. Select the files you want to get rid of and then click “OK” and “Delete Files”.
- For Windows 10, the process is simplified further. Type Disk Cleanup directly in the search bar and press “Enter”. Choose the drive and then the files that you wish to wipe. Click “OK”, followed by “Delete Files”.
The progressive ease with which the Cleanup Tool can be used points to the growing importance of regularly deleting temporary files and its place in preventing Windows 7 Error 800F0902.
PRO TIP:
Remember to run the Disk Cleanup as an administrator.
Step 4 – Fix Infections and Eliminate Malware in Your PC
How do you gauge if your system is infected with a malware and virus?
Well, for one, you may find certain applications misbehaving.
And you may also see the occurrence of Error 800F0902.
Infections and malware are the result of:
- Browsing the Internet using open or unencrypted public Wi-Fi connections
- Downloading applications from unknown and untrustworthy sources
- Intentional planting of viruses in your home and office networks
But thankfully, their impact can be contained.
- Enter “safe mode” by pressing the F8 key repeatedly when your device is restarting. Choose “Safe Mode with Networking” from the Advanced Boot Options menu.
- Back up all the data in your device to a secure location. This is preferably a storage unit that is not connected to your existing network.
- Leave program files as is. They are where the infection generally spreads from and may have been compromised.
- Run a thorough full-system scan or check of an on-demand scanner. If you already have an antivirus or anti-malware program installed, let it do the heavy lifting.
- Restart your computer once the process has run its course.
- Lastly, change all your passwords and update your drivers and operating system.
PRO TIP: Are you annoyed by the frequent updates to your antivirus program? Don’t be! These regular updates add new virus signatures to your software database for exponentially better protection.
Step 5 – Return to the Past to Eliminate Error 800F0902
The steps outlined up until this point in the tutorial should have fixed Windows 7 Error 800F0902 error. But the process of tracking what has caused an error is a series of educated guesses. So in case the situation persists, move to Step 5.
Windows devices give users the ability to travel back in time and restore system settings to an uncorrupted, error free state.
This can be done through the convenient “System Restore” program. The best part of the process is the fact that using System Restore doesn’t affect your personal data. There is no need to take backups of new songs and pictures in your hard drive.
- Open “Control Panel” and click on “System & Security”.
- Choose the option “System”.
- To the left of the modal, click on “System Protection”.
- The System Properties window should pop-up. You’ll be able to see the option “System Restore”. Click on it.
- Go with “Recommended restore” for the path of least hassles and surprises.
- Choose a system restore point (by date) that will guarantee taking your device back to the time when Error 800F0902 hasn’t been triggered yet.
- Tap “Next” and wrap up by clicking “Finish”.
If you’re using Windows 7 OS, you can reach “System Restore” by following the path Start > All Programs > Accessories > System Tools.
Step 6 — Error 800F0902 Caused by Outdated Drivers
Updating a driver is not as common as updating your operating system or an application used to run front-end interface tasks.
Drivers are software snippets in charge of the different hardware units that keep your device functional.
So when you detect an Windows 7 Error 800F0902 error, updating your drivers may be a good bet. But it is time consuming and shouldn’t be viewed as a quick fix.
Here’s the step-by-step process you can go through to update drivers for Windows 8, Windows 8.1 and Windows 10.
- Check the site of your hardware maker for the latest versions of all the drivers you need. Download and extract them. We strongly advice going with original drivers. In most cases, they are available for free on the vendor website. Installing an incompatible driver causes more problems than it can ever fix.
- Open “Device Manager” from the Control Panel.
- Go through the various hardware component groupings and choose the ones you would like to update.
- On Windows 10 and Windows 8, right-click on the icon of the hardware you would like to update and click “Update Driver”.
- On Windows 7 and Vista, you right-click the hardware icon, choose “Properties”, navigate to the Driver panel, and then click “Update Driver”.
- Next you can let your device automatically search for the most compatible drivers, or you can choose to update the drivers from the versions you have on your hard drive. If you have an installer disk, then the latter should be your preferred course of action. The former may often get the driver selection incorrect.
- You may need to navigate a host of warnings from the Windows OS as you finalize the driver update. These include “Windows can’t verify that the driver is compatible” and “Windows can’t verify the publisher of this driver”. If you know that you have the right one in line, click “Yes”.
- Restart the system and hopefully the Windows 7 Error 800F0902 error should have been fixed.
Step 7 – Call the Windows System File Checker into Action
By now the Windows 7 Error 800F0902 plaguing your device should have been fixed. But if you haven’t resolved the issue yet, you can explore the Windows File Checker option.
With the Windows File Checker, you can audit all the system files your device needs to operate, locate missing ones, and restore them.
Sound familiar? It is almost like “System Restore”, but not quite. The System Restore essentially takes you back in time to a supposedly perfect set up of system files. The File Checker is more exhaustive.
It identifies what is amiss and fills the gaps.
- First and foremost, open up an elevated command prompt.
- Next, if you are using Windows 8, 8.1 or 10, enter “DISM.exe /Online /Cleanup-image /Restorehealth” into the window and press Enter.
- The process of running the Deployment Image Servicing and Management (DISM) tool may take several minutes.
- Once it completes, type the following command into the prompt “sfc /scannow”.
- Your device will now go through all protected files and if it detects an anomaly, it will replace the compromised version with a cached version that resides at %WinDir%\System32\dllcache.
Step 8 – Is your RAM Corrupted? Find Out.
Is it possible? Can the memory sticks of your device trigger Error 800F0902?
It is unlikely – because the RAM chips have no moving parts and consume little power. But at this stage, if all else has failed, diagnosing your RAM may be a good move.
You can use the Windows Memory Diagnostics Tool to get the job done. Users who are on a Linux or Mac and are experiencing crashes can use memtest86.
- Open up your device and go straight to the “Control Panel”.
- Click on “Administrative Tools”.
- Choose “Windows Memory Diagnostic”.
- What this built-in option does is it burns an ISO image of your RAM and boots the computer from this image.
- The process takes a while to complete. Once it is done, the “Status” field at the bottom of the screen populates with the result of the diagnosis. If there are no issues with your RAM/memory, you’ll see “No problems have been detected”.
One drawback of the Windows Memory Diagnostic tool pertains to the number of passes it runs and the RAM segments it checks.
Memtest86 methodically goes over all the segments of your memory – irrespective of whether it is occupied or not.
But the Windows alternative only checks the occupied memory segments and may be ineffective in gauging the cause of the Windows 7 Error 800F0902 error.
Step 9 – Is your Hard Drive Corrupted? Find Out.
Your RAM or working memory isn’t the only culprit that may precipitate an Windows 7 Error 800F0902 error. The hard drive of your device also warrants close inspection.
The symptoms of hard drive error and corruption span:
- Frequent crashes and the Blue Screen of Death (BSoD).
- Performance issues like excessively slow responses.
- Errors like Error 800F0902.
Hard drives are definitely robust, but they don’t last forever.
There are three things that you can do to diagnose the health of your permanent memory.
- It is possible that your device may have a hard time reading your drive. This can be the cause of an Windows 7 Error 800F0902 error. You should eliminate this possibility by connecting your drive to another device and checking for the recurrence of the issue. If nothing happens, your drive health is okay.
- Collect S.M.A.R.T data by using the WMIC (Windows Management Instrumentation Command-line) in the command prompt. To do this, simply type “wmic” into the command prompt and press Enter. Next follow it up with “diskdrive get status”. The S.M.A.R.T status reading is a reliable indicator of the longevity of your drive.
- Fix what’s corrupt. Let’s assume you do find that all isn’t well with your hard drive. Before you invest in an expensive replacement, using Check Disk or chkdsk is worth a shot.
- Open the command prompt. Make sure you are in Admin mode.
- Type “chkdsk C: /F /X /R” and press “Enter”. “C” here is the drive letter and “R” recovers data, if possible, from the bad sectors.
- Allow the system to restart if the prompt shows up.
- And you should be done.
These steps can lead to the resolution you’re seeking. Otherwise the Windows 7 Error 800F0902 may appear again. If it does, move to Step 10.
Step 10 – Update Windows OS
Like the software applications you use to render specific tasks on your device, the Operating System also requires periodic updates.
Yes, we’ve all heard the troubling stories.
Devices often develop problems post unfinished updates that do not go through. But these OS updates include important security patches. Not having them applied to your system leaves it vulnerable to viruses and malware.
And may also trigger Error 800F0902.
So here’s how Windows 7, Windows 8, Windows 8.1 and Windows 10 users can check for the latest updates and push them through:
- Click the “Start” button on the lower left-hand corner of your device.
- Type “Updates” in the search bar. There should be a “Windows Update” or “Check for Updates” option, based on the OS version you’re using.
- Click it. The system will let you know if any updates are available.
- You have the convenience of choosing the components of the update you’d like to push through. Always prioritize the security updates.
- Click “OK” followed by “Install Updates”.
Step 11 – Refresh the OS to Eliminate Persistent Windows 7 Error 800F0902 Error
“Windows Refresh” is a lifesaver.
For those of you who are still with us and nothing has worked to eliminate the Error 800F0902, until recently, a fresh install of Windows would have been the only option.
Not anymore.
The Windows Refresh is similar to reinstalling your Windows OS, but without touching your personal data. That’s hours of backup time saved in a jiffy.
Through the Refresh, all your system files become good as new. The only minor annoyance is the fact that any custom apps you’ve installed are gone and the system applications you had uninstalled are back.
Still, it is the best bet as the final step of this process.
- Enter the “Settings” of your PC and click on “Change Settings”.
- Click “Update and recovery” and then choose “Recovery”.
- Select “Keep my files”. This removes apps and settings, but lets your personal files live on.
- You’ll get some warning messages about the apps that will be uninstalled. If you’ve gone through a recent OS upgrade, the Refresh process makes it so that you can’t go back to your previous OS version – if you should ever feel the need to do it.
- Click the “Refresh” button.
Are you using an older version of Windows that doesn’t come with the power to “Refresh”?
Maybe it is time to start from scratch.
- Enter your BIOS set-up.
- This is where you need to change your computer’s boot order. Make it so that the boot happens not from the existing system files, but from the CD/DVD Drive.
- Place the original Windows disk in the CD/DVD drive.
- Turn on or restart the device.
- Choose where you’d like the system files to be installed.
- Your PC will restart several times as the process runs its course.
FAQ’s
What Do Runtime Errors Like Error 800F0902 Have to Do with the Windows Registry?
The Windows Registry is basically a collection of databases in MS Windows. The registry issues are usually the number one cause of runtime errors. The Registry may corrupt due to missing files or poor installation, leading to runtime errors. The problem can typically be solved by using a software designed to fix the Registry.
Will Removing Runtime Errors Like Error 800F0902 Improve My Start Up Speed?
Runtime errors have no impact on the start up speed since the error occurs while the program is running. It may, however, cause the OS to crash during or after start up. Correcting runtime errors will have no impact on the startup speed of the computer. It may just help you save time by reducing crashes and errors which may cause the computer to keep starting up.
How Can I Keep My Computer Running Fast and Error Free?
Make sure the hardware is not dated and works well. Use an antivirus software to keep viruses at bay and ensure the OS is carefully installed. Do not delete Windows files and always install all your programs properly. You should also ensure that there is enough hard drive space and memory to support all your programs. Running out of space or memory can cause the computer to slow down, also often leading to multiple errors.
Start Download Now
Author:
Curtis Hansen has been using, fiddling with, and repairing computers ever since he was a little kid. He contributes to this website to help others solve their computer issues without having to buy a new one.
800f0902 — это достаточно распространенная ошибка обновления, которая появляется на операционных системах Windows 7, Windows 8, Windows 8.1 и Windows 10. Впрочем, на последних трех версиях ОС от Майкрософт код ошибки имеет несколько иной вид, например, 0x800f0902 или 0xc800f0902.
В большинстве случаев ошибка возникает из-за того, что служба установщика модулей обновлений (Trusted Installer) занята обработкой многочисленных запросов от другого клиента. Учитывая, что Trusted Installer взаимодействует с критически важными системными файлами, ее работа не может быть прервана обычными методами.
Как правило, ошибка 800f0902 возникает во время проверки наличия новых обновления либо после их автоматической установки, которая, разумеется, заканчивается неудачей. Зачастую на данную проблему жалуются владельцы ПК, которые давно не устанавливали новых обновлений для своей Windows.
Если ошибку 800f0902 вызывает загруженный Trusted Installer, то ожидание — вполне разумное решение. Тем не менее в некоторых случаях причиной появления этой ошибки могут быть поврежденные установочные/временные файлы обновлений. В данном случае от пользователя может потребоваться очистка папки Software Distribution.
Ошибка 800f0902 также может появляться в том случае, когда Windows, по какой-то необъяснимой причине, пытается установить обновления, которые уже присутствуют в системе. Кроме того, не стоит исключать и того варианта, что ошибка возникла по вине проблемы, находящейся на стороне серверов непосредственно самой Майкрософт.
Заметка: прежде чем мы двинемся к рассмотрению методов, вам необходимо убедиться, что ваш ПК имеет стабильное Интернет-подключение. Также не стоит забывать, что мешать нормальному обновлению Windows могут активированные прокси-сервер и VPN.
Метод №1 Запуск браузера Internet Explorer
Ошибка 800f0902 может быть связана с незавершенной инициализацией браузера Internet Explorer. Некоторым пользователям удалось избавиться от ошибки, запустив на своем компьютере Internet Explorer. Даже если вы пользуетесь браузером от стороннего разработчика, например, Google Chrome или Mozilla Firefox, попробуйте открыть Internet Explorer, подождать минуту-другую и закрыть браузер.
После такой несложной операции зайдите в Центр обновления своей Windows и запустите процесс обновления еще раз.
Заметка: этот метод будет полезен только в том случае, если вы не Internet Explorer или полностью не открывали его в своей системе. Последнее довольно сложно сделать, но некоторым пользователям это все-таки удается, например, позаимствовав установщик стороннего браузера с другого компьютера.
Метод №2 Перезапуск службы установщика модулей (TrustedIstaller)
TrustedInstaller.exe — это исполняемый файл службы установщика модулей Windows. Чем занимается данная служба? Собственно, она ответственна за установку, удаление и даже изменение различных модулей обновлений и хотфиксов Windows. Порой на работу TrustedInstaller.exe уходит безумное количество системных ресурсов — это может вызывать неполадки во время установки обновлений для ОС, включая и ошибку 800f0902.
Вам нужно перезапустить службу установщика модулей и посмотреть, решит ли это проблемы с обновлением Windows. Для перезапуска этой службы вам нужно сделать следующее:
- Нажмите комбинацию Win+R, чтобы вызвать окошко «Выполнить».
- Вставьте в пустую строку значение «services.msc» и нажмите ENTER.
- Нажмите в списке службу «Установщик модулей Windows» и дважды кликните на нее ЛКМ.
- Кликните на кнопку «Остановить», затем — «Запустить».
- Сохраните изменения, нажав «Применить» и «OK».
Отлично, служба установщика модулей была перезапущена — пора запустить обновление системы. Если никакой ошибки 800f0902 не возникло, то проблема заключалась всего лишь в зависшей службе TrustedIstaller.
Метод №3 Сканирование на наличие поврежденных системных файлов и их восстановление
Поврежденные системные файлы могут вызывать появление ошибки 80080005. Подобная ситуация, как правило, возникает после внезапного прерывания установки одного из обновлений Windows. Впрочем, не исключены и другие, более запутанные причины, но сегодня не об этом. Так или иначе восстановить поврежденные системные файлы возможно с помощью утилиты System File Checker (SFC).
Чтобы пустить в работу утилиту SFC, вам нужно сделать следующее:
- Нажмите на клавиатуре Win+R для вызова окошка «Выполнить».
- Пропишите в пустой строке «cmd» и нажмите CTRL+SHIFT+ENTER.
- Вызвав перед собой Командную строку с правами администраторской учетной записи, вставьте в консоль команду «sfc /scannow» и нажмите ENTER.
- Подождите окончания сканирования и ознакомьтесь с его результатами.
- Перезагрузите ПК.
Зайдите в Центр обновления и проверьте, исчезла ли ошибка 80080005. Если SFC были обнаружены повреждения, то ошибка практически наверняка больше не будет вас донимать.
Метод №4 Сброс папки Software Distribution
В папке Software Distribution располагаются установочные/временные файлы Центра обновления. Пользователю нет нужды взаимодействовать с этой папкой, однако при возникновении проблем с обновлением системы может потребоваться ее сброс. Под сбросом Software Distribution подразумевается простое переименование папки — ничего больше.
- Нажмите на клавиатуре Win+R для вызова окошка «Выполнить».
- Пропишите в пустой строке «cmd» и нажмите CTRL+SHIFT+ENTER.
- Теперь выполните в консоли следующий ряд команд:
- net stop wuauserv
- net stop cryptSvc
- net stop bits
- net stop msiserver
- ren C:\Windows\SoftwareDistribution SoftwareDistribution.oldren C:\Windows\System32\catroot2 Catroot2.old
- net start wuauserv
- net start cryptSvc
- net start bits
- net start msiserver
- Закройте Командную строку и перезагрузите компьютер.
После переименования папки Software Distribution проблемы с обновлением Windows в лице ошибки 80080005 должны исчезнуть.

-
Microsoft Support & Malware Removal
-
Windows Update
You should upgrade or use an alternative browser.
[SOLVED] Win7 x86 — six updates failing with error code 800F0902
-
Thread starter
Thread startergiangi82roma
-
Start date
Start date
-
-
#1
:huh:
The following updates won’t install, with error code 800F0902. I thank you all in advance for any advice!
- KB4462915 — 2018-10 Security-only update for Windows 7 for x86-based Systems (release date: October 9, 2018)
- KB4471318 — 2018-12 Monthly Rollup for Windows 7 for x86-based Systems (release date: December 11, 2018)
- KB4470199 — 2018-12 Cumulative security update for Internet Explorer for Windows 7 for x86-based Systems (release date: December 11, 2018)
- KB4467106 — 2018-11 Security-only update for Windows 7 for x86-based Systems (release date: November 13, 2018)
- KB4471987 — 2018-12 Security and Quality Rollup updates for .NET Framework 3.5.1, 4.5.2, 4.6, 4.6.1, 4.6.2, 4.7, 4.7.1, and 4.7.2 for Windows 7 SP1 and Windows Server 2008 R2 SP1
- KB4471328 — 2018-12 Security Only Quality Update for Windows 7 for x86-based Systems (release date: December 11, 2018)
This is the content of SFCFix.log:
SFCFix version 3.0.0.0 by niemiro.
Start time: 2018-12-17 15:26:26.154
Microsoft Windows 7 Service Pack 1 - x86
Not using a script file.


AutoAnalysis::
SUMMARY: No corruptions were detected.
AutoAnalysis:: directive completed successfully.


Successfully processed all directives.


Failed to generate a complete zip file. Upload aborted.


SFCFix version 3.0.0.0 by niemiro has completed.
Currently storing 0 datablocks.
Finish time: 2018-12-17 15:35:25.934
----------------------EOF-----------------------
And this is the link to CBS.zip:
Again, thank you for your help!
Cheers,
Gianluca.
- Joined
- Oct 9, 2014
- Posts
- 741
-
-
#2
SFCFix Script
Warning: this fix is specific to the user in this thread. No one else should follow these instructions as it may cause more harm than good. If you are after assistance, please start a thread of your own.
- Download SFCFix.exe (by niemiro) and save this to your Desktop.
- Download the attached file, SFCFixScript.txt, and save this to your Desktop. Ensure that this file is named SFCFixScript.txt — do not rename it.
- Save any open documents and close all open windows.
- On your Desktop, you should see two files: SFCFix.exe and SFCFixScript.txt.
- Drag the file SFCFixScript.txt onto the file SFCFix.exe and release it.
- SFCFix will now process the script.
- Upon completion, a log should be created on your Desktop: SFCFix.txt.
- Copy (Ctrl+C) and Paste (Ctrl+V) the contents of this into your next post for me to analyse please — put [CODE][/CODE] tags around the log to break up the text.
Afterwards, retry updates and if any fail, attach CBS.log.
Attachments
-
SFCFixScript.txt
-
-
#3
SFCFix version 3.0.0.0 by niemiro.
Start time: 2018-12-19 10:53:19.443
Microsoft Windows 7 Service Pack 1 - x86
Using .txt script file at C:\Users\gianluca.ferrara\Desktop\SFCFixScript.txt [0]


RegistryScript::
Successfully took ownership and permissions for registry key HKEY_LOCAL_MACHINE\SOFTWARE\Microsoft\Windows\CurrentVersion\WINEVT\Publishers\{28aa95bb-d444-4719-

a36f-40462168127e}.
Successfully took ownership and permissions for registry key HKEY_LOCAL_MACHINE\SOFTWARE\Microsoft\Windows\CurrentVersion\WINEVT\Publishers\{28aa95bb-d444-4719-

a36f-40462168127e}\ChannelReferences.
Successfully took ownership and permissions for registry key HKEY_LOCAL_MACHINE\SOFTWARE\Microsoft\Windows\CurrentVersion\WINEVT\Publishers\{28aa95bb-d444-4719-

a36f-40462168127e}\ChannelReferences\0.
Successfully took ownership and permissions for registry key HKEY_LOCAL_MACHINE\SOFTWARE\Microsoft\Windows\CurrentVersion\WINEVT\Publishers\{28aa95bb-d444-4719-

a36f-40462168127e}\ChannelReferences\1.
Successfully took ownership and permissions for registry key HKEY_LOCAL_MACHINE\SOFTWARE\Microsoft\Windows\CurrentVersion\WINEVT\Publishers\{28aa95bb-d444-4719-

a36f-40462168127e}\ChannelReferences\2.
Successfully took ownership and permissions for registry key HKEY_LOCAL_MACHINE\SOFTWARE\Microsoft\Windows\CurrentVersion\WINEVT\Publishers\{28aa95bb-d444-4719-

a36f-40462168127e}\ChannelReferences\3.

Successfully imported registry key HKEY_LOCAL_MACHINE\SOFTWARE\Microsoft\Windows\CurrentVersion\WINEVT\Publishers\{28aa95bb-d444-4719-a36f-40462168127e}.
Successfully imported registry key HKEY_LOCAL_MACHINE\SOFTWARE\Microsoft\Windows\CurrentVersion\WINEVT\Publishers\{28aa95bb-d444-4719-a36f-

40462168127e}\ChannelReferences.
Successfully imported registry key HKEY_LOCAL_MACHINE\SOFTWARE\Microsoft\Windows\CurrentVersion\WINEVT\Publishers\{28aa95bb-d444-4719-a36f-

40462168127e}\ChannelReferences\0.
Successfully imported registry key HKEY_LOCAL_MACHINE\SOFTWARE\Microsoft\Windows\CurrentVersion\WINEVT\Publishers\{28aa95bb-d444-4719-a36f-

40462168127e}\ChannelReferences\1.
Successfully imported registry key HKEY_LOCAL_MACHINE\SOFTWARE\Microsoft\Windows\CurrentVersion\WINEVT\Publishers\{28aa95bb-d444-4719-a36f-

40462168127e}\ChannelReferences\2.
Successfully imported registry key HKEY_LOCAL_MACHINE\SOFTWARE\Microsoft\Windows\CurrentVersion\WINEVT\Publishers\{28aa95bb-d444-4719-a36f-

40462168127e}\ChannelReferences\3.

Successfully restored ownership and permissions for registry key HKEY_LOCAL_MACHINE\SOFTWARE\Microsoft\Windows\CurrentVersion\WINEVT\Publishers\{28aa95bb-d444-4719

-a36f-40462168127e}.
Successfully restored ownership and permissions for registry key HKEY_LOCAL_MACHINE\SOFTWARE\Microsoft\Windows\CurrentVersion\WINEVT\Publishers\{28aa95bb-d444-4719

-a36f-40462168127e}\ChannelReferences.
Successfully restored ownership and permissions for registry key HKEY_LOCAL_MACHINE\SOFTWARE\Microsoft\Windows\CurrentVersion\WINEVT\Publishers\{28aa95bb-d444-4719

-a36f-40462168127e}\ChannelReferences\0.
Successfully restored ownership and permissions for registry key HKEY_LOCAL_MACHINE\SOFTWARE\Microsoft\Windows\CurrentVersion\WINEVT\Publishers\{28aa95bb-d444-4719

-a36f-40462168127e}\ChannelReferences\1.
Successfully restored ownership and permissions for registry key HKEY_LOCAL_MACHINE\SOFTWARE\Microsoft\Windows\CurrentVersion\WINEVT\Publishers\{28aa95bb-d444-4719

-a36f-40462168127e}\ChannelReferences\2.
Successfully restored ownership and permissions for registry key HKEY_LOCAL_MACHINE\SOFTWARE\Microsoft\Windows\CurrentVersion\WINEVT\Publishers\{28aa95bb-d444-4719

-a36f-40462168127e}\ChannelReferences\3.
RegistryScript:: directive completed successfully.


Successfully processed all directives.
SFCFix version 3.0.0.0 by niemiro has completed.
Currently storing 6 datablocks.
Finish time: 2018-12-19 10:53:20.306
Script hash: Gnn4zXfB+YmvFOn1PP3AwOe+AOfuwjlMW9oP51cXrCk=
----------------------EOF-----------------------
I’m now retrying the updates, will let you know ASAP!
-
-
#4
Thank you 1000 times and more!!!!!!!
Gianluca.
- Joined
- Oct 9, 2014
- Posts
- 741
Has Sysnative Forums helped you? Please consider donating to help us support the site!
-
Microsoft Support & Malware Removal
-
Windows Update