
Все обновления установлены, пробовал запускать Windows6.1-KB976932-X64.msu и из WU, результат один: после перезагрузки установка обрывается на 1% и запускается откат изменений.
Судя по логам, система ругается на отсутствующие компоненты драйверов ATI и NVIDIA, но карточки от ATI уже давно нет, а с драйвером NVIDIA всё в порядке.
Можно как-нибудь заставить забыть систему про эти файлы? SFC тоже на них ругается, но сделать ничего не может.
На технетовских форумах нашлось только одно «решение» — полностью переставить систему.
Логи прилагаются:
CBS.log
CheckSUR.log
WindowsUpdate.log
What is Error 0x800F0826?
Error 0x800F0826 is a kind of Runtime error that is found in the Microsoft Windows operating systems. The file can be found for Windows 7. Windows 7 Sp1 Install Error 0X800F0826 has a popularity rating of 1 / 10.
Errors
This tutorial contains information on Error 0x800F0826 or otherwise known as Windows 7 Sp1 Install Error 0X800F0826. Errors such as Windows 7 Sp1 Install Error 0X800F0826 indicate your machine has faulty hardware or software that should be fixed when possible. Below is information on how to repair Error 0x800F0826 and get your computer back to normal.
Signs of Error 0x800F0826:
- When your computer freezes or locks up at random.
- When your computer crashes when you are running Windows 7.
- If Windows 7 Sp1 Install Error 0X800F0826 pops up and causes a program to shutdown or your computer to crash.
- Your computer is running slow, taking a long time to boot up, and you suspect Error 0x800F0826 by Windows 7 is the cause.
What Causes Runtime Errors Like Error 0x800F0826?
There are several causes of runtime errors like Windows 7 Sp1 Install Error 0X800F0826, such as viruses, out of date drivers, missing files or folders, incomplete or poor installation, and registry errors. They can also occur due to an issue with the computer’s memory, which may often be due to a hardware problem. In some cases there was an issue installing Windows 7 and an error occurred.
How to Fix Windows 7 Sp1 Install Error 0X800F0826
Follow the step by step instructions below to fix the Error 0x800F0826 problem. We recommend you do each in order. If you wish to skip these steps because they are too time consuming or you are not a computer expert, see our easier solution below.
Step 1 — Uninstall and Reinstall Windows 7
If the Windows 7 Sp1 Install Error 0X800F0826 is a result of using Windows 7, you may want to try reinstalling it and see if the problem is fixed. Please follow these steps:
Windows XP
- Click “Start Menu”.
- Click “Control Panel”.
- Select the “Add or Remove” program icon.
- Find the Error 0x800F0826 associated program.
- Click the Change/Remove button on the right side.
- The uninstaller pop up will give you instructions. Click “okay” or “next” or “yes” until it is complete.
- Reinstall the software.
Windows 7 and Windows Vista
- Click “Start Menu”.
- Click “Control Panel”.
- Click “Uninstall a Program” which is under the “Programs” header.
- Find the Error 0x800F0826 associated program.
- Right click on it and select “Uninstall”.
- The uninstaller pop up will give you instructions. Click “okay” or “next” or “yes” until it is complete.
- Reinstall the software and run the program.
Windows 8, 8.1, and 10
- Click “Start Menu”.
- Click “Programs and Features”.
- Find the software that is linked to **insert file name**.
- Click Uninstall/Change.
- The uninstaller will pop up and give you instructions. Click “okay” and “next” until it is complete.
- Restart your computer.
- Reinstall the software and run the program.
Step 2 — Remove Registry Entry related to Error 0x800F0826
WARNING: Do NOT edit the Windows Registry unless you absolutely know what you are doing. You may end up causing more trouble than you start with. Proceed at your OWN RISK.
- Create a backup of registry files.
- Click “Start”.
- Type regedit, select it, and grant permission in order to proceed.
- Click HKEY LOCAL MACHINE>>SOFTWARE>>Microsoft>>Windows>>Current Version>>Uninstall.
- Find the Windows 7 Sp1 Install Error 0X800F0826 software from the list you wish to uninstall.
- Select the software and double click the UninstallString icon on the right side.
- Copy the highlighted text.
- Exit and go to the search field.
- Paste the data.
- Select Okay in order to uninstall the program.
- Reinstall the software.
Step 3 – Ensure Junk Isn’t Causing Windows 7 Sp1 Install Error 0X800F0826
Any space that isn’t regularly cleaned out tends to accumulate junk. Your personal computer is no exception. Constant web browsing, installation of applications, and even browser thumbnail caches slow down your device and in the absence of adequate memory, can also trigger a Windows 7 Sp1 Install Error 0X800F0826 error.
So how do you get around this problem?
- You can either use the Disk Cleanup Tool that comes baked into your Windows operating system.
- Or you can use a more specialized hard drive clean up solution that does a thorough job and flushes the most stubborn temporary files from your system.
Both solutions may take several minutes to complete the processing of your system data if you haven’t conducted a clean up in a while.
The browser caches are almost a lost cause because they tend to fill up quite rapidly, thanks to our constantly connected and on the go lifestyle.
Here’s how you can run the Window’s Disk Cleanup Tool, without performance issues or surprises.
- For Windows XP and Windows 7, the program can be ran from “Start” and from the “Command Prompt”.
- Click “Start”, go to All Programs > Accessories > System Tools, click Disk Cleanup. Next choose the type of files you wish to remove, click OK, followed by “Delete Files”.
- Open up the Command Prompt, type “c:\windows\cleanmgr.exe /d” for XP and “cleanmgr” for Windows 7. Finish by pressing “Enter”.
- For Windows 8 and Windows 8.1, the Disk Cleanup Tool can be accessed directly from “Settings”. Click “Control Panel” and then “Administrative Tools”. You can select the drive that you want to run the clean up on. Select the files you want to get rid of and then click “OK” and “Delete Files”.
- For Windows 10, the process is simplified further. Type Disk Cleanup directly in the search bar and press “Enter”. Choose the drive and then the files that you wish to wipe. Click “OK”, followed by “Delete Files”.
The progressive ease with which the Cleanup Tool can be used points to the growing importance of regularly deleting temporary files and its place in preventing Windows 7 Sp1 Install Error 0X800F0826.
PRO TIP:
Remember to run the Disk Cleanup as an administrator.
Step 4 – Fix Infections and Eliminate Malware in Your PC
How do you gauge if your system is infected with a malware and virus?
Well, for one, you may find certain applications misbehaving.
And you may also see the occurrence of Error 0x800F0826.
Infections and malware are the result of:
- Browsing the Internet using open or unencrypted public Wi-Fi connections
- Downloading applications from unknown and untrustworthy sources
- Intentional planting of viruses in your home and office networks
But thankfully, their impact can be contained.
- Enter “safe mode” by pressing the F8 key repeatedly when your device is restarting. Choose “Safe Mode with Networking” from the Advanced Boot Options menu.
- Back up all the data in your device to a secure location. This is preferably a storage unit that is not connected to your existing network.
- Leave program files as is. They are where the infection generally spreads from and may have been compromised.
- Run a thorough full-system scan or check of an on-demand scanner. If you already have an antivirus or anti-malware program installed, let it do the heavy lifting.
- Restart your computer once the process has run its course.
- Lastly, change all your passwords and update your drivers and operating system.
PRO TIP: Are you annoyed by the frequent updates to your antivirus program? Don’t be! These regular updates add new virus signatures to your software database for exponentially better protection.
Step 5 – Return to the Past to Eliminate Error 0x800F0826
The steps outlined up until this point in the tutorial should have fixed Windows 7 Sp1 Install Error 0X800F0826 error. But the process of tracking what has caused an error is a series of educated guesses. So in case the situation persists, move to Step 5.
Windows devices give users the ability to travel back in time and restore system settings to an uncorrupted, error free state.
This can be done through the convenient “System Restore” program. The best part of the process is the fact that using System Restore doesn’t affect your personal data. There is no need to take backups of new songs and pictures in your hard drive.
- Open “Control Panel” and click on “System & Security”.
- Choose the option “System”.
- To the left of the modal, click on “System Protection”.
- The System Properties window should pop-up. You’ll be able to see the option “System Restore”. Click on it.
- Go with “Recommended restore” for the path of least hassles and surprises.
- Choose a system restore point (by date) that will guarantee taking your device back to the time when Error 0x800F0826 hasn’t been triggered yet.
- Tap “Next” and wrap up by clicking “Finish”.
If you’re using Windows 7 OS, you can reach “System Restore” by following the path Start > All Programs > Accessories > System Tools.
Step 6 — Error 0x800F0826 Caused by Outdated Drivers
Updating a driver is not as common as updating your operating system or an application used to run front-end interface tasks.
Drivers are software snippets in charge of the different hardware units that keep your device functional.
So when you detect an Windows 7 Sp1 Install Error 0X800F0826 error, updating your drivers may be a good bet. But it is time consuming and shouldn’t be viewed as a quick fix.
Here’s the step-by-step process you can go through to update drivers for Windows 8, Windows 8.1 and Windows 10.
- Check the site of your hardware maker for the latest versions of all the drivers you need. Download and extract them. We strongly advice going with original drivers. In most cases, they are available for free on the vendor website. Installing an incompatible driver causes more problems than it can ever fix.
- Open “Device Manager” from the Control Panel.
- Go through the various hardware component groupings and choose the ones you would like to update.
- On Windows 10 and Windows 8, right-click on the icon of the hardware you would like to update and click “Update Driver”.
- On Windows 7 and Vista, you right-click the hardware icon, choose “Properties”, navigate to the Driver panel, and then click “Update Driver”.
- Next you can let your device automatically search for the most compatible drivers, or you can choose to update the drivers from the versions you have on your hard drive. If you have an installer disk, then the latter should be your preferred course of action. The former may often get the driver selection incorrect.
- You may need to navigate a host of warnings from the Windows OS as you finalize the driver update. These include “Windows can’t verify that the driver is compatible” and “Windows can’t verify the publisher of this driver”. If you know that you have the right one in line, click “Yes”.
- Restart the system and hopefully the Windows 7 Sp1 Install Error 0X800F0826 error should have been fixed.
Step 7 – Call the Windows System File Checker into Action
By now the Windows 7 Sp1 Install Error 0X800F0826 plaguing your device should have been fixed. But if you haven’t resolved the issue yet, you can explore the Windows File Checker option.
With the Windows File Checker, you can audit all the system files your device needs to operate, locate missing ones, and restore them.
Sound familiar? It is almost like “System Restore”, but not quite. The System Restore essentially takes you back in time to a supposedly perfect set up of system files. The File Checker is more exhaustive.
It identifies what is amiss and fills the gaps.
- First and foremost, open up an elevated command prompt.
- Next, if you are using Windows 8, 8.1 or 10, enter “DISM.exe /Online /Cleanup-image /Restorehealth” into the window and press Enter.
- The process of running the Deployment Image Servicing and Management (DISM) tool may take several minutes.
- Once it completes, type the following command into the prompt “sfc /scannow”.
- Your device will now go through all protected files and if it detects an anomaly, it will replace the compromised version with a cached version that resides at %WinDir%\System32\dllcache.
Step 8 – Is your RAM Corrupted? Find Out.
Is it possible? Can the memory sticks of your device trigger Error 0x800F0826?
It is unlikely – because the RAM chips have no moving parts and consume little power. But at this stage, if all else has failed, diagnosing your RAM may be a good move.
You can use the Windows Memory Diagnostics Tool to get the job done. Users who are on a Linux or Mac and are experiencing crashes can use memtest86.
- Open up your device and go straight to the “Control Panel”.
- Click on “Administrative Tools”.
- Choose “Windows Memory Diagnostic”.
- What this built-in option does is it burns an ISO image of your RAM and boots the computer from this image.
- The process takes a while to complete. Once it is done, the “Status” field at the bottom of the screen populates with the result of the diagnosis. If there are no issues with your RAM/memory, you’ll see “No problems have been detected”.
One drawback of the Windows Memory Diagnostic tool pertains to the number of passes it runs and the RAM segments it checks.
Memtest86 methodically goes over all the segments of your memory – irrespective of whether it is occupied or not.
But the Windows alternative only checks the occupied memory segments and may be ineffective in gauging the cause of the Windows 7 Sp1 Install Error 0X800F0826 error.
Step 9 – Is your Hard Drive Corrupted? Find Out.
Your RAM or working memory isn’t the only culprit that may precipitate an Windows 7 Sp1 Install Error 0X800F0826 error. The hard drive of your device also warrants close inspection.
The symptoms of hard drive error and corruption span:
- Frequent crashes and the Blue Screen of Death (BSoD).
- Performance issues like excessively slow responses.
- Errors like Error 0x800F0826.
Hard drives are definitely robust, but they don’t last forever.
There are three things that you can do to diagnose the health of your permanent memory.
- It is possible that your device may have a hard time reading your drive. This can be the cause of an Windows 7 Sp1 Install Error 0X800F0826 error. You should eliminate this possibility by connecting your drive to another device and checking for the recurrence of the issue. If nothing happens, your drive health is okay.
- Collect S.M.A.R.T data by using the WMIC (Windows Management Instrumentation Command-line) in the command prompt. To do this, simply type “wmic” into the command prompt and press Enter. Next follow it up with “diskdrive get status”. The S.M.A.R.T status reading is a reliable indicator of the longevity of your drive.
- Fix what’s corrupt. Let’s assume you do find that all isn’t well with your hard drive. Before you invest in an expensive replacement, using Check Disk or chkdsk is worth a shot.
- Open the command prompt. Make sure you are in Admin mode.
- Type “chkdsk C: /F /X /R” and press “Enter”. “C” here is the drive letter and “R” recovers data, if possible, from the bad sectors.
- Allow the system to restart if the prompt shows up.
- And you should be done.
These steps can lead to the resolution you’re seeking. Otherwise the Windows 7 Sp1 Install Error 0X800F0826 may appear again. If it does, move to Step 10.
Step 10 – Update Windows OS
Like the software applications you use to render specific tasks on your device, the Operating System also requires periodic updates.
Yes, we’ve all heard the troubling stories.
Devices often develop problems post unfinished updates that do not go through. But these OS updates include important security patches. Not having them applied to your system leaves it vulnerable to viruses and malware.
And may also trigger Error 0x800F0826.
So here’s how Windows 7, Windows 8, Windows 8.1 and Windows 10 users can check for the latest updates and push them through:
- Click the “Start” button on the lower left-hand corner of your device.
- Type “Updates” in the search bar. There should be a “Windows Update” or “Check for Updates” option, based on the OS version you’re using.
- Click it. The system will let you know if any updates are available.
- You have the convenience of choosing the components of the update you’d like to push through. Always prioritize the security updates.
- Click “OK” followed by “Install Updates”.
Step 11 – Refresh the OS to Eliminate Persistent Windows 7 Sp1 Install Error 0X800F0826 Error
“Windows Refresh” is a lifesaver.
For those of you who are still with us and nothing has worked to eliminate the Error 0x800F0826, until recently, a fresh install of Windows would have been the only option.
Not anymore.
The Windows Refresh is similar to reinstalling your Windows OS, but without touching your personal data. That’s hours of backup time saved in a jiffy.
Through the Refresh, all your system files become good as new. The only minor annoyance is the fact that any custom apps you’ve installed are gone and the system applications you had uninstalled are back.
Still, it is the best bet as the final step of this process.
- Enter the “Settings” of your PC and click on “Change Settings”.
- Click “Update and recovery” and then choose “Recovery”.
- Select “Keep my files”. This removes apps and settings, but lets your personal files live on.
- You’ll get some warning messages about the apps that will be uninstalled. If you’ve gone through a recent OS upgrade, the Refresh process makes it so that you can’t go back to your previous OS version – if you should ever feel the need to do it.
- Click the “Refresh” button.
Are you using an older version of Windows that doesn’t come with the power to “Refresh”?
Maybe it is time to start from scratch.
- Enter your BIOS set-up.
- This is where you need to change your computer’s boot order. Make it so that the boot happens not from the existing system files, but from the CD/DVD Drive.
- Place the original Windows disk in the CD/DVD drive.
- Turn on or restart the device.
- Choose where you’d like the system files to be installed.
- Your PC will restart several times as the process runs its course.
FAQ’s
Do Runtime Errors Mean I Have to Buy a New Computer?
No, you do not if you are battling errors like Windows 7 Sp1 Install Error 0X800F0826 and like Windows 7 Sp1 Install Error 0X800F0826. Runtime errors generally occur due to software issues and can be sorted out easily. In some cases, bad or aging hardware may be the cause, but such components can also be replaced. Hence, there’s usually no need to buy a new computer due to runtime errors.
Can I Edit the Windows Registry Myself?
The Windows Registry gives you full ownership and allows you to edit permissions so that you can make necessary changes onto it. Right clicking on each file can do the trick. This can be dangerous, however, if you don’t know what you are doing. In situations like this, a better option is to use a program that is specifically designed to solve Registry errors.
Will Removing Runtime Errors Like Error 0x800F0826 Improve My Start Up Speed?
Runtime errors have no impact on the start up speed since the error occurs while the program is running. It may, however, cause the OS to crash during or after start up. Correcting runtime errors will have no impact on the startup speed of the computer. It may just help you save time by reducing crashes and errors which may cause the computer to keep starting up.
Start Download Now
Author:
Curtis Hansen has been using, fiddling with, and repairing computers ever since he was a little kid. He contributes to this website to help others solve their computer issues without having to buy a new one.
This error usually prevents the successful installation of Windows 7 Service Pack (SP) 1. The system usually downloads and installs the Service Pack SP1 but reverts back to the previous version of the Windows because of this error. The error will be shown whether you install the Service Pack SP1 from the Windows Updates or from the Standalone Installer.
This error occurs because of tools like Driver Sweeper utility from Phyxion or DriverCleanerDotNet tool. Driver Sweeper Utility (or any other tool of that category) are used to remove the drivers from your Windows. These tools might also cause system file corruption which prevents your Windows to install Windows 7 SP1.
There are multiple ways to solve this problem. You can either reinstall the drivers using the same tools or you can perform a Windows Upgrade or you can simply use Windows Media to replace the drivers. Detailed steps for all these solutions are given below.
Quick Tips
- Make sure you have plenty of space in your HDD. You will see the error if the amount of space left in the HDD is less than the required space.
- Make sure there isn’t any antivirus on your system. Antiviruses are known to interfere with the Windows Updates. You don’t have to delete the antivirus, you can simply disable it for the time being. Once you are done with the update, you can enable the antivirus.
Method 1: Windows System Update Readiness tool
This tool is provided by Microsoft to check and solve any problems that you might have with your system files and system registries. It will give an error report at the end of the scan which will tell you about the problems it found and how many of those problems it solved.
Go here and download the Windows System Update Readiness tool if you have a 32-bit Windows
Go here and download the Windows System Update Readiness tool if you have a 64-bit Windows
Note: You can check whether your system is 32-bit or 64-bit by holding the Window Key and Pause button from the keyboard. A new window will appear where your system type will be mentioned under the System Type section.
Once you download the Windows System Update Readiness tool, run the downloaded file. Click Yes when it asks if you want to install the Software Update. It will take some time to install. The Windows System Update Readiness tool automatically scans and fixes any issues it might find during the installation so don’t have to do a manual scan. Once the installation is finished, close the window.
Now try to reinstall the Service Pack that was giving the error and check if the problem persists.
Sometimes the Windows Update Readiness tool might not be able to download and correct all the errors. The good thing is that you can manually download the corrupted files or packages to fix the errors. Follow the steps given below if you are comfortable in fixing the issues manually
The Microsoft’s Update Readiness Tool makes a log where you can find all the information about which package or file is corrupted or causing the issue
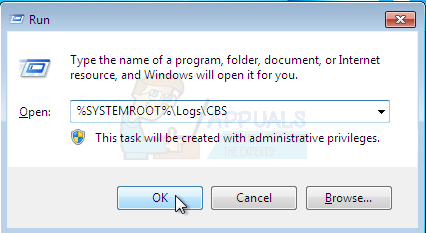
- Hold Windows key and press R
- Type %SYSTEMROOT%\Logs and press Enter

- This will open a folder in front of you. Locate and double click the folder named CBS
- Now open the log by double clicking it
- Scroll through it until u see something saying

Unavailable repair files:
servicing\packages\Package_for_KB958690_sc_0~31bf3856ad364e35~amd64~~6.0.1.6.mum
- You can see from the line that the Package name that wasn’t fixed is KB958690. You can manually download this package.
- Go here and enter the package name in the search bar located at the top right corner then click search.
- You will be able to see the package available in different versions. Click on the Download button for the version suitable for your Windows

- A new window will open. Click on the link given there.

- Click ok if it asks to confirm the download
- Once the file is downloaded, go to the location where you downloaded the package
- Right click the downloaded file and click Copy
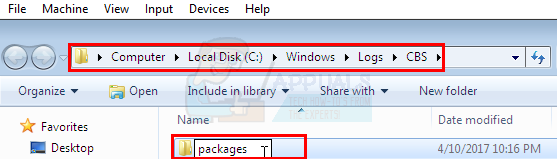
- Hold Windows key and press R
- Type %SYSTEMROOT%\Logs\CBS and press Enter

- Right click in the window and select New then click Folder
- Name this folder packages

- Now double click packages
- Right click and select Paste


Now you have manually downloaded the missing or corrupted file/package. Repeat the above process to download all the not-fixed files found in the CheckSUR.log. Once you are done, rerun the Windows Update Readiness Tool and then check if the Windows Update problem is solved or not.
Method 2: Recover the Deleted Drivers
Since the problem is mainly caused because of the Driver Cleaning tool that you used in the past, using the same tool to recover those drivers solves the problem. Usually, these driver cleaning tools will have a backup copy that you can use to restore your drivers.
So go to the official site of the driver cleaning tool that you used and look for the information regarding restoring the deleted drivers. You can use their site, search their forums or contact them to get this information.
Once you restore the drivers, try to install the Service Pack again and the problem should be solved.
If, for some reason, you can’t recover the deleted drivers, you can always download the fresh copy of those drivers from their official site.
Method 3: DISM
DISM stands for Deployment Image Servicing and Management and can be used to fix any errors in System files and registries. Basically this tool will either use online files to repair the corrupted files or can use a mounted image of the Windows to repair the corrupted files. This tool comes pre-loaded in the Windows so you don’t have to worry about downloading it.
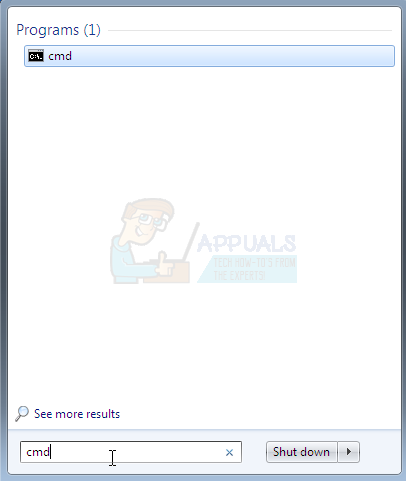
- Click Start button on your Desktop
- Type cmd in the Start Search box

- Once the cmd appears in the results press CTRL, SHIFT and ENTER simultaneously (CTRL + SHIFT + ENTER)
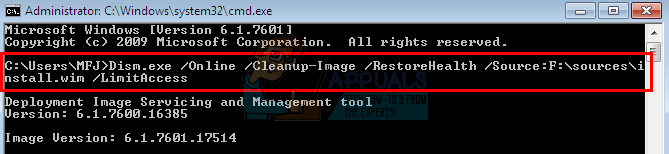
- Type dism.exe /Online /Cleanup-image /Restorehealth and press Enter. This command will try to use Windows update to restore corrupted files. But if your update client is already broken then this won’t work. Try the next step
- Insert your Windows Installation Media USB or CD/DVD
- Type dism.exe /Online /Cleanup-Image /RestoreHealth /Source:C:\sources\install.wim /LimitAccess and press Enter. Replace “C:” with the drive letter of your mounted image.

- Wait for it to complete as it might take 15-20 minutes
- Once it is done. Type sfc /scannow and press Enter. Wait for it to complete as well.
Now check whether or not the Update is working.
Method 3: Using Windows Installation Media (Check this because I couldn’t check it on my ISOs)
If you have access to Windows Installation media then you can use that to replace the files that are causing this issue.
- Make sure all the applications are closed
- Insert the Windows Installation media in your computer
- Locate the files given below in your Windows ISO folder
(x86 versions)
x86_atiilhag.inf.resources_31bf3856ad364e35_6.1.7600.16385_en-us_4c2c9aec5f3d44b5
x86_atiilhag.inf_31bf3856ad364e35_6.1.7600.16385_none_a574bbd4a69c292d
(amd64 versions)
amd64_atiilhag.inf_31bf3856ad364e35_6.1.7600.16385_none_019357585ef99a63
amd64_atiilhag.inf.resources_31bf3856ad364e35_6.1.7600.16385_en-us_a84b3670179ab5eb
- Right click on the files and select Copy
- Hold Windows key and press R
- Type %SYSTEMROOT%\winsxs and press Enter
- Right click (on empty place in the window) and select Paste
- Click yes if it asks to overwrite the files that are already present in that folder
Once you are finished, try to update the Windows again and it should be working now.
Method 4: In-Place Upgrade
Performing an In-Place Upgrade of your windows will also solve the problem. Follow the steps given below to perform an In-Place Upgrade
- Make sure all the applications are closed
- Insert the Windows Installation Media or DVD/CD
- A Setup Window should appear. Select Install Now. If the Setup Windows didn’t open, then perform the following steps
- Hold Windows Key and press E
- Open the drive of your Windows Installation Media
- Double click the Setup.exe
- Now click Install Now
- Click Go online to obtain the latest updates for installation (recommended)
- Type the Windows Product key if it asks
- Select your Operating System (Windows 7) in the Windows page
- Select Yes to Accept the license and terms
- Click Upgrade when it asks for Which type of installation do you want?
Wait for the installation to complete. Once it is finished, restart your computer.
Kevin Arrows
Kevin Arrows is a highly experienced and knowledgeable technology specialist with over a decade of industry experience. He holds a Microsoft Certified Technology Specialist (MCTS) certification and has a deep passion for staying up-to-date on the latest tech developments. Kevin has written extensively on a wide range of tech-related topics, showcasing his expertise and knowledge in areas such as software development, cybersecurity, and cloud computing. His contributions to the tech field have been widely recognized and respected by his peers, and he is highly regarded for his ability to explain complex technical concepts in a clear and concise manner.
Время от времени системные администраторы сталкиваются с ошибками при обновлении системы. Хорошо если не удалось установить какое либо незначительное обновление, но как быть, если не удается установить критическое обновление или нарушились важные функции системы? Сегодня мы на практическом примере рассмотрим как действовать в подобной ситуации.
Онлайн-курс по устройству компьютерных сетей
На углубленном курсе «Архитектура современных компьютерных сетей» вы с нуля научитесь работать с Wireshark и «под микроскопом» изучите работу сетевых протоколов. На протяжении курса надо будет выполнить более пятидесяти лабораторных работ в Wireshark.
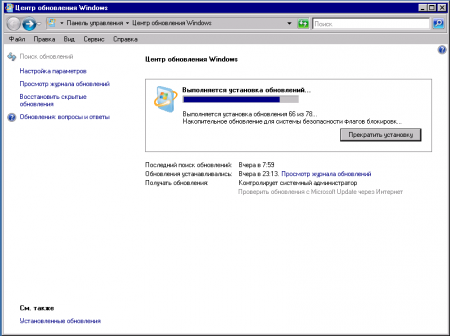
Изучая отчеты сервера WSUS одного из обслуживаемых нами предприятий мы обнаружили, что один из серверов уже продолжительное время не устанавливает обновления. Количество установок, завершившихся с ошибкой, перевалило за шесть десятков, что говорило о серьезном сбое в системе Windows Update.
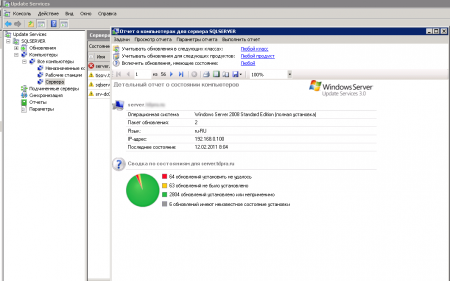
Для диагностики проблемы мы обратились к Журналу обновлений, в котором можно просмотреть подробности установки каждого обновления или получить код ошибки в случае отказа.
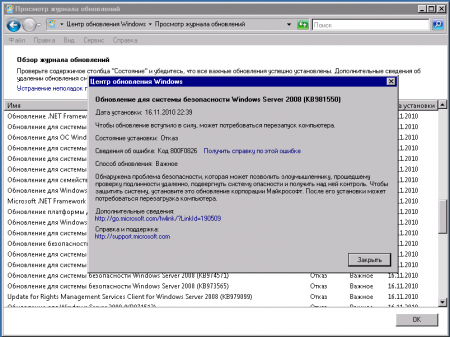
Отправной точкой для дальнейших действий должен послужить код ошибки, в данном случае 800F0826. Идем на сайт Microsoft и производим поиск по данному коду. Уже первые результаты дают нам исчерпывающую информацию об ошибке:
Ошибка Центра обновления Windows 800f0826 возникает в случае, если обновление для Windows, которое не удалось установить, препятствует установке дополнительных обновлений. В сообщении об ошибке 800f0826 не указывается обновление, вызвавшее проблему. Обновление, которое вызвало проблему, отобразит другое сообщение об ошибке.
Становится понятно, что причиной отказа в установке данного обновления (и других с этим кодом ошибки) стало третье обновление, которое должно иметь иной код ошибки. Дальнейший поиск по журналу позволил быстро выявить виновника произошедшего.
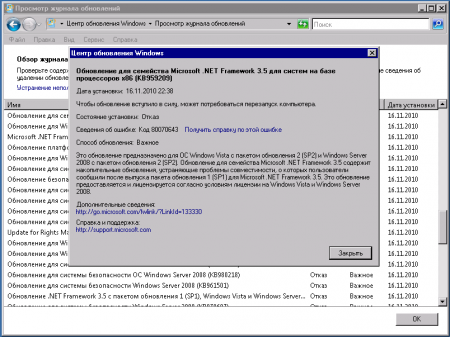
Поиск по коду ошибки 80070643 дал нам следующий результат:
Ошибка Центра обновления Windows 80070643 может возникать по ряду причин. Самой распространенной из них является проблема с платформой .NET Framework, установленной на компьютере. Кроме того, эта ошибка может возникнуть при установке обновлений для пакета Microsoft Office 2003.
Очевидно, проблему вызвало очередное обновление .NET Framework, переходим по ссылке в статье, на описание ошибки для этого продукта.
Чтобы устранить эту проблему, необходимо устранить повреждение регистрацию обновлений программного обеспечения MSI или удалить несколько версий .NET Framework с помощью средства очистки платформы .NET Framework и повторно установить эти компоненты.
Скачиваем средство очистки платформы .NET Framework (скачать) и удаляем из системы .NET Framework 3.5.
После чего качаем web-установщик и устанавливаем .NET Framework 3.5 SP1 заново.
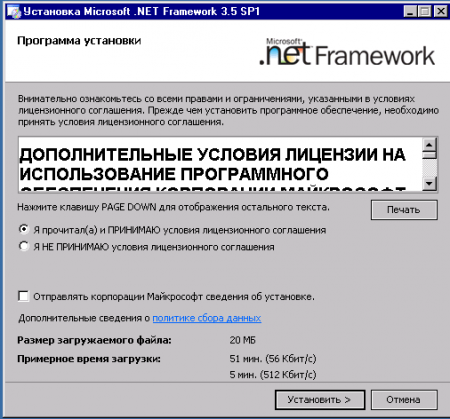
Успешно установив данный пакет, пробуем повторно обновить систему.
Перезагружаемся и убеждаемся что все установилось правильно. Несмотря на то, что в данной статье мы разобрали частный случай, методика диагностики и устранения неисправностей остается неизменной. База данных Майкрософт содержит исчерпывающие данные практически по всем кодам ошибок, которых вполне достаточно для успешного устранения большинства возникающих проблем.
Онлайн-курс по устройству компьютерных сетей
На углубленном курсе «Архитектура современных компьютерных сетей» вы с нуля научитесь работать с Wireshark и «под микроскопом» изучите работу сетевых протоколов. На протяжении курса надо будет выполнить более пятидесяти лабораторных работ в Wireshark.
Компьютерный форум
Операционные системы
Критические ошибки Windows — BSOD и Event ID
|
|
| Модератор форума: Drinko |
| Компьютерный форум » Операционные системы » Критические ошибки Windows — BSOD и Event ID » Windows 7 SP1 — Ошибка обновления 0x800f0826 |
|
Windows 7 SP1 — Ошибка обновления 0x800f0826 |
|||||
|
|||||
|
|||||
|
|
||
|
||
|
Поиск: |
В связи с введением в действие Постановления Правительства Российской Федерации от 14.11.2023 № 1905 т.н. «о запрете популяризации VPN» с 1 марта 2024 года — любое обсуждение способов обхода блокировок и VPN на портале запрещено!
| Windows 11 |
|
| Windows 10 |
|
| Windows 8.1 |
|
| Популярное |
|
| Опрос |
|
Нравятся ли вам изменения произошедшие в Windows 10? Да Нет Серьезных изменений не увидел Результаты · Архив опросов Всего ответов: 8526 |