
Все способы:
- Способ 1: Встроенное средство устранения неполадок
- Способ 2: Восстановление целостности системных файлов
- Способ 3: Устранение конфликта ПО
- Способ 4: Сброс настроек «Центра обновления»
- Способ 5: Установка обновления вручную
- Способ 6: Перезапуск Microsoft Store
- Способ 7: Отключение / удаление стороннего антивируса
- Вопросы и ответы: 0
Ошибка с кодом 0x80070426 в Windows 10 может появляться при попытке установки апдейтов как с помощью «Центра обновления», так и в фирменном магазине Microsoft Store. Как правило, решения проблемы схожи, поэтому разберем и универсальные варианты, и те, которые подойдут для конкретного типа неполадки.
Способ 1: Встроенное средство устранения неполадок
Для начала попробуйте воспользоваться встроенными решениями ОС, которые могут помочь исправить возникшую ситуацию.
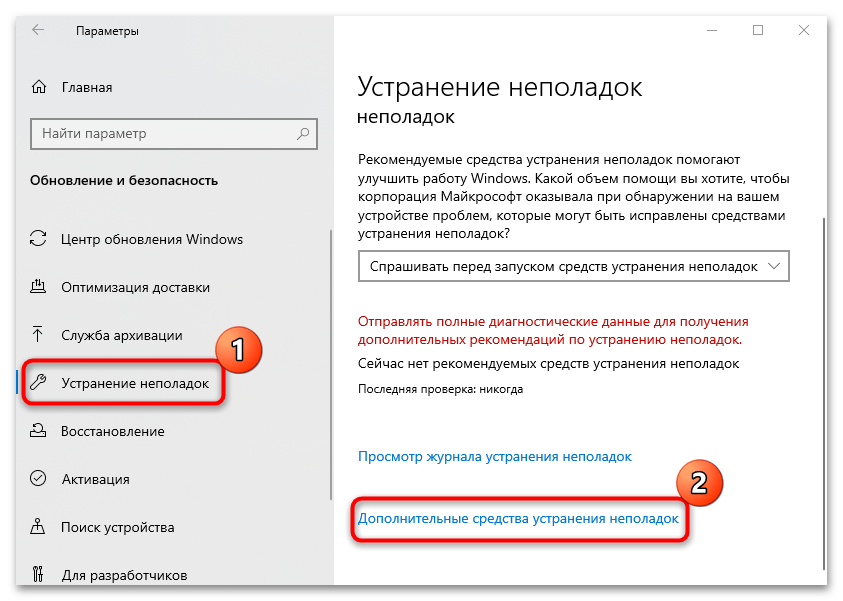
- Нажмите на кнопку «Пуск» и запустите приложение «Параметры».
- Перейдите в раздел «Обновление и безопасность».
- Далее щелкните по вкладке «Устранение неполадок», расположенной на панели слева, потом по строке «Дополнительные средства устранения неполадок».
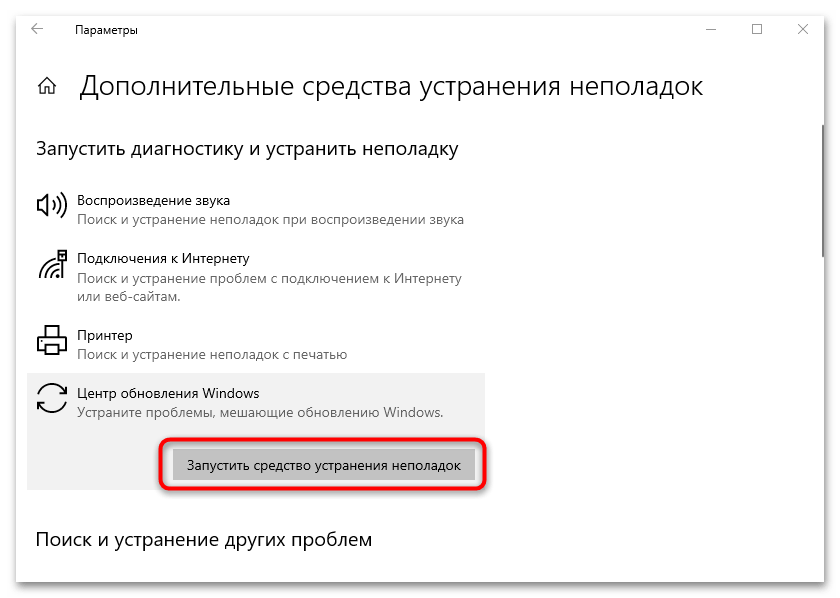
- Выберите строку «Центр обновления Windows» и кликните по кнопке запуска средства. Дождитесь, когда будет завершено сканирование системы на наличие проблем, связанных с компонентом. Если таковые найдутся, будут предложены пути решения.

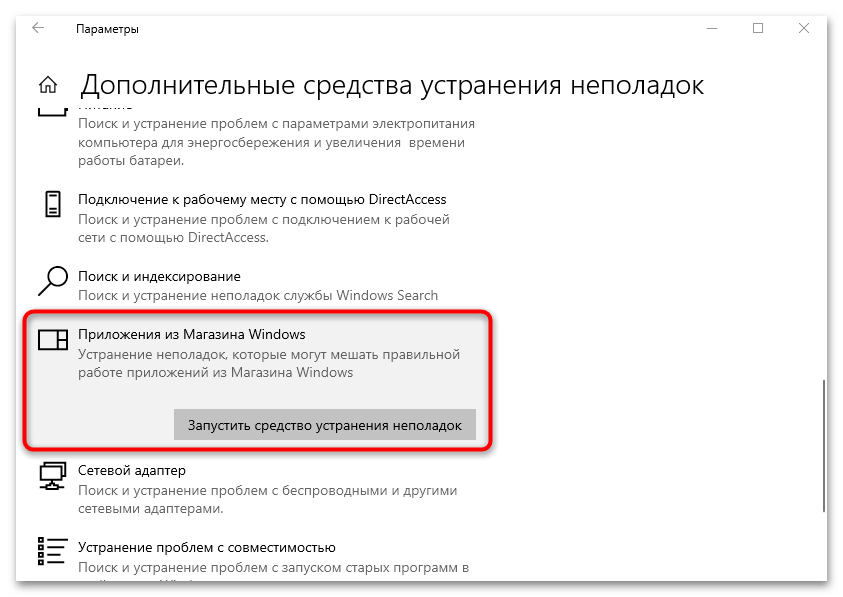
То же самое можете проделать с «Приложения из Магазина Windows». Средство проверит не только установленный софт, но и сам магазин приложений.
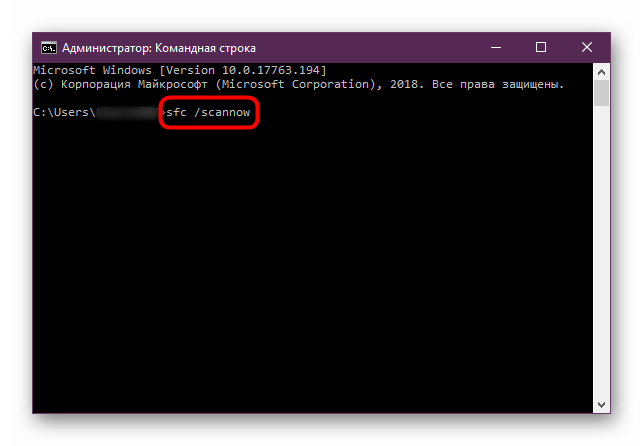
Способ 2: Восстановление целостности системных файлов
Следующее решение также является универсальным. Оно предполагает использование штатных утилит для проверки поврежденных системных файлов и их хранилища, которые также могут вызывать различные ошибки при попытке обновления, в том числе и под кодом 0x80070426. Попробуйте применить данные средства, ознакомившись с нашим подробным руководством по ссылке ниже.
Подробнее: Использование и восстановление проверки целостности системных файлов в Windows 10
Способ 3: Устранение конфликта ПО
Данная ошибка также появляется при конфликте программного обеспечения. В этом случае вы можете попробовать запустить систему в «Безопасном режиме», то есть без сторонних служб и приложений, открывающихся автоматически вместе с включением Windows. Этот метод позволит вам убедиться или опровергнуть, что проблема заключается именно в стороннем программном обеспечении, но вряд ли сможет помочь указать на конкретную программу – ее вам придется искать самостоятельно, удаляя подозрительный софт.
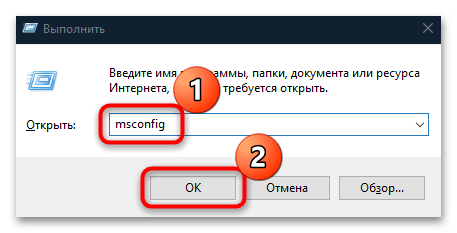
- Через диалоговое окно «Выполнить» («Win + R») и команду
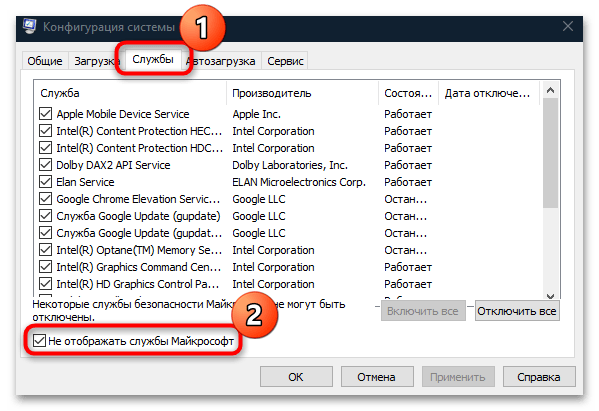
msconfigзапустите утилиту «Конфигурация системы», нажав на кнопку «ОК». - В открывшемся окне перейдите на вкладку «Службы» и отметьте пункт «Не отображать службы Майкрософт».
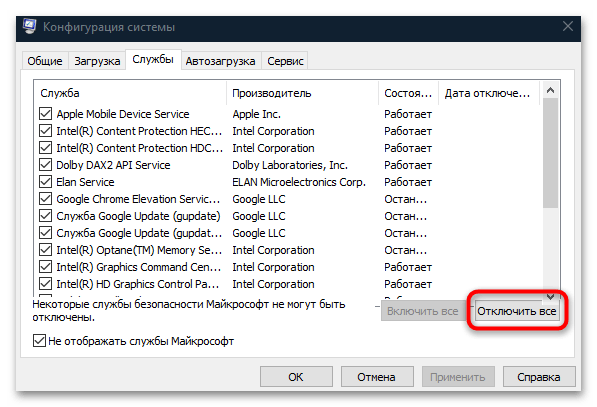
- Нажмите на кнопку «Отключить все». Примените настройки, кликнув по соответствующей кнопке.
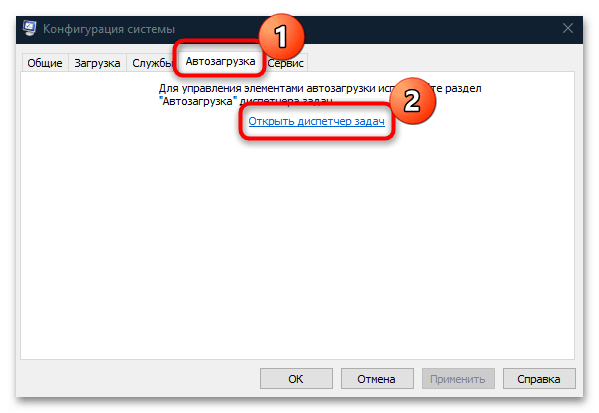
- Далее нужно убрать все сторонние программы из автозагрузки системы. Перейдите на вкладку «Автозагрузка», затем, нажав на ссылку, откройте «Диспетчер задач».
- Поочередно отключите все элементы, которые активны на данный момент.
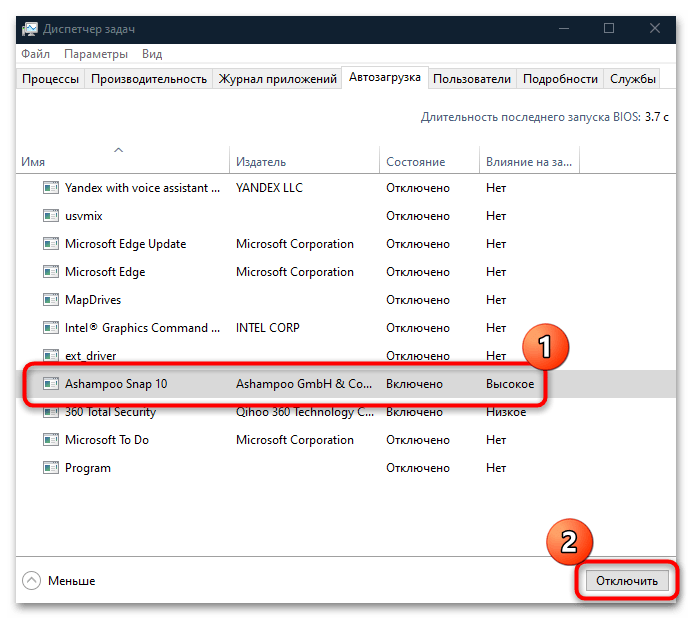
После этого можно закрывать «Диспетчер задач». Перезагрузите систему и попытайтесь снова установить обновления. Если ошибки не возникло, значит, все дело в программном обеспечении, которое конфликтует с системными действиями.
Не обязательно удалять приложения, которые вы устанавливали. Можно либо путем перебора (постепенного включения их работы) выявить проблемное и избавиться от него, либо производить обновления в «Безопасном режиме» в последующем. Также удачно установившееся обновление могло исправить причину, из-за которой происходит конфликт и, соответственно, ошибка 0x80070426.
Способ 4: Сброс настроек «Центра обновления»
Если предыдущие методы не помогли, попробуйте остановить все процессы, которые отвечают за установку обновлений, затем пересоздать папки, куда сохраняются их файлы, и вновь запустить необходимые для работы «Центра обновления» службы. По сути, произойдет сброс настроек программных компонентов. Проще всего сделать это с помощью консольных команд:
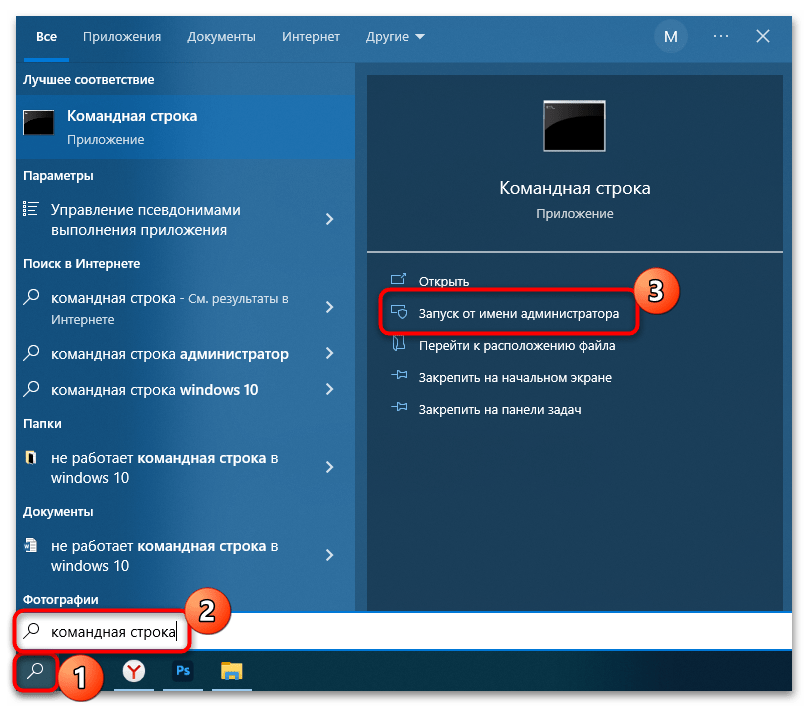
- Запустите «Командную строку» с расширенными правами. Для этого воспользуйтесь строкой системного поиска, введя соответствующий запрос (или
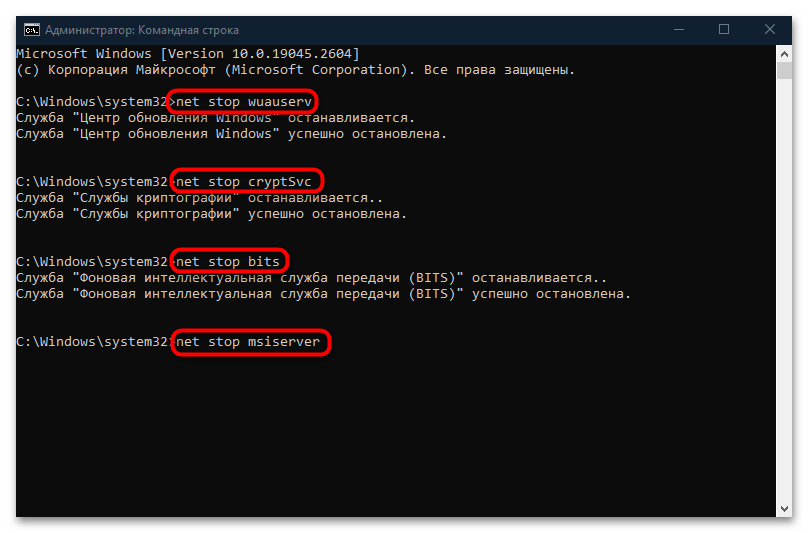
cmd), и выберите пункт «Запуск от имени администратора». - Поочередно введите и выполните нажатием на клавишу «Enter» 4 команды, которые позволят быстро остановить работу «Центра обновлений», а также связанных с ним служб:
net stop wuauserv
net stop bits
net stop cryptSvc
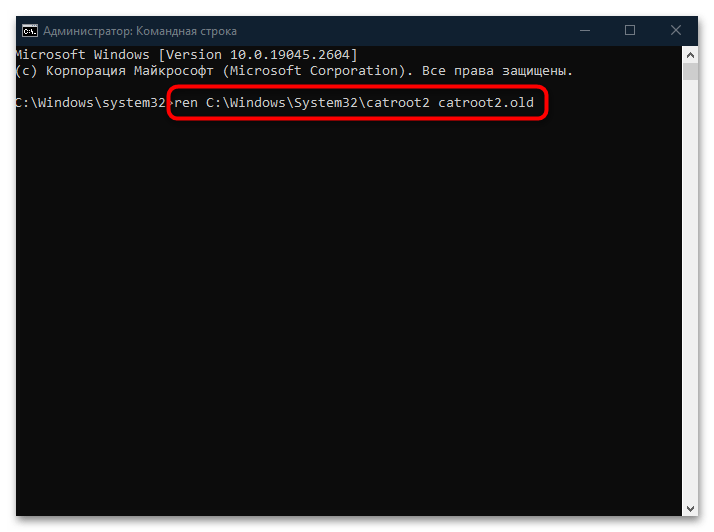
net stop msiserver - Следующим этапом будет переименование папок с обновлениями, которые находятся на локальном системном диске. В результате после попытки обновления новые каталоги будут созданы автоматически и, если ошибка исчезнет, переименованные можно будет удалить, перейдя по их расположению в «Проводнике» Windows. Выполните еще две команды, нажимая после каждой на клавишу ввода:
ren C:\Windows\SoftwareDistribution SoftwareDistribution.old
ren C:\Windows\System32\catroot2 catroot2.old - Останется запустить все остановленные процессы, выполнив следующие команды:
net start wuauserv
net start bits
net start cryptSvc
net start msiserver
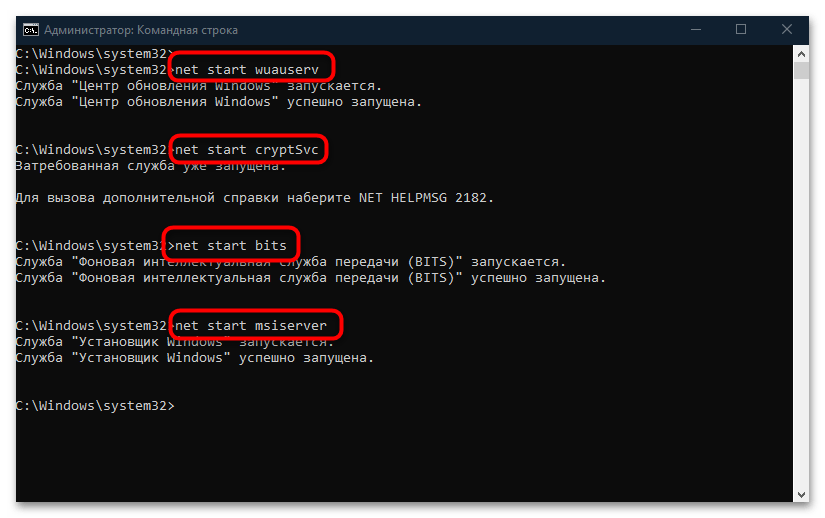
После можете закрыть консоль и попытаться вновь выполнить обновление системы.
Способ 5: Установка обновления вручную
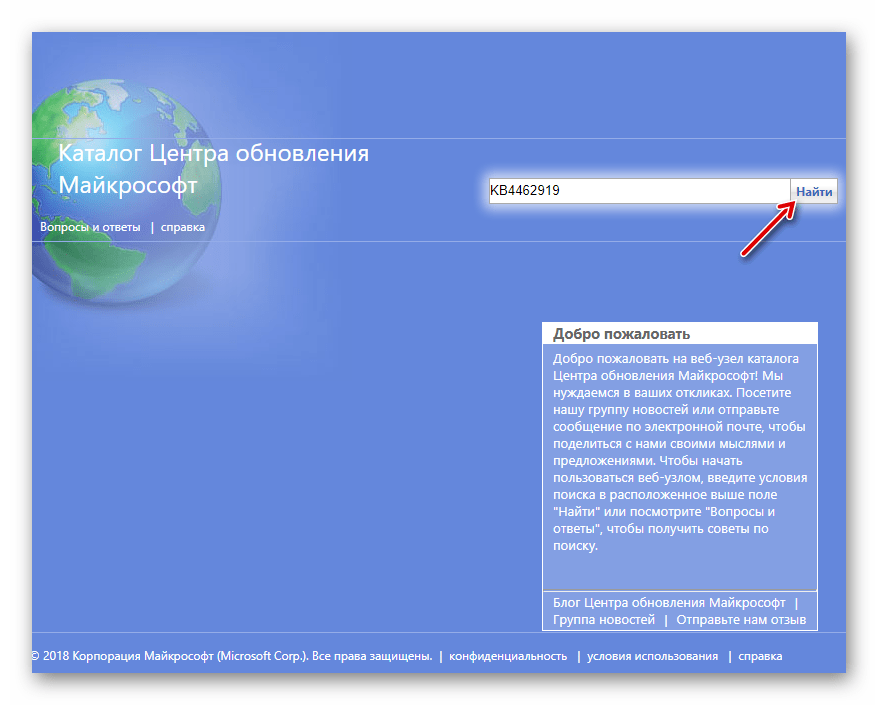
Если вы точно знаете, с каким патчем происходит рассматриваемая в статье ошибка, то одним из решений может стать ручное обновление Windows 10. Достаточно отыскать проблемный апдейт на официальном сайте компании Microsoft, скачать его и выполнить инсталляцию самостоятельно, о чем наш автор более подробно писал в отдельном руководстве.
Подробнее: Устанавливаем обновления для Windows 10 вручную
В определенных ситуациях помогает использование выпущенного компанией Майкрософт помощника по обновлению. Это приложение автоматически определяет, вышла ли новая версия системы, и если да, то предлагает скачать и установить ее в обход «Центра обновления Windows». Такой метод иногда помогает разрешить некоторые неполадки, возникающие при классических попытках установить апдейты.
Скачать Update Assistant с официального сайта
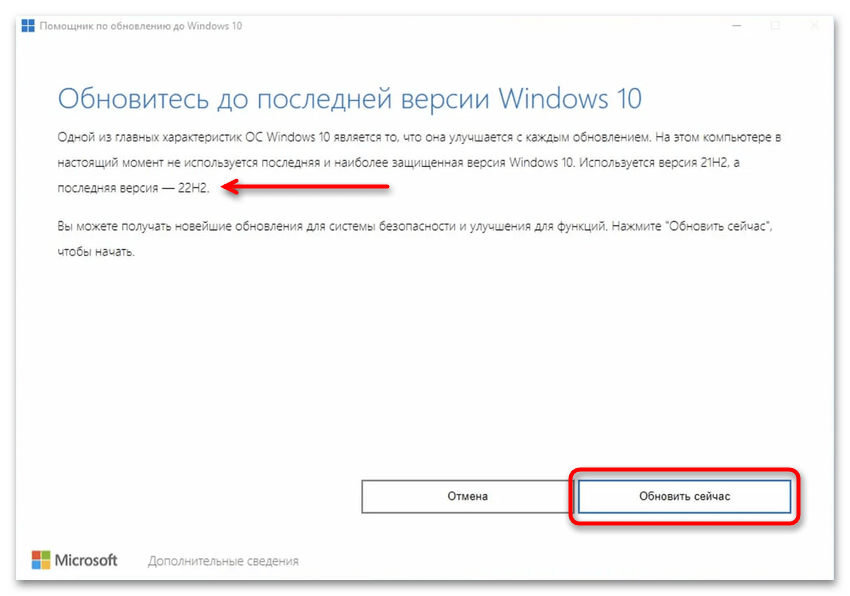
Вам достаточно скачать утилиту с сайта Microsoft, запустить ее и убедиться в выходе новой версии операционки. Затем можно запускать процедуру перехода на нее, а Update Assistant поможет сделать это без особого труда. Все пошаговые инструкции вы найдете в самой программе.
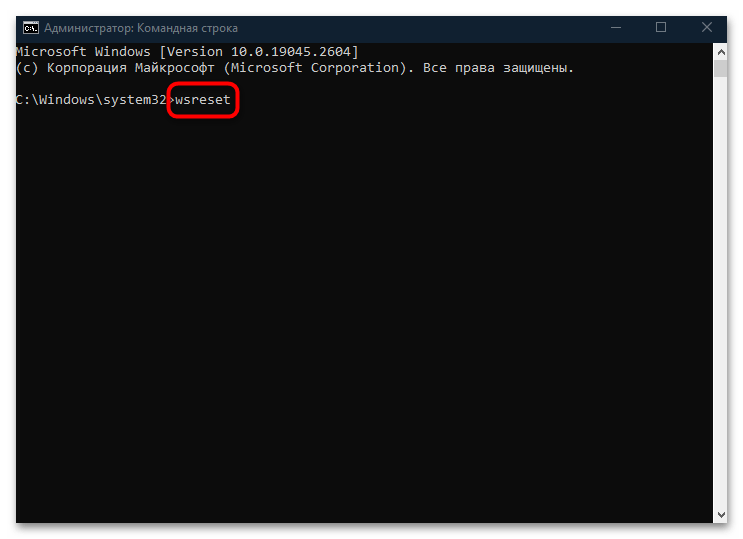
Способ 6: Перезапуск Microsoft Store
Если ошибка с кодом 0x80070426 в Windows 10 препятствует попыткам обновить фирменный магазин Microsoft Store или приложения из него, то попробуйте следующее решение, которое предполагает перезапуск магазина. Наиболее простой вариант – это специальная консольная команда. Достаточно запустить «Командную строку» от имени администратора (посмотрите, как это сделать в Способе 4), вставить wsreset и нажать на клавишу «Enter».
Аналогичное действие можно выполнить и в консоли «Windows PowerShell». Щелкните правой кнопкой мыши по кнопке «Пуск», затем выберите пункт «Windows PowerShell (Администратор)».
В открывшемся окне консоли введите и выполните поочередно команды:
Get-AppxPackage *windowsstore* | Remove-AppxPackage
Get-AppxPackage -allusers Microsoft.WindowsStore | Foreach {Add-AppxPackage -DisableDevelopmentMode -Register "$($_.InstallLocation)\AppXManifest.xml"}
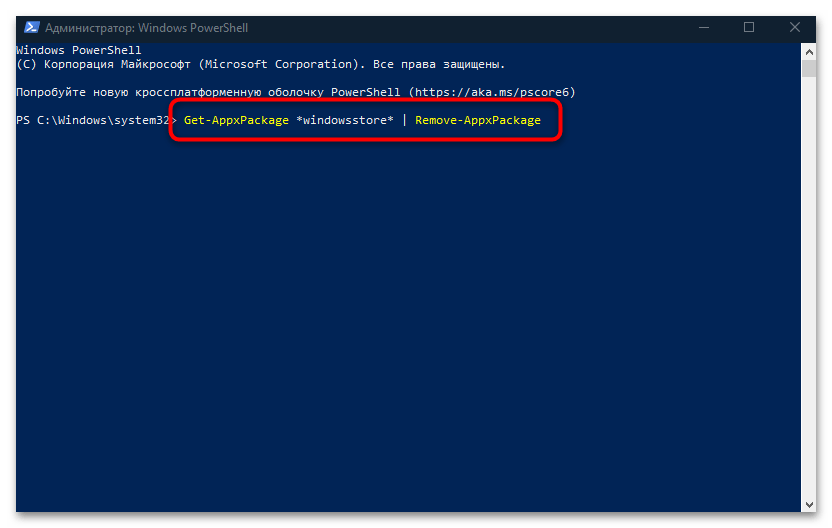
После чего произойдет переустановка, а точнее – перезапуск магазина приложений Microsoft Store, который может помочь решить рассматриваемую проблему.
Способ 7: Отключение / удаление стороннего антивируса
Встречаются случаи, когда антивирус от сторонних разработчиков препятствует установке необходимых для Виндовс 10 обновлений. Вероятно, такой софт считает подобные действия подозрительными и блокирует их. Чтобы проверить это, можете приостановить работу антивирусной программы. Делается это либо через раздел с настройками, либо через иконку в системном трее. Мы уже описывали алгоритм действий с наиболее популярными антивирусными продуктами.
Подробнее: Отключение антивируса

Если окажется так, что проблема была в антивирусном софте, то можете удалить его, затем установить аналогичное решение, которое не будет препятствовать системным процессам и блокировать нормальную работу ОС.
Читайте также: Удаление антивируса с компьютера
Наша группа в TelegramПолезные советы и помощь
Table of contents
- What is the Error Code 0x80070426?
- Solution 1: Running an SFC Scan
- Solution 2: Checking if there are Software Conflicts
- Solution 3: Running the Windows Update Troubleshooter
- Solution 4: Resetting the Windows Update Components
- Solution 5: Setting the Windows Update Services to Start Automatically
- Solution 6: Updating Your Device Drivers
When it comes to upgrading from an older version of the Windows operating system to Windows 10, Windows Defender takes the place of Microsoft Security Essentials, the previous built-in security tool. It is worth noting that a small percentage of all Windows 10 upgrades encounter issues. In some cases, users reported that Windows Defender had failed to start. The problem is usually accompanied by the Error Code 0x80070426.
If you are one of the few unlucky victims of this bug, do not despair yet because we’ve got you covered. In this post, we are going to share how to fix the Error 0x80070426 on Windows 10. Of course, we also want to free you from this curse forever. So, to prevent it from happening again, we will also discuss what causes the Windows Error Code 0x80070426.
What is the Error Code 0x80070426?
You may have noticed that when you upgraded to Windows 10, Windows Defender failed to replace Microsoft Security Essentials. Basically, the two antivirus programs are running on the new operating system.
Perhaps, you tried launching Windows Defender, but it failed to start. As such, you turned to Microsoft Security Essentials. However, when you opened it, you noticed that the Virus Protection and Spyware & Unwanted Software Protection features were disabled. So, you tried to switch them on. Unfortunately, a Microsoft Security Client dialog with the following error message showed up:
“An error has occurred in program initialization. If this problem continues, contact your System Administrator. Error Code: 0x80070426.”
To get rid of the Windows Defender Error 80070426, you need to uninstall Microsoft Security Essentials first. Once you’ve done that, you can follow our solutions below to get Windows Defender up and running.
Solution 1: Running an SFC Scan
It is likely that this error occurred during the upgrade process due to some problematic Windows system files in your computer. To determine if this is true, we recommend performing an SFC scan. Here are the steps:
- Go to your taskbar, then click the Search icon.
- Now, input
cmd. - From the results, right-click Command Prompt, then select Run as Administrator.
- Once Command Prompt is up, run the command below:
dism.exe /online /cleanup-image /restorehealth
Note
If the error code appeared while you were upgrading, then instead of running the command above, you need to use your Windows installation media. After that, you must paste the text below on Command Prompt:
dism.exe /online /cleanup-image /restorehealth /source:[DRIVE]:\sources\sxs /limitaccess
Do not forget to replace [DRIVE] with the drive letter for your Windows installation media.
- Now, you need to wait for a couple of minutes for the process to complete. Once it is done, you can proceed to the next step.
- Type
sfc /scannowin Command Prompt, then hitEnter. - The scan process will take several minutes. Once it is complete, you can restart your computer.
Solution 2: Checking if there are Software Conflicts
As we’ve mentioned, the Error Code 80070426 occurs due to software conflicts. So, to ensure that no other program will interfere with Windows Defender, you must perform a clean boot. Doing so will allow you to launch your operating system with only the essential programs, services, and drivers. This process will help you determine if there are other items coming in conflict with Windows Defender. Once you’re ready, just follow the instructions below:
- Launch the Run dialog box by pressing
Windows Key+Ron your keyboard. - Once the Run dialog box is up, input
msconfig, then hitEnter. - Go to the Services tab, then make sure that the ‘Hide all Microsoft services’ option is selected.
- Now, click the Disable All button.
- Click OK.
- The next step is to go to the Startup tab. Once you are there, click the Open Task Manager link.
- Right-click all the startup items one by one, selecting Disable from the options.
- After disabling the startup items, exit Task Manager.
- Click OK and Restart.
After restarting your computer, check if the Error Code 0x80070426 is still there when you launch Windows Defender. If it isn’t, then you need to go back to the System Configuration window and enable a startup item. After that, restart your PC to see if the error is gone. Keep in mind that you need to perform this process for all the startup items until the Error Code 0x80070426 shows up again. Once you identify the culprit, you can disable it or remove it completely from your computer.
PRO TIP
If you want optimum protection for your PC without the hassle of dealing with the Error Code 0x80070426, we suggest that you install Auslogics Anti-Malware. This software program can detect malicious items and threats no matter how discreetly they run in the background. Moreover, it can catch viruses and malware that Windows Defender may miss. As a certified Microsoft Silver Application Developer, Auslogics made sure that this tool will not conflict with your main antivirus.
Solution 3: Running the Windows Update Troubleshooter
As we’ve mentioned, the issue usually occurs because of problems during the upgrade process. So, to get rid of the Windows Defender Error 0x80070426, it is best that you run the built-in troubleshooter for updates. To do that, you need to follow the steps below:
- On your keyboard, press
Windows Key+I. Doing so will launch the Settings app. - Once the Settings app is open, click Update & Security.
- Now, go to the left-pane menu, then select Troubleshoot.
- Go to the right pane, then click Windows Update.
- Click the Run the Troubleshooter button.
- Follow the instructions on the troubleshooter to resolve the update issues.
Solution 4: Resetting the Windows Update Components
It is possible that some components of the updates were corrupted, prompting the Error 0x80070426 to appear. To resolve this problem, you simply need to reset all the services, folders, and files associated with Windows Update. Here are the instructions:
- You need to run Command Prompt as an administrator. To do that, you can press
Windows Key+Son your keyboard, then typecmd. - Right-click Command Prompt from the results, then select Run as Administrator.
- Once Command Prompt is up, paste the lines below. Remember to input them one by one, pressing
Enteron your keyboard after every command line.
net stop bits

net stop wuauserv

net stop appidsvc

net stop cryptsvc
- Run the commands below, pressing
Enteron your keyboard after every line:
ren %systemroot%\softwaredistribution softwaredistribution.old

ren %systemroot%\system32\catroot2 catroot2.old
- You need to restart the services you disabled. So, you must type the commands below, pressing
Enteron your keyboard after every line.
net start bits

net start wuauserv

net start appidsvc

net start cryptsvc
- Try installing the updates again, then check if you can launch Windows Defender without any issues.
Solution 5: Setting the Windows Update Services to Start Automatically
It is possible that the Windows Update services were not configured to start automatically, causing issues during the upgrade process. To fix this, you just have to follow the instructions below:
- Right-click the Windows icon on your taskbar.
- Select Command Prompt (Admin) or Windows PowerShell (Admin) from the list.
- Once Command Prompt or Windows PowerShell is up, run these commands:
SC config bits start= auto

SC config cryptsvc start= auto

SC config trustedinstaller start= auto

SC config wuauserv start= auto
Note
Remember to press Enter on your keyboard after every line.
- Exit Command Prompt or Windows PowerShell, then restart your computer.
Solution 6: Updating Your Device Drivers
There can be conflicts during the upgrade process if you’re using the wrong or outdated device drivers. So, you need to ensure that there are no issues with your drivers in order to get rid of the Error 0x80070426 on Windows 10. The best way to do this is to use Auslogics Driver Updater. After your installing this tool, it will automatically recognize your processor type and operating system version. All you need to do is click a button, and the program will locate, download, and install the latest compatible drivers for your computer.
Download Auslogics Driver Updater
Prevent hardware errors and ensure problem-free device operation with this advanced tool that detects outdated drivers and safely gets them updated.
To ensure that your PC will perform smoothly after the upgrade, we encourage you to install Auslogics BoostSpeed as well. The powerful cleaning module of this software will effectively sweep out all types of junk in your PC and other items that may affect its performance. After using this tool, you can expect most operations and processes to go at a faster pace.
Download Auslogics BoostSpeed
Your one-stop PC maintenance and optimization tool, this program will clean, speed up, repair and tweak your system to ensure maximum speed and efficiency.
Can you think of other methods for resolving the Error 0x80070426?
Join the discussion below and share your thoughts!
,
I recently encountered the error 0x80070426 when trying to open the Xbox app and the Microsoft Store, and after solving the problem I decided to write this guide for anyone else experiencing the same error.
Many users have reported getting error code 0x80070426 when trying to start the Xbox app or the Mail app or the Microsoft Store, or when trying to install updates. Error 0x80070426 in Windows 10/11 is usually caused by a problem with Windows Update or a problem with Windows Services. In other cases, the problem is due to corrupted system or application files.
This guide contains step by step instructions to solve the error 0x80070426 in Microsoft Store, Store apps or or in Windows Update.
How to FIX 0x80070426 error in Windows Update, Windows Store & Store Apps (Windows 10/11).
- Reset Windows Update Agent.
- Reset Microsoft Store.
- Run Updates Troubleshooter.
- Enable and Start ‘Microsoft Sign-in Assistant’ Service.
- Repair System Files.
- Uninstall/Reinstall Windows Store and Xbox app.
- In-Place Repair and Upgrade Windows.
Step 1. Reset Windows Update Agent.
The first method to fix the error 0x80070426, is to force Windows to recreate the Windows Updates store folder («C:\Windows\SoftwareDistribution«), which is the location where Windows stores the downloaded updates.
1. Open Command Prompt as Administrator. To do that, type «cmd» or «command prompt» in the Search and then click Run as administrator in Command Prompt result.

2. In command prompt, give the following commands in order (press Enter after typing each command):
-
net stop wuauserv
-
rd /s /q %systemroot%\SoftwareDistribution
-
net start wuauserv

3. Close the command prompt window and reboot your PC.
4. After restarting, check if the problem is solved.
Step 2. Reset Windows Store.
The next step to resolve the error 0x80070426 in Windows Store or in Windows Update, is to reset the Windows Store Cache. To do that:
1. Simultaneously press the Windows + R keys to open the Run box.
2. Type wsreset.exe and press Enter.
3. Normally the Microsoft Store & the Xbox app will open now without problem. If not, continue to next step.
Step 3. Run Windows Update Troubleshooter.
1. Type «control panel» in the Search and then open the Control Panel app.

2. Change the View by: to Small icons and then click Troubleshooting.

3. Then under System Security, click Fix problems with Windows Update.

4. Click Next at the first screen and then let the troubleshooter to fix the problem.
2. If a problem is found and fixed, restart your computer and check if the error persists. If no problem is detected, proceed to the next step.
Step 4. Start the Microsoft Sign-in Assistant Service.
Error 0x80070426 in the Xbox app or Microsoft Store usually occurs if the Microsoft Sign-in Assistant service is disabled in Windows Services.
1. Simultaneously press the Windows + R keys to open the Run box.
2. Type services.msc and press Enter to open Windows services.
3. Locate the Microsoft Sign-in Assistant service and see if the Startup Type is Manual. Then according the result do one the following:
A. If the Startup Type is Manual, right-click on the service and click Start to start it. Then check if your issue is fixed.

B. If the Startup Type is Disabled, double-click on the service to open it’s properties, change the Startup Type to Manual, click Apply, then click Start and OK.

Step 5. Repair System Files.
1. Open Command Prompt as Administrator.
2. At the command prompt window, type the following command & press Enter:
- dism.exe /Online /Cleanup-Image /Restorehealth

3. Be patient until ‘Deployment Image Servicing and Management’ (DISM) tool repairs component store.
4. When the operation is completed, give the command below and press Enter:
- sfc /scannow

5. When SFC scan is completed, restart your computer.
6. After restarting check if the problem is fixed and if not, continue to next step.
Step 6. Uninstall & Reinstall Microsoft Store & Xbox apps.
If the above steps doesn’t fixed your issue, proceed to uninstall & reinstall the Microsoft Store and the Xbox apps.
1a. Type «xbox» in Search, then right-click at Xbox app and select Uninstall.

1b. Then click Uninstall.

2. Now, type «powershell» in Search and then open PowerShell as Administrator.

3. In PowerShell, type (copy/paste) the following command and press Enter to uninstall the Microsoft Store:
- Get-AppxPackage *WindowsStore* | Remove-AppxPackage

4. Restart your computer.
5. Download the «XboxInstaller.exe» from the link below:
- https://aka.ms/XboxInstaller
6. Open the downloaded file, accept the license terms and click Install to install the Xbox app.

7. After installation, click «Let’s Go» to open the app and then close it.
8. Now, type «xbox» in the search, then open the Xbox app and click Install now at the prompt to install the Microsoft Store.

Step 7. Repair & Update Windows
The final method to fix the error 0x80070426, is to update Windows 10 using the Media Creation Tool.
1. Go to Windows 10 download page and click Download Now under «Create Windows 10 installation media«.*
* Note: If you own Windows 11, go to Windows 11 download page.

2. When the download is completed, close all open programs and double-click at MediaCreationTool22H2.exe to run it.

3. Accept the License Terms at the first screen and then click Upgrade this PC now and click Next.

4. At Ready to install screen, ensure that the «Keep personal files and apps» is checked and click Install.

5. The Windows installation process will begin. Wait until the installation is complete and do not interrupt it until your system reboots to the desktop.
6. When it does, go to Windows Update center and check if there are any other updates available to install. If so, let Windows to install them and you’re done!
That’s it! Which method worked for you?
Let me know if this guide has helped you by leaving your comment about your experience. Please like and share this guide to help others.
If this article was useful for you, please consider supporting us by making a donation. Even $1 can a make a huge difference for us in our effort to continue to help others while keeping this site free:
- Author
- Recent Posts
Konstantinos is the founder and administrator of Wintips.org. Since 1995 he works and provides IT support as a computer and network expert to individuals and large companies. He is specialized in solving problems related to Windows or other Microsoft products (Windows Server, Office, Microsoft 365, etc.).
В данной статье рассмотрим ошибку активации в Windows 0x80070426 и как ее исправить.
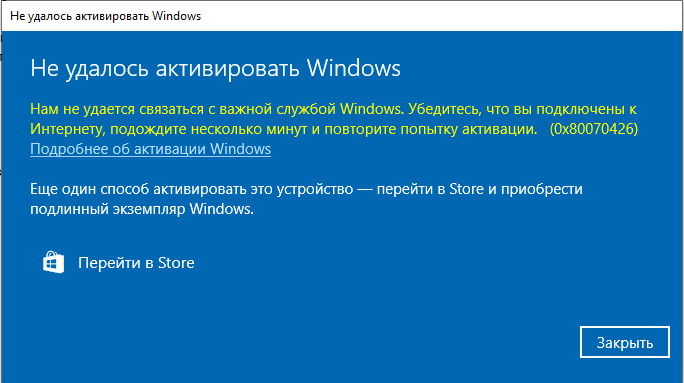
1) Первым делом убедитесь, что Ваш ключ, который Вы пытаетесь активировать — оригинальный и соответствует для Вашей версии системы. Приобрести ключ для различных версий Windows 10 можете в нашем каталоге. Так же в нашем каталоге есть в наличие ключи для Windows 7.
2) Попробуйте активировать Ваш ключ не стандартным способом, а через командную строку по инструкции.
3) Если ошибка не ушла, на время активации рекомендуем отключить антивирусы и файрволлы, если они есть.
4) Так же, можете запустить проверку системы на ошибки и их исправления. Откройте командную строку от имени администратора и поочередно введите следующие команды:
Dism /Online /Cleanup-Image /CheckHealth
Dism /Online /Cleanup-Image /RestoreHealth
sfc /scannow
Лицензионный ключ активации Windows 10 от
23 октября 2023 г. 14:38
2785
Код ошибки 0x80070426 при работе с операционной системой Windows («семеркой», «восьмеркой» и «десяткой» и более новыми версиями) встречается крайне редко. Случается это обычно в одной из трех ситуаций:
- Когда вы включаете компьютер.
- Когда вы пытаетесь войти в систему.
- Когда вы указываете пароль доступа к компьютеру.
Надо заметить, что появление ошибки не зависит о подлинности ключа. Иногда с ней сталкиваются пользователи, на ПК которых ОС является предустановленной.
Давайте рассмотрим вариант возникновения кода ошибки 0x80070426 во время открытия интерфейса ОС. Сообщение об ошибке автоматически блокирует вход, поэтому дальше компьютер использовать не представляется возможным. Для того, чтобы решить проблему, советуем последовательно выполнить предложенные ниже действия:
- Отсоедините от ПК все имеющиеся флешки и иные варианты внешних накопителей.
- Осуществите перезапуск системы. Это делается так: перед тем, как на экране появится логотип Windows, нажмите и удерживайте кнопку F8 до того момента, когда откроется меню BIOS.
- В этом меню будет предложено сделать выбор в пользу той или иной версии операционной системы, куда вы хотели бы попасть, используя безопасный режим.
- Выберите версию, где возникла ошибка 0x80070426, и подтвердите, нажав Enter.
- В открывшемся окошке обратите внимание на большую выборку. В ней надо найти и выбрать способ, с помощью которого вы загрузите систему с поддержкой командной строки, используя безопасный режим. Подтвердите ввод.
- Подождите, пока система загрузится.
- Авторизуйтесь в собственной учетной записи как администратор.
- Откройте командную строку, нажав на Win и R одновременно.
- Введите в командной строке cmd и нажмите ОК.
- Введите services.msc и подтвердите ввод.
- Найдите название Служба активации Windows в перечне служб системы.
- Нажмите на название правой клавишей мышки.
- Откройте Свойства.
Теперь в открывшемся окошке надо поискать Тип запуска и задать для него из возможных значений Автоматически. Подтвердите ваше решение нажатием кнопки ОК. Далее необходимо вернуться к перечню служб, найти защитника программного обеспечения и повторить последовательно все действия, которые были ранее перечислены.
Выбор автоматического запуска позволяет со спокойным сердцем осуществить перезагрузку компьютера, а потом произвести авторизацию, используя для этого уже стандартный режим.