
Readers help support Windows Report. We may get a commission if you buy through our links.
Read our disclosure page to find out how can you help Windows Report sustain the editorial team. Read more
7-Zip remains one of the most popular file archivers available in Windows, especially due to its open-source nature. But oftentimes, 7-Zip is either not available in the Windows 11 context menu or disappears after an update!
This forces you to extract files or make other changes from within the app’s interface, complicating the process. But adding or re-adding 7-Zip to the Windows 11 right-click context menu shouldn’t take more than a minute.!
1. Reconfigure 7-Zip’s settings
- Launch 7-Zip on your PC, click on the Tools menu at the top, and select Options.

- Go to the 7-Zip tab, and tick the checkboxes for Integrate 7-Zip to shell context menu and Integrate 7-Zip to shell context menu (32-bit).

- Finally, click on Apply and OK to save the changes.
- You should now find 7-Zip in the right-click menu on Windows 11. Although, it will be accessible only after you click on Show more options, i.e., in the secondary context menu.


This is the easiest way to add 7-Zip to the secondary context menu on Windows 11.
In case you get the Access is denied error on enabling Integrate 7zip to the shell context menu, it indicates missing administrative privileges.

All you have to do is run 7-Zip as an administrator. To do that, right-click on the program > select Run as administrator > click Yes in the UAC prompt.
2. Use a third-party tool
NOTE
Disclaimer: Windows Report is not affiliated with the Custom Context Menu app. I am recommending it based on user reviews and the fact that it’s available on the Microsoft Store. Nevertheless, be careful with the privileges you grant to the app!
- Download and install the Custom Context Menu app from the Microsoft Store. There’s both a free and paid version.
- Once installed, launch the app, and click the Add Menu icon near the top-left corner.

- Now, enter all the details for the 7-Zip Windows 11 context menu entry in the fields on the right, including the executable (.exe) file’s path.
- Once done, press Ctrl + S to save the new entry, and then restart the PC for the changes to apply.
- You should now see a 7-Zip entry in the context menu across the PC or in specific locations, depending on the configured settings.


3. Manually modify the Registry
3.1 Finding 7-Zip’s installation path
- Press Windows + S to open the Start menu, enter 7-Zip in the text field, right-click on the relevant result, and select Open file location.

- Now, right-click on 7-Zip’s shortcut and select Properties.
- Copy the path (along with the quotes) in the Target field under the Shortcut tab. This is the path to the 7-Zip File Manager’s executable (.exe) file. In our case, it is:
"C:\Program Files\7-Zip\7zFM.exe"


- Press Windows + R to open Run, type regedit in the text field, and hit Enter.

- Click Yes in the UAC prompt.
- Now, paste the following path in the address bar and hit Enter:
HKEY_CLASSES_ROOT\Directory\Background\shell
- Right-click on the shell entry in the navigation pane, choose New, select Key from the flyout menu, and then name it 7-Zip.
- In the 7-Zip key you just created, right-click on the empty space towards the right, hover the cursor over New, select String Value, and name it Icon.
- Double-click on the Icon string, enter the 7-Zip path we copied earlier in the Value data text field, and click on OK.

- Next, right-click on 7-Zip in the navigation pane, choose New, select Key, and name it Command.
- In the Command key, double-click on the Default string, paste the 7-Zip path we copied earlier in the Value data text field, and then click OK to save the changes.
- Once done, reboot the computer for the changes to apply. You can also simply restart the Windows Explorer process from the Task Manager.


Remember, steps 5 & 6 above are optional, as the two only add 7-Zip’s icon to the context menu entry in Windows 11. It’s the Command key that does the rest.
Also, this way, you can add 7-Zip to the right-click menu on Windows 10!
If things don’t work out or you want to remove 7-Zip from the Windows 11 context menu, delete all the Keys and String Values you created earlier. Make sure not to modify/remove any other keys or entries, as it might disrupt the functioning of the PC and necessitate a reinstallation of Windows 11.
4. Use a Registry script
Tip
This method involves running a script created by a third-party developer on the PC, which will make changes to the Registry Editor. Since it may introduce instability in rare cases if not executed properly, I recommend you create a restore point beforehand.
- Go to GitHub’s official script page, and click the Download ZIP button near the top right.

- Right-click on the download file, select Extract all, then choose a location and wait for the process to complete.
- Once done, open the extracted files and run 7-Zip_Windows11.
- Click Run in the confirmation box, and similarly, give approval in all other prompts.

- After the script is executed, right-click on any file, and you shall find several additional 7-Zip-related entries in the Windows 11 context menu.


If the new Windows 11 context menu entries created for 7-Zip with the script are not what you were looking for, revert the changes using the restore point you created earlier.
That sums up all the ways you can add 7-Zip to the Windows 11 context menu. Except for the methods involving changes to the Registry Editor, the rest are all simple and quick!
In case you were looking for 7-Zip alternatives, discover our top picks for file compression software. You can also try out the portable edition.
Which method worked best for you? Share with our readers in the comments section.
Kazim Ali Alvi
Windows Hardware Expert
Kazim has always been fond of technology, be it scrolling through the settings on his iPhone, Android device, or Windows PC. He’s specialized in hardware devices, always ready to remove a screw or two to find out the real cause of a problem.
Long-time Windows user, Kazim is ready to provide a solution for your every software & hardware error on Windows 11, Windows 10 and any previous iteration. He’s also one of our experts in Networking & Security.
Windows 11 brings along numerous changes to the new UI and among these is the new right-click context menu. The context menu has been a long-standing controversial addition of Windows 11, especially during the early days due to the missing ‘Refresh’ option. The option has now been restored, though you are still missing essential options, including compression shortcuts that were available in the traditional context menu. So can you add these options back to the context menu in Windows 11? Let’s find out!
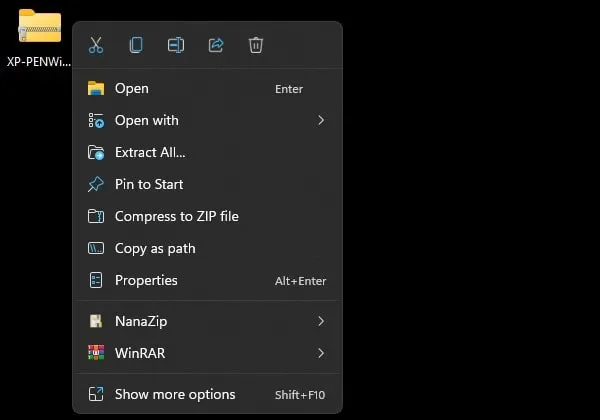
Can you get WinRAR and 7-Zip in the context menu?
Well, you can. Finally! It was about time, anyway. As of October 13, 2021, Winrar Beta v6.10 gives you the ability to access the app right from the context menu was you used to on the good old Windows 10. Not WinRAR, but 7-Zip is also available via the context menu, but things are not that simple here. Another open source software called NanaZip — a fork of the 7-Zip’s code — is now available that gets you 7-Zip in a new form and adds support for the context menu too.
Check out the guides below to get WinRAR and NanaZip (thus, 7-Zip) into the context menu on your Windows 11.
We recommend using NanaZip to get context menu compression shortcuts in Windows 11. NanaZip is a fork of 7-Zip which ensures maximum compatibility and stability when using it on Windows 11. If however, you aren’t happy with NanaZip, you can opt for the latest WinRAR beta instead. The beta version adds context menu compression shortcuts in Windows 11 however it might include some bugs.
How to get 7-Zip in Windows 11 Context Menu (using NanaZip)
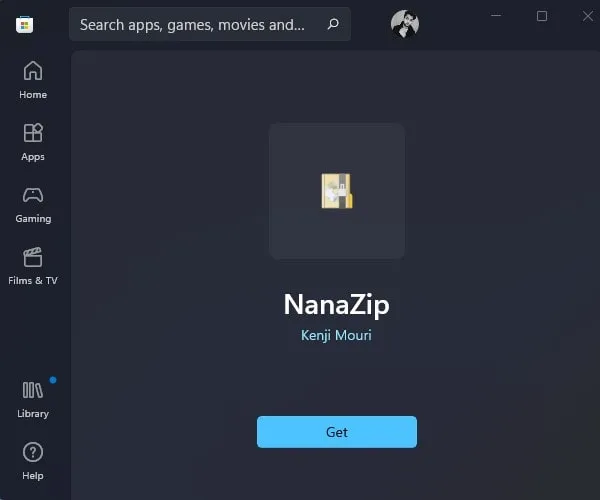
Install NanaZip on your Windows 11 PC using the link below.
- Get NanaZip from Microsoft Store
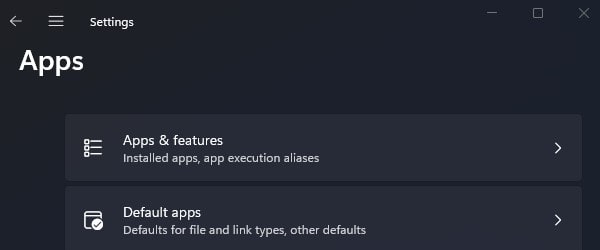
Press Windows + I on your keyboard to open the Settings app instead. Click on ‘Apps’ on your left.
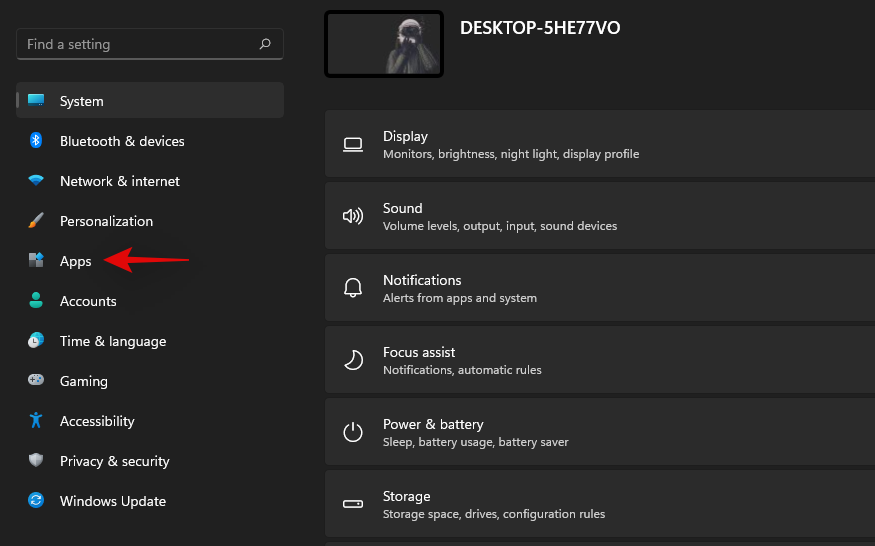
Click on ‘Default Apps’ now.
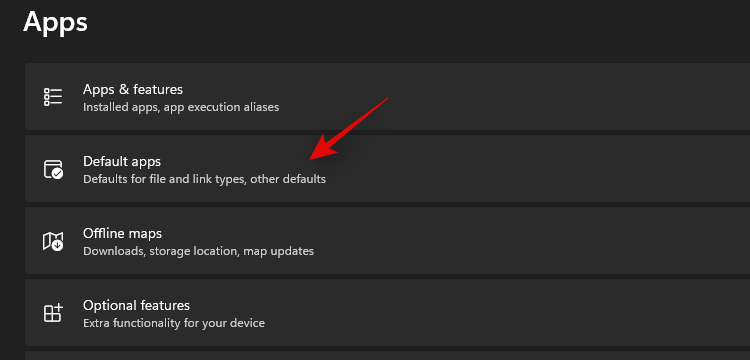
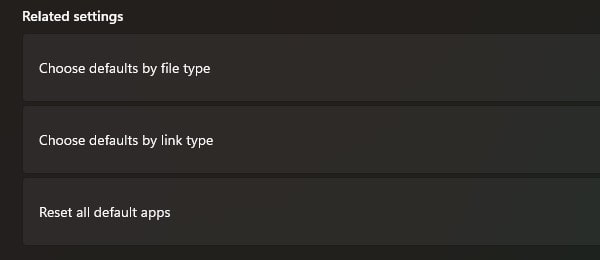
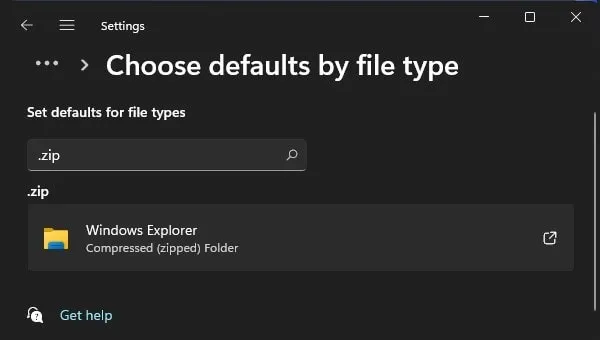
Scroll down and click on ‘Choose defaults by file type’.
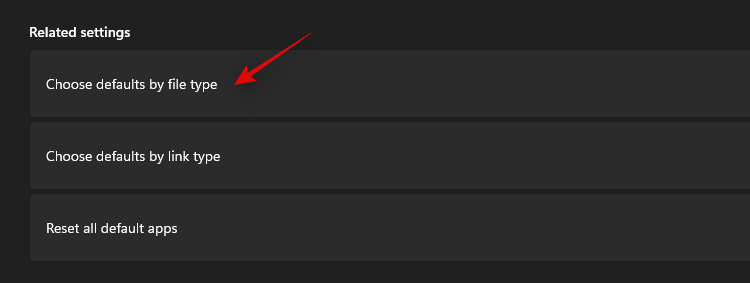
Use the search box at the top and search for ‘zip’.
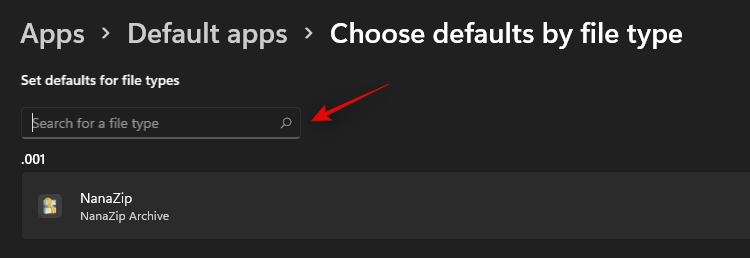
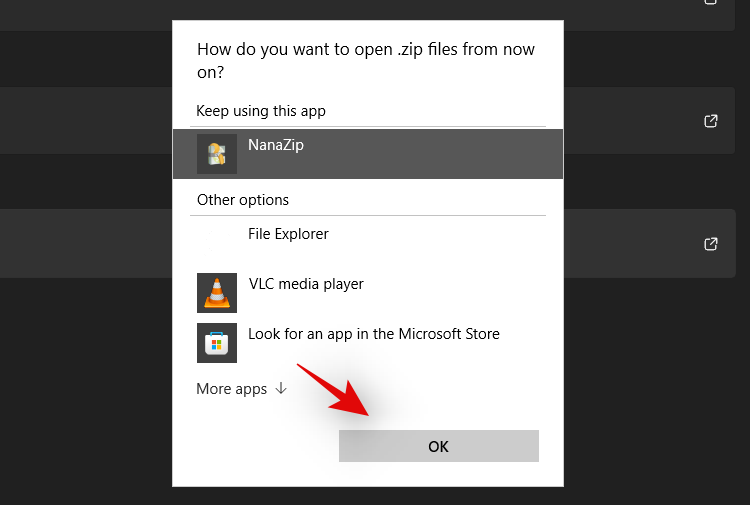
Click on the listing under .zip.
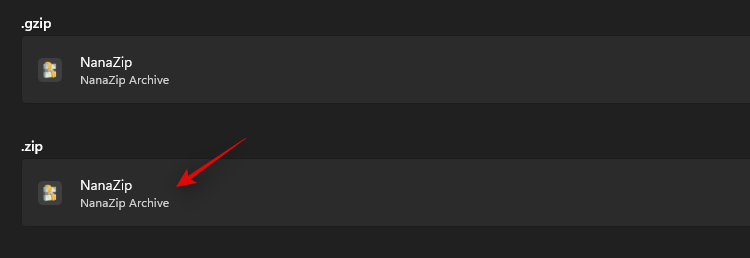
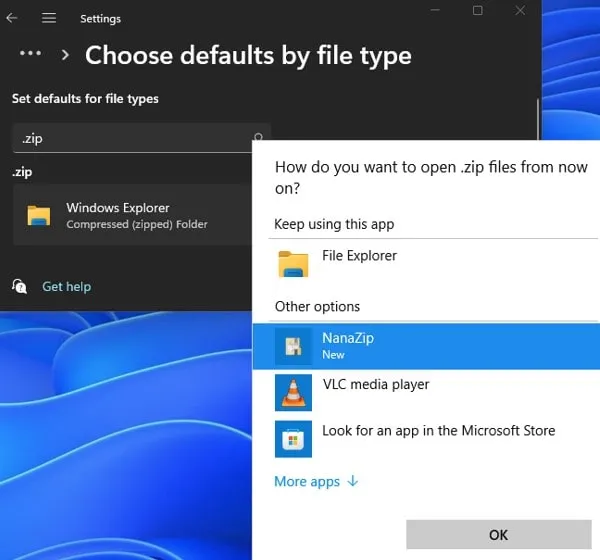
Select ‘NanaZip’.
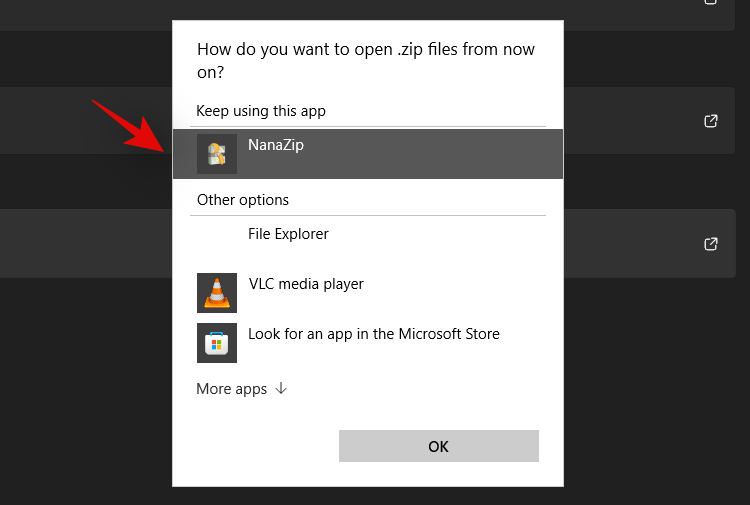
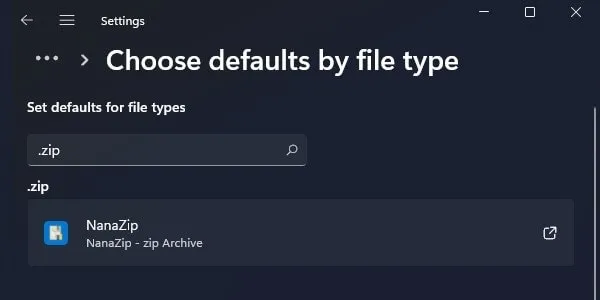
Click on ‘Ok’.
Right-click on any random file in the file explorer now and you should now have a listing for NanaZip which can be used to create a zip archive or unzip them.

NanaZip will now be set up and ready to use on your system.
You can also use the latest WinRAR Beta to get context menu compression shortcuts in Windows 11. Use the guide below to get you started.
Download the setup file from the link given below.
- Required version: WinRAR Beta v6.10 | Download Link
Double-click the setup file to run Setup and install WinRAR on your PC.
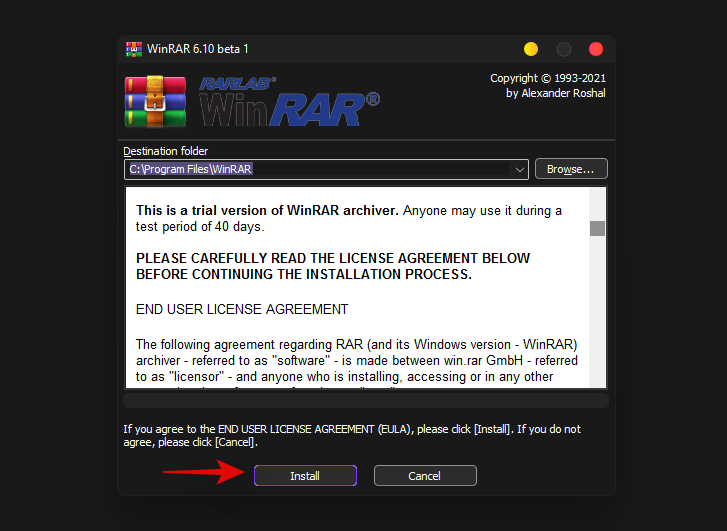
Once installed, it will give apop-up windows for setting up integrations with the common files types it supports. Be sure to select zip, rar and other file types you want WinRAR to handle on your PC.
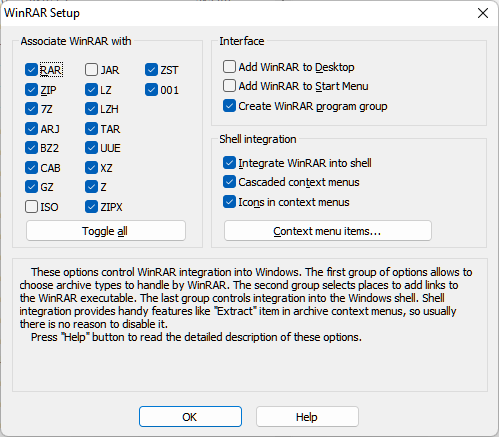
Click OK after selecting the file types.
(If you miss the integration part during setup, then you can do so by opening WinRAR app and then heading to Options (in the menu bar at the top) > Settings. In the pop-up, click Integration, and then select the file as shown above.)
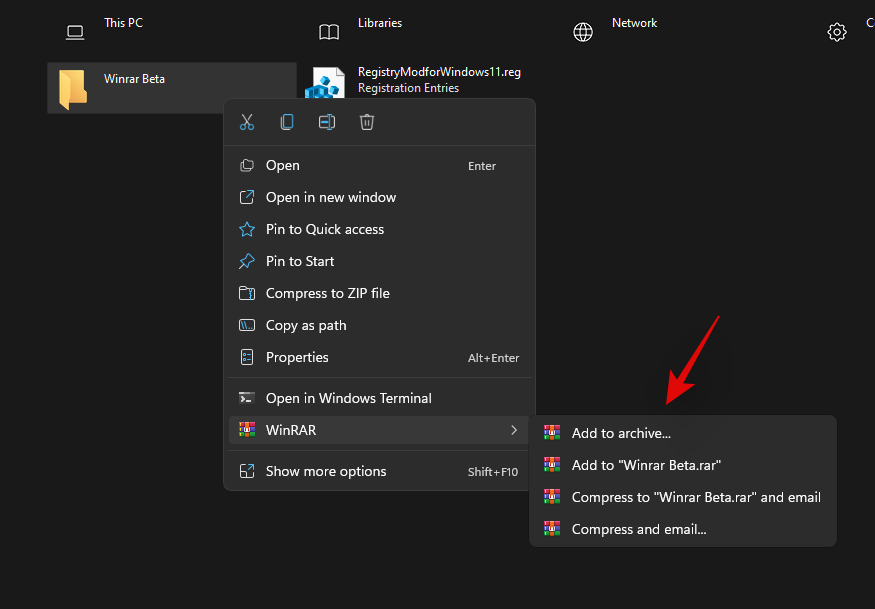
Now, right-click on a random file and you should now have WinRAR compression shortcuts in your right-click context menu.
FAQs
Here are some common queries around the new context menu additions that should help you get up to date with the latest information.
Why can’t you add options to the context menu manually?
Windows 11 comes with a new minimalistic frosted glass aesthetic which calls for a minimized context menu. The traditional all option context menu can always be accessed by clicking on ‘Show more options’. The new context menu requires third-party apps to update their upcoming apps accordingly while there seems to be no way to access the native compression utility directly from the current context menu for now.
Can you get the old Windows 10 right-click context menu?
Yes, you can easily restore the old context menu in Windows 11 by following the steps in this guide. You can also use updated versions of third-party utilities like WinAero Tweaker, OpenShell, or more.
What is the ‘Show More Options’ shortcut?
You can use Shift + F10 on your keyboard to directly get the old context menu in Windows 11.
How to install NanaZip without Microsoft Store
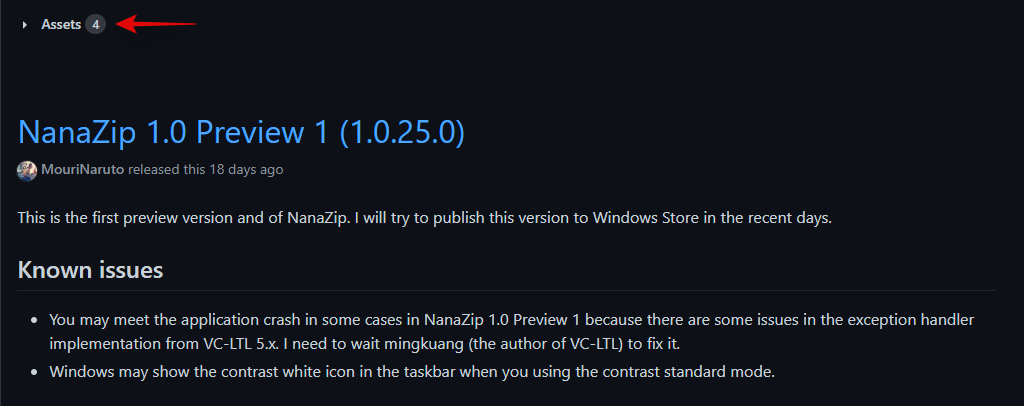
Visit the Github download page given below and click and expand ‘Assets for the latest release.
- NanaZip | Download Link
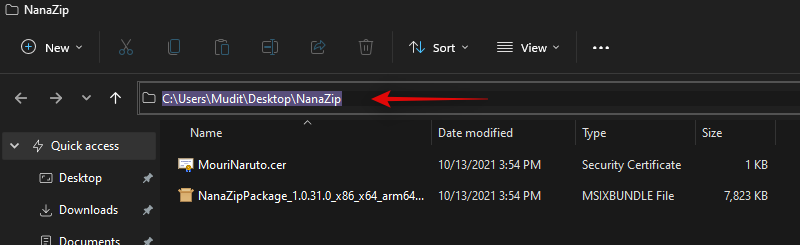
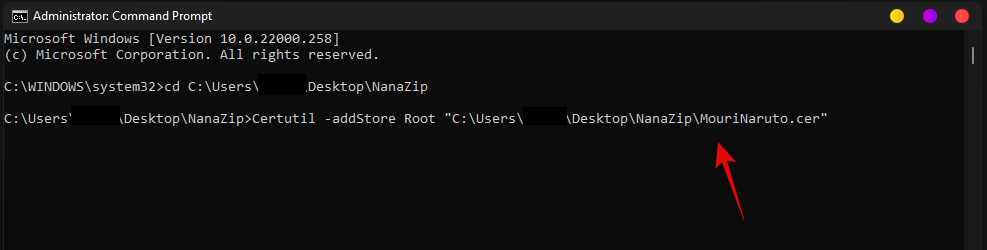
Download the following files by clicking on them. Save both the files in a folder on your desktop to ensure you don’t encounter any bugs when installing the certificate.
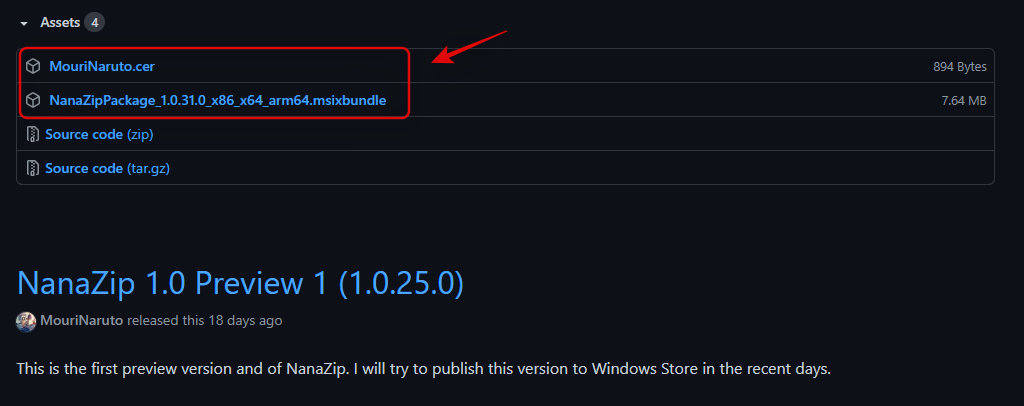
- MouriNaruto.cer
- NanaZipPackage_1.0.31.0_x86_x64_arm64.msixbundle
Now open the location where you saved your files, click in the address bar, and copy the address to your clipboard.
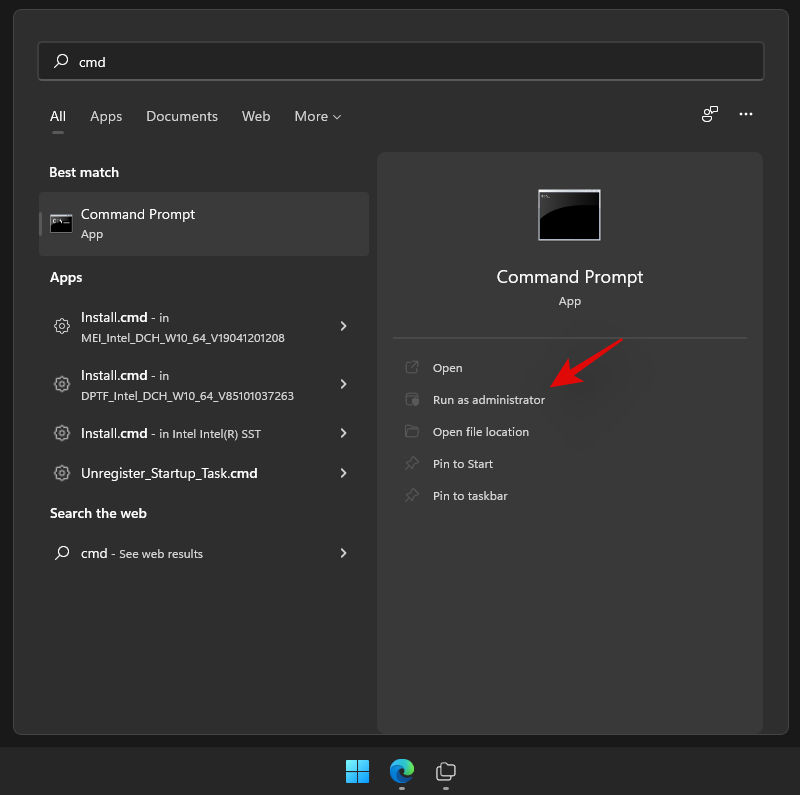
Press Windows + S on your keyboard and search for CMD. Click on ‘Run as administrator’ once the app shows up in your search results.
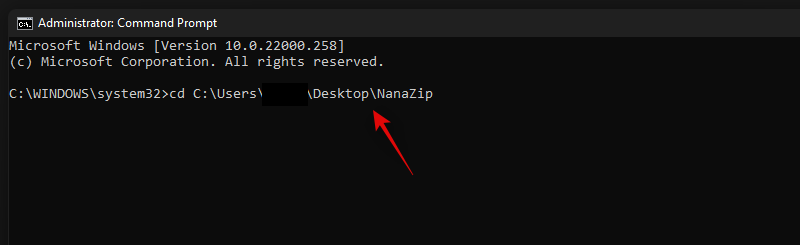
Type in the following command and replace PATH with the path copied to your clipboard.
cd PATH
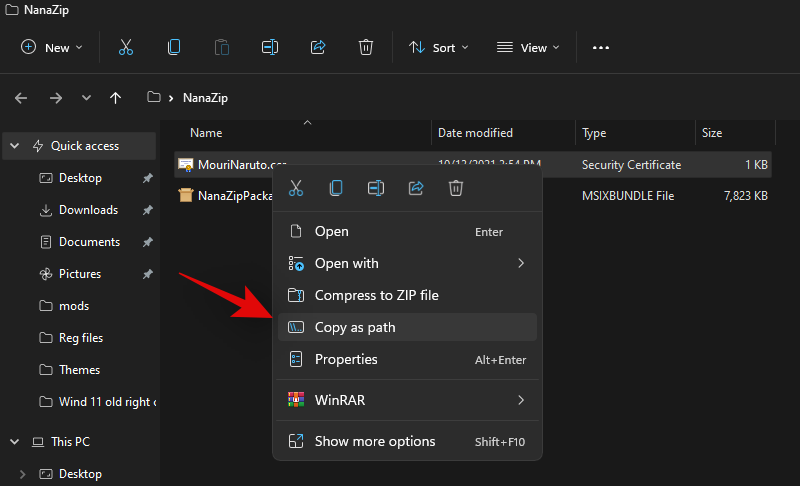
Now head back to the folder, right-click on ‘MouriNaruto.cer’ and select ‘Copy as path’.
Switch to CMD and execute the following command. Replace PATH with the path for the certificate copied to your clipboard in the last step.
Certutil -addStore Root "PATH"
The certificate will now be installed on your PC. Type in ‘Exit’ to close the command prompt.
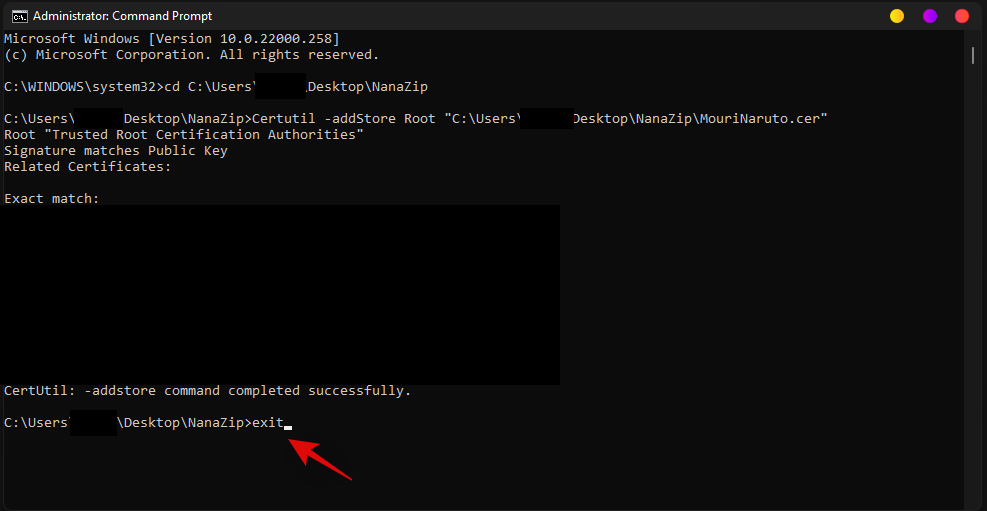
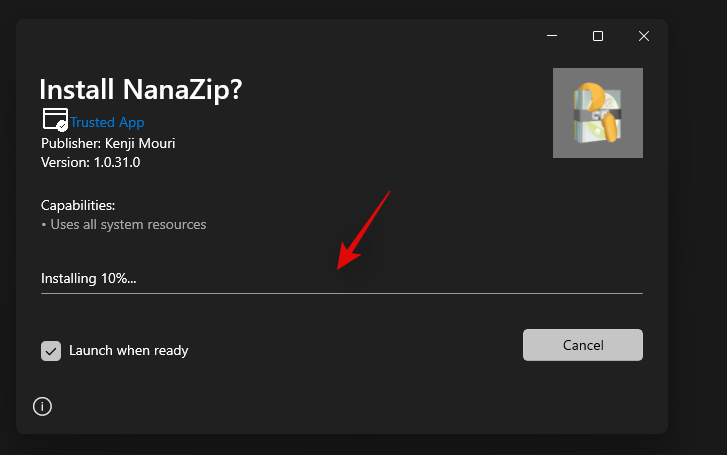
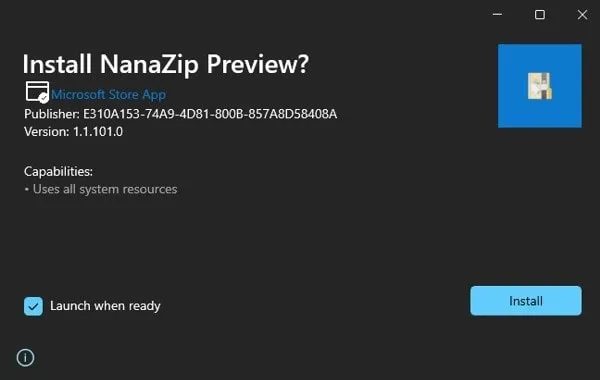
Now double click and run the other package file downloaded along with the certificate. Click on ‘Install’.
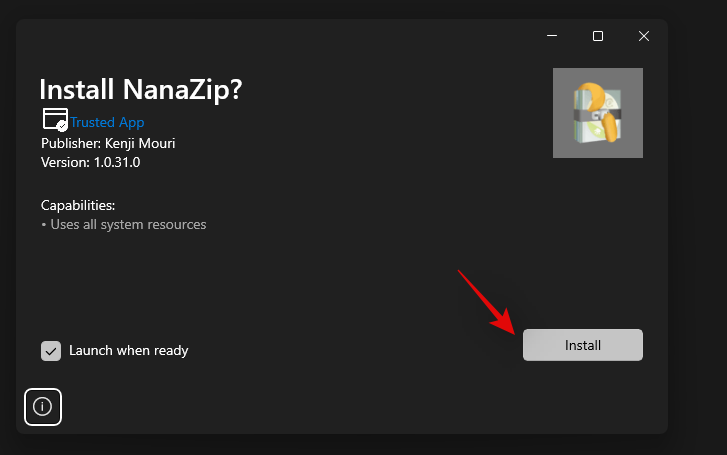
NanaZip will be be installed on your PC in no time.
We hope you were able to easily get new compression shortcuts in the right-click in context menu using the guide above. If you need help with anything, feel free to drop a comment below.
Related:
- What Is Windows 11 Registry Bypass?
- How to Use Disable TPM and Secure Boot in Rufus
- Will Windows 11 Support More Processors?
- How to Download and Install Official Windows 11 ISO yourself
- How to install Windows 11 with Windows 11 Installation Assistant
In Windows 11, Microsoft has made numerous changes to the UI, including a new right-click context menu. The new context menu shows only a few options. And, to access the traditional right-click menu, you have to click on “show more options”. Or, you can press the Shift + F10 shortcut key. Initially, the refresh option was missing in the context menu. Which was later restored in Windows update. But still, many essential options are missing.
Like, when you install 7Zip software, it doesn’t appear in right-click menu. Yes, Microsoft offers an “Extract All” option to extract folders. But, it can only extract zip file format, not all. To extract and compress all kinds of files and formats, you have to install third-party tools like WinRAR or 7Zip. Well, now the question arises, can you get WinRAR and 7-Zip in the context menu? Let’s find out!
Get WinRAR and 7-Zip on Windows 11 Context Menu.
If you’re a WinRAR user, then the good news is, you can now add WinRAR in Windows 11 right-click menu. WinRAR now officially offers some integrations options for the new Windows 11. So that, you can quickly access the app from right-click like Windows 10.
Although, If you’re a 7Zip user, then things are not simple for you. Because, till now, 7Zip doesn’t offer such an option. But, there is an open-source software called NanaZip available. Which is a fork of the 7-Zip’s code. And, NanaZip comes with context menu support. So, you can use NanaZip to compress and extract files in Windows 11. Ok, so here is how you can get WinRAR and NanaZip (7Zip Alternative) into Windows 11 Context Menu.
NanaZip (Modern Version of 7Zip.)
NanaZip is a 7-Zip derivative, developed for the modern Windows experience. Yes, as of now, it is in the early development stage. But since it is forked from a well-known open-source file archiver 7-Zip, so it will work flawlessly. It does support Brotli, Fast-LZMA2, Lizard, LZ4, LZ5 and Zstandard codecs. Mainly, it does support the context menu in Windows 10/11 File Explorer. Which is all we need.
Add 7-Zip on Windows 11 Context Menu using NanaZip.
There are two ways to install NanaZip on Windows 11 PC. Either you can install it from Microsoft Store, or you can get the latest version from GitHub.
- Open the following link to install NanaZip from Microsoft Store. Once link get open, Click on Get. And, NanaZip will get installed on your Windows 11 PC.
Alternatively, you can download the NanaZip MsixBundle file from Github. And, install it by running the setup file.
- Once NanaZip gets installed, open the Settings App by pressing Windows + I keyboard shortcut. (You can also check out Windows 11 Keyboard Shortcuts List.)
- Click on Apps > Default Apps.
- Scroll down to the default apps page, and at the bottom, you will find the “Choose defaults by file type” option in related settings. Do click on it.
- Search for “.Zip” and you will see Windows Explorer is set for the compressed (zipped) folder.
- Click on it, and select NanaZip from the app list, and click on ok.
- NanaZip will be set as a default app for Zip files.
- Now, Do right-click on any Zip file you have. And, you will see NanaZip in the context menu.
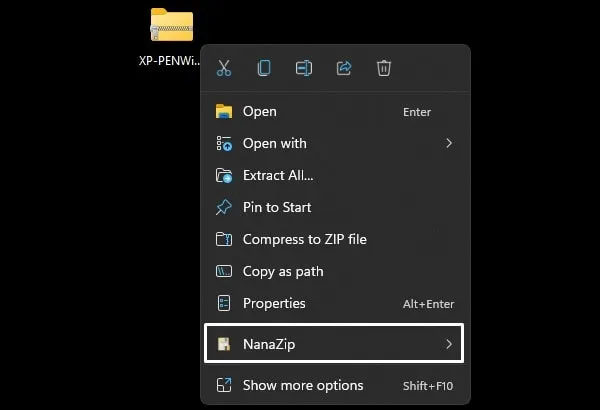
Take mouse pointer over NanaZip and you will find all 7Zip options that you like to use.
Add WinRAR on Windows 11 Context Menu
To Get WinRAR option in Windows 11 Context Menu or Right-Click Menu. You have to install the beta version of WinRAR. Because it comes with the “Legacy Context menu” option. With that option, you can get WinRAR in right-click menu of Windows 11.
- First, download the latest version WinRAR setup file. (Do check your system type before downloading the WinRAR version. Open Windows 11 Settings App > scroll down and click on About.)
- Now, do right-click on the setup file and then click on “Run as administrator”.
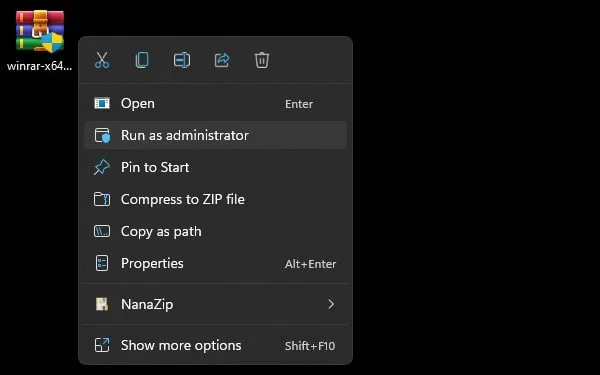
- WinRAR setup window will now appear, click on install.
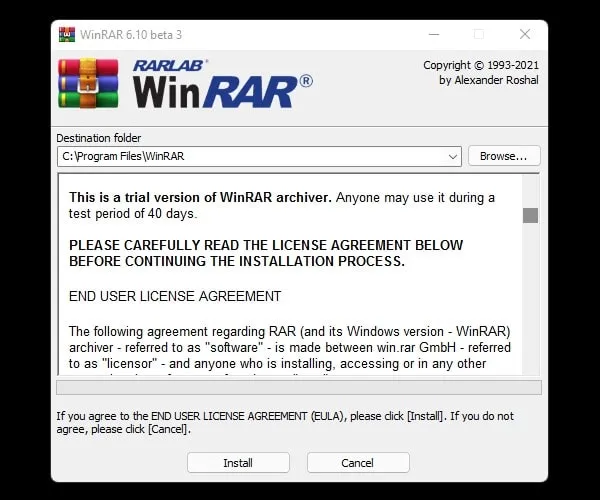
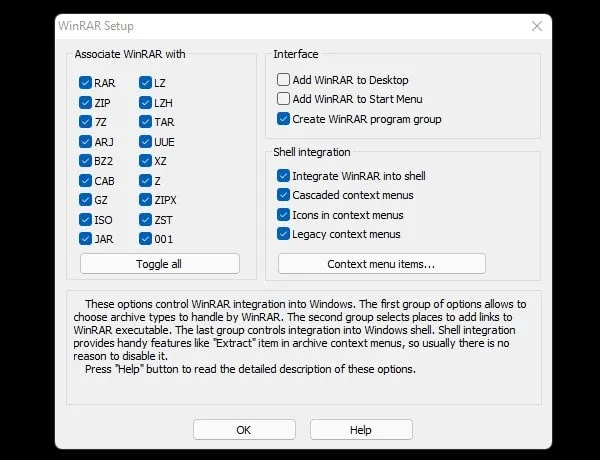
- Next, the WinRAR setup window will appear. In the shell integration section, you will find the “Legacy Context Menus” option. Enable it, and click on OK.
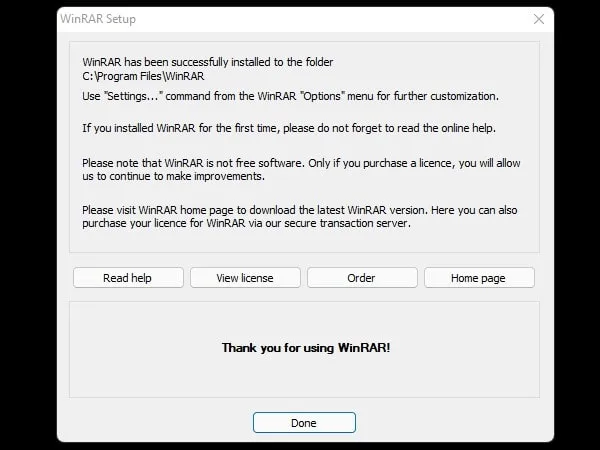
- That’s it, WinRAR will now get installed, click on Done.
- Now, right-click on any zip file and you will see the WinRAR option in the context menu.
Ok, so that’s how you can add 7Zip and WinRAR in Windows 11 context menu. You can use NanaZip instead of 7Zip. Or, you can download the beta version of WinRAR.
How to Add 7-Zip to Right-Click Context Menu in Windows 11
In today’s world, file management is an integral part of how we use our computers. Whether it’s unzipping a compressed file for a project, archiving important documents, or sharing multiple files in a single package, efficient file compression and extraction tools are a necessity. Among the plethora of software options available, 7-Zip stands out as a powerful, open-source file archiver that supports a variety of formats and offers strong compression ratios.
One of 7-Zip’s many advantages is its ability to integrate seamlessly into Windows’ right-click context menu, allowing for easy access and speedy file management tasks. In this detailed article, we’ll explore how you can add 7-Zip to the right-click context menu in Windows 11, from installation to customization.
What is 7-Zip?
7-Zip is a file archiver with a high compression ratio, which means it can reduce the size of files without losing quality. It supports a multitude of file formats, including ZIP, RAR, TAR, GZ, and its native 7z format, which offers superior compression performance.
Key features of 7-Zip include:
- Open Source: It’s free for personal and commercial use.
- Compression: Supports many compression formats and provides better compression ratios for 7z.
- Encryption: Strong AES-256 encryption for secure file archiving.
- File Management: Allows users to manage and organize files effectively.
Why Integrate 7-Zip into Windows 11?
Integrating 7-Zip into the right-click context menu of Windows 11 provides several benefits:
-
Efficiency: Quick access to compress, extract, and manage files directly through the context menu saves time, eliminating additional clicks and navigation.
-
Accessibility: Easily compress or decompress files without needing to open the 7-Zip application every time.
-
Customization: You can customize the context menu to suit your workflow, adding only the options you need.
Installing 7-Zip
Before you can add 7-Zip to your right-click context menu, you first need to install the software. Here’s how to do it:
-
Download 7-Zip:
- Visit the official website at 7-zip.org.
- Click on the version suitable for your system (either 32-bit or 64-bit).
- Download the installer file.
-
Install 7-Zip:
- Locate the downloaded installer (usually in your Downloads folder) and double-click it.
- Follow the installation prompts:
- Click “Install.”
- Wait for the installation to complete.
- Click “Finish” when prompted.
-
Launching 7-Zip:
- You can find 7-Zip in the Start Menu or search for it in the Windows search bar.
Adding 7-Zip to the Right-Click Context Menu
The next step is to add 7-Zip to the right-click context menu in Windows 11. Usually, the installation process automatically adds 7-Zip to the context menu. However, if for some reason it does not appear, here’s how you can manually add it:
Method 1: Default Installation
Once you’ve installed 7-Zip, it should, by default, add itself to the Windows context menu. To check:
-
Right-click on a File:
- Go to any folder on your computer and right-click on a file (such as a ZIP or TAR file).
-
Look for 7-Zip Options:
- In the context menu, hover over or click on the “7-Zip” option. You should see options such as:
- Open archive
- Extract Here
- Extract to “folder_name”
- Add to archive…
- In the context menu, hover over or click on the “7-Zip” option. You should see options such as:
If these options are present, 7-Zip is successfully integrated into the context menu. If not, follow the steps in Method 2.
Method 2: Manual Registry Edit
If the default installation didn’t add 7-Zip to the context menu, you may need to manually create a registry entry. This method requires caution as improper changes in the registry can lead to system instability.
-
Open Registry Editor:
- Press
Windows + Rto open the Run dialog. - Type
regeditand hit Enter. - Click “Yes” if prompted for User Account Control.
- Press
-
Navigate to the Shell Key:
- Go to the following path:
ComputerHKEY_CLASSES_ROOT*shell
- Go to the following path:
-
Create a New Key for 7-Zip:
- Right-click on the “shell” folder.
- Select “New” > “Key.”
- Name the new key
7-Zip.
-
Set the Display Name:
- Click on the
7-Zipkey you just created. - On the right pane, double-click on the «(Default)» string and enter
7-Zipas the value.
- Click on the
-
Add Sub-keys for Specific Actions:
- Right-click on the
7-Zipkey, select “New” > “Key,” and name itcommand.
- Right-click on the
-
Set the Command to Launch 7-Zip:
- Select the
commandkey. - On the right pane, double-click on the «(Default)» string and set its value to the location of the 7-Zip executable. By default, it is usually:
"C:Program Files7-Zip7zFM.exe" "%1"
- Select the
-
Adding More Options:
- For extracting files directly or adding to an archive, you may want to create additional sub-keys (e.g.,
Extract Here,Add to Archive) under the7-Zipkey in the registry and set similar commands.
- For extracting files directly or adding to an archive, you may want to create additional sub-keys (e.g.,
-
Close the Registry Editor:
- Once done, close the Registry Editor.
-
Restart Windows Explorer:
- To see the changes reflected, you can either restart your computer or restart the Windows Explorer process.
- Press
Ctrl + Shift + Escto open Task Manager. - Under the «Processes» tab, locate Windows Explorer, right-click it and select “Restart.”
-
Check the Context Menu Again:
- Right-click on any file and verify if the 7-Zip options appear.
Customizing 7-Zip Context Menu Options
Customizing your context menu is just as important as adding entries. You can tailor it to include only the functions you frequently use.
Using 7-Zip Configuration
-
Open 7-Zip File Manager:
- Launch the 7-Zip File Manager from the Start Menu.
-
Access Options:
- Go to
Toolsfrom the menu bar. - Click on
Options.
- Go to
-
Choose the Formats to Use:
- In the
Optionsdialog, you can choose the formats for which you want to enable context menu shortcuts.
- In the
-
Configure Context Menu Items:
- Deselect any options you don’t want cluttering your context menu.
- Click “OK” to save the changes.
Troubleshooting Common Issues
-
7-Zip Not Showing in Context Menu:
- Ensure you have the latest version of 7-Zip.
- Check if the application is installed properly and integrated with your system.
-
Registry Changes Don’t Take Effect:
- Ensure that you’ve followed the steps correctly without any typos.
- Restart the computer after making changes.
-
Performance Issues:
- If you experience slow performance when using 7-Zip, try to update to the latest version or check for any conflicting software.
Benefits of Using 7-Zip
The reasons for choosing 7-Zip go beyond mere installation and context menu access. Here are some additional benefits of using 7-Zip:
- Native 7z Format Support: The proprietary 7z format offers better compression ratios, especially for larger files.
- Multi-Threading: Utilizing multi-threading technology allows for faster compression and extraction processes.
- File Manager Functionality: Beyond simple compression tasks, 7-Zip’s file manager offers extensive file management capabilities.
- Cross-Platform Compatibility: The software works on various platforms beyond Windows, including macOS and Linux, offering versatility for different user environments.
Conclusion
Adding 7-Zip to the right-click context menu in Windows 11 can significantly enhance your file management efficiency. The process is straightforward, whether you rely on the default installation or opt for a manual registry edit. Customization capabilities allow you to shape your experience to fit your specific needs, ensuring quick access to frequently used options.
By following these steps, you can streamline your workflow, making compressing and extracting files a hassle-free experience. The robustness of 7-Zip, combined with its ease of use and powerful features, makes it a must-have for any computer user looking to manage files effectively. Whether for personal projects or professional tasks, integrating 7-Zip into your context menu is a smart choice that enhances productivity and efficiency.
Adding 7-Zip to the Windows 11 context menu can greatly enhance your file management efficiency. 7-Zip is a popular free and open-source file archiver that supports various file formats and provides robust compression capabilities. Customizing the context menu allows you to quickly access 7-Zip’s features without having to navigate through the program manually.
This article will guide you through the steps required to add 7-Zip to the Windows 11 context menu, as well as discuss some additional customization options to help streamline your file compression and extraction processes.
Understanding 7-Zip
Before diving into the context menu enhancements, it’s essential to understand what 7-Zip offers. 7-Zip can be installed on various Windows versions, and it supports numerous formats including ZIP, RAR, TAR, GZ, and its native 7z format, which often provides better compression ratios than other formats.
Why Customize the Context Menu?
Windows context menus offer quick access to various commands when you right-click on files or folders. By adding 7-Zip to this menu, you can:
- Quickly compress files into a ZIP or 7Z format.
- Extract files from archived folders without needing to open the application.
- Simplify tasks with options such as «Add to Archive» and «Extract Here.»
- Improve workflow efficiency, making file management smoother and less cumbersome.
Installing 7-Zip
Before you can add 7-Zip to the context menu, you need to have the application installed. You can do this by following these steps:
- Download 7-Zip: Visit the official 7-Zip website 7-zip.org and choose the appropriate version for your system (32-bit or 64-bit).
- Install 7-Zip: Run the downloaded executable file and follow the on-screen instructions to install the software.
- Verify Installation: Once installed, you can check by searching for «7-Zip» in your start menu.
Adding 7-Zip to the Context Menu
Once 7-Zip is successfully installed, it will automatically add generic options to the context menu. However, to customize or enhance these options, you’ll proceed with the following sections:
Automatic Method
-
Default Installation: If you install 7-Zip using the official installer, basic context menu options should already appear. You can access these by right-clicking on a file or folder. You might see options like «7-Zip > Add to archive…» or «7-Zip > Extract here.»
-
Testing Context Menu: To see this in action, navigate to any file (like a JPEG or a document), right-click it, and check the 7-Zip submenu.
Manual Method: Customizing the Context Menu
For users who wish to have more control over context menu items or who want additional features, you can manually edit the registry settings:
-
Create a System Restore Point: Before making any changes to the Windows Registry, it’s a good idea to create a restore point in case something goes wrong.
- Type «Create a restore point» in the Windows search bar, then click on it.
- In the System Properties window, select your drive and click on «Configure.»
- Enable «Turn on system protection,» set the maximum disk space usage, and click «Create.»
-
Open Registry Editor: Press
Win + Rto open the Run dialog, typeregedit, and hit Enter. You might need administrative privileges to make changes. -
Navigate to the Registry Key:
- Go to
HKEY_CLASSES_ROOT*shellto add options for all files. - Alternatively, navigate to
HKEY_CLASSES_ROOTDirectoryshellif you want to add it for folders only.
- Go to
-
Create New Keys: Right-click on the
shellfolder, select New, and then click on Key. You can name this key according to the action you want to add. For example, “7-Zip Compress.” -
Set the Default Value: Click on the newly created key and double-click on the (Default) value in the right pane. Set its value to the action’s display name, such as “Compress to 7z file.”
-
Add Command Key:
- Right-click on the key you just created and choose New > Key. Name it
command. - In the right pane, set the (Default) value to the command that should be executed. Generally, you’ll use a command like:
"C:Program Files7-Zip7z.exe" a "%1.7z" "%1"This command compresses the selected file into a .7z archive.
- Right-click on the key you just created and choose New > Key. Name it
-
Repeat for Additional Options: You can create additional keys for extraction and other functionalities. For example, you could create a key named “7-Zip Extract Here,” and set the command to:
"C:Program Files7-Zip7z.exe" x "%1" -o"%~dp1" -
Close the Registry Editor: Exit the Registry Editor and test the new options by right-clicking on any file or folder.
Verifying the Custom Context Menu
To verify the changes you made, right-click on any file or folder. You should see your new options under the 7-Zip context menu, affording you quick access to compression or extraction tasks.
Additional Tweaks and Advanced Options
For users who want to take their 7-Zip integration further, consider these tips:
-
Adding Multiple Formats: Consider adding options for different compression formats. Besides the default 7z, you could add commands for creating ZIP files, TAR files, etc.
-
Using Custom Scripts: If you’re comfortable with scripting, you can create batch files that incorporate more advanced features of 7-Zip and add them to the context menu.
-
Context Menu Editor: You could use third-party context menu editors (like Context Menu Tuner or Easy Context Menu) to make modifications simpler and less error-prone than editing the registry directly.
-
Grouping Items: To keep your context menu organized, secure different 7-Zip commands under a single parent name. For instance, create a “7-Zip Options” key under
HKEY_CLASSES_ROOT*shelland nest all your commands inside this key. -
Backup Registry Changes: After customizing your context menu, ensure you back up the registry settings (File > Export) so you can restore them if needed.
Common Issues and Troubleshooting
-
Context Menu Options Not Showing: If you don’t see your custom options, check that you’ve correctly specified the paths in the registry and that you have administrative rights.
-
Permissions Issue: Sometimes, restricted user accounts won’t trigger context menu changes. Ensure you’re signed in as an administrator.
-
Reinstalling 7-Zip: If you uninstall and reinstall 7-Zip, it may reset your context menu options. Be ready to redo the manual steps outlined above.
-
Performance Issues: Adding too many options can slow down your context menu response. Ensure you keep it as streamlined as possible for efficiency.
Conclusion
Integrating 7-Zip into your Windows 11 context menu enhances your file management capabilities, allowing for quicker and more efficient compression and extraction. By following these steps, you can tailor your context menu to fit your specific needs, improving your workflow and overall productivity.
Whether you are a casual user looking to manage files easily or a power user seeking advanced functions, customizing the context menu is a valuable enhancement. Just remember to back up your settings, and take care while editing the registry, making this tool a powerful ally in your file management toolkit. With these features at your fingertips, handling ZIP and archive formats will be more intuitive and less time-consuming.