
Windows 11 comes with a built-in ZIP File Extractor tool that lets us zip and unzip files with a single click. But many of us still prefer using our favorite yet useful ZIP File Extractor tool, called 7-Zip. No doubt, it’s everyone’s favorite tool, but at the same time, it has a lot of issues that irritate us a lot while using it. Some users said that they aren’t able to unzip and zip files using 7-Zip.
At the same time, some users said that they can’t find the 7-Zip option in their system’s contextual menu. If that’s the same with you, then try all the possible workarounds mentioned in this guide. We hope the listed solutions make the 7-Zip app work again on your Windows 11 PC.
Why Is 7-Zip Not Working in Windows 11?
Here are some of the most common reasons that are making 7-Zip vulnerable and not allowing it to function properly:
- Issues With Computer
- Bugs and Glitches in the App
- 7-Zip Not Added to Right Menu
- Program Not Compatible With the System
- 7-Zip Got Corrupted
- Outdated 7-Zip App
Fix 7-Zip Not Working in Windows 11
Here in this section, we’ve included the most working solutions that can fix the 7-Zip not working issue on your Windows 11 PC with ease.
1. Restart Your Computer
One of the most obvious yet effective solutions is to restart the affected device. In most cases, restarting the device fixes the issue in seconds. So, try rebooting your Windows PC twice or thrice in a row and check if this fixes the issue. If it doesn’t, move to the other solutions and try them.
2. Force Quit & Restart the 7-Zip Program
Another possible solution to fix the program-related issues is to force close and restart the app. Doing so completely closes the program and its processes and offloads them from the system’s storage until you reopen it.
You can also force close the 7-Zip app from Task Manager and then restart it. If you don’t know how to do this, then we’ve explained the same in the below-mentioned steps with ease:
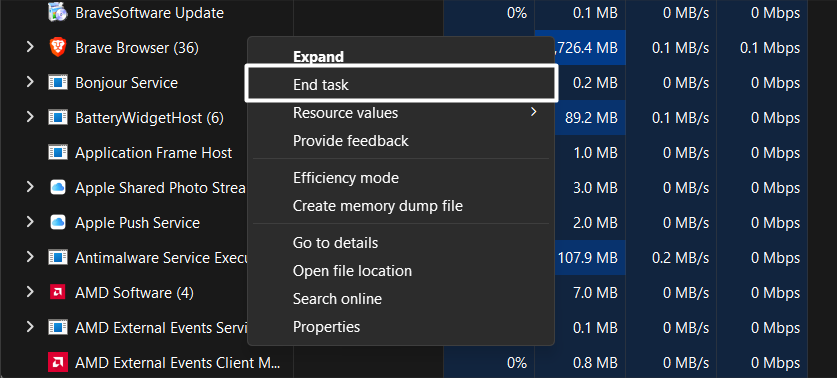
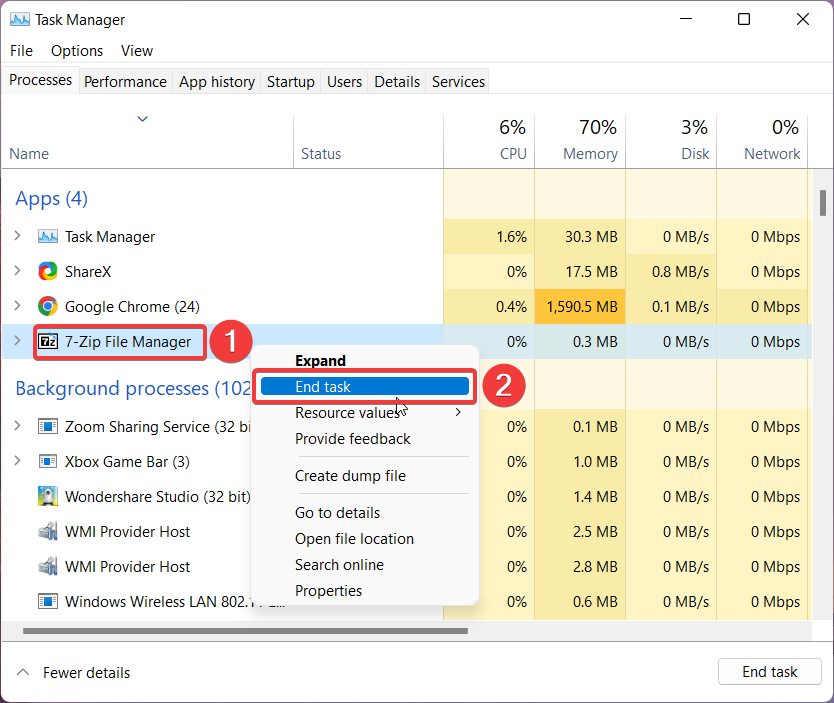
1. To start, open the Task Manager utility on your Windows 11 PC using the Control + Shift + Esc shortcut.

2. Once the Task Manager is opened, look for the 7-Zip process in the Processes section and right-click on it.

3. In the end, select the End Task option from the right-click menu to completely close the selected app and its operations.
Once you’ve closed the 7-Zip application, restart it. Now, check whether you’re now able to zip and unzip files using the 7-Zip program.
3. Click on ‘Show More Options’ To Get the 7-Zip Option
During the research, we found that some users are facing issues while opening the ZIP files using the 7-Zip app. According to them, when they select the ZIP file, open the right-click menu, and expand the Open with option, then they don’t get the option to open it with 7-Zip.
We’ve found that the new contextual menu in Windows 11 doesn’t show all the options. Therefore, we always suggest opening the entire menu by clicking on Show more options to view all the options. You can check the steps below to open the full context menu and look for the 7-Zip app:
1. So first, right-click on the ZIP file you want to open, and then select the Show more option from the dropdown menu.
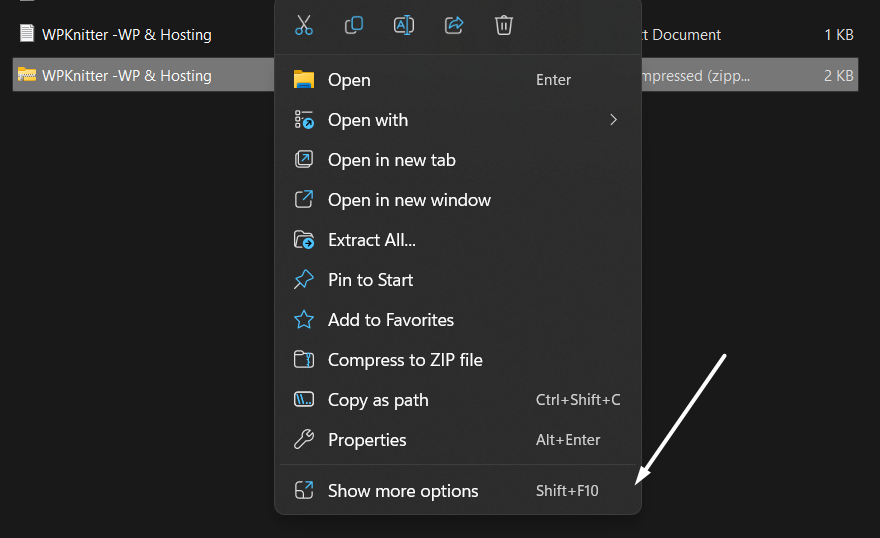
2. Next, look for the 7-Zip option in the contextual menu, and select it to get all additional options on the screen.
3. Now, select the option according to what you want to do with the ZIP file. You can choose whether you want to directly open the ZIP file or extract it.
4. Add the 7-Zip Option to the Right Menu
If the 7-Zip option is still not visible in the system’s contextual menu, then it could be possible that it hasn’t been added to the menu yet. You can add it to the contextual menu from the 7-Zip app’s settings. Follow the listed steps to know how to do the same:
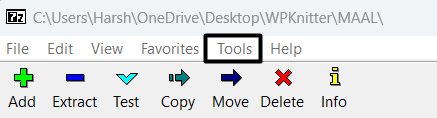
1. To start, launch the 7-Zip app on your Windows 11 PC and select the Tools option from the top menu.
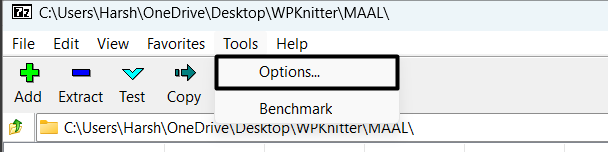
2. Then, select Options from the dropdown menu and then move to the 7-Zip section by selecting the same from the top.
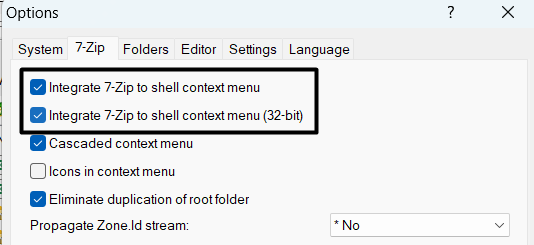
3. In the 7-Zip section, ensure the Integrate 7-Zip shell context menu and Integrate 7-Zip shell context menu (32-bit) checkboxes are checked.
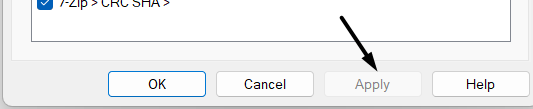
4. Click on Apply at the bottom to save the changes and then close the tab.
After doing this, open the context menu and check if the 7-Zip option is visible now. If it’s not, try other solutions on the list.
5. Set 7-Zip as a Default Program To Open Zip Files
Many users said that they want to open the ZIP files by default with the 7-Zip app, but they aren’t able to. They mentioned that all the ZIP files open using the Windows built-in ZIP File Extractor tool.
The primary reason for this issue is that the 7-Zip app is not set as the default app to open ZIP files. If that’s the same case with you, follow the mentioned steps to set the 7-Zip app as the default app to open the .zip files
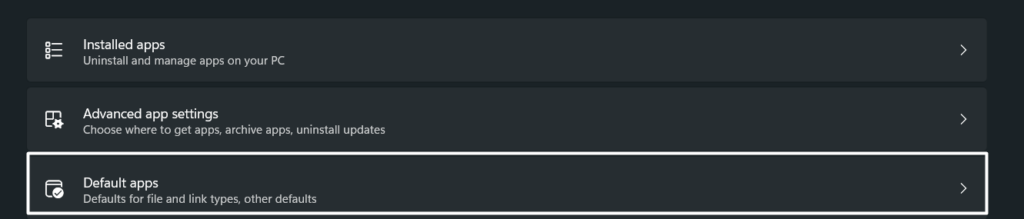
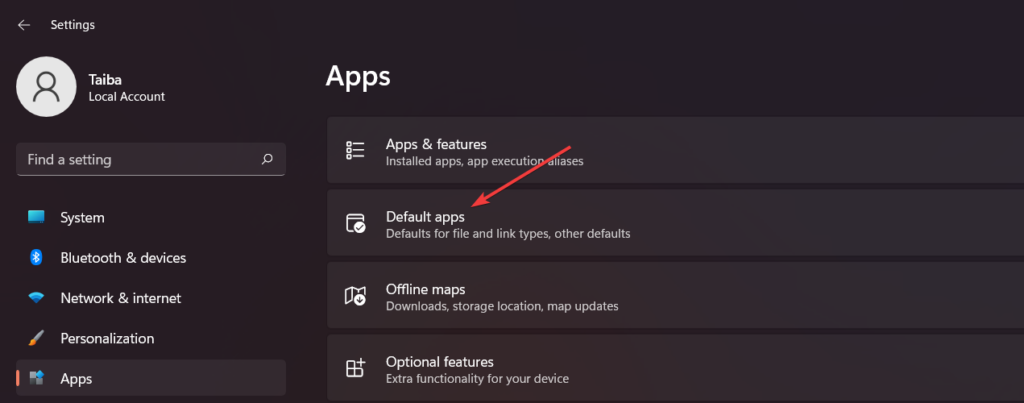
1. Open the Settings app on your Windows 11 PC and proceed to the Apps section from the left sidebar.

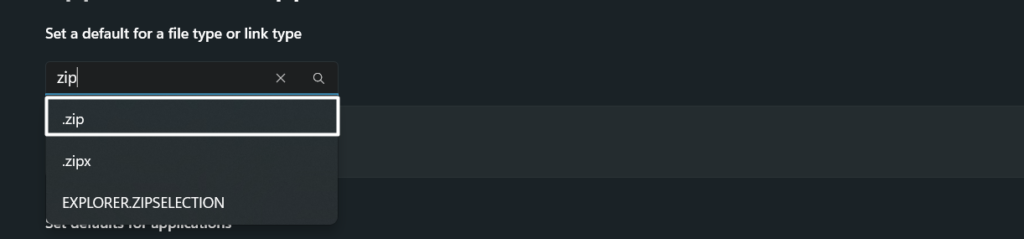
2. Now, move to the Default apps section and search for the .zip file extension using the search bar at the top.
3. Now, select the .zip file extension from the search results, and select the 7-Zip app from the given choices.
4. Once the app is selected, click on the Set default button to set the 7-Zip app as the default app to open ZIP files.

After setting the app as the default app, try opening a ZIP file and see if it’s opening using the 7-Zip app.
6. Run Program Compatibility Troubleshooter
As you know, the new Windows 11 has many built-in troubleshooters, one of which is the Program Compatibility Troubleshooter. This troubleshooter helps you find and fix compatibility issues with the apps installed on your system.
You can try running the Program Compatibility Troubleshooter to fix compatibility issues with the 7-Zip app. We’ve mentioned the steps below to use this built-in troubleshooter:
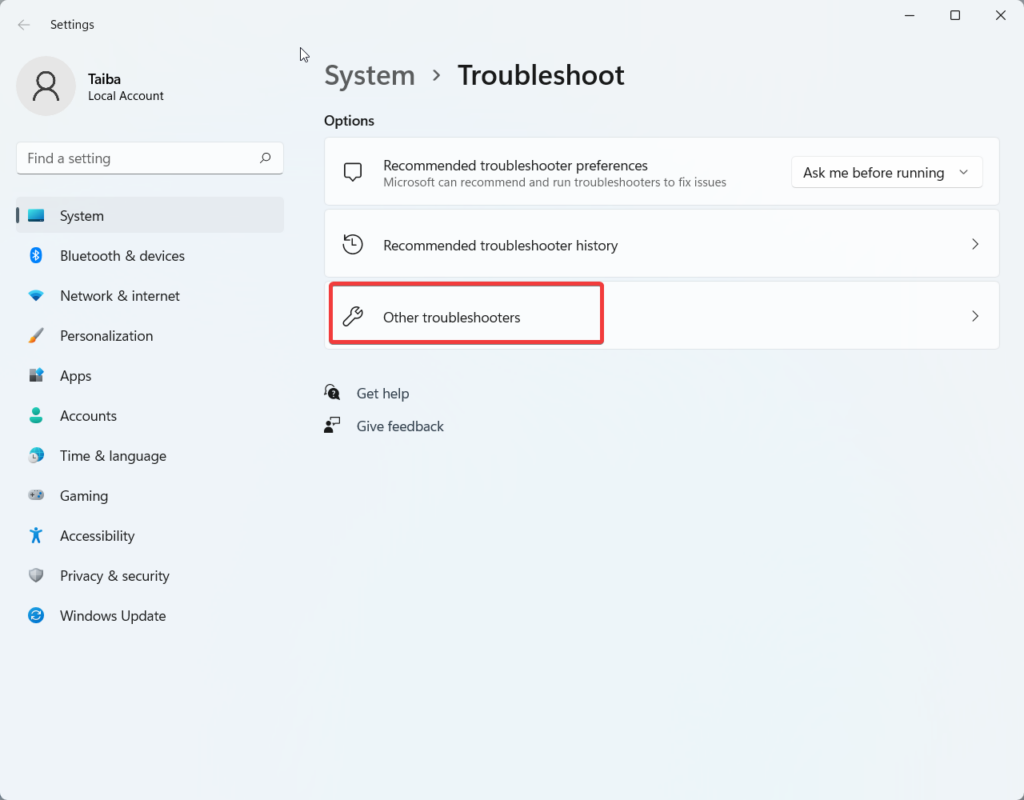
1. To do so, move to the Settings section of your Windows computer and then navigate to the Troubleshoot section.
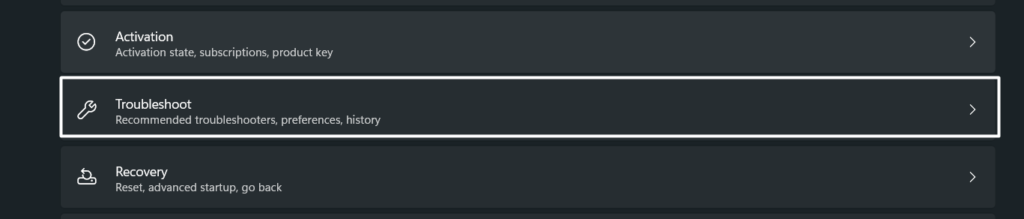
2. Now, proceed to the Other troubleshooters section in the Troubleshoot section to view all the integrated troubleshooters.
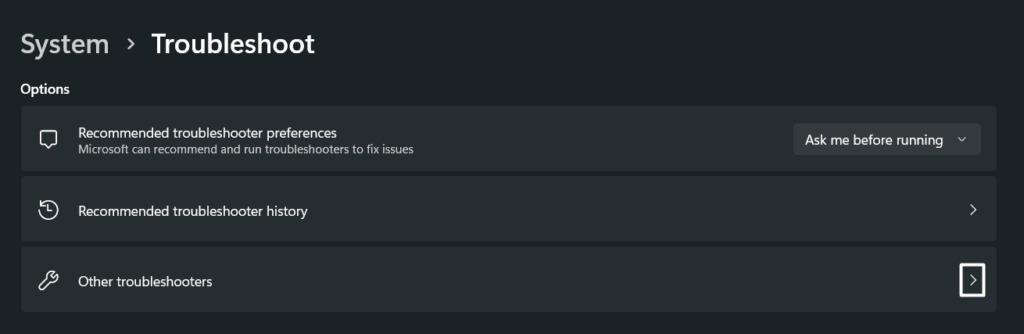
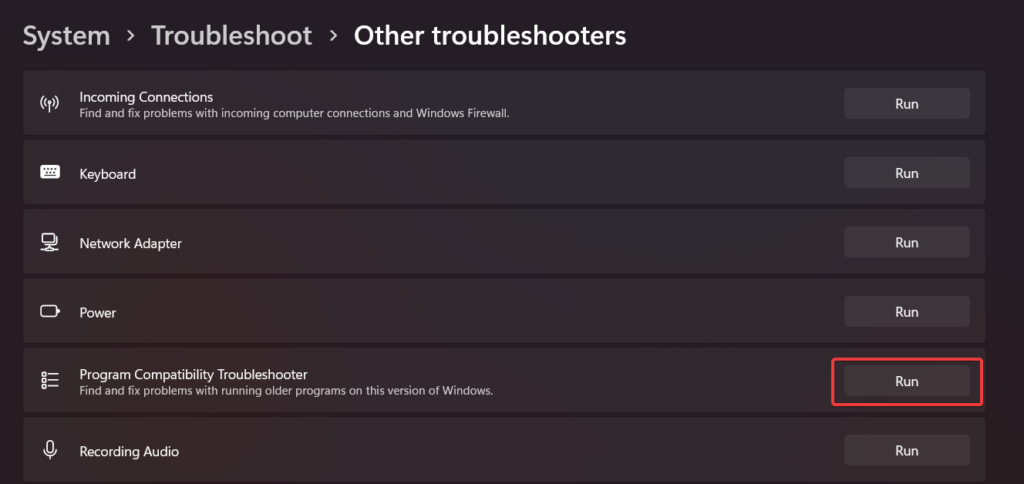
3. Next, search for Program Compatibility Troubleshooter and click on Run next to it to start the troubleshooter.

4. Then, click on Yes in the Get Help pop-up and then select the 7-Zip File Manager app from the Which application do you want to troubleshoot? section.
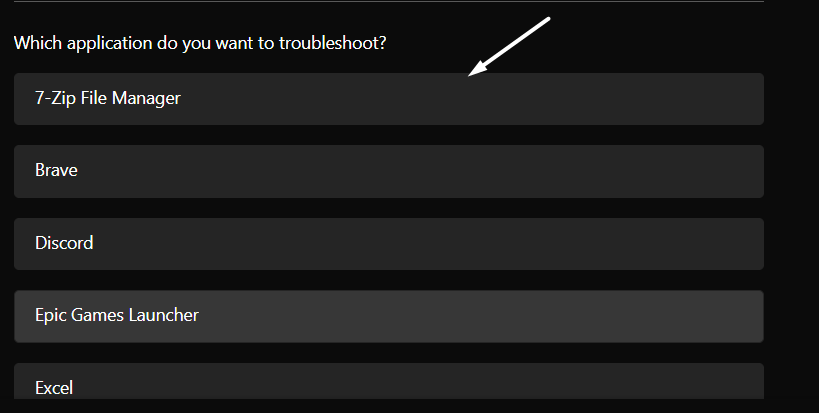
5. In the end, follow the on-screen instructions to find and fix compatibility issues with the 7-Zip app.
We hope the Program Compatibility Troubleshooter fixed the issue for you.
7. Reset & Repair the 7-Zip App
If the built-in Program Compatibility Troubleshooter tool doesn’t find and fix issues with the app, then we suggest repairing the app. Windows lets us repair the apps if they function weirdly. Doing so deletes all the app’s data and fixes issues with it.
Besides this, you can also try resetting the 7-Zip app, which will revert the app to its default state and clear the app’s data. So, take a look at the below-mentioned steps to know how to repair and reset the 7-Zip app:
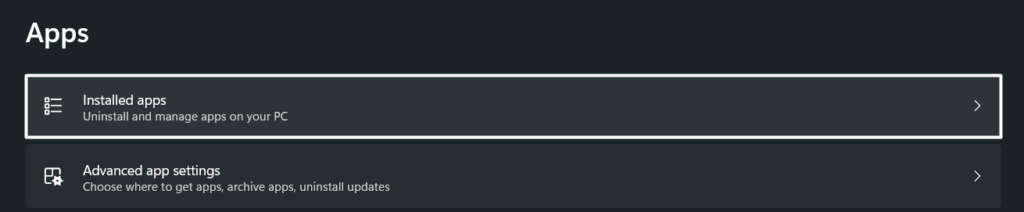
1. To start, open the Settings app on your Windows 11 PC and move to the Apps section from the left side menu.
2. Subsequently, move to the Installed apps section and search for the 7-Zip app using the search bar at the top.
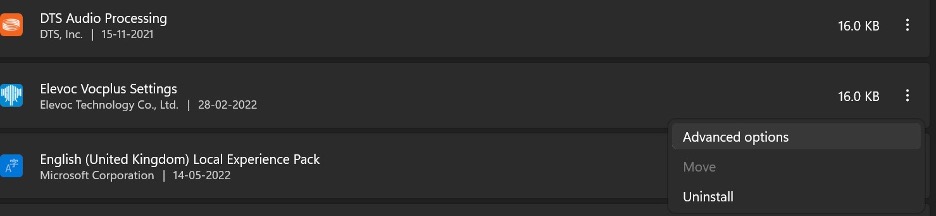
3. Then, click on the three dots next to the app and select Advanced options from the menu to open advanced options.
4. Next, scroll down until the end to move to the Reset section and click on the Reset option to reset the app.
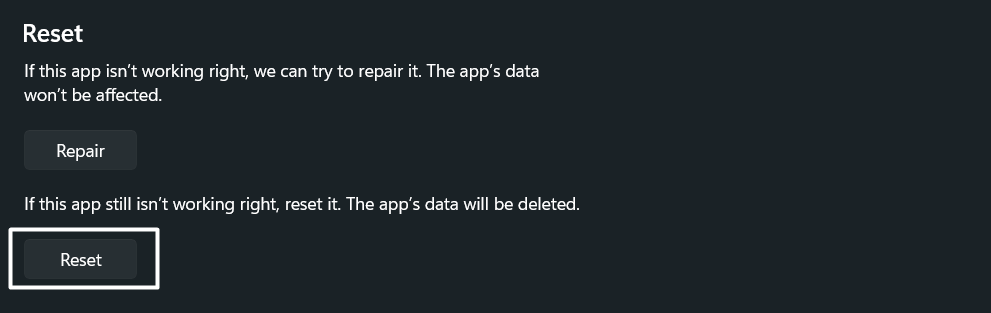
5. Lastly, click on the Repair option in the Reset section to repair the app and wait until the app gets repaired.
Once done, restart your system, and then open the app to check the issue’s status.
8. Install the Latest Version of 7-Zip
It could be possible that the current version of 7-Zip has some bugs and glitches, which is the reason you’re going through this inconvenience. In that case, we suggest updating the program to the latest version to see if updating the app fixes the existing issues. You can follow the steps below to update the 7-Zip app on your Windows 11 PC. To update the app, you need to first uninstall the existing 7-Zip app from your PC.
1. First, move to the Apps section of the Settings app to view all the programs installed on your Windows 11 computer.
2. Subsequently, search for the 7-Zip app in the Apps section and click on the three dots next to the app name.

3. Now, select Uninstall from the dropdown menu and then again click on Uninstall to confirm the uninstallation.

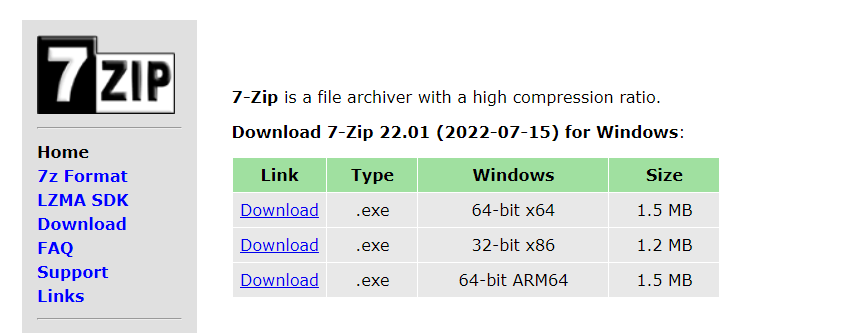
4. Once the app is uninstalled, move to the 7-Zip official download page and click on the Download option. You should download the app made for your Windows PC’s architecture. So, choose accordingly.

After downloading the latest version of the app, install it as you usually do and check whether it’s working fine now.
9. Update Your Windows 11 PC to the Latest Build
Even if reinstalling the program doesn’t resolve the issue, then you can understand that the issue is with the device, not the app. To fix these compatibility issues and bugs in the device, you can try searching for new Windows updates and installing them to see if they fix the issue. Follow the below-mentioned steps to update your Windows 11 PC:
1. Move to the Settings area of your Windows 11 PC and select the Windows Update option from the left side menu.

2. Next, click on Check for updates to search for newly available Windows updates and wait until it shows some updates or ‘You’re Up to Date’ message.

3. If you see some updates on the Windows Update screen, then click on Download and Install all to install them.

Once the PC is updated, open the 7-Zip app and check if you’re now able to zip and unzip files without any issues.
10. Reset Your Windows 11 PC
If your luck is too bad, and even updating the PC doesn’t resolve the issue, then we think you’ve no other option than formatting your system. But, if you want to go with this solution, you’ve to delete all the data present on your system’s storage.
This is because the issue exists within the device, not the 7-Zip app. Doing so will definitely fix the issue. So, If you’re ready to reset your Windows 11 PC, follow the below-mentioned steps to start with it:
1. First, press the Windows + I keyboard shortcut to open the Settings app and move to the Recovery section.

2. In the Recovery section, click on the Reset PC button under the Recovery options section to get more reset options.
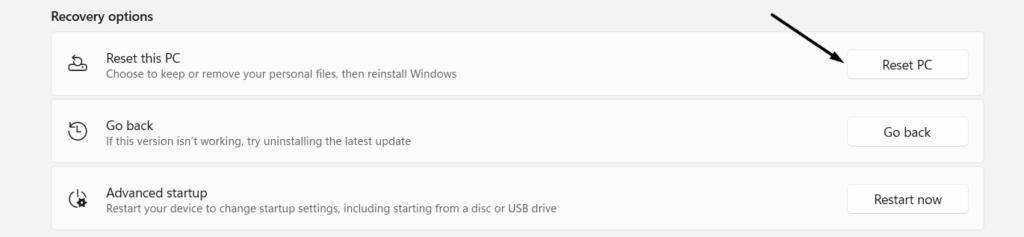
3. Lastly, click on Remove Everything in the Reset this PC pop-up to begin formatting your Windows 11 PC.

Once you’ve formatted your Windows 11 PC, you need to set up the PC again and install the 7-Zip program again. After reinstalling the app on your system, launch it and check if the problem with it is fixed now.
Frequently Asked Questions
Does 7-Zip Work in Windows 11?
7-Zip works with most versions of Windows, including Windows 11. You can click on Download to download the app on your Windows 11 PC.
How To Install 7-Zip on Windows 11?
You need to first move to the 7-Zip official download page and click on the Download option next to your Windows 11 PC’s architecture. Once the program is downloaded, you can install it as you usually install other apps.
Why Is My 7-Zip Not Opening?
There could be several reasons behind the ill-functioning of the 7-Zip app. But one of the most common reasons is the bugs and glitches within the program. The best way to fix these irritating bugs is to update the app.
How Do I Unzip a File in Windows 11?
You can check the below-mentioned steps to easily unzip files on your Windows 11 PC:
- To do so, select the ZIP file that you want to unzip, and right-click on it to open the contextual menu.
- Next, select the Extract All option from the context menu, and then choose the destination folder where you want to store the newly extracted files.
- Lastly, click on the Extract option to start the extraction process and wait until the process gets completed.
How Do I Compress a File in Windows 11?
To compress files in Windows 11, follow the below-mentioned steps:
- To start, select two or more files that you want to compress and convert into a ZIP file, and then right-click to open the contextual menu.
- Next, select the Compress to ZIP file option from the contextual menu, give a name to the new ZIP file, and press Enter.
Finally, 7-Zip Is Back Again In Action
We all use 7-Zip several times a day to zip and unzip files. But it has a lot of issues which keep irritating us. For instance, many users are currently facing an issue with 7-Zip, where they aren’t getting the 7-Zip option in their right-click menu or can’t zip and unzip files using it, which is so disappointing.
Fortunately, you have workarounds mentioned in this article. If you were also on the facing end of these issues, we hope we helped you resolve them. Also, do let us know which mentioned solution workaround worked for you.
Would you like to watch a video version of this guide? We have linked it below from our YouTube channel.

7-Zip not working on Windows 11 has been reported to be quite a common problem and you’re not alone to face it. In this article, we will provide a direct and concise guide on how to resolve these problems. This would ensure that 7-Zip functions seamlessly on your Windows 11 computer.
Moreover, we will also address common issues without any unnecessary wordiness. So, let’s dive straight into the solutions.
Here are the methods that you must implement for an instant and quick fix.
Method 1: Update 7-Zip to the Latest Version
To resolve 7-Zip issues the best method is to make sure you’re using the most up-to-date version of the software. You already know that outdated versions can lead to compatibility problems with Windows 11. So, to update 7-Zip, follow these steps:
- Visit the official 7-Zip website.
- Download the latest version of the software.
- Finally, install the new version by following the on-screen instructions.
Method 2: Check for Windows Updates
Outdated Windows 11 can also lead to compatibility issues with 7-Zip. To ensure your operating system is up to date, here are the steps that you must follow:
- First, press the Windows key and click on “Settings.”
- Go to “Windows Update.”
- Finally, click “Check for updates” and let Windows install any pending updates.
Method 3: Reinstall 7-Zip
Sometimes, issues with 7-Zip can be resolved by simply reinstalling the software. Here’s how you can reinstall 7-Zip:
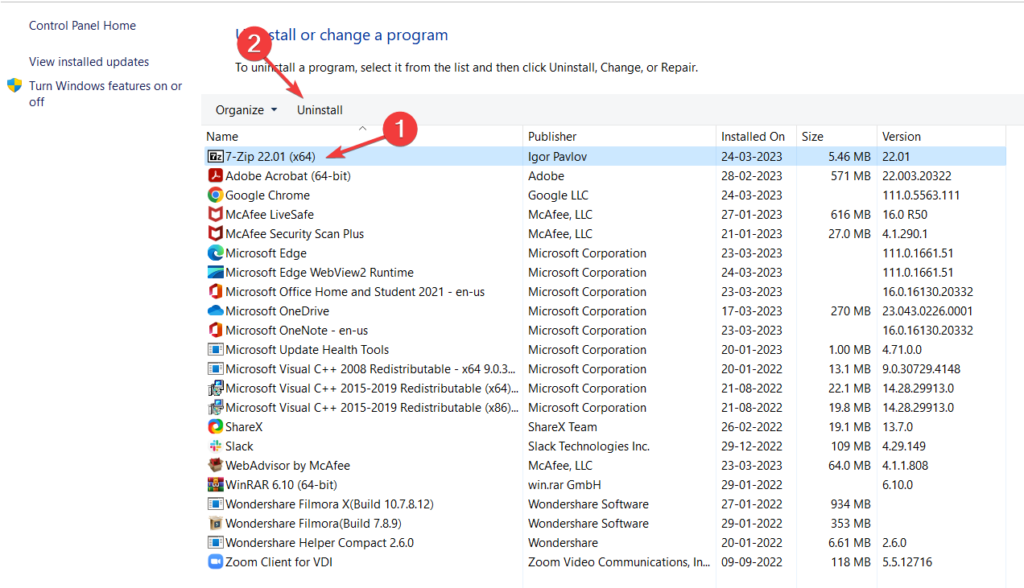
- Uninstall 7-Zip from your computer through the control panel.
- Download the latest version of 7-Zip as mentioned in step 1.
- Finally, install the software again.
Method 4: Run 7-Zip as Administrator
Certain operations performed by 7-Zip might require administrator privileges. So, here are the steps, that you must follow to run 7-Zip as an Administrator:
- Right-click on the 7-Zip shortcut.
- Next, choose the option “Run as administrator.”
Method 5: Check File Associations
Ensure that 7-Zip is set as the default program for opening compressed files. To verify this, here are the steps that you need to follow:
- Right-click on a compressed file (e.g., a ZIP file).
- Choose “Open with” and select 7-Zip.
- Make sure to check the box that says “Always use this app to open .zip files.”
Method 6: Repair 7-Zip
If reinstalling 7-Zip didn’t resolve the issue, you can try repairing the software. Let’s check out the steps that you need to follow:
- Navigate to the Control Panel.
- Go to “Programs” and select “Uninstall a program.”
- Next, find 7-Zip, right-click, and choose “Change.”
- Finally, select the repair option and follow the on-screen instructions.
Method 7: Check for Conflicting Software
Sometimes, other installed software might conflict with 7-Zip. To identify and resolve conflicts:
- Uninstall any third-party compression software.
- Restart your computer and check if 7-Zip works without conflicts.
In Conclusion…..
If you’re experiencing issues with 7-Zip not working on your Windows 11 computer, it can be frustrating. However, following the steps outlined in this article should help you resolve these problems efficiently.
By keeping 7-Zip updated, ensuring Windows 11 is up to date, and following the other steps provided, you can enjoy a seamless experience with this file compression tool.
Remember, it’s essential to tackle the issue methodically, and in most cases, one of these steps should do the trick. Good luck, and happy file compression!
7-Zip is a powerful file-archiving program popular amongst the masses for its exceptional features. It is an excellent program for managing and compressing large files and can easily share files over the internet.
Unfortunately, many users have issues with 7-Zip not working on Windows 11. In this blog post, we’ll discuss some of the most common causes of why 7-Zip is not working on Windows 11 and how to resolve it.
7-Zip may not work on your Windows 11 installation due to compatibility or technical problems. Apart from this, there are a few other possible reasons why 7-Zip might not be working on Windows 11:
- Incompatible version: Some versions of 7-Zip may not be compatible with Windows 11. If you are utilizing an older version of 7-Zip, it may need to be designed to work with the latest version of Windows.
- Corrupted installation files: There are chances that the installation file of 7-Zip may have become corrupted, causing it to malfunction or stop working entirely.
- Security software: Some security or antivirus software may interfere with the operation of 7-Zip software.
- Other software conflicts: Third-party apps installed on your system may conflict with the working of the 7-Zip app.
Fix 7-Zip Not Working in Windows 11
Implement the fixes lined up below to get 7-Zip working again on your Windows 11 PC.
1. Restart Your PC
Restarting your computer is one of the most straightforward yet reliable ways to get the software working again without much effort. Rebooting your computer removes the technical glitch and resets the cache, which resolves the main cause behind the 7-Zip not working issue in Windows 11.
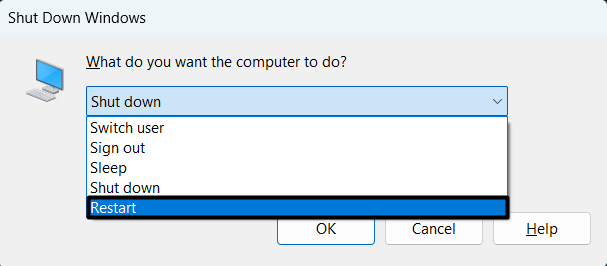
So, click the Windows icon on the taskbar, click the Power icon on the bottom right, and choose the Restart option from the sub-menu.
2. Restart the 7-Zip Process
The 7-Zip process running in the background ensures the functioning of the software on a Windows PC. If this process encounters a problem or stops running, 7-Zip software won’t be able to work properly. To rule out this cause of the problem, you are recommended to restart the 7-Zip process from the Task Manager. Here are the steps to do so:
1. Press your keyboard’s Ctrl + Shift + Esc keys to launch the Task Manager.
2. Go to the Processes tab in the Task Manager and look for the 7z.exe process under the Apps section of the list of running processes.
3. Right-click the 7z.exe process and choose End task from the context menu to terminate the 7-Zip process.
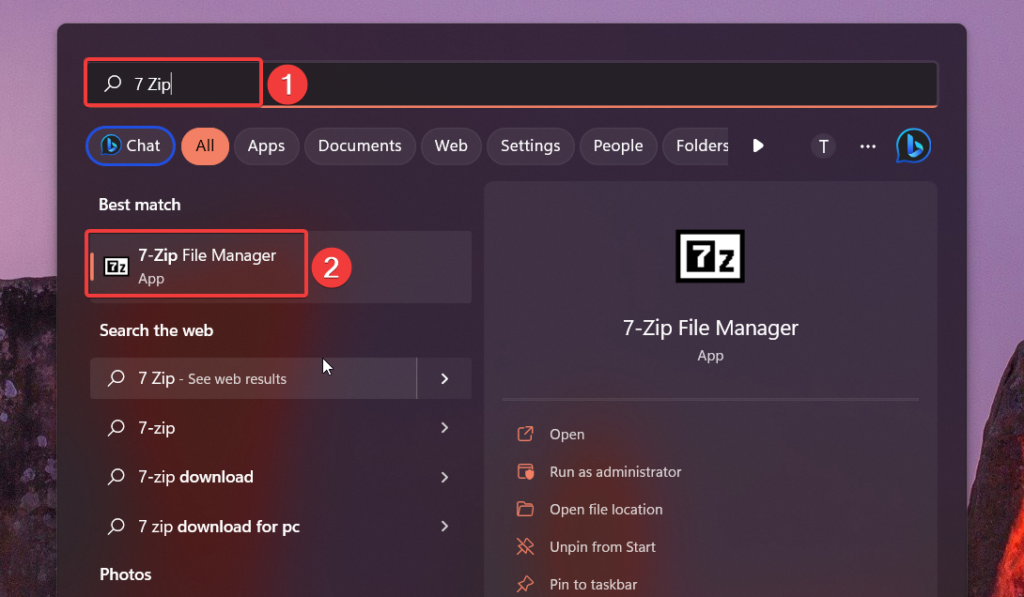
4. Now relaunch the 7-Zip application. For this, click the Start button, type 7-Zip in the search bar on the top, and choose the relevant search result.
3. Run 7-Zip in Compatibility Mode
If restarting the background process could not resolve the issue, there is a good chance that 7-Zip may not be compatible with the version of Windows 11 currently running on your system. To resolve the compatibility issues of software with Windows 11 PC, you can run 7-Zip in compatibility mode.
Running 7-Zip in compatibility mode may solve compatibility issues you may encounter with newer versions of Windows. However, running 7-Zip in compatibility mode is only recommended if you have compatibility issues. Here are the steps to go about it:
1. Right-click the 7-Zip icon on your desktop and choose Properties from the context menu.
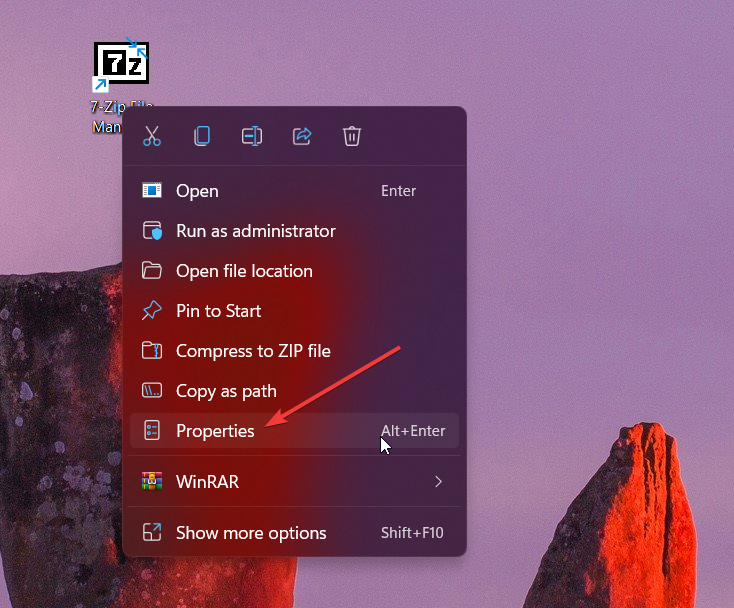
2. Switch to the Compatibility tab of the 7-Zip Properties window and check the box saying Run this program in compatibility mode.
3. In the drop-down menu, select the version of Windows that you want to run 7-Zip in compatibility mode for. For instance, Windows 8.
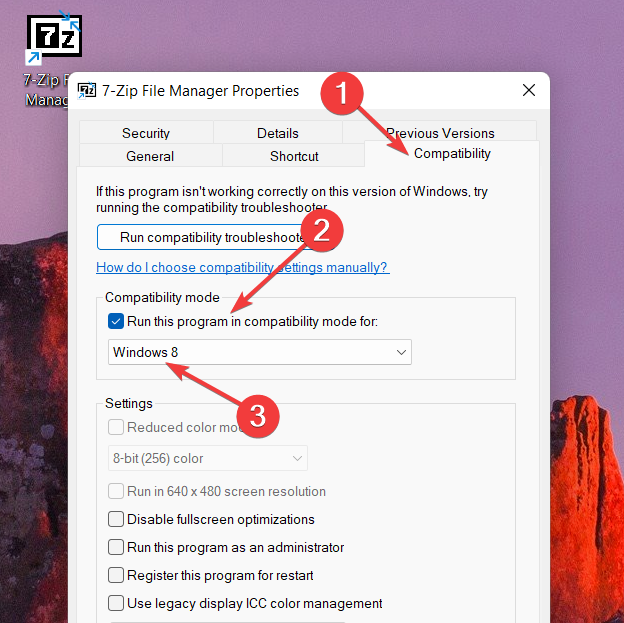
4. Press the Apply button followed by OK to save the changes.
5. Now, re-launch 7-Zip on Windows 11. This time, the app will run in compatibility mode with the selected version of Windows and, hopefully, will run just fine.
If 7-Zip does not appear in the context menu of the files when you right-click them, this could be because the software functionality has not been integrated into the context menu yet. For the uninitiated, you can tweak the 7-Zip settings to avail the app functionality at a right-click. The steps listed below will help you do the same.
1. Launch the 7-Zip File Manager on your Windows 11 computer.
2. Choose Tools from the top menu bar to get started and then Options from the drop-down menu.
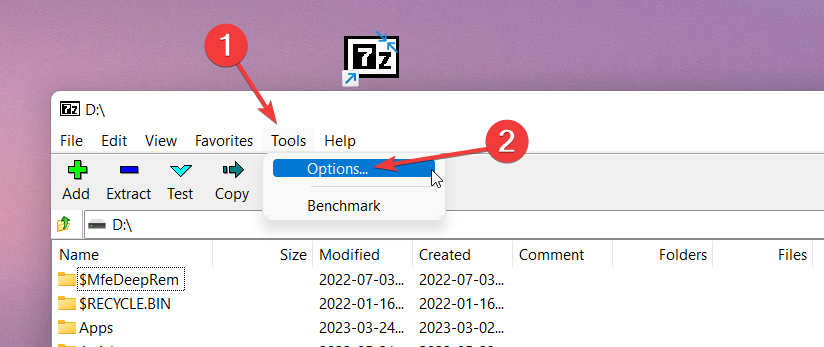
3. Now switch to the 7-Zip tab of the Options window and verify the boxes next to Integrate 7-Zip shell context menu and Integrate 7-Zip shell context menu (32-bit) are checked.

4. Press the Apply button followed by OK to save the changes.
Now right-click any file in the File Explorer and see if the 7-Zip option is now present in the context menu.
5. Set 7- Zip As the Default Program
Numerous customers complained that they desire to use 7-Zip File Manager to open ZIP files by default on their Windows 11 PC but are incompetent in doing so. They mentioned that the ZIP File Extractor tool, build into Windows 11 opens all the .zip files by default. If you are clueless about using 7-Zip as the default program for opening.zip files, follow the instructions below.
1. Launch the Settings program on your Windows 11 computer and navigate to the Apps settings from the left sidebar.

2. Go to the Default applications section and use the top search box under select a default for a file type or link type to look for the .zip file extension.
3. Click the arrow icon on the right to the ‘How do you want to open the .zip files from now on’ window.
4. Choose the 7-Zip File Manager app listed under Other Options and press the OK button.

5. Now open a .zip file app from the File Manager. This time, the 7-Zip app will open the ZIP files by default.
6. Use Program Compatibility Troubleshooter
If you are still unable to make 7-Zip work on Windows 11, you can seek help from the program compatibility troubleshooter. This troubleshooter built into your system helps diagnose the issues with the apps and resolve them without much effort. Here are the steps to run the Program Compatibility troubleshooter on your Windows 11 PC:
1. Press the Windows + I shortcut to launch the Settings app on your PC.
2. Type Troubleshoot settings in the search bar on the left navigation pane and click the relevant search result.
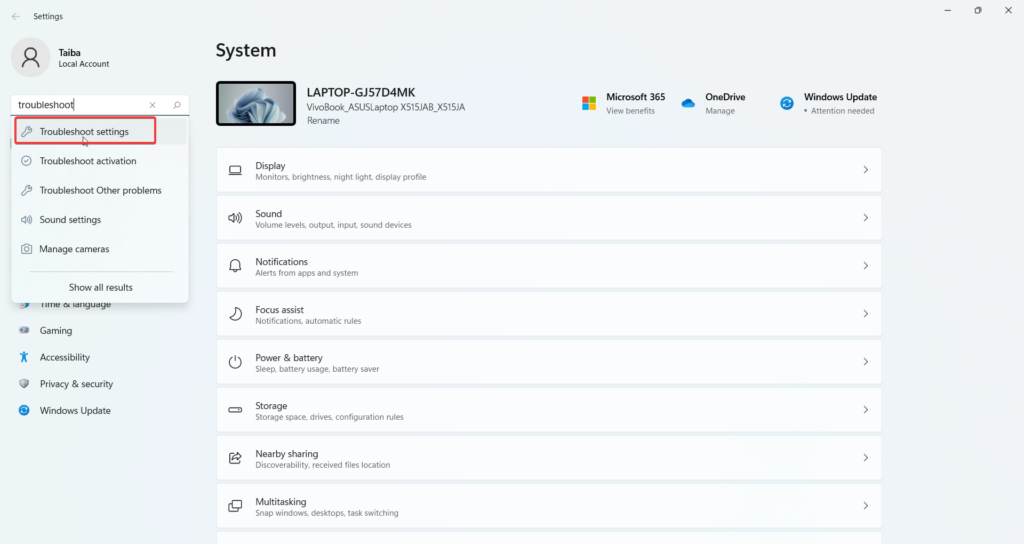
3. You will now directly access the Troubleshoot-related settings. Here, choose Other troubleshooters.
4. Scroll down the list of all the troubleshooters and press the Run button for Program Compatibility Troubleshooter.
Wait for the troubleshooter to identify problems, and when the troubleshooter detects issues, it will provide recommendations for fixing them. Apply the suggested fixes by following the on-screen directions, and when the process is completed, try running 7-Zip again to see if the issue has been resolved.
7. Repair and Reset 7-Zip
If the process still persists with 7-Zip on Windows 11 PC, there is a good possibility that the app may have become corrupt. Fortunately, you can quickly fix the corrupt 7-Zip files using the in-built Repair and Reset tools. Here is the step-by-step process to repair 7-Zip File Manager and then reset the app if the issue isn’t resolved:
1. Use the Windows + I shortcut to bring up the Settings app.
2. Choose Apps from the left sidebar.

3. Next, select Apps & Features from the right side.

4. Look for 7-Zip File Manager in the App list and click the menu icon (three dots) next to it.
5. Choose the Advanced Option from the flyout menu.

6. Keep scrolling down the next page and press the Repair button under the Reset section.
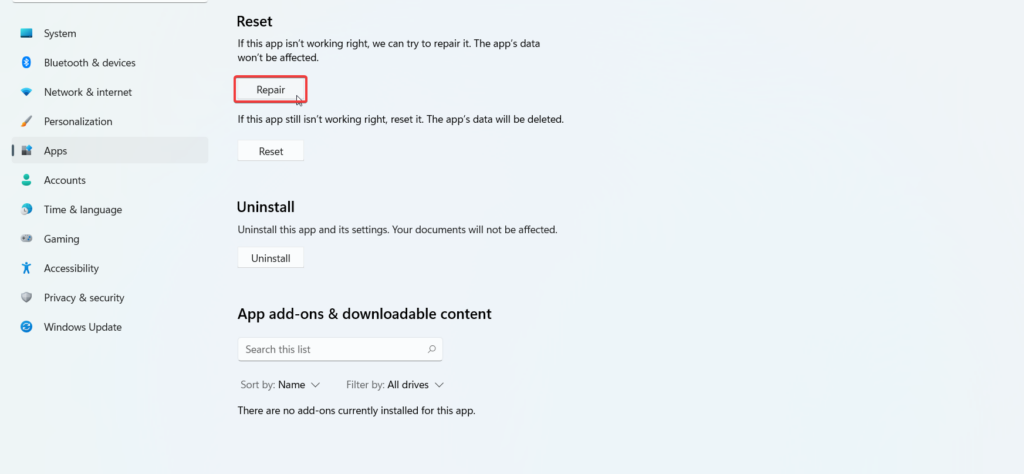
7. When the repair is completed, launch the 7-Zip app once again. If it does not function even now, click the Reset button present below it to reset the program.
8. After the app is reset, restart your computer.
Now try opening the 7-Zip File Manager again to see if the issue has been resolved.
8. Reinstall 7-Zip
If repairing or resetting 7-Zip does not solve the issue, you may need to consider uninstalling and reinstalling the program as your last resort. To reinstall 7-Zip, follow these steps:
1. Go to the Control Panel on your Windows system.
2. Set View by drop-down to Category and then select Uninstall a program.
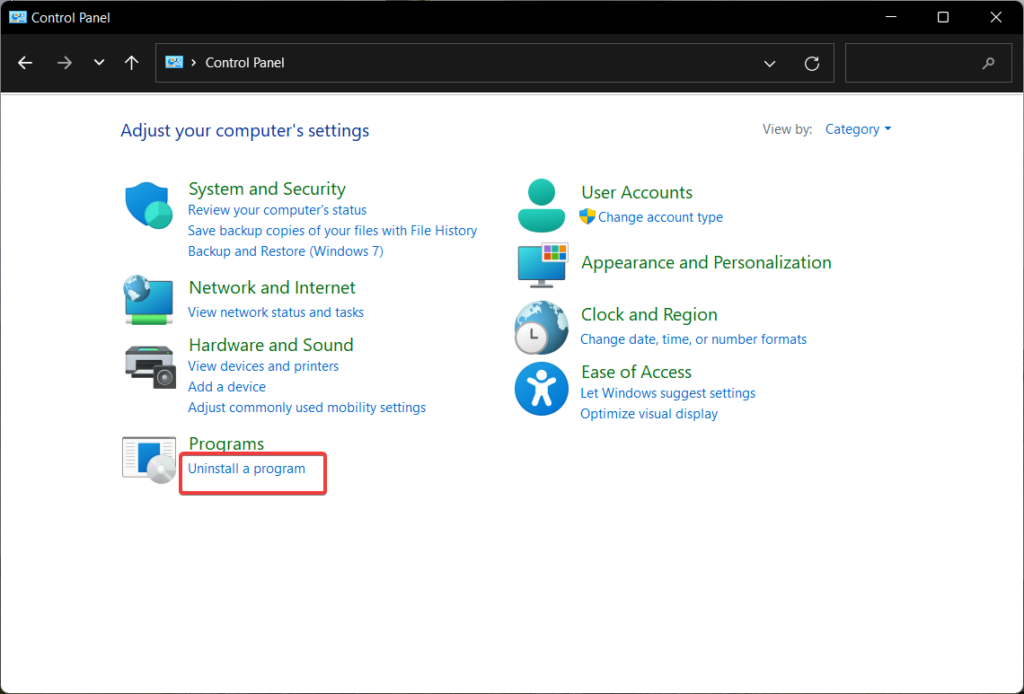
3. Find 7-Zip in the list of installed programs, click it once to select it, and click the Uninstall button on the top menu bar.
4. Once 7-Zip has been uninstalled, go to the official 7-Zip website and download the program’s latest version compatible with your device.
5. After the .exe file is downloaded, run the installer and follow the on-screen instructions to install 7-Zip.
6. Once the installation is complete, restart your computer.
Conclusion
7-Zip is a very handy tool that lets Windows users Zip and Unzip files. So, 7-Zip is not working on Windows 11 can be a disappointment for several uses. Thankfully, you can employ the workarounds provided by this guide to resolve the issue in no time and get the app working again. Which of these solutions worked for you? Do let us know in the comments section.
Encountering issues with 7-Zip on Windows 11 can disrupt our usual file management tasks, especially when it comes to compressing or extracting ZIP files. Rest assured, we’re not alone in this; it’s a common challenge, but one that often has straightforward solutions. As frequent users of Windows 11, we understand the importance of having a reliable tool like 7-Zip for handling large numbers of files or securing sensitive data. It’s essential for our daily digital routines, whether we’re organizing personal files or managing work documents.

When 7-Zip malfunctions, we immediately notice the difficulty in performing simple operations that we often take for granted. From our experience, the fixes usually involve ensuring the application process isn’t hung up, or sometimes it’s as simple as restarting our computer to clear any technical hitches. We’ve learned that such issues don’t always signify a major problem; often, it’s just a temporary glitch.
We know that tackling these issues head-on requires a methodical approach. Making sure that the issue isn’t isolated to a single ZIP file can be our first step. If we can confirm the problem occurs with different ZIP files, it alerts us that the problem is more likely with 7-Zip itself or with Windows 11’s file handling capabilities, rather than a single corrupted file. Let’s remember, efficient problem-solving begins with isolating variables, and in this case, the ZIP files we’re trying to compress or extract.
Contents
- 1 Initial Troubleshooting Steps
- 1.1 Check 7-Zip Installation
- 1.2 Ensure Windows 11 Is Up-To-Date
- 1.3 Verify Archive Integrity
- 2 In-Depth Fixes
- 2.1 Use File and Folder Troubleshooter
- 2.2 Perform SFC and DISM Scans
- 2.3 Reinstall or Reset 7-Zip
- 3 File Association and Context Menu
- 3.1 Change Default App Associations
- 3.2 Restore Missing Context Menu Options
- 4 Advanced Solutions and Optimizations
- 4.1 Configure Folder Optimization Settings
- 4.2 Use Third-Party Compression Tools
Initial Troubleshooting Steps
When 7-Zip fails to work on Windows 11, we can take several specific actions to address the issue. Here, we’ll guide you through the most important initial steps to get your software running smoothly again.

Check 7-Zip Installation
The first move we make is to ensure that 7-Zip is properly installed on your system. We navigate to the Control Panel and select Programs and Features to check if 7-Zip appears in the list of installed software. If it’s absent or appears with errors, we consider re-downloading the latest version of the software from a trusted source and reinstall it. This helps to eliminate any corrupted installation files that may be causing the problem.
Ensure Windows 11 Is Up-To-Date
Keeping Windows 11 up-to-date is crucial for software compatibility, so we check for updates regularly. From Settings, we follow the path Update & Security > Windows Update to download and install any available updates for Microsoft’s operating system. This can resolve inconsistencies between 7-Zip and the OS, especially since software updates often include patches for known compatibility issues.
Verify Archive Integrity
Finally, it’s essential to ascertain the integrity of the archives we attempt to open with 7-Zip. Corrupted archive files may lead to errors, misleading us to believe there is a problem with the software itself. To confirm this, we try opening different archive files or use the 7-Zip’s built-in “Test” feature on the suspect file. If other files open without issue, it suggests an isolated case of file corruption, and we focus on the problematic archive rather than the 7-Zip application.
In-Depth Fixes
When facing issues with 7-Zip on Windows 11, it’s crucial to pursue targeted solutions that address system-level problems and application-specific malfunctions. We’ll walk through three in-depth fixes that target these areas effectively.
Use File and Folder Troubleshooter
Windows 11 includes various troubleshooters designed to automatically fix common problems. We can use the File and Folder Troubleshooter to diagnose and resolve issues with file operations – critical when 7-Zip falters. To access this tool, navigate to the system settings, update & security, and select the troubleshoot option.
Perform SFC and DISM Scans
Corrupt system files can interfere with 7-Zip’s functionality. To address this, we should use Windows built-in System File Checker (SFC) and Deployment Image Servicing and Management (DISM) tools. SFC scans for and repairs corrupted system files. We can initiate an SFC scan via Command Prompt by typing sfc /scannow. Post this, running a DISM scan with dism /online /cleanup-image /restorehealth can help fix the Windows image and resolve persistent issues.
Reinstall or Reset 7-Zip
If the above steps don’t solve the issue, we may have to reinstall or reset 7-Zip. This process wipes the current setup, potentially clearing any glitches. We can uninstall 7-Zip through the Apps and Features settings, then download the latest version from the official site for a fresh install. Alternatively, if 7-Zip offers a reset feature within its application settings, utilizing this function can refresh the software without a full reinstallation.
File Association and Context Menu
In Windows 11, encountering issues with 7-Zip can often be traced back to file association errors or missing entries in the context menu. We’ll guide you through correcting these to ensure 7-Zip functions properly.
Change Default App Associations
When we double-click a file, Windows looks at the file extension and opens it with the associated application. If 7-Zip isn’t working, it could be because it’s not set as the default application for certain file extensions. Here’s how we rectify this:
Steps to Change Default App Associations:
- Open the Settings app by pressing Win + I.
- Navigate to Apps > Default Apps.
- Scroll down and click on Choose default apps by file type.
- Find the file extension associated with 7-Zip (such as .7z) and click the app icon next to it.
- Select 7-Zip from the list of applications.
Sometimes the “Compress to ZIP file” or 7-Zip options go missing from the context menu. This can hinder our productivity, as we rely on the convenience of right-clicking to compress or extract files quickly. To add 7-Zip back to the context menu, we follow these steps:
Steps to Restore Context Menu Options:
- Launch 7-Zip File Manager as an administrator.
- Go to Tools > Options… in 7-Zip.
- Under the 7-Zip tab, ensure the ‘Integrate 7-Zip to shell context menu’ option is checked.
- If missing, check it and click Apply, then OK.
In case we still don’t see the options, we can also check the “Show more options” by right-clicking on the file. This brings up the traditional context menu we are accustomed to from previous versions of Windows. If using an NTFS drive, be sure to check if NTFS permissions affect the context menu availability. Remember, keeping your open-source software like 7-Zip updated assists in avoiding these issues and ensures compatibility with the latest iteration of Windows 11’s File Explorer.
Advanced Solutions and Optimizations
In troubleshooting 7-Zip on Windows 11, we often overlook advanced settings that can lead to better system performance and compatibility. Here, we will address folder optimization settings and the use of robust third-party compression tools.
Configure Folder Optimization Settings
When it comes to file compression and archiving, correct folder optimization is crucial. Windows 11 has built-in settings to optimize folders for general items, documents, pictures, videos, or music. We must ensure that folders containing our archives are optimized for general items to prevent any compatibility issues with 7-Zip or other compression tools. This can be done by right-clicking the folder, selecting ‘Properties’, navigating to the ‘Customize’ tab, and setting ‘Optimize this folder for’ to ‘General items’.
Use Third-Party Compression Tools
Sometimes 7-Zip may not meet our expectations due to various issues. In such cases, turning to alternative third-party compression tools like WinRAR or WinZip can be a smart move. These tools offer support for a wide range of archive formats and often bring additional features such as enhanced encryption or repair options for corrupted files. We must explore different tools and select the one that aligns with our specific needs. For example, WinRAR is known for its strength in dealing with RAR files, while WinZip provides a more user-friendly interface and cloud integration capabilities.
Как установить 7-zip, как сжать, извлечь и зашифровать файлы и папки с помощью 7-zip в Windows 11
Для сжатия, архивирования или удобного и безопасного хранения обычно используют файловый «компрессор». Существует множество хороших программ-архиваторов, включая самые популярные, «WinZip» и «WinRAR», но единственный минус этих двух программ в том, что они платные. В качестве альтернативы можно использовать очень простое и бесплатное приложение — «7-zip».
«7-zip» — один из лучших файловых архиваторов, доступных для Windows. Это ПО для архивирования файлов с открытым исходным кодом, которое может сжимать и распаковывать файлы, а также шифровать файлы.
В этой статье мы разберем, как использовать 7-zip в Windows 11, в том числе как загрузить и установить 7-zip, как сжимать, как извлекать и шифровать архивные файлы и папки с помощью 7-zip.
- 7-zip можно использовать совершенно бесплатно — как в личных, так и в коммерческих целях.
- Программа поддерживает 87 языков.
- Высокий степень сжатия для таких форматов как 7z, ZIP и GZIP.
- Поддерживает 256-битное шифрование AES для форматов 7z и ZIP.
- Упаковка и распаковка: 7z, BZIP2 (BZ2, TB2, TBZ, TBZ2), GZIP (GZ, TGZ), TAR, ZIP (JAR), XZ, WIM.
- Только распаковка: AR, ARJ, CAB, CHM, CPIO, CramFS, DMG, EXT, FAT, GPT, HFS, IHEX, ISO, LZH, LZMA, MBR, MSI, NSIS, NTFS, QCOW2, RAR, RPM, SquashFS, UDF, UEFI, VDI, VHD, VMDK, WIM, XAR, and Z.
- Мощная версия для командной строки.
7-zip постоянно усовершенствуется разработчиками, это еще не предел всех его возможжностей.
Как установить 7-zip в Windows 11
Если вы еще не устанавливали 7-zip в Windows, выполните следующие шаги для того, чтобы загрузить и установить 7-zip.
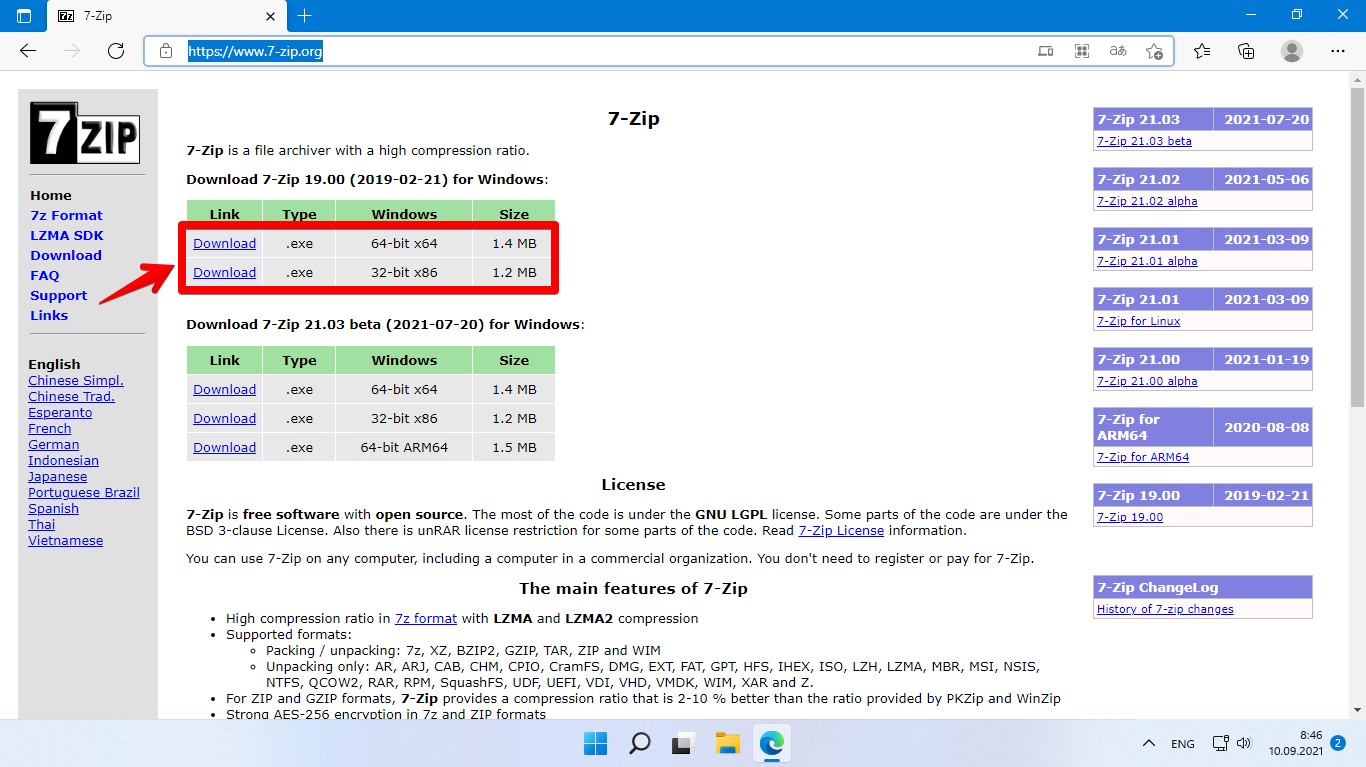
Сперва перейдем на сайт https://www.7-zip.org через веб-браузер. Затем выбираем версию 7-zip, которую хотим загрузить — если у вас 32-битная Windows, выберите 32-битную версию x86 или выберите 64-битную версию x64 для 64-битной Windows.
Щелкаем ссылку «Загрузить», чтобы загрузить файл установки.
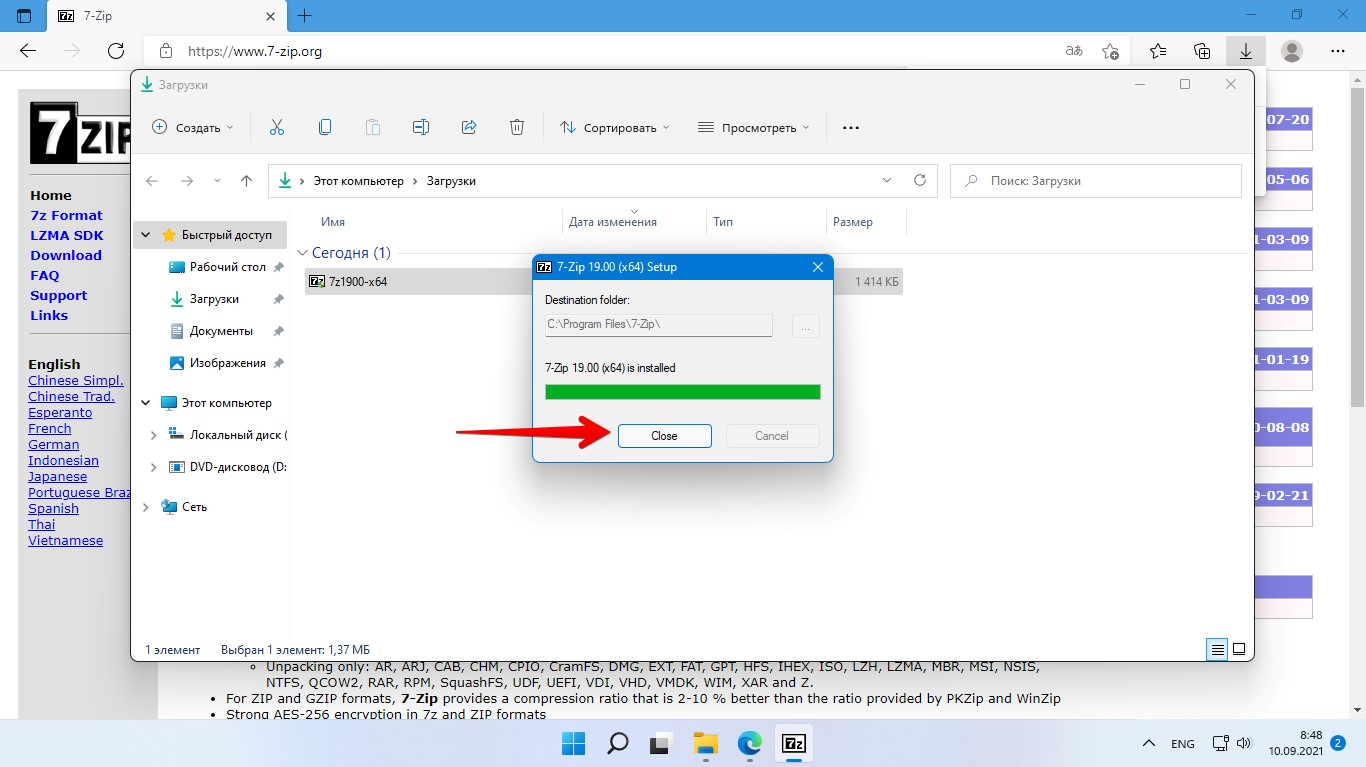
Находим инсталлятор в папке «Загрузки» и запускам двойным кликом мыши (либо через «Открыть»).

Выбираем путь для установки, либо оставляем как есть и нажимаем кнопку «Install».
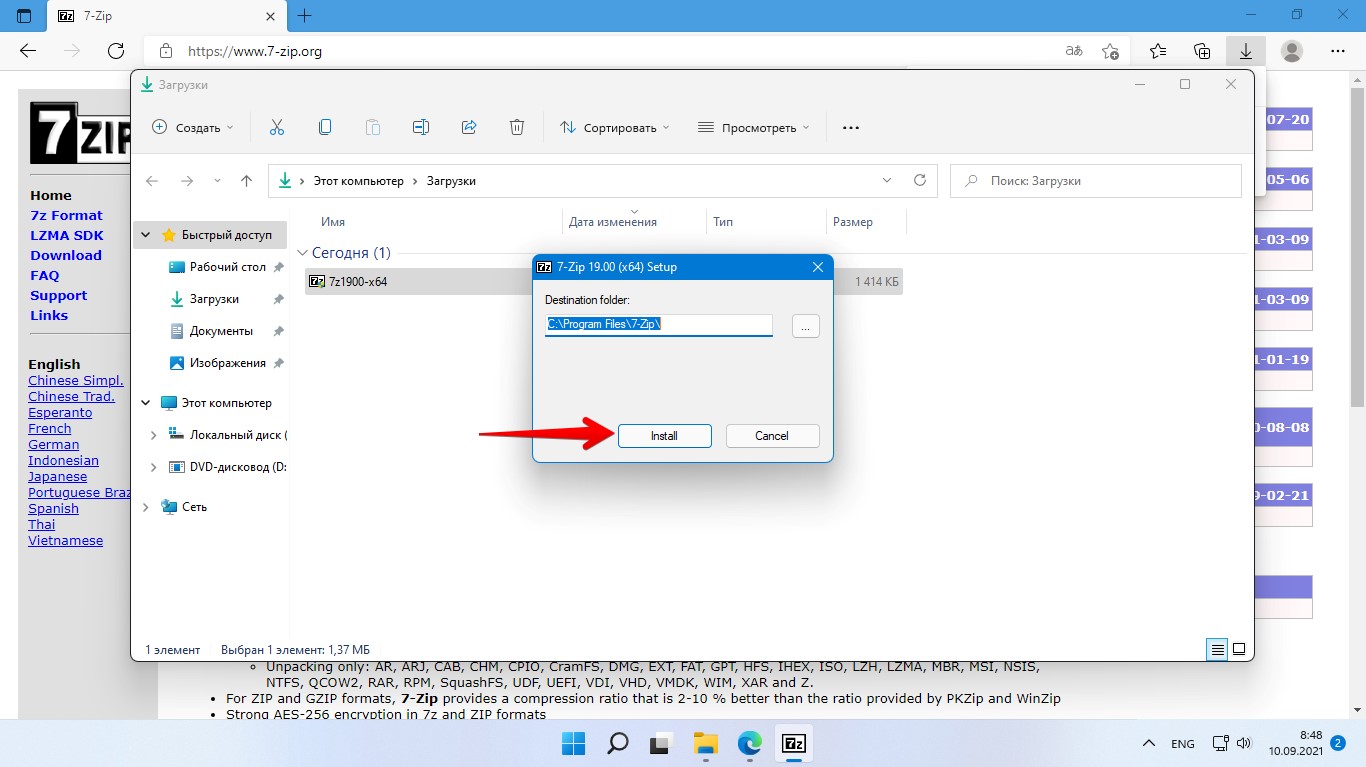
По окончанию установки нажимаем кнопку «Close».
Теперь архиватор 7-zip установлен и найти его можно во всех приложениях через меню «Пуск».
Настройка 7-zip в Windows 11
Прежде чем начать пользоваться 7-zip, необходимо установить это приложение как программу по умолчанию для открытия архивных файлов. Сделать это можно следующим способом:
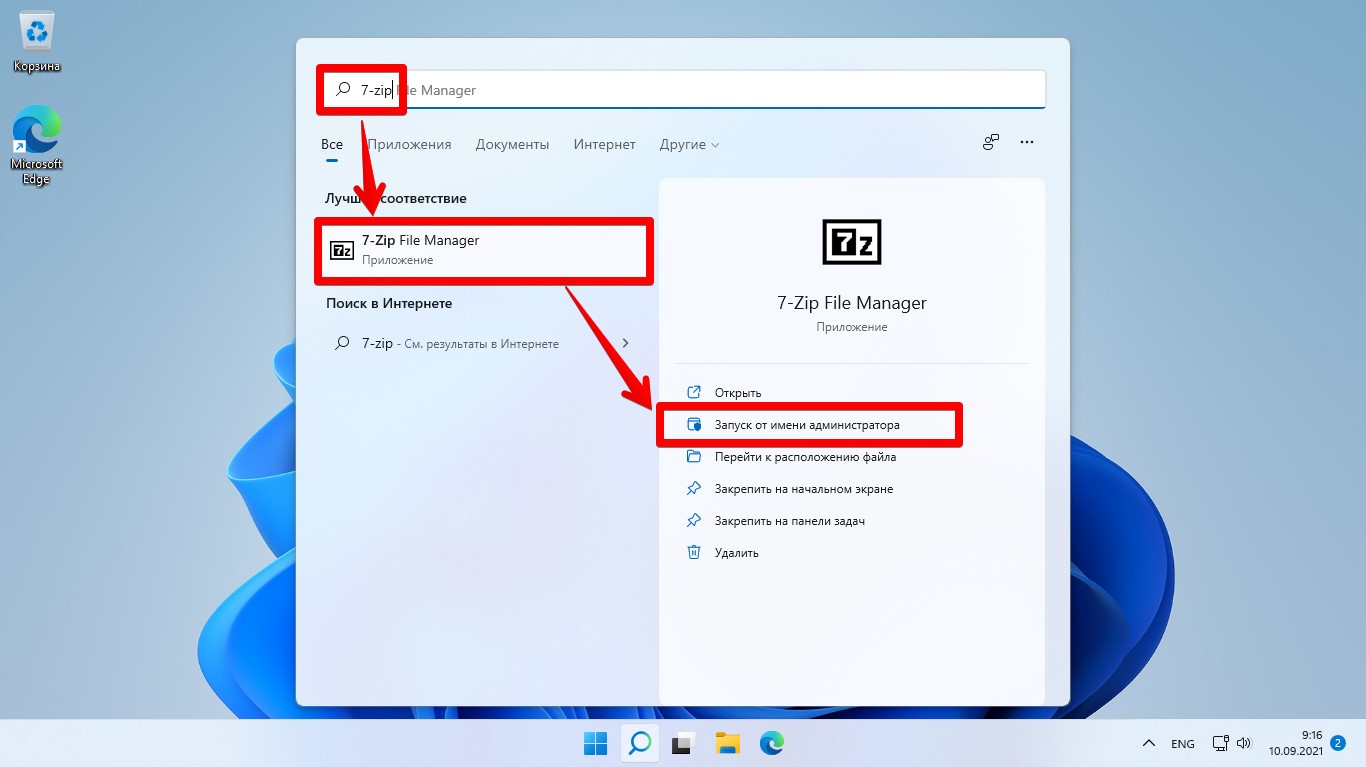
После установки приложения находим «7-zip» в поиске Windows 11 и открываем его от имени администратора.
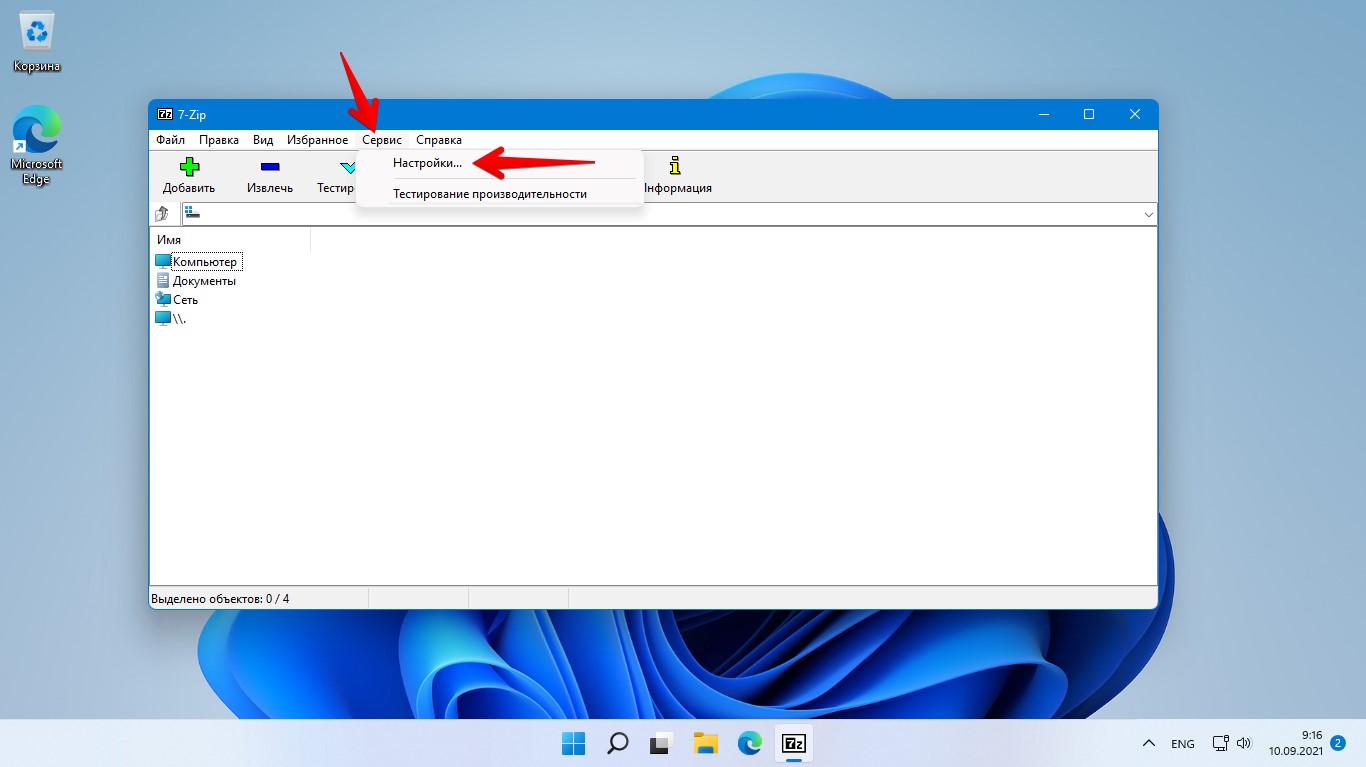
Открываем пункт меню «Сервис» — «Настройки».
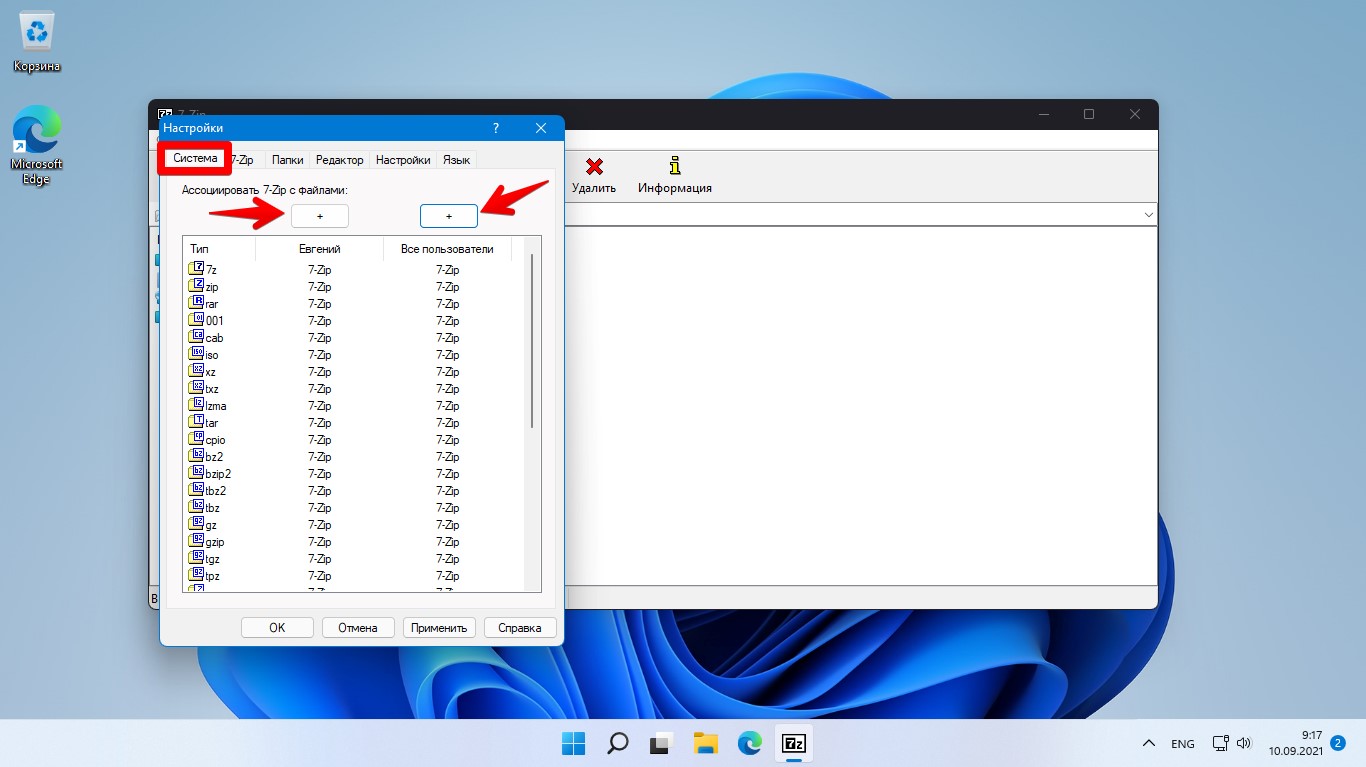
На вкладке «Система» нажимаем первую кнопку «+», чтобы сделать 7-Zip архиватором по умолчанию для всех типов архивов текущего пользователя. Даже если в системе установлено другое ПО для архивирования, нажатие этой кнопки сделает 7-zip архиватором по умолчанию.
Далее нажимаем вторую кнопку «+», чтобы сделать это приложение по умолчанию для всех пользователей. Затем нажмите «Применить», чтобы сохранить настройки, и нажмите «ОК», чтобы закрыть диалоговое окно.
Также можно настраивать типы файлов по отдельности, просто нажимая на них.
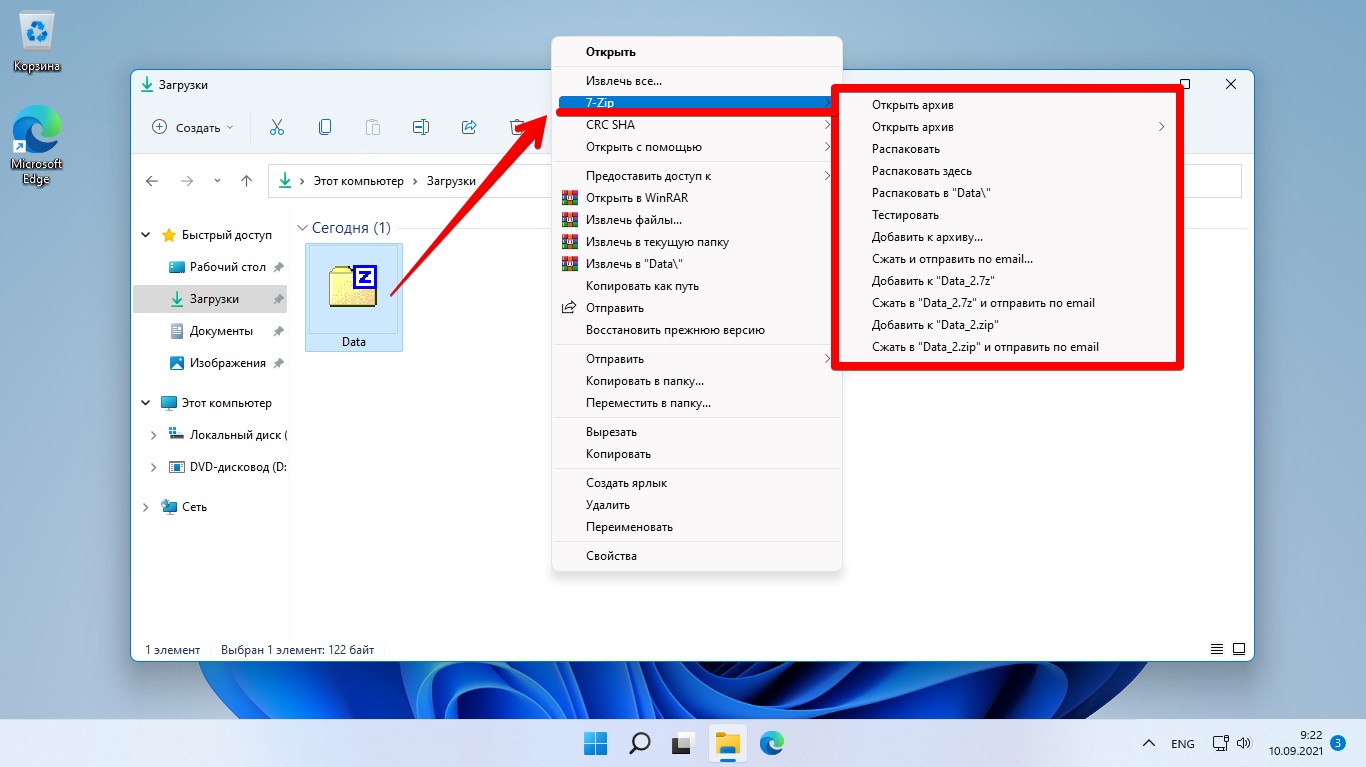
В Windows 11, когда вы щелкаете правой кнопкой мыши по архиву, появляется новое контекстное меню без дополнительных параметров для 7-zip. Для просмотра контекстного меню с дополнительными параметрами 7-zip, вам нужно нажать «Показать дополнительные параметры».

Теперь появится пункт «7-Zip», при наведении на который мы увидим еще больше параметров для работы с архиватором.
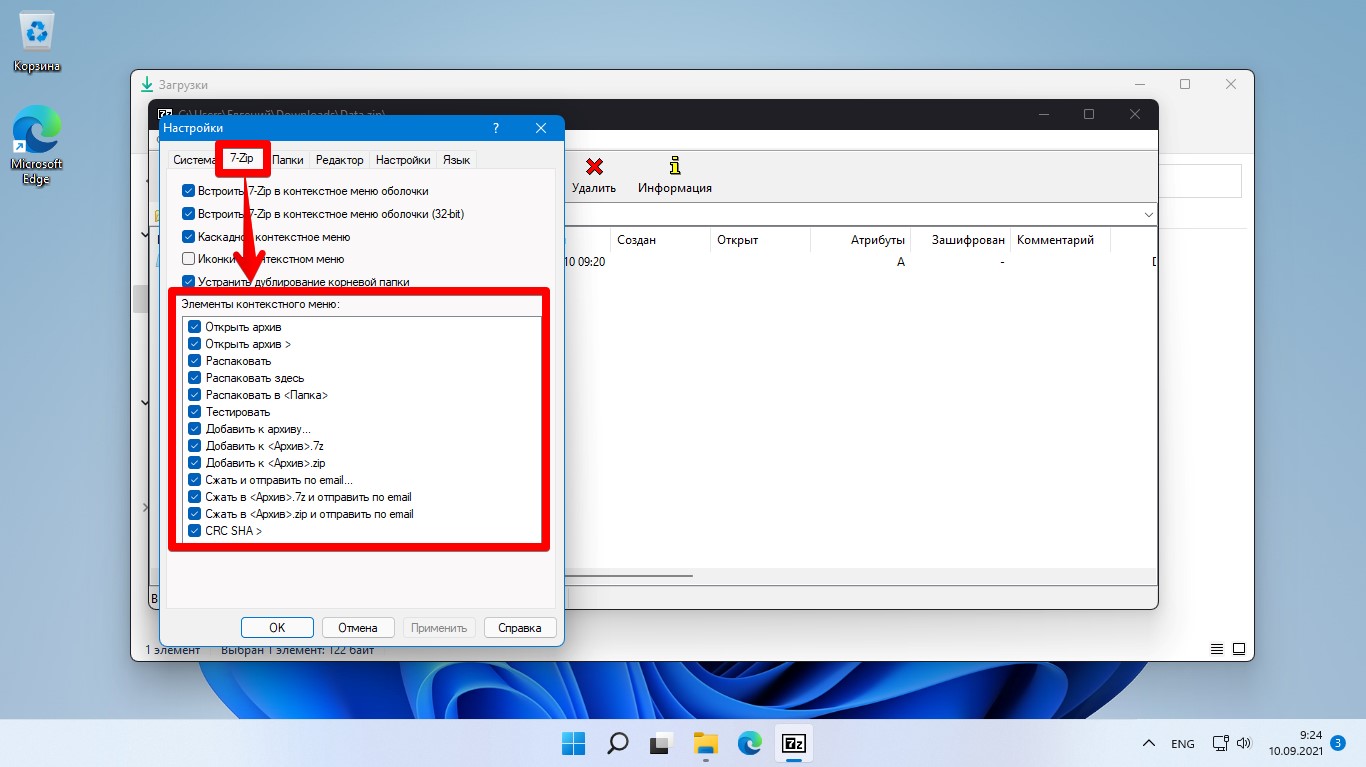
Параметры в контекстном меню можно настраивать по своему желанию. Для этого переходим в приложение «7-zip» —
«Сервис» — «Настройки» — вкладка «7-Zip» — «Элементы контекстного меню». Отмечаем элементы, которые хотим видеть в меню.
Как сжимать файлы с помощью 7-zip в Windows 11
Мы рассмотрели, как установить и настроить 7-zip. Теперь рассмотрим, как использовать 7-Zip для сжатия и извлечения файлов. Давайте сначала рассмотрим, как сжимать файлы.
Выберите один или несколько файлов, которые вы хотите заархивировать, затем щелкните правой кнопкой мыши по выбранному файлу и выберите опцию «Показать дополнительные параметры».

Затем наведите указатель мыши на «7-Zip» и выберите «Добавить в Имя_файла.zip» или «Добавить в Имя_файла.7z» для быстрого сжатия.
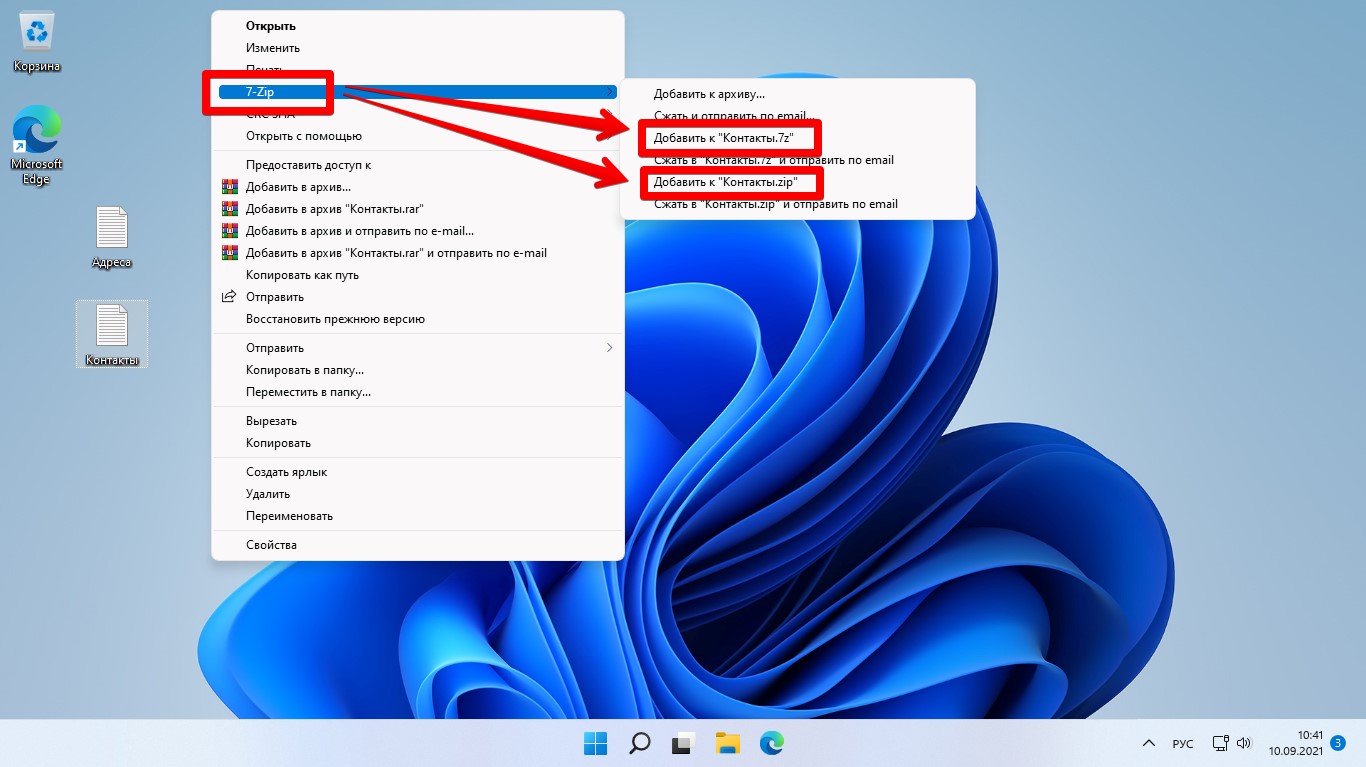
Поскольку форматы «zip» и «7z» являются самыми популярными типами архивов, эти форматы указаны как форматы архивов по умолчанию в контекстном меню. Но 7-zip может архивировать файлы и в других форматах, включая zip, tar, wim и 7z.
Чтобы выбрать другой формат файла и настроить параметры сжатия, выберите файлы, которые нужно заархивировать, щелкните правой кнопкой мыши — «Показать дополнительные параметры» — «7-Zip» — «Добавить к архиву…».

В окне «Добавить в архив» у вас есть различные настройки для управления сжатием. Вы можете переименовать файл в поле «Архив». Вы также можете изменить место сохранения сжатого файла, нажав кнопку с квадратными точками рядом с полем «Архив».
Если вы хотите выбрать другой тип архива, выберите тип файла в раскрывающемся списке «Формат архива». Вы можете выбрать форматы «7z», «tar», «wim», «zip», «xz», «bzip2» и «gzip».
Увеличить и уменьшить время сжатия можно при помощи настройки «Уровень сжатия» (от «Без сжатия» до «Ультра»). По умолчанию выбран вариант «Нормальный», который обеспечивает более стабильную скорость сжатия.
Изменить степень сжатия можно при помощи различных алгоритмов в опции «Метод сжатия» (доступны «LZMA2», «LZMA», «PPMd», «BZip2»).
Если необходимо разделить архив на несколько частей, установите размер файла в настройке «Разбить на тома размером (в байтах)».

По завершении настройки параметров нажмите «ОК», чтобы начать сжатие.
Архиватор 7-zip создаст новый сжатый файл в выбранном вами формате и с выбранными вами настройками. Время сжатия файлов может составлять от нескольких секунд до нескольких часов, в зависимости от количества файлов, папок, размера и производительности вашего ПК.
Как зашифровать файлы с парольной защитой 7-zip в Windows 11
7-zip не только архивирует файлы, но также может и защищать ваши файлы паролем. 7-zip поддерживает шифрование с помощью алгоритма AES-256, который является одной из самых надежных версий AES. Это означает, что зашифрованные файлы не могут быть прочитаны без правильного ввода пароля. Это очень удобно, когда у вас есть файлы с важной информацией.
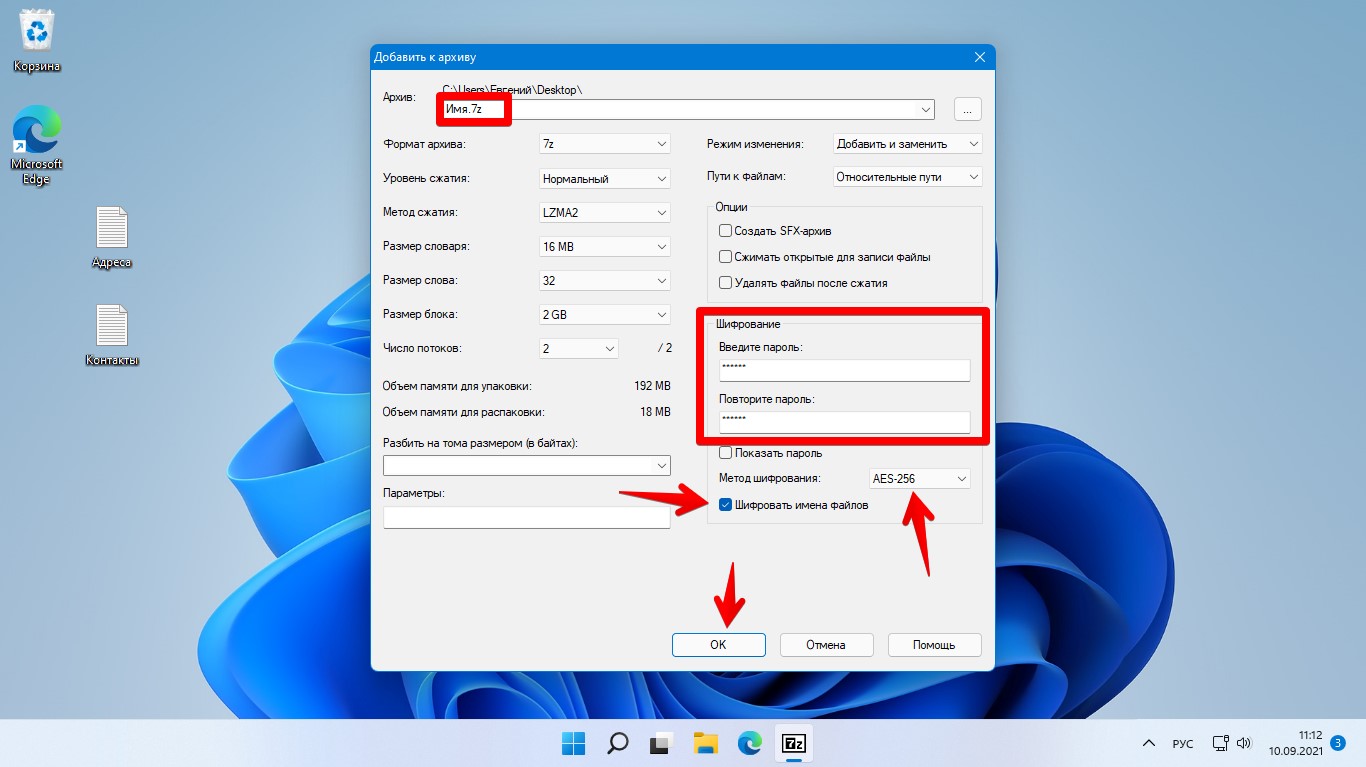
Сначала выбираем файл(ы) или папку, которые мы хотим зашифровать, далее щелкаем правой кнопкой мыши, выбираем «7-Zip», а затем нажимаем пункт «Добавить к архиву…».
В окне «Добавить к архиву» выбираем имя и путь для шифруемого файла, затем выбираем формат архива «zip» или «7z».
Затем вводим и повторяем пароль в разделе «Шифрование». «Метод шифрования» выбираем «AES-256». Если вы используете формат 7z, вы также можете установить флажок «Шифровать имена файлов» для дополнительной безопасности. По завершении нажимаем «ОК», чтобы начать сжатие.
Для создания надежного пароля рекомендуется использовать пароль, содержащий хотя бы одну цифру, хотя бы одну заглавную букву, одну строчную букву и специальные символы.
Как извлечь файлы через 7-zip в Windows 11
Извлечь файлы проще, чем их сжать. Открываем архив, нажимаем кнопку «Извлечь» — кнопка с тремя точками «Обзор» — выбираем папку, куда будем извлекать файлы и нажимаем «ОК» и еще раз «ОК» в окне «Копировать».

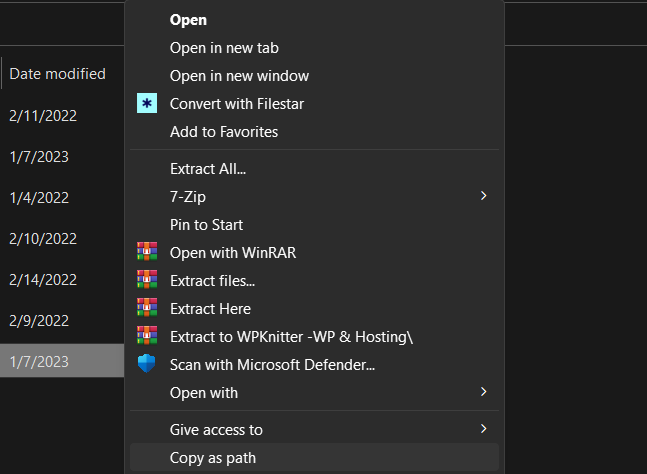
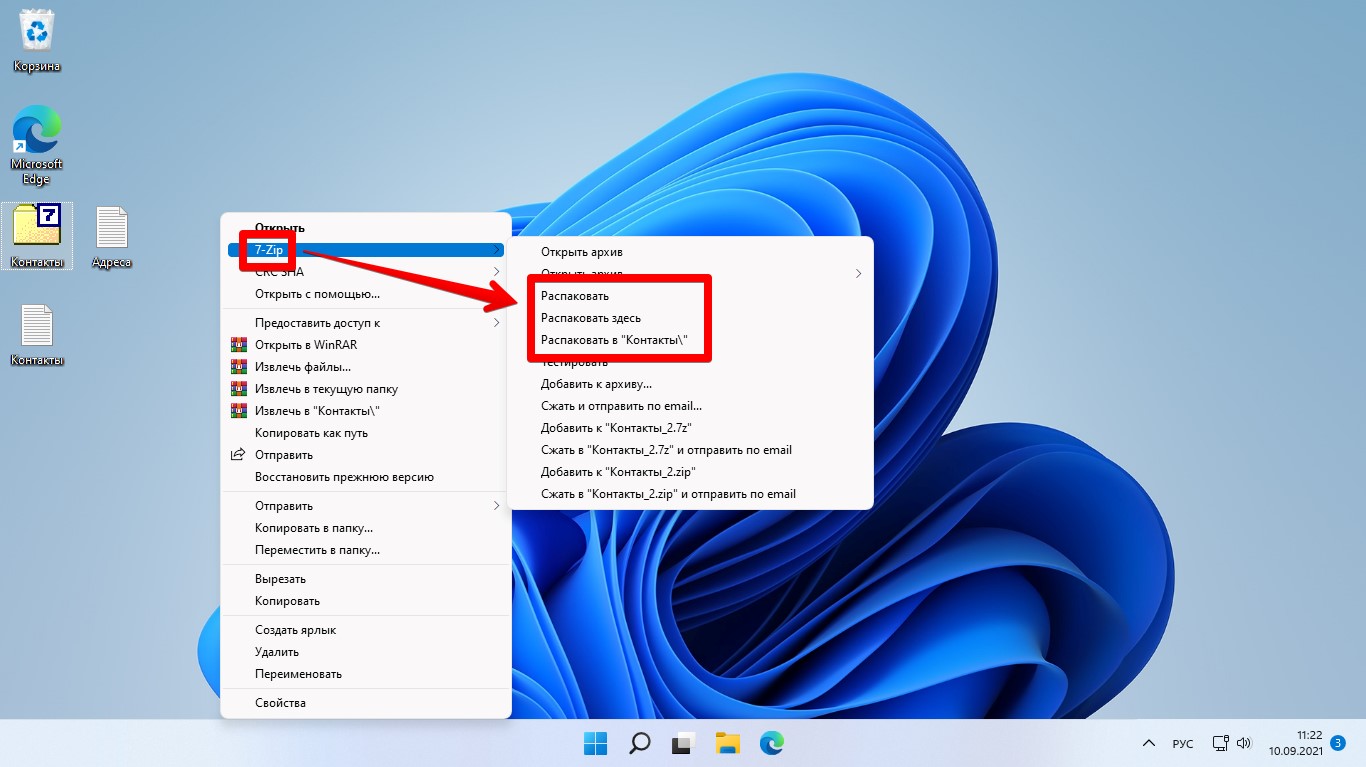
Еще один вариант для извлечения файлов — щелкаем правой кнопкой мыши по архиву — «Показать дополнительные параметры» — «7-Zip» — в дополнительном меню выбираем любой из трех вариантов в зависимости от назначения — «Распаковать», «Распаковать здесь», «Распаковать в Имя_файла».
Пожалуй это все, что вам нужно знать об использовании 7-zip в Windows 11. Удачного архивирования!