
Все способы:
- Способ 1: Обновление системы
- Способ 2: Отключение быстрого запуска
- Способ 3: Устранение проблем с питанием
- Способ 4: Обновление BIOS
- Способ 5: Снижение частоты разгона ЦП
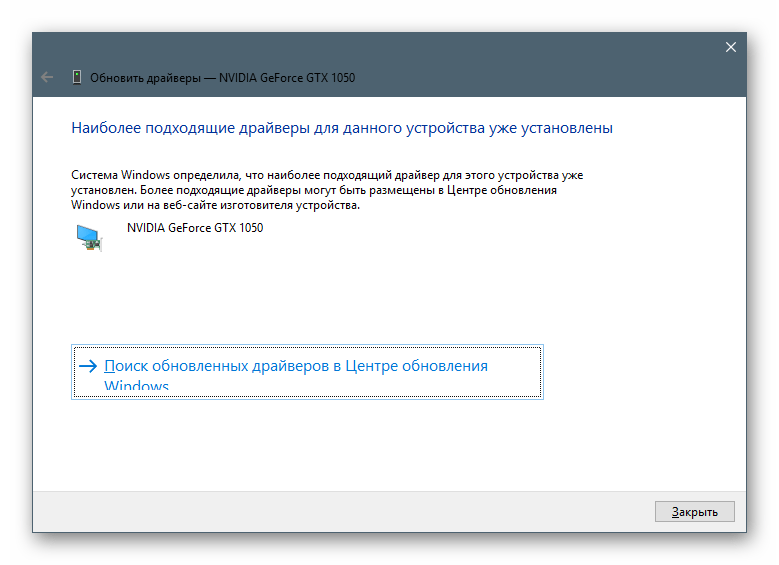
- Способ 6: Обновление драйверов
- Способ 7: Восстановление поврежденных системных файлов
- Способ 8: Замена ОЗУ
- Вопросы и ответы: 0
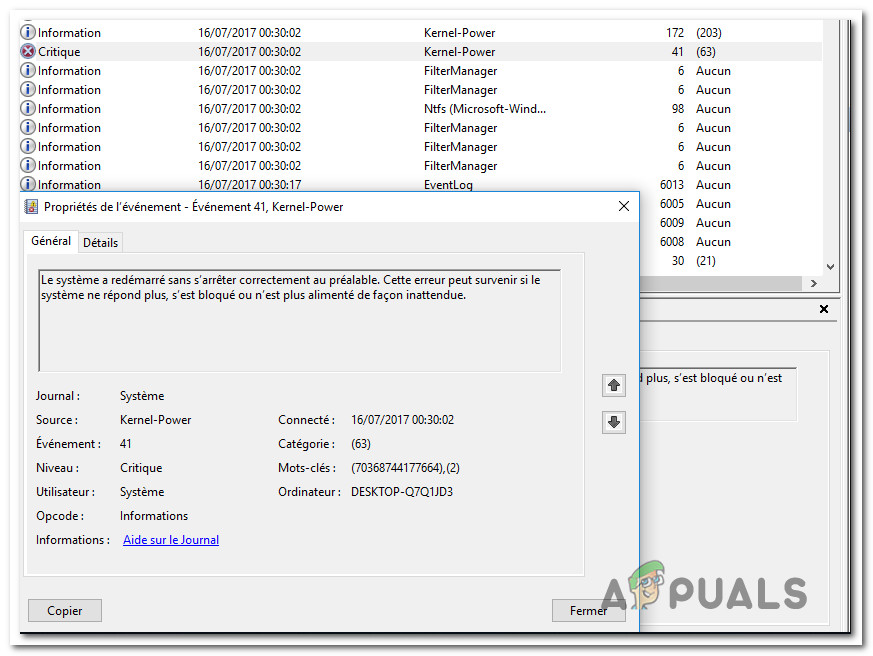
Ошибка (70368744177664), (2) возникает при аварийном завершении работы или внезапном отключении питания, причин чему, в свою очередь, может быть несколько – от некорректных параметров электропитания до несовместимости ПО и аппаратных неисправностей компонентов.
Способ 1: Обновление системы
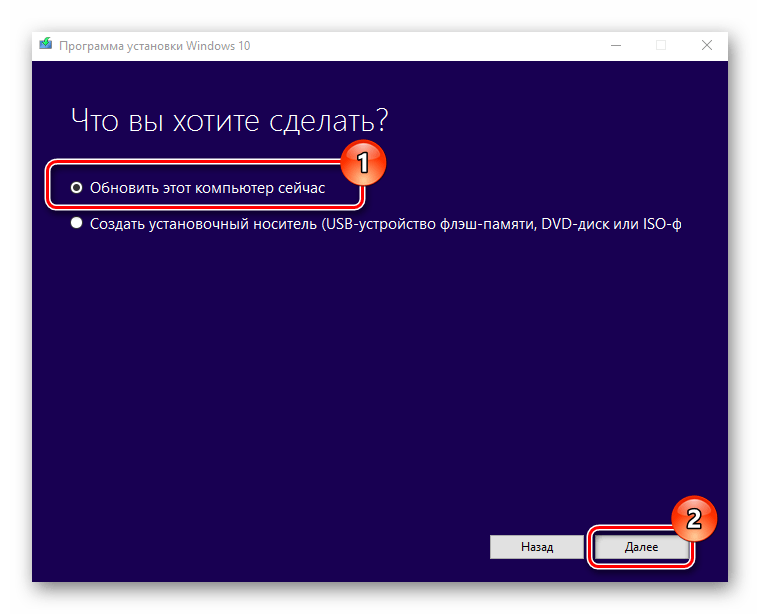
Перед тем как переходить к более серьезным методам решения ошибки (70368744177664), (2) в Windows 10, убедитесь, что в операционной системе установлены последние обновления. Порой устаревшее программное обеспечение вызывает конфликт, вследствие которого и появляется данная проблема. Неполадка случается и из-за работы средства защиты операционки, но после установки всех апдейтов работа ОС часто налаживается. «Десятка» обновляется несколькими методами, в том числе с помощью встроенного «Центра обновления» или через сторонние утилиты.
Подробнее: Обновление Windows 10 до последней версии
Способ 2: Отключение быстрого запуска
Если никакой большой нагрузки на компоненты ОС не происходит, но при этом периодически появляется рассматриваемая ошибка, тогда одним из вариантов решения проблемы может стать отключение быстрого запуска. Сама функция предназначена для увеличения скорости загрузки компьютера, но в некоторых ситуациях она становится причиной различного рода системных ошибок и сбоев.
Отключить быстрый запуск в Windows 10 можно двумя основными методами: с помощью системных настроек и посредством внесения правок в реестр. Об этом мы писали более развернуто в отдельном материале на сайте.
Подробнее: Отключение быстрого запуска в Windows 10
Способ 3: Устранение проблем с питанием
Проблемы с питанием как программного, так и аппаратного характера способны вызвать ошибку (70368744177664), (2), но в этом случае можно попытаться диагностировать причину неполадки либо выставить корректные параметры электропитания, при которых ОС сможет правильно функционировать. Для начала используйте встроенное средство устранения неполадок, и делается это как через классическую «Панель управления», так и с помощью обновленного интерфейса штатных «Настроек».
Эта инструкция подойдет только для ноутбуков, поскольку в стационарных компьютерах отсутствует встроенный аккумулятор и, соответственно, его настройки. Поэтому если у вас ПК, можете пропустить ее и воспользоваться следующей, где речь идет об использовании «Панели управления».
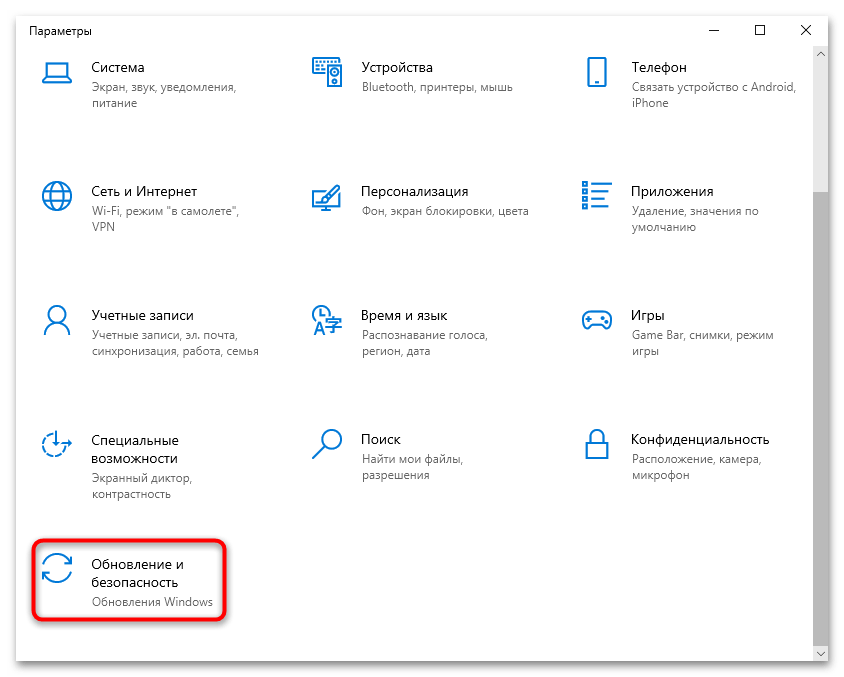
- Нажмите на кнопку «Пуск», затем выберите запуск системных «Параметров».
- Перейдите в раздел «Обновление и безопасность».
- На панели слева кликните по строке «Устранение неполадок», затем в центральной части окна выберите ссылку «Дополнительные средства устранения неполадок». Останется отыскать строку «Питание» и запустить встроенное средство.
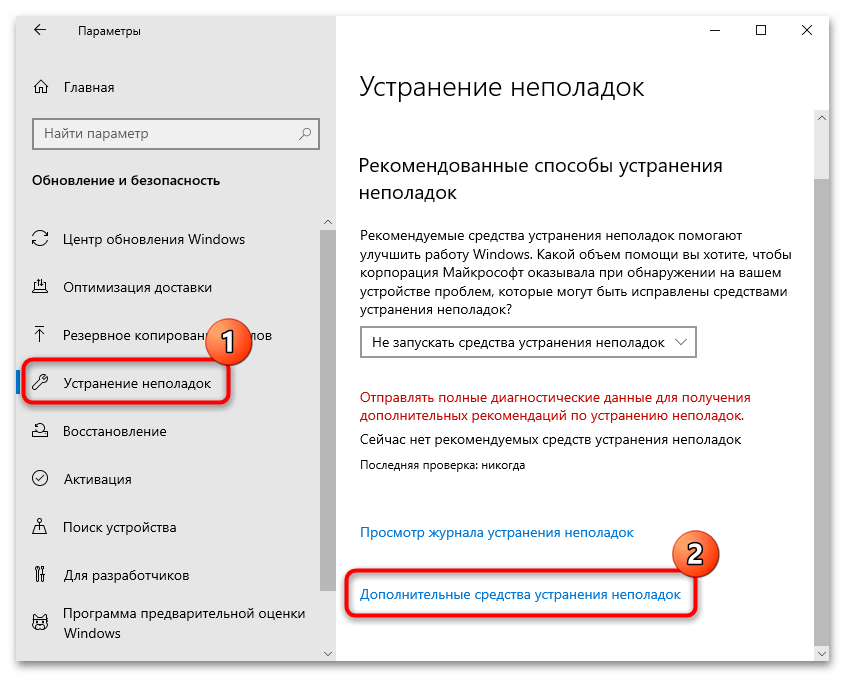
Инструмент проверит систему на наличие неполадок, которые связаны с электропитанием, в том числе аппаратные поломки.
Общая рекомендация для всех ПК заключается в проверке параметров электропитания. Некорректные настройки в этой ситуации также могут провоцировать рассматриваемую ошибку, особенно при активной работе ОС. Лучше вернуть их к тем, которые были по умолчанию:
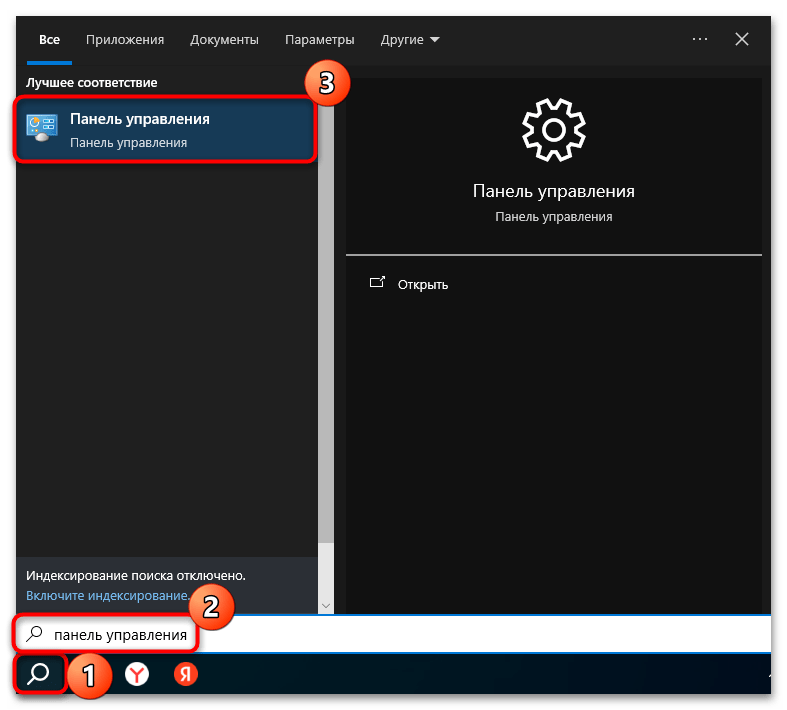
- Запустите «Панель управления», отыскав средство с помощью строки системного поиска.
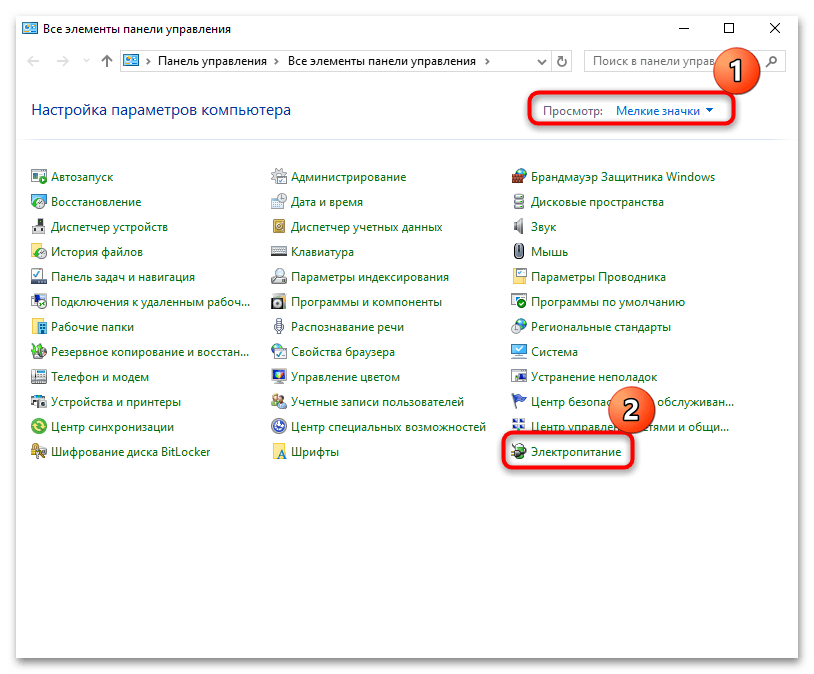
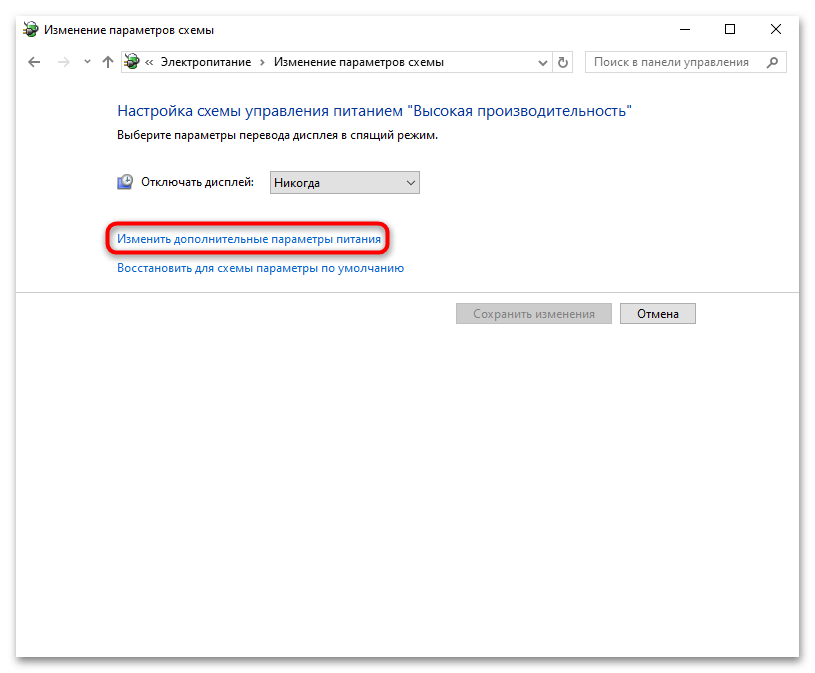
- Перейдите в раздел «Электропитание», предварительно выбрав отображение пунктов в виде крупных или мелких значков (меню «Просмотр» вверху).
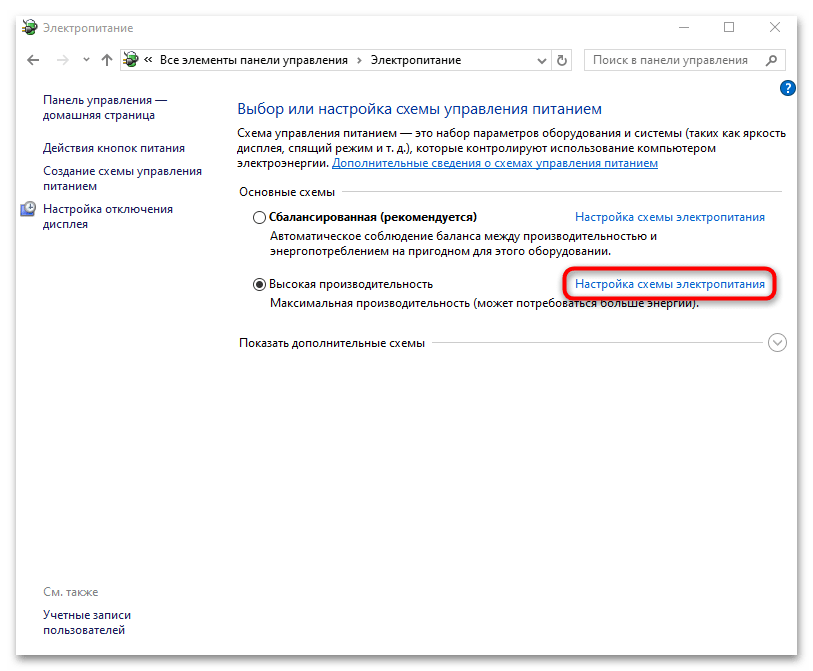
- Кликните по строке «Настройка схемы электропитания» у действующего режима.
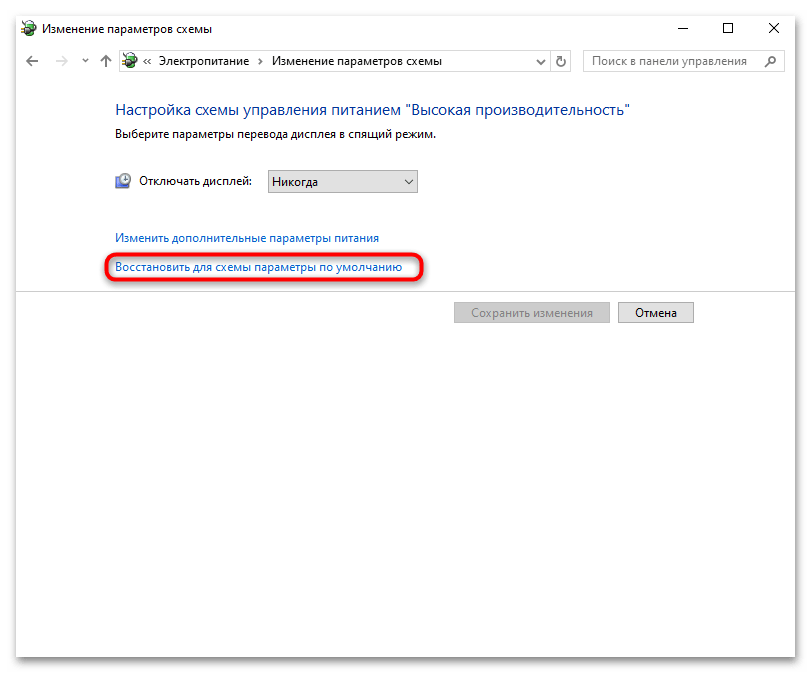
- В открывшемся окне нажмите на строчку «Восстановить для схемы параметры по умолчанию».
- Подтвердите действие в системном окне с предупреждением.
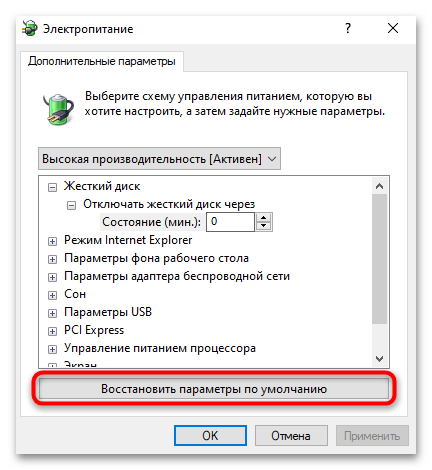
- Также следует вернуть исходные настройки для дополнительных параметров, щелкнув по «Изменить дополнительные параметры питания».
- В следующем окне выберите «Восстановить параметры по умолчанию».
Кроме того, если вы используете схему питания, при которой обеспечивается максимальное быстродействие и улучшенная производительность системы (например, режим «Высокая производительность»), можете попробовать включить другой тип схемы, к примеру «Сбалансированная», что позволит снять нагрузку на аппаратные компоненты, тем самым избавив от ошибки (70368744177664), (2).
Способ 4: Обновление BIOS
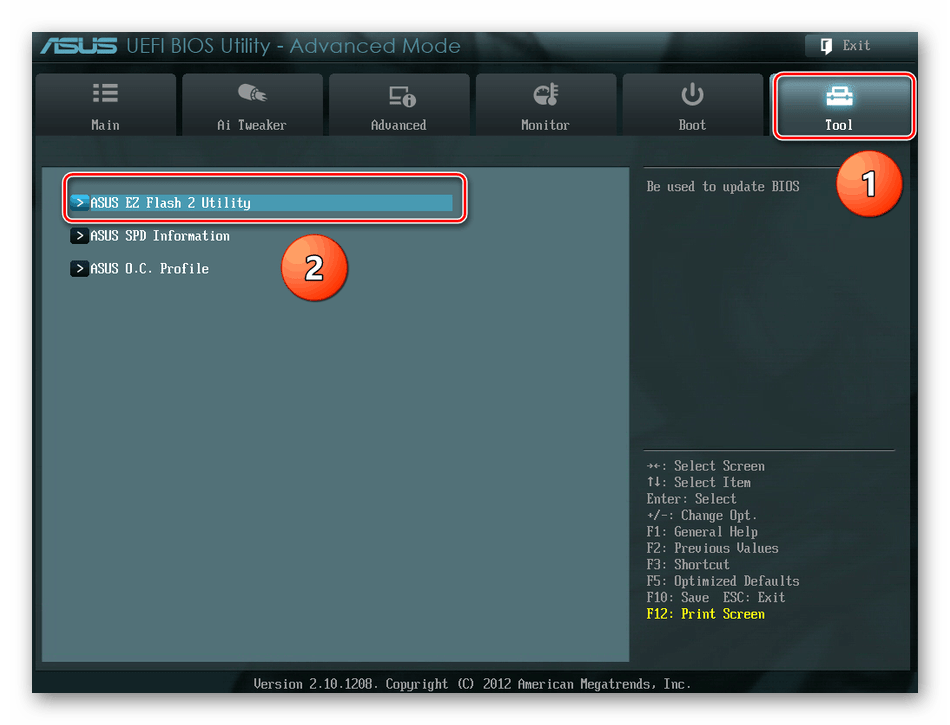
Если BIOS компьютера поврежден, он может вызывать рассматриваемую проблему. Иногда, по комментариям пользователей, ошибка исправляется после того как версия базового программного обеспечения обновляется. В отдельных случаях процедура несколько повышает эффективность работы в целом, восстанавливает поврежденную среду и даже добавляет некоторые новые опции (это касается новой версии UEFI).
Наши авторы в отдельных материалах рассматривали методы обновления BIOS более развернуто. Переходите по ссылкам ниже, чтобы узнать о них.
Подробнее:
Обновление BIOS на компьютере
Инструкция по обновлению BIOS c флешки
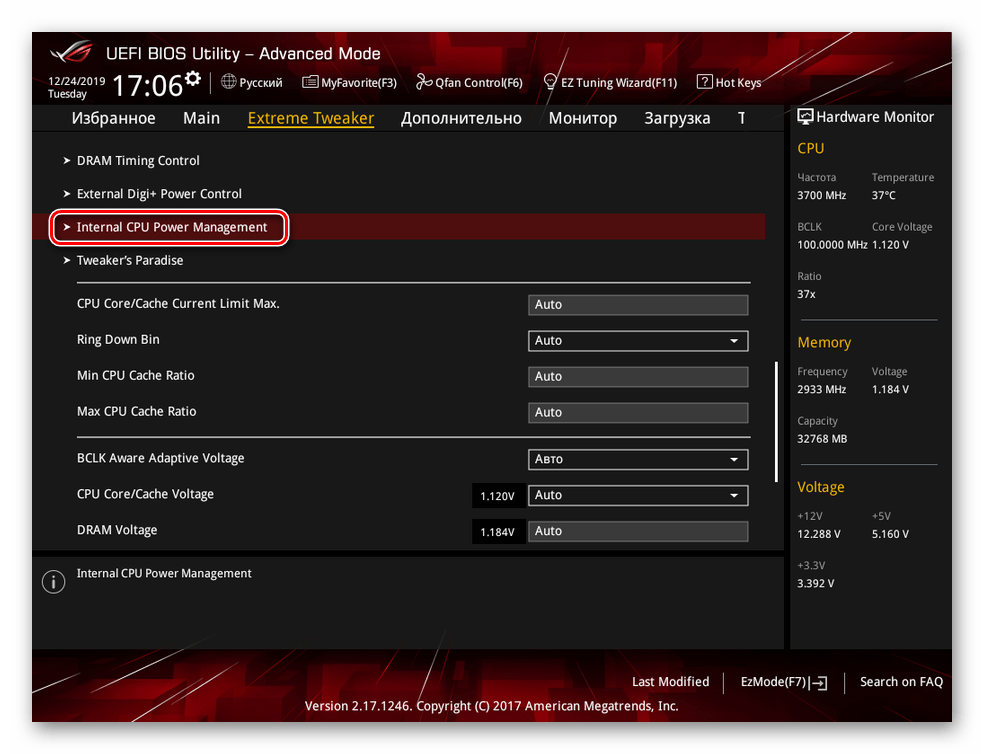
Способ 5: Снижение частоты разгона ЦП
Иногда ошибка (70368744177664), (2) мешает работе ОС при разогнанном центральном процессоре, поскольку она может быть вызвана нагревом компонентов. Исправить это помогает снижение частоты разгона, поэтому переходите к нашей отдельной статье на сайте, где описаны методы выполнения процедуры с помощью системных настроек и BIOS.
Подробнее: Как понизить тактовую частоту процессора
Способ 6: Обновление драйверов
Как известно, за бесперебойное взаимодействие аппаратных компонентов с системой отвечают драйверы. Поврежденное или несовместимое программное обеспечение зачастую вызывает ряд ошибок, в том числе (70368744177664), (2), в особенности при высокой нагрузке. И хотя в Способе 1 данной статьи мы уже упоминали о том, что все ПО операционки следует поддерживать в актуальном состоянии, чтобы избежать различных проблем, для некоторых устройств, например дискретных видеокарт, рекомендации оттуда вряд ли помогут, поскольку обновлять их драйверы лучше через фирменный софт от производителя.
Подробнее: Способы обновления драйверов видеокарты в Windows 10
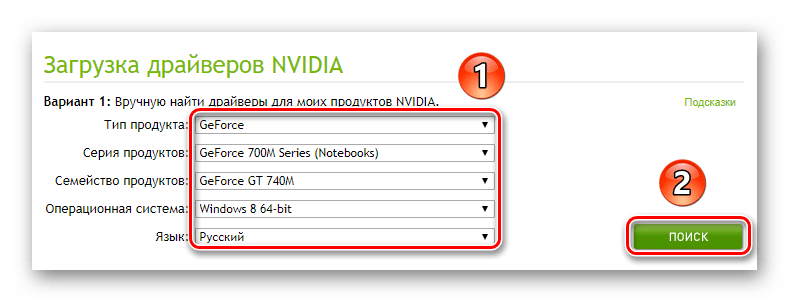
Также можно обновить драйверы для компонентов вручную, используя инструменты встроенного средства «Диспетчер устройств» или прибегнув к помощи специализированного софта от сторонних разработчиков, позволяющих в несколько кликов найти необходимое программное обеспечение и инсталлировать его и для отдельного устройства, и для всех сразу.
Подробнее:
Методы ручной установки драйверов в ОС Windows 10
Программы для обновления драйверов на ПК
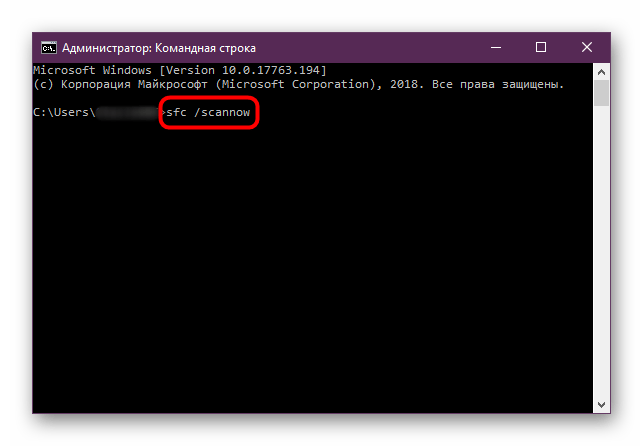
Способ 7: Восстановление поврежденных системных файлов
При нарушении целостности системных файлов также могут проявляться различные неполадки в работе Windows 10. Это иногда препятствует взаимодействию программных и аппаратных компонентов, поэтому стоит проверить их и при необходимости восстановить. К счастью, в ОС для этого реализованы автономные утилиты, запускающиеся простой командой через интерфейс консоли. Как пользоваться инструментами, мы писали ранее.
Подробнее: Как проверить целостность системных файлов в Windows 10
Способ 8: Замена ОЗУ
Если ни один из способов из статьи не помог, стоит проверить оперативную память. Если у нее есть механические повреждения или компонент изнашивается, тогда система может внезапно отключаться, вызывая данную проблему. Для начала проанализируйте компонент на работоспособность, используя сторонние или встроенные средства.
Подробнее: Проверка оперативной памяти в Windows 10

В случае аппаратной неисправности модули ОЗУ стоит заменить на новые, поскольку программного решения проблемы не существует, а со временем ситуация вовсе может усугубиться.
Подробнее:
Устанавливаем модули оперативной памяти
Наша группа в TelegramПолезные советы и помощь
Some users have been having a critical Power Kernel BSOD (Blue Screen of Death) crash where the system automatically restarts without any warning. Most affected users are reporting that the issue is occurring when they playing a game or doing something that drains a lot of system resources. Upon investigating the issue, some affected users have discovered recurring Critical Kernel-Power error inside the Event Viewer. In most reported cases, the issue is encountered on Windows 10 and Windows 8.
What is causing the Power Kernel BSOD (70368744177664) error?
We investigated this particular issue by looking at various user reports and the repair strategies that are commonly used to resolve this particular Event Viewer error. Based on our investigations, there are several common scenarios that are known to trigger the Power Kernel BSOD (70368744177664) error:
- Fast startup is enabled – Several users that have been encountering this particular BSOD while the computer was in idle reported that the issue was no longer occurring after they disabled Fast Startup.
- BSOD is caused by failing RAM – As several users have reported, this particular issue can be caused by a failing RAM stick. If this scenario is applicable, you can resolve the issue by investing in a new RAM stick or by underclocking the RAM frequency.
- Automatic fail-safe is triggered – Most motherboard models include a fail safe that will automatically restart or shutdown themselves when certain temperatures are being reached. This is done in order to avoid permanent damage to your components. In this case, using a temperature monitoring program and buying aftermarket cooler (if needed) might resolve the issue.
- BIOS but – As it turns out, this particular issue can also be triggered by a BIOS bug commonly encountered on MSI and ASUS motherboards. The bug was already patched, so you can resolve the issue (if this scenario is applicable) by updating your BIOS to the latest version available.
- Insufficient PSU – If the crash happens during resource-draining tasks, the issue might be caused in those instances where the power supply unit is incapable of providing enough power. In this case, you can either remove some none-essential components or upgrade to a more powerful PSU.
If you’re currently looking for ways to prevent the Kernel BSOD (70368744177664) error from ever occurring again, this article will provide you with several troubleshooting steps. Down below, you’ll find a collection of methods that other users in a similar situation have successfully used to either circumvent or resolve this particular error message.
For the best results, follow the potential fixes in the order that they are presented in. One of them is bound to resolve the issue in your particular scenario.
Method 1: Disabling Fast startup
if you’re encountering random Kernel BSOD (70368744177664) system crashes and you’re not doing anything too demanding while this issue occurs (your CPU is Idle), this issue might be caused by Windows 10’s Fast startup feature.
We have found over a dozen of reports with users that we’re no longer encountering the Kernel BSOD (70368744177664) after they disabled Fast Startup from their Power Options menu. This seems to point towards a scenario where the issue is caused by a glitch or bug with the Fast Startup feature.
Until Microsoft decides to patch this problem, you can prevent any further Kernel BSOD (70368744177664) system crashes by disabling the Fast Startup feature from your Power options menu. Here’s a quick guide on how to do this:
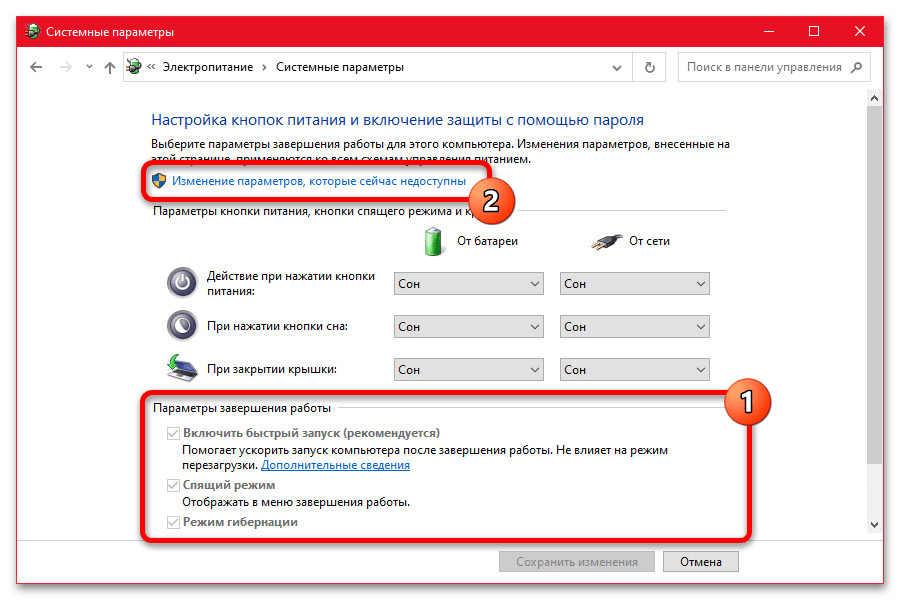
- Press Windows key + R to open up a Run dialog box. Then, type “powercfg.cpl” and hit Enter to open up the Power Options menu.
- Inside the Power Options menu, use the left-hand side menu to click on Choose what the power buttons do.
- Inside the System Settings menu, click on Change settings that are currently unavailable.
- Next, uncheck the box associated with Turn on fast startup (recommended) and click on Save changes (at the bottom of this window).
- Restart your computer and see if the issue is still occurring after the next startup is complete.
If the issue was still not resolved, move down to the next method below.
Method 2: Reducing GPU / CPU overclocking frequencies
Another common reason why other affected users encountered the Kernel BSOD (70368744177664) error is an overclocked CPU or GPU that triggers instability. In most cases, the BSOD crash ends up being triggered by component overheating.
A couple of affected users have reported that the issue was no longer occurring after they reduced their overclocking frequencies (CPU and/or GPU). If you’re working with custom frequencies and voltages for your GPU or CPU, try reverting to the default values (even if the system looks stable while in full load).
Note: You might also want to check your fans, re-apply thermal compound on your CPU, dust and airflow just to cross them off your potential culprit list.
Try using the system with the default frequencies and voltages value for a while and see if the Kernel BSOD (70368744177664) error returns. If the BSOD crash doesn’t return, gradually raise the values (if you wish to overclock again) until and be careful to avoid stepping outside the stable state.
Method 3: Replacing the PSU
Another popular reason why this error occurs is due to insufficient power that can be provided by your PSU (power supply unit). If you’re working with an underpowered PSU and you notice that your computer is crashing with the Kernel BSOD (70368744177664) error when it’s tasked with doing something resource-demanding, one possible reason for this is that your system needs more power than your PSU is capable of supplying.
You can test out this theory by removing any devices that are not essential (optical drive, additional HDD, non-critical peripherals, etc.) It also helps to underclock any frequencies from your GPU, RAM or CPU (if you previously overclocked).
If you noticed that the issue is no longer occurring after you’ve eased the burden of your PSU, you’ll need to invest into a more powerful unit if you want to accommodate all your PC’s components.
Method 4: Updating motherboard BIOS
Some users have reported that the issue was no longer occurring after they updated their motherboard BIOS. This suggests that the issue can also be caused by a BIOS but that ends up crashing the system.
But keep in mind that the steps of updating your BIOS version will be specific to the motherboard model that you’re dealing with. Most manufacturers will have proprietary software that needs to be used to update the BIOS – Asus has E-Z flash, MSI has MFlash, and so on.
In order to update your motherboard BIOS version, you’ll need to look for specific steps related to your particular model. And if you haven’t done this before, we recommend that you outsource this task to an IT technician as this procedure might end up bricking your system.
Method 5: Dealing with failing RAM
As it turns out, this particular issue can also be triggered by a failing RAM stick or by a custom frequency or voltage higher than your RAM stick is capable of maintaining in full load. Several affected users that we’re struggling to resolve the Kernel BSOD (70368744177664) error have reported that the issue was finally fixed after they either replaced their current RAM stick with a new one or reverted the custom voltages & frequencies to the default.
If you’re currently overclocking your RAM voltages & frequencies, try to revert to the default values and see if the issue is still occurring. You should also consider using a program like HWmonitor to keep an eye on your voltages and overall temperatures while your computer is in full load.
If you found that your system stability has improved once you have reverted your RAM to the default voltage & frequency values, you have two choices:
- Stick with the default voltage & frequency.
- Buy superior RAM capable of withstanding higher frequencies & voltages.
Kevin Arrows
Kevin Arrows is a highly experienced and knowledgeable technology specialist with over a decade of industry experience. He holds a Microsoft Certified Technology Specialist (MCTS) certification and has a deep passion for staying up-to-date on the latest tech developments. Kevin has written extensively on a wide range of tech-related topics, showcasing his expertise and knowledge in areas such as software development, cybersecurity, and cloud computing. His contributions to the tech field have been widely recognized and respected by his peers, and he is highly regarded for his ability to explain complex technical concepts in a clear and concise manner.
Summary
- The Kernel-Power critical error is a system error that can cause your computer to crash without warning, indicating a power supply or hardware issue.
- Common causes of the Kernel-Power error include outdated Windows, enabled Windows fast startup, and faulty RAM or graphics card.
- Fix the error by updating Windows, disabling fast startup, reseating RAM and graphics card, testing for faulty PSU, and running CHKDSK and SFC.
Does your Windows computer shut down without warning? Or does it crash every time you attempt to wake it from Sleep? Your computer might have a power supply fault, causing it to crash without warning.
The issue, known as a Kernel-Power error, seemingly appears for no reason, yet is a critical system issue. Here’s how to fix Kernel-Power Event ID 41 and stop your computer from crashing.
What Is a Kernel-Power Critical Error?
The Kernel-Power critical error is a system error that causes your system to crash. The error can trigger under a range of circumstances, though all relate to power issues or system reboots without a clean shutdown. However, the Kernel-Power 41 issue doesn’t always indicate a power supply issue but can also indicate an issue with your system hardware, causing a power fault and, in turn, your system to crash.
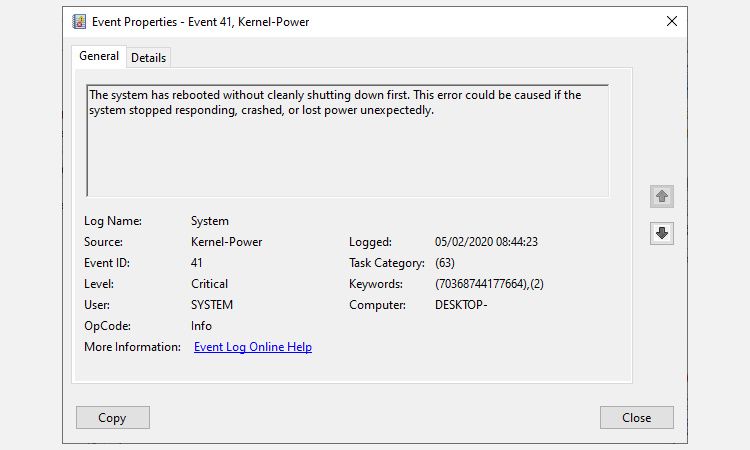
The Kernel-Power critical error is typically associated with Event ID 41. Furthermore, Kernel-Power Event ID 41 is accompanied by the keywords (70368744177664),(2), which you can use to pinpoint your bug troubleshooting.
So, what causes Kernel-Power error 41? While it is a common shutdown error code, there are several common causes with easy fixes:
- Update Windows 10 or Windows 11
- Disable Windows fast startup
- Reseat your RAM and graphics card
- Test for a faulty PSU
- Run CHKDSK and SFC
Let’s take these fixes step by step and solve the Windows Kernel-Power error. Please note that this article deals exclusively with the Kernel-Power 41 error. However, we’ve also covered fixes for the unexpected kernel mode trap error, some of which differ from the fixes for the Kernel-Power error.
1. Update Windows
Check if Windows 10 or Windows 11 is up to date. Microsoft releases Windows updates frequently, fixing bugs and other issues. Your Kernel-Power critical error could stem from a bug that there is a fix ready for in an update.
Press Win + I, type update in the search box, and select Check for updates. If there is an update waiting, download and install it, then restart your system.
2. Disable Windows Fast Startup
Windows fast startup is a hybrid sleep mode that enables your computer to boot extremely quickly. Windows 10 and Windows 11 enable fast startup as a default setting during installation.
If you enable fast startup, your computer doesn’t completely shut down. Instead, it enters a middle ground that combines a full shutdown with hibernation mode, saving the last machine state to enable you to start working straight away.
However, unlike full hibernation mode, when you return to Windows 10, it is like starting the machine from scratch. There are no windows open, and your previous applications are not open, and so on.
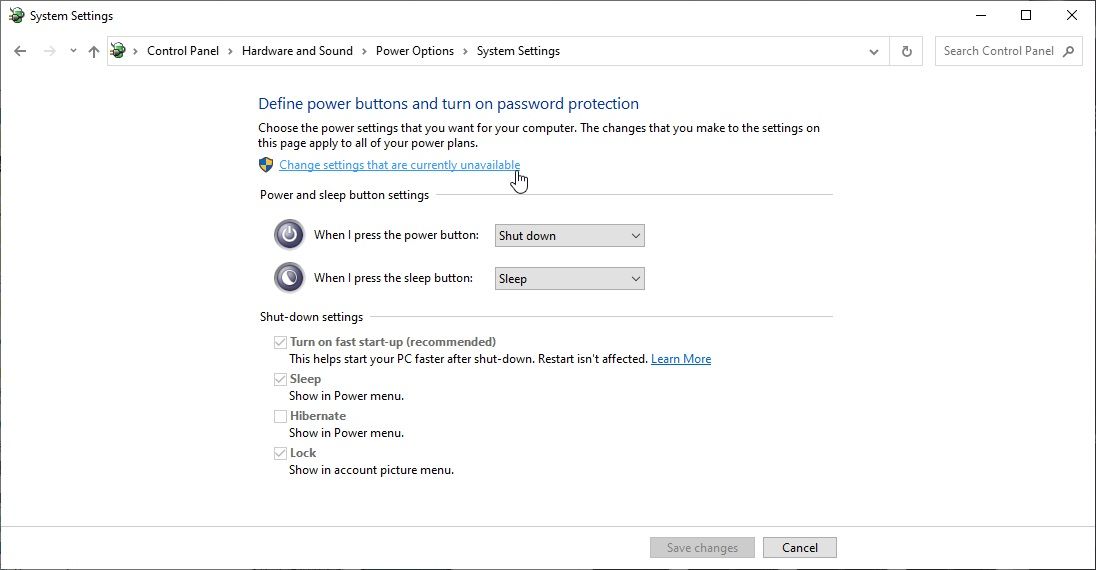
To disable Fast Startup:
- Type power set in your Start Menu search bar, then select Choose a power plan.
- Now, select Choose what the power buttons do, followed by Change settings that are currently unavailable.
- Uncheck Turn on fast start-up and hit Save changes.
Once disabled, restart your system and run it for a while. If your Kernel-Power errors are similar to mine, the error doesn’t always immediately replicate itself and can take a few days to return.
3. Reseat Your RAM and Graphics Card, and Check Your Power Cables
Some users report their Kernel-Power 41 error resolving after reseating their RAM and graphics card (GPU).
You’ll need to get inside the case of your PC or laptop to reseat the hardware. Please be aware that this will void your manufacturer’s warranty in certain cases, so proceed with caution.
While you have your PC case open, check the power cables and connectors joining your power supply unit and the motherboard. Your PC power supply cables should fit snugly in their port, and a loose connection could trigger the Kernel-Power error.
4. Test for Faulty PSU With OCCT
Testing for hardware faults with your power supply unit isn’t easy unless you have the correct hardware on hand. You can check your PSU using a multimeter or a dedicated PSU testing tool.
The majority of software-based PSU checking tools cannot deliver an accurate reading on whether your PSU is working correctly.
That said, if you do want to attempt a PSU software test, I would suggest using OCCT, a free CPU/GPU/PSU stress testing tool. OCCT stress tests your CPU, GPU, and motherboard and, in the process, can discover any faults with your power supply unit.
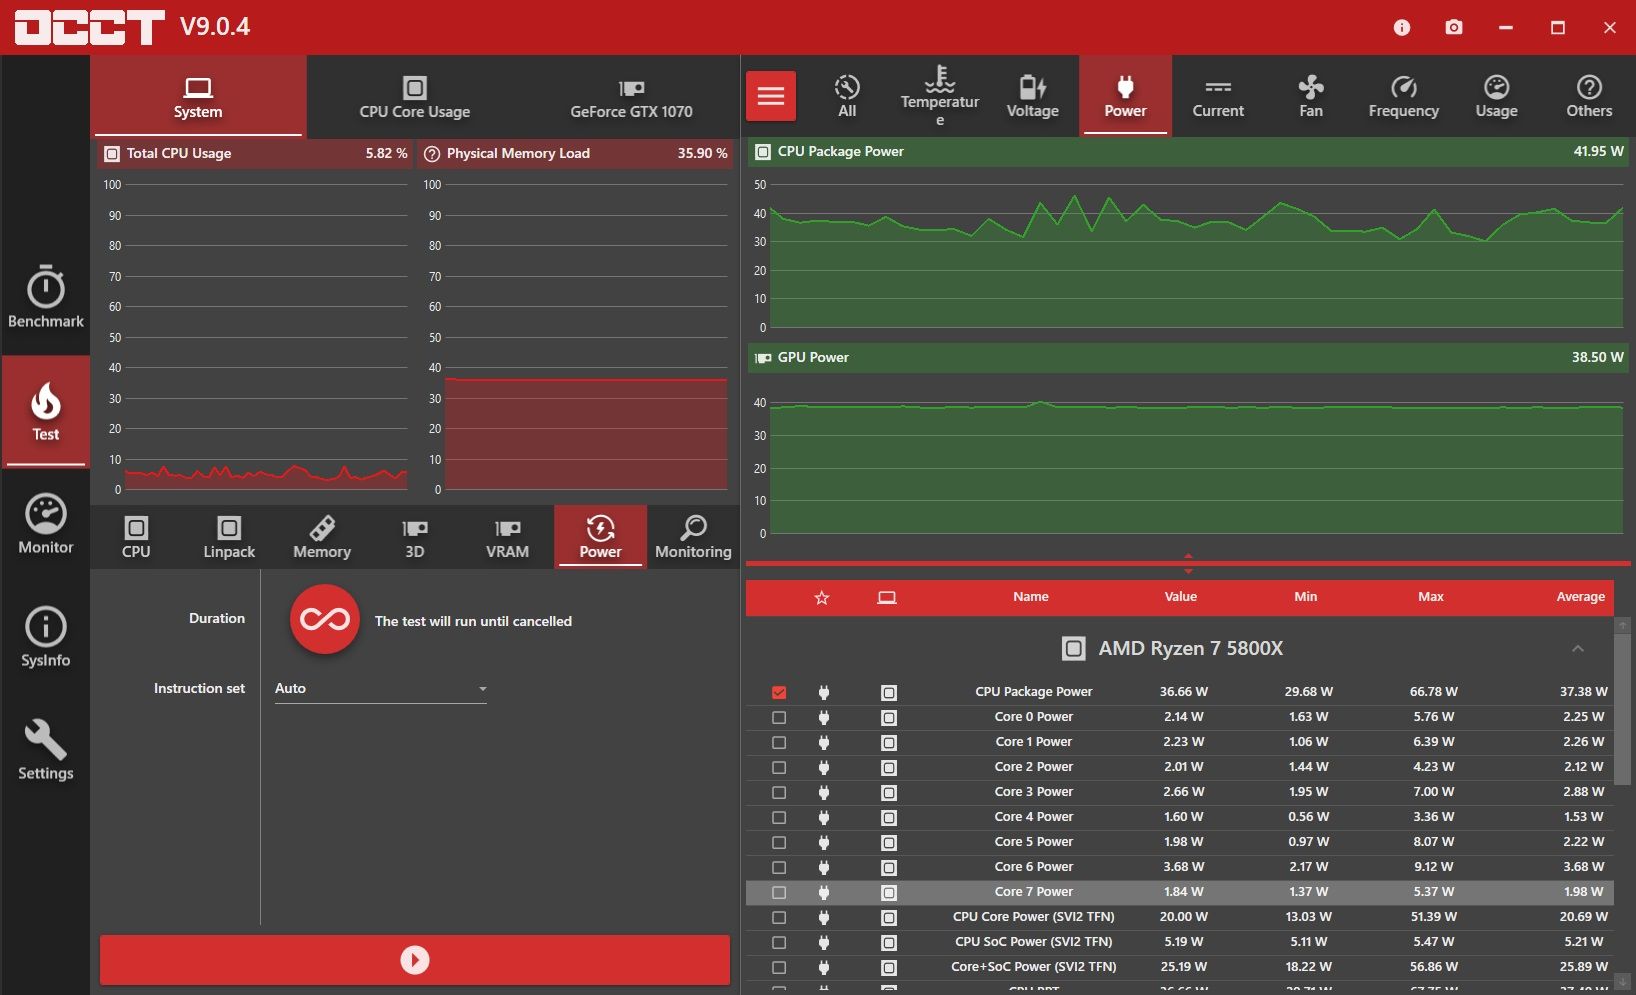
- Open OCCT.
- Under Test Configuration, select Power.
- Set the Instruction Set to Auto.
- Save any work and close any other open programs on your system.
- When ready, hit the big red play icon in OCCT to begin the stress test.
The OCCT developer states that «Most errors are detected within the first 5 minutes. However, I recommend doing at least a 1-hour long test just to be sure.»
Once the test completes, OCCT produces a log highlighting any potential PSU errors (or with other hardware!).
Download: OCCT for Windows (Free)
Try Another Power Supply Unit if Possible
Switching out your power supply unit for another is one way to confirm if the issue stems from a faulty power supply. Of course, not everyone has a spare PSU lying around, so it’s not always the easiest way to test. However, if you have the chance, do give it a try.
Should You Adjust Your System Voltages to Fix the Kernel-Power 41 Error?
I’d advise against tinkering with your system voltages to fix the error unless you know what you’re getting into. You might find that removing overclocks or undervolts returns your system to a more stable level of operation. However, attempting to undervolt or overclock your system while it is already suffering an unknown error could lead to more issues and, furthermore, become harder to diagnose as you add more variables into the equation.
5. Run CHKDSK and SFC
CHKDSK is a Windows system tool you can use to verify your Windows 10 file system. You can add specific options to find and fix faults as the tool runs. Run it from the Command Prompt, and use the CHKDSK scan to find the problem and fix your machine.
- Type command prompt in your Start menu search bar, then right-click the best match and select Run as administrator. (Alternatively, press Win + X, then select Command Prompt (Admin) from the menu.)
- Next, type chkdsk /r and press Enter. The command will scan your system for errors and fix any issues along the way.
If CHKDSK finds no faults, you can run the Windows System File Check (SFC). System File Check is another Windows system tool you can use to check for missing or corrupt Windows system files.
In case you’re wondering, the difference between CHKDSK and SFC is the scope of the scan. CHKDSK scans your entire drive for errors, whereas SFC scans your Windows system files specifically.
However, before running the SFC command, it is best to check that it is completely functional.
DISM stands for Deployment Image Servicing and Management. DISM is an integrated Windows utility with a vast range of functions. In this case, the DISM Restorehealth command ensures that our next fix will work properly.
Work through the following steps.
- Type Command Prompt (Admin) in the Start menu search bar, then right-click and select Run as administrator to open an elevated Command Prompt.
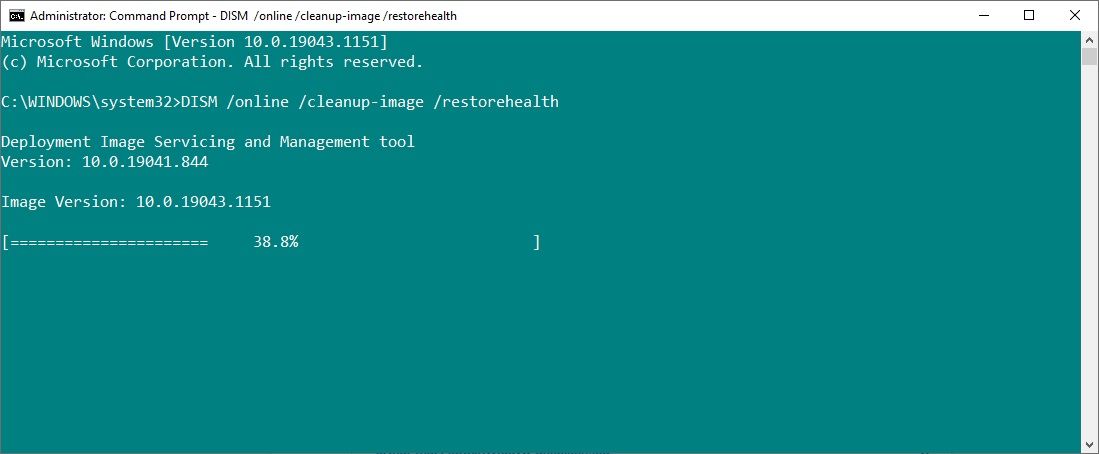
- Type the following command and press Enter: DISM /online /cleanup-image /restorehealth
- Wait for the command to complete. The process can take up to 20 minutes, depending on your system’s health. The process seems stuck at certain times, but wait for it to complete.
- When the process completes, type sfc /scannow and press Enter.
Let the scan run, then restart your system.
Fixing Kernel-Power Critical Error 41
One of these five fixes will bring your Windows 10 computer back to full health. However, you might need to try a combination of fixes to stop the Kernel-Power critical error. For me, reseating my hardware and updating Windows 10 cured the issue.
Are you experiencing sudden reboots on your system without warning? If so, you may be encountering a Kernel-Power error, which is commonly associated with activities that consume a lot of resources, such as gaming. This error may occur after installing an antivirus program or hardware devices. Some users report experiencing random crashes with codes such as (70368744177664),(2).
In the next section, we will recommend remarkable suggestions to fix this problem. But before that, let’s first understand what the (70368744177664),(2) error is and its causes.
What is (70368744177664),(2)?
The Kernel-Power error (70368744177664),(2) is a random issue that occurs when your system crashes or loses power unexpectedly. This error is associated with system data corruption or memory/driver incompatibility issues.
Why Does (70368744177664),(2) Happen on Windows 10/11?
There are several causes of the (70368744177664),(2) error. Sometimes, it may occur because of an incompatible third-party antivirus program. Some startup programs and drivers could also trigger the BSOD (70368744177664),(2) error on Windows 10/11. Based on recently reported cases, this issue seems to affect Windows 10/11 and Windows 8.
Below, we have summarized the major causes of the Kernel-Power 70368744177664,(2) error:
- Failing RAM: Some users who have encountered this issue discovered that a faulty RAM stick was the cause. You can avoid the problem by underclocking your RAM regularly or replacing the failing RAM stick with a new one.
- Enabled Fast Startup: While Fast Startup is a useful Windows feature, it can also trigger many problems, including the (70368744177664),(2) error.
- BIOS bug: You are likely to encounter this problem if you haven’t updated your BIOS to the latest version.
- Fail-Safe: Most modern PCs come with a fail-safe that automatically restarts or shuts down to avoid permanent damage to your system.
- Insufficient PSU: Sometimes, when you are running resource-draining tasks, your PC may crash. The problem usually occurs because the power supply unit may be incapable of providing sufficient power. So, if you can’t upgrade to a better PSU, get rid of some non-essential components.
Now, that we know the potential culprits, let’s discuss the troubleshooting steps you may want to try.
How to Fix the (70368744177664),(2) Error on Windows 10/11?
If the BSOD (70368744177664),(2) error is giving you sleepless nights, try these tricks to isolate the cause of the issue. You can try all of them or see which applies to your situation, then proceed with the suggestions:
Solution 1: Install the Latest Updates
Before proceeding with other solutions, ensure you have installed the latest system updates. Sometimes, an outdated third-party antivirus program (referred to as third-party antivirus program) could cause incompatibility issues with your Windows version. Once you have installed the available updates, especially the latest version of the antivirus software, restart your PC and check if the problem persists.
Other than installing updates, you may also want to physically check your hard drive, RAM, and other hardware components that are not connected correctly.
Solution 2: Turn Off Fast Startup
If you are not doing anything too demanding on your CPU and you still encounter the Kernel BSOD (70368744177664),(2), the Fast startup feature could be the culprit. Disabling this feature usually resolves the problem. Here is how to do it:
- Go to Start, then choose the Control Panel option.
- Now, navigate to the Power Options menu and click Choose what the power buttons do.
- Select Change settings that are currently available.
- After that, choose the Shutdown Settings option, and then turn off the Fast start feature.
Solution 3: Customize Power Settings
If you are running resource-intensive processes on your PC, your Power Supply Unit (PSU) may be underpowered, causing your system to crash and display the Kernel BSOD (70368744177664),(2) error.
One way to resolve power issues is to change your Power settings. The Power Plan feature in Windows 10/11 can help you manage how your PC consumes power. To change the advanced Power settings, follow the steps below:
- Type ‘power options’ into the search box and hit Enter.
- After that, select Power & sleep settings from the list of results.
- Now, navigate to the Related settings option on the right pane and click Additional power settings.
- Once the Power Options window opens, choose the Change when the computer sleeps option.
- Next, click on the Change advanced power settings option.
- Finally, choose settings that reflect how you want your device to manage power.
In addition to adjusting your Power settings, consider removing any unnecessary device, such as additional HDD, optical drive, and non-critical peripherals, among others.
Solution 4: Reduce CPU Overclocking Frequencies
As you already know, the Kernel BSOD (70368744177664),(2) can be triggered by component heating. So, if you use your PC mainly to play games or surf the internet, underclocking your CPU or GPU is a smart option. Some affected users have reported success after reducing their overclocking frequencies.
Solution 5: Update Drivers
Device drivers facilitate the smooth communication between your software and hardware components. So, without them, your computer may not function properly. As mentioned earlier, an incompatible driver could cause the (70368744177664),(2) error on Windows 10/11. If that is the case, check for outdated or corrupted drivers, and then update them accordingly.
Ideally, Windows should detect and install drivers automatically using an array of built-in tools. But sometimes, you may need to update a device driver yourself. Fortunately, you have several options to do so, including using the Device Manager or Windows Update.
But before doing that, you may need to check for and fix corrupted disk by running the chkdsk command. To run the Check Disk scan on your main drive, type the following command into the command prompt window and press Enter:
chkdsk /f C:
Important Note: Manually updating your drivers can be risky and time-consuming. For a safer and more efficient process, consider using a specific driver updater tool (Driver Updater tool). It will scan your PC for outdated, missing, or corrupted drivers, and then update them to their latest and most stable versions.
Solution 6: Update the BIOS
Sometimes, the BIOS can get corrupted, causing the (70368744177664),(2) error on Windows 10/11. Some users have reported that the problem disappeared as soon as they updated their motherboard BIOS. This trick might work for you, too.
Updating the BIOS can improve the efficiency of your system in many ways. It supports new processors, updates a corrupted UEFI environment, overwrites a bug, or even adds new features and functions.
The simplest way to update or reset the BIOS is restarting your PC, and then booting to the BIOS setup options. But you should keep in mind that updating your BIOS version will depend on the motherboard model.
Quick Fix: Repair Corrupted System Files
If none of the above methods worked for you, and you suspect that system file corruption is to blame, consider scanning for and cleaning the damaged sections. We recommend that you try using a reliable PC cleaning tool, such as the one referenced by Outbyte PC Repair.
Besides checking for memory corruption, this tool will also get rid of junk files that eat up your RAM. Actually, the PC repair application can fix many computer errors and optimize your PC for top performance. So, it’s much better than resolving the problem manually.
There you have it. We hope that the above solutions helped you to fix the issue. You may also need to check this article on how to fix slow startup on Windows 10/11.
Give us some love and rate our post!
Blackkkk2650
Пользователь
Регистрация:
16.07.2022
Сообщения: 31
Рейтинг: 0
Регистрация:
16.07.2022
Сообщения: 31
Рейтинг: 0
Добрый день, столкнулся с проблемой перезагрузки пк во время работы с ошибкой в Просмотре событиq Kernel Power 41 (63)
Комп мобрал не так уж и давно что бы что то вышло из строя
Комплектующие:
Maтеринка: Atermiter X79Turbo
Процессор: xeon E5 2650
Видеокарта: Asus GTX 550 Ti 1GB
БП: Chiftec Smart siries 650W
Прошу помочь, буду очень благодарен!
Имя журнала:
System
Источник:
Microsoft-Windows-Kernel-Power
Дата:16.07.2022 1:07:22
Код события:
41
Категория задачи:(63)
Уровень:Критический
Ключевые слова:(70368744177664),(2)
Пользователь: СИСТЕМА
Компьютер:
DESKTOP-A7S6PIM
Описание:
Система перезагрузилась, завершив работу с ошибками. Возможные причины ошибки: система перестала отвечать на запросы, произошел критический сбой или неожиданно отключилось питание.
Xml события:41
8
1
63
0
0x8000400000000002
8744
System
DESKTOP-A7S6PIM
278
0xffff9182312cb460
0x0
0x0
0x0
0
0
0
0
false
0
0
true
0
0
false
Регистрация:
06.10.2015
Сообщения: 8608
Рейтинг: 3043
Нарушения: 1000
Blackkkk2650 сказал(а):↑
Добрый день, столкнулся с проблемой перезагрузки пк во время работы с ошибкой в Просмотре событиq Kernel Power 41 (63)
Комп мобрал не так уж и давно что бы что то вышло из строя
Комплектующие:
Maтеринка: Atermiter X79Turbo
Процессор: xeon E5 2650
Видеокарта: Asus GTX 550 Ti 1GB
БП: Chiftec Smart siries 650W
Прошу помочь, буду очень благодарен!
Имя журнала:
System
Источник:
Microsoft-Windows-Kernel-Power
Дата:16.07.2022 1:07:22
Код события:
41
Категория задачи:(63)
Уровень:Критический
Ключевые слова:(70368744177664),(2)
Пользователь: СИСТЕМА
Компьютер:
DESKTOP-A7S6PIM
Описание:
Система перезагрузилась, завершив работу с ошибками. Возможные причины ошибки: система перестала отвечать на запросы, произошел критический сбой или неожиданно отключилось питание.
Xml события:41
8
1
63
0
0x8000400000000002
8744
System
DESKTOP-A7S6PIM
278
0xffff9182312cb460
0x0
0x0
0x0
0
0
0
0
false
0
0
true
0
0
false
Нажмите, чтобы раскрыть…
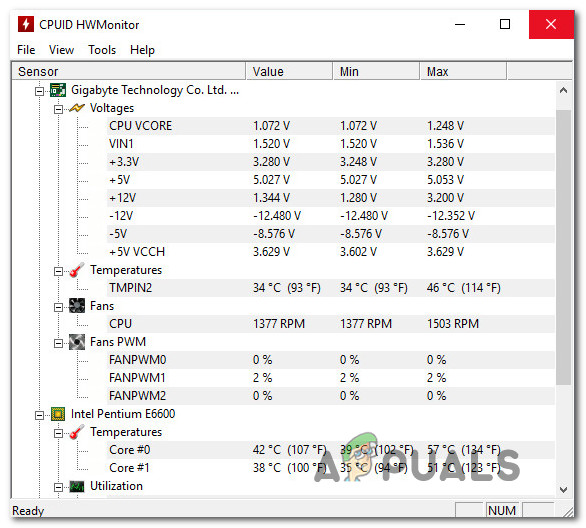
Что у тебя по напряжениям на бпшнике? Скачай HWiNFO покажи напряжения нам и температуры.
Blackkkk2650
Пользователь
Регистрация:
16.07.2022
Сообщения: 31
Рейтинг: 0
Регистрация:
16.07.2022
Сообщения: 31
Рейтинг: 0
BolshoiDlinnuiNeobrezanui сказал(а):↑
Что у тебя по напряжениям на бпшнике? Скачай HWiNFO покажи напряжения нам и температуры.
Нажмите, чтобы раскрыть…
вот, если я правильно понял
Регистрация:
06.10.2015
Сообщения: 8608
Рейтинг: 3043
Нарушения: 1000
Blackkkk2650 сказал(а):↑
Нажмите, чтобы раскрыть…
Ничего критического не вижу. Странно, что на твоей материнке нет датчиков отображающих вольтаж по 5вольтовой и 12вольтовой линиях.
Рекомендую сбросить настройки в биосе. Для начала.
Blackkkk2650
Пользователь
Регистрация:
16.07.2022
Сообщения: 31
Рейтинг: 0
Регистрация:
16.07.2022
Сообщения: 31
Рейтинг: 0
BolshoiDlinnuiNeobrezanui сказал(а):↑
Ничего критического не вижу. Странно, что на твоей материнке нет датчиков отображающих вольтаж по 5вольтовой и 12вольтовой линиях.
Рекомендую сбросить настройки в биосе. Для начала.Нажмите, чтобы раскрыть…
Биос с сбрасывал никакого результата
Регистрация:
06.10.2015
Сообщения: 8608
Рейтинг: 3043
Нарушения: 1000
Blackkkk2650 сказал(а):↑
Биос с сбрасывал никакого результата
Нажмите, чтобы раскрыть…
Комп через переноску подрублен? ИБП юзаешь?
Отключи всё это, тыкни системник напрямую в розетку.
-CoSmiC-
Пользователь
Регистрация:
29.06.2016
Сообщения: 1649
Рейтинг: 996
Регистрация:
29.06.2016
Сообщения: 1649
Рейтинг: 996
Это ГГ видеокарточке. Можно попробовать термопасту заменить. Но скорее всего чип уже сдыхает.
Blackkkk2650
Пользователь
Регистрация:
16.07.2022
Сообщения: 31
Рейтинг: 0
Регистрация:
16.07.2022
Сообщения: 31
Рейтинг: 0
BolshoiDlinnuiNeobrezanui сказал(а):↑
Комп через переноску подрублен? ИБП юзаешь?
Отключи всё это, тыкни системник напрямую в розетку.
Нажмите, чтобы раскрыть…
Через переноску, ибп нету, пробовал подключать напрямую, никакого результата
Регистрация:
06.10.2015
Сообщения: 8608
Рейтинг: 3043
Нарушения: 1000
Blackkkk2650 сказал(а):↑
Через переноску, ибп нету, пробовал подключать напрямую, никакого результата
Нажмите, чтобы раскрыть…
Пф-пф-пф… идей больше нет, тогда
DoubleDMGe
Пользователь
Регистрация:
22.07.2015
Сообщения: 14639
Рейтинг: 11347
Регистрация:
22.07.2015
Сообщения: 14639
Рейтинг: 11347
Да эти ошибки с питанием ваще сложная тема.
Я уже много раз рассказывал тут историю, что не мог разобраться долго с похожей ошибкой .
Оказалось сата шлейф коротил , от какого то из дисков …
ke1evra
Пользователь
Регистрация:
25.12.2012
Сообщения: 1477
Рейтинг: 1298
Регистрация:
25.12.2012
Сообщения: 1477
Рейтинг: 1298
ты взял китайский комплект, получил последствия — всё закономерно. 90% что проблема в матери. 10% что в бп. если подкинешь другой бп и проблема останется… то ты понял
Blackkkk2650
Пользователь
Регистрация:
16.07.2022
Сообщения: 31
Рейтинг: 0
Регистрация:
16.07.2022
Сообщения: 31
Рейтинг: 0
BolshoiDlinnuiNeobrezanui сказал(а):↑
Пф-пф-пф… идей больше нет, тогда
Нажмите, чтобы раскрыть…
плохо
Cerezo
Пользователь
Регистрация:
14.12.2015
Сообщения: 6064
Рейтинг: 3766
Регистрация:
14.12.2015
Сообщения: 6064
Рейтинг: 3766
Как вариант все провода внутри компа отключить и заного подключить. Зплдно проверить есть ли почерневшие контакты
Blackkkk2650
Пользователь
Регистрация:
16.07.2022
Сообщения: 31
Рейтинг: 0
Регистрация:
16.07.2022
Сообщения: 31
Рейтинг: 0
Cerezo сказал(а):↑
Как вариант все провода внутри компа отключить и заного подключить. Зплдно проверить есть ли почерневшие контакты
Нажмите, чтобы раскрыть…
Я пробовал, все контакты нормальные
Nikoliasik_Zeus
Почетный пользователь
Регистрация:
22.05.2014
Сообщения: 17684
Рейтинг: 27299
Регистрация:
22.05.2014
Сообщения: 17684
Рейтинг: 27299
Какая ревизия мат платы? там есть подделки
Blackkkk2650
Пользователь
Регистрация:
16.07.2022
Сообщения: 31
Рейтинг: 0
Регистрация:
16.07.2022
Сообщения: 31
Рейтинг: 0
Nikoliasik_Zeus сказал(а):↑
Какая ревизия мат платы? там есть подделки
Нажмите, чтобы раскрыть…
а где посмотреть?
Nikoliasik_Zeus
Почетный пользователь
Регистрация:
22.05.2014
Сообщения: 17684
Рейтинг: 27299
Регистрация:
22.05.2014
Сообщения: 17684
Рейтинг: 27299
Blackkkk2650 сказал(а):↑
а где посмотреть?
Нажмите, чтобы раскрыть…
под вторым x16 слотом написана ревизия платы
Blackkkk2650
Пользователь
Регистрация:
16.07.2022
Сообщения: 31
Рейтинг: 0
Регистрация:
16.07.2022
Сообщения: 31
Рейтинг: 0
Nikoliasik_Zeus сказал(а):↑
под вторым x16 слотом написана ревизия платы
Нажмите, чтобы раскрыть…
v1.3, оно или нет?
Nikoliasik_Zeus
Почетный пользователь
Регистрация:
22.05.2014
Сообщения: 17684
Рейтинг: 27299
Регистрация:
22.05.2014
Сообщения: 17684
Рейтинг: 27299
Blackkkk2650 сказал(а):↑
Нажмите, чтобы раскрыть…
оно
плата не подделка и то хорошо
с али заказывал или с рук брал?
если с али — придется возиться с бивасом,как вариант,ставить сток
https://xeon-e5450.ru/socket-2011/motherboards/bios-dlya-plexhd-x79-turbo/
Стоковый биос от ревизии 1.03. Bios Date: 17.07.2019
если с рук — напиши человеку,менял ли он биос или ставил лоувольт мод.
желательно поискать какую-нибудь затычку для проверки,вдруг карточка тож того.
Тема закрыта
-
Заголовок
Раздел
Ответов Просмотров
Последнее сообщение
-
Сообщений: 5
07 May 2025 в 00:42Сообщений:5
Просмотров:24
-
Сообщений: 21
07 May 2025 в 00:32Сообщений:21
Просмотров:54
-
zefir
07 May 2025 в 00:23Сообщений: 5
07 May 2025 в 00:23Сообщений:5
Просмотров:21
-
sMn
07 May 2025 в 00:02Сообщений: 7
07 May 2025 в 00:02Сообщений:7
Просмотров:26
-
Сообщений: 1
06 May 2025 в 23:56