
One of the options Windows 7 has for you to adjust the color depth is its “bit” depth. It’s the highest “bit” available (typically 32 bits). Choosing this option will make your monitor display colors in CMYK instead of RGB. This is useful if you use 16-bit programs, such as Photoshop. The lowest “bit” available is “16.”
To change the color depth of your display, go to the Control Panel and click Advanced Settings. On the Display Properties window, click on the Monitor tab. Click on the Adapter mode and then choose True Color (32-bit). You can confirm the change by following the on-screen directions. If you’re unsure of which option to choose, you can also run a command-line command to change the settings. Open the Command Prompt and type “cmd” into the Run dialog box.
You can adjust the color depth of Windows 7 monitors in the Display settings menu. In Windows 10, you can do this through the Settings menu or the System or Display option. You can also enable HDR mode by opening the monitor’s OSD. Click the gear icon in the Display settings to enable the setting. Once you’ve enabled HDR mode, the Windows HD Color settings will appear in blue. The settings will be saved automatically.
How Do You Improve Color Depth?
The color depth on your monitor is determined by the amount of bits per pixel. The higher the number of bits per pixel, the greater the range of colors you can see and thus, the quality of your monitor. Earlier computers and graphics cards supported only 1-bit color, which was monochrome. Nowadays, most computers support 32-bit color, which allows you to view 16.7 million colors. Windows 7 introduced 48-bit color, which is more than twice as much as 32-bit color.
The first step to change your color depth in Windows 7 is to go to Control Panel and select Advanced settings. From there, go to the properties of your graphics card. Look for the Display Modes tab and select the appropriate one. If you have more than one monitor, choose the highest bit for each monitor. You may want to change the default setting to “16-bit” if you only use one display. Once you’re done, your monitor should now display CMYK colors.
How Do I Set Bit Depth?
If you have more than one monitor, you may want to adjust the color depth on each monitor. This setting can be found in Advanced display settings, which can be found in Start > Settings > System > Display. Go to the Colors tab and choose 16 bit or 256 bit. If you have more than one monitor, repeat the process for each monitor. You can also set a higher color depth if you need it for a specific program.
Sometimes the resolution or color mode settings aren’t set properly, leaving Windows stuck in 16-bit color settings. If you want to restore your display to its default color settings, follow these steps. Click on the Advanced Settings link on the display properties window. Select the display mode that you want, then click OK. Select the color mode and click OK. Windows will then show you the options for each display mode. If you are having trouble setting the color depth on a particular monitor, you may need to change the display settings for all of them.
Where is Color Depth Set?
When adjusting your display’s color depth, Windows 7 provides several options. The highest “bit” is Highest (32 bits). Select the appropriate option, click OK, and your monitor should display CMYK, or 16-bit colors. This is particularly important if you’re using programs that use 16-bit color. To change your color depth, click the Control Panel icon on the lower right of the screen.
If you have multiple monitors, you can choose to reduce the color quality of one of them. This setting will improve the display of some software but may cause errors when you try to open certain programs. Make changes to the settings in the Display Properties window to improve the appearance of your display. Some software requires lower-quality color displays, and if you encounter errors when opening such programs, adjust your color settings. After making these changes, restart your computer and make sure you have installed the latest drivers.
How Do I Turn Off Color Blind on Windows 7?
If you’re blind and want to use your PC normally, you can turn off colorblind mode in Windows 7 by opening the Ease of Access Center. Open this window and select the ‘Use color filters’ option. Change the settings and you’ll see a color wheel change color. Toggling this feature is as easy as pressing the Win+C keys. The same shortcut can toggle the colorblind mode for all windows.
The Ease of Access section of the Control Panel will show you three preset color blind filters. Select the appropriate one by clicking the toggle. Similarly, you can choose the settings for Deuteranopia, Protanopia, or Tritanopia. If you have already enabled the color blind mode, you can return to the normal mode by pressing Win+Ctrl+S. If you need to turn it off completely, you should disable the color filter option.
If you’re trying to change the saturation levels on your Windows 7 screen, you can try lowering the level to 0% in the graphics card’s control panel. However, this trick might not work with external monitors. If your computer is equipped with an Intel Graphics chip, you can also adjust the saturation levels on your screen by using a keyboard shortcut. To use this method, choose the “Color Settings” option and click on it.
How Do I Turn Off High Contrast in Windows 7?
Whether you are using a normal screen or an Aero theme, you might want to know how to turn off high contrast in Windows 7. To do this, go to Control Panel, Appearance and Personalization, and click on Display. You can also type Optimize visual display into the search bar, and it will show the options that you need. Click the high contrast option and then uncheck it. If you are still seeing blurred images, try changing the theme.
If you’re experiencing difficulty reading text on your screen, you can switch off high contrast in Windows 7. You can do this from the Control Panel by clicking on the Ease of Access Center icon and selecting High Contrast. Or, you can toggle the feature by pressing the keyboard shortcut CTRL+SHIFT+PRINT SCREEN. The screen will adjust automatically to the new settings. Once you’ve changed the settings, click OK.
How Do I Change My Color Depth to 16 Bit?
If you want to set your monitor to a more appropriate bit depth, you can do it in Windows 7. First, open the Display Settings section of Control Panel. Next, navigate to Advanced Settings. In this window, select Display and then choose the display mode. If you have multiple monitors, select the one with the highest color depth. Click the OK button to finish. Now, you’re ready to change color depth on Windows 7.
You can choose whether to use 16-bit color or 32-bit. In the display mode drop-down menu, click the “Resolution” option. If you don’t see a setting for resolution, you need to change the Resolution slider or use the Colors menu. The latter is a great way to change the color depth without resetting the resolution. However, you should remember that 16-bit color is not supported directly by Windows 10.
How Do I Change RGB on My Laptop?
If you’re wondering how to change RGB on my laptop, you’re not alone. Many newer models have RGB keyboards. To control your RGB lighting, you can use Control Center. To access it, open the Start Menu and type “control center”. Control Center looks different on different models, but it’s generally the same design. The main menu has many useful settings, including fan speeds, CPU and memory temperatures, voltages and fan types. You can change RGB effects using the submenu for “RGB Effects.”
Another way to change RGB on your laptop is to install a utility from the SteelSeries website. The software allows you to change the RGB of your keyboard in multiple ways. There are preset RGB patterns on some models, while others can be changed by using the function key on your keyboard. You can also create your own RGB pattern by clicking the mouse icon. You can also disable RGB on a key/zone if you don’t want to use it.
Learn More Here:
1.) Windows Help Center
2.) Windows – Wikipedia
3.) Windows Blog
4.) Windows Central
Advertisement
Change the selection color of Windows 7 32 bit without using any extra software. Here is how to do it.
Step 1
Open the partition where your Microsoft Windows 7 is installed. By default it is C drive. Now go to Windows > Resources > Themes. Like this:

You will see some files and folders there; right click over your current theme’s .theme file and open it with notepad:

You can click “Open it” and browse/select the Notepad executable
OR
If you find it difficult; just open the Notepad; click File > Select Open and change the file type to “all files” from”text files”:

Browse to Windows > Resources > Themes and select the .theme file you are using now; it will open with Notepad like this:

Step 2
Just scroll down a bit, you will find the string :
[Control Panel / Colors]
See this:
Why I am showing you a wrong screenshot? Because; I discovered not all theme files have this string! Infact, in 64 bit the string is absent in most of the theme files!
In 32 bit you will get this:
[ControlPanel/Colors]
HotTrackingColor=xyz abc pqr

Step 3
Now, you need a software to get the values for the colors.
Note that, a color may have double digit value not triple ; i.e., abc=52 xyz=34 pqr=78 ; the values represent RGB value.
You need a software to pick colors; I use ColorPic free software for this website and other graphical works. You can download it from here.
Step 4
Save the edited file in desktop or some convenient place. Just replace the original one with this one. Remember to save the file as “all files”.
Done. As you can see all the default blue color in the notepad screenshot has been changed to green.
Note: If you add the string in 64 bit; the colors of hyperlinks will be changed; not the selection colors.
Thanks to flexdaw for sharing this idea and the 32 bit screenshot has been used belongs to him.

Tagged With adjust desktop color selection , windows selection color , HOW TO CHANGE DEFAULT SELECTION COLUR FROM BLUE TO ELSE , windows change selection color , change Desktop selection color , change selection color in windows 7 , change selection color windows , change selected text color windows 7 , change rgb values windows 7 , change color of selection on desktop
Как поменять битность монитора?
Цветовая битность монитора играет важную роль в отображении изображений на экране компьютера. Этот параметр определяет количество цветов, которые монитор может отобразить, что влияет на качество и реалистичность изображения. В данной статье мы рассмотрим процесс изменения битности монитора и как это можно сделать на операционных системах Windows и macOS.

Оглавление
- Проверка возможностей монитора
- Подготовка к изменению битности
- Изменение битности монитора в операционной системе Windows
- Изменение битности монитора в операционной системе macOS
- Последствия изменения битности монитора
- Основные советы и рекомендации
- Заключение
Проверка возможностей монитора
Проверка возможностей монитора перед изменением его битности — важный шаг для успешной настройки вашего компьютера. Битность монитора определяет количество цветов, которые он способен отобразить, и это влияет на качество изображения. Для начала следует определить максимальную поддерживаемую битность вашего монитора. Это можно сделать путем просмотра спецификаций монитора на его официальном веб-сайте или в руководстве пользователя.
Помимо максимальной битности, стоит учитывать и другие характеристики монитора, такие как разрешение экрана и частота обновления. Выбор правильной битности монитора зависит от ваших потребностей и предпочтений. Например, если вы работаете с графикой или фотографиями, вам может потребоваться монитор с высокой битностью для точного воспроизведения цветов.
Не стоит забывать о том, что изменение битности монитора может повлиять на производительность вашего компьютера, особенно если он устарел или не обладает достаточными ресурсами. Поэтому важно принимать во внимание и этот аспект при выборе подходящей битности для вашего монитора.
Проверка возможностей монитора перед изменением его битности — ключевой шаг, который поможет вам сделать правильный выбор и настроить ваш компьютер так, чтобы он соответствовал вашим потребностям и предпочтениям.
Подготовка к изменению битности
Подготовка к изменению битности монитора — важный шаг, который поможет избежать неприятных сюрпризов и обеспечит гладкое выполнение процесса. Прежде всего, необходимо убедиться, что ваша видеокарта и драйверы актуальны. Обновление драйверов обеспечит совместимость с новыми настройками и улучшит производительность.
Далее следует выполнить резервное копирование важных данных. Даже самые простые операции могут привести к неожиданным последствиям, поэтому иметь резервную копию данных — это как страховка от потери важной информации. При необходимости вы сможете быстро восстановить систему к предыдущему состоянию и избежать ненужных хлопот.
Не стоит забывать и о мониторе. Прежде чем приступить к изменению битности, убедитесь, что ваш монитор поддерживает выбранную вами глубину цвета. Проверьте его спецификации или посетите официальный сайт производителя для получения подробной информации о поддерживаемых режимах работы.
Важно понимать, что подготовка к изменению битности монитора — это не только предварительные меры безопасности, но и гарантия успешного и эффективного процесса изменения параметров вашего монитора. Правильная подготовка поможет избежать неприятностей и обеспечит удовлетворительный результат, отвечающий вашим ожиданиям.
Изменение битности монитора в операционной системе Windows
Изменение битности монитора в операционной системе Windows — это важная процедура, которая может значительно повлиять на качество отображаемого изображения. В Windows предоставляется возможность выбрать различные глубины цвета в зависимости от потребностей пользователя и характеристик монитора.
Шаги для Windows 10
-
Щелкните правой кнопкой мыши на свободном месте на рабочем столе и выберите «Параметры дисплея». Это откроет окно настроек дисплея, где вы сможете внести изменения.
-
Перейдите на вкладку «Дополнительные параметры дисплея». Здесь вы найдете дополнительные опции для настройки вашего монитора, включая разрешение и глубину цвета.
-
Найдите опцию для изменения разрешения и глубины цвета. В разделе «Цветовая глубина» выберите желаемую битность из доступных вариантов.
-
Выберите желаемую битность и примените изменения. После выбора желаемой глубины цвета нажмите кнопку «Применить», чтобы сохранить изменения, а затем «ОК», чтобы закрыть окно настроек.
Эти простые шаги позволят вам легко изменить битность вашего монитора и настроить его под свои предпочтения и требования. Помните, что выбор оптимальной битности зависит от ваших потребностей и характеристик вашего монитора.
Изменение битности монитора в операционной системе macOS
В macOS изменение битности монитора является относительно простой процедурой, но требует аккуратности и осведомленности. Для этого вам потребуется выполнить несколько простых шагов, чтобы добиться желаемого результата.
Прежде всего, перейдите в «Параметры системы» на вашем Mac. Затем выберите раздел «Монитор», где вы увидите список доступных разрешений и битностей. В этом разделе вы можете выбрать желаемую битность цвета для вашего монитора.
Не забудьте учитывать возможности вашего монитора при выборе битности. Некоторые мониторы могут не поддерживать высокие битности цвета, что может привести к неправильному отображению изображений или проблемам совместимости с некоторыми приложениями.
После выбора желаемой битности примените изменения, и ваш монитор будет отображать изображения с новой цветовой глубиной. В случае, если вы заметите какие-либо проблемы или неудовлетворительное качество изображения, вы всегда можете вернуться к предыдущей настройке.
Изменение битности монитора в macOS может значительно улучшить визуальный опыт работы с вашим компьютером, обеспечив более насыщенные и реалистичные цвета на экране.
Последствия изменения битности монитора
При изменении битности монитора следует учитывать не только потенциальные преимущества, но и возможные последствия этого действия. От выбора битности зависит не только качество отображаемого изображения, но и производительность вашей системы, а также совместимость с различными приложениями и играми.
Улучшение цветопередачи и реалистичности изображения
Повышение битности монитора до более высокого уровня может значительно улучшить визуальный опыт пользователя. Более глубокая цветовая гамма позволяет отображать более широкий спектр цветов, что делает изображения более насыщенными, реалистичными и приближенными к оригиналу. Это особенно важно для профессионалов в области графики, дизайна и фотографии, где точность цветопередачи играет критическую роль.
Увеличение потребления ресурсов системы и возможное снижение производительности
Однако, повышение битности монитора требует большего объема ресурсов компьютера. Более высокая битность требует больше видеопамяти и процессорной мощности для обработки и отображения изображений. В результате это может привести к увеличению нагрузки на систему и снижению производительности, особенно на старых или менее мощных компьютерах.
Возможное возникновение проблем совместимости
Помимо производительности, изменение битности монитора также может повлиять на совместимость с некоторыми приложениями и играми. Некоторые программы могут быть не оптимизированы для работы с более высокими битностями и могут отображать артефакты или работать некорректно. Перед изменением битности монитора рекомендуется убедиться, что ваши основные приложения и игры совместимы с выбранной битностью.
Важно заметить, что каждая система уникальна, и влияние изменения битности монитора может отличаться в зависимости от конфигурации и характеристик вашего компьютера. Перед принятием окончательного решения рекомендуется провести тестирование на вашей системе и оценить все потенциальные последствия.
Основные советы и рекомендации
При изменении битности монитора, важно учитывать несколько ключевых аспектов, чтобы получить оптимальный результат и избежать возможных проблем. Ниже приведены основные советы и рекомендации, которые помогут вам в этом процессе.
Выбор оптимальной битности
Прежде всего, необходимо тщательно подойти к выбору битности монитора. Высокая битность обеспечит более реалистичное и насыщенное изображение, однако она также может потреблять больше ресурсов вашей системы. В то время как низкая битность может уменьшить нагрузку на компьютер, но при этом снизит качество отображаемых цветов.
Учитывайте требования задач
При выборе битности монитора важно учитывать конкретные требования ваших задач и предпочтения по качеству изображения. Например, для редактирования фотографий или просмотра высококачественного видео может потребоваться более высокая битность, чем для повседневных задач.
Внимательно следите за производительностью
Изменение битности монитора может повлиять на производительность вашей системы. Если вы заметили значительное замедление работы компьютера после изменения битности, рассмотрите возможность вернуться к предыдущей настройке или обратитесь за помощью к специалистам.
Проверяйте совместимость с приложениями
Некоторые приложения и игры могут иметь ограничения или проблемы совместимости с определенными битностями монитора. Перед изменением битности, рекомендуется проверить совместимость ваших основных приложений или игр с выбранной битностью.
Экспериментируйте и тестируйте
Наконец, не бойтесь экспериментировать с различными настройками и тестировать их в различных сценариях использования. Это поможет вам найти оптимальную битность, которая соответствует вашим потребностям и предпочтениям.
В целом, изменение битности монитора — это важная процедура, которая может существенно повлиять на ваш визуальный опыт. Следуя вышеперечисленным советам и рекомендациям, вы сможете достичь оптимального качества изображения и улучшить ваше пользовательское впечатление от работы с компьютером.
Заключение
Изменение битности монитора — это важная процедура, которая может повлиять на визуальный опыт пользователя. Следуя указанным выше шагам и рекомендациям, вы сможете улучшить качество изображения на вашем мониторе и сделать его более соответствующим вашим потребностям и предпочтениям.
Download Windows Speedup Tool to fix errors and make PC run faster
When you right-click on your Windows 7 or Windows Vista Desktop and select Personalize, in the Windows Color & Appearance, you are presented with a set of eight colors to choose from. It can be used to change the color of windows, the start menu, and the taskbar by picking one of these available color schemes. However, you can add a custom color scheme to it, or you can also create your color set using the color mixer, should you wish to. In this post, we will show how you can add custom Windows Color & Appearance in Windows 7 and Vista.

To add your custom color for Windows appearance, you need the following:
- Restorator software
- Registry Editor
- Image Editing Software like Adobe Photoshop
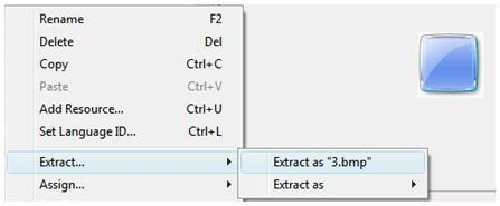
First, run Restorator and open themecpl.dll (located under C:\Windrows\System32) and navigate to BITMAP. Now extract any bitmap file from 1 to 8.
Next, run Photoshop and change colors by adjusting the hue/saturation. Open the extracted bitmap image in Photoshop and click on Image > Adjustments > Hue/Saturation or press CTRL+U. Adjust or change color as you want and save & exit.
Once again, run Restorator and open themecpl.dll and click on Resources > Add Resources or Press CTRL+U.

Now select the bitmap file, drag, and drop at the highlighted area.

Change Registry value to apply Custom Colors
HKEY_LOCAL_MACHINE\SOFTWARE\Microsoft\Windows\CurrentVersion\ControlPanel\Glass Colorization\Swatches
1] Create a key with a GUID name. It must be unique among all GUIDs existing under Swatches
Simple trick:
Copy any GUID like {FD81078C-1B36-4595-A92E-91F05C4FA5DC} and change one of the character or digit … I am sure; it will be 99.99 % unique.
The new GUID is {FD81078C-1B36-4595-A92E-91F05C4FA5DD})
2] Create a DWORD (32-bit) value and name it to color. Set the value of color, which you want.
Simple trick: Right Click on the desktop and navigate Personalize > Windows color and appearance, now set your favorite color using the color mixer.
Run Registry Editor and navigate to-
HKEY_CURRENT_USER\Software\Microsoft\Windows\DWM
and click on ColorizationColor and copy its value and paste in Color DWORD value)
3] Create a DWORD (32-bit) value and named NameId. Set the value to 69 in decimal. This registry value reads a string from themecpl.dll.mui file located under C:\Windows\System32\en-US. The 69 String ID in themecpl.dll.mui contains string value Vistas.
4] Create a DWORD (32-bit) value and named PreviewId. Set the value to 103 (The ID or name of the bitmap resource file that has been added to themecpl.dll.)
5] Create a DWORD (32-bit) value and named PreviewOrder. Set the value to 9, which tells the color scheme added at the 9th number.
6] Create an Expandable String value (REG_EXPAND_SZ) and named Resource. Set the value to themecpl.dll.
7] Exit and Reboot the computer.
Update: Restorator is available now as a trial version only. The trial version expires after 30 days. So you can use it to follow this tutorial, knowing this fact.
Guest Post By Ramesh Kumar, MVP.
Jacob is passionate about the Windows operating system but loves to write about all tech-related subjects.