
Windows 10: 101 INITIALIZATION FAILED
Discus and support 101 INITIALIZATION FAILED in Windows 10 Software and Apps to solve the problem; My PC is displaying the error: 101 INITIALIZATION FAILED. I have accessed command prompt and successfully completed the following prompts: bootrec…
Discussion in ‘Windows 10 Software and Apps’ started by Spence Gerber, Oct 16, 2024.
-
101 INITIALIZATION FAILED
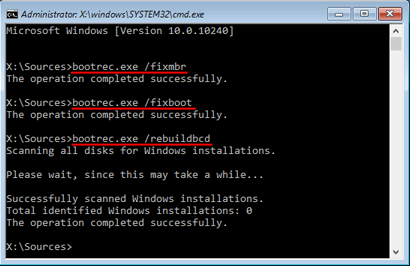
My PC is displaying the error: 101 INITIALIZATION FAILED. I have accessed command prompt and successfully completed the following prompts: bootrec /fixMBRbootrec /rebuildBCDHowever, when I type bootrec /fixBoot, it says “access is denied.” I don’t know how else to fix this issue.

-
bl initialize library failed 0xc0000bb
Let’s try to use system restore instead. Follow the steps below:
-
Start your desktop, and after the manufacturers logo disappears and Windows 10 tries to boot, press and hold the power button for 5-10 seconds to perform a hard shut
down. -
Do the step #1 until you see the Windows logo screen or Please wait during boot. (You
may need to perform this up to 3 times.) -
After Windows 10 boots into the Windows 10 Recovery Environment (WinRE), you can now access Startup
Recovery, Safe Mode, and Command Prompt. -
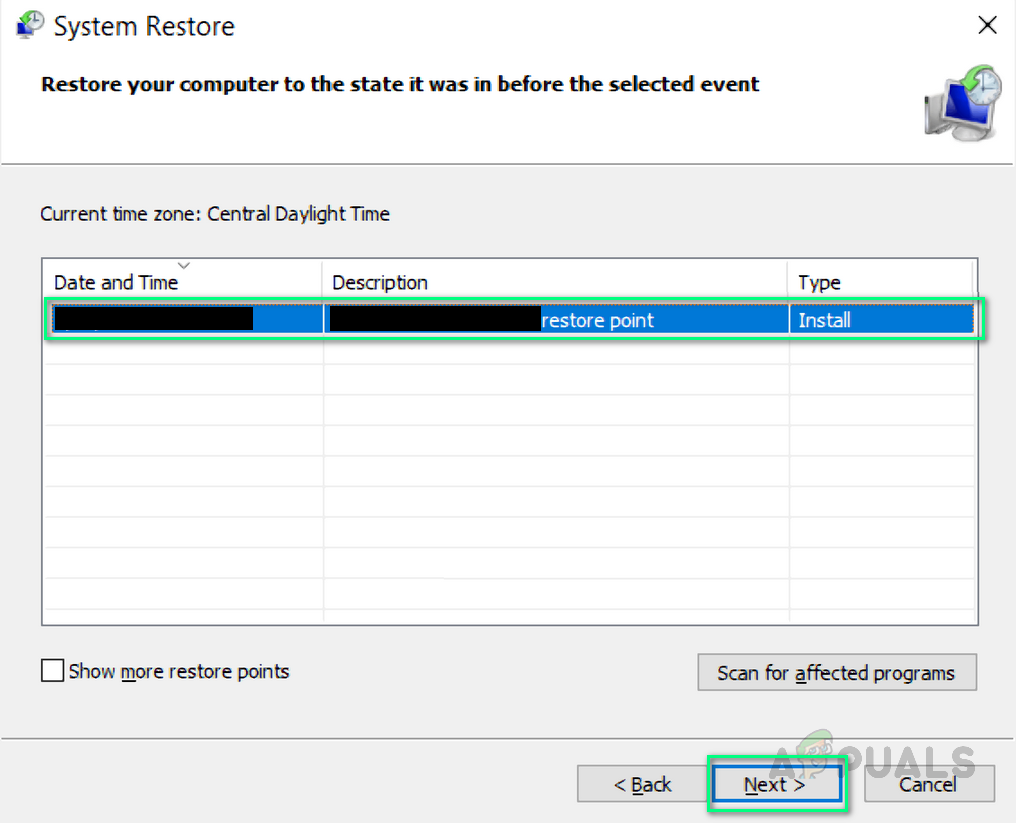
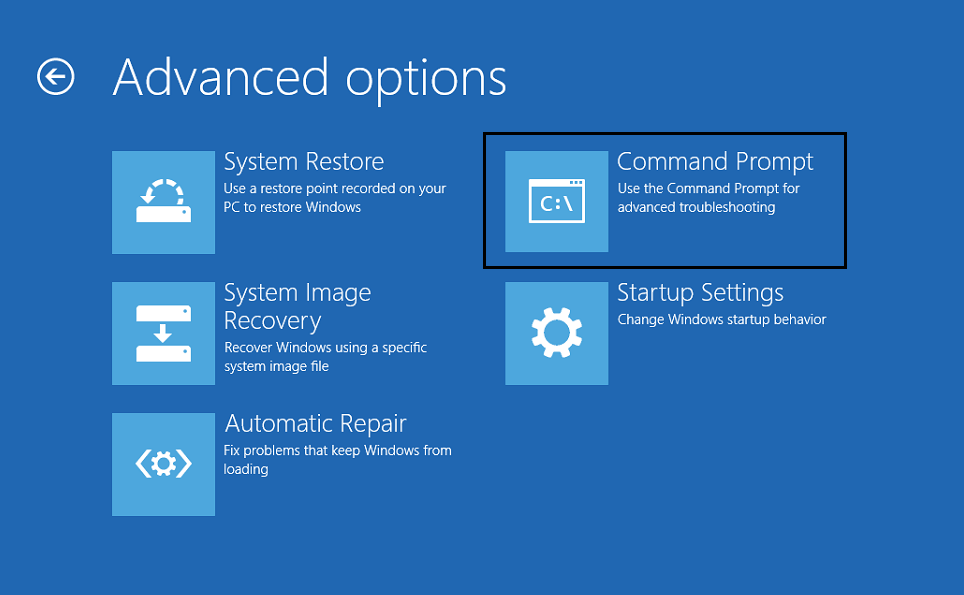
Go to Troubleshoot > Advanced Options > System Restore,
and then check if you have a restore point. -
In the list of available restore points, choose the date prior to the issue. Steps can be found in this article on
how to perform a System Restore. Refer to Restore from a system restore point.
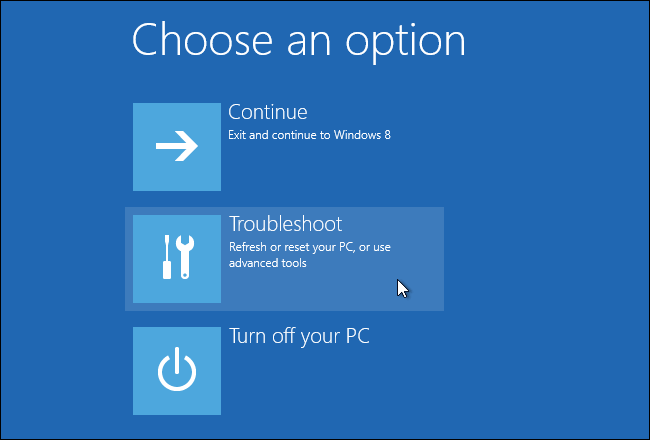
If the steps above fails, we suggest that you boot your computer in Safe Mode (while in the Recovery Environment) and see if it helps. Follow the steps below on how
to boot in Safe Mode:- Go to Troubleshoot > Advanced Options > Startup Settings and click Restart.
- Upon restart, click/press 4 to boot into Safe Mode.
If Safe Mode does not work, we may need to Reset your computer. Follow the steps below:
- Go to Troubleshoot > Advanced Options > Reset this PC.
- Choose to keep all your files and applications. This will re-install Windows 10 whilst keeping your data and applications.
Update us after you perform the steps.
-
Start your desktop, and after the manufacturers logo disappears and Windows 10 tries to boot, press and hold the power button for 5-10 seconds to perform a hard shut
-
Failed to Initialize Smart Audio Failed to Initialize Smart Audio — Windows 10Thank you Aswin! The instructions from Andreas Socratous didn’t work because «Conexant SmartAudio HD» wasn’t listed as a choice to disable. I used Vijay Kroupolu M’s Method 1: Clean Boot. I just followed Step 1 and 2; didn’t do any actual «troubleshooting.»
The dialogue box isn’t appearing now when I turn on the computer! I don’t know if SmartAudio is working or not, but I’m not sure if that makes any difference. Thanks! -
101 INITIALIZATION FAILED
When I updated to windows 10 my old 101 puzzle and logic games are not working
Hello,
I appreciate if you could answer a
few questions to narrow down the issue and to provide you better assistance.- How did you installed these games on your Computer? Is it through CD/DVD or Windows Store?
- When you say, «old 101 puzzle» are you referring to Microsoft Jigsaw puzzles?
As you have already tried different troubleshooting steps with no avail, I suggest you to contact the game manufacturer regarding this matter for assistance and check if this helps.
Write to us with the above information and status of the issue to assist you further.
Thank You.

101 INITIALIZATION FAILED
-
101 INITIALIZATION FAILED — Similar Threads — 101 INITIALIZATION FAILED
-
101 INITIALIZATION FAILED
in Windows 10 Gaming
101 INITIALIZATION FAILED: My PC is displaying the error: 101 INITIALIZATION FAILED. I have accessed command prompt and successfully completed the following prompts: bootrec /fixMBRbootrec /rebuildBCDHowever, when I type bootrec /fixBoot, it says “access is denied.” I don’t know how else to fix this… -
101 INITIALIZATION FAILED
in Windows 10 BSOD Crashes and Debugging
101 INITIALIZATION FAILED: My PC is displaying the error: 101 INITIALIZATION FAILED. I have accessed command prompt and successfully completed the following prompts: bootrec /fixMBRbootrec /rebuildBCDHowever, when I type bootrec /fixBoot, it says “access is denied.” I don’t know how else to fix this… -
Reset failed to initiate.
in Windows 10 Software and Apps
Reset failed to initiate.: Trying to reset my PC on the settings > recovery > reset however when I click on reset it does nothing but restart. It actually comes with nothing then as if it like I just restarted the PC since its doing so fast and no buffering or no initialization at all. I want to reset… -
process1 initialization failed
in Windows 10 Software and Apps
process1 initialization failed: I am not kidding. I have been spending hours, hours, and days trying to get Windows 10 to start. I cannot get to the Desktop or to a Command Prompt. Usually, I am able to fix just about anything. This one has me stumbled. I refuse to give up. The information on the laptop is… -
process1 initialization failed
in Windows 10 BSOD Crashes and Debugging
process1 initialization failed: I am not kidding. I have been spending hours, hours, and days trying to get Windows 10 to start. I cannot get to the Desktop or to a Command Prompt. Usually, I am able to fix just about anything. This one has me stumbled. I refuse to give up. The information on the laptop is… -
Failed to initialize
in Windows 10 Customization
Failed to initialize: I downloaded a program — Twinity — and thought all was fine until I tried to log in and got the failed to intialize message. Can I get round this?Thanks
https://answers.microsoft.com/en-us/windows/forum/all/failed-to-initialize/cb4619db-8347-4ced-85da-896f0692a1cb
-
Storage initialization fail
in Windows 10 Network and Sharing
Storage initialization fail: Storage initialization fail in Windows 10?https://answers.microsoft.com/en-us/windows/forum/all/storage-initialization-fail/b4d566b6-d144-4c14-99a4-27cbaa81f261″
-
initialization failed
in Windows 10 BSOD Crashes and Debugging
initialization failed: hello everyoneso when i started my PC he showed me this screen[IMG]
then restarted and did that in a loop
https://answers.microsoft.com/en-us/windows/forum/all/initialization-failed/10e740ab-553d-4214-a0a4-4c49d49ebfac
-
Failed to Initialize OpenCL
in Windows 10 Software and Apps
Failed to Initialize OpenCL: First error in a program after the Windows 10 Fall Upgrade…I’m using Adobe After Effects CC 2015.
[img]
Any ideas?
29754
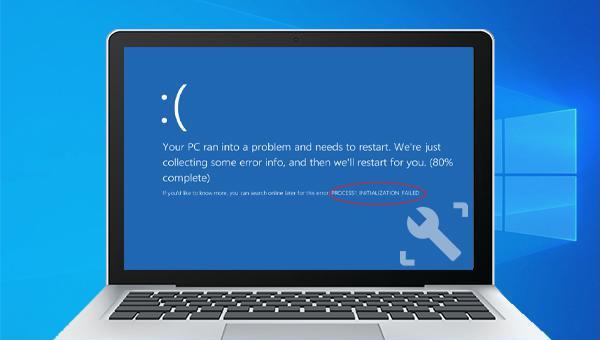
Blue Screen of death (BSOD) errors are one of the most harmful errors encountered by PCs because these errors only occur when there is some serious hardware, driver, or software problem. One of the most reported BSOD errors by users is I01 initialization failure.

This error can appear while starting the PC, upgrading the operating system to the latest version or casually doing routine work on Windows 10. Most of the BSOD errors occur if the initialization of the I/O system failed or due to some issues with the hardware components of the PC. The frequent occurrence of this error can result in system corruption, so it is crucial to fix this error to prevent any further damage to the system. Users usually end up with the following notification on their PC’s screen:
Pre-requisites:
We will recommend you opt for the following steps before proceeding towards solutions. These workarounds will fix some minor but critical issues of your system that may be a cause of the error under discussion and will surely help the users to choose the best-suited solution to the BSOD error in their system, from the next section. The possible workarounds are given below:
- Repair Corrupt Files: To avoid the BSOD error due to damaged system files, try to repair or restore them by the given steps:
Open “Command Prompt” > type “DISM.exe /Online /Cleanup-image /Restorehealth” > Press “Enter”.
Again, type “sfc /scannow” > Press “Enter”. - Repair Hard Drive Errors: It is better to run a hard drive repair mechanism to eliminate this possible cause of the error. To repair the hard drive errors, follow these steps:
Open “Command Prompt” > type “chkdsk/r C:” > press “Enter”.
Again, run the check disk command for the rest of the available disk drives. - Run Malware Scan: Sometimes malware can halt the Windows functions and cause BSOD error, as discussed in causes. Follow these steps to scan the system for malware: Windows Security>Virus and Threat Protection>Quick Scan.
- Update Windows: BSOD error due to outdated operating systems is something that can be solved by updating Windows with the latest security patches and feature updates. These updates fix many bugs and compatibility issues with certain hardware and software. Update your Windows following these steps:
Open “Settings”> “Update & Security” > “Windows Update” > “Check for updates”. - Update Drivers: Whenever Windows operating system is updated, your old drivers can conflict with the new operating system and can cause BSOD errors. That is why keeping them updated is mandatory. To update the particular device driver:
Open “Device Manager” > Expand “Display Adapters” >Select “device”> Right-click and select “Update Driver Software”. - Unplug Extra Hardware: Remove all external storage devices such as drives, docks, or any hardware you might have plugged into your device that you are not using currently.
Now let us jump to the solutions provided by our technical team. These solutions are based on thorough online research and user feedback.
Solution 1: Run Windows Built-in BSOD Troubleshooter
In case none of the above-mentioned workarounds fixed the error, let us try Windows 10’s Built-in BSOD Troubleshooter. This tool is specifically designed to resolve various system issues including the BSOD errors. It runs a security scan that is not limited to Windows and its components only, it also analyzes Motherboard BIOS and its firmware (as per the latest addition in Windows). Therefore, it is most likely going to help you to solve the problem under consideration. Follow the steps given below to run the BSOD troubleshooter:
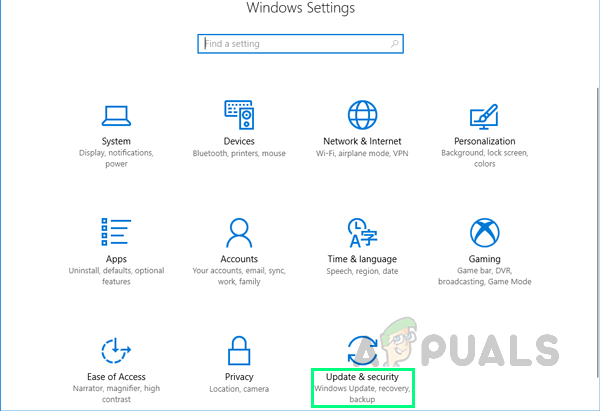
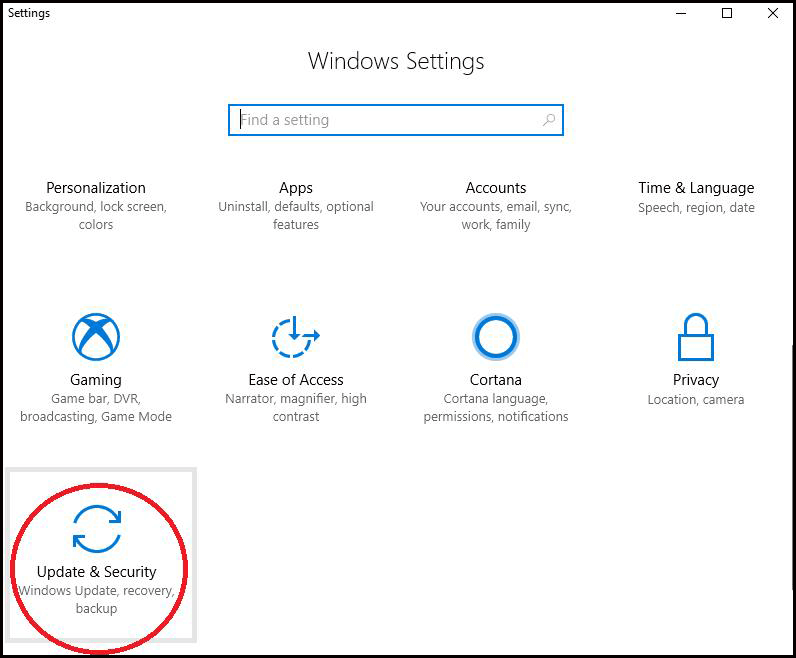
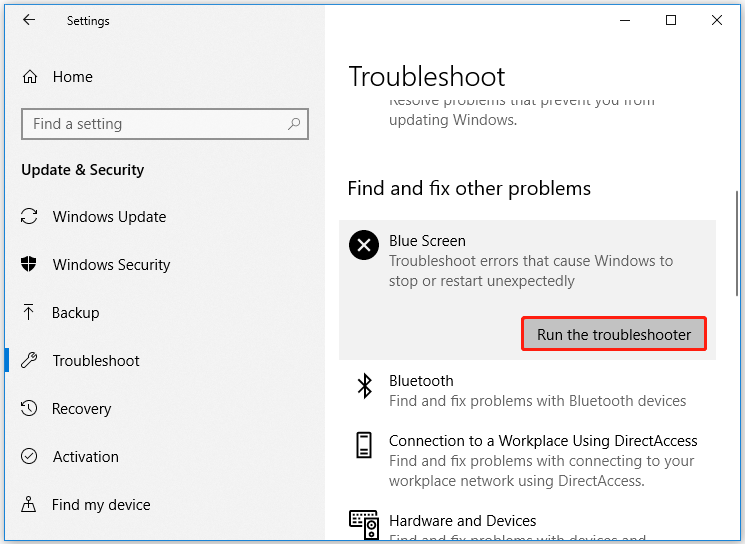
- Click Start > Settings Icon > Update & Security. This will open a window that contains Windows update-related settings i.e., Windows Security, Backup, Troubleshoot, etc.

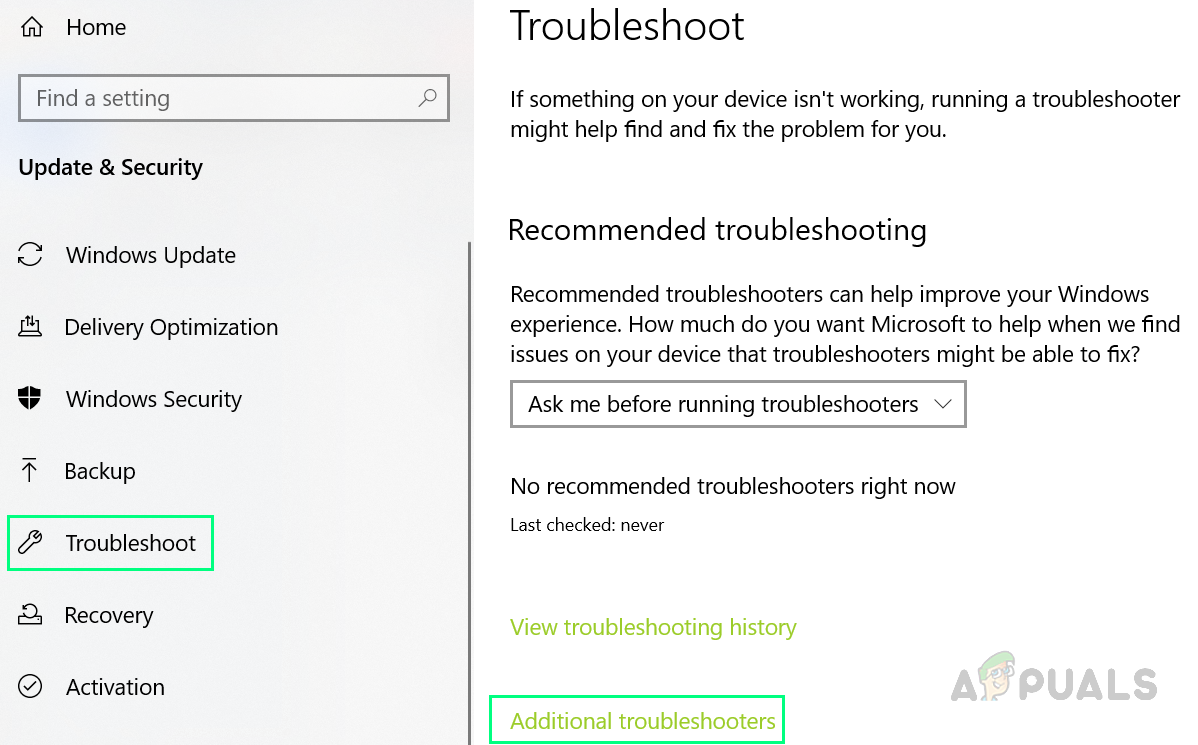
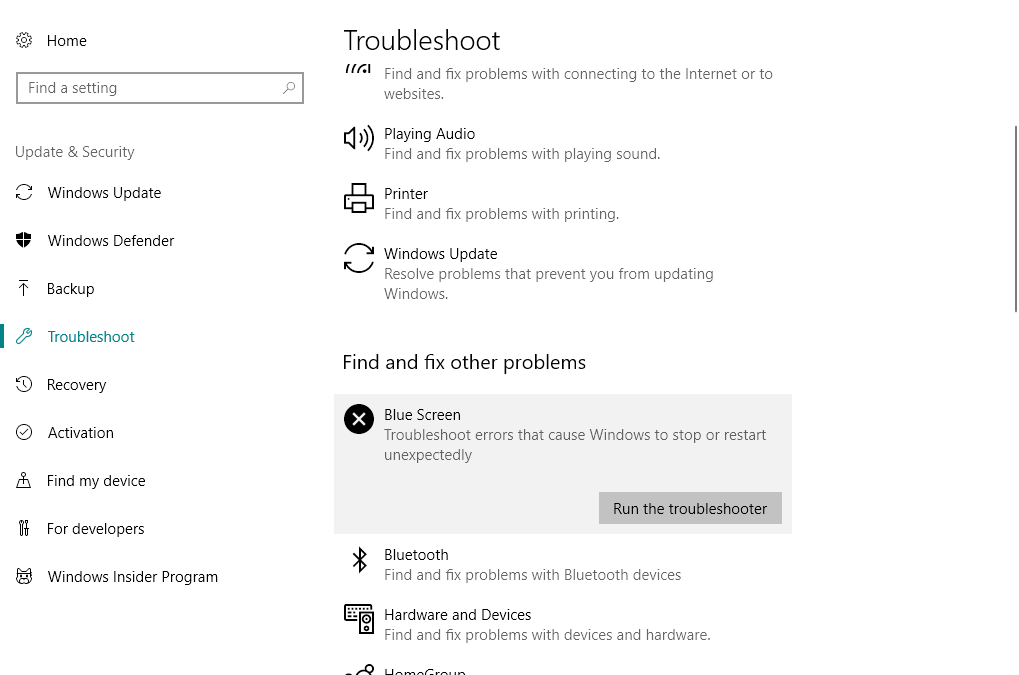
Opening Windows Update & Security Settings - Click Troubleshoot > Additional troubleshooters. This will take you to Windows troubleshooting options for different categories i.e., Internet Connections, Windows Update, Printer, etc.

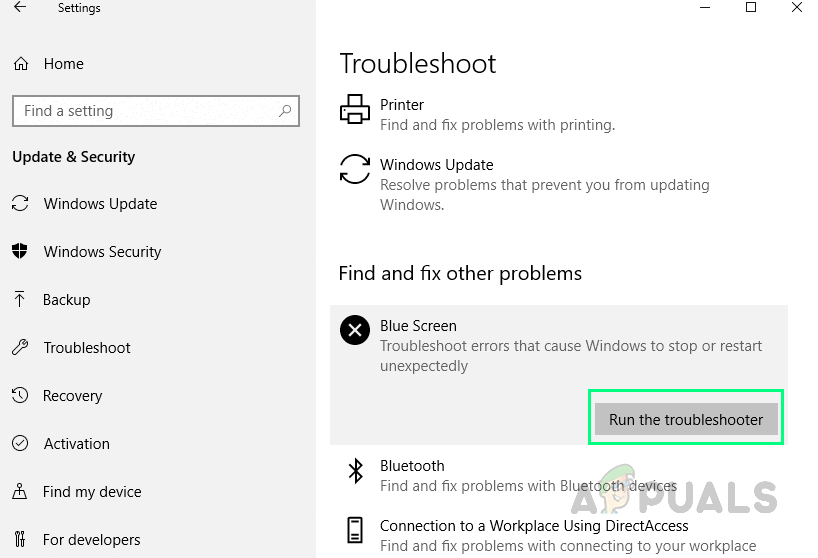
Opening Windows Additional Troubleshoot Options - Click Blue Screen > Run the troubleshooter. This will run a Windows BSOD troubleshooter that will try to resolve things automatically. Follow the on-screen instructions to complete the troubleshooting process. It will indicate the root cause of the BSOD error i.e., whether it is the software or hardware problem causing the error. This process may take a few minutes therefore, wait until it gets finished.

Running Blue Screen Troubleshooter
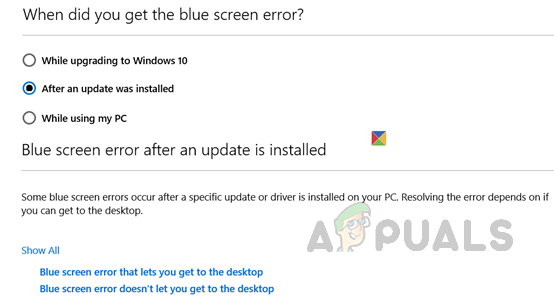
If you are running on Windows Update Version 1809 or later then you will have to access the Blue Screen Online Troubleshooter, the latest addition on the Microsoft website. It helps beginner users troubleshoot their Blue Screens and fix the error automatically. To do so follow the given steps:
- Open the Online BSOD Troubleshooter on Microsoft Official Page. You will simply see a wizard with different options that indicate when did you get the Blue screen error.

Opening Online BSOD Troubleshooter - Now you have multiple options to play with:
If you select While upgrading to Windows 10, you will be asked to revert back to your previous Windows version.
If you select After an update was installed, you will be asked to check for updates or remove newly installed hardware.
If you select While using my PC, some helpful suggestions will be offered if you can get to your desktop, as well as, if you are unable to access the desktop. - Select the best-suited option according to the situation and follow up the given instructions and steps to fix the problem. Despite all the procedures offered by Microsoft, if the blue screen error persists then move to the next solution.
Solution 2: Rebuild MBR & BCD
The Master Boot Record is a key part of the startup system of your PC. It contains all the essential information about the disk partitions of computers and helps load the operating system. Without a properly functioning MBR, your PC will not work and show blue screen errors. BCD or Boot Configuration Data contains boot configuration parameters on how to start your operating system. Rebuilding MBR & BCD will help your PC to start normally without any errors. This solution proved to be helpful for a lot of users online and it is also recommended by Microsoft Technical Experts. To rebuild the MBR and BCD, follow these steps:
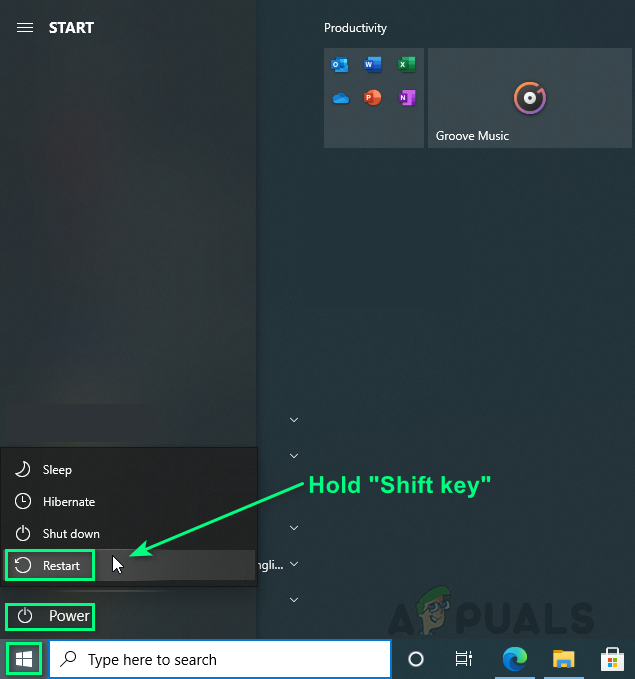
- Click Start, Power Icon, and then click on the Restart option while holding the Shift key on your keyboard. This will allow your PC to enter “Windows Startup Repair” options after it boots up.

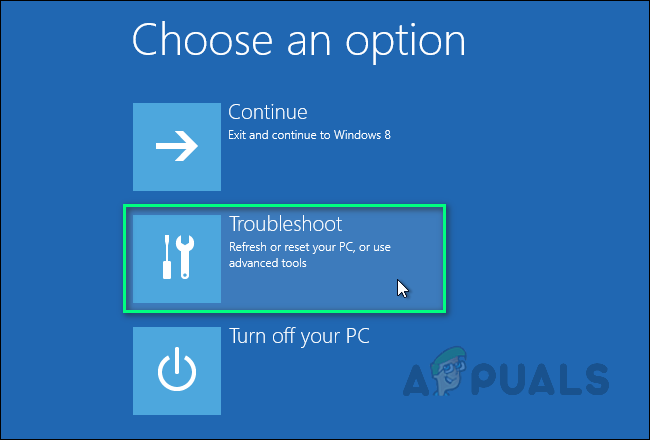
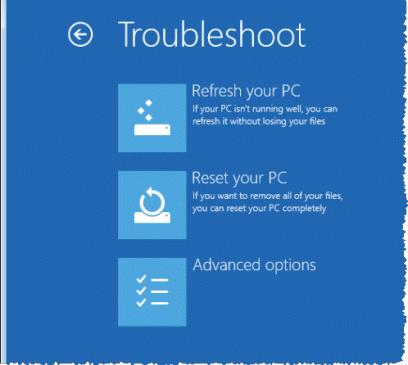
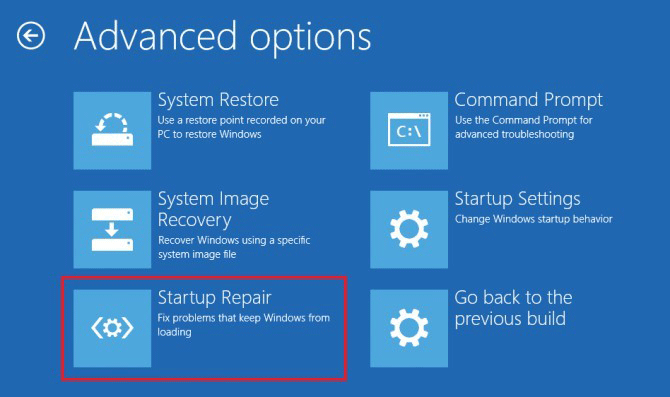
Custom Restart to Enter Windows Startup Repair Mode - The Windows bootup process will get interrupted by displaying a list of options on the screen to choose from. Select the Troubleshoot option. This will open a window to provide you with two different options to either reset the PC or access the advanced options to resolve the issue.

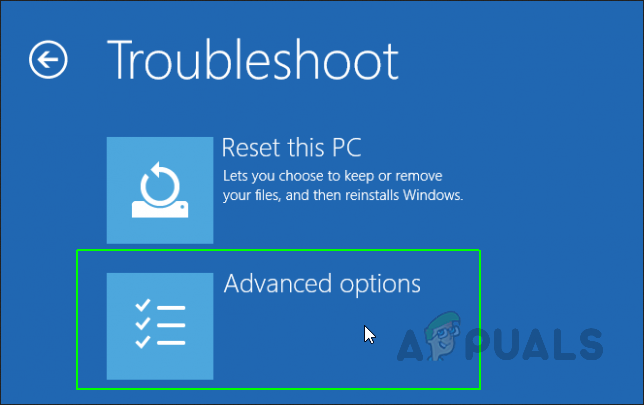
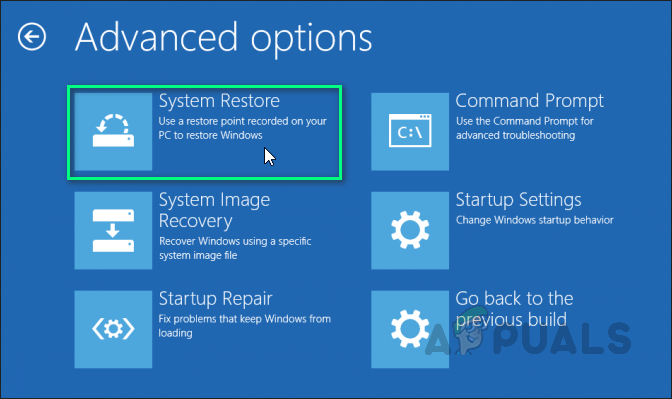
Opening Troubleshoot Options - Click Advanced options to open a window with different categories of available options for rectifying the error i.e., System Restore, Startup Repair, Command Prompt, etc.

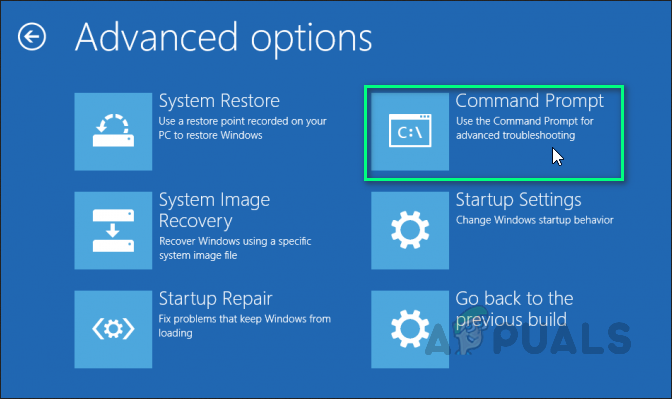
Opening Advanced Options - Select the Command Prompt option. It will open the Windows automation tool that is part of the Windows operating system to automate methods & commands for certain actions.

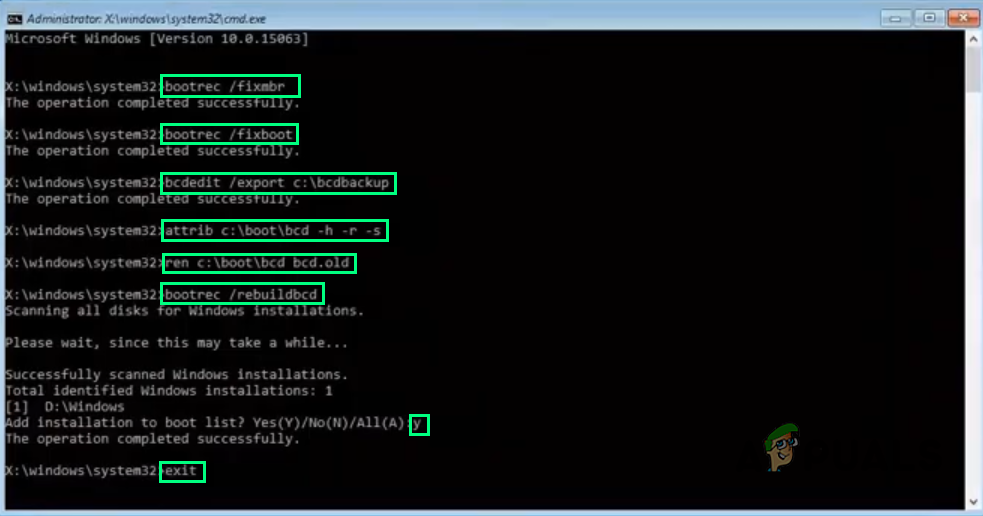
Opening Command Prompt - Now type the following commands in Command Prompt and press Enter after every command:
bootrec /fixmbr

bootrec /fixboot

bcdedit /export c:\bcdbackup

attrib c:\boot\bcd -h -r -s

ren c:\boot\bcd bcd.old

bootrec /rebuildbcd and then y

exit

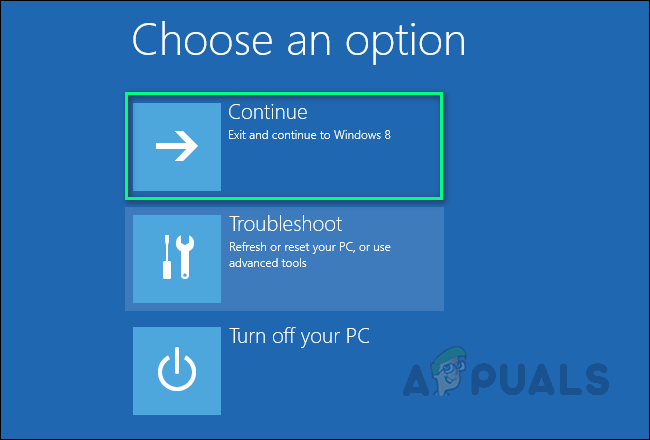
Rebuilding MBR & CBR Using Commands - Now click Continue to restart your PC and check if the issue is resolved. If this solution did not work for you and you are still facing the error under consideration then the only option left is to reset/restore your PC which is covered in the last solution, solution 3.
Restarting PC
Solution 3: Restore/Reset PC
This solution has two parts: restoring the PC and resetting it. If the blue screen error started to occur recently, it is quite possible that the issue was created by a change that your system has experienced recently. Therefore, an easy fix would be to restore your PC to an earlier “System Restore Point” where there was no issue in the first place.
This is only possible if you had created a “System Restore Point” for your PC or not. In case, you hadn’t created one then you have no option left but to reset your PC. A reset removes the corrupted or problematic copy of Windows from your device and then replaces it with a fresh copy of Windows. It wipes out all programs & apps, reinstalls Windows, along with the built-in Windows apps (such as the Start menu, Settings, Mail, Calendar, and Microsoft Edge), fixing the error under consideration.
Hence follow the solution procedure according to either of the two situations:
Have a System Restore Point:
- Click Start, Power Icon, and then click on the Restart option while holding the Shift key on your keyboard. This will allow your PC to enter “Windows Startup Repair” options after it boots up.
- The Windows bootup process will get interrupted by displaying a list of options on the screen to choose from. Select the Troubleshoot option. This will open a window to provide you with two different options to either reset the PC or access the advanced options to resolve the issue.
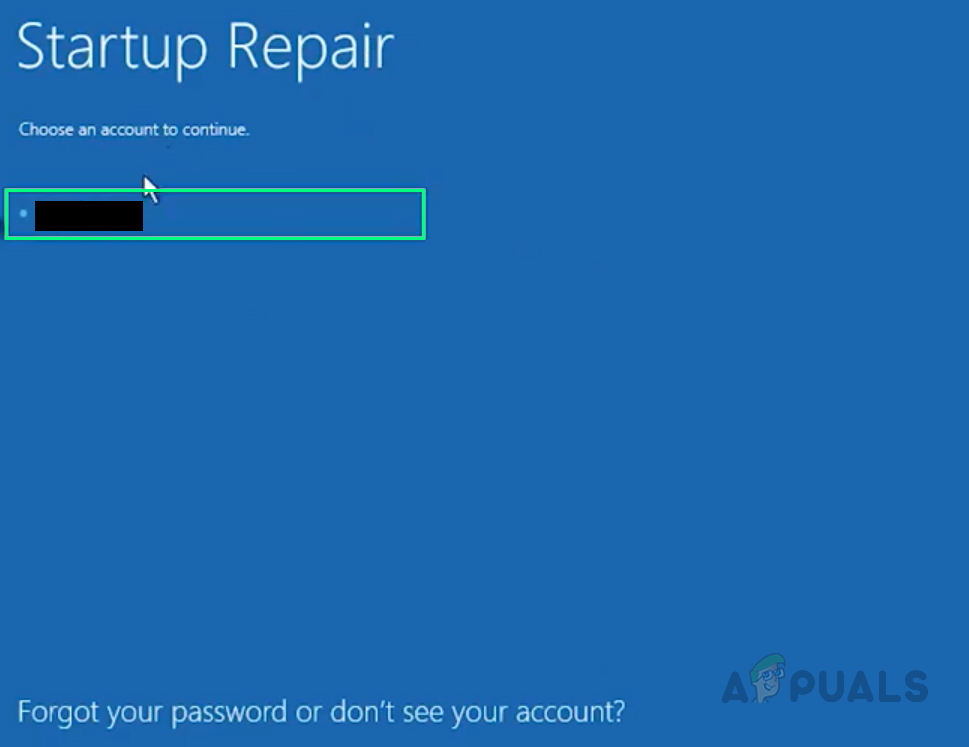
- Select Advanced options > System Restore. This will open a window where you will have to select your Microsoft Account in which you have saved the “System Restore Point”.
Opening System Restore Option - Select your Microsoft Account. This will open the next window automatically where you need to choose your keyboard layout from the available options.

Selecting Microsoft Account - Choose your Keyboard layout from the given options and click Continue. A window will pop up, click Next. Note that system restore does not affect any of your data and documents but the recently installed programs might be uninstalled.
- Now select your Latest System Restore Point from the given options and select Next.

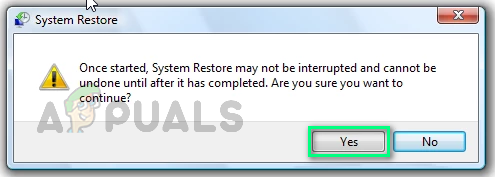
Selecting the Latest System Restore Point - A confirmation window will pop up, click Yes to start the system restore process. Your computer will be restored to the state it was in, right when the respective System Restore Point was created. The procedure will take time so wait until it gets finished.

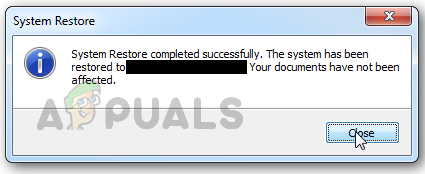
Confirming System Restore Action - Once the process is completed, a notification will pop up. Finally, click on the Close option to successfully complete the System Restoration Process. Restarted your computer normally and you no longer will receive any BSOID issues.

Exiting System Restore Process Window
Doesn’t Have a System Restore Point:
- Click Start, Power Icon, and then click on the Restart option while holding the Shift key on your keyboard. This will allow your PC to enter “Windows Startup Repair” options after it boots up.
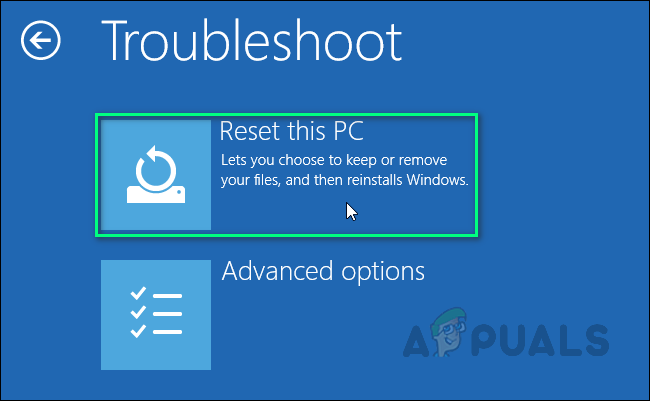
- The Windows bootup process will get interrupted by displaying a list of options on the screen to choose from. Select the Troubleshoot option. This will open a window to provide you with two different options to either reset the PC or access the advanced options to resolve the issue.
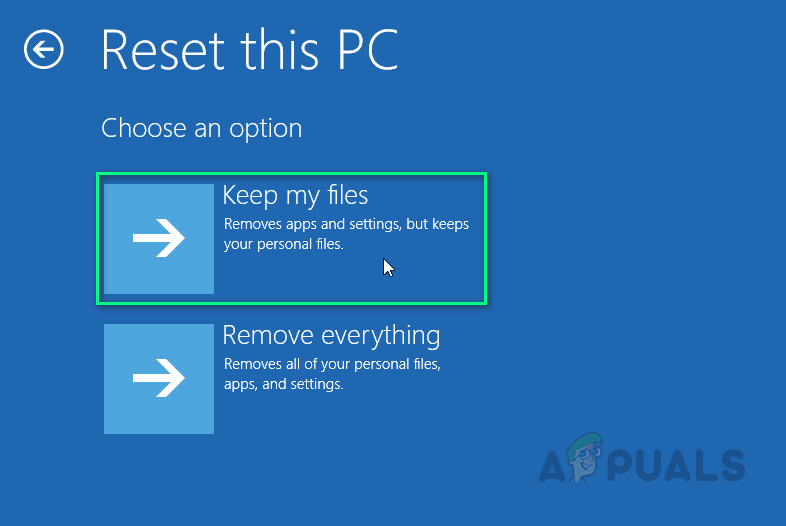
- Select Reset this PC. It will provide you with two different options before starting the reset process.

Selecting Reset This PC Option - Choose the Keep my files option if you want to keep your personal data and files. Otherwise, go with the Remove everything option.

Selecting Keep My Files Method - Then select your Account and type in your password. In case you do not have a password then simply press Continue on the next window.

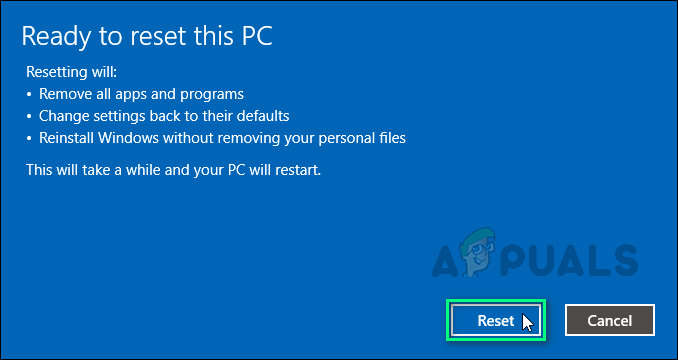
Selecting Microsoft Account - Now, select the Reset option and wait for Windows 10 to reset. Do not unplug or turn off your computer as the process will take time. Once the computer has successfully been reset, your problem should be permanently fixed.

Resetting PC

Kevin Arrows
Kevin Arrows is a highly experienced and knowledgeable technology specialist with over a decade of industry experience. He holds a Microsoft Certified Technology Specialist (MCTS) certification and has a deep passion for staying up-to-date on the latest tech developments. Kevin has written extensively on a wide range of tech-related topics, showcasing his expertise and knowledge in areas such as software development, cybersecurity, and cloud computing. His contributions to the tech field have been widely recognized and respected by his peers, and he is highly regarded for his ability to explain complex technical concepts in a clear and concise manner.
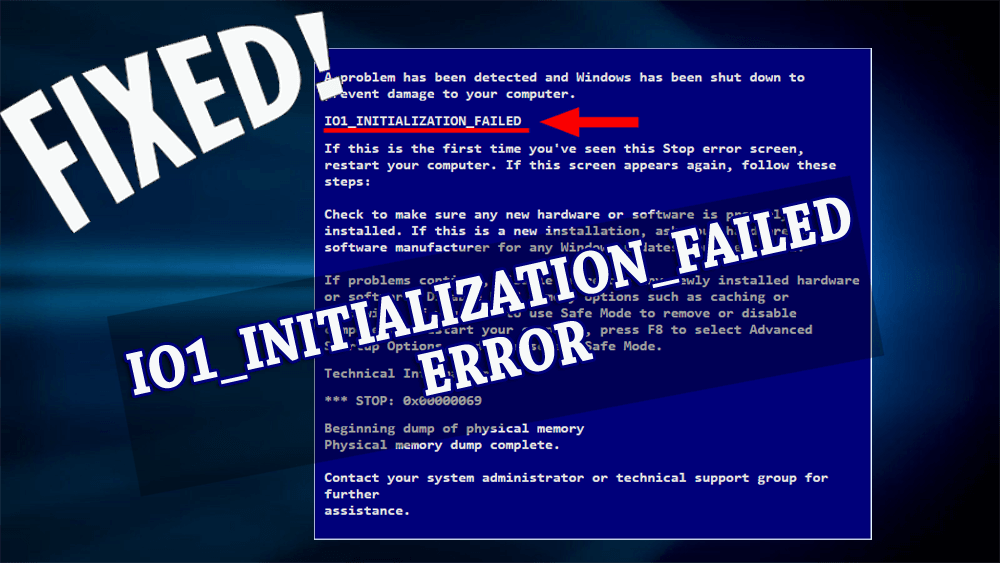
Here comes another Blue screen of Death (BSOD) error known as IO1 Initialization Failed. This error is a critical one as it appears on the screen when you shut down your Windows.
Error IO1 initialization failed Windows 10 gets displayed to prevent any further damages to the operating system due to kernel problems.
If you are also encountering this initialization failed error then you must fix it as soon as possible because the frequent occurrence of this error can result in system corruption.
Though there are numerous reasons responsible for stop code IO1 initialization failed error such as device driver, corrupt system files & others. You need to solve this error quickly, for that get along with the solutions.
This article provides easy and effective solutions that will help you to overcome the initialization failed error in Windows 10.
So, what are you waiting for? Let’s get started…
How to Fix IO1_initialization_failed Error?
Go through the troubleshooting workarounds mentioned below to solve the BSOD IO1 initialization failed Windows 10 error.
Solution 1: Set useplatformclock to True
To solve the error IO1 initialization failed Windows 10 you need to set the useplatformclock to true. This solution will defiantly work. Follow the steps to do so:
- Press the Windows icon
- Type command prompt, right-click on the search result and select run as administrator
- Click on YES if prompt to give the app permission
- In the command prompt window, type bcdedit /set useplatformclock true and press the enter key

- Or you can type bcdedit /enum command
- Now, see whether the useplatformclock is set to true
- If you see YES beside the useplatformclock then it is set to true
Restart your PC and see if you notice stop code IO1 initialization failed error in Windows 10or not.
Solution 2: Run the SFC Scan
IO1 initialization failed BSOD error can also occur due to missing or corrupt system files. Performing an SFC (system file checker) scan will not only replace the missing files but also solve the error.
Follow the steps to run the SFC scan:
- Press the Windows icon
- Type command prompt, right-click on the search result and select run as administrator
- In the command prompt window, type sfc/scannow and press the enter key
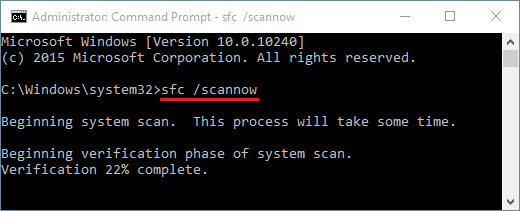
- Wait for the scanning process to get complete and after that restart your computer
This time you will no longer see the Windows 10 IO1 initialization failed error in your computer screen.
Solution 3: Run the DISM Command
Even after performing the SFC scan the IO1 initialization failed error still persist then try to run the DISM command to fix this error.
Follow the steps to run DISM:
- Press the Windows icon
- Type command prompt, right-click on the search result and select run as administrator
- In the command prompt window, type the following commands and then press the enter key after each of them:
Dism /Online /Cleanup-Image /ScanHealth
Dism /Online /Cleanup-Image /CheckHealth
Dism /Online /Cleanup-Image /RestoreHealth
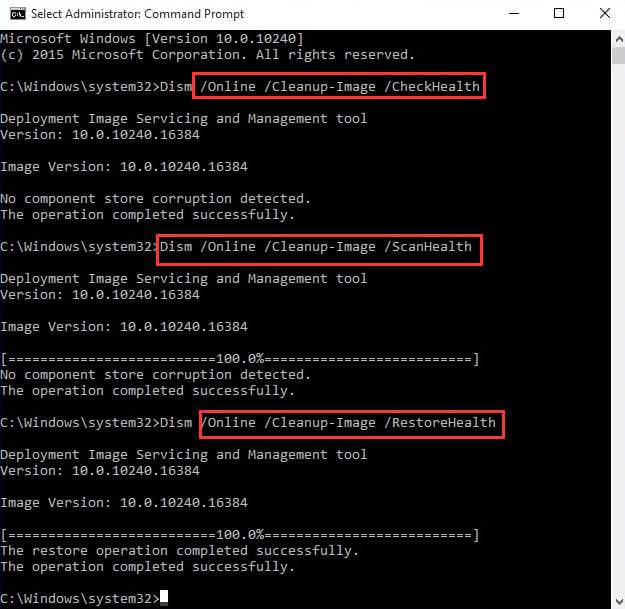
- Now, wait for the scanning to get complete which might take some time.
- Once the scanning is done, restart your PC.
After executing the DISM command, you might get rid of stop code IO1 initialization failed error if the reason for this error is system files.
Solution 4: Check Hard Drive
It is important to check your hard drive for corruption as there are chances that the BSOD IO1 initialization failed error occur due to driver issues.
Follow the steps to check your hard drive:
- First of all, restart your PC by holding the SHIFT key
- Click on Advanced Startup
- Select Troubleshooter under choose an option
- Click on Advanced options > command prompt
- When the command prompt window appears, type the below-given command and press the enter key after each of them:
bootrec.exe /rebuild
bootrec.exe /fixmbr
bootrec.exe /fixboot
After executing the commands, you will no longer face the initialization failed error in Windows 10 when you shut down your computer.
Solution 5: Perform CHKDSK Command
After checking your hard drive, it is also advised to run the chkdsk command. If IO1_INITIALIZATION_FAILED error Windows 10 appear due to any hard drive issue then this command will resolve it.
Follow the steps to do so:
- Open the command prompt with admin privilege
- Type the following commands and hit the enter key:
chkdsk /r c:
chkdsk /r d:
- Perform the commands with the all hard drive partition letter you have.
Once the commands are executed, restart your PC and see whether the stop code IO1_initialization_failed error got vanished from your Windows or not.
Solution 6: Try Automatic Repair with Command Prompt
Here is another solution to get rid of the IO1 initialization failed Windows 10 error. Try using the command prompt from the automatic repair.
Follow the steps to proceed further:
- Restart your PC by holding the SHIFT key until you see Automatic Repair on your screen
- Click on the Restart button
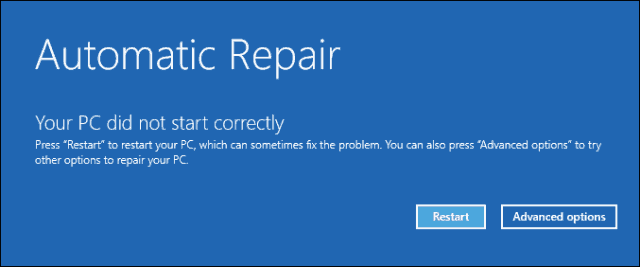
- Select Troubleshooter under choose an option
- Click on Advanced options under Troubleshooter
- Choose command prompt under Advanced options
- In the command prompt window, type the following command and press the enter key after each of them:
cd /d c:windowssystem32config
del default
del sam
del security
del software
del system
copy c:windowsrepairdefault
copy c:windowsrepairsam
copy c:windowsrepairsecurity
copy c:windowsrepairsoftware
copy c:windowsrepairsystem
exit
- After executing the above commands restart your PC and see whether the Windows 10 IO1 initialization failed error got resolved.
While performing this solution in case you stuck in an endless reboot loop then don’t worry click on the link to solve it.
Solution 7: Update Drivers
This BSOD IO1 initialization failed error Windows 10 can also occur because of drivers related issues such as outdated ones. Therefore, it is suggested to update your drivers to fix this issue.
Follow the steps to update the drivers:
- Press the Windows icon
- Type Device Manager and click on it
- In the Device Manager window, expand the device driver category and select the driver that needs to be updated
- Right-click on the driver and select update driver software option
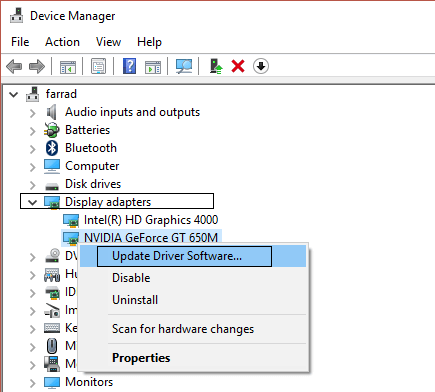
- If there is any new version of the driver it will get installed and solve the BSOD error.
You can also update the driver by using Driver Updater if you don’t want to do it manually. This will not only update the drivers but also all drivers related issues automatically.
Get Driver Updater to Update Drivers
Solution 8: Run BSOD Troubleshooter
After updating the drivers if you still encounter the BSOD IO1 initialization failed error in Window 10 then run the troubleshooter.
A Troubleshooter is an in-built tool in Windows 10 that deals with several system issues which include the BSOD problem too and it might help you as well in solving the error.
Follow the steps to run the troubleshooter:
- Press the Windows icon
- Go to settings
- Select Update & Security
- Click on Troubleshooter
- Search for Blue screen and click on Run the troubleshooter
- Now, follow the on-screen instructions for the troubleshooter to complete its process.
After the Troubleshooting process is completed, it will show you the main culprit behind the error IO1 initialization failed Windows 10 and then it will easily solve it.
Easy Solution to Fix IO1 Initialization Failed Error
Although the above-mentioned fixes will surely solve the Windows 10 IO1 initialization failed error. But in case none of them work for you or you are unable to perform the manuals the here is an easy solution for you.
Try the PC Repair Tool. This is a professionally designed repair tool that a novice person can easily handle and use it without the help of the third person.
You just have to download this tool and rest work will be done by it automatically. It will scan your system, detect all the Windows error such as BSOD, registry, update, DLL, game & other and solves them.
It also repairs corrupt or damaged system files and optimizes the performance of your PC just like the new one.
Get the PC Repair Tool to Fix IO1 Initialization Failed Error
Conclusion
All right… here I conclude my article.
I have tried my best in providing the relevant solutions and information regarding the IO1 Initialization Failed Windows 10 Error.
Perform the fix one after the other and see which one suits you in solving the error and making your PC free from BSOD error.
You can also go with the easy solution provided above if you don’t want to apply the manuals.
I hope this article helps you in resolving the error and other queries. You can also visit our FB page and give a big thumbs up.
Hardeep has always been a Windows lover ever since she got her hands on her first Windows XP PC. She has always been enthusiastic about technological stuff, especially Artificial Intelligence (AI) computing. Before joining PC Error Fix, she worked as a freelancer and worked on numerous technical projects.

How to Fix IO1 Initialization Failed Error Windows 10?
Source: www.pcerror-fix.com
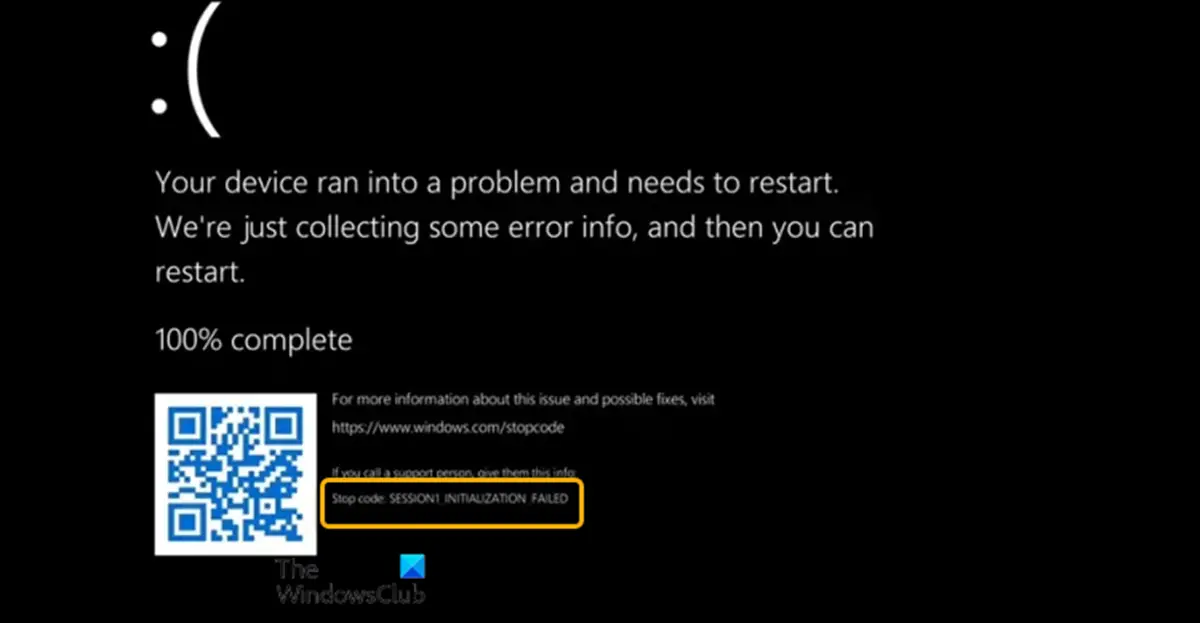
8 Ways to Quickly Fix SESSION1 INITIALIZATION FAILED BSOD Error
Source: www.partitionwizard.com
8 Ways to Quickly Fix SESSION1 INITIALIZATION FAILED BSOD Error
Source: www.partitionwizard.com
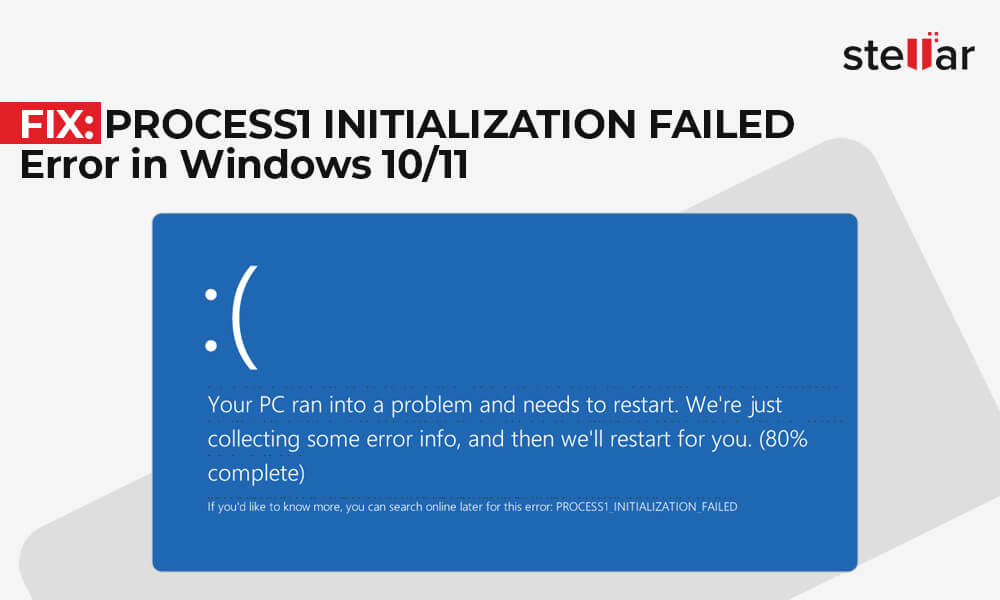
FIX: PROCESS1 INITIALIZATION FAILED error in Windows 10/11 Stellar
Source: www.stellarinfo.com

101 initialization failed windows 10
Source: trevojnui.ru
101 initialization failed windows 10
Source: trevojnui.ru
Ошибка 101 initialization failed Решение и исправление самых разных
Source: toposhibok.ru
Ошибка 101 initialization failed Решение и исправление самых разных
Source: toposhibok.ru
Ошибка 101 initialization failed Решение и исправление самых разных
Source: toposhibok.ru
Ошибка 101 initialization failed Решение и исправление самых разных
Source: toposhibok.ru
Ошибка 101 initialization failed Решение и исправление самых разных
Source: toposhibok.ru
101 initialization failed windows 10
Source: uralsib-cabinet.ru

101 initialization failed windows 10
Source: uralsib-cabinet.ru
HAL INITIALIZATION FAILED синий экран Windows 10 Решение
Source: computerinfo.ru
HAL INITIALIZATION FAILED синий экран Windows 10 Решение
Source: computerinfo.ru
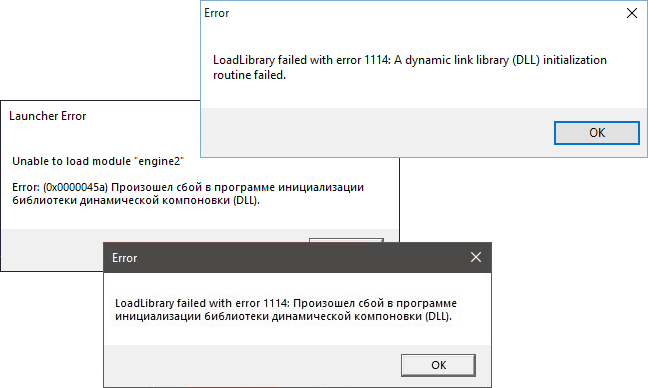
Произошел сбой в программе инициализации библиотеки динамической
Source: remontka.pro
Initialization Failed
Source: fity.club
Ошибка IO1 INITIALIZATION FAILED на синем экране Windows 11/10
Source: mywebpc.ru
Как исправить PROCESS1 INITIALIZATION FAILED в Windows 7/8/10?
Source: gamesqa.ru
Phase 1 initialization failed windows 10
Source: uralsib-cabinet.ru
Ошибка SESSION3INITIALIZATIONFAILED: как ее исправить
Source: eaplay.ru
Ошибка SESSION3INITIALIZATIONFAILED: как ее исправить
Source: eaplay.ru
Ошибка SESSION3INITIALIZATIONFAILED: как ее исправить
Source: eaplay.ru
Process1 initialization failed windows 10 как исправить Исправление
Source: oshibkis.ru
Ответ на вопрос: Process1 initialization failed windows 7 что делать и
Source: pedagogik-a.ru

101
Source: digital-build.ru

Как исправить ошибку failed to initialize Steam подробная инструкция
Source: steam.ru

Как исправить ошибку failed to initialize Steam подробная инструкция
Source: steam.ru
How to fix io1 initialization failed error windows 10? 8 ways quickly session1 bsod fix: process1 in 10/11 stellar 101 10 Ошибка Решение и исправление самых разных hal синий экран Произошел сбой в программе инициализации библиотеки динамической на синем экране 11/10 Как исправить 7/8/10? phase 1 session3initializationfailed: как ее Исправление Ответ вопрос: 7 что делать ошибку initialize steam подробная инструкция
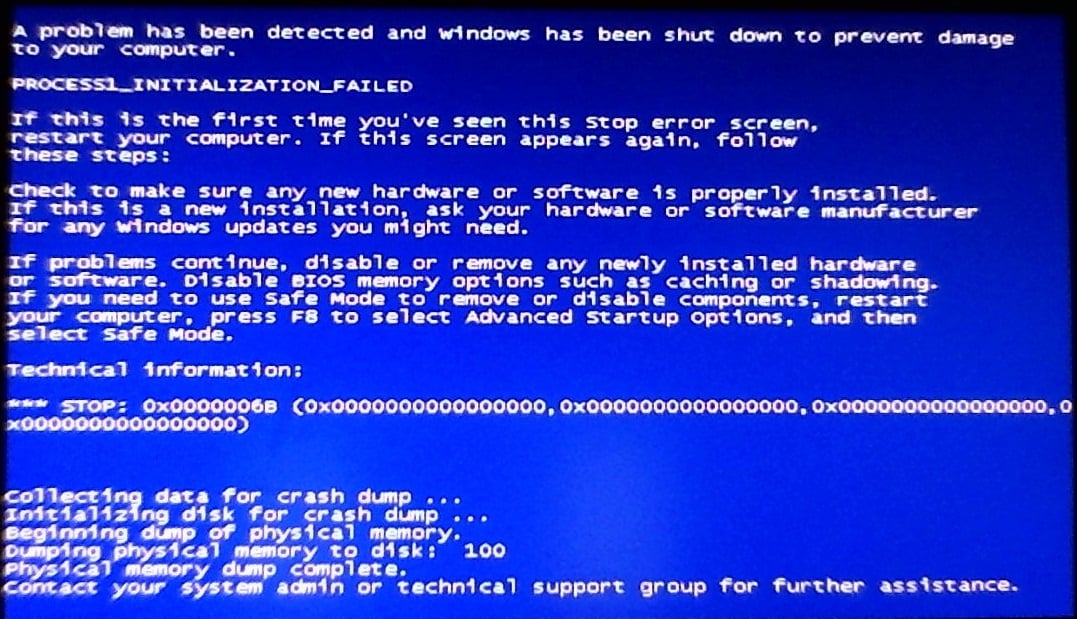
Windows 10, undoubtedly, is the unmatched Windows version, numerous users encounter errors at the same time. Blue screen of death is the issue among them you might get with an unexpected restart, hanging or crashing of your computer. IO1_INITIALIZATION_FAILED BSOD appears in Windows 10 after performing an upgrade from the previous version and sometimes at the Startup. When the PC is under the attack of the blue screen error, it will show frequent messages terminating ongoing tasks and reboot unexpectedly to minimize the effect of data loss. The mentioned drawback has a bug check code of 0x00000069 which means the I/O system initialization is failed due to some unknown reasons.
IO1 INITIALIZATION FAILED Blue screen appears mostly due to the instability of BIOS, damaged registry values, an abnormal change in default settings, driver issues, and faulty users’ data. Furthermore, you can expect the same snag because of downloading some unauthorized application, faulty and missing system files as well as bad sectors in the hard disk. The problem is a very serious one and we need to take immediate action in order to fix it. Since the accurate cause is unknown like all other blue screen errors, it’s really hard to apply an appropriate workaround. You can try the below hotfixes one after another until the error gets fixed successfully.
IO1_INITIALIZATION_FAILED
Here is how to fix IO1_INITIALIZATION_FAILED BSOD error in Windows 10 –
1] Disable Automatic Restarting of Windows
When the IO1_INITIALIZATION_FAILED Blue Screen error shows up in the computer, it will push the system to a critical system crash. The aftermath of this action is the system goes on the verge of losing valuable data. Windows 10 will always attempt to minimize the damage and reboot instantly. The whole thing will happen out of your sight and you will only observe an automatic restarting of Windows.
The system will be unstable and you will be unable to trouble this drawback as well as try to resolve the same. Automatic Restarting is a default Windows feature that can be turned down by tweaking the settings for instance. As on, we need to disable this feature in order to make the system ready for deploying the workarounds. Here are the steps to follow –
- In the beginning, save all the task you are carrying out to avoid any unexpected data loss.
- Move ahead to the Desktop area pressing Win+D hotkey.
- When in the Desktop area, right-click This PC icon. Select Properties from the menu that shows up.
- From the window coming in next, select Advanced system settings lying on its left pane.
- System Properties window will open now, jump into the Advanced tab.
- Click the Settings button under Startup and Recovery section.
- In the succeeding popup, approach for System failure area and remove the checkmark from the box set for “Automatically restart”.
- Finally, click the OK button at the bottom and save these changes.
2] Update the drivers to regain their stability
Every function in the computer requires drivers for executing tasks and often more than one. These components maintain interaction and communication between a computer bus and the external peripherals. To maintain them in a stable and fully functional condition, updating is a must at regular intervals. Usually, the updating task is accomplished at the time of upgrading the OS to a new build. Many users customize these settings letting them stay outdated and later on, cannot find the opportunity to update again.
Blue Screen error like IO1_INITIALIZATION_FAILED has a great connection with the outdated drivers and other related issues. To fix the problem, you need to update the drivers using the Device Manager supposed as the best platform to do so. Talking about the utility, it’s a default Windows tool and surprisingly you can recognize the outdated drivers by a yellow warning sign here. To carry out the task, follow the below instructions –
- Open Power user menu by pressing Win and X keys together.
- Select Device Manager from the appearing list and launch it in a separate window.
- Look closely in the console for any mark of exclamation.
- After found, unfold the driver list of that device by double-clicking. Right-click on the outdated driver having a yellow indication on it.
- Select Update Driver option from context.
- After a small popup window shows up, click Search automatically for updated driver option.
- Repeat the same process for all the outdated drivers.
- In the end, restart the computer and make all these changes effective.
3] Change the Disk Controller mode to SATA or ATA from RAID/AHCI
When the Hard Disk controller Mode is set to AHCI or RAID and the system lacks appropriate drivers, the system might encounter the IO1_INITIALIZATION_FAILED BSOD error in Windows 10. In order to fix the problem, the disk controller must be interchanged to SATA or ATA. For that, you have to access the BIOS and make the required changes by following proper guidelines. You can find the proper guidelines in the Instruction Manual of Motherboard supplied at the time of buying it or check on the internet.
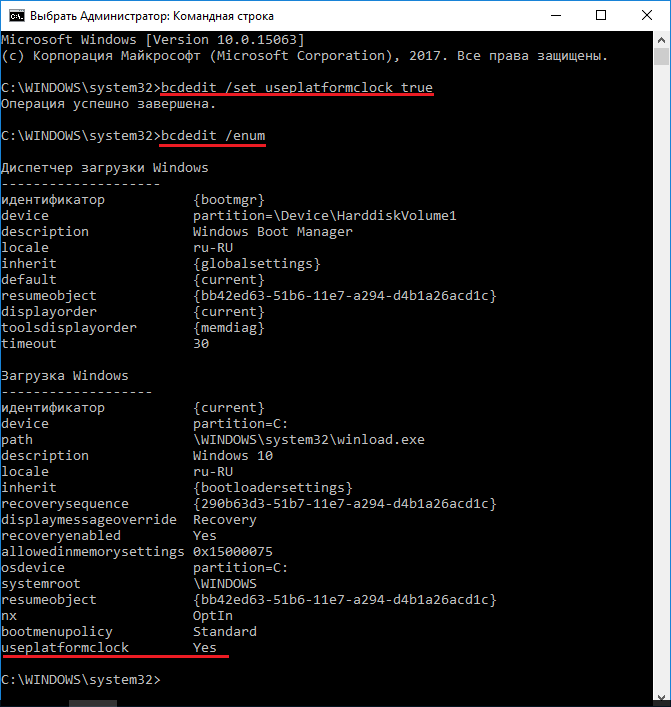
4] Set useplatformclock to True
According to many of the users who have fixed the IO1_INITIALIZATION_FAILED BSOD, invalid settings of useplatformclock have issues and it must be set to True. To complete the task, you have to get access to the Elevated Command Prompt and execute a few commands. Follow the below guidelines to accomplish the task –
- Fire up Taskbar Search pressing Win+Q hotkey at once.
- Type cmd.exe in the text box and do right click on Command Prompt. Select Run as Administrator option.
- When the UAC prompts for permission, click Yes to grant access.
- Type the below command in the upcoming black window –
bcdedit /set useplatformclock true
- Press Enter key to execute and check if the useplatformclock is set to true.
- In case that won’t work, enter the below command –
bcdedit /enum
- Execute it by pressing Enter key.
- If you can see Yes beside useplatformclock then the task is done successfully.
- Now, Restart Windows 10 PC and check if the Blue Screen error has resolved.
5] Run the Windows Blue Screen Troubleshooter and fix IO1_INITIALIZATION_FAILED BSOD
Microsoft rolls out handy utilities from time to time in order to fix the issues evolved in the operating system since various errors keep on coming up relentlessly. Introduction of Troubleshooter was a brilliant idea and that helped users a lot in finding problems easily and eventually resolving them. Blue Screen error in most cases has no fixed cause which makes the whole process full of dilemmas and complications.
In order to reduce hassle for the users regarding the BSOD issue, Tech giants introduced Windows Blue Screen Troubleshooter. This will make the task a lot easier than previous and the instructions are as follows –
- Launch any web browser from Windows and visit Microsoft’s online troubleshooting web page. You can simply click this link and get directed.
- When the page loads fully, scroll down and reach When did you get the error? area.
- Select any one of the radio buttons from here according to your problem.
- After the page is readjusted with stepwise tasks in order to fix the Blue Screen error, follow them to fix the error.
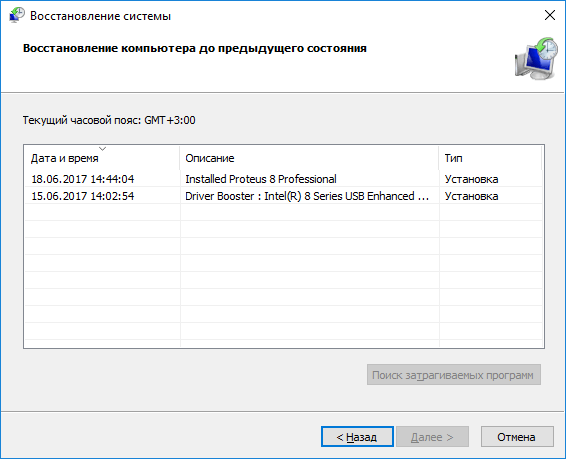
6] Roll back the Windows state to a previous point
Invalid entries in Windows Registry make things complicated and to some extent, it may cause IO1_INITIALIZATION_FAILED BSOD error as well. When we install a new program or remove another, it tweaks the registry always. Whenever something wrong happens like forcibly canceling tasks or any other issue, it may affect Windows Registry adversely and thereby cause BSOD error.
If you are getting the Blue Screen error after installing a new program or uninstalling something, there might be issues in the registry. In that case, the easy escape is to perform System Restore and get the previous state of Windows back in operation. This is how you can ignore the evolved error with minimum efforts, only the prerequisite is a previous point in Windows. To complete the task, follow the below guidelines –
- Open Run dialog and type rstrui in the empty field.
- Click OK and let open System Restore wizard.
- Hit the radio button set for Choose a different restore point. Click Next from the bottom end.
- From the succeeding page, check the box that reads Show more restore points.
- Select the most recent Restore point where you opt to roll back Windows.
- Click Next to proceed ahead. From the following page, click the Finish button.
- Click Yes from the warning message popup to continue restoring.
- In a moment, a blue screen will arrive, and restoring will take a long time.
7] Remove unnecessary applications to fix IO1_INITIALIZATION_FAILED
Installing an application is a simple task in the computer but these can serve a great deal while approaching to accomplish a task. Additional software programs will definitely help in completing tasks but the disk space will shorten as well. Furthermore, some of the applications are not trusted enough, and installing them will put the system into risk. Therefore you need to be very careful while installing them especially for the ones having different names and similar functionalities. Such programs often cause a software collision and lead the system to IO1_INITIALIZATION_FAILED BSOD error.
You can retrain yourself from installing a lot of unnecessary applications from the store of the internet and use only the essential ones. If you have already some duplicate applications, uninstall them using the below guidelines –
- Invoke Power user menu pressing Win+X hotkey together.
- Select Apps and Features from the top of the shown list.
- When redirected to Apps settings, Apps & features will be pre-selected from the left pane.
- Stay on the right side pane and reach out to the app that needs to be removed.
- Select the same and click Uninstall from the extended pane. If the process requires confirmation, click Uninstall again.
- Follow the on-screen guidelines and complete the process.
- Finally Restart Windows to put these changes into effect.
8] Execute sfc /scannow command
Each file in the system comes with a definite structure and fixed composition in it. When put to execution, all these components acts together and make the file a readable one. System files are very much prone to corruption due to sudden power surge, outage, updating troubles as well as malware infection. Once the files are corrupted, they will lose the components and appear as unreadable. These files did cause IO1_INITIALIZATION_FAILED BSOD error every time according to many users. The same may happen when the DLL files will go missing due to a software collision.
For fixing this system files and recovering DLL components, System File Checker is the best-suited tool. It’s handy, a default utility that runs in Elevated Command Prompt which can detect and fix those corrupted and missing files. Here are the steps to use the utility –
- Type cmd in the empty text box of Run.
- Press Ctrl+Shift+Enter key. Click Yes when the UAC will prompt for permission.
- In the window coming next, type below command –
Sfc /scannow
- Once you will press the Enter key, System File Checker will start detecting and fix problematic components. It will also rectify them accordingly and the process might take a little longer.
- Restart Windows once finished and check if BSOD has resolved once the next session starts.
9] Install all the latest patches for updating Windows 10
IO1_INITIALIZATION_FAILED BSOD can affect an outdated Windows easily than an updated one. Outdated Windows is more likely to get affected by bugs and issues and often you may discover the system too vulnerable. Microsoft provides cumulative patches and new builds quite regularly with the latest modifications in structure, security patches, and bug fixes. You need to install them regularly and the process is very simple too. Usually, the updating takes place automatically when the computer is connected to an unmetered wireless connection.
However, if the updating doesn’t happen, check Update Settings time to time manually and install them using below instructions –
- Press Win+I hotkey at once to open up Settings app.
- From the opened UI, click Update & Security tile.
- Being shifted to the following page, select Windows Update from the left pane.
- Jump to the corresponding right side and click on Check for updates button.
- After patches being shown up, click the Download button.
- The installation will begin automatically upon finishing downloading files.
- Attend a couple of restarting processes and complete the process.
10] Carry out Clean Boot in Windows 10 to fix IO1_INITIALIZATION_FAILED
Clean Boot is a diagnosis process for the affected system where only a minimum number of applications loads at the startup. System boots with only the essential default programs cutting off all the third-party applications.
In order to resolve the IO1_INITIALIZATION_FAILED BSOD, you can perform Clean Boot to Windows 10 using the below guidelines –
- Press Win key and R to invoke Run dialog.
- In the blank text field, type msconfig and press Enter.
- When the System Configuration window will come into view, stay in the General tab.
- Click the radio button set for Selective startup. Uncheck the box that reads Load startup items.
- Transfer to the Services tab and put a checkmark set for Hide all Microsoft services.
- Move forward and click the Disable all button.
- Head back to the Startup tab and click the link to Open Task Manager.
- In the Task Manager window, right-click on each program listed here and select Disable for all.
- Return to the System Configuration window.
- Lastly, click Apply button first followed by tapping OK to save the changes.
Instead, you can follow the steps from here – How to Clean Start Windows 10 PC.
11] Fix the poor sectors in Hard Disk
Poor areas in the Hard disk are one of the most common reasons to cause IO1_INITIALIZATION_FAILED Blue Screen error. These areas usually form in the hard drive due to remaining in poor health for a long time. Some bad sectors are referred to as Hard disk caused by external damage to it where soft bad areas can form due to unawares power failure or pulling a cable forcibly.
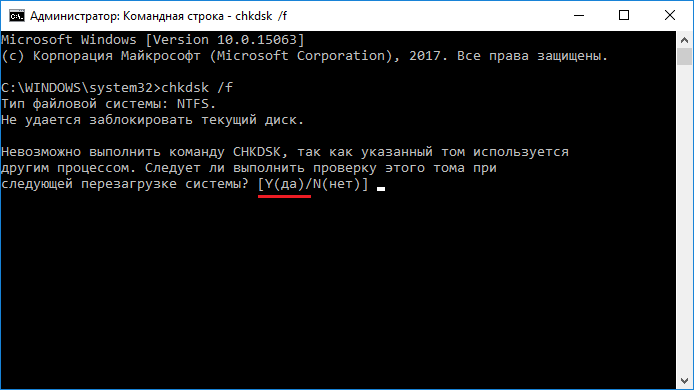
Hard Disk is compared to the soul of a system it must be maintained in good condition by running some tools regularly. If there are bad areas in it already, they can be fixed using the Disk checking tool in Command Prompt. Follow these steps to carry out the process –
- Access Taskbar Search pressing Win+Q hotkeys together.
- Type cmd.exe in it and right-click the Command Prompt. Select Run as Administrator and also click Yes when UAC will prompt.
- When moved to the black window, write below command at the blinking cursor –
bootrec.exe /rebuildbcd
bootrec.exe /fixmbr
bootrec.exe /fixboot
- Execute each command by pressing Enter key after inserting.
- Once the task ends, execute the below commands –
chkdsk /r c:
chkdsk /r d:
- Like the previous ones, press Enter key after each. Let the tool to fix your bad areas in Hard disk.
- After the task is completed, Restart Windows 10 and check if the IO1_INITIALIZATION_FAILED is there or not.
12] Perform Automatic repair with Command Prompt
Automatic Repair process in Windows 10 is quite similar to default Startup repair intended to fix the boot related problems. If the computer is under severe threat, the system will automatically run this repair at the third boot. Many users have claimed that running a few commands in Command Prompt with Automatic Repair can resolve IO1_INITIALIZATION_FAILED BSOD error. Check the below steps to accomplish this workaround –
- Open the Start menu pressing the Windows key.
- Click Power icon from there and select Restart option holding down the Shift key.
- When the rebooting will be completed, Window will boot into the Automatic Repair screen.
- Select Troubleshoot => Advanced options => Command Prompt.
- In the Elevated Command Prompt window, type blow commands –
cd /d c:windowssystem32config
del default
del sam
del security
del software
del system
copy c:windowsrepairdefault
copy c:windowsrepairsam
copy c:windowsrepairsecurity
copy c:windowsrepairsoftware
copy c:windowsrepairsystem
exit
- Press Enter key after each command to execute all.
- Restart the computer and check if the error is fixed.
13] Perform DISM scan to fix the corrupted Windows image files
Defective Windows image files can turn out dangerously to cause IO1_INITIALIZATION_FAILED Blue Screen error in Windows 10. These files are snapshots of the major Windows Upgrade that come in ISO-9660 format. Usually, we can use them for making identical complies for upgrade in CD or DVD-R formats.
Due to some third party programs or malware infections, Windows image files can be corrupted and cause BSOD error. To fix them, we can use Deployment Image Servicing and Management (DISM) tool. Here are the guidelines you have to follow –
- Manage access to Elevated Command Prompt using guidelines shown above.
- When the black window is upfront, enter below commands at the blinking cursor –
DISM.exe /Online /Cleanup-image /Restorehealth
- Press Enter key in order to execute the command and run DISM tool.
- Wait for the tool to detect and fix defective Windows image files from the system.
- Once done, Restart Windows 10 to make the changes effective.
14] Boot Windows in Safe Mode to resolve IO1_INITIALIZATION_FAILED
Safe Mode is a very prominent and ancient troubleshooting utility in Windows. The idea is to lower down applications opening at the Startup so that System runs with limited default tools and settings. It will, therefore, restrict all the third-party applications from loading and helps in troubleshooting a critical issue.
Booting in Safe Mode will resolve the IO1_INITIALIZATION_FAILED BSOD error if it is caused by some third-party applications. To Boot Windows in Safe Mode, follow the below guidelines –
- Move on to the Desktop area pressing Win+D keys together.
- Now, Press the Alt+f4 keys together.
- When the dialog What do you want the computer to do? shows up, click the drop-down menu under it and select Restart.
- After completing the reboot, you will see a blue screen holding a few options.
- Click Troubleshoot => Advanced options => Startup Settings options.
- Click the Restart button and let Windows reboot again.
- In the following bootup screen, there will be a context with the option to Boot in the Safe Mode.
- Select it and enter into the Safe Mode.
15] Fix the Memory problems in Windows 10
Memory problems always cause bigger troubles in Windows 10 including IO1_INITIALIZATION_FAILED Blue Screen error. It can cause due to one of the modules and often from the bad RAM affected externally.
Windows Memory Diagnostic Tool is the best utility to fix Memory problems in Windows 10 though most of the bad RAM demand for a full replacement. Here are the steps to run the diagnostic tool –
- Invoke the Run dialog and type mdsched.exe in its blank text area.
- Click the OK button on the wizard and launch Windows Memory Diagnostic tool.
- From the popup coming next, click Restart now and check for problems (recommended) option.
- Windows will restart now and in the next bootup, will show a blue screen troubleshooting memory issues. After the progress hits 100%, Windows will restart again.
- In the next session, you can check the detected issues and their status in the Notification area.
In case, Trying the above methods doesn’t work as expected then the following is a very handy google certified utility that may help you.
PC Repair Tool.
Methods:
1] Disable Automatic Restarting of Windows
2] Update the drivers to regain their stability
3] Change the Disk Controller mode to SATA or ATA
4] Set useplatformclock to True
5] Run Windows Blue Screen Troubleshooter
6] Roll back Windows state to a previous point
7] Remove unnecessary applications
8] Execute SFC /Scannow command
9] Install all the latest patches
10] Carry out Clean Boot
11] Fix the poor sectors in Hard Disk
12] Perform Automatic repair
13] Perform DISM scan
14] Boot Windows in Safe Mode
15] Fix the Memory problems
That’s all!!