
Did you face difficulty installing pending updates on your Windows 11/10 PC because of an error 0xc1900401? If yes, then worry not as you are not alone. Several other users have encountered this issue when they were trying to update their operating systems.
In this post, we will discuss what may trigger such an update error in Windows 11 or 10 Machines along with seven fixes that should resolve this issue. Before any further ado, let’s learn the reasons and solutions in detail –
What causes an error 0xc1900401 in Windows?
The error 0xc1900401 normally occurs when your device meets one or a combination of the below conditions –
- Weak or Low-speed Internet connection
- Faulty devices attached to your computer’s ports
- Disabled update service
- Corrupted system files/folders or system image
- Corruption inside the Windows cache folders
- Third-party antivirus software is causing issues
If you do know what exactly has gone wrong on your computer, navigate to the appropriate solution. Otherwise, follow the solutions in the exact order as provided below.
If you are facing trouble updating your Windows operating system, try out the below suggestions –
1. Check your Network
Many a time, update errors occur simply because you are not connected to an active internet connection. Open any web browser and see if you are able to surf online or not. In case the sites are opening very slowly or not at all, the update error 0xc1900401 must be occurring because of network problems. Try to connect to stable and high-speed internet and then update your device again.
How to Reset the Network Settings on Windows 11/10
There is another important thing that you must ensure and that is the “Set as metered connection” setting on your PC. If you accidentally or intentionally enabled your PC as a metered connection, you need to disable this feature first. To check this, you may follow these easy steps –
- Hit the network icon available on the taskbar.
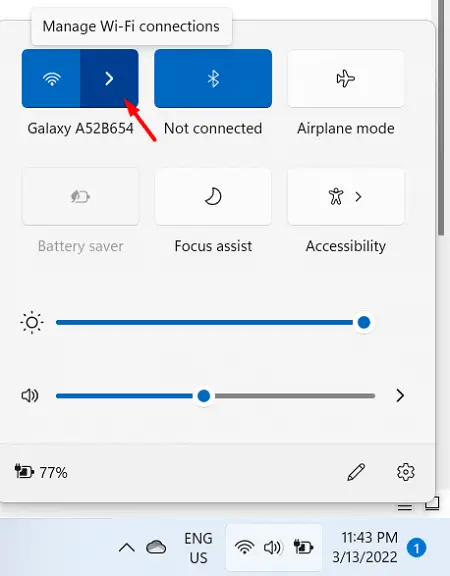
- Click Manage WiFi Connection and then Properties.
Alternatively, you may also open this setting by navigating to the below path –
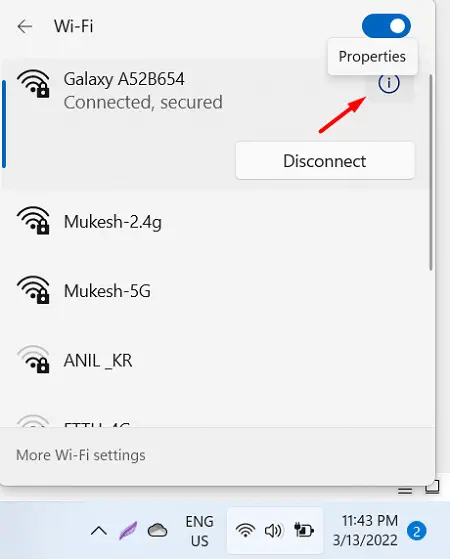
Settings (Win + I) > Network & Internet > Wi-Fi > Your_Device
- Scroll down and see the current status of the toggle switch beside the Metered connection.

- If you find this switch enabled, turn it off and retry updating your Windows OS.
2. Remove peripheral/secondary devices
Some users like to have all their secondary devices attached to their PCs even when they are not using them. Any issue within a peripheral device may corrupt the update service and an ongoing update fails on an error code 0xc1900401. As you are already struggling with an update-related issue, we advise you to disconnect all your secondary devices and see if this works.
Tip: Remove all external devices except the wired Mouse and Keyboard.
3. Enable Windows Update Service
At times, Windows update services get disabled automatically and thus cause an error code 0xc1900401 while updating Windows. Check its current status by following the below steps and re-enable it if found disabled.
- Press Win + R to launch Run.
- Type “
services.msc” and hit OK. - When the Services window opens up, scroll down to Windows update and check its status. To do so, right-click on this service and choose the option – Properties.
- If the service status reads “Stopped”, click the Start button just below it.

- Restart your PC now and when it does, attempt again to update your Windows 11/10 PC.
4. Troubleshoot Windows Update
Troubleshooting Windows Update is a nice way to find out the underlying causes behind any update-related issue. Run this utility program by following the steps below. Even in cases where it doesn’t resolve the issue, it will suggest ways following which you can solve the current issue. Here’s what you need to do –
On Windows 11:
- Press Win + I, and navigate to the following –
Settings > System > Troubleshoot > Other troubleshooters > Windows Update
- You will see a Run button beside Windows Update. Well, hit it and follow the on-screen instructions that appear moving forward.

- Reboot your PC when the troubleshooting is completed.
Windows 10:
The path to troubleshooting Windows Update varies in Windows 10. If you are still using this version, reach out to the below path first –
Settings > Update & Security > Troubleshoot > Additional troubleshooters
- Locate and click Windows Update.
- When this expands, hit the button – Run the troubleshooter.

- Let this tool find and resolve the underlying causes behind the error 0xc1900401.
- Once this is over, reboot your computer. Sign back into your device again and check if you can now update your Windows 10 PC.
5. Run SFC/DISM Scans
The presence of corrupted files and folders in Windows 11/10 may also trigger an update-related issue on your PC. The internal files become corrupt only when you are using a third-party antivirus program on your computer. If you do own any such software, disable/uninstall that first, and run SFC/DISM scans simultaneously.
- Launch Command Prompt as administrator first.
- When the UAC window prompts, hit Yes.
- Now, copy/paste the below code and press Enter –
sfc /scannow

- Wait till the System file checker finds and repairs any missing or corrupted system files.
- Once this is over, check for corruption inside Windows 11/10 Image by running the below code –
DISM /Online /Cleanup-Image /RestoreHealth

- The code above is basically a DISM tool that can look out for any corruption inside the Windows Image and fix that.
Note: Both these tools take 15-20 minutes to analyze and resolve the underlying corruption, so wait patiently.
6. Reset Windows update components
The update error 0xC19000401 in Windows may also occur when the contents inside the Cache folders exceed the permissible limit. There’s no way to find out if the updates are failing because of it or not. To overcome this issue then, one should purge the Windows cache folders.
Note: Before you clear contents inside the cache folders, make sure to disable all update-related services. This way, there won’t be any new issues because of disabled services. Here are the essential steps to work upon –
- Press Win + R, type “CMD“, and press Ctrl + Shift + Enter keys together.
- Doing so will invoke Command Prompt as administrator.
- On the elevated console, execute the below codes one after another –
net stop bits
net stop wuauserv
net stop appidsvc
net stop cryptsvc
- Delete all user profile application data by running this command next –
Del "%ALLUSERSPROFILE%\Application Data\Microsoft\Network\Downloader\*.*"
- Now that you have disabled all update services, purge SoftwareDistribution and Catroot2 folders by running the below two codes –
rmdir %systemroot%\SoftwareDistribution /S /Q
rmdir %systemroot%\system32\catroot2 /S /Q
- Missing DLL files on the registry may also trigger an error 0xC19000401 in Windows. So, it is recommended to re-generate such files by running these codes.
regsvr32.exe /s atl.dllregsvr32.exe /s urlmon.dllregsvr32.exe /s mshtml.dll
- Resolve any network-related issues by executing the below commands –
netsh winsock resetnetsh winsock reset proxy
- Restart all the services that you have stopped earlier and check if doing so resolves the error 0xC19000401 on your computer.
If you are still facing trouble updating your Windows OS, try the last workaround as suggested below –
7. Manually install pending Windows 11/10 updates
Each time an update gets released for Windows 11 or 10 PC, a standalone package is also uploaded to Microsoft’s Update catalog. As you are facing issues updating Windows, the manual method should work just fine. If you are on Windows 11, follow this tutorial. Windows 10 users may follow this guide on how to manually install pending updates.
The error 0xC19000401 must have been resolved by now. If not, there’s nothing much you can do now except clean installing Windows OS on your device.
Though updating process in Windows is quite easy, people oftentimes encounter glitches while doing so. One such issue is Error 0xc1900401. When this fatal code takes place, the process gets stuck at a certain percentage, however, the installation still works in the background. This happens when the download progress indicator gets broken. After a certain period of time, the build gets downloaded and you can install the same whether it’s broken or faulty. As a consequence you may notice unwanted abnormalities like high CPU usage, Edge crashes, and audio issues even if you successfully installed the build. However, you can fix Windows 10 or 11 update Error 0xc1900401 and get error-free version by performing a few workarounds.
Generally, Windows update Error 0xc1900401 strikes due to poor internet connection, faulty peripherals connected to your PC, and problematic Windows update services. Apart from that, corrupted system components, abnormalities inside Windows cache folders, and antivirus software can cause the issue. Since there are several reasons to bring forth update errors in Windows-operated machines, you might need to try out different workarounds to find the suited fix. Here is the methods list for quick navigation.
0xc1900401 error code Windows 10 or 11 update
Here is how to fix Windows 10 or 11 update Error 0xc1900401 –
Way-1: Check internet connection
One of the most basic requisites before proceeding with updating process is to ensure there is a stable internet connection with the Windows device. There may have been some issues with the presently connected network, it might be a bit intermittent or the bandwidth may appear very low. Such glitches may not allow the downloading of patches and make the procedure stops at a certain percentage after starting. Both the cases will bring forth Update Error 0xC1900401 in Windows.
If the internet issues is probable, restart the router or call the service provider for a quick fix. Having done that, check the internet network is not set as Metered too. Microsoft introduced this feature so that, Windows doesn’t download large files and consume most of the mobile data. Hence, downloading will never start when the feature is enabled. To disable metered connection for current network, follow the way –
- Press – Windows + R.
- In run command, insert – ms-settings:network-wifi
- Click – OK.
- Select your Wifi connection present on the right pane of the appearing settings page.
- Turn off the toggle button of Set as metered connection.
Way-2: Run update troubleshooter
Even though the internet connection is a stable one, the downloading gets interrupted sometimes or doesn’t start at all. The reason is yet to be known and you may have to go through critical troubleshooting, to be honest. Microsoft came to the rescue and developed a handy troubleshooter in order to eliminate problems regarding Windows Update using a single utility.
Talking about Windows Update Troubleshooter which is a key fix for resolving the Update Error 0xC1900401 in Windows 11 or 10. To run this, follow the below steps –
Windows 10
- Press – Windows + I.
- Select – Update & Security.
- From the left sidebar, select – Troubleshoot.
- Move to the right-hand side.
- Click – Additional troubleshooters.
- Next, select – Windows update.
- From the expanded tray, click – Run the troubleshooter.
Windows 11
- Right-click on the Start button and choose – Settings.
- From the right pane, pick – Troubleshoot.
- After shifting to the next page, click – Other troubleshooters.
- Hit – Run located next to Windows update.
- Follow on-screen instructions to continue.
- If the utility suggests an automatic fix, click – Apply this fix.
- Close troubleshooter.
- Reboot Windows.
- When the system powers up, retry to get Windows updates.
Way-3: Unplug external devices
A few hardware devices are very much necessary nowadays such as a printer, webcam, speaker, or USB hub. Apart from the primary peripherals like mouse or keyboard, users count those items as operational aids. However, there are certain cases revealing a probability of driver conflicts among the external hardware accessories. In the end, you may also experience update error 0xC1900401 in Windows 11 or 10.
Therefore, unplug these peripherals from the machine except those really necessary for navigation before commencing the Windows Update. Once it is completed successfully, connect them and use them as required.
Way-4: Ensure related Windows update services are running
Windows update service lets the system download and install the patches automatically when enabled. This is a critical instrumental component that ensures the computer is keeping pace with the security patches and getting up to date in time. However, this service can be disabled accidentally at any time. If so, you may experience update error 0xC1900401 in Windows as well.
To fix the issue, you have to re-enable Windows Update service following the below guidelines –
- Press – Windows key.
- Type – services.
- Hit – Enter.
- When Services window appears, find – Windows Update.
- Right-click the same and choose – Properties.
- Set the Startup type to Automatic.
- If the service is not running, click – Start.
- Shift to – Log on tab.
- Select the radio button present before Local System account.
- Uncheck – Allow service to interact with desktop.
- Click Apply and then OK.
- After that, imitate the same procedure for Background Intelligent Transfer Service, Event Log, and Remote Procedure Call (RPC) services too.
Way-5: Fix corrupted system data
Windows have some core files that help the Operating System to run flawlessly and in executing tasks when the user put in a command. These components are more of sensitive nature and are prior target of malware invaders. When malware gets an opportunity to dodge the security interface, system files lose their integrity. They can no longer perform the same and this will cause various critical troubles. Sometimes mishaps like software collisions, sudden power surges, or power outages can lead them to be erased. Both these conditions can be responsible to bring up update error 0xC1900401 in Windows 11 or 10.
In order to fix these components and recover the missing files, you can run SFC scan in the Operating System. The System File Checker is a default utility renewed to trace out all the damaged system files, identify missing . DLL files and then repair them as well as recover. To carry out SFC scan, follow the below guidelines –
- Press – Windows + S.
- Type – cmd.exe.
- Choose – Run as administrator.
- For User Account Control, click – Yes.
- In the black window, insert –
sfc /scannow. - Hit – Enter.
- Don’t interrupt the process and let it reach 100%.
- After completion, check the report to confirm whether the System file checker found corruption and fixed them.
- If not, execute –
dism /online /cleanup-image /restorehealthin elevated command prompt. - Reboot your system once the process ends.
- When the system starts up, sign back in.
- Run sfc /scannow once again.
Way-6: Clear Windows Update cache
Windows Update is a built-in function in the Operating System and it lets Windows 10 or 11 optimize system configuration constantly. However, all the necessary data, update files are stored in one of the folders in the Local Disk called “SoftwateDistribution”. If there is an error at the time of downloading the updates, corrupted components will be generated in the folder as well. In order to fix the generated error code, you have to clear the contents from SoftwareDistribution folder.
- Press – Windows + E.
- Navigate to – C:\Windows\SoftwareDistribution\Download folder.
- Select all the contents of this path by pressing – Ctrl + A.
- Either click Delete icon or press – Ctrl + D to remove selected items.
Way-7: Reset update agents
When a new update patch is available to download, Windows Update components process everything necessary to install that. If there is a glitch in these components, the total system will run into a failure and eventually brings up error codes. To reset the components, follow the way –
- Press – Windows + R.
- Type – cmd.
- Press – Ctrl + Shift + Enter.
- When User Account Control prompts, click – Yes.
- In the appearing elevated Command Prompt, insert the following lines one after another and hit Enter after each –
net stop bit

net stop wuauserv

net stop appidsvc

net stop cryptsvc

Del "%ALLUSERSPROFILE%\Application Data\Microsoft\Network\Downloader\*.*"

rmdir %systemroot%\SoftwareDistribution /S /Q

rmdir %systemroot%\system32\catroot2 /S /Q

regsvr32.exe /s atl.dll

regsvr32.exe /s urlmon.dll

regsvr32.exe /s mshtml.dll

netsh winsock reset

netsh winsock reset proxy

net start bits

net start wuauserv

net start appidsvc

net start cryptsvc
- Close Command Prompt and then reboot the PC.
Way-8: Uninstall third-party antivirus program
Anti-virus programs keep you protected from malware, spyware, trojans, spyware, or any suspicious bug found on the internet. A robust security interface is a much-needed thing nowadays to protect all sensitive information and valuable data. Furthermore, system files lose their integrity of malware components invade the system and damage them.
Windows Security is by far the best antivirus program and you don’t need a third-party app for the same purpose. However, some users may install a few and let the system have a software conflict. The result is destructive and brings up Update Error 0xC1900401 in Windows 11 or 10. To prevent the problem, uninstall third-party anti-virus program from the operating system.
- Press – Windows + X.
- Choose – Run.
- In the Run command, insert – appwiz.cpl.
- Click – OK.
- From Program and Feature window, look for the third-party antivirus program installed on your system.
- Right-click the same and select – Uninstall.
- Comply with on-screen instructions to completely remove the application.
Way-9: Clean Windows update download path
If you are running into issues like update error 0xc1900401, delete the download path of Windows update. Tweaking the registry, you can do so. Here are the steps to follow –
- Press – Windows + R.
- In the run command, insert – regedit.
- Click – OK.
- To allow User Account Control, hit – Yes.
- Once on the Registry Editor, navigate to – HKEY_LOCAL_MACHINE\SOFTWARE\Policies\Microsoft\Windows\WindowsUpdate
- In the right column, find – WUServer and WIStatusServer.
- Right-click on any of it and choose – Delete.
- Remove both.
- Restart Windows.
Way-10: Boot Windows in Safe mode
Booting Windows in Safe Mode is a usual troubleshooting technique in the operating system and maybe the oldest one in use. In this special startup method, Windows will be booted with minimal system resources, only the necessary default programs, and with a very basic layout. At the same time, the process opts out all the third-party apps making the troubleshooting a lot easier.
A large group of people has claimed that they have been able to fix the Update Error 0xC1900401 in Windows 11 or 10 by performing Safe Boot. To do so, follow the below guidelines –
- Open Run Dialog box (Win+R).
- In the text field, type –msconfig
- Once System Configuration wizard appears, shift to Boot tab.
- Click the checkbox present before Safe boot.
- Select the radio button of Minimal.
- Click – Apply and then OK.
- Choose Restart when asked.
- You will be directly into safe mode.
- After booting in safe mode, try updating Windows.
Way-11: Manually download update
Usually, Windows receives updates automatically when connected to active internet. This autonomous process often gets interrupted due to various reason and end up hindering the process. Windows Update Error 0xc1900401 can be a result of the same thus you can try for manual update to ignore unwanted issues. Here is the process –
- First of all, check which build you want to get.
- For that, press – Windows + S
- Type – update history.
- Hit – Enter.
- When the Settings page turns up, note down the KB version showing 0xc1900401 error.
- Visit – Microsoft update catalog webpage.
- Click the search bar and type the KB number you want to download.
- Press – Enter.
- Look for the version that matches the system configuration.
- Click – Download present beside the suited version.
- A new page will prompt, click the link that ends with msu.
- Once the MSU file is downloaded, visit the directory where the system stores downloaded item.
- Double-click the file you just got.
- To allow User Account Control, click – Yes.
- Follow the on-screen instructions to finish installing.
Way-12: Get Windows update using Media Creation Tool
Nevertheless, Windows Updating process is autonomous, it can be involved in various error codes. In the end, automatic updating is not possible and you will definitely need something to get the job done. Media Creation Tool is an ideal option for those who are a bit out of luck to get an update in time.
If you are having Update Error 0xC1900401 in Windows 11 or 10, can get Windows Update using Media Creation Tool. Here are steps to follow –
- Navigate to Software download page of Microsoft.
- Click – Download tool now.
- Go to the directory where downloaded items are saved.
- Double-click the .exe file you got.
- For User Account Control, click – Yes.
- Accept the license terms.
- Select – Upgrade this PC now.
- Click – Next.
- Select – Download and install updates (recommended).
- Hit – Next.
- Click Accept to acknowledge all the terms and licenses.
- Check the box that says – Keep personal files and apps.
- Hit – Next.
- Follow the on-screen instructions to finish installing Windows Setup.
Methods list:
Way-1: Check internet connection
Way-2: Run update troubleshooter
Way-3: Unplug external devices
Way-4: Ensure related Windows update services are running
Way-5: Fix corrupted system data
Way-6: Clear Windows Update cache
Way-7: Reset update agents
Way-8: Uninstall third-party antivirus program
Way-9: Clean Windows update download path
Way-10: Boot Windows in Safe mode
Way-11: Manually download update
Way-12: Get Windows update using Media Creation Tool
That’s all!!
Updated May 2025: Stop error messages and fix your computer problem with this tool. Get it now at this link
- Download and install the software.
- It will scan your computer for problems.
- The tool will then fix the issues that were found.
Why does Windows Update give the error code 0xc1900401?
There are many possible reasons why one might encounter the Windows Update error code 0xC1900401, including:
• An outdated driver
• Unnecessary hardware devices
• A corrupted Windows update cache file
• A corrupt Windows update database
• Malware infection
The most common reason for encountering this error is due to a corrupt Windows update cache file. This is usually caused by a virus scanning program such as Avast, Panda, AVG, etc., running in the background while updating windows. If there is no antivirus software installed, it could also be caused by another application accessing the Windows update cache file without permission.

Fix Windows Update Error 0xc1900401
Microsoft Windows 10 is one of the most popular operating systems around because it provides solid performance and reliable security. However, it isn’t immune to problems. In fact, there are many different errors you might encounter on your PC. This video teaches you how to fix error code 0xc1900401.
Learn tips and techniques that will make computer work like brand new again. Learn how to repair registry errors, BOOTMGR, RAM, FLASH, CLOSE, DEVICE MANAGER, System Restore, and BSoDs. We’ll discuss how to quickly solve common computer problems. How to troubleshoot slow computers, hard disk drives, firewalls, web browsers, printers, antivirus, windows update, OS installation, system restore, backupPC, and much more.
After watching this video, you’ll learn how to resolve issues related to Windows Updates, device manager, bootmgr, and regedit. I’ll show you how to prevent hardware failures and data loss due to registry errors, flash memory, firewall, virus protection, and ram problems.
I’ll use the AcerAspire V3-572G notebook to demonstrate how to diagnose basic PC issues and repair Windows 7, 8, Vista, XP, Server 2003, and 2000. You’ll discover how to easily identify what’s causing “blue screen,” lock up, or crash errors. Plus, learn how to monitor CPU usage, check network connections, and analyze logs. We’ll take a look at optimizing startup, shutdown, hibernation, and sleep settings.
If you are experiencing any blue screens or black screens, read out loud to yourself while listening to the audio podcast. Do this every day or twice per week where you experience the issue for about 20 minutes. Listen to the audio podcast multiple times until you feel confident in identifying the cause of the problem. Once you’ve determined the source of the problem, follow the instructions within the podcast to see if the problem goes away. If the problem still exists, repeat the process once again.
Updated: May 2025
We highly recommend that you use this tool for your error. Furthermore, this tool detects and removes common computer errors, protects you from loss of files, malware, and hardware failures, and optimizes your device for maximum performance. This software will help you fix your PC problems and prevent others from happening again:
- Step 1 : Install PC Repair & Optimizer Tool (Windows 11, 10, 8, 7, XP, Vista).
- Step 2 : Click Start Scan to find out what issues are causing PC problems.
- Step 3 : Click on Repair All to correct all issues.
1] Check the internet connection
If you are planning to install any software update, it is vital to check whether your internet connection is stable enough. If you find yourself facing problems while downloading the latest version of Windows 10, here are some things you can do to resolve the issue.
Download the latest Windows update
The easiest way to fix the problem is to simply download the latest Windows update. Here, you can see the list of available updates. Click the Get Now button next to each update and follow the instructions given on screen.
Change the download location
Another method to solve the issue is to change the download location. Under the network settings section, select the option Other and enter the IP address of the server where you wish to download the update.
Resetting the router
You can also reset the router to ensure that everything works fine again. This step is required only if the above methods don’t work. In the device manager window, scroll down to the bottom and locate the network adapter. Right-click on it and choose Properties. Then, under the Adapter tab, click on the Advanced button. Finally, click on the Reset button and wait for the process to complete. Afterward, restart your PC and try updating the system once again.
2] Run Windows Update Troubleshooter
If you are having trouble installing updates on your PC, follow these steps to troubleshoot the issue.
2] Click “View detailed problem information”
3] In the window that opens, select “Troubleshoot software issues”.
4] Select “Windows Update”, and then choose “Check now”.
5] Once the check completes, close the window.
6] Restart your computer.
4] Enable Windows Update & Windows Update Medic Services
Windows Update Service is one of the most important components of Microsoft operating systems. It helps you keep your PC up to date with latest security patches and software updates. However, it can cause serious issues like system crash, slow performance, blue screen, etc. If you want to disable Windows Update Service, follow the steps mentioned below.
Right-click on “Windows Update”, select Properties, and uncheck the box next to Start the service automatically.
Method 2 : Go to Command Prompt window. Type ‘net stop wuauserv’ and press Enter. Then type ‘wusa /uninstall’. Press Enter again. Now type ‘net start wuauserv’ again.
Method 4 : You can use Windows Update Catalog to download the required updates manually. For this, just open the Windows Update Catalog app. Click on Download Updates button. Select the desired updates and then click OK.
Method 5 : To fix the problem permanently, delete the registry key HKEY_LOCAL_MACHINE\SOFTWARE\Microsoft\Windows\CurrentVersion\WindowsUpdate\. This method works best if you’re running Windows 10 Home edition.
If none of the above solutions work, try reinstalling Windows Update Service.
5] Delete SoftwareDistribution folder
The next thing you can do [is delete the SoftwareDistributionfolder. To begin with, boot system in safe mode. Now, open Command Prompt in Administrator Mode. Type the following command and press Enter.net Stop WUauServiceNetStopCryptSvcRun WindowsUpdateInCleanBootStatePerform Clean Boot ,and then manually update Windows and see if that works. Download Update From Microsoft UpdateCatalogIfnoneofthementioneddoingsolvedtheproblem,thelastthingyoucantryistomaniuleydownloadtheupdatefromMicrosoftUpdateCatalog.
6] Run Windows Update in Clean Boot State
If you are facing issues while installing Windows Updates, it could be caused by running Windows Update in clean boot state. If you are facing such issues, follow the steps given below to fix the same.
Steps:
1] Open Command Prompt window and type “wusa /uninstall /kb:KB2999226”. Press Enter key.
2] Type “wusa /unattend”, press enter.
3] Type “exit” and press Enter.
4] Now, restart the computer in normal mode.
5] After the reboot, install Windows Update again.
7] Download Update from Microsoft Update Catalog
Microsoft offers several ways to download security updates for Windows 10 devices. You can use one of the following methods depending on what device type you are running.
Windows 10 Home – Use the Windows Update app.
If you’re having trouble finding the option to download updates, try restarting your PC.
RECOMMENATION: Click here for help with Windows errors.
Frequently Asked Questions
How do I fix a problem with an update in Windows 10?
If you see “Windows Update Error Code 0X80073712”, it could mean one of three things:
1. You’re running out of space on your hard disk.
2. Your computer is infected with malware.
3. You’ve got a problem with your Internet connection.
In each case, there’s a way to fix the error. Here’s how to do it.
First, make sure you’re up to date with Windows Updates. Next, open Task Manager (press CTRL + ALT + DEL), find the process named wuauserv.exe and end it. This stops Windows Update from trying to download updates.
What is wuauserv?
WUAServ is an essential component of Windows 10 and Windows server 2016. This article describes how to disable it.
Latest Windows 10 is launched with the enhanced gaming features that have been initiating a new era of PC gaming with its stimulating experience. Windows 10 Build 15019 brings thrilling of gaming features like new Games section in Settings, awaited Game Mode, Windows Game bar with improved full-screen support, built-in Beam streaming, and much more.
These awesome gaming features made the youngsters crazy about the Windows 10, and they want an immediate upgrade in their computer operating system. Although installation process of Windows 10 is quite easy, users have been facing some glitches while having Windows upgrade. One of such Windows Update issues is PC Build 15019.
Sometimes, PC builds 15019 unable to fix some annoying bugs from older builds. Its download progress indicator is also broken. Usually, it appears like you got stuck at 1% or other percentages, although the installation process still works in the background. If you have encountered this bug, be patient and try to ignore the percentage indicator.
Within few minutes, PC build 15019 will get downloaded, and you can install it without any hassle. Even after updating PC build 15019, users have been noticing nonstop exceptions in Spectrum.exe that causes high CPU usage, Edge crashes, and audio issues.
Microsoft comes with the description of this bug and stated that this PC built can create some issues after installation that can affect audio, CPU, and edge crash. Users also experienced the same kind of bugs just after installation that features several symptoms like an audio glitch, high disk usages in CPU, and edge crashes while opening setting in the app.
There are some troubleshooting methods that can be used to bypass this bug are listed below:
Method 1: Use Command Prompt to Fix PC Build 15019 Windows Update issues
This is one of the best methods to fix audio issues, high CPU usage and Edge crashes in Windows 10 PC build 15019. You need to go through the following steps in this method:
- Go to search menu, type cmd, and launch Command Prompt
- Copy and paste the following:
Rmdir /s %ProgramData%\Microsoft\Spectrum\PersistedSpatialAnchorsShutdown - Then choose Y to confirm removal, if no file is found move to Method 2.
- Type Exit and restart your computer

Method 2: Delete Persisted Spatial Anchors Folder
- Launch File Explorer
- Navigate to the following path: C:\ProgramData\Microsoft\Spectrum
- Select the “PersistedSpatialAnchors” folder, and click on Delete
- Restart the computer
- You may have encountered with a message saying “Files are in use” when you have tried to delete the folder, simply restart your computer and try again.
If both of the methods mentioned above doesn’t work for you, then try one more.
Method 3: Stop the Window Updates
Another method to tackle issues where Windows Update reflects “initializing,” and doesn’t appear performing is to stop the Window Updates.
- Click Start
- Type cmd -> right click cmd and choose run as administrator
- In the command prompt window, type net stop wuauserv
- Reboot PC.
- Repeat steps 1-3, and then type net start wuauserv
- Test Now.
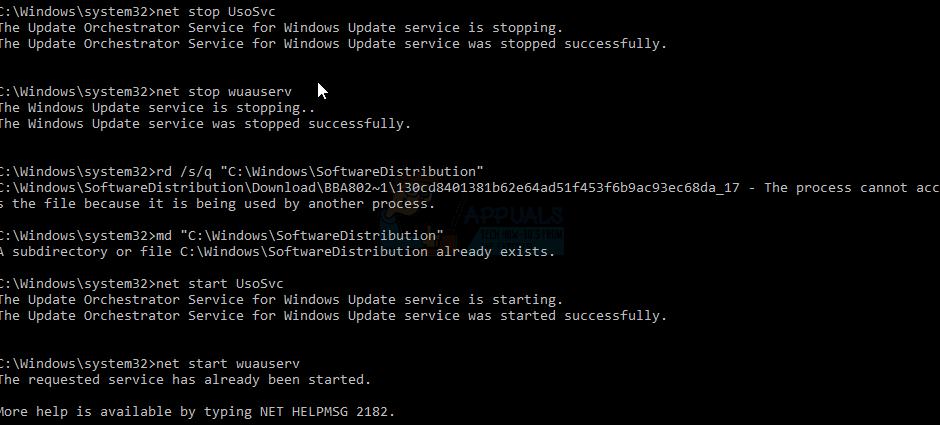
If the Method above doesn’t work, then follow step 1-2 to open command prompt as administrator and then do the following commands in the sequence below:
net stop UsoSvc
net stop wuauserv
rd /s/q “C:\Windows\SoftwareDistribution”
md “C:\Windows\SoftwareDistribution”
net start UsoSvc
net start wuauserv
Kevin Arrows
Kevin Arrows is a highly experienced and knowledgeable technology specialist with over a decade of industry experience. He holds a Microsoft Certified Technology Specialist (MCTS) certification and has a deep passion for staying up-to-date on the latest tech developments. Kevin has written extensively on a wide range of tech-related topics, showcasing his expertise and knowledge in areas such as software development, cybersecurity, and cloud computing. His contributions to the tech field have been widely recognized and respected by his peers, and he is highly regarded for his ability to explain complex technical concepts in a clear and concise manner.
Windows Update is an essential feature that ensures your operating system is up-to-date with the latest security patches, performance improvements, and new features. However, users sometimes encounter errors during the update process that can be frustrating and impede productivity. One such error is 0xc1900401. In this article, we will delve into the reasons behind this error, its manifestations, and comprehensive steps to troubleshoot and fix the issue effectively.
Understanding Windows Update Error 0xc1900401
Error code 0xc1900401 typically arises during the upgrade process, especially when users are attempting to upgrade to a new version of the Windows operating system (like from Windows 10 to Windows 11). This error can occur due to various reasons, including system compatibility issues, corrupted system files, or certain settings that inhibit the update process.
When this error occurs, it may manifest as a message stating, «There were problems installing some updates, but we’ll try again later.» It can be aggravating for users trying to enhance their system’s capabilities, and resolving it often requires a systematic approach.
Common Causes of the Error
- Incompatibility Issues: The hardware or software configuration may not meet the requirements of the new Windows version.
- Corrupted Files: Damage to system files or the Windows Update service can create barriers to successful updates.
- Interference from Third-Party Software: Antivirus programs or firewall settings can sometimes conflict with the Windows Update process.
- Insufficient Disk Space: Upgrading to a new version of Windows can require substantial disk space; insufficient space can halt the process.
- Network Issues: A disrupted internet connection can lead to incomplete downloads and updates.
Preliminary Checks
Before delving into troubleshooting, performing some preliminary checks can streamline the process and potentially resolve the issue.
1. Verify System Requirements
Ensure that your device meets the minimum system requirements for the version of Windows you are attempting to install. Check the CPU, RAM, storage, and GPU specifications.
2. Check Disk Space
Make sure there is enough disk space. Typically, you should have at least 20 GB of free space available for a version upgrade. To check this:
- Open File Explorer.
- Right-click on This PC and select Properties.
- Evaluate the available space on your hard drives.
3. Update Drivers
Outdated device drivers can cause compatibility issues during the update. Ensure your hardware drivers, especially for your graphics card, are updated to the latest version.
4. Temporarily Disable Antivirus
Some antivirus software can interfere with the update process. Disable your antivirus temporarily to see if it resolves the issue. Remember to enable it afterward.
Step-by-Step Guide to Fix Windows Update Error 0xc1900401
If the preliminary checks don’t resolve the issue, you can try the following comprehensive steps.
Step 1: Run Windows Update Troubleshooter
- Press the Windows key and type Troubleshoot settings. Open the settings.
- Scroll down and select Additional troubleshooters.
- Click on Windows Update, then click on the Run the troubleshooter button.
- Follow the on-screen instructions. The troubleshooter may identify and fix some common issues automatically.
Step 2: Check the Windows Update Service
Sometimes, the Windows Update service may not be running. Follow these steps to check and restart it:
- Press Windows + R, type
services.msc, and hit Enter. - Find Windows Update in the list. Right-click on it and select Properties.
- In the Startup type dropdown, select Automatic.
- Click on the Start button if the service isn’t already running.
- Click OK to save changes and close the window.
Step 3: Clear Software Distribution and Catroot2 Folders
Corrupted files in the Software Distribution and Catroot2 folders can prevent updates from completing. Here’s how to clear these folders:
- Press Windows + R, type
cmd, and press Ctrl + Shift + Enter to run Command Prompt as an administrator. - In the Command Prompt window, enter the following commands one at a time and press Enter after each:
net stop wuauserv net stop cryptSvc net stop bits net stop msiserver net stop wuauserv net stop cryptSvc net stop bits net stop msiserver - Now navigate to the Windows directory:
- Type
cd %windir%in the Command Prompt.
- Type
- Delete the Software Distribution folder:
del /f /s /q SoftwareDistribution - Delete the Catroot2 folder with:
del /f /s /q C:WindowsSystem32catroot2 - Restart the services you stopped earlier by entering:
net start wuauserv
net start cryptSvc
net start bits
net start msiserver
Step 4: Use the System File Checker
The System File Checker (SFC) tool can scan for and restore corrupted system files that might be causing the update error.
- Open Command Prompt as an administrator (similar to Step 3).
- Type
sfc /scannowand press Enter. - Wait for the process to complete. This might take a while.
- If any issues are found and repaired, restart your computer and attempt the update again.
Step 5: Use the DISM Tool
The Deployment Imaging Service and Management Tool (DISM) can restore the health of your Windows image.
- Open Command Prompt as an administrator.
- Type the following commands one at a time:
DISM /Online /Cleanup-Image /CheckHealth DISM /Online /Cleanup-Image /ScanHealth DISM /Online /Cleanup-Image /RestoreHealth - Allow the process to complete and then reboot your system.
Step 6: Reset Windows Update Components Manually
If previous steps did not resolve the issue, you may need to reset Windows Update components manually:
- Open Command Prompt as an administrator.
- Enter the following commands to stop Windows Update services:
net stop wuauserv net stop cryptSvc net stop bits net stop msiserver - Rename the Software Distribution and Catroot2 folders:
ren C:WindowsSoftwareDistribution SoftwareDistribution.old ren C:WindowsSystem32catroot2 Catroot2.old - Restart the services:
net start wuauserv
net start cryptSvc
net start bits
net start msiserver
Step 7: Repair Windows Installation
If the error persists, you can consider performing an in-place upgrade or repair installation of Windows:
- Download the Windows 10 or 11 installation media from the official Microsoft website. Choose the Download tool now option.
- Run the Media Creation Tool and select Upgrade this PC now.
- Follow the subsequent prompts. Make sure to choose the option to keep your files and applications to avoid data loss.
Step 8: Check the Windows Update Log
If you’re still encountering issues, you may want to delve into the Windows Update logs. Though this is more technical, it can provide insights into what’s going wrong.
- Press Windows + R, type
powershell, and hit Enter. - In PowerShell, type:
Get-WindowsUpdateLog - This command creates a WindowsUpdate.log file on your desktop. You can open it in a text editor to look for specific error messages that could guide further troubleshooting.
Step 9: Check Network Configuration and Internet Connection
A stable internet connection is crucial during the update process. Check your network configuration:
- Open Settings > Network & Internet.
- Click Status, and ensure you are connected.
- If you are using Wi-Fi, try connecting via Ethernet, as a wired connection can often be more stable.
- Restart your router if necessary.
Step 10: Disable User Account Control (UAC)
User Account Control (UAC) can occasionally block processes from completing. Temporarily disabling it can help:
- Type
Control Panelin the search bar and open it. - Click on User Accounts > Change User Account Control settings.
- Set it to Never notify and click OK.
- Restart your computer and try the update again.
Step 11: Perform a Clean Boot
A clean boot can help eliminate software conflicts that may interfere with updates. Here’s how to do it:
- Press Windows + R, type
msconfig, and press Enter. - Go to the Services tab, check Hide all Microsoft services, and click on Disable all.
- Then, go to the Startup tab and click on Open Task Manager.
- Disable all startup items.
- Close Task Manager and click OK on the System Configuration window. Restart your computer and attempt the update again.
Step 12: Seek Microsoft Support
If all else fails, consider reaching out to Microsoft Support for professional assistance. They have resources and tools that can help diagnose and fix deeper issues with the Windows Update process.
Conclusion
Encountering Windows Update error 0xc1900401 can be a frustrating experience, especially when it hinders the ability to use updated software and features. However, by systematically applying the troubleshooting steps outlined in this guide, you can likely resolve the issue and successfully install the latest updates.
It’s essential to maintain regular system checks and updates to prevent similar issues in the future. Monitoring your hardware requirements, ensuring sufficient disk space, and keeping your drivers updated are good practices that aid in a smoother computing experience. If you continue to experience problems after trying all these solutions, it might indicate a more systemic issue that requires deeper investigation.
By following this guide, you ultimately take great strides towards ensuring your system runs smoothly and remains secure. Keeping your operating system up-to-date not only improves performance but also fortifies it against various vulnerabilities that cyber threats exploit.