
Windows 11 offers several universal windows platform applications that come as pre-installed, among which the camera app is one such. This built-in program is used for a plethora of purposes like online meetings, remote classes, video chat, online conferences, and even live streaming. However, you might face Camera error code 0xA00F429F when attempting to start the app.
Full error message you come across is “Can’t start your camera If you’re sure the camera is connected and installed properly, try checking for updated drivers. If you need it, here’s the error code: 0xA00F429F <WindowShowFailed> (0x887A0004)” This error code may appear due to buggy Windows update, corrupted driver, permission problem, or program’s conflict.
Camera error code 0xa00f429f
Here is how to fix Camera Error code 0xA00F429F in Windows 11 or 10 –
Way-1: Permit System Access Camera
Allowing access to camera app gives users the authority to use the application which may play a crucial role in solving this problem. We have already covered several errors that include this method which you might like to see – How to Fix Windows 11 Camera not working. Now, follow the steps –
- Press – Winkey+I.
- Choose Privacy & Security from the Settings.
- Move to the App permission section and click on – Camera.
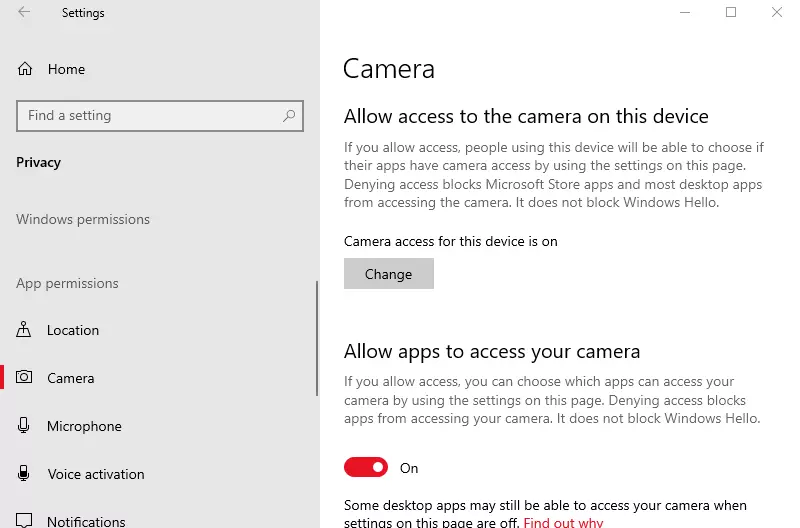
- Make sure that Camera access is turned on.
- Also, turn on Let apps access your camera.
Way-2: Reset or uninstall and reinstall Windows Camera App
Camera Error code 0xA00F429F in Windows 11 explicitly specifies that the drivers must be updated; however, this is not always the case as corruption is also possible. Best thing is that reinstalling the Windows app can work as a quick fix. So, follow these steps:
A] Using Settings app
- Right-click on – Start.
- Select –Settings
- Click on – Apps.
- Next, select – Installed apps.
- Go to the Camera app.
- Click on the 3-dots icon and select – Advanced options.
- Move down to – Reset.
- Now, click on Repair.
- See if the error is fixed.
- If the problem still persists, click on Reset and confirm through the pop up.
- Try to launch the camera app.
In case you running Windows 10 then follow – How to Reset Camera App.
B] Through PowerShell
If the above method doesn’t work, uninstall and reinstall the camera app through Windows PowerShell may help –
- Press Win+Q.
- Type – PowerShell.
- Select – Run as administrator.
- To uninstall the camera app, run the following command:
Get-AppxPackage *camera* | Remove-AppxPackage- Reboot your PC and open Microsoft Store.
- Search the app and click on Get in order to reinstall the application.
Way-3: Tweak Registry Entry
Registry and camera have close relation when you face problems when launching the app. Tweaking an entry EnableFrameServerMode can work when you encounter 0xa00f429f camera error=. Therefore use the Registry editor by following the given steps:
- Click on taskbar search.
- Type – regedit and press Enter.
- Select Yes on UAC prompt.
- Navigate to the following key in the Registry Editor –
Computer\HKEY_LOCAL_MACHINE\SOFTWARE\WOW6432Node\Microsoft\Windows Media Foundation\Platform- Right-click the empty space on the right and choose New => DWORD (32-bit) Value.
- Give it the name – EnableFrameServerMode.
- Right-click on “EnableFrameServerMode” and select the option Modify.
- Type 0 in the Value data field.
- Use Hexadecimal as the base value and then click OK.
- Restart your system or at least Windows Explorer from Task Manager.
This should have resolved your problem, if it still persists then check out the next way.
Way-4: Update or Uninstall Driver
Sometimes, especially when an unknown bug is affecting a driver update, the updated version can create problems instead. This is also applicable to Camera which is showing error code 0xA00F429F.
Hence you need to check whether the problem started after installing an update for the app and delete it if this happened. There is also an option Roll back you can use in this case through Device Manager. You may even delete the driver and replace it with Microsoft basic driver to break the continuity of error code.
You may lose certain functionality of the official driver as a result of this step. Still, if you only want to chat, snap photographs, or record video using the Windows Camera app, this may be a good option for you. So, move forward with the steps –
- Press Windows and X together.
- Select – Device Manager.
- Once you are on the program, click on View > Show hidden devices.
- Double-click on the Cameras (For you this may be Imaging devices or another name)
- Right-click on the Device (for me it is “HP Truevision HD Camera”).
- Choose Update driver.
- On the wizard that appears, click on “Search automatically for drivers“.
- Let the process complete and reboot your computer.
- Open Camera app and see whether the error is fixed. If not then again launch the Device Manager.
- Go to the Cameras and right-click on the device under it.
- This time choose Uninstall device.
- Click on “Uninstall” and restart the device.
- Once more restart the PC and check for the camera error as it could be solved now.
- Still not fixed! Now try this – Go to the Device Manager and right-click on the Camera (as done in previous steps).
- Select – “Update driver”.
- Click on – “Browse my computer for drivers”.
- Select – Let me pick from a list of available drivers on my computer.
- Highlight the appropriate device from the list of compatible hardware. You can also select Microsoft basic driver if this is available. Click on Next.
- Lastly, reboot the device and the issue should be solved now.
Way-5: Allow camera to communicate through Windows Firewall or Third-Party Antivirus
We have seen several times, how firewall or third-party antivirus applications can misjudge Windows applications as a security threat and hinder their performances. Camera Error code 0xA00F429F might be the result of this misbehave.
That’s why it’s advisable to give camera access from Firewall, by following the steps:
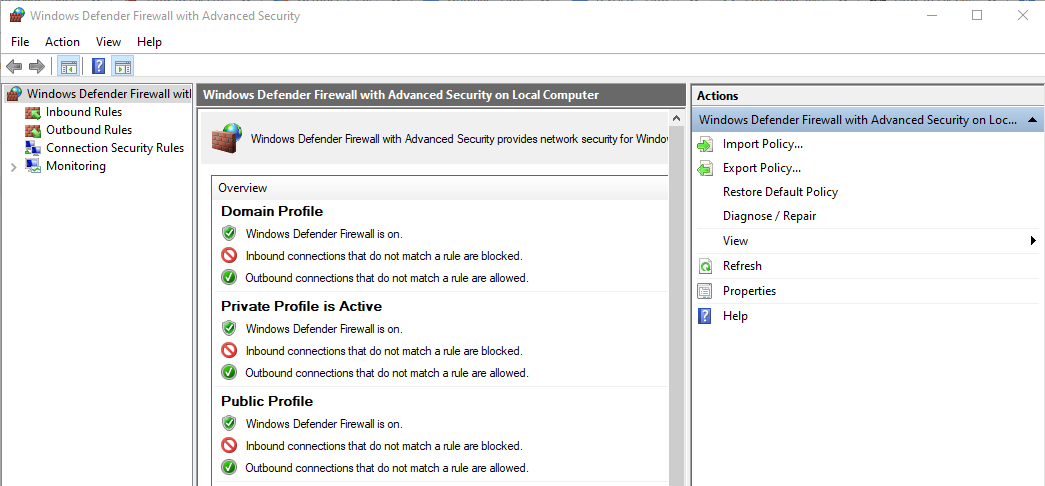
Camera App Access through Windows Firewall
- Press the Windows key and type Firewall.
- Choose the top option from the results.
- From Windows Security app settings, choose – Allow an app through Firewall.
- On the new window, scroll Allowed apps and features and ensure that Windows Camera is in the list
- In case you don’t find then click on Change settings.
- Then select – Allow another app.
- From Add an app window, click on Browse.
- Browse and select the camera app and choose Open.
- Check both the boxes – for Private and Public.
- Click on OK.
- Now try launching the camera app.
Alternatively, go through – Allow Apps to Communicate through Firewall in Windows 10.
Camera App Access via Third-Party Antivirus
- To Start the antivirus program, double-click its icon.
- Go to the Firewall settings and make sure the Camera app has access.
Way-6: Reset the Permissions
After receiving a major release on Windows 11 you may need to authorize your programs to utilize the camera again. Some apps do not have normal access to the device by default in recent versions of Windows 11 which may lead to showing camera error code 0xa00f429f. Follow the steps below to provide your apps access to the camera:
- Go to Start => Settings.
- Select – Privacy & Security.
- Select – Camera.
- Toggle the switch to On for the apps you wish to give access to your camera from the list.
- Allow access to the camera on this device if the switch is greyed out.
- Restart your computer and reopen the affected program to test if the camera is working properly.
Way-7: Close all the Background Apps
Sometimes background apps can affect your PC performance and hamper certain apps’ functioning like the camera app, showing error code 0xa00f429f. Thus, you must close all the background programs by following these steps:
- Press Ctrl + Shift + Esc simultaneously. This will launch To launch Task Manager.
- In the Processes column, go to Background processes.
- Look for the programs like Mail, Message, Meet, Chat, or other that are available in the list.
- Right-click on them one by one and select End task.
- Now open the camera app without any problem.
Way-8: Remove Camera Roll Folder
The Camera app stores all generated photographs and movies in the Camera Roll folder in Windows 11. However, some users have stated that removing the Camera Roll folder could fix the 0xa00f429f camera error. To accomplish this follow the steps mentioned below:
- Press Windows+E at the same time.
- From the left navigation pane, click Pictures.
- Select the Camera Roll folder and press Delete.
- Click Yes when the Delete Confirmation Dialog displays.
- Restart your PC and hopefully, the error will be solved.
Methods:
Way-1: Permit System Access Camera
Way-2: Reset or uninstall and reinstall Windows Camera App
Way-3: Tweak Registry Entry
Way-4: Update or Uninstall Driver
Way-5: Allow camera to communicate through Windows Firewall or Third-Party Antivirus
Way-6: Reset the Permissions
Way-7: Close all the Background Apps
Way-8: Remove Camera Roll Folder
That’s all!!
Windows 11 brings an array of exciting features and improvements, including a revamped Camera app designed to enhance your multimedia experience.
However, like any application, the Windows Camera app (that comes preinstalled) is not immune to errors. One such frustrating error that users encounter is the “0xA00F429F” error, which prevents the Camera app from functioning correctly.

What actually happens is when affected users open the Camera app, instead of opening, it shows an error message that reads:
Can’t start your camera. If you’re sure camera is connected and installed properly, try checking for updated drivers.
If you need it, here’s the error code 0xA00F429F<WindowShowFailed>(0xC00D36BB) or (0x887A0004)
The 0xA00F429F error is a common problem that can be caused due to various factors, including outdated or corrupt camera drivers, incorrect privacy settings, and malware infections.
You may love to read about Camera App’s 0xA00F429F Error in Windows 11. If you own Surface Pro X and see MediaCaptureFailedEvent “0xA00F4271 (0x80004005)” Error.
If your webcam stops working after upgrading to Windows 11, then check this post: Fix – Webcam not working after upgrading to Windows 11
If you landed on this blog post, then it’s possible that you’re seeing the same error message when opening the camera app. Below in this blog post, we will walk you through the steps on how to fix the 0xA00F429F error in Windows 11.
Using Physical Buttons on Different Laptop Brands
If you are experiencing a camera error on your laptop, the first thing to check is whether the camera is turned on or off using the physical button. Here are the methods to turn on the camera for different PC manufacturers:
- MSI Laptops: Press the “Fn” key and the “F6” key simultaneously to turn on the camera.
- ASUS Laptops: You can turn on the camera by pressing either the “F10” key or “Fn + F10” together.
- HP Laptops: Look for the Kill Switch button on the left or right side of the laptop. Slide it to the ON position to activate the camera.
- Lenovo Laptops: To turn on the camera, press the “F8” key or use the combination “Fn + F8“.
Make sure to try these steps to ensure the camera is enabled before troubleshooting further camera issues.
Update, Uninstall, and Reinstall Camera Drivers
You need to ensure that the Camera device is up to date for proper functioning. You can follow the instructions discussed here: How to Update Drivers for Windows 11.
The blog post has instructions on how to update, delete, and reinstall drivers on Windows PCs.

Alternatively, you can head over to the manufacturer’s website and download the latest Camera driver for your Windows PC or use OutByte Driver Updater.
Check Windows 11 privacy settings
Another possible cause of the 0xA00F429F error is incorrect privacy settings. To check your privacy settings, follow these steps:
Open the Settings app in Windows 11. For that, click on the Start button and select Settings from the start menu.
Switch to Privacy & Security on the left.

On the right side, scroll down until you reach to App permissions section and click on the Camera.
Make sure that the Camera Access setting is turned ON.
Run the Camera troubleshooter
Windows 11 includes a built-in troubleshooter that can help you fix problems with the Camera app. To run the troubleshooter, follow the instructions discussed below:
Click on the Search icon and type Troubleshoot other problems. When the same setting appears in the search results, click to open it.
Scroll down to Camera Troubleshooter and then click on the Run button.

Follow the on-screen instructions and let the troubleshooter find and resolve the issue.
Reset the Camera app
If the above steps do not fix the problem, you can try resetting the Camera app. To reset the Camera app, follow these steps:
Click on the Search icon and type Camera, when the same app appears in search results, click to open it.

Click on the App settings option available on the menu.

In the App settings page, scroll down to the Reset section, then click on the Reset button.
Use Registry hack
Click on the Search icon and type regedit, when the Registry editor appears in the search results, click to open it.
In the Registry Editor, go to the following key: Computer\HKEY_LOCAL_MACHINE\SOFTWARE\WOW6432Node\Microsoft\Windows Media Foundation\Platform
Once you are at the correct key, right-click on an empty area and select New > DWORD (32-bit) Value.

A new DWORD value will be created, and you should name it “EnableFrameServerMode.” Double-click on it and set its Value data to 0.
Ensure that the “Base” is set to “Hexadecimal.”
Click on “OK” to save the changes.
Close the Registry Editor. To apply the changes.
When the “EnableFrameServerMode” DWORD value is set to “0” (with the Base value set to Hexadecimal), it effectively disables the Frame ServerMode for cameras. The Frame ServerMode is a feature in Windows that allows multiple applications to access a camera simultaneously.
By disabling this feature, only one application at a time can access the camera, which might be necessary to resolve certain camera-related issues or conflicts.
After that, open the camera app and check if this fixes the issue or not.
Disable the Camera Shields feature in the Antivirus Program
Some third-party antivirus software packages have features like “camera shields” that can block access to the camera. If you are using one of these packages, then try to disable this feature to fix the issue:.
The steps to disable the camera shields or similar features will vary depending on the antivirus software package you are using. However, in general, you will need to open the antivirus software settings and find the section that deals with camera protection. Once you have found this section, you should be able to disable the camera shields.
Reinstall the Camera app
If resetting the Camera app does not fix the problem, you can try reinstalling the Camera app. To reinstall the Camera app, follow these steps:
Uninstall the Camera app
Press the Windows key on your keyboard to open the Start menu.
Type “PowerShell” in the search bar. Right-click on “Windows PowerShell” from the search results and select “Run as administrator” from the context menu.
If the UAC dialog box appears, click “Yes” to continue with administrative privileges.

In the PowerShell window, paste the following command and press Enter:
Get-AppxPackage *camera* | Remove-AppxPackageThis command will uninstall the Camera app from your system.
Reinstall the Camera app from the Microsoft Store
Open the Microsoft Store app on your Windows 11 PC.
Click on the Search icon and type Camera, when the same app from Microsoft appears in search results, click to open it and then click on the Install button.

Once the installation is complete, you should have the Camera app back on your computer.
Please note that performing these steps will remove and reinstall the Camera app. If you have any important data or settings associated with the Camera app, make sure to back them up before proceeding.
Turn ON the Camera from the BIOS
Checking camera settings in BIOS may not be available on all PCs. Typically, this feature is found in business-class PCs running Windows 10, allowing users to enable or disable the camera or webcam system-wide.
If your device supports this functionality, you can follow these steps:
You can enter your device into bios and check if it’s available or not.
Navigate to the appropriate section, which might be labeled as “System Configuration” or “Miscellaneous Devices.” Check if there is an option to “Enable Camera.”

Enable it by checking the box. Save the changes by clicking “Apply” and then exit the BIOS.
Restart your computer to apply the changes.
Please note that this method applies to Dell PCs in the example provided. If you are using a different brand, refer to their official website or documentation for specific instructions on accessing camera settings in the BIOS.
Keep in mind that not all PCs support camera management through BIOS, so this option may not be available on your device.
Scan your computer for malware
Finally, if you have tried all of the above steps and the problem persists, you can scan your computer for malware. Malware can sometimes cause problems with the Camera app. To scan your computer for malware, you can use a free antivirus program like Malwarebytes.
Conclusion
These are the steps on how to fix the 0xA00F429F error in Windows 11. If you have followed all of the steps and the problem still persists, you can contact Microsoft support for help.
I hope this blog post was helpful. Please let me know if you have any questions.
Windows 10 and 11 come with pre-installed UWP apps that are essential for daily use. Among these is the Camera app, which allows you to record yourself if your device has a webcam. In case you have uninstalled the Camera app, you can easily reinstall it from the Microsoft Store.
With work from home and distance learning becoming popular because of the coronavirus, a lot of people rely on their camera for their online meetings, remote classes, video calls, online conferences, and even live streaming.
Most of the time, the camera works well with various applications, except for when camera errors like 0xA00F429F happen. Several Windows users have recently found that Windows 10/11 can’t start camera, and error code 0xA00F429F occurs. This has happened to users using Zoom, Skype, Facebook Messenger, and other applications that use the camera, which means that the problem is not program-specific.
When users try to use the application with a camera, only a black screen appears with the following error message:
Can’t start your camera
If you’re sure the camera is connected and installed properly, try checking for updated drivers.
If you need it, here’s the error code: 0xA00F429F<WindowShowFailed>(0x887A0004)
This error has affected several Windows users, particularly those who have recently installed updates.
Reasons Behind Windows 10/11 Can’t Start Camera, Error Code 0xA00F429F
At first glance, it seems like the user gets the “Can’t start camera on Windows 10/11” error 0xA00F429F because of driver problems. It is stated in the error message to check for updated drivers. If you recently installed a system update, such as Windows 10/11 1809 or other major builds, it is recommended to check your hardware drivers for those that need to be updated, including your camera. It is possible that the update corrupted the installed driver for the camera or the manufacturer of your camera has also released an updated driver in response to that system update.
There is also a chance that the update has reset the permissions granted to your applications, so you need to request permission again to be able to use the camera.
Sometimes the error is caused by the simple fact that another application is currently using the camera. Take note that you cannot simultaneously run applications that use the same camera. Depending on the application, you’ll either get the message that the camera is already in use or some other error message, like Windows 10/11 can’t start camera, error code 0xA00F429F.
There are numerous other issues that can cause the “Something went wrong camera” error, and in order to resolve it, you may need to update your drivers to ensure the compatibility of your PC and the device.
Finally, it’s possible that your laptop camera isn’t working for another reason, but thankfully, this article is here to help.
How to Fix Can’t Start Camera Error 0xA00F429F
When you get the Windows 10/11 Can’t start camera error code 0xA00F429F, the first thing you need to do is restart your computer and check if the camera is now working. Determine whether the error affects a specific program only or if it affects all the other applications. If it is program-specific, uninstall the app and reinstall a fresh, clean copy to fix the error.
If you’re using a third-party camera connected via USB, check whether your camera is plugged in correctly to your computer. If there is a switch, make sure that it is turned on. You should also close all other applications that you don’t use but are currently running, particularly those that use the camera as well. For the purpose of troubleshooting this error, leave one application that uses the camera running and close everything else.
To resolve this error, try the solutions listed below:
Solution 1: Give your computer access to the camera.
- Press the Win+X keys on your keyboard to open the Settings
- Select Privacy from the Settings window.
- Go to Camera and enable Allow apps to access your camera.
- If the above-mentioned toggle is grayed out, first enable the Allow camera access on this device
Solution 2: Give the Camera app access to firewall or antivirus.
To give your camera app access to Firewall:
- Open Cortana search -> type firewall -> select the first option from the list.
- Select Allow an app or service through Windows Defender Firewall from the Firewall settings.
- Look for the camera app and grant incoming and outgoing access.
To allow camera access via third-party antivirus software (steps differ depending on software):
- Double-click the antivirus software icon to launch it.
- Navigate to Firewall settings and ensure that the Camera app has access.
Solution 3: Reset/Reinstall the Windows Camera App.
If the problem is related to the Camera app itself, you can first reset it by following the instructions here:
- Open Settings from the Start menu or by pressing Windows + I.
- Click on Apps > Apps & features and look for Camera from the list.
- Click on it, then click on the Advanced options link.
- Scroll down and click the Reset button to reset the app.
If that does not work, you can reinstall the app using a PowerShell command. Press Windows + X, then choose Windows PowerShell (Admin) from the menu. Execute the following command in the PowerShell window:
Get-AppxPackage *camera* | Remove-AppxPackage
This should uninstall the camera app. Next, reboot your computer and install the latest Camera app from the Microsoft Store.
Solution 4: Edit the Registry.
This worked for several Windows users but remember that editing the registry may cause irreversible changes to your computer, so proceed with caution. To resolve this error:
- Press Windows + S, then search for Registry Editor.
- Navigate to the following key: Computer\HKEY_LOKAL_MACHINE\SOFTWARE\WOW6432Node\Microsoft\Windows Media Foundation\Platform
- Right-click on the right pane, then choose New > DWORD (32-bit) Value.
- Type in EnableFrameServerMode under Value name.
- Double-click the newly created EnableFrameServerMode entry.
- Under Value data, type in 0 with the base value as Hexadecimal.
- Click OK to save your changes.
Restart your computer and check if the camera is now working.
Solution 5: Reset Permissions.
If you upgraded to Windows 10/11 or installed a major system update recently, you might need to allow your applications again to use the camera. In some more recent versions of Windows 10/11, some programs do not have standard access to the camera by default.
To allow your apps to access the camera, follow the steps below:
- Click Start > Settings.
- Click on Privacy > Camera.
- In the list of apps, choose the applications you want to allow access to your camera by toggling the switch to On.
- If the switch is grayed out, click Allow access to the camera on this device.
Restart your computer and open the affected application again to see if the camera has been fixed.
Solution 6: Update, Rollback, or Uninstall Camera Driver.
If the older camera driver does not work well with the updated version of Windows 10/11, you can check the manufacturer’s website for the latest version of the camera driver and install it on your computer. You may also consider using tools like Outbyte Driver Updater or similar products to scan your computer for outdated device drivers, including your camera, and potentially update them automatically.
On the other hand, if the driver was updated in the background, you can try rolling back to an older version of that driver, the version that does not trigger the error code 0xA00F429F.
Or, you can uninstall the driver and replace it with the basic driver from Microsoft. There is a chance that you might lose some features, but if you only need to use the camera for some basic video calls or record videos, this might be a good solution for you.
Solution 7: Set up a new user account.
If the error persists, create a new user account and see if the camera resolves itself after switching to a new user account.
Solution 8: Press the camera button/switch.
Some webcams include an external switch. We must turn it on to ensure that it is operational.
Most recent HP laptops include a camera key on the keyboard. Please ensure that it is turned ON. Examine your keyboard carefully to see if there are any mistakes.
Solution 9: Quit all apps running in the background.
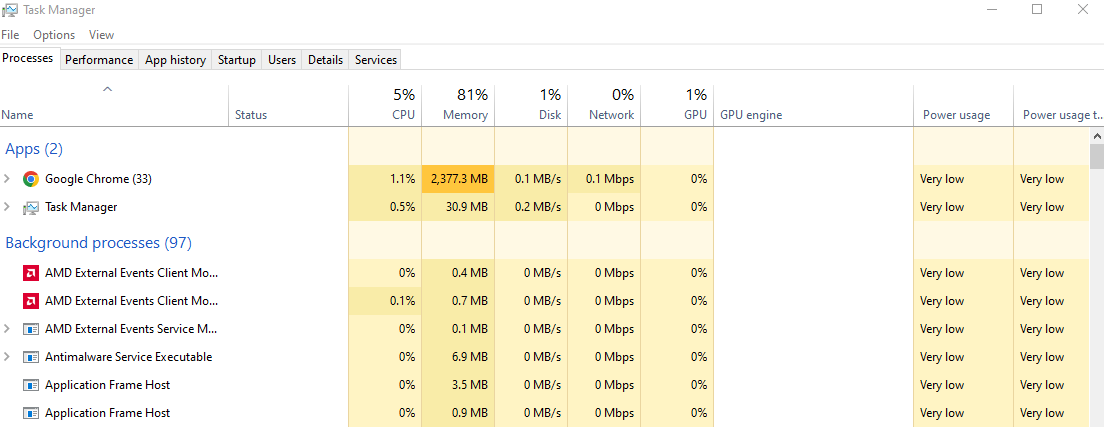
- To open Task Manager, press CTRL + SHIFT + Esc at the same time.
- In the task manager window, find the apps that are running the camera in the background, right-click on them, and choose End task from the menu.
Check to see if the problem has been resolved and the camera is operational. If not, proceed to the next step.
Solution 10: Delete your Camera Roll folder.
Many users reported that deleting the Camera Roll folder solved their problem. To accomplish this:
- Press Windows+E at the same time to launch the Explorer window.
- Select Pictures.
- Right-click on the Camera Roll Folder and press Ctrl+D on your keyboard to delete it.
- When the Delete Confirmation Dialog appears, click Yes.
- Restart your computer.
Check the camera’s functionality after applying this fix. If that doesn’t work, try the next solution.
Wrapping Up
Getting camera error code 0xA00F429F can be a hassle for students and remote workers who rely on messaging applications to stay connected with their peers. If this error keeps bugging you, the above steps should easily help you troubleshoot this one.
Give us some love and rate our post!
Some users recently reported that they encountered an error 0xa00f429f when trying to use the Camera app. This error code comes with an error message that says, “Windows can’t start your camera“. This could be the result of a recent update gone wrong or a corrupt driver.
Although the error says that the drivers should be updated, this might not always be the case. Additionally, drivers can be damaged. This article will help you figure out the possible solutions to this problem.

When does Camera Error 0xa00f429f occur?
If you are experiencing a camera error 0xa00f429f when trying to use the Windows Camera app, you may have recently installed an update that failed, or your drivers might have become corrupted.
The full error message that accompanied the error is as follows:
Can’t start your camera
If you’re sure the camera is connected an installed properly, try checking for updated drivers.
If you need it, here’s the error code:
0xA00F429F <WindowShowFailed> (0x887A0004)
Windows can’t start your Camera, Error 0xa00f429f
The Windows Camera app gives an error code of 0xa00f429f if you try to open it. This can be the result of a recent update going wrong or a corrupt driver. These are some solutions that may help:
1. Reinstall the Windows Camera app
Users report that they were able to fix the error code immediately when reinstalling the Windows camera. To do this, you can follow these steps:
- Open the Windows PowerShell with admin access.
- Now copy and paste the below command line and press Enter:
Get-AppxPackage *camera* | Remove-AppxPackage
- After you successfully reinstall the Windows Camera app, restart your computer.
- You can then install the latest version from the Microsoft Store app.
2. Create a new user account
If the error persists, then you should create a new user account and see if the camera resolves automatically after switching to a new user account.
3. Reinstall the Camera driver
In case the error still appears on your computer screen, uninstall and reinstall the Camera driver. Here is how you can do this:
- Press the Windows+R keys to open the Run command.
- Type devmgmt.msc in the text box and press Enter.
- Now, right-click on your camera driver and select Uninstall device.
- This should now download the latest version of the missing drivers for you. Hopefully, everything works properly now.
Read Next:
- How to Fix Camera Error 0xa00f4288 in Windows 11
- Fix Windows Camera Error Code 0xA00F4244
Issue: Hello. I recently tried to use my camera on a Windows laptop but I received a 0xA00F429F WindowShowFailed error. How do I get rid of it?
Solved Answer
Windows is one of the most popular operating systems among home users and businesses. Since the pandemic started, many people switched to working from home. Online meetings are becoming more and more common. For this, workers need properly working webcams.
Unfortunately, some users run into issues when trying to use their external or integrated cameras. People report seeing the 0xA00F429F WindowShowFailed camera error. It can be caused by multiple things. Usually, it shows up when people try to use the camera after upgrading the operating system. The error is known to appear on Windows 10 and 11.
One of the solutions that should help people fix the 0xA00F429F<WindowShowFailed> error is resetting or reinstalling the Windows Camera app. Users may also be unable to use their cameras because of missing or outdated drivers.[1] In this guide, you will find 5 steps that should help you fix this issue.
Manual troubleshooting can be a lengthy process, so you can also try using a maintenance tool like FortectMac Washing Machine X9 to scan your machine. It can fix most system errors, BSODs,[2] corrupted files, and registry[3] issues. Otherwise, follow the step-by-step instructions below.

Solution 1. Reset the Windows Camera App
If the problem is related to the Camera app, you can first reset it by following the instructions here:
- Open Settings from the Start menu or by pressing the Windows key + I
- Click on Apps > Apps & features and look for Camera from the list
- Then click on the Advanced options link

- Scroll down and click the Reset button to reset the app
Solution 2. Reinstall the Windows Camera App
Fix it now!
Fix it now!
To repair damaged system, you will have a 24hr Free Trial and the ability to purchase the licensed version of the Fortect Mac Washing Machine X9.
You can also reinstall the app using a PowerShell command:
- Press the Windows key + X, then choose Windows PowerShell (Admin) from the menu
- Execute the following command in the PowerShell window:
Get-AppxPackage *camera* | Remove-AppxPackage

Solution 3. Edit the Registry
This worked for several Windows users but remember that editing the registry may cause irreversible changes to your computer, so proceed with caution:
- Press the Windows key + S, then search for Registry Editor
- Navigate to the following key:
Computer\HKEY_LOKAL_MACHINE\SOFTWARE\WOW6432Node\Microsoft\Windows Media Foundation\Platform
- Right-click on the right pane, then choose New > DWORD (32-bit) Value
- Type in EnableFrameServerMode under Value name
- Double-click the newly created EnableFrameServerMode entry

- Under Value data, type in 0 with the base value as Hexadecimal
- Click OK to save your changes
- Restart your computer and check if the camera is now working.
Solution 4. Reset Permissions
Fix it now!
Fix it now!
To repair damaged system, you will have a 24hr Free Trial and the ability to purchase the licensed version of the Fortect Mac Washing Machine X9.
If you upgraded to Windows 10/11 or installed a major system update recently, you might need to allow your applications again to use the camera. Follow the steps below:
- Click Start, then Settings
- Click on Privacy, and choose Camera
- In the list of apps, choose the applications you want to allow access to your camera by toggling the switch to On
- If the switch is grayed out, click Allow access to the camera on this device

- Restart your computer
Solution 5. Reinstall Camera Driver
If the older camera driver does not work well with the updated version of Windows 10/11, you can check the manufacturer’s website for the latest version of the camera driver and install it on your computer. If you want an automatic solution, you can use a dedicated utility like DriverFix. It can find the best drivers for your system and install them. You can also uninstall the driver and replace it with the basic driver from Microsoft:
- Go to the Device Manager
- Locate your Camera driver

- Click on it and choose Uninstall
- Restart your computer and see if it is working
Repair your Errors automatically
ugetfix.com team is trying to do its best to help users find the best solutions for eliminating their errors. If you don’t want to struggle with manual repair techniques, please use the automatic software. All recommended products have been tested and approved by our professionals. Tools that you can use to fix your error are listed bellow:
do it now!
Download Fix
Happiness
Guarantee
do it now!
Download Fix
Happiness
Guarantee
Compatible with Microsoft Windows
Compatible with OS X
Still having problems?
If you failed to fix your error using FortectMac Washing Machine X9, reach our support team for help. Please, let us know all details that you think we should know about your problem.
Fortect will diagnose your damaged PC. It will scan all System Files that have been damaged by security threats. Mac Washing Machine X9 will diagnose your damaged computer. It will scan all System Files and Registry Keys that have been damaged by security threats. To repair damaged system, you will have a 24hr Free Trial and the ability to purchase the licensed version of the Fortect malware removal tool. To repair damaged system, you have to purchase the licensed version of Mac Washing Machine X9 malware removal tool.
Protect your online privacy with a VPN client
A VPN is crucial when it comes to user privacy. Online trackers such as cookies can not only be used by social media platforms and other websites but also your Internet Service Provider and the government. Even if you apply the most secure settings via your web browser, you can still be tracked via apps that are connected to the internet. Besides, privacy-focused browsers like Tor is are not an optimal choice due to diminished connection speeds. The best solution for your ultimate privacy is Private Internet Access – be anonymous and secure online.
Data recovery tools can prevent permanent file loss
Data recovery software is one of the options that could help you recover your files. Once you delete a file, it does not vanish into thin air – it remains on your system as long as no new data is written on top of it. Data Recovery Pro is recovery software that searchers for working copies of deleted files within your hard drive. By using the tool, you can prevent loss of valuable documents, school work, personal pictures, and other crucial files.