
This post on MiniTool Website mainly discusses the cause of error code 0x81000033 when you create a system backup image. What’s more, it offers several nice solutions for you on how to solve this issue.
Backup Error Code 0x81000033
When trying to perform a Windows backup with the inbuilt backup tool, you may receive such a prompt, “The backup failed, error code 0x81000033.” Once receiving this error code, you cannot create a system backup image successfully. After knowing when 0x81000033 appears, this article will continue to introduce the cause of it.
Tip: When you try to create a system image with Backup & Restore in Windows, it may fail with backup error codes 0x81000033 and 0x80780119. The latter one is mainly caused by insufficient disk space. There is another article showing you how to fix error code 0x80780119 – Fix Windows Backup Failed Not Enough Disk Space 0x80780119 Code.
Backup Error Code 0x81000033 may be caused by the conditions listed as follows.
1. Windows 10 image backup not enough space in the System Reserved Partition
2. Installed too many unnecessary language packs on your PC
3. Disabled system protection
4. Device drivers out of date
How to Fix Windows Backup Error Code 0x81000033?
Try the following solutions that might help you a lot after triggering this error code.
Solution 1: Spare Some Disk Space by Using Disk Cleanup
You can first go and check if there is enough free space on the root drive. Once this error code appears, you are supposed to take advantage of Disk Cleanup to release more free space. Then restart your PC, create a system back up again. If the backup error code 0x81000033 still arises, you may try the following solution.
Tip: In addition to this method, you can also free disk space in other ways. There is a relevant article about that – 10 Ways to Free up Disk Space in Windows 10/11.
Solution 2: Increase the Size of System Reserved Partition
Not having enough free space inside the Windows 10 partitions is the prior reason for 0x81000033, so expanding the space of System Reserved Partition is a very useful method when your computer suffers from the heavy pressure of partition space.
To fix backup error code 0x81000033 in this way, you can create a system volume and then appoint it as the new system reserved partition.
Step 1. Type Win + E to choose File Explorer and check all the existed driver letters. Launch the Command Prompt as an administrator.
Step 2. Copy “bcdboot.exe /s C:\Windows /s G:” in the pop-up window and click Enter. (In this code, “C” is the root drive and “G” represents the newly created system volume.)
Step 3. Execute the following commands one after another and remember to hit Enter after each command.
DISKPART
DISKPART> select volume G
DISKPART> active
Step 4. Restart your PC.
Solution 3: Delete Unnecessary Language Packs
Too many language packs not only occupy substantial disk space but also stop the system from generating restore points. As a result, you’d better remove all the unwanted language packs in the Setting of your PC.
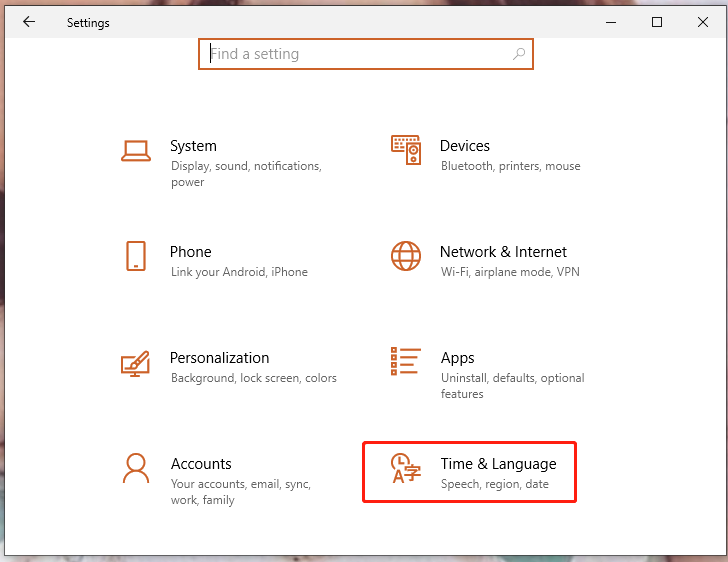
Step 1. Click the Start menu to choose Setting.
Step 2. Select Time & Language.
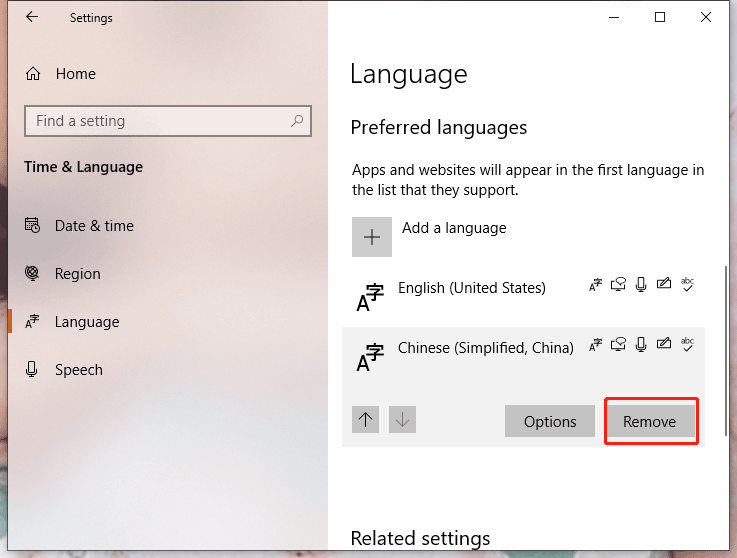
Step 3. In the Language window, choose the language pack that you want to remove by left-clicking it and then click Remove.
Solution 4: Turn on the System Protection
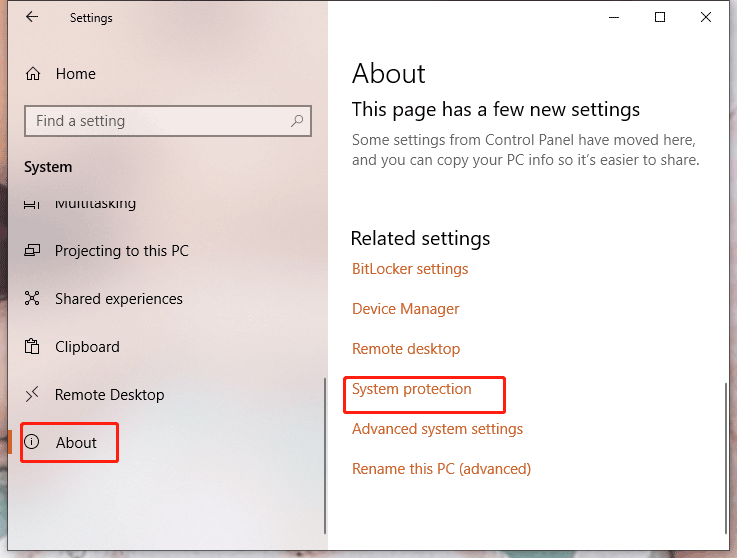
By default, this feature remains disabled, so it is normal for you to create any restore image unsuccessfully. This solution is pretty easy if you never turn on the system protection. Just go to Setting of your PC, and click System. In the System>About window, select System protection.
And then choose the system drive followed by Configure in System Properties.
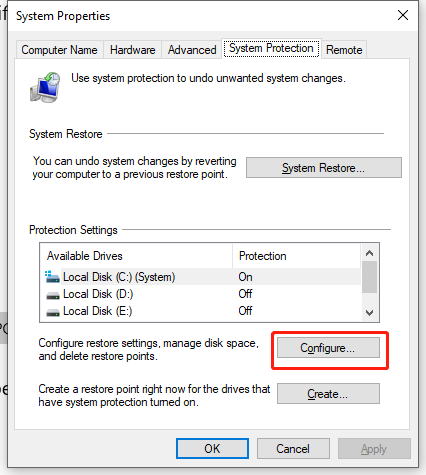
In the pop-up window, check Turn on system protection.
Solution 5: Update the Outdated Device Drivers
The outdated device drivers are another important reason for triggering backup error code 0x81000033. You can follow the next steps to update drivers. Take the graphics card driver update as an example.
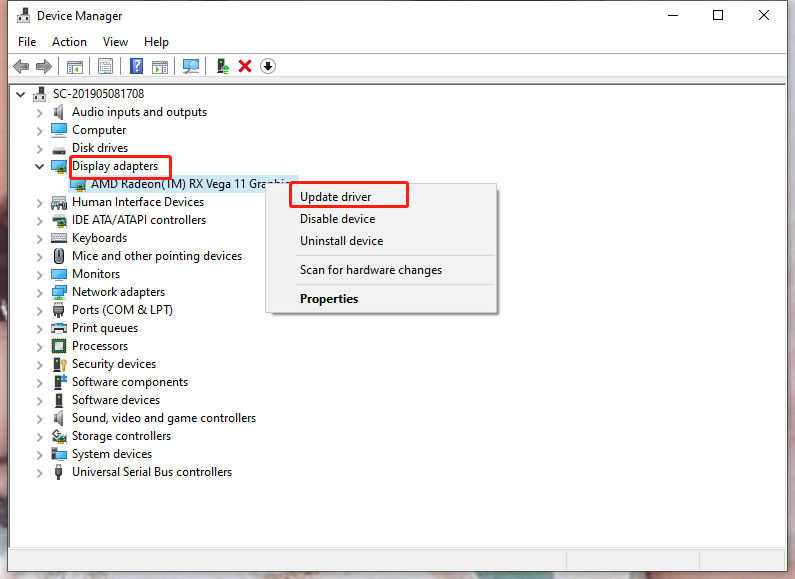
Step 1. Type Device Manager in the search bar and next choose the most matched one.
Step 2. Click Display adapter in the Device Manager window, right-click your graphics driver and choose Update driver.
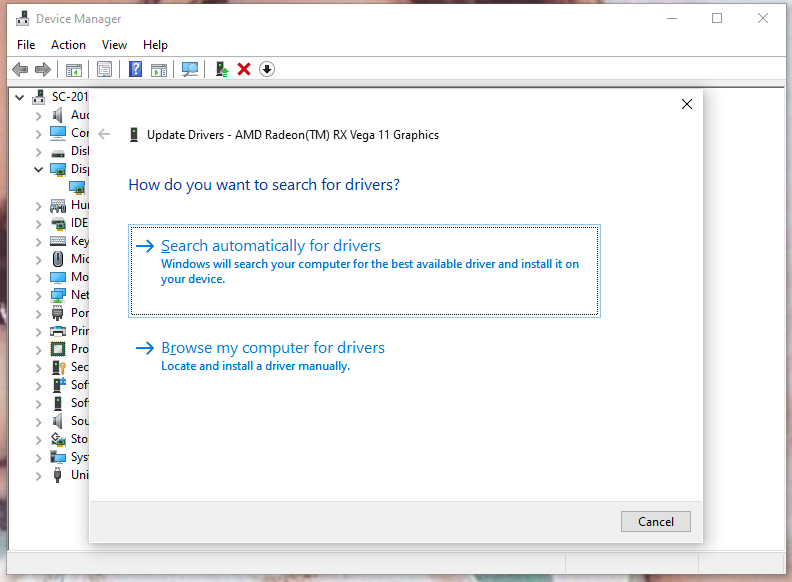
Step 3. In the pop-up window, click “Search automatically for drivers”. After that, Windows will look for the latest driver software for your PC on the Internet. If there is a newer one, Windows Device Manager will download and install the newer one for you.
There is a relevant article showing you 2 ways of updating device drivers – How to Update Device Drivers Windows 10 (2 Ways)
If you don’t want to suffer from backup error code 0x81000033 and want a reliable backup tool, you can choose a free backup software, MiniTool ShadowMaker. There is an article showing you 2 ways of backing up – Windows 10 vs Windows 11 Backup & Restore vs MiniTool ShadowMaker.
MiniTool ShadowMaker TrialClick to Download100%Clean & Safe
As mentioned above, in terms of the interest of the long run, MiniTool ShadowMaker is a better option that is worthy to have a try when creating a system image. Here we will offer a detailed guidance on how to do that.
Step 1. Launch MiniTool ShadowMaker in Windows by clicking the left key twice, then click Keep Trail to start a backup.
Step 2. In the main function interface, click Backup.
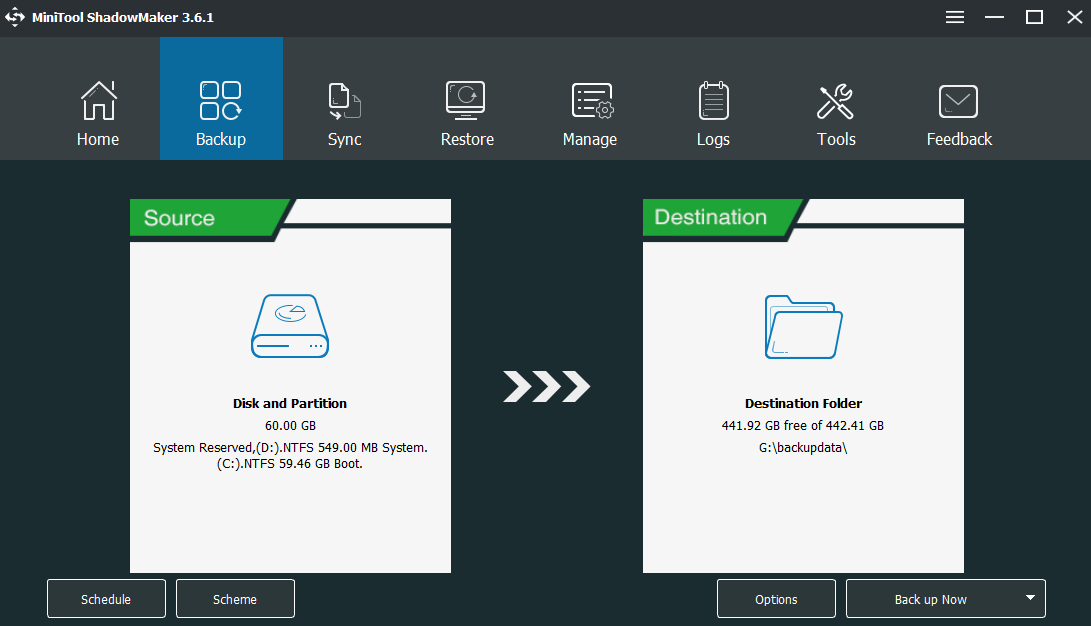
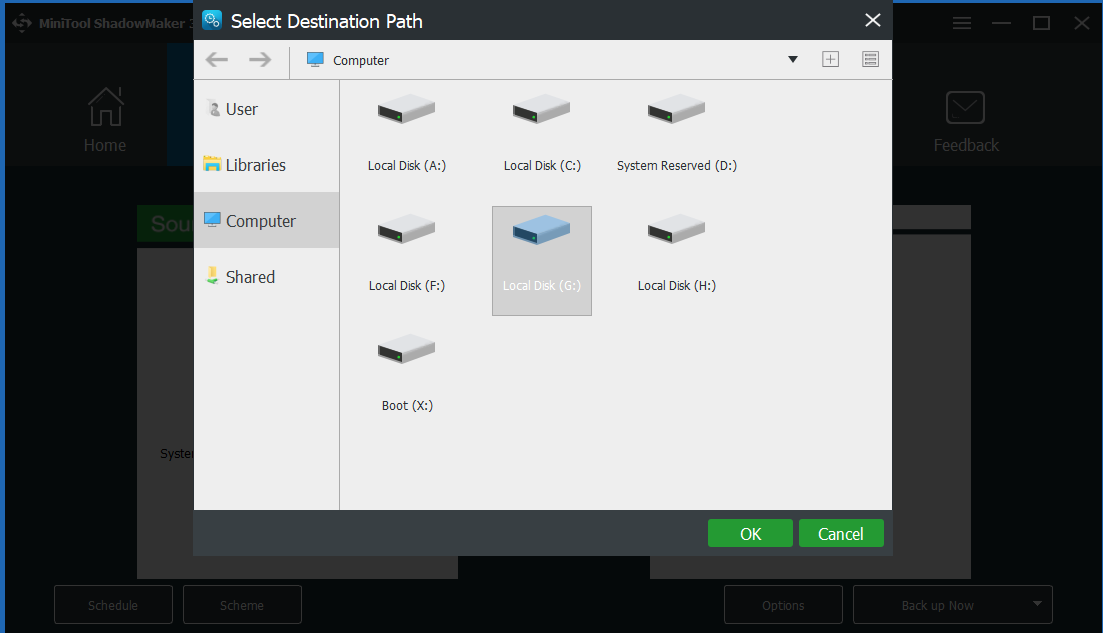
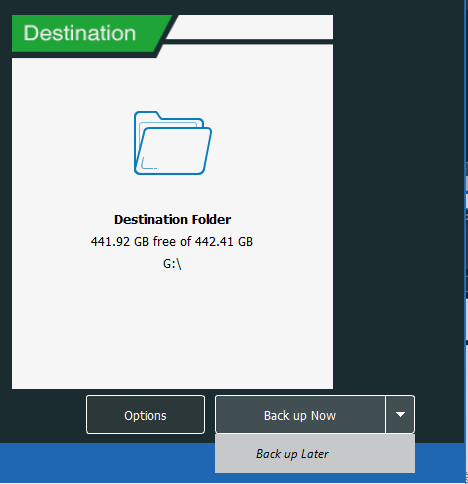
Step 3. As you can see, the System C and System Reserved Partition in Source are chosen by default so you only need to select a destination path by clicking on Destination to store the system image.
Note: In addition to backing up your system to another disk, you can also back up your PC to NAS, the Libraries folders and so on. If you are interested in NAS backup, you can have a try under the guidance of this related article – What Is a NAS Drive and How to Do a NAS Backup on Windows 10?
Step 4. Click Back up Now in the lower right to launch the backup process at once or put it off by clicking Back up Later. (The delayed backup task will remain in the Manage interface if you choose the latter one.)
Bottom Line
Do you have a better understanding of the backup error code 0x81000033 and figure out why Windows 10 backup fails to complete? Sincerely hope that the resolution mentioned in this article will solve your problem.
Of course, you can also leave a comment to our support team at [email protected] if encounter other problems in all aspects of using MiniTool ShadowMaker to create a system image.
In this post, we will discuss what causes Backup failed Error 0x81000033 and what are the possible ways to address this issue on Windows 11/10 PC. If you are also facing trouble generating a system restore point because of this error code or 0x80780119, try out the solutions discussed in this guide.
Upon receiving this bug, you won’t be able to create a system image backup on your computer. This issue may throw an error message as well that reads the following –
"The backup failed, Error code 0x81000033"
By now, you must have become aware of what the error code 0x81000033 is. So, let’s learn what possibly cause this issue and how to resolve it on Windows 11 or 10 PC.
What causes Error 0x81000033 on Windows 11/10?
The system image backup error 0x81000033 may occur when your system meets one or more of the below conditions –
- Not having enough free space inside the System Reserved partition
- Having too many language packs installed on the computer
- Outdated or obsolete device drivers
- Turned off system protection
- USN Journal taking too much disk space

Fix The backup Failed, Error 0x81000033
Now that you know what possibly may trigger this error code, here’s a list of solutions running which you may fix this issue on Windows 11 or 10 PC. Try to follow the solutions in the same order as provided below –
- Purge Disk spaces using the Disk Cleanup Tool
- Remove unnecessarily installed language packs
- Turn on System Protection
- Update Device drivers
- Delete existing USN journal
- Increase the size of the System Reserved partition
- Inspect Hardware via CHKDSK
1] Purge Disk spaces using the Disk Cleanup Tool
Lack of storage spaces is the prime reason because of which the backup failed on error 0x81000033 or 0x80780119. Go and check the current free spaces on the root drive. In case it does display filled up to 85% or more, use Disk Cleanup to free up unnecessarily stored cache, temp files, old Windows installations, etc.
Make sure to restart your PC so that any residual or leftover files delete as well. When you sign back into your PC, try again to create a system backup. If you are still facing problems generating a restore point, try the next solution.
2] Remove unnecessarily installed language packs
By default, there is a single language pack installed on Windows 11 or 10 PC. However, at times, we accidentally mark the checkboxes while installing optional updates and thus end up having too many language packs running on our devices.
The presence of too many language packs not only occupies a huge amount of disk space but also prevents the system from generating any restore points. So, it is best to remove all those packs that you don’t or rarely use on your Windows PC. Here’s how to get rid of unnecessarily installed language packs –
- Open Settings by pressing Win + I.
- Select Time & language on the left pane.
- Head over to the right side and click Language & region.

- Under the Language section, you may find all language packs installed on your computer.
- You may see three horizontal dots beside any language pack. Well, click on it and hit the option – Remove.

- The system will immediately uninstall the selected pack.
Reboot your PC next and see if you can now create a system backup without getting into error 0x81000033.
3] Turn on System Protection
By default, the System Restore point generation is disabled on Windows 11 or 10 PC. This remains as it is unless you turn ON the system protection for different Disk drives available on your computer.
Note: This solution is applicable only when the system protection feature is disabled on your PC. If you had enabled this feature sometime back on your computer, skip this solution and follow the next one.
As long as the system protection remains disabled, you can’t create any restore point. The error 0x81000033 or 0x80780119 must be occurring because of this default setting. To turn On the system protection on Windows 11/10, do the following –
- Right-click on the Windows icon and select System.
- The Settings window will launch next under System > About.
- Under Device specifications, look for the option – “System Protection“.

- The system will launch its properties window next.
- Under Protection Settings, select the root drive followed by Configure.

- Moving ahead, check the radio button “Turn on system protection”.

- Hit Apply then OK to save this configuration.
Restart your PC and try again to create a restore point. I hope you may now create a system backup successfully if the system protection was previously disabled.
4] Update Device Drivers
The presence of outdated/obsolete device drivers may also invoke this error code 0x81000033 while creating a system image. You may check and update the corrupted ones by following these easy steps –
- Go to Settings > Windows Update on Windows 11 and hit Check for updates. If you are still on Windows 10, browse to this path instead – Settings > Update & Security > Windows Update. Once you are there, hit the Check for updates button.
- Let the system connect to Microsoft servers and find if any optional updates are available for your device or not.
- In case it does reveal any pending updates, click “Optional updates”.
- On the succeeding page, mark all the checkboxes, and hit the button – “Download and Install“.

- Wait for a few seconds while the system downloads and installs the checked-in drivers.
Once this is over, restart your PC and see if doing so resolves error codes 0x81000033 or 0x80780119.
5] Delete USN Journal
These days, all disk drives are formatted with NTFS and thus they include a unique feature on them and that is USN Journal. It is this update sequence number that maintains a record of all the recent changes made on the root drive.
Each passing day adds some data to this journal as we often made several changes to our devices. When the USN journal size exceeds its permissible limit, this may result in an error code 0x81000033 while generating restore points.
Here’s how you may delete the USN Journal on your computer –
- Press Win + S to launch the Search window.
- Type “Disk Management” and hit the top result i.e. “Create and format hard disk partitions“.
- Once this opens up, change the drive letter of the System Reserved volume. Let’s say you change this to “F”.
- Launch the CMD as administrator next and execute these codes –
fsutil usn queryjournal F:
fsutil usn deletejournal /N /D F:
- Go back to Disk Management, right-click on the System Reserved partition, and hit the option – “Change Drive Letter and Paths command”.
- When a dialog box appears, click Remove. A pop-up window will appear next, hit Yes.
- Click Yes again to confirm the recent changes.
Once you delete the existing USN journal, restart your PC. I hope you are now able to create system images now without getting into any bug or issue.
6] Increase the size of the System Reserved partition
When the error 0x81000033 is occurring because of fewer disk spaces inside the System Reserved Partition, one should try to increase its disk space. Since this is a system reserved partition, you can’t increase its size normally.
What you may do is create a new system volume and assign it as the new system reserved partition. Here’s how to perform this task –
- First of all, decide the drive letter that you want to assign to the newly created system volume. Press Win + E to launch File Explorer, and see all the pre-existing drive letters. If the letters E, F, or G are already in use, consider naming the upcoming driver as “H:”.
- Launch Command Prompt as an administrator.
- On the elevated console, copy/paste the following and press Enter –
bcdboot.exe /s C:\Windows /s H:
Note: In the code above, “C:” is the root drive, and “H:” is the drive letter that we are trying to assign to the new system volume. Change them appropriately if either or both vary on your device.
- Execute the below list of commands one after another. Don’t forget to press the Enter key after each command.
DISKPART
DISKPART> select volume H
DISKPART> active
- After you complete running these codes successfully, restart your PC.
7] Inspect Hardware via CHKDSK
If the error 0x81000033 is still appearing, check if the hard disk is alright and functioning properly on your device. To do this, follow these simple steps –
- First of all, press Win + R.
- Type “CMD”, and press Ctrl + Shift + Enter together to launch Command Prompt as administrator.
- The UAC window will appear next, hit Yes to confirm accessing the console.
- On the elevated prompt window, type the following, and press Enter –
chkdsk C: /f /r

- The command won’t run as the root drive is already in use. Type “Y” and press Enter to confirm running this code when the PC restarts.
- Come out of the Command Prompt, and reboot your PC. CHKDSK will then take over.
Once this completes scanning the hard disk, you will get a report mentioning whether you can still use your HDD or if this requires a replacement.
How do I Fix Error error 0x80780119?
The backup failed, error 0x80780119 also occurs when your device lacks sufficient disk spaces, corrupted device drivers, damaged HDD, etc. We have already stated what you can do to fix this issue on Windows 11/10 PC. Follow the solutions discussed in this guide, and you will easily address the error 0x80780119.
I hope the solutions indeed work to resolve error codes 0x81000033 or 0x80780119 on your computer.
Backing up your data is one of the most important preventative measures you can take to protect yourself from data loss. Microsoft Windows 10 and 11 includes built-in backup tools, such as File History and Backup and Restore, that facilitate the backup process. However, users sometimes encounter various errors when attempting to back up their data, one of which is the backup error 0x81000033. This error typically indicates an issue with the backup destination, permissions, or a corrupted system component. In this article, we will delve into the causes of the backup error 0x81000033, explore why it occurs, and provide step-by-step methods to fix the error.
Understanding Backup Error 0x81000033
Backup error 0x81000033 usually arises when the Windows backup tool cannot locate the backup target location or when there’s an issue with the configuration of the backup settings. This error hinders the backup process, potentially putting your important files at risk.
Common Causes of Backup Error 0x81000033
-
Corrupted Backup Destination: If the target location you’ve chosen for your backups is corrupted, or if there are permission issues, the backup process will fail with error 0x81000033.
-
Incorrect Configuration: Sometimes, settings for File History or Backup and Restore may be incorrectly configured, leading to this error.
-
Network Issues: If you are using a network drive to store backups, any interruptions or disconnections can result in backup errors.
-
Antivirus Interference: Certain antivirus software may interfere with the backup process, resulting in various errors including 0x81000033.
-
Corrupted System Files: Corrupted Windows files can prevent backups from being created properly.
Preparing for Troubleshooting
Before diving into troubleshooting steps, there are a few steps you should take to prepare for the resolution process:
-
Check Backup Settings: Go to your Windows settings and ensure that the backup settings are correct.
-
Backup Data Manually (if possible): As a precaution, try to manually copy important files to another drive to ensure their safety while you troubleshoot the issue.
-
Temporary Disable Antivirus Software: If you suspect your antivirus software might be interfering with the backup process, temporarily disable it while performing other troubleshooting steps.
-
Ensure Windows is Updated: Always ensure your system is running the latest version of Windows, as updates often contain important fixes for various bugs.
Methods to Fix Backup Error 0x81000033
Method 1: Check Backup Destination
To eliminate administrative issues that might arise from permissions, follow these steps:
- Open File Explorer.
- Navigate to the backup destination folder (e.g., an external drive or network drive).
- Right-click on the folder and select Properties.
- Click on the Security tab.
- Ensure that your user account has Full Control. If not, click on Edit, select your user account, and check the Full Control box.
If you are using an external drive, also ensure that the drive is connected properly and is functioning correctly. You can test this by trying to open files from the drive.
Method 2: Run the Windows Backup Troubleshooter
Windows includes a built-in troubleshooter that can automatically identify and fix certain backup-related issues.
- Open Settings.
- Navigate to Update & Security > Troubleshoot > Additional troubleshooters.
- Find the option that relates to Back up and Restore, and run the troubleshooter.
- Follow the instructions provided to identify any issues.
Method 3: Check Network Settings
If you are backing up to a network drive, ensure that your device is correctly connected to the network:
- Check if your device can access the network drive.
- Ensure your network connection is stable.
- If you are using Wi-Fi, try switching to a wired connection to rule out Wi-Fi issues.
Method 4: Disable Third-Party Antivirus
If you suspect that your antivirus software is causing the issue, temporarily disable it and then try the backup again.
- Right-click on your antivirus icon in the taskbar.
- Select the option to disable or exit the program.
- Attempt to perform the backup again.
Note: Remember to re-enable your antivirus software after troubleshooting.
Method 5: Check for Corrupted System Files
Sometimes, backup error 0x81000033 is caused by corrupted system files within Windows. Running the System File Checker (SFC) can help to identify and rectify these issues.
-
Open Command Prompt as Administrator:
- Press
Windows + Xand select Windows Terminal (Admin) or Command Prompt (Admin).
- Press
-
Run the SFC Command:
- Type the command
sfc /scannowand press Enter. - Wait for the scan to complete. It may take some time, so be patient.
- If any corrupted files are detected, SFC will attempt to repair them automatically.
- Type the command
-
Reboot your computer and try the backup again.
Method 6: Perform a Clean Boot
Clean booting your system will start Windows with a minimal set of drivers and startup programs, helping to eliminate software conflicts. This can be an effective way to determine whether a background program is interfering with backups.
- Press Windows + R, type
msconfig, and hit Enter. - In the System Configuration window, navigate to the Services tab.
- Check the box that says Hide all Microsoft services.
- Click on Disable all.
- Next, navigate to the Startup tab and click on Open Task Manager.
- Disable all startup items.
- Close Task Manager and go back to the System Configuration window. Click OK and restart the computer.
After performing a clean boot, try to back up your files again. If it works fine now, you can enable services one at a time to find the culprit.
Method 7: Change Backup Settings
Sometimes, adjusting the backup settings can resolve issues:
- Open Settings and navigate to Update & Security > Backup.
- Select More options under File History settings.
- Here you can change the backup frequency, retention, and other options.
- Save your changes and try to perform the backup again.
Method 8: Create a New User Profile
If you continue to experience error 0x81000033, the issue may be related to a corrupted user profile. Creating a new user account may resolve the issue.
- Open Settings and navigate to Accounts > Family & other users.
- Click on Add someone else to this PC.
- Follow the prompts to create a new local or Microsoft account.
- Log off your current account and log into the new one.
- Attempt to perform the backup from this new account.
Method 9: Check Disk for Errors
Corrupted disks can also stop backup processes completely. Use the Check Disk utility to assess and fix potential disk errors.
- Open Command Prompt as an Administrator.
- Type the command
chkdsk C: /f(replaceC:with the drive letter you want to check) and press Enter. - You may be prompted to schedule the check for the next reboot. Type
Yand restart your computer.
After the check is complete, try backing up your files again.
Method 10: Use a Third-Party Backup Solution
If none of the methods above remedy the backup error 0x81000033, consider using an alternative backup software solution such as EaseUS Todo Backup, Acronis True Image, or Macrium Reflect. These programs often provide more flexibility and functionality compared to Windows’ built-in tools and can better handle certain issues.
Conclusion
Encountering backup error 0x81000033 on Windows 10 or 11 can be frustrating, but, as demonstrated above, there are multiple ways to address the issue. By methodically going through each of the outlined solutions, users can ensure that their critical data is backed up effectively and secured against loss.
In addition to solving error 0x81000033, users should regularly check their backup settings, keep their systems updated, and remain vigilant about the integrity of their backup destinations to maintain a robust data protection strategy. Remember, while technology can sometimes fail, ensuring you have multiple angles of protection for your data is always a wise approach.
В процессе резервного копирования данных на компьютерах под управлением операционной системы Windows 10 пользователи иногда сталкиваются с ошибкой архивации 0x81000033. Эта ошибка указывает на проблемы с созданием резервной копии файлов и может привести к потере важных данных.
Одной из основных причин появления этой ошибки является неверное разрешение файловой системы NTFS на диске, на котором происходит резервное копирование. В таких случаях, система не может создать новый файл в каталоге резервного копирования и выдает ошибку 0x81000033.
Чтобы исправить эту ошибку, можно воспользоваться несколькими методами. Во-первых, можно попробовать выполнить проверку диска с помощью инструмента CHKDSK. Для этого нужно открыть командную строку с правами администратора и выполнить команду «CHKDSK /F», которая запускает проверку диска и исправление ошибок.
Во-вторых, можно изменить разрешение файловой системы NTFS на диске. Для этого нужно открыть свойства диска, выбрать вкладку «Инструменты» и нажать на кнопку «Проверка». В открывшемся окне нужно выбрать «Проверить и восстановить поврежденные секторы» и нажать «Начать». После завершения процесса следует перезапустить компьютер.
Важно отметить, что перед выполнением изменения разрешения файловой системы или проверкой диска, рекомендуется сделать резервную копию всех важных данных на другом устройстве или диске.
Если приведенные выше методы не помогли исправить ошибку архивации Windows 10 (0x81000033), то возможно, проблема связана с повреждением файлов системы или другими факторами. В таком случае, рекомендуется обратиться за помощью к специалистам или воспользоваться поиском решений на официальном сайте Microsoft или в интернете.
Обзор ошибки архивации Windows 10 (0x81000033)
Ошибку архивации Windows 10 (0x81000033) может вызывать несколько причин, включая неисправности во внешнем носителе, неполадки в системных файлах или неправильные настройки при создании резервной копии.
Когда возникает эта ошибка, пользователи могут столкнуться с проблемой, что они не могут создать резервную копию своих данных, что может стать причиной потери важной информации в случае сбоя системы или потери данных.
Для исправления ошибки архивации Windows 10 (0x81000033) можно попробовать следующие решения:
- Проверить внешний носитель на наличие ошибок и повреждений. Для этого можно запустить функцию проверки диска в Windows, используя инструмент «Проверка диска».
- Обновить системные файлы Windows. Это можно сделать с помощью инструмента «Обновление Windows».
- Проверить настройки резервного копирования. Убедитесь, что вы выбрали правильные диски и папки для сохранения резервной копии.
- Выполнить очистку временных файлов и кэша системы. Для этого можно воспользоваться инструментом «Очистка диска».
- Попробовать использовать альтернативные программы для создания резервных копий. Некоторые сторонние программы могут быть более стабильными и эффективными.
В случае, если ни одно из вышеперечисленных решений не помогло, рекомендуется обратиться к технической поддержке Microsoft, чтобы получить дополнительную помощь и рекомендации по исправлению ошибки архивации Windows 10 (0x81000033).
Важно знать, что ошибка архивации Windows 10 (0x81000033) может быть вызвана различными причинами, поэтому необходимо проанализировать все возможные проблемы и применить соответствующие решения для их устранения. Регулярное создание резервной копии данных является важной мерой предосторожности для защиты ваших файлов и информации.
Причины ошибки архивации Windows 10 (0x81000033)
Ошибка архивации Windows 10 (0x81000033) может возникнуть по многим причинам. Вот некоторые из них:
1. Недостаточное пространство на диске: Если на вашем устройстве нет достаточного места на диске для создания резервной копии, то возникает ошибка архивации (0x81000033). Убедитесь, что на диске есть достаточно свободного пространства.
2. Неправильные настройки резервного копирования: Если настройки резервного копирования Windows 10 не сконфигурированы правильно или были изменены, может возникнуть ошибка архивации (0x81000033). Убедитесь, что настройки резервного копирования установлены правильно.
3. Ошибки в файловой системе: Если на вашем устройстве присутствуют ошибки в файловой системе, это может привести к ошибке архивации. Прогоните инструмент Chkdsk для исправления возможных ошибок.
4. Проблемы с жестким диском: Если жесткий диск вашего устройства поврежден или неисправен, это может вызвать ошибку архивации Windows 10 (0x81000033). Проверьте жесткий диск на наличие ошибок и исправьте их, при необходимости.
5. Конфликтующие программы или вирусы: Некоторые программы или вредоносные программы могут мешать процессу резервного копирования и вызывать ошибку архивации Windows 10 (0x81000033). Убедитесь, что все программы, работающие в фоновом режиме, отключены, и проведите полное сканирование системы на вирусы.
6. Неполадки в службах резервного копирования: Если службы резервного копирования Windows 10 не работают должным образом или были повреждены, может возникнуть ошибка архивации (0x81000033). Используйте инструменты восстановления системы, чтобы восстановить службы в исходное состояние.
Исправление ошибки архивации Windows 10 (0x81000033) может потребовать несколько разных шагов в зависимости от причины ее возникновения. Рекомендуется обратиться к специалисту или посетить форумы сообщества Windows для получения дополнительной помощи при решении этой проблемы.
Решение проблемы архивации Windows 10 (0x81000033)
Ошибка архивации Windows 10 с кодом 0x81000033 может возникать по ряду причин, и для ее устранения требуется выполнить несколько простых действий. Ниже описано решение этой проблемы:
| Шаг | Описание |
|---|---|
| Шаг 1 | Проверить наличие достаточного свободного места на диске |
| Шаг 2 | Отключить антивирусное программное обеспечение временно |
| Шаг 3 | Удалить старые резервные копии |
| Шаг 4 | Исправить ошибочные файлы резервного копирования |
| Шаг 5 | Использовать другой носитель для резервного копирования |
Перейдем к подробному рассмотрению каждого шага:
Шаг 1: Проверить наличие достаточного свободного места на диске
Ошибка 0x81000033 может возникать из-за нехватки свободного места на диске для создания резервной копии. Проверьте использование пространства на диске и убедитесь, что на диске есть достаточно свободного места для создания копии. Если свободного места недостаточно, освободите его, например, путем удаления ненужных файлов или программ.
Шаг 2: Отключить антивирусное программное обеспечение временно
Антивирусное программное обеспечение может блокировать процесс резервного копирования и вызывать ошибку 0x81000033. Временно отключите антивирусное программное обеспечение или добавьте процессы, связанные с резервным копированием, в список исключений. Затем повторите попытку создания резервной копии и проверьте, устраняется ли ошибка.
Шаг 3: Удалить старые резервные копии
Если на диске недостаточно свободного места для создания новой резервной копии, попробуйте удалить старые или ненужные резервные копии. Вы можете использовать инструмент «Disk Cleanup» для удаления временных файлов и предыдущих резервных копий. После удаления старых копий повторите попытку создания новой резервной копии.
Шаг 4: Исправить ошибочные файлы резервного копирования
Если во время резервного копирования возникают ошибки, то проблема может быть связана с поврежденными или ошибочными файлами. Для исправления этой проблемы Вы можете выполнить следующие действия:
- Выполните сканирование жесткого диска с помощью инструмента «Check Disk».
- Проверьте целостность системных файлов с помощью команды «sfc /scannow».
Шаг 5: Использовать другой носитель для резервного копирования
Если все вышеперечисленные шаги не помогли решить проблему, Вы можете попробовать использовать другой носитель (например, другой внешний жесткий диск или сетевое хранилище) для создания резервной копии. Подключите альтернативное устройство и повторите попытку создания резервной копии.
После выполнения всех этих шагов рекомендуется перезапустить компьютер и повторить попытку создания резервной копии. Если ошибка 0x81000033 все еще не исчезает, возможно, что проблема более серьезная и может потребоваться обратиться за помощью к специалисту.
Как проверить состояние системных файлов
Проверка состояния системных файлов может помочь идентифицировать и исправить потенциальные проблемы, которые могут привести к ошибке архивации Windows 10 (0x81000033). Для выполнения этой операции можно использовать встроенную утилиту SFC (System File Checker). Следуйте инструкциям ниже, чтобы провести проверку системных файлов на вашем компьютере:
- Нажмите клавишу Windows + X и выберите Командную строку (администратор).
- В открывшемся окне командной строки введите команду sfc /scannow и нажмите Enter.
- Дождитесь завершения процесса сканирования. Это может занять некоторое время.
- По окончании проверки утилита SFC автоматически исправит обнаруженные проблемы в системных файлах, если это возможно.
- Перезагрузите компьютер, чтобы завершить процесс.
После перезагрузки проверьте, исправилась ли ошибка архивации Windows 10 (0x81000033). Если проблема остается, можно попробовать другие методы решения. В некоторых случаях может потребоваться выполнение расширенной проверки или восстановление системных файлов с помощью других инструментов.
Обратите внимание, что проверка состояния системных файлов может быть полезной не только при возникновении ошибки архивации, но и в других ситуациях, когда возникают проблемы с работой операционной системы. Этот метод поможет устранить ошибки, связанные с поврежденными или отсутствующими системными файлами.
Как настроить службы автоматической архивации
Вот как настроить службы автоматической архивации в Windows 10:
- Откройте Панель управления. Нажмите на кнопку «Пуск», найдите «Панель управления» в списке программ и откройте ее.
- Выберите «Система и безопасность». В Панели управления выберите категорию «Система и безопасность».
- Выберите «Резервное копирование и восстановление». В разделе «Система и безопасность» перейдите к категории «Резервное копирование и восстановление».
- Настройте план резервного копирования. В новом окне выберите «Настроить резервное копирование» или «Изменить настройки плана резервного копирования» для существующего плана.
- Выберите место сохранения резервных копий. Укажите диск, сетевое хранилище или другие устройства, где вы хотите хранить резервные копии. Нажмите «Далее».
- Выберите данные для резервного копирования. Отметьте нужные папки, файлы или диски для резервного копирования. Нажмите «Далее».
- Настройте расписание резервного копирования. Выберите время и частоту создания резервных копий. Нажмите «Далее», чтобы продолжить.
- Проверьте настройки и запустите резервное копирование. Просмотрите выбранные настройки и нажмите «Сохранить настройки и запустить резервное копирование».
После завершения настройки служб автоматической архивации Windows 10 будет создавать резервные копии указанных данных согласно выбранному расписанию. Таким образом, вы сможете защитить свои важные файлы и избежать ошибки архивации (0x81000033).
Восстановление архивации Windows 10 (0x81000033)
Ошибка архивации Windows 10 с кодом 0x81000033 может возникнуть по разным причинам, включая проблемы с жестким диском, недостаток свободного места на диске или конфликты с антивирусным программным обеспечением. Если вы столкнулись с этой ошибкой, есть несколько методов, которые вы можете попробовать для восстановления архивации.
Метод 1: Освободите место на диске
Одной из причин возникновения ошибки 0x81000033 может быть недостаток свободного места на диске. Проверьте, есть ли достаточно свободного места на диске, на котором вы планируете создать резервные копии. Если место ограничено, удалите ненужные файлы или переместите их на другой диск.
Метод 2: Используйте другое место для архивации
Если у вас остается недостаточно места на диске, попробуйте выбрать другой диск или внешнее устройство для архивации. Вы можете использовать внешний жесткий диск или флеш-накопитель, чтобы сохранить резервные копии. Убедитесь, что выбранное вами место имеет достаточно свободного пространства.
Метод 3: Проверьте жесткий диск
Плохие секторы на жестком диске или другие физические повреждения могут привести к ошибке архивации Windows 10. Вы можете воспользоваться встроенным инструментом CHKDSK для проверки и восстановления диска. Откройте командную строку с правами администратора и выполните команду chkdsk /f C:, где C — это буква диска, на котором возникает проблема.
Метод 4: Отключите антивирусное ПО
Иногда антивирусное программное обеспечение может помешать созданию резервных копий и вызвать ошибку 0x81000033. Попробуйте временно отключить антивирусное ПО и повторить процесс архивации. Если это решает проблему, вы можете настроить программное обеспечение антивируса для исключения процесса архивации.
Метод 5: Перезапустите службы резервного копирования
Иногда перезапуск служб резервного копирования может помочь восстановить архивацию Windows 10. Откройте окно «Управление службами» и найдите следующие службы: «Сервис резервного копирования Windows», «Загрузчик резервного копирования» и «Планировщик резервного копирования». Правой кнопкой мыши щелкните каждую службу и выберите «Перезапустить».
Если ни один из этих методов не помог восстановить архивацию Windows 10 и ошибка 0x81000033 по-прежнему появляется, вам может потребоваться обратиться за помощью к специалистам технической поддержки или форумам сообщества Windows для получения дополнительной помощи и рекомендаций.