
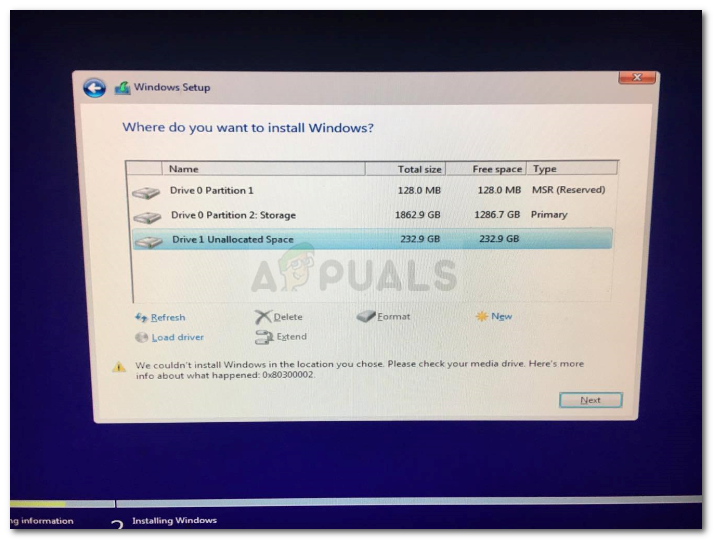
Installing a Windows 10 upgrade is definitely not an easy task since the process is not always smooth sailing and you could encounter some errors when doing so. This isn’t unusual since there are various software configurations and hardware configurations as well as services it depends on in order to properly work. So if any of them malfunctions or becomes corrupted, it will affect the process which will result in errors like the error code 0x80300002. When you encounter this kind of Windows Update error, you will see the following error message on your screen:
“We couldn’t install Windows in the location you choose. Please check your media drive. Here’s more info about what happened: 0x80300002”
You can encounter this kind of error if there is corruption in the partition table of the drive where the installation is in progress. In addition, corruption on the Media device could also cause this problem. So if you encounter this error when running Windows Setup, read on as this post will guide you in fixing it.
There are several ways to resolve this issue. The first thing you can do is to verify the compatibility between the BIOS and the installation media. You could also try recreating all the partitions as well as recreating the bootable USB drive. For more detailed information, follow the given options below.
Option 1 – Check if the BIOS is compatible with the installation media
The first thing you can do to fix the error is to check if there are any compatibility issues between the BIOS and the installation media you’re using. This is actually one of the most likely reasons why you’re getting the error since this is a complicated point for the Windows installation process. If the installation media is based on GPT, then your BIOS must be based on UEFI. So if you have your bootable media with the MBR partitioning, you need to set your BIOS to Legacy.
- In the Windows Search box, type “command prompt” and from the search results that appear, right-click on Command Prompt and select the “Run as administrator” option.
- After that, execute this command: exe /convert /allowfullOS
- Now, wait until the process is completed since you can track its process on your screen.
- Once it’s done, go to Settings > Update & Security > Advanced Startup options and from there, click on Restart Now. This will restart your computer and give you advanced options.
- Next, select Troubleshoot > Advanced Options where you will see further options including System Restore, Startup Repair, Go back to the previous version, Command Prompt, System Image Recovery, and UEFI Firmware Settings.
- Now select the “Legacy” option. This will take you to the BIOS. Boot Mode is typically available under Boot > Boot Configuration. Once you’re there, set it to Legacy and then save the changes you’ve made. After that, your computer will restart.
Option 2 – Try recreating a new bootable drive
- Insert your USB drive into your PC.
- Tap the Win + R keys to open the Run dialog box and type in “cmd” and tap Enter to open the Command Prompt. Alternatively, you can also search for “cmd” in the Cortana search box to open Command Prompt.
- Once you’ve opened CMD, type in this command to open the DISPART utility – diskpart
- After that, you should see a new black and white window that would say, “DISKPART>”.
- Next, type in “list disk” in the command line and tap Enter to see the list of all the Storage devices as well as your hard disk connected to your PC. Here, you have to identify your disk’s number.
- Type in this command where “X” is the disk number you have identified and then tap Enter – disk X
- Type in this command and hit Enter to clear the table records and all the visible data on the drive – clean
- Now you have to recreate a new primary partition of the drive so you’ll have to type in this command and tap Enter right after – create part pri
- A new primary partition has been created so you have to select it by typing this command and tapping Enter – select part 1
- Now you have to format it to make it visible to normal users by typing – format fs=ntfs quick
Note: If your platform supports the Unified Extensible Firmware Interface or UEFI, replace the “NTFS” with “FAT32” in the command on Step 10.
- After that, type in this command and tap Enter after – active
- Finally, type this command and hit Enter to exit the utility – exit
- After you prepare the image for the operating system, save it to the root of your USB Storage device.
Option 3 – Try to recreate all the partitions
If none of the first two options given above worked, then you can try to recreate all the partitions instead. All you have to do is restart the Windows installation process and wait until you get to the part that says, “Where do you want to install Windows?”. From there, you will see options like delete, format, extend, create new partitions, and many more. Now you have to select the Delete all the partitions options and then use the “New” button to create new partitions. Just make sure that you have one primary partition at least where you can install Windows 10. After that, continue the installation of Windows on the new partition. Keep in mind that when you create a new partition, it also recreates the partition table configuration which means that the chances of getting an error are very unlikely.
Do You Need Help with Your Device?
Our Team of Experts May Help
Troubleshoot.Tech Experts are There for You!
GET HELP
Troubleshoot.Tech experts work with all versions of Microsoft Windows including Windows 11, with Android, Mac, and more.
Share this article:
You might also like
ActiveX Controls are plugins you may constantly come across when working with Internet Explorer. An illustration of these kinds of control is the MICROSOFT IE Flash Player. They frequently result into significant problems for the Computer, yet they’re vital for IE to operate correctly.
You shouldn’t ever overlook that after you install Active Controls in your Personal Computer, you effectively provide them with access to other areas of your PC. The ActiveX Controls not only tracks your search routines, but in addition puts malicious software, which might possibly be hazardous to your Computer.
Solution
Error Causes
ActiveX Controls make your Internet Explorer work as required and are usually great and beneficial to your own Computer. Yet, they can function as a source of problems because of the following factors.
- You should stop installing ActiveX Controls from Un Trustworthy Resources
In the event they are installed by you from un trustworthy resources new threats are likely introduced by ActiveX Controls to your PC. One of the more regular types of ActiveX Controls worth necessary for installation is Flash Player. Yet, never be in a hurry to install these Controls from resources that you don’t trust.
- Limit The Number of ActiveX Controls You Install on your PC
Prevent installing java/oracle ActiveX controls, because of its weak security measures which could make your Personal Computer and any additional information there in, open to attacks.
Limit to the variety of ActiveX Controls that you install on your PC as these could increase the vulnerability canvas on your computer.
Further Information and Manual Repair
You can manually fix any malfunction that springs up from ActiveX Controls. Yet, more than mending the harm, produce the setting that ensures you never have troubles from them to start with. Just how do you do that?
a) Stop installing or downloading ActiveX Controls from Un Trustworthy Sources
This has been mentioned above, but it’s worth repeating because it’s the most common reason behind ActiveX Controls malfunctions. You might anticipate that for this kind of obvious reason for ActiveX Controls malfunctions, PC consumers would be extra cautious, however that is never true.
b) Limit ActiveX Controls Softwares
You can restrict ActiveX controls from running automatically on your PC. To limit them, head to Tools in Internet Explorer, and choose Internet Options. Proceed to the Security tab, and select Customs level
Browse completely down before you get to the area designated «ActiveX». Subsequently, mark «Prompt» under every choice that you encounter. But don’t mark the choice indicated «Run ActiveX Controls and Plug-Ins», together with, «Script ActiveX Controls Marked Safe for Scripting».
By performing the measures emphasized above, you happen to be in substance stating that, you will not permit any installation of ActiveX Controls, without express authorization by you.
In this manner, you have better control over different forms of ActiveX Controls you permit to be installed, therefore reducing potential threats to your PC.
Read More
The previous Windows versions all came with Microsoft’s browser Internet Explorer. A lot of users love it because not only that it is easy to use. It is also very fast. Users didn’t have to worry about compatibility because it is almost always compatible with its Windows Version.
When they introduced Windows 10, they changed the name of the browser from Internet Explorer to Microsoft Edge. It is faster and more user-friendly compared to its predecessors. But after the Creator Update, some experienced receiving the inet_e_resource_not_found error code.
In contrary to what everyone expects, you actually don’t have to uninstall and reinstall the Microsoft Edge App. What you can do is reset the browser in your Apps & Features Settings in your Microsoft Settings.
To reset the browser you can follow the steps below:
- Click on the Windows icon and go to settings.
- Click on Apps and this will bring you to the Apps & Features page. Look for Microsoft Edge from the list of Apps and click on it.
- Choose Advance Option
- Scroll down then Under Reset, click on repair or reset. When you repair it will fix the existing problem but the data that caused the problem may still be present and can still cause problems. If you click on reset, it will delete all the cache and cookies that are installed in your browser but it will save your Favorites as well as your bookmarks.
Another way to resolve this is by disabling the feature TCP Fast Open on Microsoft Edge. To disable this, go ahead and follow the steps below:
- Open the Microsoft Edge browser.
- Type in about: flags on the Address (URL) bar.
- Under Networking, uncheck the Enable TCP Fast Open.
- Close your Microsoft Edge browser and open a new one.
Flushing the DNS also worked for other Users. Sometimes, the error code the inet_e_resource_not_found is caused by a corrupted DNS cache. There are 2 ways to flush your DNS. The first option is to use the command prompt to run the command.
- To access the Command prompt or CMD, you can search for it on Cortana or you can click on the Windows icon to access the Programs, scroll down to the Windows System folder and click on it.
- A drop-down menu will show up, click on Command Prompt which is the first on the list.
- Type in the code ipconfig /flushdns and press enter.
- There will be a message that will show that says Windows IP configuration successfully flushed the DNS Resolver Cache
- Exit the CMD by typing exit and press enter.
The easiest way to do this is to Press the keys Window + R on your keyboard. Type in ipconfig /flushdns in the search box and hit enter or click on OK.
These are only some of the ways to resolve the inet_e_resource_not_found. There are other ways to further troubleshoot this issue such as reinstalling your Wifi Adapter Driver or adjusting the DNS Server Address. But most of the time, users are able to resolve the issue with the steps provided above.
Read More
Faraday bag is a new take on security and privacy for people using a lot of electronic devices and credit cards. So what is exactly a Faraday bag?
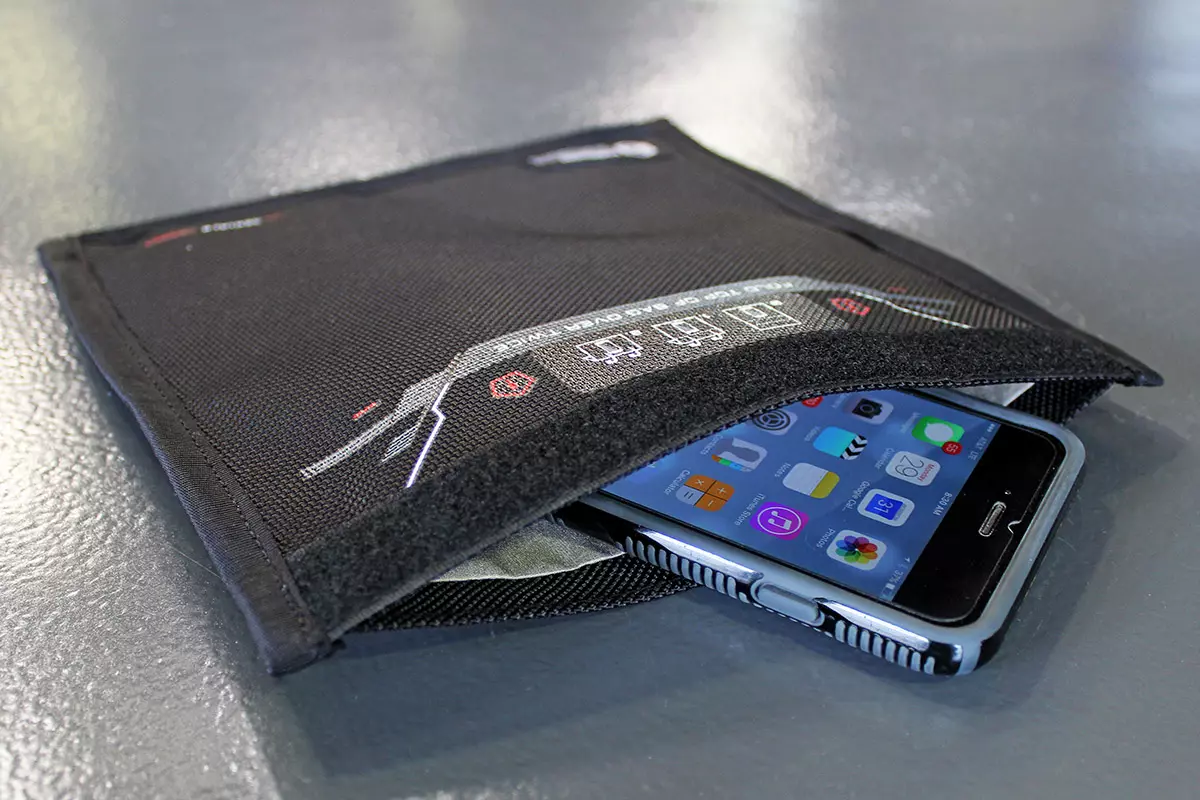
Faraday bag explained
Faraday bag is designed in the same manner as the Faraday cage which was invented by Michael Faraday, who was an English scientist who contributed to the study of electromagnetism and electrochemistry. His main discoveries include the principles underlying electromagnetic induction, diamagnetism, and electrolysis.
The idea of the Faraday cage is that anything inside a cage that is made of specific grid size is completely isolated from outside current and magnetic fields since the cage itself will pick up everything upon itself. This means that for example, a human could be inside a cage that is struck by lightning and be perfectly safe and fine.
This idea led to the Faraday bag design, which takes this concept and places a wiring pattern inside clothing in order to isolate all magnetic fields from the outside so your devices and cards are completely cut off from any kind of influence and electromagnetic waves. If the pattern and quality of material for the bag are good, you have a fully safe placeholder for your stuff.
Advantages of Faraday bag
The main advantages, of course, are the privacy and safety of mobile phones and credit cards from outside influences and this is why this bag has been designed in the first place. If the bag is designed properly your phone would not be able to be hacked nor accessed from any outside source, GPS tracking will also be disabled and your phone location will not be visible. Credit cards will also be completely safe from any malicious attack via wi-fi signals.
Disadvantages of bag
Well, the disadvantage of using this bag is a very simple one, since your phone is isolated from outside influence that will also mean that you will not be able to take messages or calls on it while it is in the bag. Notifications from the internet would also be disabled so it is security vs usability deal.
Read More
Magcore.dll Error — What is it?
Magcore.dll is a type of Dynamic Link Library. This file is associated with software developed by ArcSoft, a renowned multimedia application developer.
Magcore.dll consists of small programs that help load and run software developed by ArcSoft on your system smoothly.
This file virtually comes into function when you use certain audio and video features incorporated in ArcSoft programs for example ArcSoft Media converter.
However, you may experience Magcore.dll error code on when this DLL file fails to run and load programs. The error may hamper your ability to access ArcSoft programs on your system and cause you a great deal of inconvenience.
Magcore.dll error is often displayed in any one of the following formats:
“The file magcore.dll is missing”
“MagCore.dll cannot be found”
«Cannot find [PATH]magcore.dll»
“This application has failed to start because MagCore.dll was not found. Reinstalling the application may fix the error.”
Solution
Error Causes
This DLL file is known to be prone to errors. MagCore.dll error occurs due to several reasons such as:
- Missing or damaged MagCore.dll file
- Hardware failure
- Viral infection
- Registry issues
If you experience MagCore.dll error on your system, it is advisable to fix it right away. Though it is not fatal, but if you don’t repair it, you may not be able to access practically all ArcSoft programs on your PC.
Further Information and Manual Repair
Here are some of the efficient and easy manual methods to resolve error MagCore.dll on your PC:
Method 1 — Scan and Remove Malware
MagCore.dll error can be triggered by viral or other malware infection. Malware can easily damage DLL files and masquerade as the MagCore.dll file. To resolve, simply download a powerful antivirus on your system.
Run it to scan your entire PC for viruses and remove them right away.
Method 2 — Update the Drivers for Hardware Devices
As we mentioned above the error may be related to hardware failure too. In times like these, it is advisable to update the drivers for hardware devices.
For example if you try to play a 3D video game and it fails to run showing you MagCore.dll error message, then simply try updating the drivers for your video card. Drivers can be updated in Windows by using a driver update wizard from within Device Manager.
Method 3 — Use System Restore to Undo Recent System Changes
After trying method 1 and 2, if the error code still persists, then it is opt for method 3.
Use Windows System Restore utility to undo recent system changes and bring your PC to its normal previous condition before the error occurred. To restore, simply go to the start menu, type System Restore.
Now click on System Restore and just pick a point in the past called a restore point to return important Windows files and settings.
Method 4 — Repair the Registry
If the underlying cause of the MagCore.dll error code is related to registry issues, then simply repair the registry. You can fix it manually but it is a little complicated and time-consuming. You may find it difficult if you are not a technical whiz.
Nonetheless to resolve and repair it in seconds, download Restoro. This is a powerful and a user-friendly PC Fixer embedded with a registry cleaner and several other highly functional scanners.
Run it to scan your entire PC for registry problems. The registry cleaner utility removes all bad and invalid entries, cleans up the registry space, and repairs the damaged files.
Click here to download Restoro and repair MagCore.dll error code on your PC.
Read More
The file is too large for the destination file system is the error when you try to copy a file larger than 4GB on a drive formatted in the FAT32 file system. FAT32 is the old file system used in previous Windows versions and it was replaced by superior NTFS, altho FAT32 is still used because of its compatibility fact that it could be accessed in various operating systems its disadvantage among others is that it can not hold files larger than 4GB in size. This refers to the size of a single file, so if you have a file that is this large and when you try to copy or move it on a drive formatted in FAT32 you will get this message, and the operation will not be able to complete.
Format drive
In order to actually transfer the file in its glorious size, I am afraid that you will need to format destination drive in NTFS or if you have data on drive which you do not want to lose with formatting, use third-party software to convert file system from FAT32 to NTFS without losing data. I would recommend AOMEI partition assistant, it is a free and proven application letting you both manage your partitions and convert any one of them into another file system without data loss. You can get AOMEI here.
Split file
Another option if you are not keen on installing third-party tools or formating is to divide large files into smaller ones that are less than 4GB in size. You can use any archiving application since built-in Windows ZIP support will not let you split file into various different sizes. The best tool in my humble opinion is WinRAR, but you can choose any proven one. When file is split into parts less than 4GB in size, you will have no issues copying or move the file to the destination drive.
Read More
There are times when you might find it difficult to delete folders or files in File Explorer and it could be due to many reasons. One of these reasons can be attributed to the failure that can lock down the folders or files which prevents you from deleting them. In this kind of situation, you can utilize the Command Prompt to delete the folders, sub-folders, and files on your computer, and in this post, you will be guided on how exactly you can do that.
Before you proceed, keep in mind that when you use the Command Prompt incorrectly, it might affect your computer and render it inoperable, thus, you must be extra careful when executing the steps given below and it would also be better if you create a System Restore Point. After that, refer to the following instructions.
Step 1: First, in the Start Search, type “command prompt” in the field and from the search results, right-click on Command Prompt and then select the “Run as administrator” option to open Command Prompt with admin privileges.
Step 2: After opening Command Prompt as admin, navigate to the folder where the file you want to delete is located. Note that you have to execute the “cd” or the change directory command.
Step 3: Next, execute the following command in Command Prompt:
DEL /F /A <file path with extension>
Note: In the given command, “/F” is the force delete command, while “/A” is the command that selects the files with the ready for archiving attribute.
Step 4: After that, go to the location where you can find the folder you want to delete by using the “cd” command again. And then execute the following command right after:
RD /S <folder path>
Note: In the given command, “RD” is the command that removes the folder from the directory, while “/S” removes all of its sub-folders and files. On the other hand, if you also use the “/Q” parameter, you won’t see the “Y/N” confirmation but if you didn’t use it, then simply tap the Y button to proceed.
Read More
Driver Pro Description
DriverPro is a program developed by PC Utilities Pro. This program is often found bundled in other installations.
From the author: PC Utilities Pro is a leading software development company founded in 2009. As a group of young enthusiastic programmers, we constantly strive in creating powerful, yet easy-to-use solutions that would enable even the most basic computer users to keep their PCs running like new.
When installed, DriverPro will add registry entries for the current user that allow it to run each time to computer is started. It will also add a scheduled task in Windows, that allows it to run at various times. The optimizing nature of the application allows it to access any file and information on your computer without your knowledge.
Multiple anti-virus programs have marked this application as a Potentially Unwanted Program, and it is not recommended to keep it on your computer.
About Potentially Unwanted Applications
Have you ever discovered an unwanted program running on your PC and wondered exactly how the heck it got there? A PUA / PUP (potentially unwanted application / potentially unwanted program) is a software program that comes bundled with freeware/shareware and you agree to install on your computer. These are programs you certainly don’t want on your computer since it doesn’t provide any useful service.
Despite being regarded very dangerous, PUPs aren’t necessarily computer viruses or malware What makes a PUP different from malware is the fact that whenever you download one, you are doing it with your consent – though in most instances unwittingly and unwillingly. PUPs might not be malware but still, they’re harmful programs to your computer. At best, these unwanted applications provide hardly any benefit, and at worst, they could be quite damaging to your computer.
What do PUPs do on your computer, really?
Most Potentially Unwanted Programs will come in the form of adware, which typically aims to exhibit numerous irritating pop-up ads, banners, coupons, and bargains on websites you go to. PUPs that come as browser add-ons and toolbars are readily identifiable. They’ll track your online activities, redirect your search results to unsafe websites where spyware and adware can be downloaded, hijack your home page, and slow your internet browser down to a crawl.
PUPs load up a dangerous bite if kept unchecked. They will often include things like information gathering program code which could gather and send your sensitive information back to 3rd parties. These are programs that don’t really do anything good for you; in addition to occupying space on the hard drive, they also slow down your PC, often alter settings without your authorization, the list of annoying features goes on and on.
Great tips on protecting yourself from unwanted software
• When setting up anything on your computer system, always study the fine print, like the license agreement. Don’t accept terms of use that are for bundled programs.
• Only Use the “custom” or “manual” install method – and never blindly click Next, Next, Next.
• Use an advert blocker/pop-up blocker; Install anti-malware products such as Safebytes Anti-malware. These software programs could establish a wall between the computer and cybercriminals.
• Think twice before you decide to download any type of freeware or shareware. Just before adding a plug-in or web browser extension, think about whether it is really necessary.
• Only download programs from the original providers’ websites. Avoid download portals because they use their very own download manager to pack extra programs along with the initial download.
Help! Malware Blocking Anti-virus Installation And Access To The Web
All malware is bad, but certain kinds of malicious software do a lot more damage to your computer than others. Some malware is meant to hinder or block things that you wish to do on your computer. It may well not allow you to download anything from the net or it will stop you from accessing some or all websites, particularly the anti-malware sites. So what you should do if malware prevents you from downloading or installing Safebytes Anti-Malware? Do as instructed below to get rid of the malware in alternate ways.
Get rid of malware in Safe Mode
The Windows operating system has a special mode known as “Safe Mode” where just the bare minimum required programs and services are loaded. In the event, the virus is set to load automatically when the PC starts, shifting to this mode may well prevent it from doing so. To start the computer into Safe Mode, press the “F8” key on the keyboard just before the Windows boot screen appears; Or right after normal Windows boot up, run MSConfig, check the Safe Boot under the Boot tab, and click Apply. After you restart into Safe Mode with Networking, you could download, install, and update the anti-malware program from there. Now, you are able to run the anti-virus scan to eliminate computer viruses and malware without any interference from another malicious application.
Switch to some other internet browser
Web-based viruses could be environment-specific, aiming for a particular internet browser or attacking particular versions of the browser. If you appear to have malware attached to Internet Explorer, then switch over to a different internet browser with built-in safety features, such as Firefox or Chrome, to download your favorite antivirus program – Safebytes.
Run anti-virus from your USB drive
Another way is to download and transfer an anti-malware program from a clean computer to run a scan on the affected system. Adopt these measures to run the anti-malware on the infected computer system.
1) On a clean computer, download and install Safebytes Anti-Malware.
2) Plug the pen drive into the uninfected computer.
3) Run the setup program by double-clicking the executable file of the downloaded application, which has a .exe file format.
4) Select the USB flash drive as the location when the wizard asks you where you intend to install the software. Follow the activation instructions.
5) Remove the flash drive. You may now utilize this portable antivirus on the infected computer.
6) Run the Safebytes Anti-malware directly from the flash drive by double-clicking the icon.
7) Press the “Scan” button to run a full system scan and remove viruses automatically.
Detect And Remove Viruses With SafeBytes Anti-Malware
Want to download the very best anti-malware software for your laptop or computer? There are many applications available that come in paid and free versions for Microsoft Windows computers. A few are worth your money, but many aren’t. You need to pick a company that creates industry-best antimalware and has earned a reputation as reliable. Among few good programs, SafeBytes Anti-Malware is the strongly recommended software for the security-conscious end user.
Safebytes is one of the well-established PC solutions firms, which provide this complete anti-malware software program. This software program can easily detect, remove, and protect your computer from the most advanced malware intrusions such as adware, spyware, trojan horses, ransomware, parasites, worms, PUPs, along with other potentially harmful software applications.
SafeBytes anti-malware offers a plethora of advanced features that set it apart from all others. The following are some of the good ones:
Real-time Protection: SafeBytes provides complete and real-time security for your personal machine. It will regularly monitor your computer for hacker activity and also gives users superior firewall protection.
Best AntiMalware Protection: This deep-cleaning anti-malware program goes much deeper than most antivirus tools to clean out your computer system. Its critically acclaimed virus engine finds and disables hard to remove malware that hides deep within your PC.
Web Protection: SafeBytes gives an instant safety rating about the web pages you are about to check out, automatically blocking unsafe sites and ensuring that you are certain of your safety while browsing the world wide web.
Fast Scan: SafeBytes Anti-Malware has a multi-thread scan algorithm that works up to 5x faster than any other antivirus software.
Very Low CPU and RAM Usage: This software program is not “heavy” on your computer’s resources, so you’ll not notice any overall performance problems when SafeBytes is operating in the background.
Fantastic Tech Support Team: You will get 24/7 technical assistance to promptly resolve any issue with your security application.
Technical Details and Manual Removal (Advanced Users)
To remove Driver Pro manually, navigate to the Add/Remove programs list in the Control Panel and choose the offending program you want to get rid of. For web browser plug-ins, go to your web browser’s Addon/Extension manager and select the add-on you want to remove or disable. You may also want to reset your web browser settings, as well as clear your web browser cache and cookies.
Lastly, check your hard disk for all of the following and clean your registry manually to remove leftover application entries after uninstalls. Please note that only professional computer users should try to manually edit the system files mainly because removing any single vital registry entry leads to a major problem or even a computer crash. Also, certain malware is capable of replicating itself or preventing its removal. Carrying out this in Safe Mode is suggested.
Files:
%Program Files%\Driver Pro\Driver Pro.exe
%UserProfile%\Desktop\Driver Pro.lnk
%UserProfile%\Start Menu\Driver Pro\Driver Pro.lnk
%UserProfile%\Start Menu\Driver Pro\Help.lnk
%UserProfile%\Start Menu\Driver Pro\Registration.Lnk
Registry:
HKEY_CURRENT_USER\Software376694984709702142491016734454
HKEY_CURRENT_USER\Software\Microsoft\Windows\CurrentVersion\Run 13376694984709702142491016734454
Read More
Socket Error 10013 — What is it?
Socket error 10013 is an error code that often pops on the screen when you try to access the server. This error code restricts your permission to access. It shows that your permission request was denied.
The error message is displayed in the following format:
“Socket.error: [Errno 10013] an attempt was made to access a socket in a way forbidden by its access permissions”
Solution
Error Causes
Narrowing down a particular reason for the cause of socket error 10013 is difficult, typically because this error code can be generated due to several reasons. Here are some of the common reasons for its occurrence on your PC:
- High-security set up- Firewall or an antivirus program
- Too many functions tied to the same driver confuses the socket
- Outdated drivers
- Malware
The good news is that the socket error 10013 is not fatal. However, it is advisable to fix and resolve the issue to avoid inconvenience.
Further Information and Manual Repair
Here are some of the best, quickest and easiest methods to work around the problem and resolve socket error 10013 without any hassle or delay.
Method 1 — Turn off Firewall
Believe it or not, a high level of internet security measures like Firewalls and anti-virus programs are a common cause of socket error 10013.
Firewalls are made to protect a computer from harmful connections but sometimes it may also restrict server connections, considering them as a threat to your system security.
Due to this, permission access is adamantly denied. To resolve this issue on your PC, the best way to go about is to turn off your Firewall or any other anti-virus programs installed on your system.
Once you turn off these programs, try accessing the server again. The majority of the time the issue is resolved by carrying this step. Nonetheless, if the error still persists, try the methods given below.
Method 2 — Check the Permissions section of the Firewall Program
Another way to resolve this is to check the permission section of the Firewall program and check for the server. If the server is not listed, contact the Internet Service Provider (ISP) and ask for help in adding the server to the list.
Method 3 — Update Drivers
The outdated driver may sometimes be the reason for the socket error 10013. The socket may no longer use the drivers installed on your PC which is why permission to access the server is not granted.
When this is the reason, try updating the drivers to resolve. For new drivers, visit the software manufacturers’ website, download, and install.
Method 4 — Scan for Viruses and Malware
Another alternative is to scan for viruses and malware. Sometimes the cause for the error is a viral infection. Therefore, remove them to resolve.
The best way is to download Restoro. This is a user-friendly and next-generation PC Fixer embedded with 6 scanners including a powerful anti-virus. It scans your entire PC and removes all types of viruses including malware, adware, spyware, and Trojans in seconds.
Click here to download Restoro.
Read More
A lot of users connect to the internet are using VPN on their Windows 10 computers which means that their regions could be different from the actual region of their Windows 10 computers. Thus, if you are facing some issues in updating your computer in this kind of environment, specifically the Windows Update error 0x800F0922, you need to follow the tips given in this guide to help you resolve the issue.
When you encounter this kind of Windows Update error, you might see either of the following error messages on your screen:
“Windows could not search for updates, Code 0x800F0922 Windows Update encountered an unknown error”
Or:
“Windows failed to install the update with error 0x800F0922”
This issue might be caused by two possible reasons such as:
- VPN issues
- Not enough space on the System Reserved partition
To resolve the problem, here are some tips that might help:
Option 1 – Try disabling the VPN
As mentioned, if you are using VPN, this could be the reason why you’re getting the Windows Update error 0x800F0922 so the most obvious thing to do is for you to turn off the VPN and try to run the Windows Update once more. And if you use a VPN software that works using their software, you can just completely exit or log-off from its account. On the other hand, if you are using a built-in Windows 10 VPN, you can simply turn it off or delete all the settings you have created there. Although it’s understandable that you might have to use a VPN connection to connect to the work network, you really have to disable it at least until the Windows Update is no longer stuck in the error 0x800F0922. It would be best if you do this when you are not working.
Option 2 – Try to free up space in the System Reserved partition
The System Reserved partition is a part of the hard disk created when Windows is first installed on it. It is where the Boot Configuration Database, Boot Manager Code, Windows Recovery Environment, and the reserves space for the startup files are stored. And as mentioned early on, the error might be due to some insufficient space in the System Reserved partition so the next thing you can do is to increase the space in this partition. Note that it is a complex process so you need to make sure that you have made backups to all your data on the computer. So if ever something goes out of hand, at least you have copies of your important files in case you aren’t able to boot into the system at all.
Read More
Blizzard is one of the most beloved game company which brought some of the most and greatest titles in PC gaming. Blizzard has released its own launcher in which you can launch games, sadly sometimes launcher does not want to work and fails to connect.
If this happens to you be sure to:
-
Reset your network devices to make sure your router hasn’t become flooded with data.
Power cycling your modem and router allows them to reset and re-establish a connection to your ISP. Follow these steps to completely power cycle the devices in your network connection:Note: If your modem has a battery backup, you will need to take the battery out or use the reset button on the modem.
- Shut down all computers connected to the modem/router.
- Power down and unplug the modem and the router if you’re using one.
- Allow to sit for 60 seconds unplugged.
- Plug in and turn on the modem and router, and allow them to completely boot up until the front panel connection lights on the modem show a steady connection.
- Start the computer and allow it to completely boot up.
-
If you’re using a wireless connection, optimize your internet connection to rule out a connection issue.
If you’re experiencing issues with your low-speed or wireless internet connection, follow the steps below to troubleshoot the problem.
-
Try plugging your computer directly into your modem.
- Shut down other programs that access the internet, such as other games or download programs.
- Satellite, mobile phone, and WiMax internet connections are not stable connections and may cause further connection issues when playing Blizzard games. If possible, consider switching to a more stable connection.
-
-
Update your drivers and operating system to resolve any compatibility issues.
Out-of-date drivers and operating systems can cause a variety of issues and are one of the first things to check when a game is having problems. The instructions below will help you check and update your drivers.
- Even new computers can have out-of-date drivers and operating systems because updates are released routinely.
- Some games and programs might run fine on a system with old drivers, but outdated drivers can still create technical issues with specific games or programs.
- Check our supported video cards articles to make sure your hardware is compatible:
- World of Warcraft
- Hearthstone
- StarCraft II
- Diablo III
- Heroes of the Storm
- Overwatch
Refer to the steps below to update drivers and software for your operating system.
-
Release and renew your IP and flush your DNS to resolve any network conflicts.
- While on the desktop, press Windows Key and type CMD.
- Right-click Command Prompt and select Run as administrator.
- Type ipconfig /release in the command prompt.
- Wait a few seconds for a reply that the IP address has been released.
- Type ipconfig /renew in the command prompt.
- Wait a few seconds for a reply that the IP address has been re-established.
- Type ipconfig /flushdns in the command prompt.
- Close the command prompt and attempt to make a connection.
-
Close all other applications to resolve software conflicts and free up resources.
Before trying the steps below, close unnecessary programs and restart your computer.
Identify Problematic Startup Items
- Press Ctrl+Shift+Esc to open the Task Manager.
- Click More Details.
- Select the Startup tab.
- Right-click on each item and select Disable.
- Restart the computer.
If this resolves the issue, enable the startup application one at a time to determine which one is causing the problem. You will need to restart between each application you enable.
Note: To re-enable startup applications, follow steps 1-4 and select Enable.
-
Delete the Battle.net Tools folder to automatically rebuild outdated or corrupt files.
- Close Blizzard processes.
- Press Ctrl + Shift + Esc to bring up the Task Manager.
- Click the Processes tab.
- Select all Agent, Blizzard Battle.net desktop app, and game processes, and click End Process.
- Navigate to the folder containing the Battle.net directory:
- Press Windows Key + R to open the Run dialogue.
- Type C:\ProgramData\ into the Open field and press Enter.
- Delete the Battle.net folder.
- Run Battle.net and update the game to see if the issue persists.
If the error persists after you try these steps, another program may be causing the problem. Restart your computer and delete the Battle.net folder one more time.
Note: The above steps may cause the Blizzard Battle.net desktop app to forget game install locations. If your games can’t be found, you will see Install on the Blizzard Battle.net desktop app game tab instead of Play. To find your installation, click Locate this game or run the game launcher.
- Close Blizzard processes.
Read More
Copyright © 2023, ErrorTools. All Rights Reserved
Trademark: Microsoft Windows logos are registered trademarks of Microsoft. Disclaimer: ErrorTools.com is not affiliated with Microsoft, nor claims direct affiliation.
The information on this page is provided for information purposes only.
The Error 0x80300002 is often caused by partition errors or corrupted Windows installation media due to which you won’t be able to complete your Windows installation. Installing Windows has been an easy task, thanks to the Windows Installer. Equipped with a user-friendly interface, one can install their Windows DVD in no time. However, sometimes the process might demand some work before you can get the newly installed Windows on your computer.
Windows Installer errors are not common and rarely occur. The errors related to Windows Installer are usually caused by the hardware connected to your PC in which case the Installer is not to blame but the media or hardware you’re utilizing is at fault.
Windows Installer errors don’t occur every day but when they do, it usually is due to —
- Corrupted Windows installation media. If the media that you are using to install Windows on your system is corrupt, it can cause the error to pop up.
- Incorrect partition. If you’ve selected a wrong partition for Windows installation, it can prompt you with this error.
- Changes made prior. If you’ve made changes to your older Windows prior to installing Windows, it can also cause the error to show up.
With that said, use the following solutions to resolve your issue:
Solution 1: Disconnect any External Hardware
The error can sometimes be caused by external hardware connected to your system. A few users have reported that their error was due to the external hardware that was connected to their system and was resolved once the hardware was disconnected. Hence, to start off, make sure there’s no extra hardware connected to your system except your installation media.
Solution 2: System Restore
If you’ve made any changes prior to the installation of the Windows again, the error can be caused due to it. In such a case, you’ll have to make use of System Restore. It is a Windows feature that lets the users restore their system to a point prior to the emergence of the error. Therefore, use system restore and then try to install Windows. Here’s how to restore your system:
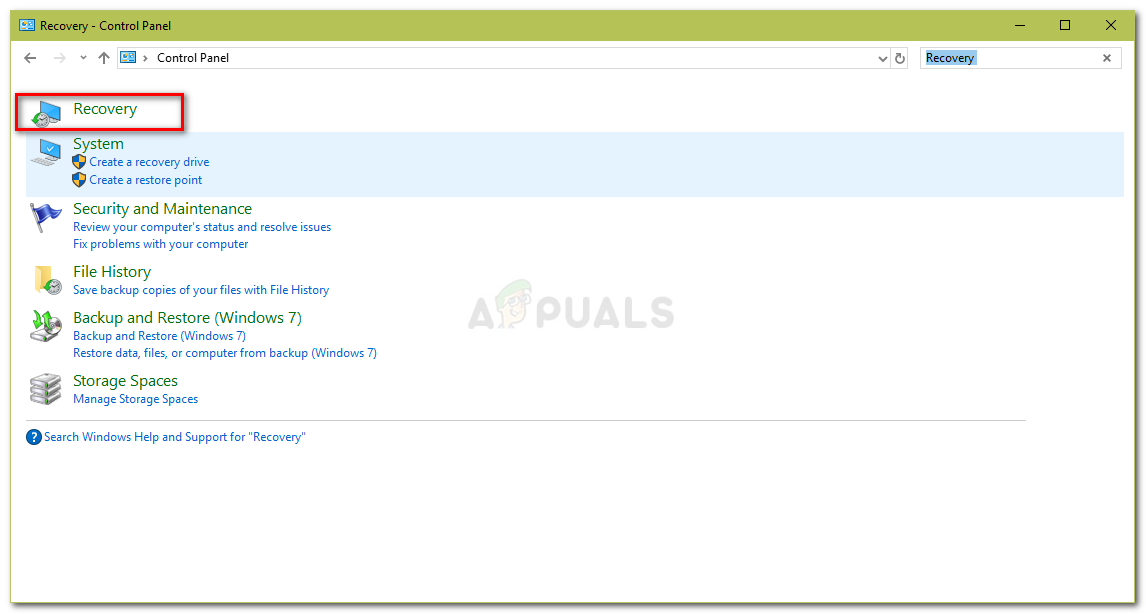
- Open Start Menu and go to Control Panel.
- Type in Recovery in the search and click it.

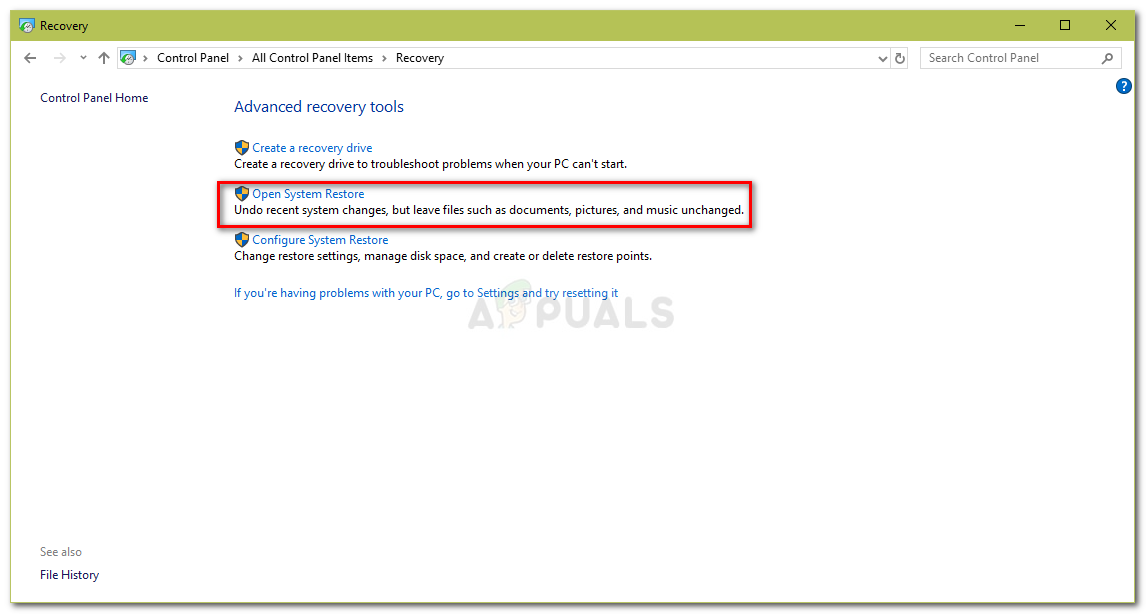
Control Panel – Recovery - There, select ‘Open System Restore’.
System Restore – Control Panel - Select a point back and then hit Next.
- Follow through the steps to restore your system.
- Try to install your Windows again.
Solution 3: Deleting Partitions
Before you proceed and implement this solution, please make sure you’ve backed up any important information that is stored on your system. The error can sometimes be caused by bad partitions in which case you’ll have to delete the partitions and then install the Windows. Here’s how to delete your partitions:
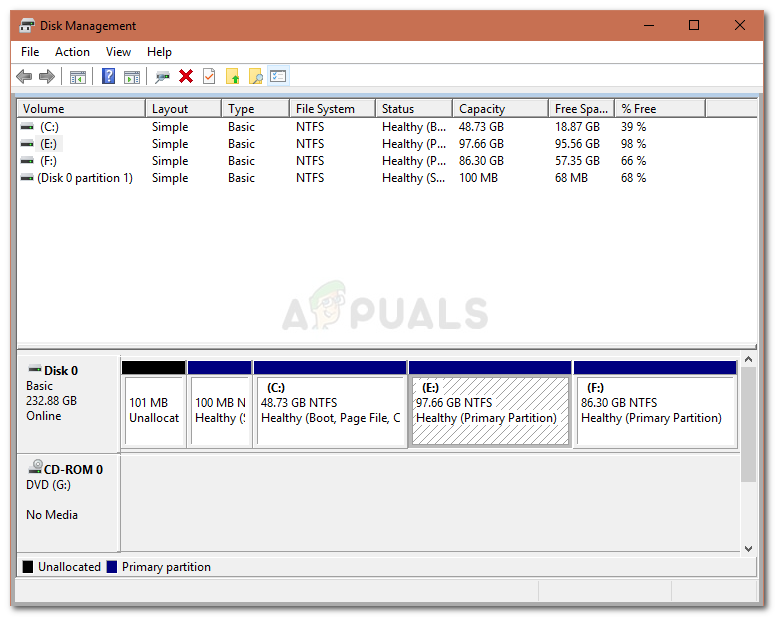
- Go to Start Menu and type in ‘Disk Management’.
- Under Best match, ‘Create and format hard disk partitions’ will be listed, open it.
- This will open up Windows Disk Management.

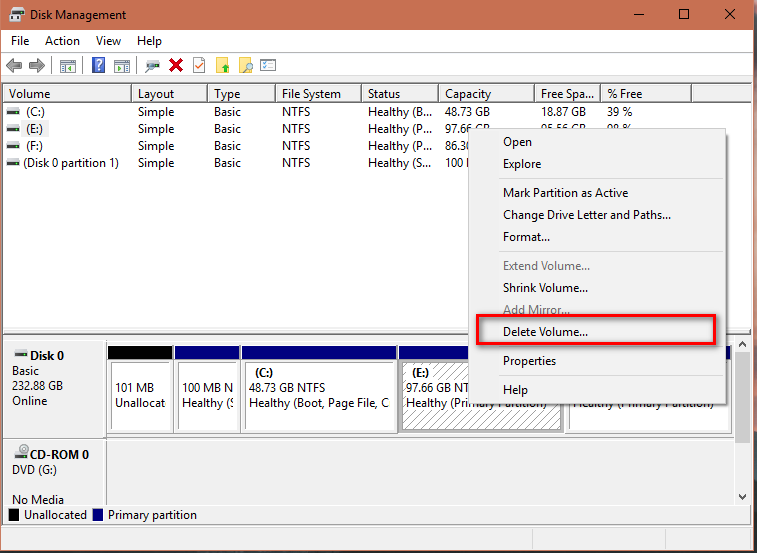
Windows Disk Management - There, you’ll see your disk drives. Right-click on the partitions and select ‘Delete Volume’.

Deleting Partitions for Windows Installation - Now insert your Windows Installation Media, and follow through the on-screen steps.
- Once asked to select the partition where you want to install Windows, select Drive Options.
- Using the unallocated space, create a new partition.
- You can make 2 partitions, one for your Windows (System Partition) and the other as a Primary partition.
- Finish the installation.
Solution 4: Connect your Hard Disk to a different PC
Another thing you can do to resolve the issue is unplugging your hard disk from your system and connecting it to a different computer. Besides the error, this is something you should if you can’t see any partitions when asked for the System partition. Once connected to a different system, set up NTFS partition using Windows Installer and then go through the installation process.
Solution 5: Faulty Hardware
Lastly, if the above-mentioned solutions didn’t work for you, there’s only one possible reason for this. Something in your PC is corrupted or fried. In such a case, you’ll have to replace the hardware and then try to install your Windows.
Kevin Arrows
Kevin Arrows is a highly experienced and knowledgeable technology specialist with over a decade of industry experience. He holds a Microsoft Certified Technology Specialist (MCTS) certification and has a deep passion for staying up-to-date on the latest tech developments. Kevin has written extensively on a wide range of tech-related topics, showcasing his expertise and knowledge in areas such as software development, cybersecurity, and cloud computing. His contributions to the tech field have been widely recognized and respected by his peers, and he is highly regarded for his ability to explain complex technical concepts in a clear and concise manner.
It’s been some years since I have had to do anything with a Windows installer, but this last week I spent the better part of four hours wrestling with installing Windows 10 on a brand new gaming machine.
Now I know that this should be really straight forward as it’s just a normal disk in a desktop machine, but it really seems to be a tricky problem due to the lack of clear error messages you get when it fails to start the installation.
The basis is getting a valid copy of Windows 10 in an ISO download, putting it on a bootable USB stick, putting that in a port on the new machine, booting the machine to start the USB installer, clicking a few times to get your new disk formatted, partitioned, and finally watching the installation start copying files onto your new machine.
You would think it’s that easy, right?
My journey was a bit harder than that… but I want to share the solution for others.
Note the below examples are all done from an OSX machine where I download, create, and use the Windows ISO file for a USB stick to install Windows 10.
Installing Win10
The easy part was to obtain a valid Windows 10 download for my 64-bit machine, which gave me and ISO file is renamed to Win10x64.iso in a directory called windows:
$ ls windows/
-rw-r—r—@ 1 eschabel staff 5.8G Mar 5 09:35 Win10x64.iso
The USB stick I used was 32 GB, but as long as you can get one big enough to hold this file it’s fine. The rest was done from the terminal using the following steps.
First using DiskUtility app, I formatted the USB to FAT 32 and named it WIN10. This is where the problem started, I just didn’t know it yet as this uses GPT (GUID Partition Table) which is a format used to define the hard disk partitions in computers with UEFI startup firmware. The GUID Partition Table (GPT) replaces the previous master boot record (MBR) method.
If you did this from the terminal you would have to type the following command (after checking that your USB stick was indeed listed as disk2 using diskutil list command:
$ diskutil eraseDisk MS-DOS «WIN10» GPT /dev/disk2 <<<< don’t do this!
Later, in the next section you’ll see why you don’t want to do this. You need to replace GPT with MBR so that you get a master boot record format.
$ diskutil eraseDisk MS-DOS «WIN10» MBR /dev/disk2
Once this completes you just need to mount the ISO file, copy the files to the USB, perform a trick for one file that’s too big (splitting it), and done, right?
$ hdiutil mount Win10x64.iso
Note one file is too large, install.wim, so we skip that one initially:
$ rsync -vha —exclude=sources/install.wim /Volumes/CCCOMA_X64FRE_EN-GB_DV9/* /Volumes/WIN10
Once this completes, make sure you have installed wimlib with Homebrew and you can split the copy of install.wim as follows:
$ wimlib-imagex split /Volumes/CCCOMA_X64FRE_EN-GB_DV9/sources/install.wim /Volumes/WIN10/sources/install.swm 3800
This takes awhile and once finished remove USB properly and insert in your new machine, boot (ensure the boot process picks up your USB) and it will start the installer for Windows 10.
At this point it’s just a few steps to pick the language, click INSTALL NOW button, enter the product code to activate your windows version, accept the agreement presented, then choose the CUSTOM installer option, and now it got interesting for me when I used GPT formatting on the USB stick.
USB stick formatting GPT or MBR
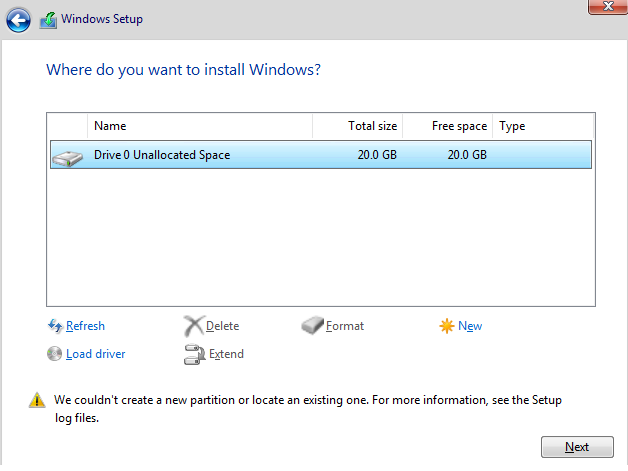
At this point in the install, you’re presented with a disk partitioning tool and your unallocated disk, select it and click on the NEW option to have windows installer format 3 partitions for you automatically. All good here, but if using the GPT formatted USB installer at this point I got the following error message:
«We Couldn’t Create a New Partition or Locate an Existing One»
I dropped into the windows utility DISKPART using SHIFT + F10 dropping into a console. From there you can reformat the created primary partition by hand just to be sure that it’s NTFS as follows:
> DISKPART
> LIST DISK
> SELECT DISK 0
> SELECT PARTITION 3
> FORMAT FS=NTFS QUICK
Then exit out and back to graphical interface, select partition 3 but then when I click NEXT it fails with this cryptic message:
«We couldn’t install Windows in the location you choose, error 0x80300002»
That’s nice… so went back and formatted the USB installer with MBR as stated above at which point the graphical installer partitioned and installs as advertised.
Go figure.
|
|
|
0 / 0 / 0 Регистрация: 22.05.2020 Сообщений: 7 |
|
|
22.05.2020, 09:30. Показов 8655. Ответов 9 Доброго времени суток! Форум курил уже несколько дней, вижу кучу тем по схожей теме, но с такими нюансами вроде бы не нашёл. Исходные данные:
В настройках BIOS указано следующее (как на фотке во вложении): Далее установщик видит Диск0 (мой SSD M.2) и не может ничего на него установить, выдавая ошибку 0x80300002 (во вложении) Видимо, нужно создать том, но по кнопке Создать из установщика также выдаётся ошибка (во вложении). Запускаю в установщике diskpart, выбираю диск, на всякий случай команда clean (хотя там нечего удалять), потом create partition primary, выдаёт ошибку ввода-вывода. Еще команда detail disk показывает, что у SSD M.2 айдишник с одними нулями. Это норма вообще? Подскажите, куда копать? Раз диск виден, то вряд ли дело в драйвере/нюансах UEFI и т.д.? Хотелось бы дифференцировать проблему с установкой и понять, что проблема в самом накопителе.
0 |
|
Programming Эксперт 39485 / 9562 / 3019 Регистрация: 12.04.2006 Сообщений: 41,671 Блог |
22.05.2020, 09:30 |
|
9 |
|
15903 / 7926 / 755 Регистрация: 03.01.2012 Сообщений: 32,863 |
|
|
22.05.2020, 10:47 |
|
|
MisterChe, А если после очистки диска в дискпарте select disk 0 А то вы устанавливаете с UEFI-флешки, а звёздочки на GPT я у вашего диска не вижу…
0 |
|
0 / 0 / 0 Регистрация: 22.05.2020 Сообщений: 7 |
|
|
22.05.2020, 15:12 [ТС] |
|
|
при конвертации в GPT такая же ошибка (ввода-вывода). Раздобыл старенький HDD и временно установил 10ку на него. В Управлении дисками SSD M.2 виден как неинициализированный. Инициализация также выдаёт ошибку ввода-вывода.
0 |
|
7959 / 3206 / 616 Регистрация: 09.09.2017 Сообщений: 11,618 |
|
|
22.05.2020, 15:36 |
|
|
Сообщение от MisterChe Новая Gigabyte A320M-S2H (версия BIOS f41) и По инфе из и-нета накопитель — SSD M.2 SATA. По инфе с оф. сайта МП она поддерживает SSD M.2 SATA не со всеми процессорами: Кликните здесь для просмотра всего текста
1. 1 разъем M.2 (Socket 3, M key, типоразмер 2242/2260/2280/22110, поддерживаются SSD-накопители SATA и PCIe x4*/x2) MisterChe, Если процессор соответствует, то можно попробовать откатить версию BIOS на стартовую F1 или F4.
1 |
|
0 / 0 / 0 Регистрация: 22.05.2020 Сообщений: 7 |
|
|
22.05.2020, 22:04 [ТС] |
|
|
3. * Supports only M.2 SATA SSDs when using an AMD Athlon™-series/ 7th Gen. A-series or Athlon™ X4 APU. А вот как раз на Athlon 200GE сборка, т.е. должен видеть его. И видит, но не даёт установить/проинициализировать. Сообщение от ibarg откатить версию BIOS на стартовую F1 или F4. есть опасение, что материнская плата перестанет видеть процессор на таких старых сборках.Тем более, что как раз в обновлении f41 заявлено Update AGESA 1.0.0.3 AB Пока что, наоборот, апнул BIOS до f50. Не помогло, всё по-прежнему. Согласен временно упростить задачу и сделать так, чтобы система стояла как сейчас на HDD, а SSD M.2 был просто доступен для записи и чтения в Windows 10. Повторюсь, в Управлении дисками накопитель виден, но про инициализации хоть в GPT, хоть в MBR выдаёт ошибку ввода-вывода.
0 |
|
7959 / 3206 / 616 Регистрация: 09.09.2017 Сообщений: 11,618 |
|
|
22.05.2020, 22:15 |
|
|
Сообщение от MisterChe А вот как раз на Athlon 200GE сборка Это Athlon не 7-го поколения, а поновее на базе архитектуры Zen. Речь идет об этих процессорах: https://www.amd.com/ru/product… th-gen-am4
1 |
|
0 / 0 / 0 Регистрация: 22.05.2020 Сообщений: 7 |
|
|
22.05.2020, 22:42 [ТС] |
|
|
Понял вас. Выходит, что формальный ответ такой — не работает, потому что и не должно работать? А как может помочь откат до старого биоса? Просто понять хочется
0 |
|
7959 / 3206 / 616 Регистрация: 09.09.2017 Сообщений: 11,618 |
|
|
22.05.2020, 22:45 |
|
|
Сообщение от MisterChe А как может помочь откат до старого биоса? В данном случае никак. Я писал Сообщение от ibarg Если процессор соответствует, то можно попробовать откатить версию BIOS на стартовую F1 или F4. Но процессор не соответствует. Сообщение от MisterChe Выходит, что формальный ответ такой — не работает, потому что и не должно работать? Выходит так.
0 |
|
0 / 0 / 0 Регистрация: 22.05.2020 Сообщений: 7 |
|
|
22.05.2020, 23:10 [ТС] |
|
|
Благодарю за участие! 3. * Supports only M.2 SATA SSDs when using an AMD Athlon™-series/ 7th Gen. A-series or Athlon™ X4 APU. Считаю, что перевод «М.2 SSD на сате поддерживается только при использовании Атлонов 7го поколения …» неверный. Верный перевод такой «Если вы используете Атлон 7го поколения, то только M.2 SSD на SATA можете поставить», т.е. они говорят, что NVME не пойдёт на новых Атлонах. Таким образом, всё же производитель МП не говорит, что на моём процессоре нельзя запустить этот M.2 SSD
0 |
|
7959 / 3206 / 616 Регистрация: 09.09.2017 Сообщений: 11,618 |
|
|
23.05.2020, 00:09 |
|
|
Сообщение от MisterChe всё же производитель МП не говорит, что на моём процессоре нельзя запустить этот M.2 SSD Резонно. Тогда стоит попробовать откатить версию BIOS до F30. (Update AGESA 0.0.7.2 for Athlon 200-series (Raven2) APU and further new CPU support).
0 |
|
inter-admin Эксперт 29715 / 6470 / 2152 Регистрация: 06.03.2009 Сообщений: 28,500 Блог |
23.05.2020, 00:09 |
|
Помогаю со студенческими работами здесь Фантомный загрузочный накопитель виден в UEFI Есть значок подключенной флешки и звук подключения, но накопитель не виден в проводнике Есть значок подключенной флешки и звук подключения, но накопитель не виден в проводнике Оперативка и SSD накопитель Какой выбрать SSD M.2 накопитель? Искать еще темы с ответами Или воспользуйтесь поиском по форуму: 10 |
|
Новые блоги и статьи
Все статьи Все блоги / |
||||
|
Как перейти от Waterfall к Agile
EggHead 06.05.2025 Каскадная модель разработки Waterfall — классический пример того, как благие намерения превращаются в организационный кошмар. Изначально созданная для упорядочивания хаоса и внесения предсказуемости. . . |
Оптимизация SQL запросов — Продвинутые техники
Codd 06.05.2025 Интересно наблюдать эволюцию подходов к оптимизации. Двадцать лет назад всё сводилось к нескольким простым правилам: «Избегайте SELECT *», «Используйте индексы», «Не джойните слишком много таблиц». . . . |
Создание микросервисов с gRPC и Protobuf в C++
bytestream 06.05.2025 Монолитные приложения, которые ещё недавно считались стандартом индустрии, уступают место микросервисной архитектуре — подходу, при котором система разбивается на небольшие автономные сервисы, каждый. . . |
Многопоточность и параллелизм в Python: потоки, процессы и гринлеты
py-thonny 06.05.2025 Параллелизм и конкурентность — две стороны многопоточной медали, которые постоянно путают даже бывалые разработчики. Конкурентность (concurrency) — это когда ваша программа умеет жонглировать. . . |
Распределенное обучение с TensorFlow и Python
AI_Generated 05.05.2025 В машинном обучении размер имеет значение. С ростом сложности моделей и объема данных одиночный процессор или даже мощная видеокарта уже не справляются с задачей обучения за разумное время. Когда. . . |
|
CRUD API на C# и GraphQL
stackOverflow 05.05.2025 В бэкенд-разработке постоянно возникают новые технологии, призванные решить актуальные проблемы и упростить жизнь программистам. Одной из таких технологий стал GraphQL — язык запросов для API,. . . |
Распознавание голоса и речи на C#
UnmanagedCoder 05.05.2025 Интеграция голосового управления в приложения на C# стала намного доступнее благодаря развитию специализированных библиотек и API. При этом многие разработчики до сих пор считают голосовое управление. . . |
Реализация своих итераторов в C++
NullReferenced 05.05.2025 Итераторы в C++ — это абстракция, которая связывает весь экосистему Стандартной Библиотеки Шаблонов (STL) в единое целое, позволяя алгоритмам работать с разнородными структурами данных без знания их. . . |
Разработка собственного фреймворка для тестирования в C#
UnmanagedCoder 04.05.2025 C# довольно богат готовыми решениями – NUnit, xUnit, MSTest уже давно стали своеобразными динозаврами индустрии. Однако, как и любой динозавр, они не всегда могут протиснуться в узкие коридоры. . . |
Распределенная трассировка в Java с помощью OpenTelemetry
Javaican 04.05.2025 Микросервисная архитектура стала краеугольным камнем современной разработки, но вместе с ней пришла и головная боль, знакомая многим — отслеживание прохождения запросов через лабиринт взаимосвязанных. . . |
Наверх
При чистой установке Windows 10 на ноутбук с установочной USB флешки столкнулся со странной ошибкой. При выборе раздела, на который установить Windows появилась ошибка:
Нам не удалось создать новый или найти существующий раздел. Дополнительные сведения см. в файлах журнала программы установки.
We couldn't create a new system partition or locate an existing system partition. For more information, see the Setup log files.
При этом вы можете создавать, удалять разделы в окне установки Windows, но установить операционную систему ни на один из разделов невозможно.
Чтобы понять причину ошибку, запустите командную строку прямо с экрана установки Windows, нажав Shift+F10.
Выведите содержимое файла ошибок установки Windows (setuperr.log):
type X:\Windows\panther\setuperr.log
В моем случае в логе была ошибка:
Error [0x06069d] IBS GetMachineInfo:Couldn't find info for boot disk [0]
Также может быть ошибка:
IBSLIB LogReasons: [BLOCKING reason for disk 0: CanBeSystemVolume] The selected disk is not the computer's boot disk.
Проблема в том, что установщик Windows не может создать новый раздел из-за некорректной структуры разделов, либо на компьютере доступно несколько физическим дисков (флешки, SATA/IDE HDD, SSD, USB накопители).
Что нужно сделать, чтобы установить Windows на проблемный диск? Сначала попробуйте самые простые вещи:
- Если на компьютере установлено несколько HDD/SSD дисков, временно отключите их все, кроме того, на который вы хотите установить Windows;
- Измените порядок загрузки в настройках BIOS/UEFI, чтобы ваш жесткий диск оказался первым в списке Fixed Boot Order. Для загрузки компьютера с установочной USB флешки нужно при загрузке открыть Boot Menu с помощью клавиш F8-F12, Esc, F1 или F2 (в зависимости от производителя компьютера/ноутбука и версии BIOS). Если компьютер загрузится с установочной флешки и запустит мастер установки Windows, попробуйте продолжить установки Windows в штатном режиме;
- Если на диске нет важных данных, очистите его, удалив все разделы в окне Windows Setup и попробуйте установить Windows в неразмеченное пространство (Unallocated).
Если рассмотренный выше способ не помог, нужно скопировать установочный файлы Windows с USB флешки непосредственно на жесткий диск компьютера и установить Windows прямо с жесткого диска (USB флешку нужно обязательно отключить, чтобы у вас осталось только одно загрузочное устройство).
Для этого загрузите компьютер с флешки, на экране установки Windows создайте раздел, на который вы хотите установить ОС. Затем нажмите Shift+F10 на экране установки Windows чтобы открыть командную строку. Выполните следующие команды:
diskpart
List disk
– команда выведет список подключенных к компьютеру дисков. У вас должно быть два диска Disk 0 и Disk 1 (один из них это USB флешка, а второй – жесткий диск компьютера). Определите ваш жесткий диск по размеру и выберите его (по его номеру, в нашем примере это Disk 0:
select disk 0
Выведите список разделов на диске:
list partition
Найдите номер раздела, на который вы хотите установить Windows. Например, это Partition 1. Выберите его:
select partition 1
Сделайте раздел активным:
active
Отформатируйте раздел в файловую систему NTFS и назначьте ему букву диска M:
format fs=ntfs quick
assign letter=M
Следующая команда поможет вам определить букву диска, назначенную вашей USB флешке (например, у вас это диск C:):
list volume
Закройте diskpart:
exit
Теперь можно скопировать установочные файлы Windows с USB флешки (C:) на ваш жесткий диск (M:):
xcopy C: M: /e /h /k
После завершения копирования нужно обновить загрузочный сектор на жестком диске и сделает ваш жесткий диск загрузочным:
bootsect.exe /nt60 M:
Выключите компьютер, извлеките флешку. При следующей загрузке должна запуститься обычная установка Windows (установочные файлы дистрибутива при этом хранятся на вашем жестком диске).
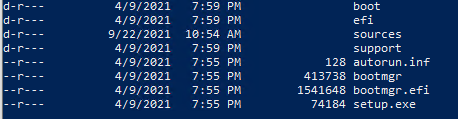
После окончания установки Windows нужно запустить msconfig и удалить лишнюю загрузочную запись Windows Setup из меню Windows Boot Manager на вкладке Boot. Перезагрузите компьютер и удалите установочные файлы Windows с жесткого диска:
- Каталоги: boot, efi, sources, support
- Файлы: autorun.inf, setup.exe
Ошибка
We couldn’t create a new partition or locate an existing one
также может появится в Windows Server при установке ОС на SAN LUN, доступный по нескольким путям. Т.к. модуль multipath (MPIO) Windows Server в WinPE не доступен, вам нужно изменить конфигурацию вашей SUN сети, чтобы диск (LUN )был доступен только по одному пути.
Если после выполнения указанных действий ошибка пропала, но появилась другая:
Установка Windows на данный диск невозможна. На выбранном диске находится таблица MBR-разделов. В системах EFI Windows можно установить только на GPT-disk
Это означает что на вашем компьютере используется современная UEFI вместо BIOS, и вы не можете установить Windows на диск с таблицей разделов MBR. Чтобы продолжить установку, вам нужно включить в настройках UEFI режим совместимости с BIOS (называется CSM или Legacy), либо сконвертировать таблицу разделов на диске из MBR и GPT и продолжить установку:
Для конвертации MBR в GPT без потери данных можно использовать утилиту mbr2gpt (доступна в среде WinPE). Сначала выполните валидацию диска (в этом примере disk 0 – диск, на котором нужно изменить таблицу разделов, его номер можно узнать с помощью diskpart как описано выше):
mbr2gpt /validate /disk:0 /allowFullOS
Затем сконвертируйте таблицу разделов:
mbr2gpt /convert /disk:0 /allowFullOS
Подробнее структура GPT диска для Windows (разделы EFI, MSR) описана в этой статье.