
При установке обновлений Windows 11 и 10, а в некоторых случаях — драйверов через Центр обновления пользователи могут увидеть сообщение об ошибке с кодом 0x80248014 и описанием «Возникли проблемы с установкой некоторых обновлений, но мы повторим попытку позже», либо «Ошибка скачивания».
В этой инструкции подробно о возможных способах исправить ошибку, если вы с ней столкнулись и дополнительная информация, которая может быть полезной.
Очистка кэша обновлений и диска

Первое, что стоит попробовать, если вы столкнулись с ошибкой 0x80248014 — очистить папку с загруженными файлами и другими компонентами обновлений, а также убедиться, что на системном разделе диска (диске C) есть хотя бы несколько гигабайт свободного места, а если это не так — очистить диск от ненужных файлов.
Для удаления скачанных файлов обновлений вы можете использовать следующие шаги:
- Запустите командную строку или Windows PowerShell (Терминал Windows) от имени администратора (как это сделать).
- По порядку введите следующие команды, нажимая Enter после каждой.
net stop wuauserv
net stop cryptSvc
net stop bits
net stop msiserver
ren C:\Windows\System32\catroot2 catroot2.old
ren C:\Windows\SoftwareDistribution SoftwareDistribution.old
net start wuauserv
net start cryptSvc
net start bits
net start msiserver
- Закройте командную строку и попробуйте повторить установку обновления.
Что касается очистки системного раздела диска, вы можете использовать встроенные средства системы для этого: например, в Windows 11 можно зайти в Параметры — Система — Память — Рекомендации по очистке. Но ещё лучше: нажать клавиши Win+R на клавиатуре, ввести cleanmgr и нажать Enter, нажать кнопку «Очистить системные файлы», после чего посмотреть, что можно удалить и выполнить очистку диска.

Встроенное устранение неполадок
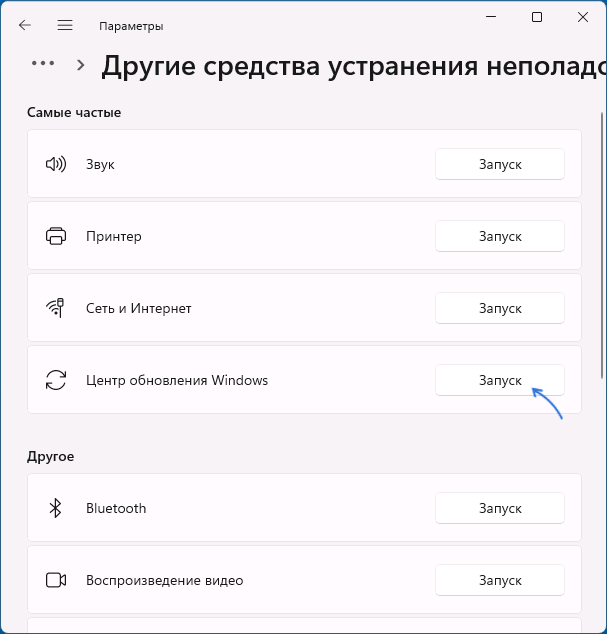
Можно попробовать воспользоваться встроенным управлением неполадок обновлений Windows. В Windows 11 путь будет следующим:
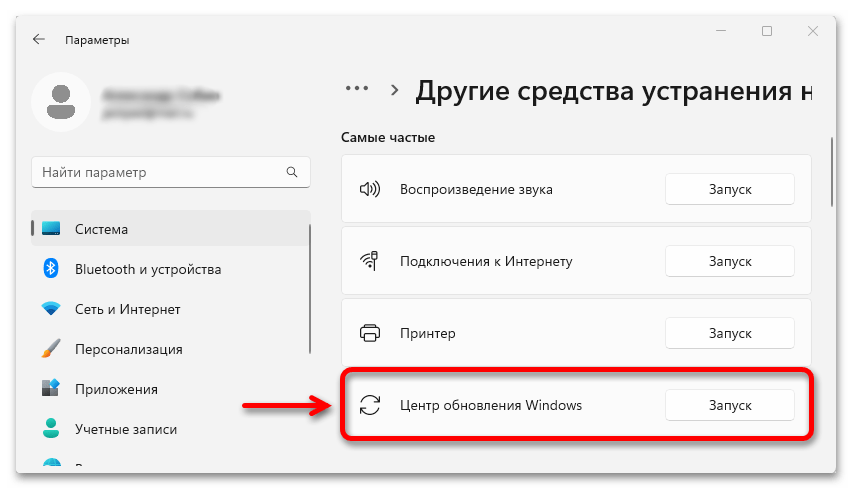
- Откройте Параметры — Система — Устранение неполадок.
- Перейдите в подраздел «Другие средства устранения неполадок».
- Нажмите кнопку «Запуск» справа от «Центр обновления Windows».

- Выполните устранение неполадок: возможно, они будут исправлены автоматически, а возможно информация в окне средства устранения неполадок поможет разобраться, чем именно вызвана ошибка 0x80248014.


Восстановление хранилища компонентов и системных файлов
Следующая возможность, которая в редких случаях может помочь при ошибке — восстановление образа системы и системных файлов. Чтобы выполнить эти действия:
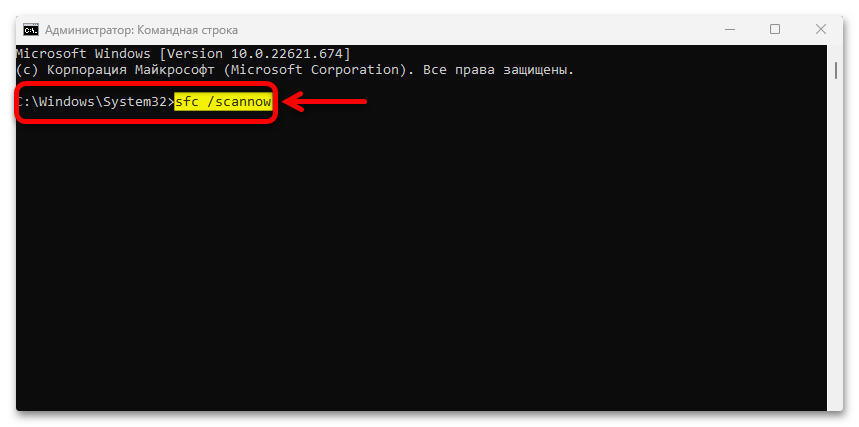
- Запустите командную строку от имени администратора.
- По порядку введите команды
DISM /Online /Cleanup-Image /RestoreHealth
sfc /scannow
- После их выполнения попробуйте выполнить установку обновления повторно.
Кстати, если проблемы с обновлениями возникли после недавних изменений в системе или установки стороннего ПО, можно попробовать использовать точки восстановления системы — это тоже может сработать.
Ручная загрузка и установка обновления
Если установка обновления с использованием Центра обновлений приводит к ошибке 0x80248014, можно попробовать установить его вручную:
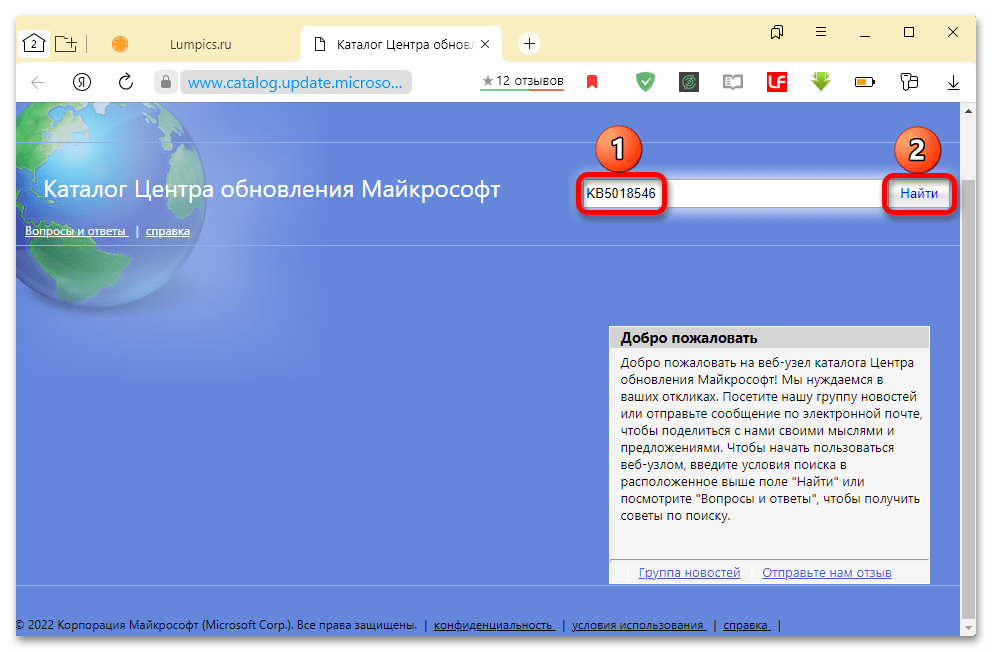
- Для обновлений Windows можно использовать официальный каталог Центра обновлений и выполнить поиск обновления по его номеру KB (который обычно указан в Центре обновлений). После загрузки установка обновления обычно выполняется простым запуском скачанного файла.

- Если ошибка возникает при обновлении драйвера, можно скачать драйвер соответствующей версии с сайта производителя оборудования.

Некоторые дополнительные нюансы, которые могут помочь в решении проблемы:
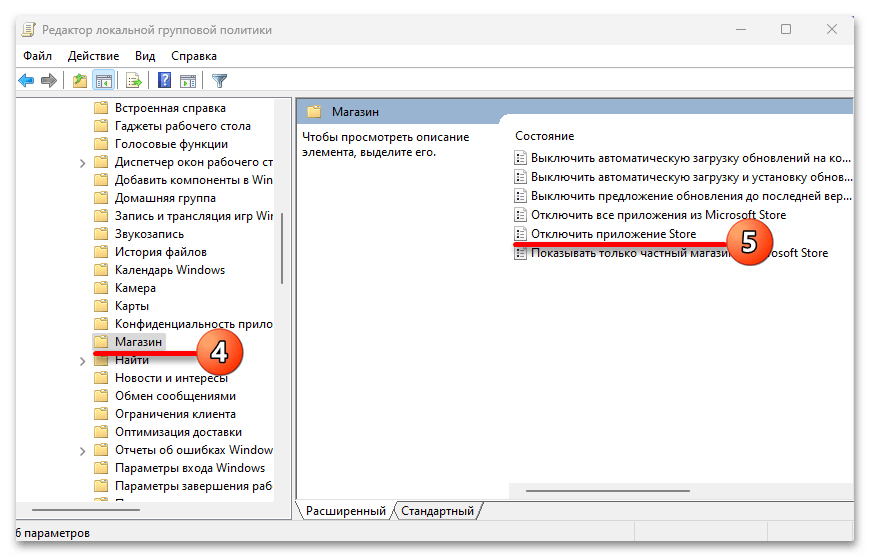
- Есть сообщения, что отключение Microsoft Store с помощью политик может приводить к ошибке 0x80248014 в Центре обновлений. Необходимая политика находится в Конфигурация компьютера — Административные шаблоны — Компоненты Windows — отключите приложение Store в редакторе локальной групповой политики (Win+R — gpedit.msc)
- Для ошибки скачивания 0x80248014 для различного рода «Extension» могут сработать способы из этой статьи про схожую ошибку 0x80070103.
- Попробуйте использовать дополнительные варианты решения со страницы Как исправить ошибки Центра обновлений Windows.
- Проблемы с доступом в Интернет, сторонние антивирусы на компьютере в некоторых случаях также могут приводить к рассматриваемой ошибке.
- Можно проверить, будет ли выполнена установка обновления без ошибки, если использовать чистую загрузку Windows.
И, наконец, в крайнем случае, можно использовать «Обновление на месте» для исправления рассматриваемой и других ошибок Windows 11/10.
Буду благодарен, если в комментариях вы сможете поделиться информацией о том, какой из способов сработал в вашем случае: эта информация может помочь и другим пользователям.
5 способов устранения ошибки 0x80248014, возникающей во время обновления ОС Windows 10 или Windows 11
Если вы захотите обновить Windows 10 (Windows 11), то можете столкнуться с ошибкой 0x80248014.
Причины ее возникновения бывают самыми разными:
• Повреждена файловая система.
• Повреждены файлы обновления.
• Есть повреждения у других компонентов, имеющих отношения к Центру обновления.
• Параметры даты и времени настроены неверно.
Это всего лишь несколько примеров потенциальных причин. На самом деле их гораздо больше. Как же избавиться от ошибки 0x80248014?
Существует целых 5 эффективных способов устранения указанной ошибки. Давайте по порядку.
Способ первый
Воспользуйтесь средством устранения неполадок. Речь идет о специализированной системной программе, с помощью которой такие задачи решаются. Данная утилита уже встроена в ОС, осталось только найти эту утилиту и применить ее возможности.
Делаем следующее:
• Открываем Пуск.
• Кликаем на иконку, где изображена «шестеренка».
• Входим в Параметры компьютера.
• Выбираем Обновление и безопасность. Нам нужна вкладка Устранение неполадок.
• Нажимаем Запустить и работать.
• Находим Центр обновления Виндоус.
• Запускаем средство устранения неполадок.
• После завершения процесса устранения проблем перезагружаем компьютер.
Теперь следует еще раз посетить Центр обновления и проверить, можете ли вы теперь обновить систему без появления ошибки.
Способ второй
Отключите антивирус и Firewall, которые иногда негативно влияют на нормальную работу ОС. Возможно, сторонний антивирус у вас не установлен, но знайте, что даже в этом случае не прекращается функционирование его системных вариантов, а именно Защитника и Брандмауэра Виндоус. Отключите их, чтобы точно понимать, связаны они с появляющейся ошибкой или нет.
Для деактивации Защитника нужно:
• Нажать одновременно клавиши Win (внизу слева на клавиатуре) и S.
• Войдите в Центр безопасности защитника Windows.
• Выберите Защиту от вирусов и угроз.
• Выберите Параметры защиты от вирусов и других угроз.
• Подтвердите отключение.
Для деактивации Брандмауэра надо:
• Нажать одновременно клавиши Win (внизу слева на клавиатуре) и S.
• Откройте Брандмауэр Windows.
• Выберите Включение и отключение брандмауэра Windows.
• Подтвердите отключение.
После того, как системные варианты антивируса будут отключены, проверьте в Центре обновления, есть ли код ошибки 0x80248014.
Способ третий
Исправьте время и дату. Для этого следует:
• Открыть Пуск.
• Кликнуть на «шестеренку».
• Выбрать в открывшихся Параметрах Время и язык > Дата и время.
• Выставить правильную дату и правильное время.
• Сохранить изменения.
Не забудьте потом в Центре обновления проверить, исчезла ли ошибка.
Способ четвертый
Переименуйте папку Software Distribution.
В указанной папке хранятся файлы обновлений, которые загружаются с официальных серверов Microsoft. Бывает так, что какие-либо из этих файлов могут оказаться с повреждениями или вступающими с другими обновлениями в конфликтные отношения. Чтобы переименовать папку, используйте адрес C:\Windows\SoftwareDistribution. Замените SoftwareDistribution на SoftwareDistribution.old. потом в Центре обновления уточните, устранена или нет ошибка 0x80248014. В некоторых случаях папку можно просто удалить: пустая новая папка появится автоматически.
Способ пятый
Произведите чистую загрузку.
Чистая загрузка – процесс комплексный. Для его осуществления необходимо:
• Нажать одновременно клавиши Win (внизу слева на клавиатуре) и R.
• Ввести msconfig.
• Подтвердить ввод клавишей Enter.
• Открыть Службы.
• Отметить опцию Не отображать службы Майкрософт галочкой.
• Нажать Отключить все.
• Открыть Автозагрузку.
• Кликнуть Открыть диспетчер задач.
• Отключить все программы из появившегося списка.
• Перезапустить компьютер.
Теперь привычно перейдите в Центр обновления и проверьте, осталась ли ошибка 0x80248014 или исчезла. Если кода ошибки больше нет, то получается, что какая-то из системных служб являлась причиной ее появления. Включайте их по порядку для обнаружения этой службы.
Все способы:
- Способ 1: Диагностика подключения к сети
- Способ 2: Оценка дискового пространства
- Способ 3: Проверка служб
- Способ 4: Включение магазина
- Другие решения
- Вопросы и ответы: 1
Способ 1: Диагностика подключения к сети
Ошибка 0x80248014 обычно возникает в «Центре обновления Windows», когда там не удается загрузить какой-то апдейт. Конкретную причину сбоя, как правило, не указывают, а значит, нужно учитывать разные варианты, например проблемы с интернетом. Проверьте, подключен ли компьютер к глобальной сети, и если да, то насколько стабильно это соединение.
Подробнее:
Проверка стабильности интернет-соединения
Решение проблемы с неработающим интернетом на ПК

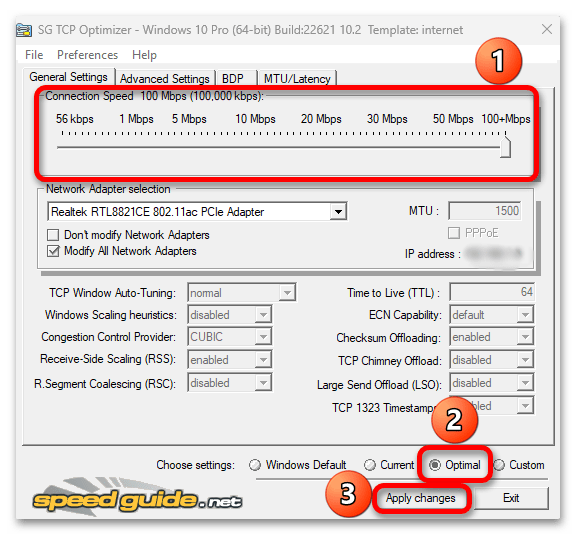
Если доступ к интернету есть, но скорость передачи данных значительно ниже той, что предусматривает ваш тариф, ознакомьтесь со специальной статьей на нашем сайте, которая может помочь поднять пропускную способность до исходных значений.
Подробнее: Способы увеличения скорости интернета на ПК с Windows 11
Способ 2: Оценка дискового пространства
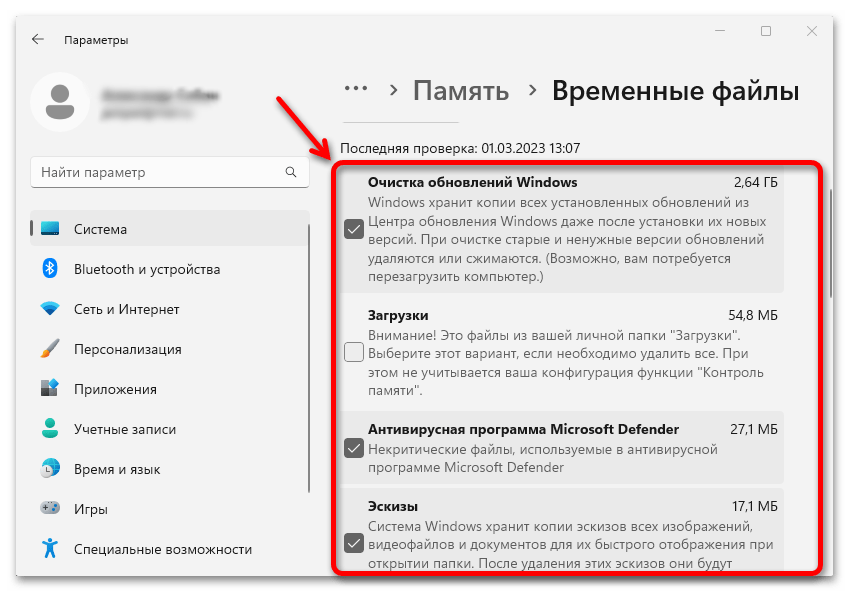
Сколько конкретно требует тот или иной апдейт выяснить сложно, но если в системном разделе накопителя меньше 8-10 ГБ свободного пространства, сначала освободите больше места, а затем снова попробуйте обновиться.
Существует сразу несколько способов освобождения памяти. Можно почистить компьютер от лишнего мусора и временных файлов, удалить ненужный сторонний софт или, в крайнем случае, некоторые стандартные приложения операционной системы Виндовс.
Подробнее: Освобождение места на диске C в Windows 11
Способ 3: Проверка служб
Следует убедиться, что включены все необходимые службы.
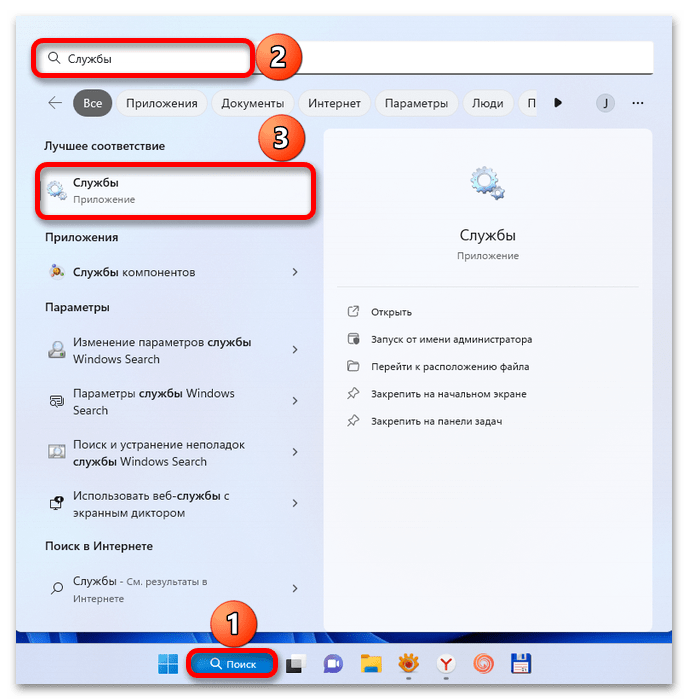
- В поиске Виндовс 11 вводим
Службыи запускаем их.
Читайте также: Как открыть «Службы» в Windows 11
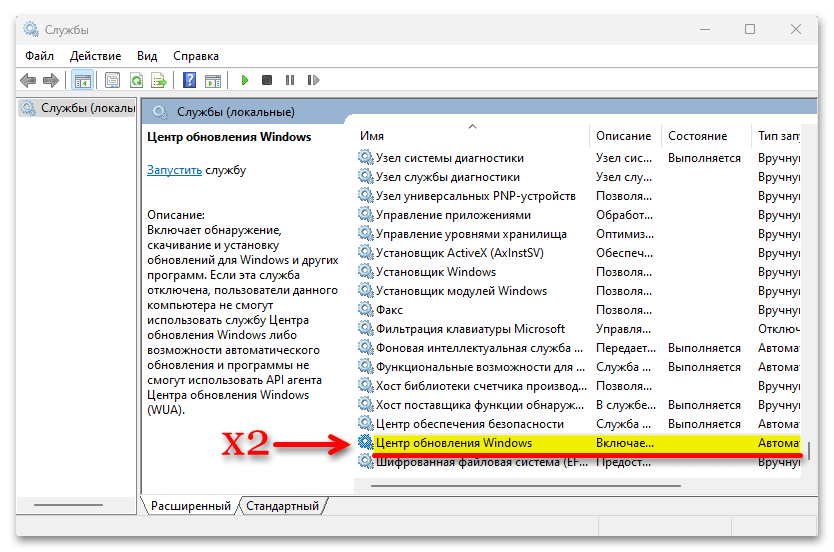
- В первую очередь ищем «Центр обновления Windows» и открываем ее двойным кликом.

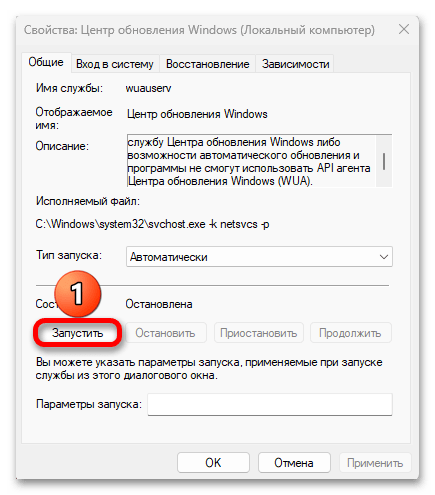
Как правило, она запускается во время поиска обновлений. Возможно, в вашем случае этого не произошло, поэтому скачивание и завершается ошибкой. Если служба остановлена, кликаем «Запустить»,

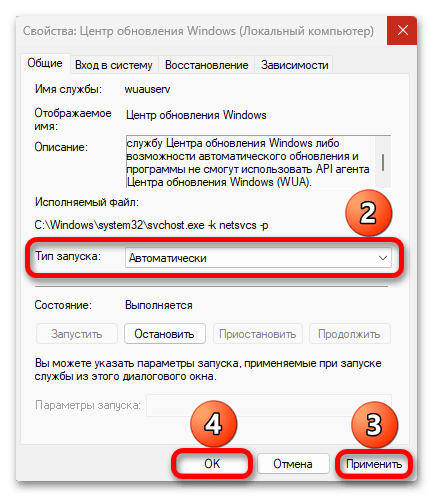
проверяем, что выбран автоматический тип запуска, применяем изменения и закрываем окно.
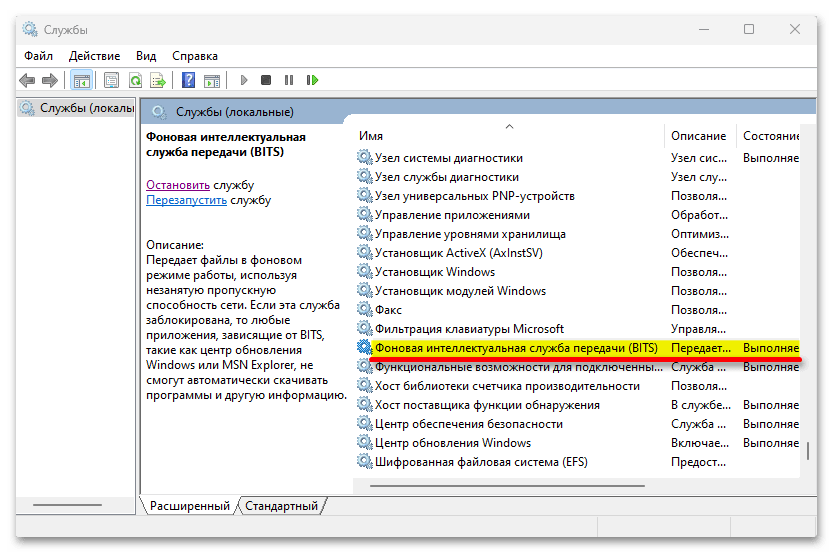
- Теперь запускаем, если они отключены, «Фоновую интеллектуальную службу BITS»,

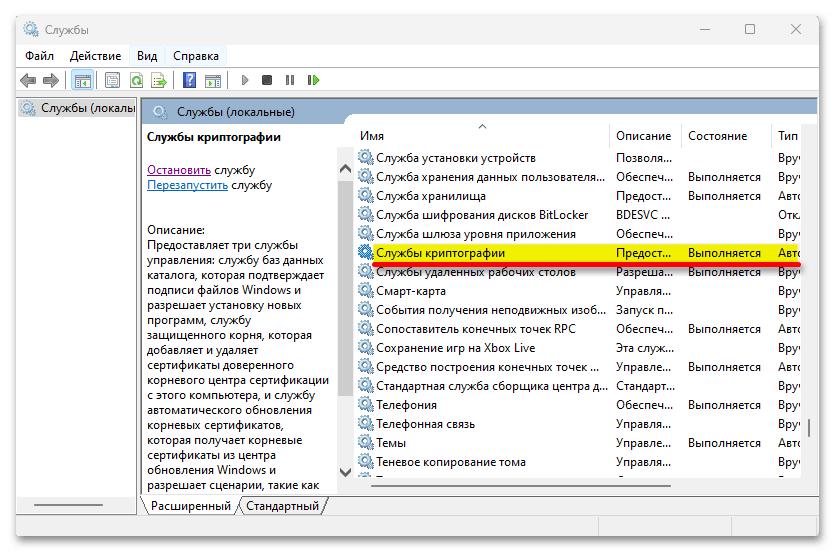
«Службы криптографии»,

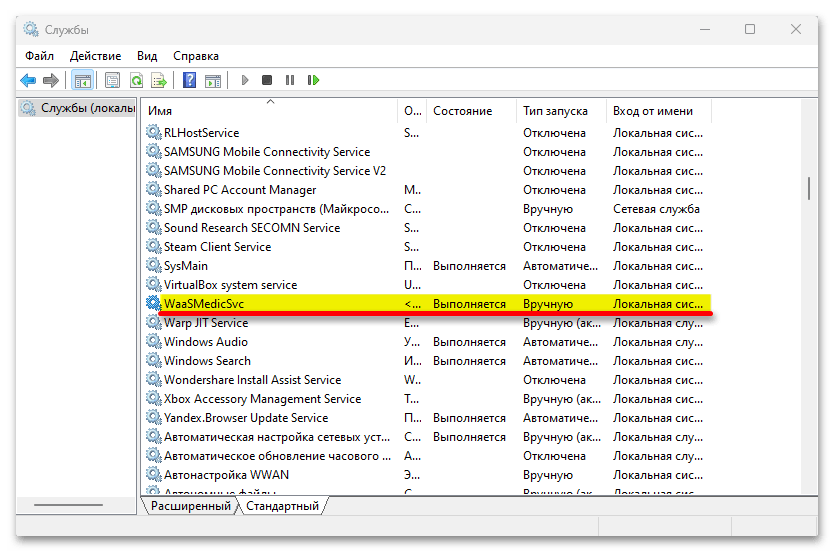
и «WaaSMedic».
Способ 4: Включение магазина
Проверьте, не включен ли в «Редакторе локальной групповой политики» параметр, ограничивающий работу Microsoft Store. Просто уже бывали случаи, когда именно по этой причине не загружались обновления для операционной системы. Правда, этот способ выполним только на компьютерах с Windows 11 «Pro» и выше, так как домашняя версия такой редактор не поддерживает.
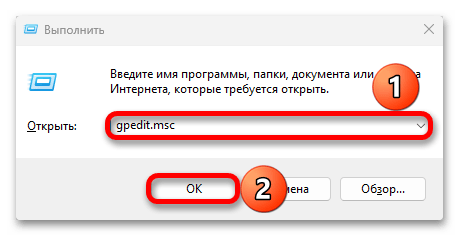
- Сочетанием клавиш «Windows+R» вызываем окно «Выполнить», вводим команду
gpedit.mscи нажимаем «OK».
Читайте также: Запуск «Редактора локальной групповой политики» в Windows 11
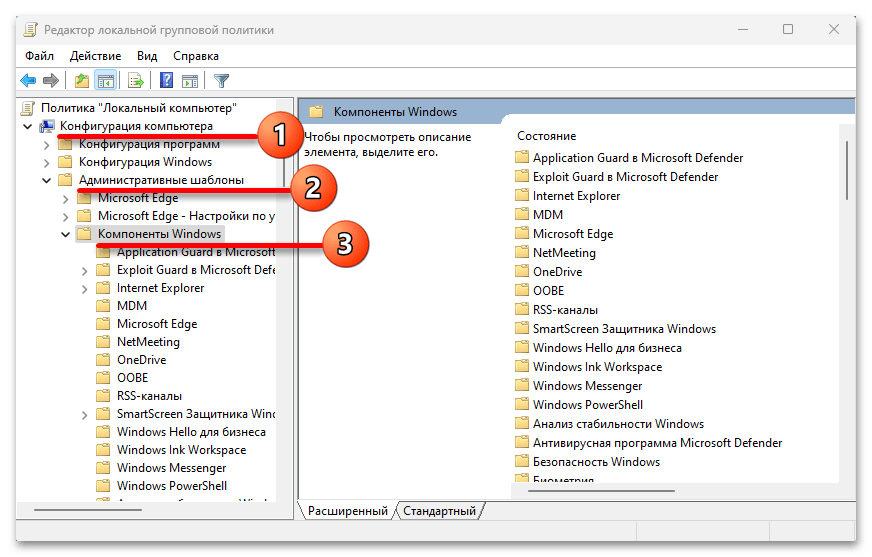
- Переходим в каталог с компонентами Windows так, как показано на скриншоте ниже:
Конфигурация компьютера/Административные шаблоны/Компоненты Windows
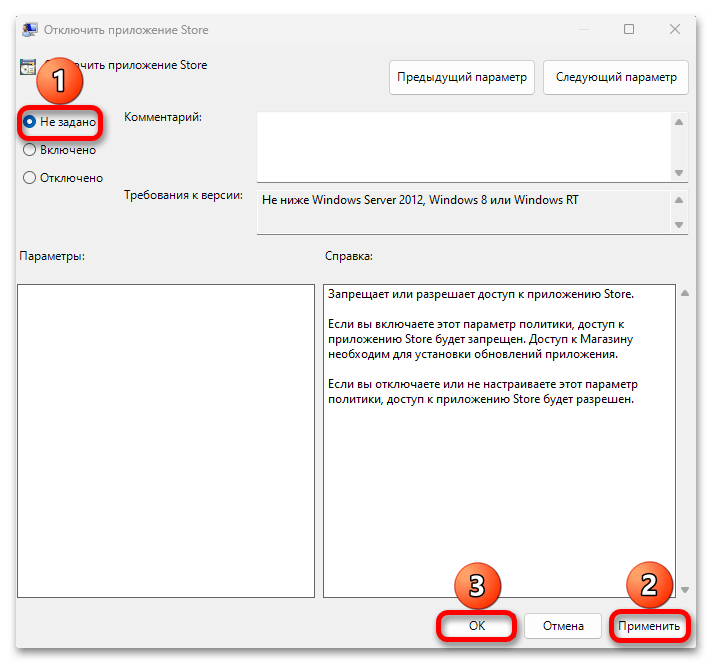
жмем на папку «Магазин» и двойным кликом открываем параметр, отключающий приложение Store.
- Если он включен, значит, выбираем значение «Отключено» или «Не задано», применяем изменения, закрываем «Редактор» и перезагружаем компьютер.
Другие решения
Если ошибку выдает какой-то один апдейт, а все остальные скачиваются без проблем, можно попробовать загрузить его отдельно из каталога Microsoft и установить вручную.
Для устранения неполадок в работе «Центра обновления» операционная система поддерживает специальное средство, которое, если повезет, сделает все за вас.
Не исключено, что сначала нужно восстановить поврежденные системные файлы или обновить/установить отсутствующие драйверы устройств. В общем, если выше описанные действия не помогли, то есть и другие способы устранения ошибки, о которых подробно написано в отдельной статье на нашем сайте.
Подробнее: Восстановление работы Центра обновления в Windows 11
Наша группа в TelegramПолезные советы и помощь
The problem we are going to discuss here can occur when upgrading by any method whether through Update assistant, automatic mode, or Media creation tool. Moreover, sometimes this will trouble when you try to install or update applications from Microsoft Store by causing the process to fail and showing a message. However, we have covered this issue earlier in – How to Fix 0x80248014 Windows 10 Update error WU_E_DS_UNKNOWNSERVICE but it needs more attention.
Error 0x80248014 generally shows up because of malfunctions in components or missing the associated files. The message that will come across during this occurrence in Windows 11 or 10 is “Error 0x8024801, There were some problems installing updates, but we”ll try again later.” Windows Update failures occur due to a variety of factors, including insufficient disk space, problems with internet connectivity, damaged Windows Update Components, etc.
Error 0x80248014 in Windows Update
Here is how to fix error 0x80248014 in Windows 11 or 10 –
Way-1: Launch the Windows Update Troubleshooter
Windows Update Troubleshooter is a built-in program that detects problems and restores the related settings to default. Running this tool will likely solve 0x80248014 error automatically.
- Click on Start.
- Type – Control Panel.
- Press – “Enter”.
- Change the “View By” setting to “Large icons“. See – How to Make Windows 10 Control Panel Icon Size Bigger.
- Click – Troubleshooting.
- Choose the option Fix problems with Windows Update from the right pane.
- Troubleshooter window will appear; select – Next.
- Close the ‘Troubleshooter’ then restart your system.
Way-2: Reset the Windows Update Component
Windows Update Component is a crucial element of the process that includes the associated services and SoftwareDistribution having deciding folders. A faulty component may be a culprit for any errors you see while updating Windows. Luckily, you can reset the Windows Update Component using manual method or PowerShell script without any risks and hazards. This post elaborates the same – How to Reset Windows Update to Default in Windows 10. Let’s see an easier way aka using PowerShell script –
- Press Window and R.
- Type – cmd.
- Hit – Ctrl + Shift + Enter.
- Select Yes on the confirmation prompt.
- On the command prompt copy-paste below lines one by one, and press Enter each time –
net stop wuauserv
net stop cryptSvc
net stop bits
net stop msiserver
ren C:\Windows\SoftwareDistribution SoftwareDistribution.old
net start wuauserv
net start cryptSvc
net start bits
net start msiserver
ren C:\Windows\System32\catroot2 Catroot2.old- Restart the system and check if the error 0x80248014 is solved.
Way-3: Reset Windows Store Cache
Store error 0x80248014 is also prevalent in addition to the same code with Windows update so it also needs remediation. Because Reset store cache is all-in-one solution to problems with the application this single method has the ability to fix this message appearing when installing or updating apps. Follow the steps –
- Click on Search from the Taskbar.
- Type – WSReset.exe.
- Select the same command from result.
- Allow the syntax to complete its task through Command prompt and Windows Store open.
See – 5 Ways to Reset Microsoft Store in Windows 10.
Way-4: Verify the status of Windows Update Services
Access the Services tool and verify that the services associated with Windows Update, for example, “Windows Update Medic”, “Windows Update”, “Update Orchestrator Service”, etc., are not disabled:
- Right click on Taskbar.
- Select Run.
- Type – services.msc.
- Hit Enter to launch the Services tool.
- Set the services Startup types as given below –
1] Manual – Windows Update Service or wuauserv (Triggered).
2] Services for Windows Update Medic or WaaSMedicSvc – Manual.
3] Automatic Cryptographic Service or CryptSvc.
4] Manual – Background Intelligent Transfer Service or BITS.
5] Automatic – DCOM Server Process Launcher or DcomLaunch.
6] Automatic – RPC Endpoint Mapper or RpcEptMapper.
7] Manual – Windows Installer or msiserver.
Way-5: Manually Install the Windows Update
This is one of the best methods to fix Error 0x80248014 in Windows 11 or 10. Using KB number, conduct a search for the patch on Update Catalog website and grab the standalone copy of installer. Now manually apply the patch by following the instructions –
- Start with knowing the patch number of the updates from Settings > “Update & Security > View update history”.
- Now navigate to Microsoft update catalog.
- Type the KB number in the search box.
- Hit Enter to have the results in front.
- Locate the file having architecture identical to the architecture of your CPU.
- Click on Download.
- Go to the location where the standalone file is kept and double-click on it.
- Click on Yes if prompted.
Way-6: Run a Virus Check
Use a Full scan to look for and eliminate any viruses or dangerous programs that could be running on your system. Several malicious codes can not only interfere with Windows update installing process but also steal your data. Move with the steps under and remove them –
- Click on Start.
- Type “Security”.
- Hit Enter to launch Windows Security app.
- Choose the option ‘Virus & threat protection.
- Select the link Scan options.
- Check the – ‘Full scan’.
- Finally, click on – Scan now.
- In case, you have already third-party anti-malware run a thorough scan using that.
- When finished reboot the device and check if the error is resolved.
Way-7: Rebuild or Recreate the Software Distribution Folder
Windows 11 or 10 stores its Updates in the SoftwareDistribution folder (aka “C:\Windows\SoftwareDistribution\Download“). In order to download and install updates from scratch, this folder may occasionally become corrupted, and you will need to recreate it. Follow these steps to recreate or rebuild the “SoftwareDistribution”:
- Press – Win+R.
- Type – services.msc.
- Click – OK
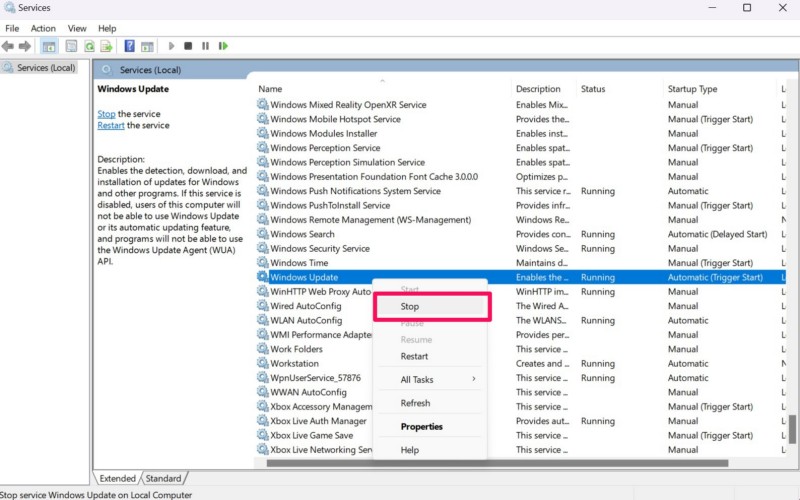
- Right click on – Windows Update service.
- Select – Stop from the Context menu.
- Then, open Windows Explorer (Win+E) and go to: C:/Windows/.
- Locate the SoftwareDistribution folder and remove it.
- Restart your computer.
- Go to “Windows Update Settings” and click on Check for updates.
Way-8: Clear the Catroots2 folders’ Contents
You might want to try emptying the catroot and catroot2 contents to see if it helps. These folders contain files and ‘folders’ having signature of Windows Update package.
- Go to “C:\Windows\System32\catroot2” and ‘delete’ all items there.
- Similarly access “C:\Windows\System32\catroot2”. Select all the files and folders in the directory and press Delete.
- Restart your computer and recheck for updates.
Way-9: Restart Windows PC
To ensure maximum performance, you should reboot the Windows 10/11 device once a week at least. Some users inform that only restarting the system has solved error 0x80248014 in Windows 11 or 10 for them so you can give an attempt to it
Way-10: Remove Unnecessary Temp Files
A built-in function in Windows 10 and Windows 11 following their predecessors allows users to delete temporary files. To remove any superfluous transient files go with the instructions below.
- Click on – Search.
- Type – cleanmgr.
- Press – Enter.
- On Disk cleanup small pop-up, click on OK.
- Select Clean up system files on the next window.
- Again choose OK
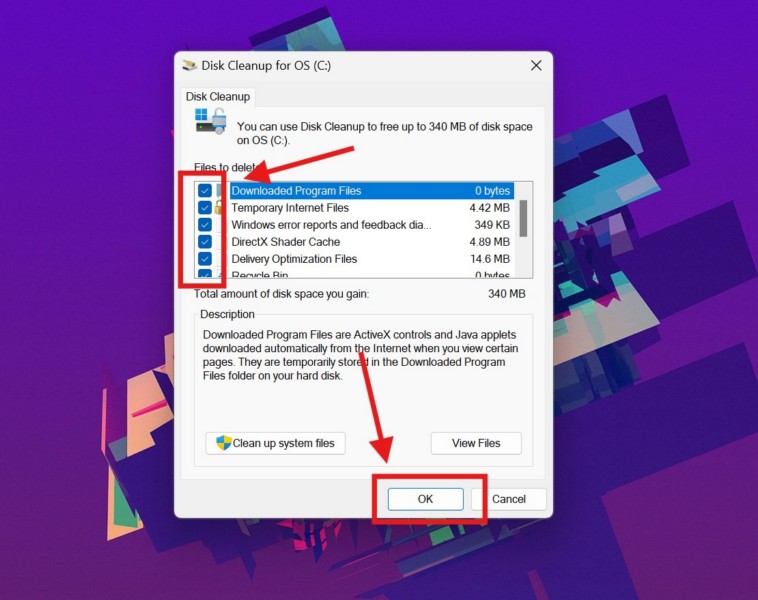
- Check all the boxes under “Files to delete” section.
- Click on OK and then on Delete Files.
- Restart the PC and check if Error 0x80248014 no longer occurs.
Methods:
Way-1: Launch the Windows Update Troubleshooter
Way-2: Reset the Windows Update Component
Way-3: Reset Windows Store Cache
Way-4: Verify the status of Windows Update Services
Way-5: Manually Install the Windows Update
Way-6: Run a Virus Check
Way-7: Rebuild or Recreate the Software Distribution Folder
Way-8: Clear the Catroots2 folders’ Contents
Way-9: Restart Windows PC
Way-10: Remove Unnecessary Temp Files
That’s all!!
If you are a Windows user, you would already know how important it is to keep the Windows operating system up-to-date. This requires timely download and installation of Windows updates that are released by Microsoft on supported PCs and laptops. However, what do you do when a major update is available on your Windows 11 PC or laptop and you cannot download it via the Windows Update page in the Settings app? This has been happening for many users as they are getting the Windows Update error 0x80248014 whenever they are trying to download and install a latest Windows 11 update on their PCs or laptops.
Now, as you have already landed on this page, we presume that you are getting the same Windows Update error 0x80248014 on your Windows 11 PC or laptop and are looking for effective fixes for it. Well, fret not! In this comprehensive guide, we will discuss everything about the Windows Update error 0x80248014 and show you some of the most effective fixes to resolve the issue on your Windows 11 PC or laptop. So, without further ado, check out the following sections right away!
What is the Windows Update Error 0x80248014 on Windows 11?
Before we jump onto our list of fixes and suggestions to resolve the Windows Update error 0x80248014 on Windows 11, let’s quickly take a look at what it actually is and which underlying issues causes the error in the first place.
The Windows Update error 0x80248014 usually shows up due to issues with the Windows Update service or with other Windows services related to the same. It can also trigger due to Windows Update cache and temporary files. However, in rare cases, the error 0x80248014 can show up due to issues with system files in the system file directory on Windows 11.
The Windows Update error 0x80248014 indicates that the Windows Update system is unable to access the Windows servers and fetch the download package of the latest Windows update. So, users can try out a few fixes to try and clear the path for the Windows Update system to access the Windows servers on Windows 11 PCs and laptops. If nothing works, they can always manually download and install the latest Windows 11 update on their devices.
Fix Windows Update error 0x80248014 on Windows 11 PCs and Laptops
Alright, now that you know a bit about the Windows Update error 0x80248014 and the underlying issues that might cause it to show up on Windows 11 PCs and laptops, take a look at some of the troubleshooting methods that can help you resolve the same. We have scoured the web and listed the fixes and suggestions that have helped other users get rid of the error 0x80248014 on their Windows devices.
Along with the below fixes and suggestions, you will find easy-to-follow, step-by-step guides to execute them on your Windows 11 PC or laptop yourself. Having said that, let’s jump right onto our list of troubleshooting methods to fix the Windows Update error 0x80248014 on Windows 11, shall we?
1. Check Your Internet Network
The Windows Update system relies on an active and stable internet network to download the Windows update packages from Microsoft’s servers. Hence, if the internet network connected to your Windows 11 PC or laptop is facing downtime or experiencing slow speeds, the Windows Update services will not be able to fetch the update packages to download and might trigger the Windows Update error 0x80248014.
So, one of the first things that you should check when you get the Windows Update error 0x80248014 on your device is the internet network. You can open a web page using your web browser or launch an online application and check if it is loading up.
In case you find that your internet network is down or experiencing slower-than-usual speeds, you can turn off and turn on the router (for Wi-Fi connections) or disconnect and reconnect the ethernet cable (for wired connections). If that does not bring your internet network back to normal, contact your Internet Service Provider (ISP) and report about the issue.
Once your internet network is active and stable, open the Windows Update page in the Settings app and try downloading the latest update. Check if you are getting the Windows Update error 0x80248014 or not.
2. Check the Disk Space on Your Windows 11 PC or Laptop
Another major reason why you might encounter the Windows Update error 0x80248014 on your Windows 11 PC or laptop is low disk space. You see, the Windows update packages are quite big in size and require sufficient amount of free space within the primary drive of your device to properly download. So, if you do not have enough free space in your primary drive, which is usually the C drive, you can very well encounter the Windows Update error 0x80248014 on your device.
In this case, you must uninstall some programs or delete some data from within your primary drive to free up space. Once you are able to free up enough space to accommodate the latest Windows update package on your Windows 11 PC or laptop, try downloading it via the Windows Update page in the Settings app. With the necessary amount of free space available within your primary drive, you should not get the Windows Update error 0x80248014 on Windows 11.
3. Run the Windows Update Troubleshooter on Windows 11
Now, if your internet is working fine and you have enough free space but still getting the Windows Update error 0x80248014 when trying to download a Windows update on your Windows 11 PC or laptop, you can try running the Windows Update troubleshooter. If you did not know, the Windows Update troubleshooter is a handy tool built into Windows that can detect and resolve issues relating to the Windows Update system.
So, you can follow the steps right below to run the Windows Update troubleshooter on your Windows 11 PC or laptop and check if that helps you get rid of the Windows Update error 0x80248014:
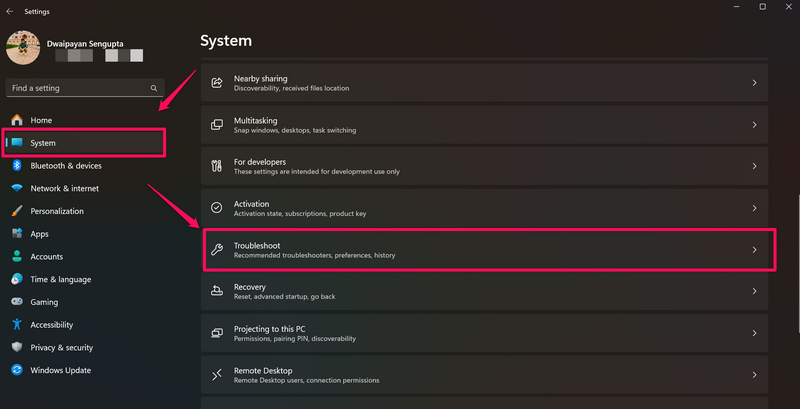
1. Use Windows + I to launch the Settings app on your Windows device.
2. Under the System tab on the left navigation bar, click the Troubleshoot option on the right pane.
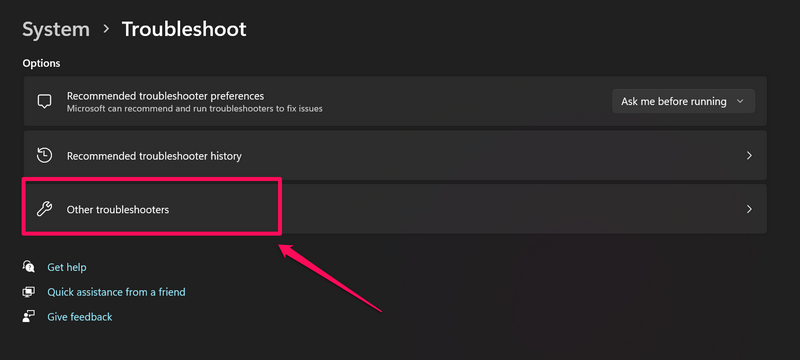
3. Click the Other troubleshooters option.
4. Locate the Windows Update troubleshooter on the following page and click the Run button next to it to initiate the process.
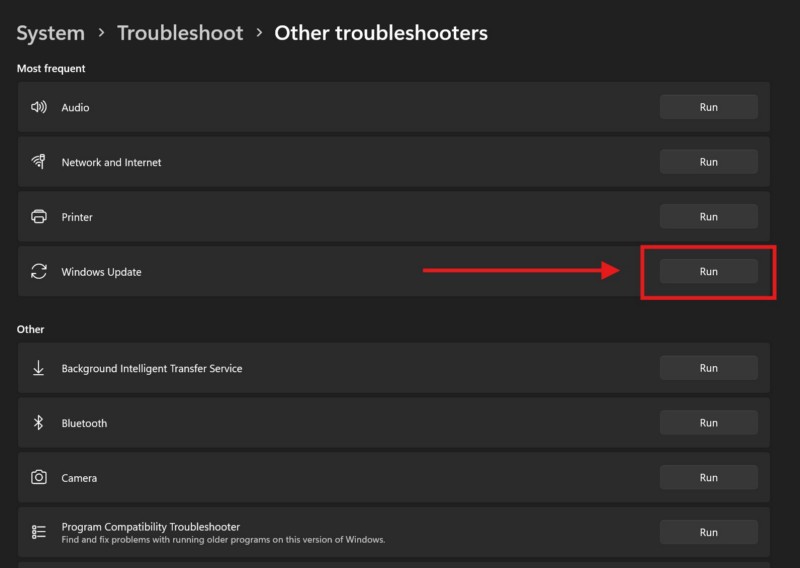
5. Wait for the troubleshooter to detect the issues.
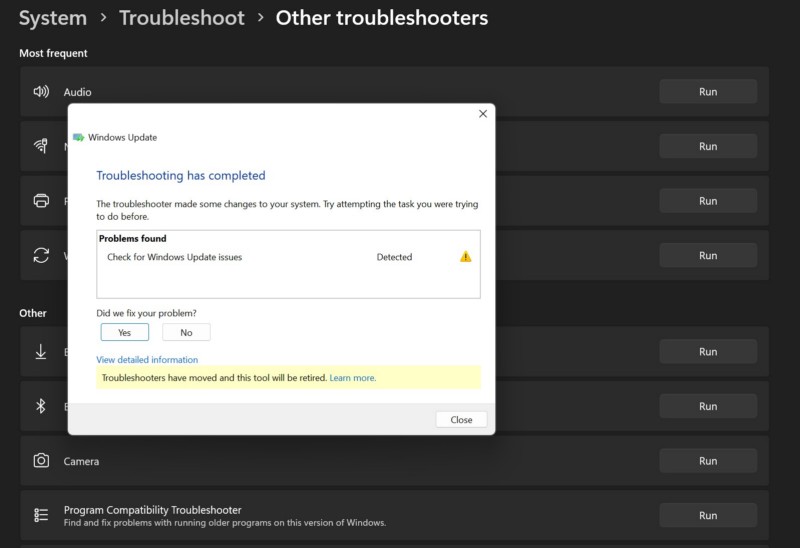
6. If the tool finds any underlying issues that might generating the Windows Update error 0x80248014, it will resolve them automatically.
Hence, after the Windows Update troubleshooting process is completed on your Windows 11 PC or laptop, try downloading the latest update package and check whether or not the Windows Update error 0x80248014 is generating.
4. Restart the Windows Update Services on Windows 11
The next thing you can try to resolve the Windows Update error 0x80248014 on your Windows 11 PC or laptop is restarting the Windows Update service and other services that are related to the Windows Update system. This essentially resets the Windows Update service components on Windows 11 and resolves the technical glitches that might be causing the Windows Update error 0x80248014 to generate on your device.
So, follow the steps right below to restart the Windows Update service and other related services on your Windows 11 PC or laptop:
1. Press the Windows + R hotkey to open the Run tool on your device.
2. Type in or copy-paste the following path address and press the Enter key or click the OK button:
Services.msc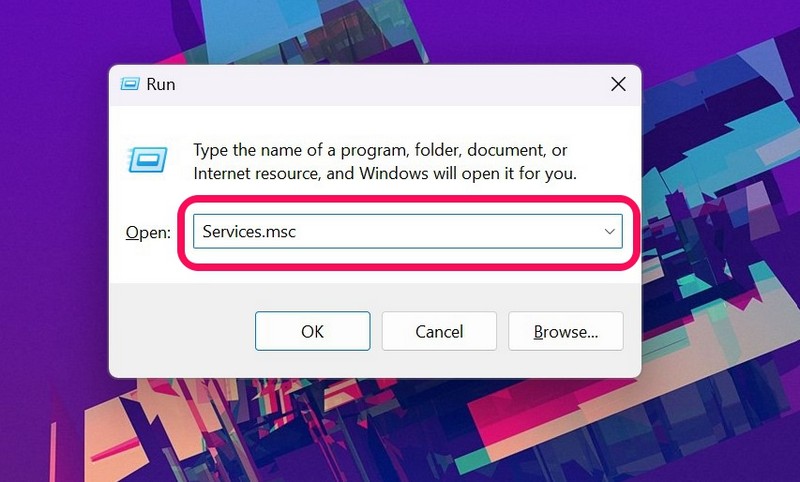
3. Within the following Services window, first locate the Windows Update service on the right pane. The items on the right pane are listed in an alphabetical order and you can press the W key on your keyboard to find all the services with the “Windows” moniker.
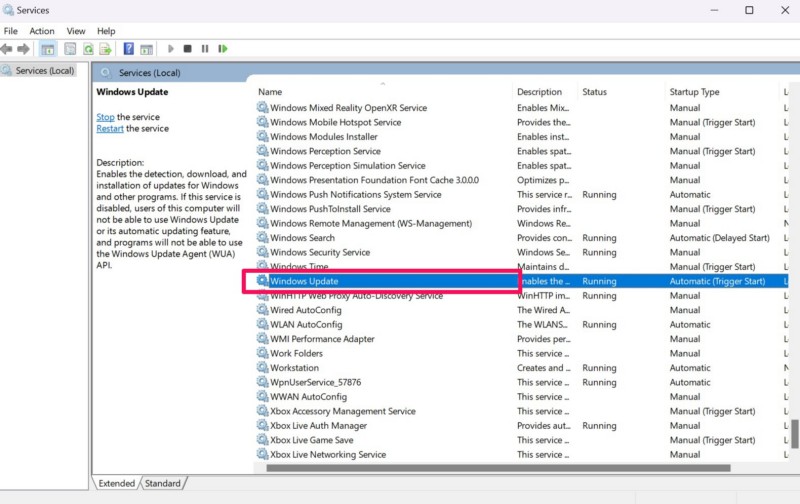
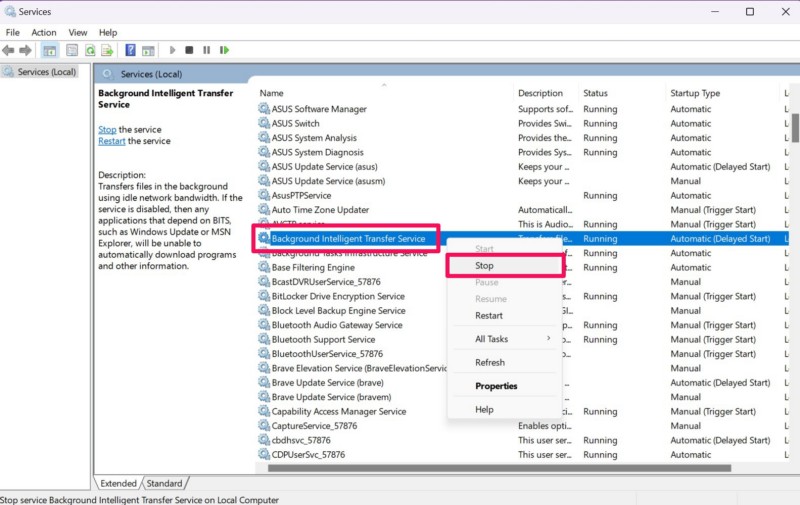
4. Once you find the Windows Update service, right-click on it and click the Stop option on the context menu.
5. Now, find the Background Intelligent Transfer Service on the list and stop the service just as you did the Windows Update service.
6. Next, find the Cryptographic Services on the list and stop that as well.
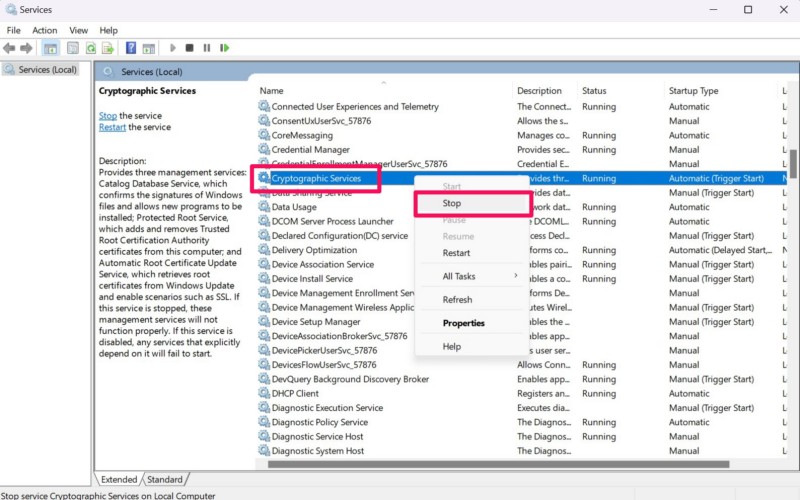
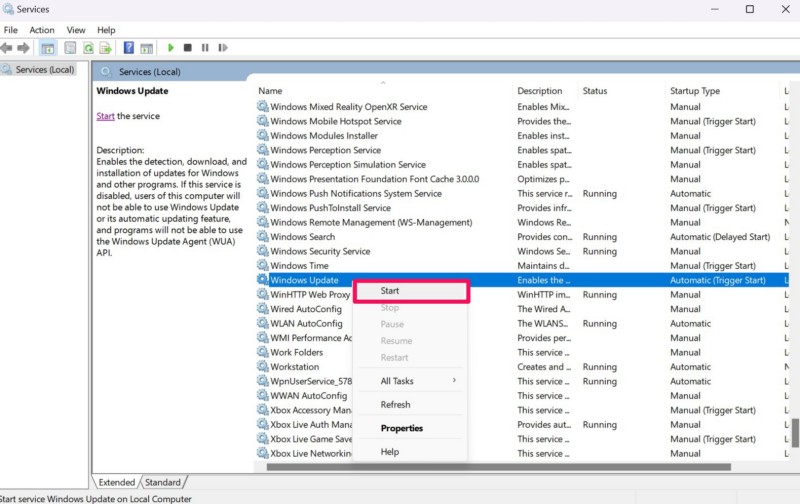
7. Wait a few seconds and then restart all the above services that you stopped. You can start them by right-clicking and selecting the Start option on the context menu.
8. Finally, reboot your Windows 11 PC or laptop via the Start menu.
Following the restart of your device, open the Windows Settings app, go to the Windows Update tab, and try downloading the latest Windows update. If the Windows Update error 0x80248014 does not generate, it means that there was a technical issue with the Windows Update service or the other services related to it.
5. Clear the Windows Update Cache on Windows 11
If restarting the Windows Update services on your Windows 11 PC or laptop did not resolve the Windows Update error 0x80248014, the next thing you can do is clear the Windows Update cache on your device. The Windows Update cache files are temporary files that are stored within the system and if any of them becomes corrupted on your device, you can encounter the Windows Update error 0x80248014 while downloading a newer update.
So, follow the steps right below to clear the Windows Update cache on your Windows 11 PC or laptop and check if that gets rid of the Windows Update error 0x80248014:
1. Use steps 1-4 from the previous fix (Fix #4) to stop the Windows Update service on your device.
2. Now, use the Windows + E hotkey to open the File Explorer.
3. Copy-paste the following path address on the above URL bar within the File Explorer window and press Enter:
C:\Windows\SoftwareDistribution\Download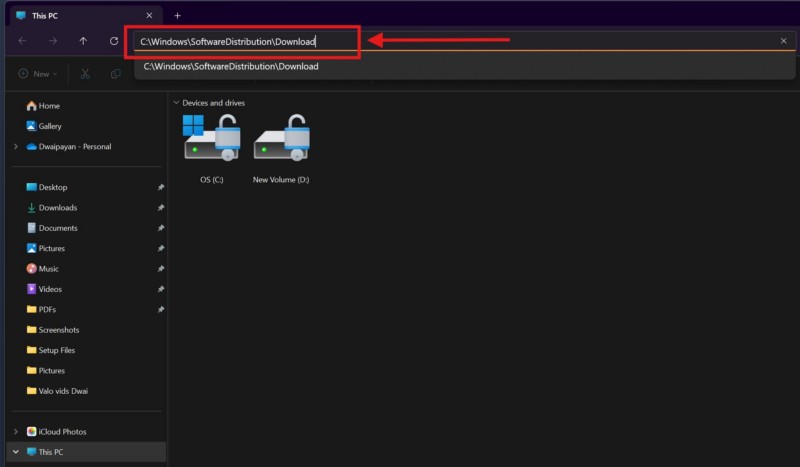
4. Within the following folder, press Ctrl + A to select all the available files or folders, right-click on any of them, and hit the Delete option on the context menu.
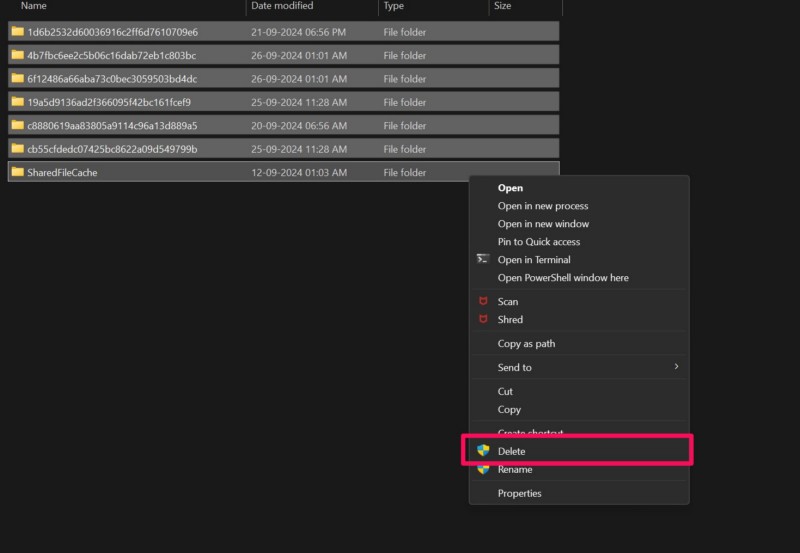
5. Next, open the Services window once again and restart the Windows Update service.
Finally, go to the Windows Update page within the Settings app and try downloading the latest update package. Check whether or not the Windows Update error 0x80248014 is showing up or not.
6. Use Disk Cleanup on Windows 11
Apart from Windows Update cache files, the Windows Update error 0x80248014 can also trigger due to issues within other temporary files stored on your Windows 11 PC or laptop. If that is indeed the case, you can try running the Disk Cleanup tool on your device and check if that resolves the issue.
Follow the steps right below to run the Disk Cleanup tool on your Windows 11 computer:
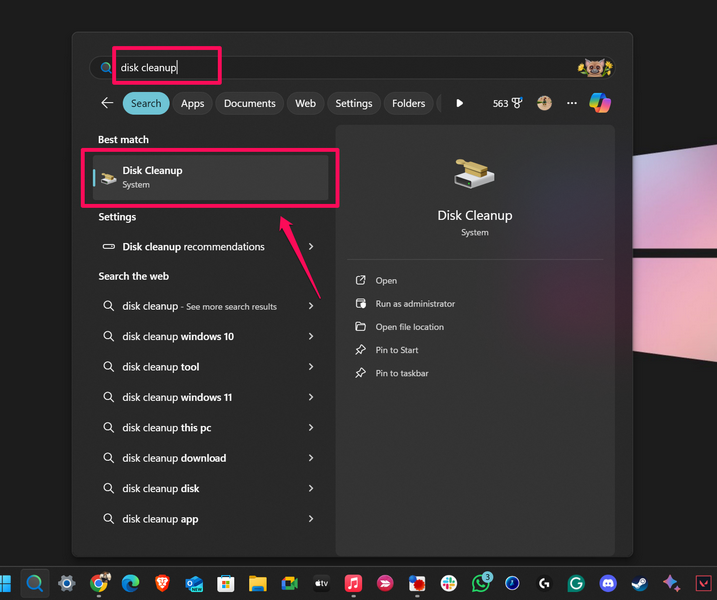
1. Use Windows + S to invoke Windows search.
2. Type in Disk cleanup in the above text box and click the Disk Cleanup tool on the search results page.
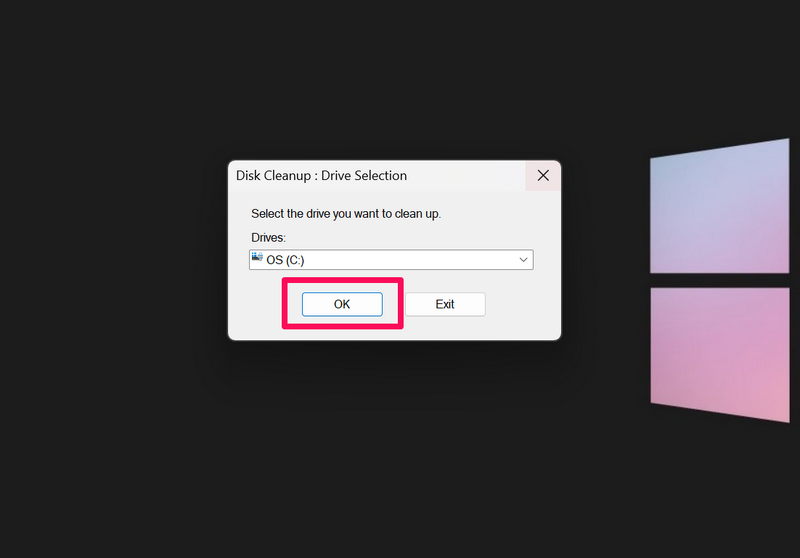
3. In the following Drive Selection window, select your primary disk drive, which is usually the C drive, and hit the OK button.
4. Finally, check all the boxes under the Files to delete section within the following window and click the OK button.
This will remove all the temporary files, cache, and other data from your Windows 11 PC or laptop. So, after running the Disk Cleanup tool, try downloading the latest Windows update via the Settings app and check whether or not you are getting the Windows Update error 0x80248014.
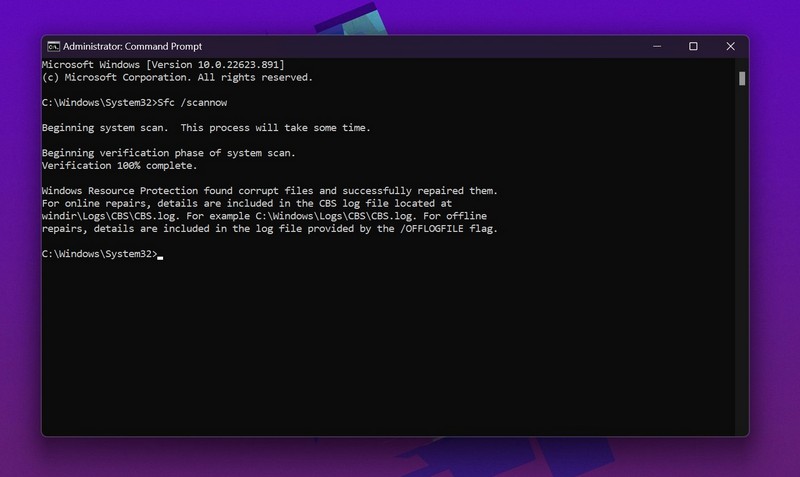
7. Run SFC Scan on Your Windows 11 PC or Laptop
As mentioned earlier, in some rare cases, the Windows Update error 0x80248014 can be a result of issues with system files on Windows 11 PCs and laptops. So, if that is the case for your device, you can try running the System File Checker scan, popularly known as the SFC scan, to get rid of the said error. The SFC scan is essentially a command-line tool that scans the system file directory and replaces missing or corrupted system files.
You can follow the steps right below to run the SFC scan on your Windows 11 PC or laptop:
1. Use Windows + S to open Windows search and type in cmd in the search box.
2. Click the Run as administrator button for the Command Prompt tool on the search results page.

3. Click Yes on the following User Account Control (UAC) prompt.
4. Within the elevated Command Prompt window, type in or copy-paste the following command and press the Enter key to run it:
sfc /scannow
5. Wait for the SFC scan to complete. The process may take some time but do not close the Command Prompt window until it is completed.
6. After completion, restart your Windows 11 PC or laptop.
Following the restart, sign into your Microsoft account, open the Settings app, and check whether or not you are getting the Windows Update error 0x80248014 when trying to download the latest Windows update.
8. Run DISM Scans on Windows 11
Much like the SFC scan, the DISM scans, also called the Deployment Image Servicing and Management scans, is a group of command-line executables that resolves issues with the disk images of the Windows system. So, if the SFC scan was unable to resolve the Windows Update error 0x80248014 on your Windows 11 PC or laptop, there is a high chance that the DISM scans will be able to do so.
Follow the steps right below to run the DISM scans on your Windows 11 device and check if it works in resolving the Windows Update error 0x80248014:
1. Use steps 1-3 from the previous fix (Fix #7) to open an elevated Command Prompt window on your Windows 11 PC or laptop.
2. In the Command Prompt window, type in or copy-paste the following commands and press Enter to run them one by one:
DISM /Online /Cleanup-Image /CheckHealthDISM /Online /Cleanup-Image /ScanHealthDISM /Online /Cleanup-Image /RestoreHealthNote: Make sure to run the above command in the same order and one after the other. Do not run them in Command Prompt simultaneously.

4. Wait for all the DISM scans to complete.
5. Restart your Windows 11 PC or laptop after completion.
Following the restart, go to the Windows Update page within the Settings app, initiate the download of the latest Windows update, and check whether the Windows Update error 0x80248014 shows up or not.
9. Download and Install the Windows Update Manually on Windows 11
Now, if all the above methods fail to resolve the Windows Update error 0x80248014 on your Windows 11 PC or laptop, you can manually download the Windows update package. Microsoft has an official catalog where the company stores all the latest updates for its products and services. From there, users can find and manually download the latest updates for Windows 11, Windows 10, and various other products and services.
So, follow the steps right below to manually download the Windows update package that is generating the Windows Update error 0x80248014 on your Windows 11 PC or laptop:
1. Note down the version number of the latest Windows update package that you are trying to download.
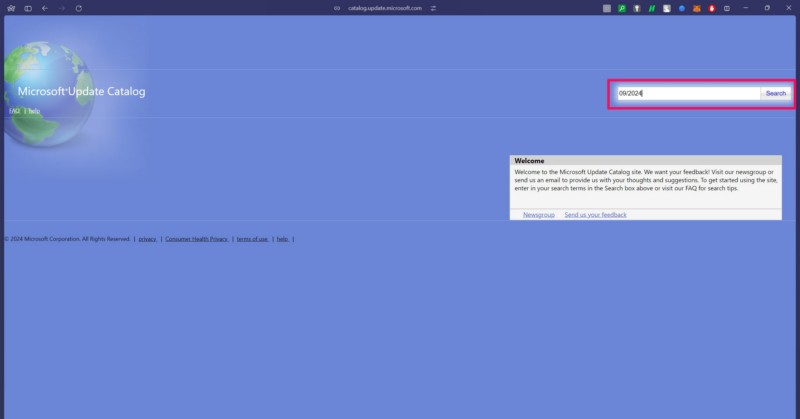
2. Then, use a web browser (preferably Microsoft Edge or Chrome) to open the Microsoft Update Catalog page via the provided link.
3. Type in the current month and year within the search bar at the top right corner and hit the Enter key or click the Search button.
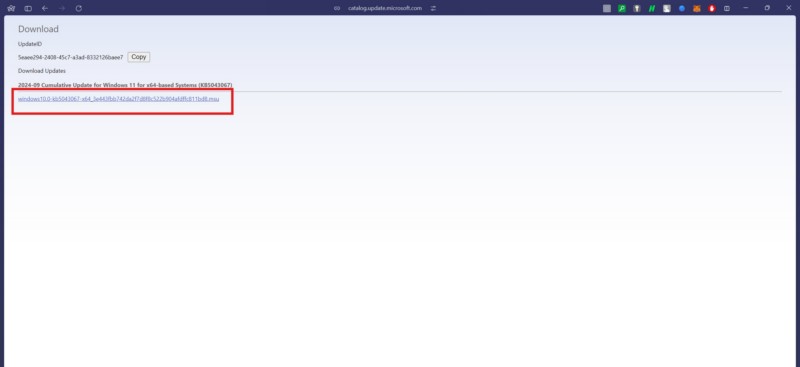
4. On the following search results page, locate the latest updates for Windows 11 and click the Download button for the same.

Note: Make sure to check the “Products” column for the update package that you are trying to install and ensure that it says Windows 11. You must also match the version number of the update package with the number which you noted previously.
5. Click the download link for the update on the following page to initiate the download
6. After the download is completed, locate the update package on your device and double-click it to initiate the installation process.
7. Follow the on-screen instructions to complete the installation of the Windows update.
8. Restart your Windows 11 PC or laptop.
So, that is how you can manually download latest Windows updates on your Windows 11 PC or laptop. This is one of the best workarounds when you get the Windows Update error 0x80248014 or any other similar error.
FAQs
Why can’t I download Windows updates on my Windows 11 PC?
There could be various reasons why you might not be able to download Windows updates on your Windows 11 PC or laptop. It could be due to a faulty internet network, issues with the Windows Update service and other related services, issues with system files, low disk space, or corrupted Windows Update cache.
How do I fix the Windows Update error 0x80248014 on Windows 11?
The Windows Update error 0x80248014 usually arises when there are issues with the Windows Update services on Windows 11. So, one of the common ways to fix the Windows Update error 0x80248014 is to restart the Windows Update service, Background Intelligent Transfer Service, and the Cryptographic service. You can also run the SFC and DISM scans to fix issues with system files and disk images that might be causing the Windows Update error 0x80248014 to generate on your PC or laptop.
How to clear Windows Update cache on Windows 11?
To clear the Windows update cache data on Windows 11, first stop the Windows Update service in the Services window, navigate to the C:\Windows\SoftwareDistribution\Download in the File Explorer, and delete all the files and/or folders stored within it. After removing the cache data, restart the Windows Update service in the Services window.
Wrapping Up
With that, we wrap up our in-depth guide on how to fix the Windows Update error 0x80248014 on Windows 11 PCs and laptops. As the said error prevents users from downloading the latest Windows update packages on their devices, it creates a major issue as outdated Windows versions often contain serious bugs, glitches, and security vulnerabilities that might compromise their Windows 11 PCs or laptops.
So, if you were encountering the Windows Update error 0x80248014 on your computer, we hope this article was able to help you resolve it right away. If it did, don’t forget to let us know in the comments below. If you liked the content of this guide, you can subscribe to our website and YouTube channel to get updates about more such posts and videos. As always, thank you for reading this article till the very end, and we will see you again in our next guide.