
Все способы:
- Способ 1: Настройка даты и времени
- Способ 2: Встроенное средство устранения неполадок
- Способ 3: Восстановление системных файлов
- Способ 4: Чистая загрузка Windows
- Способ 5: Установка обновлений вручную
- Способ 6: Сброс компонентов «Центра обновлений»
- Способ 7: Настройки прокси-сервера
- Вопросы и ответы: 0
Способ 1: Настройка даты и времени
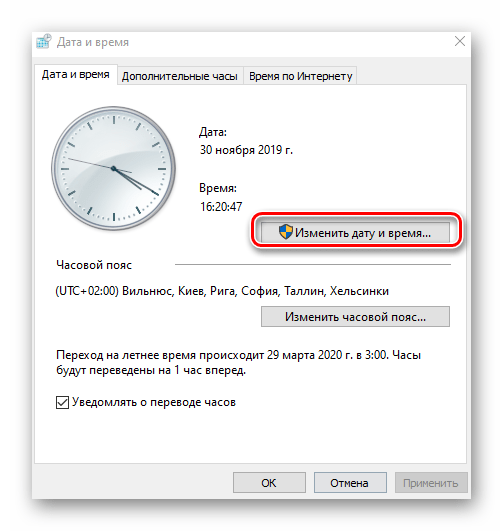
Проблемы при обновлении и, соответственно, ошибка с кодом 0x80244022 нередко появляются, когда в системе установлены некорректные настройки даты и времени. Компьютеру не удается произвести правильную синхронизацию с серверами Microsoft и установить апдейт.
В первую очередь проверьте, правильные ли у вас выставлены настройки даты и времени. При необходимости можно вручную изменить значения, используя встроенные средства системы. О том, как это сделать, более детально написано в нашем отдельном материале.
Подробнее: Изменение времени в ОС Windows 10
Как только дата и время установлены верно, вновь попробуйте установить обновление Windows 10. Если у вас возникли проблемы с настройкой и синхронизацией, переходите по ссылке, чтобы узнать, как можно решить их.
Подробнее: Решение проблемы с синхронизацией времени в Windows 10
Способ 2: Встроенное средство устранения неполадок
В «десятке» предусмотрены встроенные средства, которые ищут и устраняют неполадки в тех или иных программных компонентах системы. Не исключение и «Центр обновления», который отвечает за скачивание и установку апдейтов:
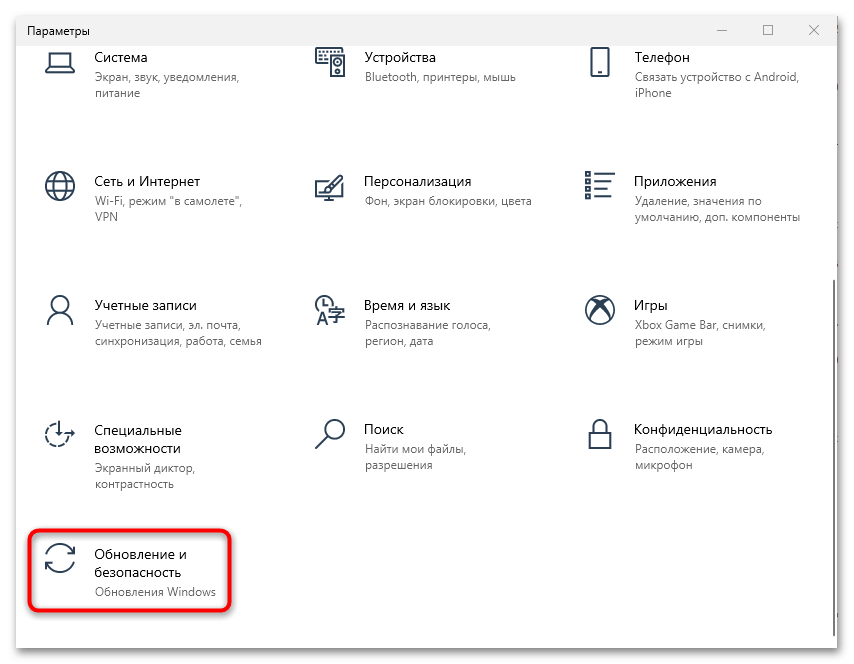
- Откройте «Параметры». Для этого нажмите на кнопку «Пуск» и выберите соответствующий пункт из списка.
- Перейдите в раздел «Обновление и безопасность».
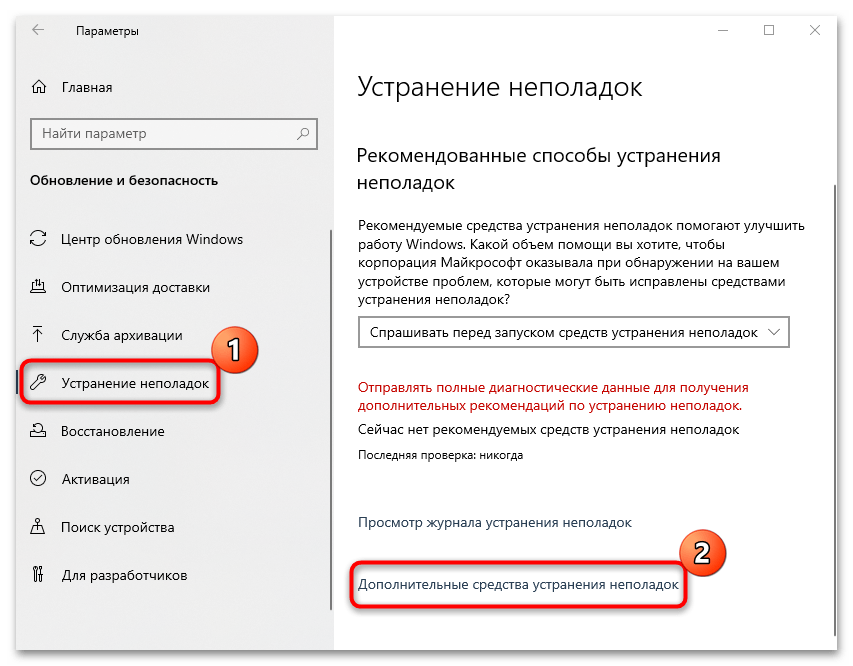
- Затем на вкладке «Устранение неполадок» кликните по строке «Дополнительные средства устранения неполадок».
- Найдите строку «Центр обновления Windows» и нажмите на нее. Появится кнопка, запускающая средство, — по ней и кликните.
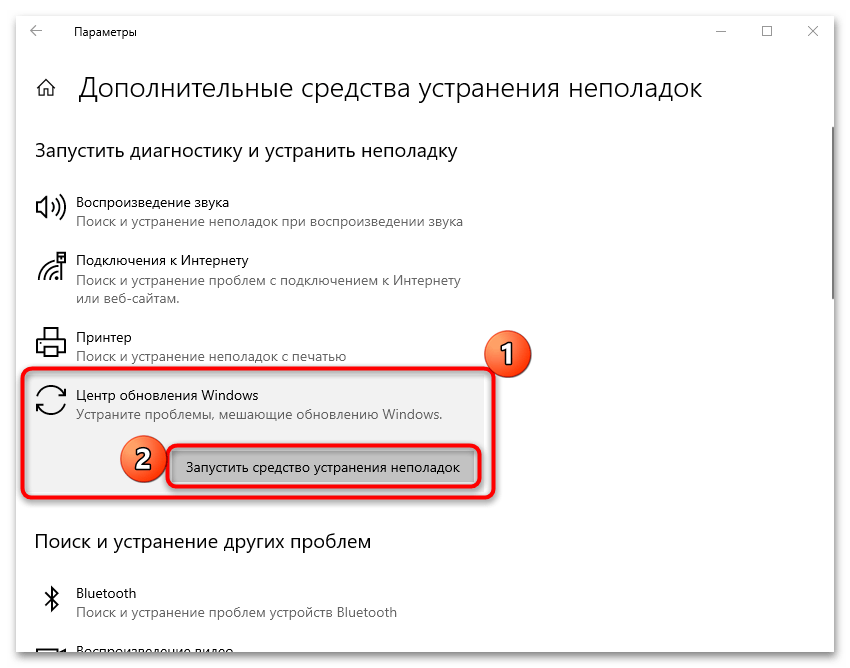
После этого ничего делать не придется до тех пор, пока средство не проверит систему на наличие неисправностей с компонентом. Если проблема будет выявлена, то она решится автоматически. Также могут быть предложены пути решения для пользователя.
Способ 3: Восстановление системных файлов
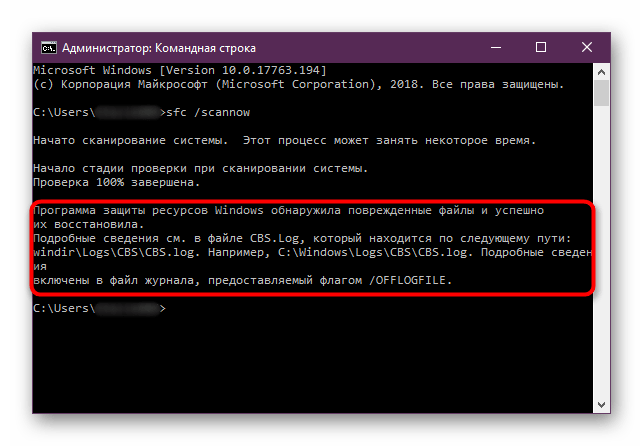
Попытайтесь восстановить важные системные файлы ОС, поскольку вследствие ошибок или воздействия вирусов их целостность могла быть нарушена. Чтобы найти и исправить поврежденные данные, используются специальные утилиты, которые запускаются из интерфейса консоли «Командная строка». О том, как проверить системные файлы, читайте в нашем отдельном материале.
Подробнее: Использование и восстановление проверки целостности системных файлов в Windows 10
Способ 4: Чистая загрузка Windows
Ошибка 0x80244022 может быть вызвана тем, что в работу «Центра обновлений Windows» или непосредственно в установку апдейтов вмешивается служба или программа. Если у вас нет времени искать проблемный компонент, то можно выполнить включение ОС без всех лишних фоновых процессов со стороны встроенных и сторонних инструментов или софта.
Чистая загрузка Windows 10 предполагает запуск с отключенным службами и элементами автозагрузки:
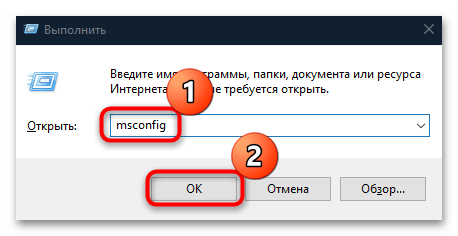
- Одновременно зажмите клавиши «Win + R», в строке диалогового окна «Выполнить» напишите
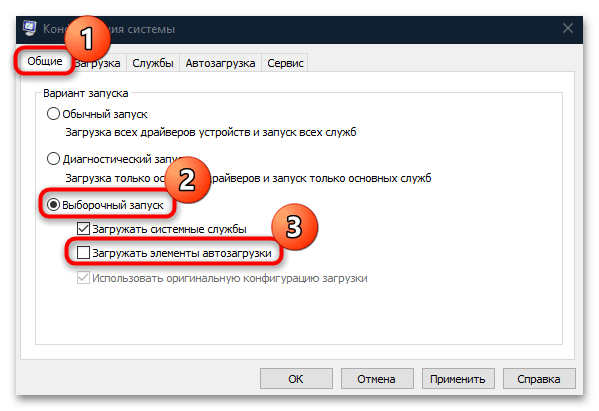
msconfigи нажмите на кнопку «ОК». - Отобразится окно «Конфигурация системы». На вкладке «Общие» отметьте пункт «Выборочный запуск», затем уберите отметку у опции «Загружать элементы автозагрузки».
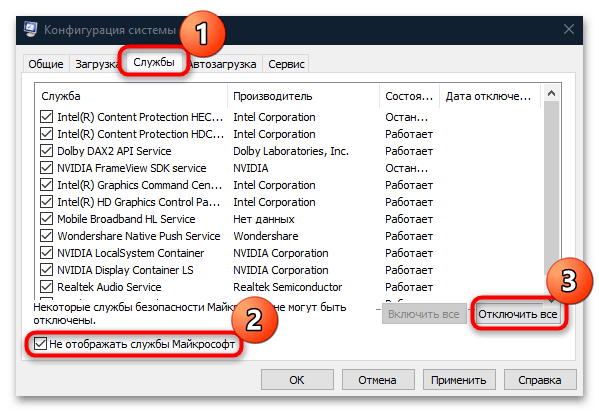
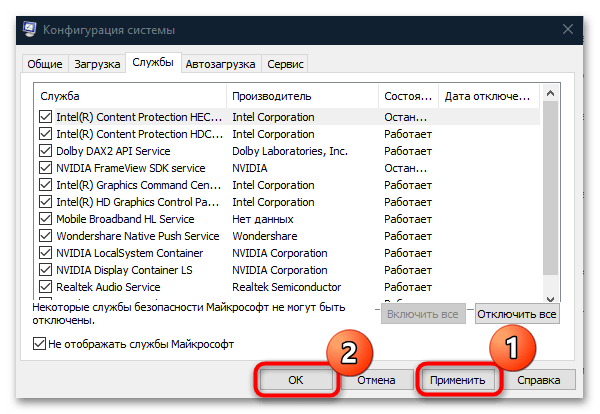
- Далее переходите на вкладку «Службы» и отметьте «Не отображать службы Майкрософт». Оставшиеся элементы нужно отключить – нажмите на соответствующую кнопку.
- Примените и сохраните настройки.
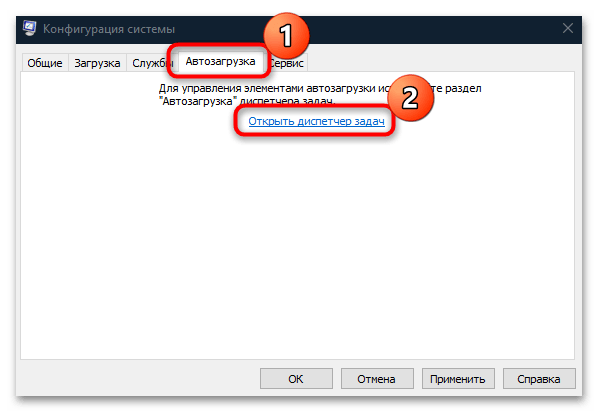
- Затем можно перейти в настройку автозагрузки в «Диспетчере задач». Делается это на вкладке «Автозагрузка».
- В открывшейся утилите уберите лишние элементы автозагрузки, выделив их и нажав на кнопку «Отключить» внизу.

После того как все сделано и отключено, перезагрузите компьютер и попытайтесь обновить систему.
Способ 5: Установка обновлений вручную
Есть смысл попробовать обновить операционную систему вручную без использования автоматических средств. Помимо скачивания апдейтов с официального сайта, можно применить сторонние утилиты, которые являются хорошей альтернативой штатному «Центру обновления Windows».
Несмотря на то что операция довольно трудоемкая и занимает много времени, в некоторых случаях она способна исправить ошибку с кодом 0x80244022. Альтернативные способы обновления Виндовс 10 наши авторы разбирали в отдельных статьях.
Подробнее:
Устанавливаем обновления для Windows 10 вручную
Программы для обновления Windows 10
Способ 6: Сброс компонентов «Центра обновлений»
Раз ошибка касается обновлений операционной системы, есть вариант сбросить настройки и компоненты «Центра обновления Windows 10». Процедура предполагает перезапуск некоторых служб (BITS, Windows Update, Cryptographic и других), а также создание новых папок на локальном диске, которые связаны с апдейтами с сохранением старых как резервные копии.
Чтобы исправить рассматриваемую ошибку, запустите «Командную строку» от имени администратора, затем поочередно копируйте и вставляйте команды, приведенные ниже. После каждой из них нужно нажимать на клавишу «Enter».
net stop bits

net stop wuauserv

net stop appidsvc

net stop cryptsvc

ren %systemroot%\SoftwareDistribution SoftwareDistribution.old

ren %systemroot%\system32\catroot2 catroot2.old

net start bits

net start wuauserv

net start appidsvc

net start cryptsvc

Следует отметить, что первые четыре команды отключают некоторые службы Windows, две следующие команды – переименовывают папки, где есть апдейты, в резервные копии. Последние четыре – вновь активируют отключенные службы. После этого пробуйте установить обновление Windows — нужные для этого папки создадутся автоматически, а старые, с расширением «.old», вы можете удалить самостоятельно (%systemroot% — это C:\Windows).
Способ 7: Настройки прокси-сервера
Появление ошибки 0x80244022 нередко обусловлено проблемами с подключением, а точнее – с прокси-сервером. Некоторые пользователи пишут, что из-за локальных подключений по прокси-серверу возникает конфликт с обновлениями. Попробуйте отключить функцию, а затем повторить установку апдейтов:
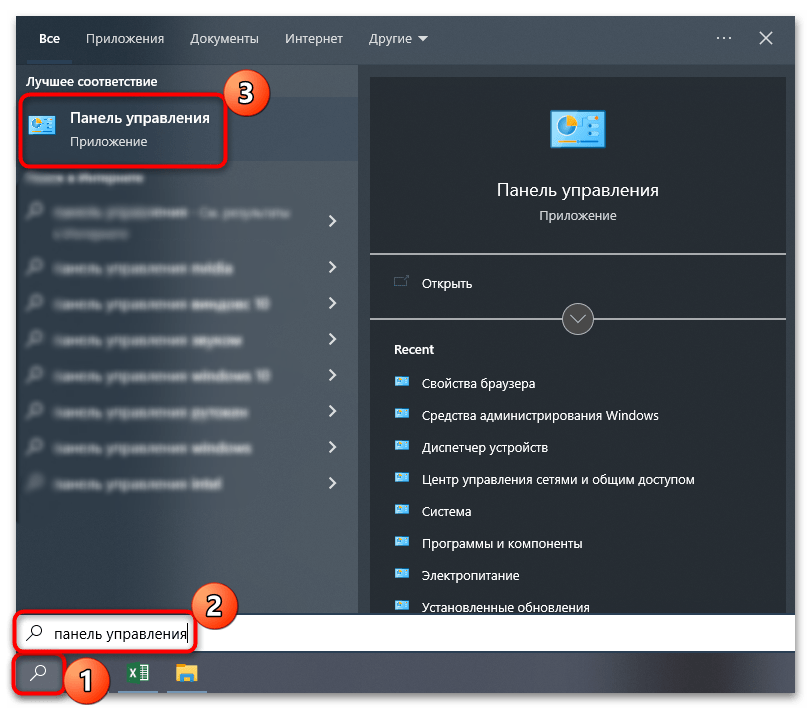
- Перейдите в «Панель управления», отыскав ее через системную поисковую строку.
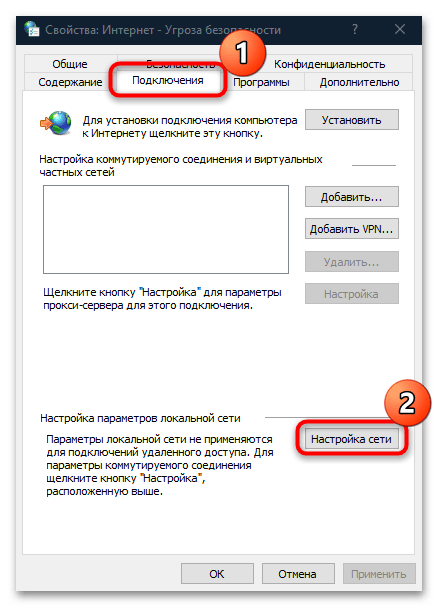
- В качестве просмотра разделов выберите «Крупные значки» и вызовите окно «Свойства браузера».
- На вкладке «Подключения» нажмите на кнопку «Настройка сети» внизу.
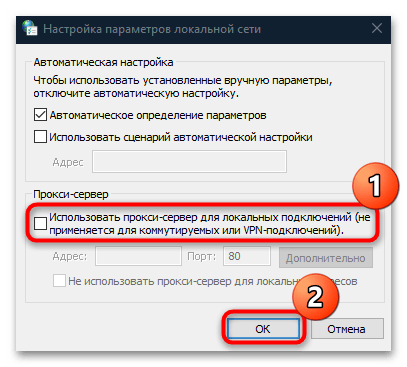
- Появится системное окно, где нужно снять отметку у функции «Использовать прокси-сервер для локальных подключений». Подтвердите настройку, нажав на кнопку «ОК».

Наша группа в TelegramПолезные советы и помощь
У одного из заказчиков столкнулся с интересной проблемой установки обновлений на клиентах с Windows 7. Обновления распространяются посредством сервера WSUS, интегрированного в среду System Center Configuration Manager. На SCCM сервере используется Windows Server 2008 R2, версия WSUS соответственно — WSUS 3.0 SP2. Должны обновляется клиентские ПК с Windows 7 SP (порядка 2000 компьютеров).
Клиентские компьютеры не могут получить обновления с Software Update Point, в журналах при этом фиксируется ошибка 0x80244022.
На клиентской стороне журнал WUAhandler.log содержит ошибки:
OnSearchComplete - Failed to end search job. Error = 0x80244022.
Scan failed with error = 0x80244022.
В журнале службы Windows Update WindowsUpdate.log тоже множество ошибок вида:
2017-08-09     11:02:04:371   612     4858    Setup   WARNING: SelfUpdate check failed to download package information, error = 0x80244022
2017-08-09     11:02:04:371   612     4858    Setup   WARNING: SelfUpdate check failed to download package information, error = 0x80244022
2017-08-09     11:02:04:371   612     4858    Agent    * WARNING: Skipping scan, self-update check returned 0x80244022
2017-08-09     11:02:04:371   612     4858    Agent    * WARNING: Exit code = 0x80244022
2017-08-09     11:02:04:371   612     4858    Agent  WARNING: WU client failed Searching for update with error 0x80244022
2017-08-09     11:02:04:371   612     4abc    AU        # WARNING: Search callback failed, result = 0x80244022
2017-08-09     11:02:04:371   612     4abc    AU        # WARNING: Failed to find updates with error code 80244022

На стороне сервера при этом в логе WSUSCtrl.log есть ошибка:
request failed with HTTP status 503: Service Unavailable
Failures reported during periodic health check by the WSUS Server SPB-MAN1. Will retry check in 1 minutes
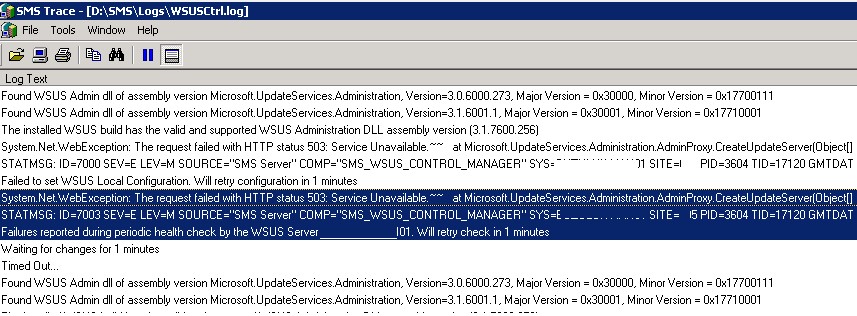
Т.е. по логу видно, не отвечает сайт WSUS отвечает. Действительно, если открыть URL адрес WSUS Administration (http://SCCM-Srv1:8530), появляется ошибка:
HTTP Error 503. The service is unavailable
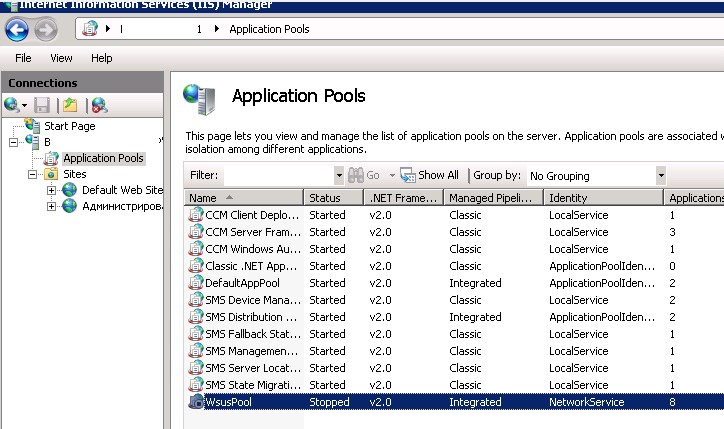
Открыв консоль управления IIS Manager, я увидел что пул, отвечающий за работу WSUS (WsusPool) находится в отключенном состоянии.
После ручного запуска пула, через 20-30 минут он опять падет. В журнале системы при этом обнаружилось интересное сообщение Event ID 5117 WAS с текстом:
A worker process serving application pool ‘WsusPool’ has requested a recycle because it reached its private bytes memory limit

По умолчанию в системе лимит используемой памяти для пула WsusPool
ограничен 1,8 Гб. При превышении этого значения (а это может запросто случится при большом количестве клиентов WSUS, особенно при первом сканировании), пул сбрасывается. Чтобы понять сколько памяти использует ваш пул WSUS, достаточно посмотреть за процессом w3wp.exe. При превышении лимита 1,8 Гб, процесс перезапускается. Таким образом для решения проблемы нужно увеличить объем выделяемой памяти.
Примечание. Проблема отчасти напоминает рассмотренный ранее кейс с ошибкой 0x8024401 при получения обновлений c в Windows 10.
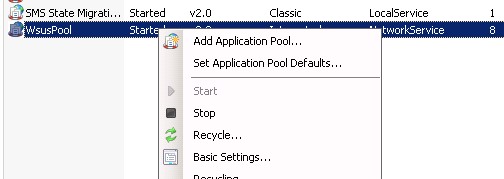
Сделать это можно из консоли IIS Manager, выбрав Application Pools -> ПКМ WsusPoll -> Recycling, увеличив значение в поле Private memory usage (in KB).
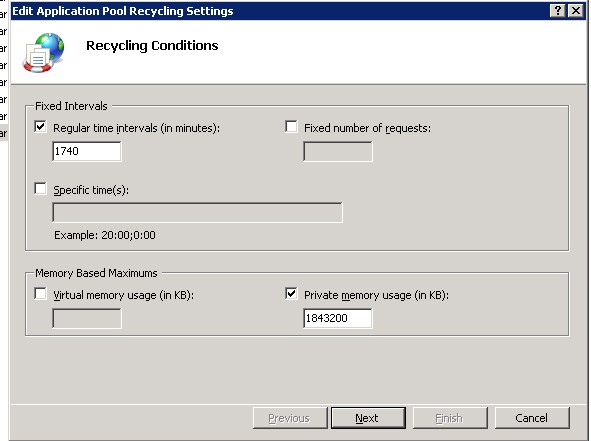
Насколько увеличить, решайте сами, рекомендую начать с 3-4 Гб. В моем случае для 2000+ клиентов WSUS, оказалось достаточно 6 Гб памяти.
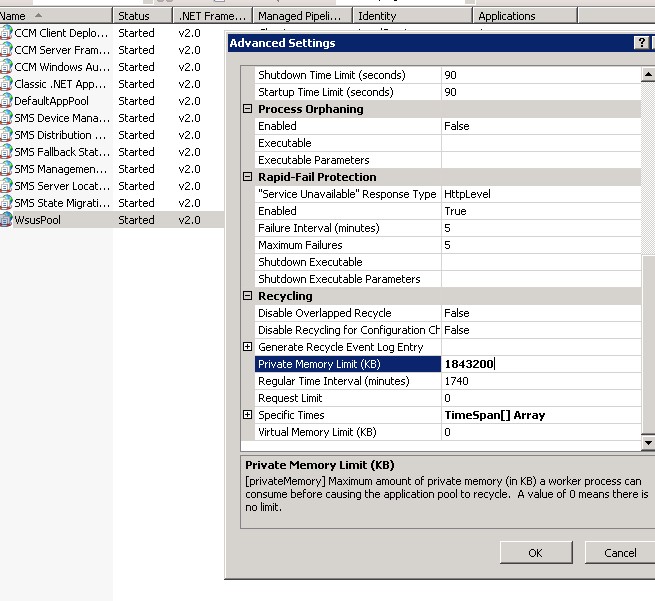
Размер выделяемой памяти также можно изменить и из раздела расширенных настроек пула (Advanced Settings), увеличив значение в поле Private memory usage (KB).
Осталось перезапустить пул через кнопки Start/Stop или Recycle.
После чего процесс w3wp.exe перестал потреблять более 3 Гб RAM. А на следующий день на компьютерах стали закачиваться обновления.
Совет. При большом количестве клиентов WSUS, получающих обновления с SCCM Software Update Point (особенно получающих обновления впервые), в расширенных настройках пула можно увеличить следующие параметры:
- Queue Length с 1000 до 25000
- “Service Unavailable” Response Type — c HttpLevel на TcpLevel
- Failure Interval (minutes) – с 5 до 30
- Change ‘Maximum Failures’ – с 5 to 60
Кроме того, рекомендуется установить на WSUS 3.0 SP2 под Windows Server 2008 R2 следующие обновления:
- KB2720211
- KB2734608
На WSUS 4.0 на Windows Server 2012 R2 такие:
- KB2919442
- KB2919355
- KB3095113
- KB3159706
|
Центр обновления Windows |
|||||
|
|||||
|
|||||
|
|||||
|
|||||
|
|||||
|
|||||
|
|||||
|
|||||
|
|||||
|
|||||
|
|||||
|
|||||
|
В связи с введением в действие Постановления Правительства Российской Федерации от 14.11.2023 № 1905 т.н. «о запрете популяризации VPN» с 1 марта 2024 года — любое обсуждение способов обхода блокировок и VPN на портале запрещено!
Several users running on 23H2 or other versions reported encountering a nagging error code when trying to install Windows update. As a result, the process fails and upgrading or updating the system becomes impossible. The error code is 0x80244022. Main reason for this error is faulty connection between Microsoft update server and your local computer. Furthermore, the update server might be unreachable at times. However, you should also check whether system files are not corrupted and third-party programs or proxies are not interfering with the update process.
No need to fret, though. When 0x80244022 error occurs, first of all, give your system a reboot and try updating later. If that doesn’t do the trick, let’s get hands-on. Start by resetting the Windows Update service, toggle off proxy settings, and double-check your date and time settings. Sometimes, it’s just a matter of mixed signals between your device and the update server. Now, Windows 11 hiccups are part and parcel of the deal but fear not. Manually installing updates, running an SFC scan, or letting the troubleshooter work its magic usually solves the puzzle.
Windows Update Error 0x80244022
Here is how to fix Windows Update Error 0x80244022:
Change DNS Settings
Since the issue is likely to appear due to unreachable update server you may change the DNS server addresses and then give a try. Follow the steps:
- Press Winkey+R and type ncpa.cpl.
- Hit Enter to launch the Network connections window.
- Right-click on the running adapter and select Properties.
- Check the item Internet Protocol (TCP/IPV4).
- Click on Properties.
- Select the option “Use the following DNS server addresses”.
- Check the following addresses in Preferred and Alternate DNS server respectively:
8.8.8.8 and 8.8.4.4

1.1.1.1 and 1.0.0.1

94.140.14.14 and 94.140.15.15
- Keep in mind to restart the system after changing.
- Go to Settings > Windows Update > Check for updates.
See: How to Fix Windows Update Error 0x80188309
Troubleshoot the System
Troubleshooting your system can be the key to resolving the pesky Error Code 0x80244022. Check out the steps mentioned below to fix the issue and get your Windows Update back on track effortlessly:
- Download the Windows Update Troubleshooter.
- Extract the files and launch wu.diagcab file.
- Follow the troubleshooting steps to fix the issues.
Run DISM via Command Prompt
DISM is a Windows application for repairing the Windows image, which includes Windows Setup, Windows Recovery Environment, and Windows PE. By following the method, you may be able to overcome error code 0x80244022 and ensure a more seamless Windows Update experience:
- Click on Search and type cmd.exe.
- Select Run as administrator.
- Enter the following commands sequentially:
DISM /Online /Cleanup-Image /CheckHealth
DISM /Online /Cleanup-Image /ScanHealth
DISM /Online /Cleanup-Image /RestoreHealth- Restart the computer and check if the Windows update problem is solved.
- If 0x80244022 still persists then again launch the command prompt (admin).
- Type:
sfc /scannowand hit Enter. - Exit Command Prompt, then retry Windows Update.
Manually download and install the Update
You might be able to fix the error by doing things yourself. Downloading the Windows update manually and installing it is a straightforward and effective way.
- Go to “Settings > Windows Update > Update history”.
- Find the KB causing the trouble.
- Visit the Microsoft Update Catalog, enter the KB code, and hit Enter.
- Find the supported file and click Download.
- Select the link to the Standalone package and save it to your computer.
- Open the downloaded patch to initiate the update.
Adjust Date & Time Settings
Don’t underestimate the impact of correct Date and Time settings in resolving the aforementioned Windows Update error as ensuring accurate synchronization can be the key to a smooth Windows Update experience.
Learn how a quick check on your Date and Time settings can play a crucial role in troubleshooting and potentially resolving this common issue:
- Click on Start and select Settings.
- Choose Time & language from the left menu.
- Select Date & time.
- Go to the Additional settings section and click on Sync now.
- Reboot your PC, and check the Date and Time.
Try Resetting Windows Update Components
Resetting Windows Update components is a potent solution for Error Code 0x80244022. However, proceed with caution as it involves tweaking Windows Registry entries. Therefore, creating backups is a good idea to ensure a safety net in case of any unforeseen hiccups during the process:
- Launch Command Prompt as Admin.
- Stop BITS, Windows Update, Cryptographic, and MSI Installer services with specific commands:
net stop bits
net stop wuauserv
net stop appidsvc
net stop cryptsvc- Then, use
Del “%ALLUSERSPROFILE%\\Application Data\\Microsoft\\Network\\Downloader\\qmgr*.dat- Execute
cd /d %windir%\system32. - Re-register BITS and Windows Update files using the provided commands:
regsvr32.exe atl.dll
regsvr32.exe urlmon.dll
regsvr32.exe mshtml.dll
regsvr32.exe shdocvw.dll
regsvr32.exe browseui.dll
regsvr32.exe jscript.dll
regsvr32.exe vbscript.dll
regsvr32.exe scrrun.dll
regsvr32.exe msxml.dll
regsvr32.exe msxml3.dll
regsvr32.exe msxml6.dll
regsvr32.exe actxprxy.dll
regsvr32.exe softpub.dll
regsvr32.exe wintrust.dll
regsvr32.exe dssenh.dll
regsvr32.exe rsaenh.dll
regsvr32.exe gpkcsp.dll
regsvr32.exe sccbase.dll
regsvr32.exe slbcsp.dll
regsvr32.exe cryptdlg.dll
regsvr32.exe oleaut32.dll
regsvr32.exe ole32.dll
regsvr32.exe shell32.dll
regsvr32.exe initpki.dll
regsvr32.exe wuapi.dll
regsvr32.exe wuaueng.dll
regsvr32.exe wuaueng1.dll
regsvr32.exe wucltui.dll
regsvr32.exe wups.dll
regsvr32.exe wups2.dll
regsvr32.exe wuweb.dll
regsvr32.exe qmgr.dll
regsvr32.exe qmgrprxy.dll
regsvr32.exe wucltux.dll
regsvr32.exe muweb.dll
regsvr32.exe wuwebv.dll
netsh winsock reset
net start bits
net start wuauserv
net start appidsvc
net start cryptsvc
Proxy Deactivation
Disabling proxy settings may help you resolve the error Code during Windows Update. Moreover, proxy settings can occasionally create a communication barrier between your device and the update server, resulting in a glitch.
Discover how a simple change in proxy settings may pave the way for a more seamless updating procedure, ensuring your system remains up-to-date and error-free. Here are the steps to follow:
- Press Win + R, type inetcpl.cpl, and Enter.
- Click on the Connections tab.
- Open LAN Settings.
- Tick Automatically detect settings.
- Unmark the Proxy server box.
- Click on OK and close the wizards.
Adjust Windows Update Service Settings
If you are still battling with this issue, then, you might want to tune up your Windows Update Service settings with these below-mentioned simple steps to potentially overcome this error 0x80244022. By ensuring the correct configuration, specifically setting the startup type to Manual, you pave the way for a smoother update process:
- Press Win key+R, type services.msc, and Enter.
- Right-click Windows Update and select Properties.
- Ensure Manual startup type.
- Click on the Service status Start.
- Click Apply, then OK.
- Exit the program.
- Retry the installing the update.
- After that, Restart your PC.
Methods:
Change DNS Settings
Troubleshoot the System
Run DISM via Command Prompt
Manually download and install the Update
Adjust Date & Time Settings
Try Resetting Windows Update Components
Proxy Deactivation
Adjust Windows Update Service Settings
That’s all!!
In this post, I will show you how to fix the Windows Update error 0x80244022 that appears when you attempt to download the latest Windows updates online. I will demonstrate multiple ways to resolve the Windows update download error 0x80244022.
On my Windows 11 PC, I encountered error 0x80244022 while downloading the latest updates. The update download was stuck in downloading state for a long time and after a few minutes it resulted in error 0x80244022.
Error 0x80244022 is a common error that most of us encounter during the installation of updates on Windows 11/10. There are numerous things that could prevent Windows Updates from downloading, but the error code is crucial to figuring out what’s wrong. Not to worry, I’ll outline some crucial steps you can take to resolve error 0x80244022.

On Windows 10, some users may see the error message stating “There were some problems installing updates, but we’ll try again later. If you keep seeing this and want to search the web or contact support for information, this may help: (0x80244022).”
Resolving Windows Update Error 0x80244022
The Windows update error 0x80244022 translates to service is temporarily overloaded. The error 0x80244022 occurs when the Windows update service encounters problems in connecting to the Microsoft Update website, downloading, and installing updates, among other things.
Because it is unclear why this issue occurs, it is recommended that a diagnostic scan of the system be performed to identify the source of the problem. The screenshot below shows the Windows update error 0x80244022 occurring on Windows 11 PC while installing the update KB5056372.

Now that you know why the error 0x80244022 occurs on Windows PC while downloading and installing the updates, let’s go through some solutions that can help you resolve this issue.
Solution 1: Run Windows Update Troubleshooter
When you face update download difficulties, another typical troubleshooting option is to run the built-in Windows update troubleshooter. This utility will run on your computer and notify you of any problems with Windows update components.
You can run the Windows update troubleshooter on your Windows 11 computer with the following steps. Right-click the taskbar’s Start icon to select Settings. Scroll down the System tab to select Troubleshoot. Click Other troubleshooters to view the troubleshooters. Then select the Run option for Windows Update.

The Windows Update troubleshooter launches, and this tool scans for issues related to Windows updates. The Windows update troubleshooter can identify the errors such as 0x80244022 and resolve it. The Windows update troubleshooting report shows the list of issues found on the PC. Normally, a restart is recommended after running the Windows update troubleshooter.

Solution 2: Run SFC Scan
The SFC (System File Checker) scan locates the corrupted files and fixes them after scanning. If you are encountering Windows update error 0x80244022, use the System File Checker to scan Windows and restore your files. Moreover, running this can also assist in fixing the mentioned update error. Use the following to launch the SFC Scan on your computer.
- Click Start and type “Command Prompt” and select Run as administrator.
- Enter the command sfc /scannow.
- The sfc /scannow command will scan all protected system files, and replace corrupted files with a cached copy that is located in a compressed folder at %WinDir%\System32\dllcache.
After the sfc scan now is complete, restart your computer and the error 0x80244022 should now be fixed.

Solution 3: Manually cleanup the SoftwareDistribution folder
If Windows Update isn’t working, and you are experiencing error 0x80244022, it could be caused by a problem with the SoftwareDistribution folder, and I will show you how to clean up the SoftwareDistribution folder on Windows PC.
The Software Distribution folder contains several files related to Windows Updates. Whenever the components or files get corrupt, you may encounter errors while downloading new updates. Deleting certain folders in the SoftwareDistribution folder will resolve these issues.
Perform the following steps to clear the SoftwareDistribution folder on Windows PC:
- Launch the File Explorer by pressing Windows+E keys on your keyboard.
- Press Ctrl+L at the same time to access the Address Bar, and type in %systemroot%\SoftwareDistribution, then press enter key. This will open the SoftwareDistribution folder.
- Inside it, locate the DataStore and Download folders and delete the contents of both folders.
- Reboot your computer and the updates should work properly.

Solution 4: Restart your Computer
The reason you encounter error 0x80244022 is due to Windows Update service being temporarily overloaded. So, it can be a temporary error that may not appear if you restart your computer. One of the ways to resolve error 0x80244022 is to restart your computer and run Windows Update check.
In the screenshot below, you can see that the Windows Update error 0x80244022 was resolved after restarting my PC. I was able to download the Windows updates without any errors. The KB5026372 update was downloaded and installed without any issues.

Also Read
- 2 Easy Ways to Remove Insider Preview Evaluation Copy Watermark
- How to Uninstall Windows Updates using PowerShell
- Fix: Windows Activation Error 0xC004C020
- Fix: Windows Update Error 0x80248007 in Windows 11
Still Need Help?
If you need further assistance on the above article or want to discuss other technical issues, check out some of these options.