
Table of contents
- How to Fix the Error 0x80244019
- Method 1: Check the features of your antivirus software
- Method 2: Use the troubleshooter for Windows updates
- Method 3: Change the settings for your Windows Update
- Method 4: Reset the Windows Update components
- Method 5: Perform a clean boot
- Method 6: Manually install the updates
- Method 7: Installing optional updates
- Method 8: Perform an in-place upgrade
- Conclusion
- FAQ
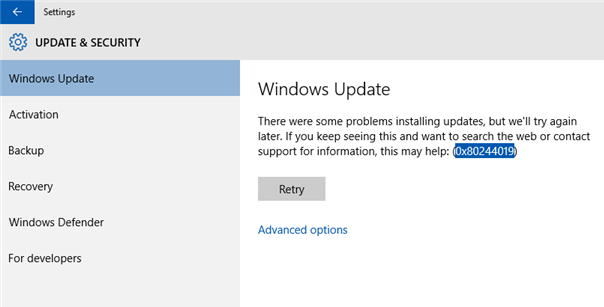
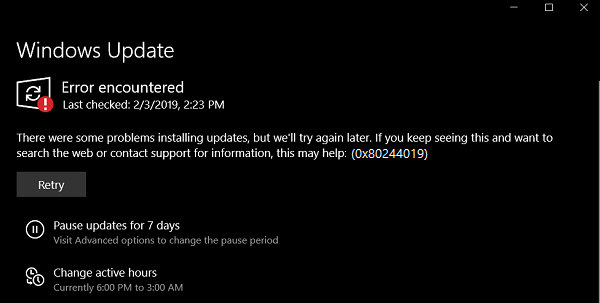
Have you experienced theWindows update error 0x80244019 ? This guide will help you resolve the problem. As you know, keeping your Windows updated is important to protect your system from cyber threats. However, the error number 0x80244019 can be problematic if it is not resolved early. This article will show you how to resolve the 0x80244019 error. Let’s begin.
How to Fix the Error 0x80244019
Follow the methods below to fix the 0x80244019 error:
Method 1: Check the features of your antivirus software
If you’re using a third-party antivirus program, it can interfere with your system and cause the error 0x80244019 to appear.
You can eliminate this problem by disabling certain features in your antivirus.
If you’ve tried that solution and yet the error persists, you should try removing your antivirus. This just might permanently fix the problem.
If so, we recommend switching to a different antivirus program.
PRO TIP
Several security tools are available on the market. However, we highly suggest using a reliable program like Auslogics Anti-Malware.
It is designed not to interfere with your main antivirus while detecting threats and attacks you’d never suspect existed.
You can remove the error and still get the protection your computer needs.
Learn more at: Auslogics Anti-Malware: Features and Reviews
Method 2: Use the troubleshooter for Windows updates
Windows 10 has different troubleshooters dedicated to repairing specific programs and processes.
Users who tried to find methods to fix Windows 10 error code 0x80244019 discovered that using the Windows update troubleshooter helped them resolve the problem.
You can also use that tool to get rid of the error. Simply follow these instructions:
- On your keyboard, press
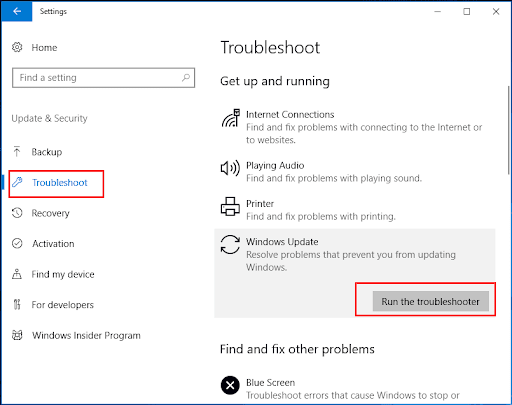
Windows key + I. This should open the Settings app. - Select Updates & Security , then go to the left pane and click Troubleshoot .
- Go to the right pane and click Windows Update .
- Click Run the troubleshooter .
- Once the troubleshooter has completed the scanning and repair process, check if the problem persists.
Related:Windows Update Troubleshooter: Fixing Windows Update Issues
Method 3: Change the settings for your Windows Update
Certain settings of your Windows Update client may be causing the error 0x80244019 to show up. You can tweak the options to see if this fixes the issue.
Simply follow the steps below:
- Click the Search icon on your taskbar.
- Type
settings, then hitEnter. - Go to Update & Security .
- Scroll down until you reach the Update settings section.
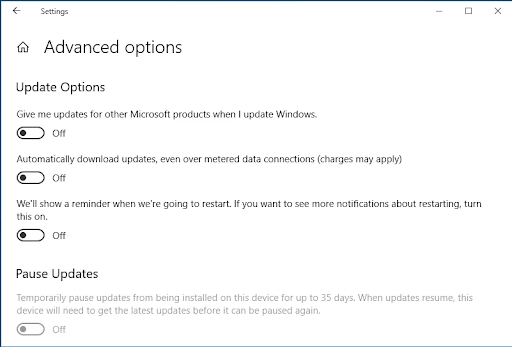
- Click on Advanced options .
- Switch off the Give me updates for other Microsoft products when I update Windows option.
Related:How to Fix Windows Update Error 0x80073712?
Method 4: Reset the Windows Update components
You have to ensure that all the important components of Windows Update are running correctly. You can’t successfully download and install the updates if they aren’t.
You might even see the error 0x80244019. Thankfully, this can be resolved by resetting certain components.
To do that, you just need to follow these instructions:
- Right-click the Windows logo on your taskbar.
- Select Command Prompt (Admin) or Powershell (Admin) from the menu.
- Run the following commands:
net stop wuauserv

net stop cryptSvc

net stop bits

net stop msiserver

ren C:\Windows\SoftwareDistribution SoftwareDistribution.old

ren C:\Windows\System32\catroot2 Catroot2.old

net start wuauserv

net start cryptSvc

net start bits

net start msiserver
These commands should reset the necessary components for Windows Update. Try downloading and installing the updates again and see if the error persists.
Related:[EXPLAINED] Does Windows 10 Need Antivirus?
Method 5: Perform a clean boot
The error 80244019 can show up due to certain third-party applications interfering with your system. You can fix this by performing a clean boot.
By doing this, your computer will start without any third-party services or applications. That said, here are the steps you need to follow:
- On your keyboard, press
Windows key + R. This should open the Run dialog box. - Type
msconfig, then hitEnter. - Go to the Services tab and select the Hide all Microsoft services box.
- Click Disable all .
- Go to the Startup tab, then click Open Task Manager .
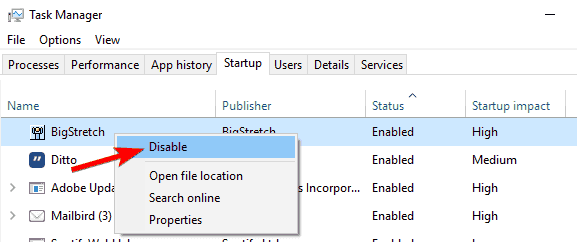
- Right-click every startup item, then select Disable .
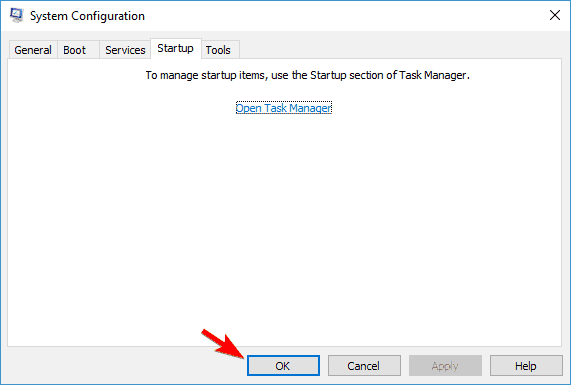
- Exit Task Manager, then click OK to restart your PC.
After performing a clean boot, try installing the update and check if the error is gone.
Method 6: Manually install the updates
Resolving the Windows update error 0x80244019 on Windows 10 sometimes requires manual installation. The process is not too complicated.
The first step is to get the update’s KB number. To do so, search for that number in the Windows Update section.
- Once you’ve taken note of the KB number, follow the steps below:
- Visit the Windows Update Catalog website.
- Click the search field and submit the KB number.
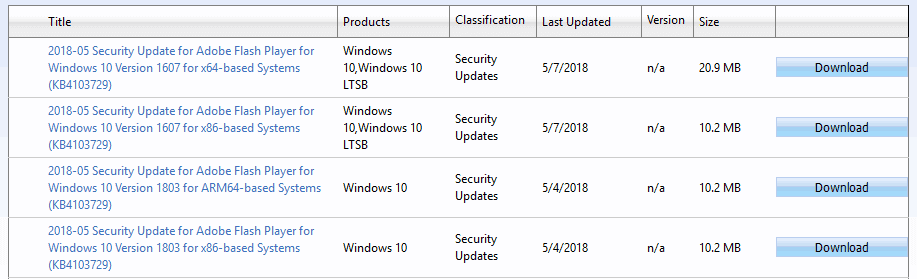
- You will see a list of matching updates. Choose the update that is suitable for your system architecture.
- Download and install the update, then check if the error persists.
It is worth noting that this method is just a workaround for the error. It lets you avoid the error but does not fix the core problem. If you find the time, try performing an in-place upgrade as laid out in Method 8.
Method 7: Installing optional updates
Some users who had become tired of problematic updates opted to use a special tool that blocked the installation process.
Of course, this method can help you avoid specific update issues. However, hiding optional updates can cause the error 0x80244019 to appear.
So, it would be best to unblock and install them. Doing this should help you install the rest of the updates without hassle.
Method 8: Perform an in-place upgrade
You can also get rid of the error 0x80244019 by performing an in-place upgrade. This allows you to install and update the latest Windows version.
Don’t worry, because this method still allows you to keep all your files and applications. You just have to follow the instructions below:
- Go to Microsoft’s website and download the Media Creation Tool .
- Run the program, then select Upgrade this PC now . The setup will now download all the necessary files.
- Select the Download and install updates (recommended) option.
- Wait while the setup is downloading the updates.
- Follow the on-screen instructions until you reach the Ready to install screen.
- Click the Change what to keep option.
- Don’t forget to select the Keep personal files and apps option. Click Next to proceed.
After completing the process, your PC should have the latest Windows version. This should also help you resolve the error 0x80244019 .
PRO TIP
We recommend updating your drivers first if you plan to run the Media Creation Tool from a USB flash drive.
This ensures that you will be able to perform the in-place upgrade with no problems. You can manually do that, but an easier option would be to use Auslogics Driver Updater.
This tool fixes and updates all your problematic drivers, ensuring you can use your USB flash drive and other peripherals without hassle.
Conclusion
Now that you have the methods to rectify the annoying Windows update error 0x80244019, you can take on the problem.
By properly troubleshooting and resolving errors, you can keep your system updated and safe from cyberattacks.
Let us know which solution works best for you in the comments section below, and don’t let this error stop you from moving forward.
Share this information with friends who may be having similar problems.
FAQ
How do I fix the error 0x80244019?
Check your antivirus software and disable any features causing the error. If that doesn’t work, remove your antivirus program, as it may conflict with system updates.
An additional tool for identifying and resolving update-related issues is the Windows Update troubleshooter.
Additionally, you can resolve the issue by changing the settings or restarting the Windows Update components.
How do I fix the 0x80244010 Windows 10 update error?
First, make sure your internet connection is reliable and stable. Then, restart your computer and attempt to install the Windows update once more.
If the error continues, you can use the Windows Update troubleshooter to find and fix any update process problems.
The error 0x80244010 can also be fixed by manually applying the updates or looking for any pending updates that may be interfering with the process.
WSUS на базе Windows Server 2012 и выше поддерживает возможность установки на Windows 10 не только обычных обновлений безопасности и исправлений, но и крупных пакетов обновлений (в терминологии Microsoft – апгрейдов). Но прямо из коробки этот функционал не работает, такие апгрейды (в концепции Windows 10 называются Redstone ) на клиенты просто не закачиваются. Разберемся в проблеме.
Во WSUS на Windows Server 2012 появился новый тип классов обновлений – Upgrades. Включается он в консоли WSUS в разделе Options ->Product and Classification -> вкладка Classification. Нас интересует опция Upgrades (если она не включена, не спешите ее включать!).
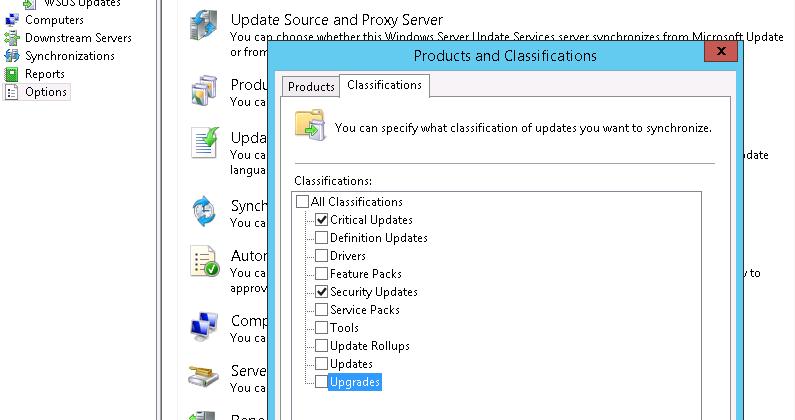
Если включить эту опцию, то сервер WSUS все равно не будет загружать апгрейды, выдавая при загрузке ошибку. Чтобы сервер WSUS начал скачивать пакеты апгрейдов, нужно на WSUS сервере установить отдельное обновление: KB 3095113 (https://support.microsoft.com/en-us/kb/3095113).
Примечание. Если у вас ранее уже была активирована классификация Upgrades и выполнялась синхронизация, после установки KB 3095113 придется провести очистку базы WSUS с помощью следующих PowerShell команд:
- Отключаем классификацию Upgrades
Get-WsusClassification | Where-Object -FilterScript {$_.Classification.Title -Eq “Upgrades”} | Set-WsusClassification –Disable - Удаляем из базы информацию об этик апгрейдах
$wsus = Get-WsusServer
$wsus.SearchUpdates(“version 1511, 10586, 1607”) | foreach { $wsus.DeleteUpdate($_.Id.UpdateId) } - Осталось включить классификацию Upgrades
Get-WsusClassification | Where -FilterScript {$_.Classification.Title -Eq “Upgrades”} | Set-WsusClassification - И повторно запустить синхронизацию.
$sub = $s.GetSubscription()
$sub.StartSynchronization()
Но это еще не все, даже после установки KB 3095113 на сервере, пакеты апгрейдов на клиентах все равно не появляются. В журналах WindowsUpdate.log на ПК с Windows 10 появляется можно найти ошибку 0x80244019:
2016/08/24 15:32:36.3654849 1064 2660 DownloadManager BITS job {84234ABB-06CE-4251-941C-281B4424EB32} failed, updateId = 8CB55544-8521-238E-AAFB-422D647DC0A6.200, hr = 0x80190194. File URL = _http://wsus.mydomain.com:8530/Content/7C/6F5CAF07827FAE0E37739F3222603EAF38808B7C.esd, local path = C:\Windows\SoftwareDistribution\Download\dc0dc85b32300fe505d5d9a2f479c1b0\10586.0.151029-1700.th2_release_CLIENTENTERPRISE_VOL_x64fre_en-us.esd
2016/08/24 15:33:36.3658125 1064 2660 DownloadManager Progress failure bytes total = 2659650046, bytes transferred = 18574952
2016/08/24 15:33:36.3845664 1064 2660 DownloadManager Error 0x80244019 occurred while downloading update; notifying dependent calls.
В логе видна попытка закачать файл ESD (новый формат распространения образа ОС), —7C/6F5CAF07827FAE0E37739F3222603EAF38808B7C.esd с сервера. Попробуйте открыть этот URL в браузере – появится ошибка 404. Дело в том, что этот тип файлов не разрешен в настройках IIS и его передача блокируется.
Чтобы разрешить серверу WSUS передавать ESD файлы, откройте консоль Internet Information Service (IIS) Manager, перейдите на сайт WSUS Administration и выберите каталог Content. В настройках IIS выберите раздел Mime Types.
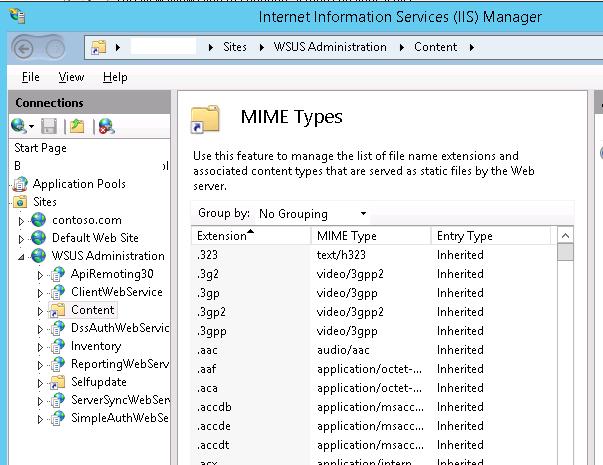
Добавьте новый тип MIME (Add MIME type):
Расширение файла: .esd
Тип MIME: application/octet-stream
Совет. То же самое можно сделать командами:
cd %windir%\system32\inetsrv
appcmd set config /section:staticContent /+"[fileExtension='.esd',mimeType='application/octet-stream']"
Перезапустите службу IIS (iisreset) и выполните повторную синхронизацию на клиентах. Клиенты Windows 10 должны начать закачивать esd файлы и могут приступать к установке пакетов обновлений.
Примечание. Для информации: WSUS версии 3.2 на Windows Server 2008 R2 раздавать апгрейды для Windows 10 не сможет. Судя по всему, в ближайшее время Microsoft этот недостаток исправлять не планирует.
Ошибка 0x80244019 типична при обновлении Windows 10. Так бывает при загрузке апдейтов с серверов Microsoft и сетевого хранилища (WSUS). Проблема возникает из-за некорректных настроек Центра обновления, сбоев системы и дефектов файлов ОС. В зависимости от того, откуда качаются апдейты, разнятся и варианты исправления неисправности 0x80244019.
Способы решения ошибки 0x80244019
Способы при апдейте с сервера Майкрософт
- Пройдите по пути «Параметры» => «Обновление и безопасности» => «Дополнительные параметры» и поставьте галочку в строчке «При обновлении Виндовс предоставить …».
- Откройте командную строку с администраторскими полномочиями. Введите и подтвердите нажатием Enter эти запросы:
- net stop wuauserv
- net stop cryptSvc
- net stop bits
- net stop msiserver
- ren C:\Windows\SoftwareDistribution SoftwareDistribution.old
- ren C:\Windows\System32\catroot2 Catroot2.old
- net start wuauserv
- net start cryptSvc
- net start bits
- net start msiserver
- Произведите «чистый» запуск ОС. Уберите из автозагрузки все сервисы, а в системном компоненте «Сервисы» отключите все, что не относится к Microsoft. После перегрузки ОС повторите попытку обновления.
Способы при обновлении с WSUS
- Проверьте у администратора сети корректность используемого порта и группы.
- Если есть другой компьютер сети, где обновление происходит успешно, то экспортируйте из его реестра ветку HKEY_LOCAL_MACHINE\SOFTWARE\Policies\Microsoft\windows\WindowsUpdate. Откройте сохраненный файл реестра на проблемном ПК, подтвердите изменения реестра.
- Посоветуйте администратору сети установить параметры WSUS через GPO. Этот вариант наиболее эффективен для устранения ошибки 0x80244019.
-
Home
-
News
- How to Fix Windows Update Error 0x80244019? Solutions Are Here!
By Tina |
Last Updated
Have you ever met the issue error 0x80244019 when you are trying to update Windows? Then do you know how to fix Windows update error 0x80244019? This post shows you the solutions to the error Windows update 80244019.
The Windows Update Error 0x80244019?
The error 0x80244019 may occur when you are trying to update Windows. And the Windows update error 80244019 may be caused by various reasons, such as a piece of antivirus software, the Windows Update Settings, Windows Update components, and so on.
Then do you know how to fix the error Windows update 80244019? In this post, we will show you the solutions to the error 0x80244019.
Solutions to Windows Update Error 0X80244019
Note: Before fixing the error 0x80244019, you had better back up all your important files so as to keep your data safe.
Solution 1: Disable Anti-Virus Software Temporarily
In order to solve the Windows update error 0x80244019, you can temporarily disable the third-party antivirus software. And reboot your computer to check whether the Windows update error 80244019 is solved.
After the Windows update 80244019 issue is solved, you need to turn on the antivirus again because it is important to protect your computer from virus attack.
Related article: How to Back up Windows to Safeguard Your Computer? Try MiniTool!
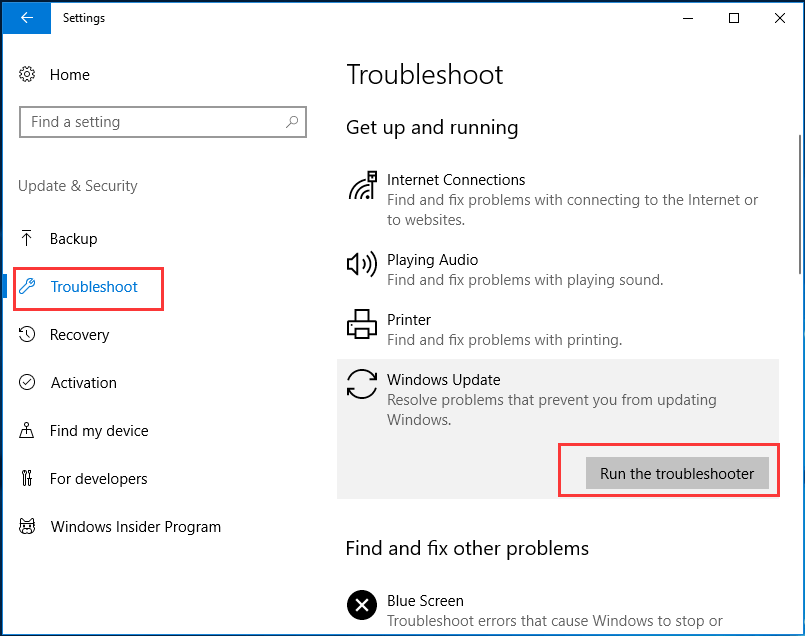
Solution 2: Run Windows Update Troubleshooter
To fix the error 0x80244019, you can try to run the Windows Update Troubleshooter which can be used to find some problem and fix them.
So you can go to the Settings page by clicking Windows key and I key together to open this page. Then click Update & Security to go on. Then click Troubleshoot > Windows Update > Run the troubleshooter to go on.
When the process is finished, you can check whether the Windows update error 0x80244019 is solved.
Solution 3: Perform Windows Update in Clean Boot State
At here, we will introduce the third method to fix the problem 0x80244019. If you want to update Windows, you can try to run Windows update in a clean boot stat which starts the system with minimal drivers and startup programs. When you start your computer in a clean boot, the computer starts minimal drivers.
In this way, if the Windows update error is caused by some driver, the issue can be solved.
To perform a clean boot, you can open the Run dialog and type msconfig to open the System Configuration window and go to the Service tab.
Then check the option Hide all Microsoft service and click the option Disable all to continue.

Next, please go to the Startup tab and click Open Task Manager to continue. Right-click each startup item and click Disable to continue.
Then you can close Task Manager and click OK to continue.
When you have finished all the steps, you can reboot your computer to check whether the error 0x80244019 is solved.
Solution 4: Reset Windows Update Components
The Windows update error 0x80244019 may occur when some components are not running. So in order to fix the error 0x80244019, you can reset the Windows update components through inputting the following command.
Here, we will list the commands and you need to reset the Windows update manually.
- net stop cryptSvc
- net stop bits
- net stop msiserver
- Ren C:\Windows\SoftwareDistribution SoftwareDistribution.old
- Ren C:\Windows\System32\catroot2 Catroot2.old
- net start wuauserv
- net start cryptSvc
- net start bits
- net start msiserver
When the process is finished, please run Windows update again and try to check whether the Windows update error 80244019 is solved.
Final Words
In this post, we have introduced 4 methods to fix the error 0x80244019. If you have the same Windows update problem, please try those solutions.
About The Author
Position: Columnist
Tina is a technology enthusiast and joined MiniTool in 2018. As an editor of MiniTool, she is keeping on sharing computer tips and providing reliable solutions, especially specializing in Windows and files backup and restore. Besides, she is expanding her knowledge and skills in data recovery, disk space optimizations, etc. On her spare time, Tina likes to watch movies, go shopping or chat with friends and enjoy her life.
Keeping Windows and your apps up-to-date is critical for your system’s security. An infinite number of threats circulate on the internet, many of which cause irreparable damage to your computer.
Unfortunately, many errors can occur during the update process. In this article, we’ll focus on the Windows Update error 0x80244019 and show you how to fix it.
Note that users have also experienced this error in Windows 7.
How can I fix the Windows Update error 0x80244019?
1. Run the Windows Update troubleshooter
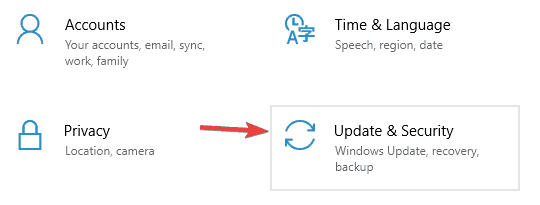
- Press Windows Key + I to open the Settings app.
- When Settings app opens, go to Update & Security section.

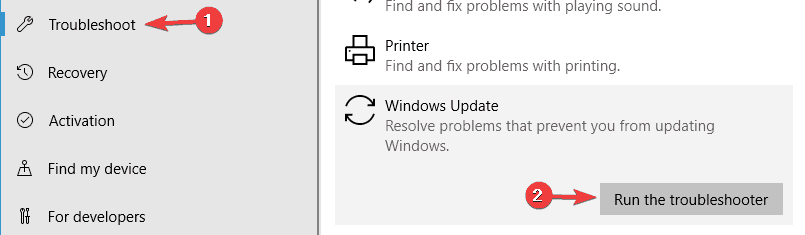
- Select Troubleshoot from the left pane. In the right pane select Windows Update and click Run the troubleshooter button.

- Follow the instructions on the screen to complete the troubleshooter.
According to users, sometimes you might be able to fix this problem simply by running Windows Update troubleshooter.
As you know, Windows 10 has a wide range of troubleshooters available, and they are specially designed to automatically fix common problems.
If you’re having error 0x80244019 on your PC, you just need to run the Windows Update troubleshooter by following the above steps.
Once the troubleshooter is finished, check if the problem is still there.
2. Change Windows update options
- Open the Settings app and navigate to Update & Security section.
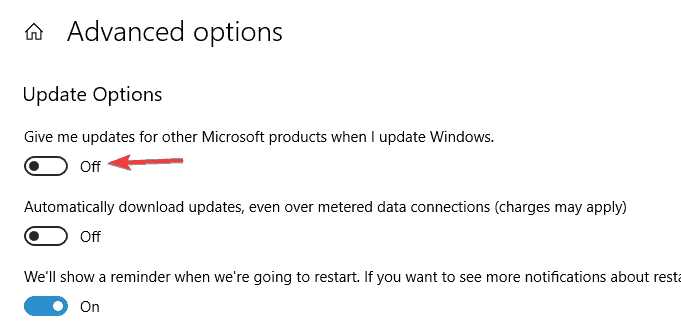
- When Windows Update window opens, click on Advanced options.
- Now turn off Give me updates for other Microsoft products when I update Windows.

According to users, sometimes your options can cause error 0x80244019 to appear.
If you can’t update your PC due to this error, you might have to change your settings a bit. You can do that by following these steps from above.
After turning off this option, the issue should be resolved and you’ll be able to update Windows without any issues.
3. Check your antivirus
According to users, sometimes your antivirus can interfere with your system and cause error 0x80244019 to appear.
To fix the problem, it’s recommended to disable certain antivirus features and check if that solves the issue.
If that doesn’t work, your next step would be to completely disable your antivirus. In the worst-case scenario, you might have to uninstall your antivirus and check if that solves the issue.
If removing the antivirus solves the problem, you should consider switching to different antivirus software.
4. Reset Windows Update components
- Press Windows Key + X to open Win + X menu. Now select Command Prompt (Admin) or Powershell (Admin) from the list.
- When Command Prompt opens, run the following commands:
- net stop wuauserv
- net stop cryptSvc
- net stop bits
- net stop msiserver
- ren C:WindowsSoftwareDistribution SoftwareDistribution.old
- ren C:WindowsSystem32catroot2 Catroot2.old
- net start wuauserv
- net start cryptSvc
- net start bits
- net start msiserver
In order to download the updates, certain Windows Update components need to be running. If these components aren’t running, you might encounter error 0x80244019.
However, you can fix this problem simply by resetting these components. To do that, you just need to follow these steps describe in the lines above.
After running these commands the necessary components will be reset and the issue should be resolved.
If you don’t want to run these commands manually, you can always create a Windows Update reset script that will automatically reset the necessary components for you.
5. Perform a clean boot
- Press Windows Key + R and enter msconfig. Now press Enter or click OK.
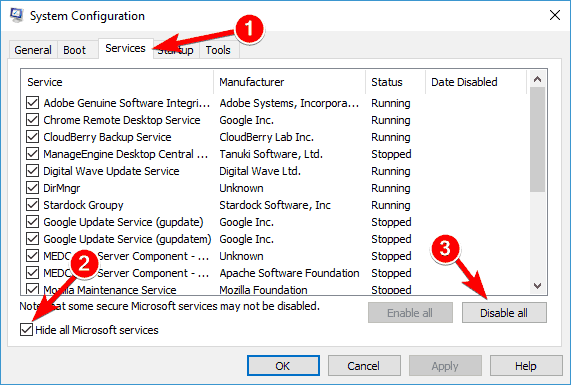
- On the Services tab select the Hide all Microsoft services check box > click Disable all.

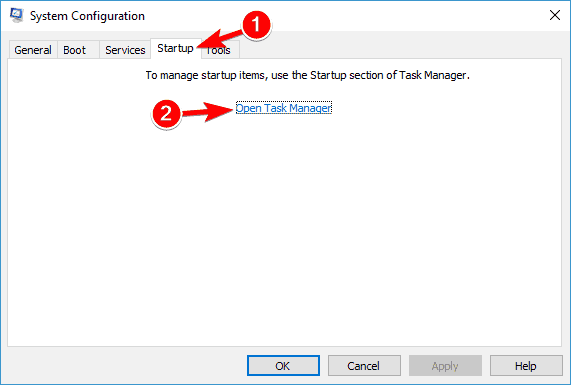
- On the Startup tab > click Open Task Manager.
- Right-click each startup item and then click Disable.

- Close Task Manager > click OK > restart the computer.
Third-party applications can sometimes interfere with your system and cause error 0x80244019 and other update errors to appear. To fix the problem, it’s advised to perform a Clean boot.
If you’re not familiar, in Clean boot state your PC will start without any third-party applications or services.
This is a great feature, especially if you’re concerned that a third-party application is interfering with your system. To perform a clean boot, perform the steps that were described a bit earlier.
After disabling all startup applications and services, try to install the update again and check if the issue is still there.
6. Disconnect all USB devices
In some rare cases, your USB devices can cause error 0x80244019 to appear. If you’re having this problem, it’s advised to disconnect all your USB devices from your PC.
This includes external hard drives, USB flash drives, gamepads, printers, etc.
Basically, you need to disconnect all devices except your keyboard and mouse. After doing that, try to install the update again and check if the problem is still there.
7. Install the update manually
- Go to Windows Update Catalog website.
- Enter the KB number in the search field.
- List of matching updates will now appear. Select the update that matches your system architecture and download it.

If you can’t download the latest updates due to error 0x80244019, you might want to try installing the update manually.
This isn’t that hard, and in order to do it, first you need to find the KB number of the update. To do that, visit the Windows Update section and look for the KB number of the update.
Once you find the KB number, you need to do perform the steps from above.
Once you download the update, install it and check if that solves the issue.
Keep in mind that this method won’t fix the core problem, instead, you’ll just avoid the error message by downloading and installing the update on your own.
8. Install optional updates
Windows 10 installs updates automatically, but sometimes you might encounter a problematic update. In order to prevent the update from installing, you need to block it with a special tool.
If you want to know more about blocking Windows Updates, we wrote a special article about it, so you should check it out.
Although blocking updates can help you with certain problems, several users reported that hiding optional updates can cause this problem to appear.
Therefore, if you have any optional updates hidden, be sure to unblock and install them.
After doing that, this problem should be resolved and you’ll be able to install the updates without any problems.
9. Perform an in-place upgrade
- Download Media Creation Tool and run it.
- Select Upgrade this PC now and click Next.
- Wait while the setup downloads the necessary files.
- Select Download and install updates (recommended).
- Wait while setup downloads the updates.
- Follow the instructions on the screen until you reach Ready to install screen. Click on Change what to keep.
- Make sure that Keep personal files and apps is selected. Now click Next.
- Follow the instructions on the screen to complete the setup.
To fix this problem you might have to perform an in-place upgrade.
By doing so, you’ll install the latest version of Windows, with all current updates, while keeping your files and applications intact.
This process is relatively simple, and you can perform it by following the steps from above.
Once the setup is finished, you’ll have the latest version of Windows installed and the issue should be resolved.
- Microsoft says a “really bad” bug halted Windows 11 25H2 rollout to Canary channel
- Windows 11 is getting new Start menu, Notepad upgrades, and more
- Windows 11 KB5055653 Beta improves HDR and Windows Update
- Windows 11 KB5055651 Dev introduces Dolby Vision, improved HDR & more
- Microsoft fixes Group Policy bug that prevented Windows 11 24H2 installation
Update error 0x80244019 can be problematic since it can leave your system vulnerable. Speaking of this error message, here are some related issues that users reported:
- 0x80244019 Windows Server 2016 – This issue can affect Windows Server 2016, and if you have this problem, you might be able to fix it using one of our solutions.
- Windows 7 update error 0x80244019 – Many users reported this issue on older versions of Windows. Even if you don’t use Windows 10, you should know that most of our solutions can b applied to older versions of Windows as well.
We hope the solutions listed above helped you fix Windows 10 update error 0x80244019.
If you’ve come across other workarounds to fix this problem, you can list the troubleshooting steps in the comment section below.