
The Error 0x80240438 is a recently occurring bug that appears when users try to update their Windows 10 OS or install apps via Microsoft Store. As there is an interlinkage between the store app and the update section, the error remains the same for both. There are primarily three different reasons that lead to this error on Windows 10. They are – Enabled Firewall, Use of IPV6 for the net connectivity, and manually connecting to a Proxy.
Temporarily turning off the Firewall, disabling IPV6, and the use of a manual proxy should resolve the error code 0x80240438. If not, run the update troubleshooter, modify the windows update group policy, or tweak the registry DOWRD key. In this post, we discuss 10 different approaches to correct this issue that are applicable to all Windows 10 Build versions. Let’s explore the solutions in detail –

To solve the Error code 0x80240438 in Windows 10, try the following suggestions –
Fixes List
- Disable Third-party Antivirus Program
- Disable Windows Firewall/ Windows Security
- Manually install the Standalone Package
- Run Windows Update Troubleshooter
- Disable IPV6
- Disable Proxy
- Modify Windows Update features Group Policy
- Reset Windows Update Folders
- Clear Microsoft Store Cache
- Tweak Registry Editor
1] Remove Third-party Antivirus Program
Using a third-party anti-malware program may cause the update or Store error 0x80240438 on Windows 10 PC. This is because there exist two different applications that perform similar tasks i.e. Windows Security. Since you can’t remove the latter one as being the in-built app, you should uninstall the 3rd party antivirus program. Anyways, Windows Defender works quite effectively, unlike its predecessors.
- Hit the Win icon and scroll down to locate the antivirus in the Apps list.
- Make a right-click on the matching result and hit the Uninstall button.
- If the UAC window prompts, tap Yes to confirm this uninstallation.
Note: If you don’t want to uninstall the software, disable it by visiting the Settings page.
- Make sure to reboot your PC as there are leftover files that don’t delete even after the program deletion.
2] Disable Windows Firewall/ Windows Security
Windows Firewall aims to provide maximum security by blocking any files that it finds suspicious. This is very helpful in keeping malicious invaders away. However, this may sometimes block the monthly patch resulting in an error message like 0x80240438. You must check whether this indeed is the case before applying any other fixes. To do so, temporarily disable Windows Firewall using the below steps –
- Press Win + S to start the Search bar, type Windows Firewall and click the top result.
- On the next user interface, click “Turn Windows Defender Firewall on or off“.
- Choose to “Turn off Windows Firewall (not recommended)” under both networks i.e. Private and Public.

- Hit OK to confirm this action. Now, check if the error 0x80240438 resolves or not while opening the Store app/updating Windows 10 OS.
3] Manually install the Standalone Package
Microsoft releases security as well as non-security cumulative updates very often on the patch Tuesday. Since you are already encountering an update error, you may download and install the standalone package that comes with each CU. Here’s how to proceed –
- If you are a Windows 11 user, switch to this article on how to manually download and install the latest cumulative updates on your computer.
Get the name of a Recent CU
- Jointly Press Win+I to launch the Settings app.
- Select Update & Security thereafter Windows Update on the succeeding screen.
- On the right pane, scroll down and click View Update History.
- Here, you can get a list of all cumulative updates – successful or failed ones.
- Note the failed patch number and move to the next section.

Download the Standalone Package
- Open any of your web browsers and visit Microsoft Update Catalog.
- At the search bar, paste the failed knowledge base number (noted down above) and press Enter.
- A list containing all the matching CUs will appear afterward.
- Click the Download button next to the most suited and latest update as per your system architecture.
- When a new window appears, click the first link to download the .msu file. Wait for a while as this is a relatively big file.
- Once over, go to the Download folder and double-click the set-up file to start installing the standalone package.
4] Run Windows Update Troubleshooter
Windows 10 includes an in-built utility that can troubleshoot any update-related issues. If the error 0x80240438 is still appearing, run the troubleshooter to find and repair the underlying cause. Here are the essential steps to work upon –
Windows 11:
- Go to Settings and click System on the left pane.
- Head over to the right side, scroll down, and click Troubleshoot.
- When this expands, click Other troubleshooters.
- Locate Windows update under “Most frequent”, and hit the Run button.
- Now, wait while this tool diagnoses and resolves the issue automatically.
Windows 10:
- Jointly press WinKey + I to start the Settings app.
- Select Update & Security thereafter Troubleshoot on the succeeding window.
- Jump to the right side and click to expand the Windows Update section.
- Hit Run the troubleshooter to start looking for any update errors.

- Follow the instructions as they appear in the remaining process.
Once over, Restart the PC so that changes performed may become effective.
5] Disable IPV6
Several users have confirmed that disabling IPV6 under the Network settings resolves error 0x80240438 on their PCs. That’s why we have included this in the list of solutions and the procedure is as follows –
- Launch the control panel and reach out to the following location –
Control Panel\Network and Internet\Network Connections
- Make a click on the internet connection (currently in use to access net connectivity) and hit Properties.
- Next, uncheck the box left to “Internet Protocol Version 6 (TPC/IPV6)” and tap OK.
- Make sure to Reboot your PC so as to apply the recent changes.
From the next login, you must be able to update Windows 10 OS or launch Microsoft Store.
6] Disable Proxy
Connecting the PC to a proxy often causes bugs and issues. So, if you are still experiencing the error 0x80240438 while opening the Store app, try once to disable the Proxy. Here are the steps to work upon –
- Press Win+Q hotkey altogether to start the Search box and type “Proxy”.
- Click the top result to launch the Proxy Settings window.
- Move to the right panel and scroll down to “Manual Proxy Setup“.
- Turn off the toggle switch next to “Use a Proxy server” and click the Save button.

Note: If you use a script address, make sure to disable this as well.
- Restart your PC and check whether this error resolves after the next login or not.
7] Modify Windows Update features Group Policy
If the error 0x80240438 still persists, you should modify the Windows Update features group policy. On different Windows 10 forums, this solution is widely accepted. That’s why we are including this method as well –
- Right-click on the Win icon and select Run.
- Type
gpedit.mscat the empty text box and press Enter. - When the Group Policy window comes into view, browse to the below address –
User Configuration > Administrative Templates > Windows Components > Windows Update
- Move to the adjacent right side and scroll down to locate “Remove Access To Use All Windows Update Features“.
- Once found, double-click on it to open its respective window. Mark the checkbox next to “Not configured” and hit OK.
- Restart your computer so as to implement the changes from the next login.
8] Reset Windows Update Folders
The existing contents inside the SoftwareDistribution and Catroot2 folders may also cause the error 0x80240438 on Windows 11 or 10 PC. To get rid of this nagging issue, you must clean these two update folders accomplishing the below steps –
- Press Win & R to invoke the Run dialog.
- Type cmd at the void, hold Ctrl+Shift and press Enter to launch the Command Prompt as Admin.
- When the UAC window prompts, tap Yes to authorize the access.
- Now, execute the following codes one after another. Make sure to press the Enter key after each command.
net stop bits
net stop wuauserv
net stop appidsvc
net stop cryptsvc
- The above codes will stop the essential update services, now run the below codes to rename certain services –
rmdir %systemroot%\SoftwareDistribution /S /Q
rmdir %systemroot%\system32\catroot2 /S /Q
- Subsequently, configure your network connectivity using the following commands –
netsh winsock reset
netsh winsock reset proxy
- After successfully executing the above codes, restart the services that you have previously stopped.
net start bits
net start wuauserv
net start appidsvc
net start cryptsvc
- Finally, Restart your system and check whether the update error code 0x80240438 gets solved or not.
9] Clear Microsoft Store Cache
Note: This workaround is primarily for Microsoft Store-related error 0x80240438. If you are receiving the error message while performing Windows 10 update, you may skip this solution.
As time passes by, a huge amount of cache piles up in Windows Store. If you don’t clear these unnecessary data, you may end up receiving the error 0x80240438. So, go through the below steps to clear the Store cache –
- Launch the Run dialog, type
wsresetat the void, and press the Enter key. - The Windows console appears immediately afterward clearing off the stored cache.
- When the command prompt finishes the task, Microsoft Store will start without any error code.

10] Tweak Registry Editor
If you are still getting the error 0x80240438 on your computer, modifying the “DisableWindowsUpdateAccess” entry inside the registry may resolve this bug. Here’s how to perform this task –
- Press Winkey + R altogether to start the Run dialog. Type
regeditat the void and press Enter to invoke the Registry Editor. - Using the key ladder on the left pane, reach out to the below path –
HKEY_CURRENT_USER\Software\Microsoft\Windows\CurrentVersion\Policies\WindowsUpdate
- Head over to the right side and locate “DisableWindowsUpdateAccess“.
- Click on this DWORD entry twice and put “0” at its value data.

- Click OK and Restart Windows 10 to implement the above changes.
That’s it, I hope the above fixes do help to resolve the Update and Store Error 0x80240438 on your Windows 11/10 device. If you have any queries or suggestions related to this article, do tell us in the comment section.
One of the common issues that users come across while updating Windows or installing apps through Microsoft Store is Error Code 0x80240438. Most of the time, both Store and Windows Update encounter the same error code as they have an interlinked delivery mechanism. As each operating system has multiple characteristics, so the culprit of the issue also varies.
Some of the possible causes that put a hindrance in the Windows Update and Store service are proxy settings, Windows Firewall, IPV6, and more. Regardless of the versions of Windows 10 or 11 you are using, the resolutions will be same. So in the article, we will discuss some of the most verified workarounds to resolve bug code 0x80240438. Find out the solutions –
Windows 11 and 10 Update Error Code 0x80240438
Here is How to Fix Windows 11/10 Update Error Code 0x80240438 –
1] Install the Windows Update Manually
Microsoft is very much keen to release cumulative updates and features quite regularly packing latest modifications and fixes for bugs and issues. Most of these files start downloading and installation follows automatically in presence of an active internet connection. Error code 0x80240438 appears while the Windows Update feature is autonomous and this is just a cumulative patch, unlike feature update. Hence, we can proceed to install the update patch manually using below guidelines –
- Press Windows key and type in – update history.
- Hit – Enter.
- Explore the list of successful and failed updates.
- Check for the failed updates and then navigate to Microsoft Update Catalog.
- Here, search for the KB that got failed to install. Once you see it, download the compatible architecture and install the file manually.
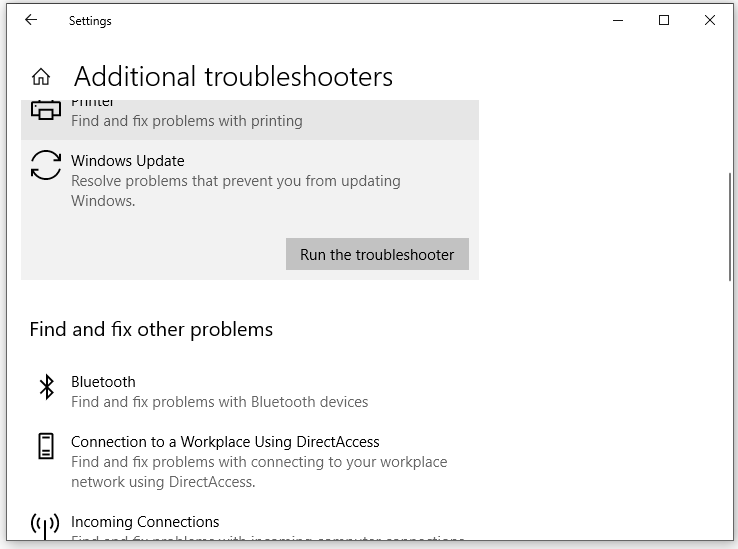
2] Use the Windows Update Troubleshooter
Windows 10 and 11 Update Error code 0x80240438 comes in when the system encounters difficulties in installing related cumulative patch. Many of the similar drawbacks kept on haunting the users over the ages. To eradicate this issue, Microsoft came up with brand new idea of Windows Update Troubleshooter. The tool guides us on how to resolve a specific error that happens while installing an update. Here is how to use the tool –
For Windows 10
- Press Win+I hotkeys at once to launch the Windows Settings app.
- Click on the Update & Security tile to pass forward in the succeeding page.
- When the page arrives, select Troubleshoot from the left pane.
- Jump to alongside right and click – Additional troubleshooters.
- Select Windows Update option from there.
- Hit Run the Troubleshooter button from the expanded pane.
- The utility will now start looking for update errors in the system. It will also provide guidelines to solve the issue accordingly.
- Follow the instructions shown in the display to complete the process.
For Windows 11
- Right-click Start button and choose – Settings.
- Move to the right of Settings page.
- Scroll down a bit and click – Troubleshoot.
- Select – Other troubleshooters.
- From the next page, click Run present beside Windows update.
3] Disable Windows Firewall
Having an active security solution often can be detrimental for an update patch to be installed automatically as the tool will detect the file as malware. Windows Firewall provides us real-time protection against malicious invaders and offers maximum security. However, the same can also cause Error code 0x80240438 in Windows 10 and 11. In order to fix the error, we can disable Windows Firewall temporarily until the issue goes off. Here is how to disable the Windows Firewall –
- Open the Taskbar Search pressing Win+Q hotkey together.
- Type Windows Defender Firewall in the empty text space. Select the app after arriving in the result.
- Moving on to the app UI, click Turn Windows Defender Firewall on or off from left pane.
- After a new window unveils, click the radio button against Turn off Windows Firewall (not recommended) option for both the networks on this page.
- Click the OK button and save these changes and there will not be any more 0x80240438 update error.
4] Uninstall Third-party anti-malware tool
Like the Windows Security, any other third party application may often block an update patch and eventually users encounter 0x80240438 error. Moreover, keeping a 3rd party anti-malware solution may be detrimental parallel to Windows Security. So, make room to uninstall security solutions from outside sources right away using the below steps –
- Right-click on Start icon and choose Apps and Features from appearing Win+X menu.
- When the Apps Settings will open up, reach out to the third party security solution on the right pane.
- Select the same and hit Uninstall from expanded pane.
- When UAC prompts for permission, click Yes and follow on-screen guidelines until the process ends.
- Finally, reboot Windows to implement the modifications.
5] Disable IPV6 from Windows
Various forums are evident that disabling IPV6 resolves Error code 0x80240438 in Windows 11 and 10. Therefore we may also give it a try following below instructions –
- Press Win + R keys and invoke the Run dialog box.
- Type ncpa.cpl and click OK button located on wizard to open up Network connections window.
- Moving on to the new window, do a right-click on the internet connection that is connected to your computer.
- Select Properties option from appearing menu.
- Jump to another popup window and uncheck the box against Internet Protocol Version 6 (TPC/IPv6).
- Click on OK button from bottom area and save changes.
- Lastly, reboot the device and check if the error exists in the system when a new session begins.
6] Tweak Group Policy Editor
Tweaking policy in the Group Policy Editor will let you remove access from Windows Update. Enabling the settings will remove all the Windows Update features from system. Many users have confronted that they have fixed Error code 0x80240438 tweaking the policy. Follow the below guidelines to complete the task –
- Invoke the Run dialog and type gpedit.msc in its empty text box.
- Press Enter key to open Group Policy Editor and navigate to below path –
User Configuration > Administrative Templates > Windows Components > Windows Update
- Upon reaching to Windows Update, jump on the alongside right pane.
- Hereby, make a double click on Remove Access To Use All Windows Update Features.
- Select the radio button against Not Configured.
- If you see it is enabled, configure one of the below notification options –
0 = Do not show any notifications – This setting will remove all access to Windows Update features, and no notifications will be shown.
1 = Show restart required notifications – It will display notifications about restarts that are required to complete the installation.
- Click the OK button finally and close the Group Policy Editor window.
- Restart Windows PC to make changes effective.
7] Disable Proxy server connection
Disable Proxy server connection may also be pretty helpful in eliminating Error code 0x80240438 in Windows 11 and 10. To do so, follow the below steps –
- Press Windows key, type internet options and hit Enter key to access Internet Properties.
- Jump into the Connections tab.
- Move out to Local Area Network (LAN) settings area and click the LAN Settings.
- Upon opening a new settings page, uncheck the box that reads Use a proxy server for your LAN (These settings will not apply to dial-up or VPN connections) under Proxy Server section.
- Click the OK button and later on, reboot Windows to make the changes effective.
8] Clear off Microsoft Store Cache
Windows Update Error code 0x80240438 resembles the Microsoft Store issue as well hence, clearing the Store cache might help. Follow the below guidelines to clear the cache –
- Open Run dialog box pressing Windows key and R.
- Type wsreset in the void text space and press Enter.
- The Command Prompt will open up in a few moments and take over the task.
- Once the process ends, Command Prompt window will close automatically and open Microsoft Store.
See – How to Reset Cache of Windows Store
9] Rename Windows Store cache folder
If the Error code 0x80240438 is evolved from Microsoft Store, renaming the Store Cache folder will resolve the setback. For that –
- Get access to Run and enter following text in its empty search box and press Enter key eventually –
%localappdata%\\Packages\\Microsoft.WindowsStore_8wekyb3d8bbwe\\LocalState- Locate the cache folder, make a right-click on the same, and choose Rename option from menu.
- Name it as cache.old and hit Enter to save it.
- If you don’t find the cache folder in LocalState, make a right-click on empty space and choose New > Folder.
- Enter the name Cache and close File Explorer.
- Now open Windows Settings app and head over to Troubleshoot page.
For Windows 10, Go to Settings => Update & Security => Troubleshoot => Additional troubleshooters.
Windows 11 users, navigate to Settings => Troubleshoot (right column) => Other troubleshooters.
- Reach out to the Windows Store App and hit Run the Troubleshooter or Run button.
- After finishing the process, the error will resolve hopefully.
10] Remove everything from of C:\\Windows\\SoftwareDistribution folder
Some contents in the SoftwareDistribution folder may often be a cause for Error code 0x80240438 in Windows 10 and 11. In order to resolve the issue, delete everything from this folder going through below process –
- Open the Taskbar Search, write services in the void text box, and press Enter to launch the application.
- Move out for Background Intelligent Transfer Service, make a right-click on it and select Stop.
- Close the Services app and open File Explorer pressing Win+E hotkey at once.
- In the upcoming window, navigate to the “C:\Windows\SoftwareDistribution” folder.
- Select all items pressing Ctrl+A hotkey at once and press Delete key on the keyboard.
- Reboot Windows and when the system will load back, we can expect the error will resolve.
11] Modify Registry Editor
Modifying the DWORD value of “DisableWindowsUpdateAccess” is found to resolve Error code 0x80240438 in Windows 11 and10 easily. Follow the below guidelines to accomplish –
- Do a right-click on Start and select Run.
- In the empty text box of the wizard, type regedit and hit Enter to access Registry Editor.
- Navigate to the below directory in left-wing –
HKEY_CURRENT_USER=>Software=>Microsoft=>Windows=>CurrentVersion=>Policies=>WindowsUpdate- On the right pane of WindowsUpdate locate the DWORD DisableWindowsUpdateAccess.
- Make a double click on the same and set the value data as 0.
- Click OK and Restart Windows to implement registry settings.
- After the new session will begin, hopefully, there will be no more 0x80240438 error.
Methods:
1] Install the Windows Update Manually
2] Use the Windows Update Troubleshooter
3] Disable Windows Firewall
4] Uninstall Third party anti-malware tool
5] Disable IPV6 from Windows
6] Tweak Group PolicyEditor
7] Disable Proxy server connection
8] Clear off Microsoft Store Cache
9] Rename Windows Store cache folder
10] Remove everything from of C:\\Windows\\SoftwareDistribution folder
11] Modify Registry Editor
That’s all!!
-
Home
-
News
- How to Fix Windows Update Error 0x80240438?
By Aurelie | Follow |
Last Updated
As we all know, to run your computer more smoothly and efficiently, it is important to install the latest Windows update on your computer in time. Recently, you might get Windows update error 0x80240438 during the update process. In this post from MiniTool, we conclude some causes and solutions for you.
There Were Some Problems Installing Updates with 0x80240438
Windows update errors are not a new thing. Windows update error 0x80240438 might pop up when you try to update your Windows 10/11. The complete error message reads:
There were some problems installing updates, but we’ll try again later. If you keep seeing this and want to search the web or contact support for information, this may help. (0x80240438)
Usually, poor internet connection, virus infection, system file corruption, and incomplete Windows update components, might be blamed. Without further delay, let’s jump into it!
Tips:
Windows Update failure might lead to some issues like potential data loss. Therefore, it is essential to create a backup of important files. To do so, a piece of free PC backup software – MiniTool ShadowMaker is the best choice. This tool is designed to back up items like files, folders, disks, partitions, and disks just in a few simple clicks. Get the free trial and have a try now!
MiniTool ShadowMaker TrialClick to Download100%Clean & Safe
How to Fix Windows Update Error 0x80240438 on Windows 10/11?
Fix 1: Run Windows Update Troubleshooter
To address Windows update error 0x80240438, you can run a Windows inbuilt tool called Windows Update Troubleshooter. This tool will help you to fix most issues related to Windows Update. To do so:
Step 1. Press Win + I to open Windows Settings.
Step 2. Navigate to Update & Security > Troubleshoot > Additional troubleshooters.
Step 3. Select Windows Update and hit Run the troubleshooter.
Fix 2: Repair Corrupted System Files
Corrupted system files are also responsible for Windows Update failed with 0x80240438. To repair them, you can run System File Checker and Deployment Image Servicing and Management in order. Here’s how to do it:
Step 1. Type cmd in the search bar to locate Command Prompt and select Run as administrator.
Step 2. In the command window, run sfc /scannow and don’t forget to hit Enter.
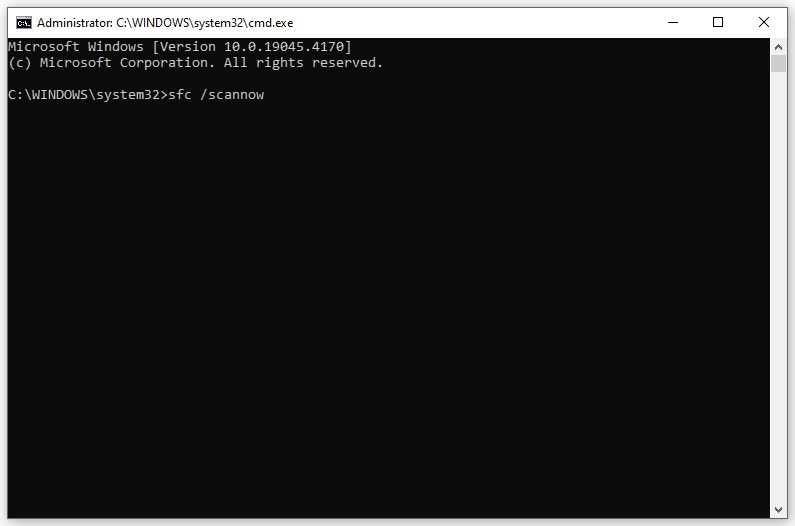
Step 3. After completion, type the following command and hit Enter.
DISM /online /cleanup-image /restorehealth
Step 4. Reboot your system to see if Windows update error 0x80240438 disappears.
Fix 3: Install the Update Manually
If Windows Update failed to check for updates with error 0x80240438, you can go to the Microsoft’s official website to download the update manually. Follow these guidelines:
Step 1. Launch your browser and go to Microsoft Update Catalog.
Step 2. Type the KB number that you fail to install and hit Search.
Step 3. Find the update according to your system requirements and hit the Download button beside it.
Fix 4: Reset Windows Update Components
When you have problems installing a Windows update, it is a good option to reset Windows Update components. Here’s how to do it:
Step 1. Launch Command Prompt with administrative rights.
Step 2. Type the following commands one by one and don’t forget to hit Enter to disable related services.
net stop wuauserv
net stop cryptSvc
net stop bits
net stop msiserver
Step 3. Run the following commands one by one to rename the SoftwareDistribution and catroot2 folders.
Ren %systemroot%\SoftwareDistribution SoftwareDistribution.bak
Ren %systemroot%\system32\catroot2 catroot2.bak
Step 4. Execute the commands below one by one to restart related services.
net launch wuauserv
net launch cryptSvc
net launch bits
net launch msiserver
# Other Useful Tips
- Restart related services.
- Check internet connection.
- Scan for malware or viruses.
- Disable Windows Defender Firewall Temporarily.
Final Words
After reading this post, Windows update error 0x80240438 might be a piece of cake for you. If you have other similar issues with Windows Update, you can also try these tips and solutions. Have a nice day!
About The Author
Position: Columnist
Aurelie is a passionate soul who always enjoys researching & writing articles and solutions to help others. Her posts mainly cover topics related to games, data backup & recovery, file sync and so on. Apart from writing, her primary interests include reading novels and poems, travelling and listening to country music.
Error Code 0x80240438 is an error related to Windows Update that many users have complained about. The error window displays the “There were some problems installing the updates, but we’ll try later” message, halting the update process.
What Is Error Code 0x80240438
After some research into the matter, we’ve narrowed down this error to several possible reasons that might be responsible for your problem. Starting with Third-party applications. These are the center of problems for such updates because they have the power to stop them whenever the updates seem like a threat of some kind.
Other than that, it may be that your device’s update or system files are corrupt or damaged. In which case you’d need the help of Windows’ scan services.
Similar to the ones above, a bunch of other causes can also be listed, but that’s no good because most of them can be fixed via a universal fix. So, continue reading ahead and apply the fixes we’ve got for you.
Fix 1 – Disable Anti-virus
As mentioned earlier, a third-party anti-virus can interfere with the update process. In that case, it is important to switch them off temporarily to fix the error code 0x80240438. Once the update is done, enable the anti-virus.
Fix 2 – Use Windows Troubleshooter
Windows has a dedicated tool for this issue, which occurs often. Windows troubleshooter can detect issues within a set domain of a problem by locating the issue’s root. It then offers you a report of the cause behind the issue and delivers several fixes. Open the Start menu, search Troubleshoot Settings, and open it. Select “Additional troubleshooter” > select Windows update from the list of troubleshooters and press ‘run the troubleshooter.’ The troubleshooter will scan for errors and provide a fix for them.
Fix 3 – Run the SFC/DISM Scans
As mentioned earlier, a valid reason for Error Code 0x80240438 could be file corruption in the system. This problem, if true, could be harmful not only to your update processes but dangerous to other integral processes as well. So, running Windows SFC and DISM scans is necessary.
The SFC and DISM scans are important file checker and service management tools. These are very good at detecting corrupt files and replacing them with operational ones. To fix Windows update error code 0x80240438, open CMD and run it as administrator. Type the following commands and press enter after each of them.
- sfc /scannow
- DISM /online /cleanup-image /restorehealth
Solving Windows Update Error code 0x80240438 can be intimidating at first. However, the issue isn’t complicated and boils down to a few fixes. If the ones above have worked for you, then congratulations. If you are facing errors and issues with other PC games or your PC, then also see our hub for commonly occurring PC errors and their fixes.

Jake Bishop
I report on gaming news and occasionally create the best video game guides.
Updated May 2025: Stop error messages and fix your computer problem with this tool. Get it now at this link
- Download and install the software.
- It will scan your computer for problems.
- The tool will then fix the issues that were found.
Windows 10 is one of the best operating systems ever made. However, it does come with some issues. One of those issues is the inability to download apps from the Microsoft Store. If you’re having trouble installing applications, here’s how to fix it.
If you’ve already tried everything else, try reinstalling Windows 10. To do so, follow these steps:
1. Wait for the process to finish.
2. Restart your computer once the reset is complete.
3. Open the Microsoft Store and sign in with your Microsoft account.
A guide on how to resolve problem number 0x80240438 in the Windows 10 App Store.
Windows 10 app store error code 0x80070438 is one of the most common errors we see on our support desk. This error usually occurs due to some sort of corruption within the system files. In this article, we’ll show you how to troubleshoot this issue and resolve it easily.
We recommend downloading and installing Microsoft Security Essentials free antivirus software and run a full scan to detect malware threats.
Step 1 – Restart the computer
If you are unable to open the Windows Store, restarting the computer might help. You can do this by pressing the power button and selecting “Restart”.
Step 2 – Update Windows
If there aren’t any updates available, you can download the latest version of Windows 10 directly from the Microsoft website.
Step 3 – Repair Windows
Solution 1. Disable IPv6
The internet is slowly moving away from IPv4 address space. In fact, it took over three years to move from 10% to 50%. If you are one of those people who wants to make sure that you won’t miss out on anything important while waiting for the transition to complete, you might want to disable IPv6. There are many ways to do this, but we’ll show you how to do it manually.
If you’re having trouble figuring out what IP version to use, here’s a quick guide.
First, find your router settings. For most routers, there is a section called “IPv6 Settings.” You’ll probably see something like this:
Your router needs to know that you’ve disabled IPv6. On this page, look for a link labeled “ipv6”. Clicking on that link will take you to a page where you can enter some information. Here’s what you need to put into that form:
You’ll notice that the “Enable” option is grayed out. That’s because you already disabled IPv6. All you need to do now is fill out the rest of the form. When you’re done, save the changes and close the window. Now, you just need to wait for the world to stop working.
If you’re running Windows 7 or 8, you’ll need to reboot your computer. If you’re running Windows XP, you’ll need to restart your network adapter.
Once you’ve finished rebooting, try opening a web browser again. You should be able to access sites normally without any problems.
Solution 2. Troubleshooter for Windows Store Apps
To find out which apps are creating problems, typeinTroubleshortotheapp store and press enter.
Click on the pp store to open the app store. ThenselectSearchforan app and press enter. Select the app you want to try and press Enter again.
The Troubleshooting Assistant opens. You can now choose whether to run it immediately or wait until later. There, you’ll see “Windows Store Apps.” Click on that, and then select “Run troubleshooter.”
If you’re still having trouble, you might need to uninstall some apps. Scroll down and look for anything that looks like it could cause problems.
You can also try reinstalling Windows 10. This won’t fix everything, but it’s worth trying.
Solution 3. Disable Windows Firewall
To avoid the 0x80241C4 error, turn off Windows firewalls temporarily. If it doesn’t work, try turning off Windows firewall permanently. Then select “Turn Off”. After rebooting, reenable the firewall again.
You can follow us on Twitter @9to5Mac or Facebook for all our latest news regarding Apple and iPad.
Solution 4. Disable Background Intelligent Transfer Service and remove the content of C:\\Windows\\SoftwareDistribution
This article explains how to disable background intelligent transfer service in Windows 10. If you want to know what is BITS, why do I need to disable it and how to disable it, read this article.
Updated: May 2025
We highly recommend that you use this tool for your error. Furthermore, this tool detects and removes common computer errors, protects you from loss of files, malware, and hardware failures, and optimizes your device for maximum performance. This software will help you fix your PC problems and prevent others from happening again:
- Step 1 : Install PC Repair & Optimizer Tool (Windows 11, 10, 8, 7, XP, Vista).
- Step 2 : Click Start Scan to find out what issues are causing PC problems.
- Step 3 : Click on Repair All to correct all issues.
Solution 5. Disable Proxy connection
If you use a proxy server to access the Internet, it might be causing slow speeds or even blocking some sites. If you want to know how to fix this problem, read on.
There are many ways to disable a proxy connection. You can do this directly through your browser settings, or through the command prompt. Here we will show you how to disable the proxy connection through the command prompt. We will explain step by step what each command does, and how to turn off the proxy connection.
Step 1. Open Command Prompt
To open the command prompt, press Windows key + X. Then type cmd into the search box and hit Enter. A black window will pop up. In the command prompt, type ipconfig /all and press enter.
Step 2. Find the IP address of the proxy server
In the output, find the IP address of the computer where the proxy server is located. For example, my proxy server is 192.168.1.2, so I found the following information:
IPv4 Address : 192.168.1.*
Solution 6. Clear Windows Store cache
If you are facing issues while installing apps on your Windows 10 PC, chances are that some cached data is preventing the installation process from working properly. If you’re having trouble downloading apps from Microsoft’s Windows store, chances are that the problem lies in the fact that your browser is caching something.
The reason for this could be anything from a simple mistake to malicious software trying to trick you into thinking that you’ve already downloaded the app. Whatever the case may be, clearing out the cache file(s) associated with your web browser should help solve the problem.
Here’s how to do it:
1. Open up Internet Explorer or Chrome
2. Click the “Tools” button located in the upper left corner
3. Select “Internet Options”
4. Go down to the “Advanced” tab
Solution 7. Rename Windows Store cache folder
PressWindowskey+R,paste%localappdata%\packages\microsoft.windowsstore_8wekyb3d1…in the run, and click ok.
Find the CacheFolder, and right-click execute rename with the cache. old.
IfsuchfolderisnotonLocalStatefolder, right-click extract there with the new folder. name Cachaeand close file explorer.
NowpressWindowskey+I and open the updates & security section.
SelectTroubleshootfromleftpaneextendtoWindows Store App.
SelecttroublesthatarerelatedtoWindows Store app.
ClickFixitbuttonandfollowtheinstructionsto fix it.
Solution 8. Modify the DisableWindowsUpdateAccess Value
Microsoft recently changed how it handles Windows Updates. In previous versions of Windows, there was a registry key called DisableWindowsUpdateAccess that allowed administrators to disable automatic updating. However, Microsoft removed this functionality in Windows 10 version 1809. Now, you must use Group Policy Editor to modify the value.
The following steps show how to do this.
1. Open the Registry editor. Type regedit into the box and press Enter.
2. Navigate to HKEY_LOCAL_MACHINE\SOFTWARE\Policies\Microsoft\Windows\WindowsUpdate.
3. Name the new value DisableWindowsUpdateAccess. Double-click on the newly added DWORD and enter 0x00000001 in the Value data field. Click OK twice.
4. Close the Registry Editor window.
5. Restart your computer.
6. When prompted, choose Check for updates. If you see the notification about disabling Windows Updates, follow the instructions and restart your computer once again.
7. Once the update completes, check for updates again. You should now be able to access Windows Updates without having to manually download and install them.
RECOMMENATION: Click here for help with Windows errors.
Frequently Asked Questions
How Frequently Should I Check to See If There Are Any Updates?
At the very least once every week, you need to check for any new developments. If you are utilizing an automatic update system (such as Microsoft Update), then you need to check for updates once per day or two at the absolute least.
Should I Really Invest in a Newer Version of My Operating System?
Yes! In order for your computer to execute applications like Word or Photoshop, it requires an operating system (OS). If you do not keep your operating system up to date, your computer will soon cease functioning as it should.