
“error 0x800f0954
I was installing NET Framework and I got this error code I don’t know what it is or how to fix this can someone help me?”
When installing .NET Framework 3.5, you may encounter error 0x800f0954. This error appears with a short error message and a code to help you find the potential fixes to that problem. Besides, Microsoft gives additional information about the causes of the error on their official site, but this explanation is quite baffling for a non-technical person.
This article discusses the 0x800f0954 Windows 10 error in detail and suggests the 5 best ways to resolve it.
0x800f0954 NET Framework 3.5 Windows 10/11
Most Windows applications and components are designed and powered by .NET Framework. Whenever Microsoft upgrades one or more of this framework’s components, you receive a Windows update to download and install its latest version.
However, if this framework fails to install for some reason, you receive an error message accompanied by error code 0x800f0954, which looks as follows:
The framework error can occur due to a variety of reasons, such as,
- CBS (Component Based Servicing) Log Issues: The DISM (Deployment Image Servicing and Management) utility sometimes maintains CBS logs to indicate some non-existing system problems throwing error 0x800f0954.
- Problems with Windows Update Server: Installing Windows updates requires connections to WSUS (Windows Server Update Services), and if this connection is interrupted or broken, it causes 0x800f0954 Windows 10.
- Old .NET Framework Version: If you try to install an older version of .NET Framework, you may encounter error 0x800f0954.
- Conflicting Group Policy Editor: When group policy editor settings interrupt system services, you face a 0x800f0954 error.
How to Fix .NET Framework 3.5 Error 0x800f0954 in Windows 10/11?
If you are facing error 0x800f0954 net framework 3.5, you can apply the following fixes to resolve it:
Fix 1: Smart Repair with PassFab FixUWin
PassFab FixUWin is a comprehensive solution to all your Windows problems. Although it is designed to help you manage and control your system resources efficiently, its Smart Repair feature enables you to resolve 200+ Windows errors smartly with minimal effort. It can automatically scan your system and replace the problematic files. Using this utility, you can fix BSoD, crashing, boot loops and other errors by creating a Windows repair disk.
Here is how to use PassFab FixUWin to resolve error 0x800f0954 .NET Framework 3.5:
Step 1: After installing PassFab FixUWin, click Create boot disk now.
Step 2: Plug in a boot media (USB/CD/DVD) and hit the Next button.
This will create a bootable Windows repair disk for your system.
Step 3: Restart your computer and set the bootable USB on boot priority.
Step 4: Click the Automated repair button to initiate the repair process. This will help you repair your system without performing any complex steps.
Step 5: Now, hit the Start repair button after selecting the disk partition you want to repair.
You will have to wait for some time for the repair process to be complete. This time depends upon the data stored on the chosen disk.
Step 6: Click Restart to restart your system.
Once this utility has completed repairing, you can install .NET Framework 3.5 without facing any error 0x800f0954.
Fix 2: Bypass WSUS to Install Updates Directly
As mentioned earlier, the error 0x800f0954 can occur due to connection errors in WSUS (Windows Server Update Service). You can try bypassing this utility and directly install the updates and features from Windows Update.
Step 1: Right-click the Start button to open the context menu and choose Run.
Step 2: Enter regedit.exe in the Run dialog and hit Enter.
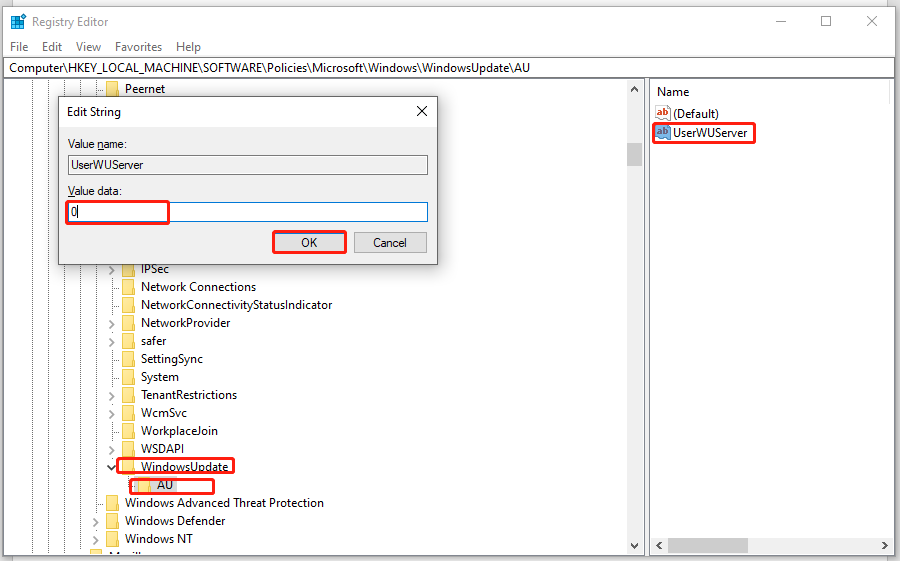
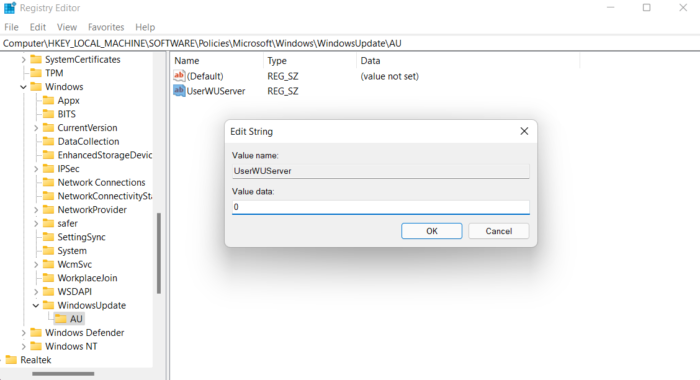
Step 3: Follow the path: HKEY_LOCAL_MACHINE\SOFTWARE\Policies\Microsoft\Windows\WindowsUpdates\AU.
Step 4: Set the UserWUServer data value to 0 on the right pane.
Step 5:Exit the registry editor and restart your computer.
After the command completes successfully, restart your system to implement the changes.
Fix 3: Fix Error 0x800f0594 with DISM Command
DISM is a built-in Windows command line tool to repair system errors. If the above fix fails to resolve your issue, you can try repairing the .NET Framework 3.5 error with this tool. To do so, the .NET Framework installation file must be stored on Windows Installation Media or the ISO file.
Step 1: Mount the latest Windows 10/11 ISO image by double-clicking.
Step 2: Notice the drive letter of the DVD or mounted drive.
Step 3:Open the command prompt in elevated mode and type the following command:dism /online /enable-feature /featurename:NetFX3 /Source:H:\sources\sxs /LimitAccess**
After the command completes successfully, restart your system to implement the changes.
Fix 4: Fix Error Code 0x800f0954 by Cleaning CBS Log
One of the major culprits behind error 0x800f0954 is the CBS log created by DISM. The best way to eliminate this cause is to delete this log:
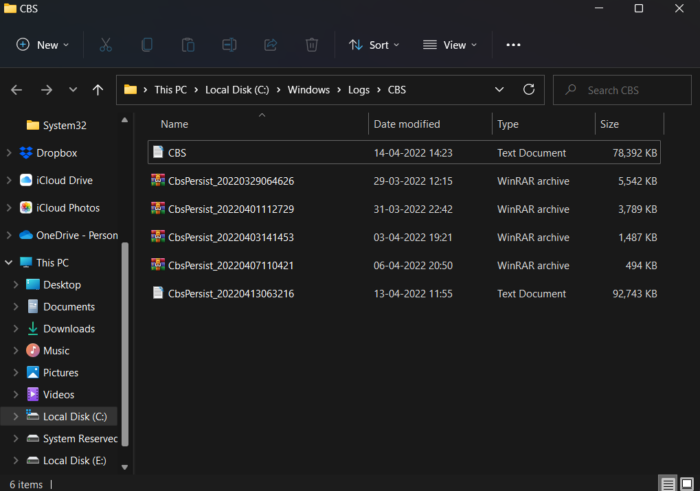
Step 1: Open the C drive and go to the Windows folder.
Step 2: Go to Logs -> CBS.
Step 3: Select all files by pressing CTRL + A keys and hit Shift + Delete keys to delete them permanently.
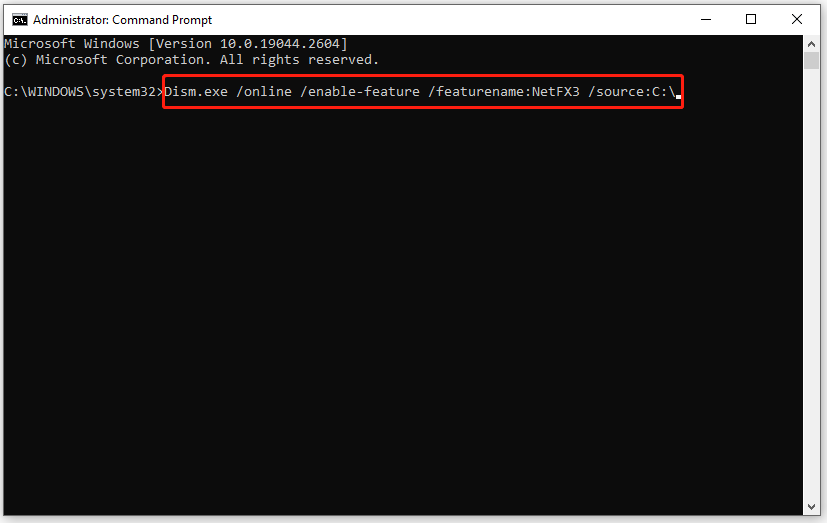
Step 4: Now, you need to re-run the DISM command by accessing the elevated command prompt and typing this command: dism.exe /online /enable-feature /featurename.NetFX3 /source.C.
Step 5: Install .NET Framework 3.5.
Fix 5: Resolve Error 0x800f0954 with Group Policy Editor
The optional Windows updates and features sometimes fail due to Group Policy issues. You can alter these policies to repair error 0x8000f0954 in Windows 10. Follow the given steps to apply this fix:
Step 1: Press Windows + R keys to launch Run dialog.
Step 2: Type gpedit.msc command and hit Enter.
Step 3: Go to the following path using the left-navigation menu in the Local Group Policy Editor window:
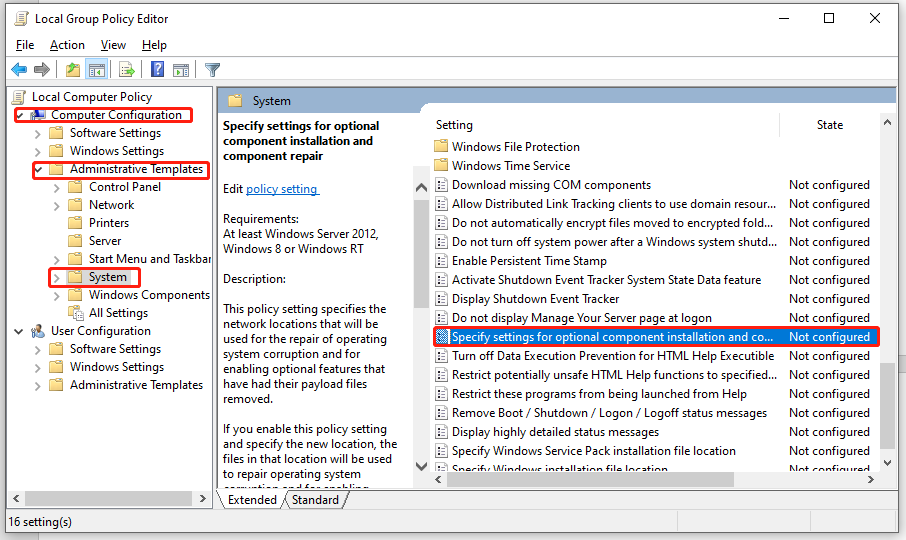
Computer Configuration\ Administrative Templates\ System.
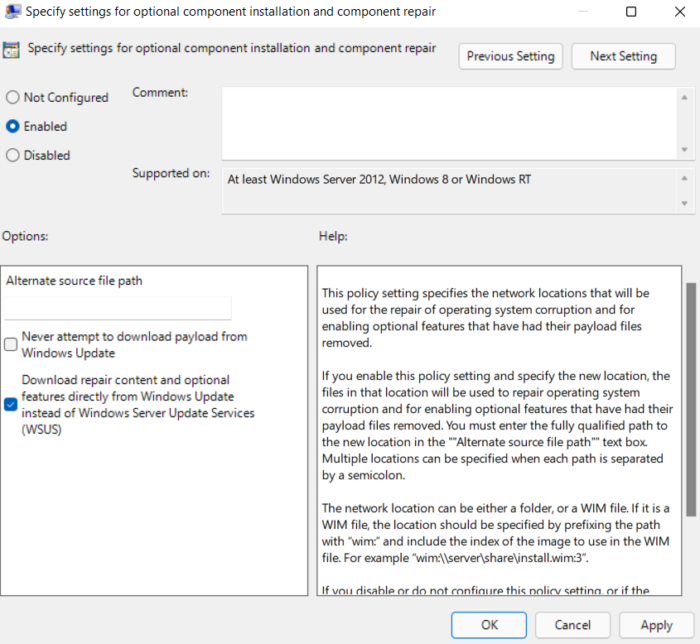
Step 4: Double-click the Specify settings for optional component installation and component repair option on the right side of the window.
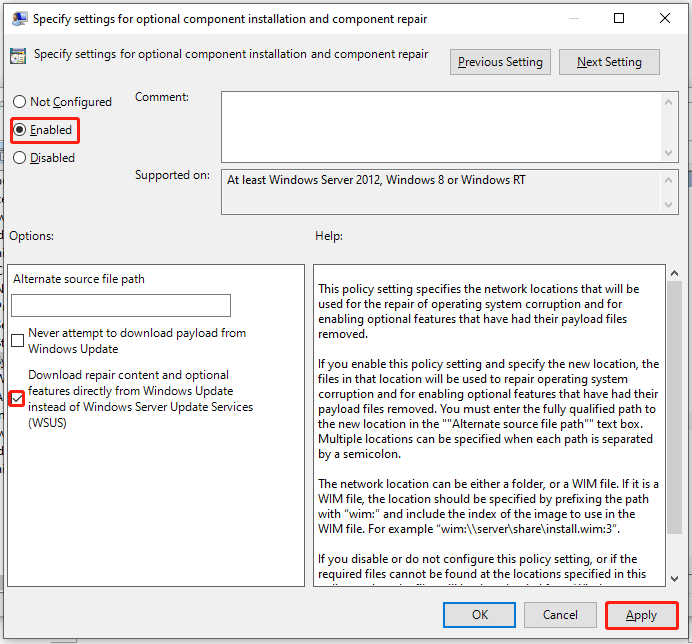
Step 5: Enable the service.
Step 6: Check the “Download repair content and optional features….” option.
Step 7: Click Apply and then OK to confirm the action.
Step 8: Restart system.
Now, try to install .NET Framework 3.5.
FAQs
1.What is error code 0x800f0954 rsat?
The error code 0x800f0954 RSAT occurs on Windows when installing Remote Server Administration Tools (RSAT) using DISM for additional features. The RSAT is included in the Features on Demand in Windows 10. This tool is used to manage other systems running the same OS remotely. It is designed for IT admins to help them manage roles, features, and role services for remote computers.
If you face RSAT error code 0x800f0954, you can apply the fixes in this guide to mitigate it.
2.How to Fix Error Code 0x800f0954 language pack?
When you try to install language pack features, they sometimes cause error 0x800f0954 due to misconfigured Windows Update Services, corrupted system files, or a weak Internet connection.
To avoid this error, you can add the desired language pack as follows:
- Open Settings and choose Time & Language settings.
- Switch to the Language tab on the left navigation.
- Click on Add a Language.
- Search your preferred language, select it, and click Next.
- Follow the instructions on the screen.
Final Words
The error 0x800f0954 is triggered due to various reasons and on various occasions. In this article, we have proposed the best ways to mitigate the error code 0x800f0954 .NET Framework Windows 10/11. All the solutions are tested and proven. We hope you found them helpful.
COMMENT
Some of you may receive the error code 0x800f0954 when you would like to install .NET Framework 3.5 or install any optional Windows Updates. Don’t panic! In this guide on MiniTool Website, we will show you 4 solutions to eliminate this error from your computer.
.NET Framework is a general-purpose platform developed by Microsoft. It provides a runtime environment and a set of libraries and tools for building and running applications on the Windows operating system. However, you may receive error code 0x800f0954 when trying to install .NET Framework 3.5 or other optional features via the Windows Features functionality or the DISM command-line tool in Windows 7, Windows 8.1 and Windows 10. Here are the error messages you might receive when getting DISM error 0x800f0954 or .NET Framework error 0x800f0954.
- Error: 0x800f0954. DISM failed. No operation was performed.
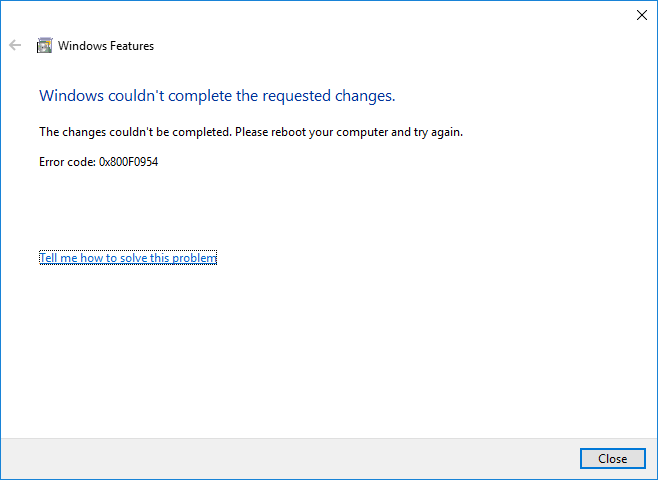
- Windows couldn’t complete the requested changes. The changes couldn’t be completed. Please reboot your computer and try again. Error code: 0x800f0954.
- 0x800f0954, CBS_E_INVALID_WINDOWS_UPDATE_COUNT_WSUS.
After having a basic concept of DISM error 0x800f0954 or .NET Framework error 0x800f0954, here comes the question what causes this error? The 4 common culprits are listed as follows:
- Windows Update Server issue: Windows Server Update Services enables you to update Windows on a computer network. If your system cannot reach WSUS, DISM error 0x800f0954 might also appear.
- DISM CBS logs issue: At times, the DISM utility can generate some logs related to CBS but they indicate that there are some non-existent problems in your system.
- Older .NET Framework version: Usually, you are supposed to install the latest version of the .NET Framework on your computer. If you attempt to install any older .NET Framework package, you are very likely to receive .NET 3.5 error 0x800f0954.
- The hindrance of Local Group Policy Editor: If one policy is disabled from Local Group Policy Editor due to some reason, there will be an obstruction in the connection between Windows Server Update Services and Windows Optional Features Installer.
How to Fix DISM Error 0x800f0954 in Windows 7/8.1/10/?
Fix 1: Skip Windows Server Temporarily
If your system fails to access the Windows Update server, it won’t allow you to install optional Windows updates, resulting in the occurrence of .NET Framework 3.5 error 0x800f0954. In this case, you can try bypassing the WSUS server.
Step 1. Press Win + R to open the Run dialog.
Step 2. Type regedit and hit Enter to launch Registry Editor. If prompted by User Account Control, hit Yes to grant the permissions.
Step 3. Navigate to the following location: HKEY_LOCAL_MACHINE\SOFTWARE\Policies\Microsoft\Windows\WindowsUpdate\AU
If you find there is no WindowsUpdate key under Windows, you can create it manually. Just right-click on the Windows key > select New > choose Key > rename it to WindowsUpdate.
Then, right-click on WindowsUpdate > select New > choose Key > rename it to AU.

Step 4. Select the AU key > right-click on the blank area on the right side > select New > choose String Value > rename it to UserWUServer.
Step 5. Double-click on UserWUServer to change Value data to 0 and press OK to save the changes.
Step 6. Open File Explorer and right-click on This PC to choose Manage.
Step 7. Double-click on Services and Applications & Services > scroll down to find Windows Update > right-click on it to choose Restart. Now, you can install .NET Framework 3.5 successfully without the error code 0x800f0954.
Fix 2: Clean the CBS Logs
It is reported that DISM error 0x800f0954 is no longer existing after deleting the Component Based Servicing logs related to DISM. Here’s how to do it:
Step 1. Press Win + E to open File Explorer.
Step 2. Navigate to the following location: C:\Windows\Logs\CBS.
Step 3. Press Ctrl + A to select all the files inside the CBS folder and right-click on them to choose Delete.
Step 4. Then, close the CBS folder and run Command Prompt as an administrator.
Step 5. Run the following command to install .NET Framework and don’t forget to hit Enter.
Dism.exe /online /enable-feature /featurename:NetFX3 /source:C:\
Now, you will probably install .NET Framework without error code 0x800f0954.
Tips:
What if your CNS logs are corrupted? Don’t worry! You can find some effective solutions in this guide — What Is CBS.log Windows 10 & How to Fix CBS.log Corrupt Issue.
Fix 3: Amend Group Policies
If there are some problems with group policies, some operational features and repair content will also fail to download. Follow these guidelines:
Tip: This solution isn’t applicable for all Windows versions. If you use Windows 10 Home, you need to skip this fix because it cannot support Local Group Policy Editor.
Step 1. Press Win + R to open the Run box.
Step 2. Type gpedit.msc and hit OK to launch Local Group Policy Editor. If prompted by UAC, hit Yes.
Step 3. Navigate to Computer Configuration > Administrative Templates > System. With System selected, scroll down in the right-hand pane to find Specify settings for optional component installation and component repair and double-click on it.
Step 4. Set the policy to Enabled and check Download repair content and optional features directly from Windows Update instead of Windows Server Update Services (WSUS).
Step 5. Click on Apply to save the configuration and then exit Local Group Policy Editor. DISM error 0x800f0954 might be gone at the next system startup.
Fix 4: Install .NET Framework 3.5 with PowerShell
If you install an older .NET Framework package using DISM, it can also cause DISM error: 0x800f0954. To solve this issue, you can install .NET Framework 3.5 via Windows PowerShell.
Step 1. Right-click on the Start icon and select Windows PowerShell (Admin) in the context menu.
Step 2. In the command window, type Add-WindowsCapability –Online -Name NetFx3~~~~ –Source D.\sources\sxs and then tap on Enter.
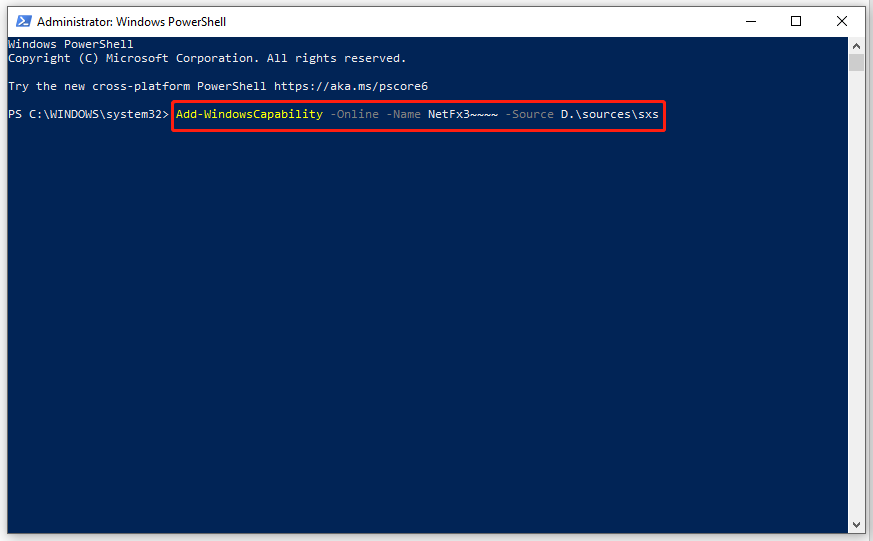
Step 3. After the process is done, quit Windows PowerShell and reboot your computer.
Fix 5: Install .NET Framework 3.5 from Windows 10 ISO
If none of the solutions are useful to you, the last option is to install .NET Framework 3.5 or optional features from Windows 10 ISO. Make sure that the ISO file corresponds to the version of Windows 10 installed on your computer.
Step 1. Go to Microsoft official website and click on Download tool now.
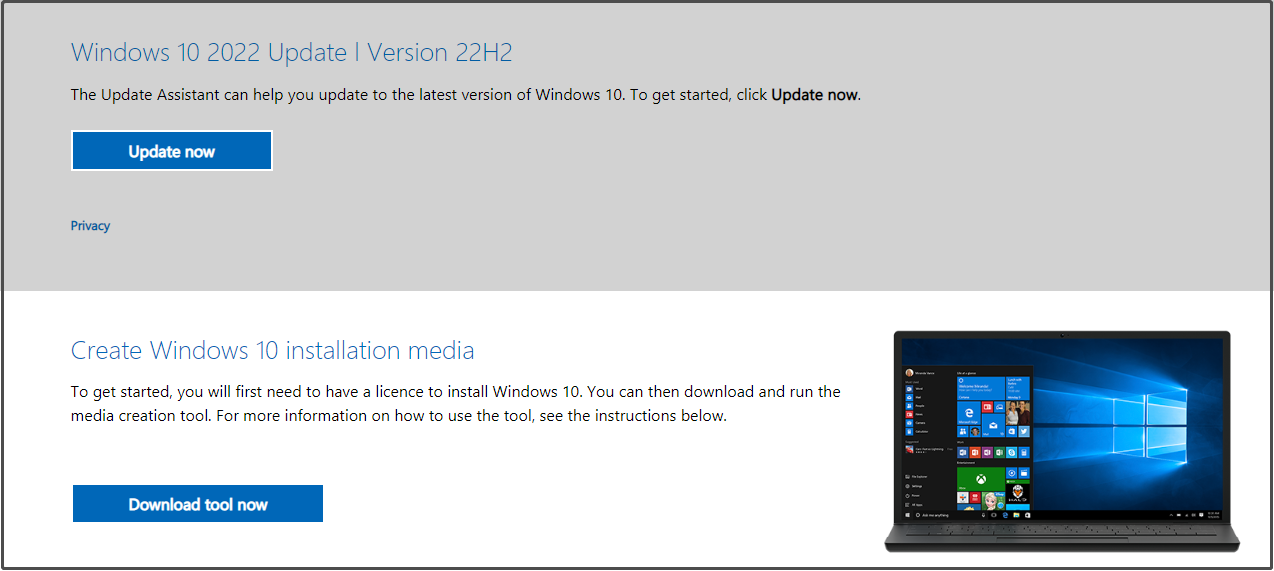
Step 2. Hit Accept to accept the license terms > tick Create installation media (USB flash drive, DVD, or ISO file) for another PC > hit Next > select Language, Architecture, and Edition > hit Next > tick ISO file > hit Next > choose a download location for Windows 10 ISO file > hit Save.
Step 3. Once downloaded, find the ISO file in File Explorer and right-click on it to select the Mount option. Then, note down the drive letter of the mounted drive.
Step 4. Launch Command Prompt as an administrator and run the following command (don’t forget to replace H:\ with the drive letter of your mounted drive):
dism /online /enable-feature /featurename:NetFX3 /Source:H:\sources\sxs /LimitAccess
Tips:
If you need to installing all the components (including Windows Communication Foundation HTTP Activation and Windows Communication Foundation Non-HTTP Activation), please add the /All parameter in the command behind featurename:NetFX3. Most users don’t need the two components.
Related article: Windows 10 ISO Mount/Unmount | Get This Full Guide Now
This post works on fixes for DISM error 0x800f0954 or .NET Framework error 0x800f0954. If you are trapped in the same hardship, the workarounds in this post can work for you. Click to Tweet
By now, you may manage to remove DISM error 0x800f0954 from your computer. It is natural for computer users to encounter such errors in daily life and work. Even if you are very proficient in computers, you will never predict what you will suffer from the next second.
Therefore, backing up your computer is an indispensable part of daily life. With a backup copy before hand, you can restore your system to a normal state easily when your Windows devices get into trouble rather than thinking hard about how to troubleshoot the error.
With regard to backup, MiniTool ShadowMaker is in a class of its own. This professional backup software is free & reliable, and you can create a backup of your files, folders, partitions, disks, & operating system within a few simple steps. At the same time, it also supports file sync and disk clone on Windows systems in addition to backup. The trump card of MiniTool ShadowMaker is a one-click system backup solution. Let’s see how it works.
Step 1. Download, install, and launch this free tool.
MiniTool ShadowMaker TrialClick to Download100%Clean & Safe
Step 2. Click on Keep Trial and go to the Backup page.
Step 3. As you can see, the system is selected by default in SOURCE, so you only need to choose a destination path for your backup image in DESTINATION. Here, it is highly recommended to store your backup files in one partition of a USB flash drive or an external hard drive.
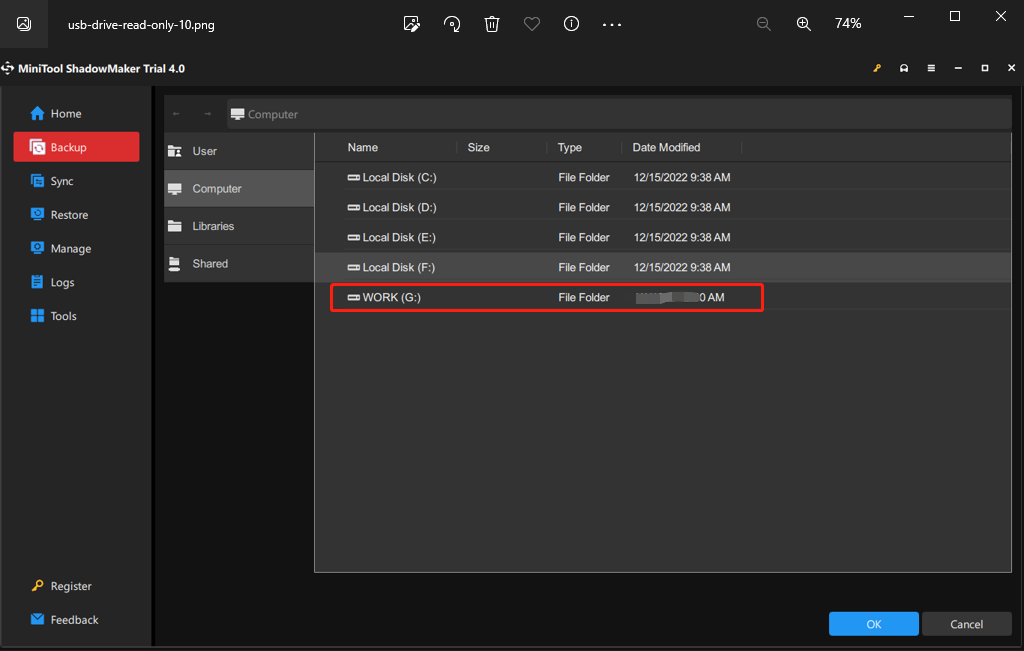
Tips:
As for creating a backup for your valuable files, you can go to Backup > SOURCE > Folders and Files to choose the desired files/folders and then choose a storage path in DESTINATION.
Step 4. After making your choice, click on Back Up Now to start the backup at once.
Then you need to create a bootable USB disk with MiniTool ShadowMaker in case your computer fails to boot. Follow these steps:
Step 1. Launch MiniTool ShadowMaker and go to the Tools page.
Step 2. Click on Media Builder and WinPE-based media with MiniTool plug-in.
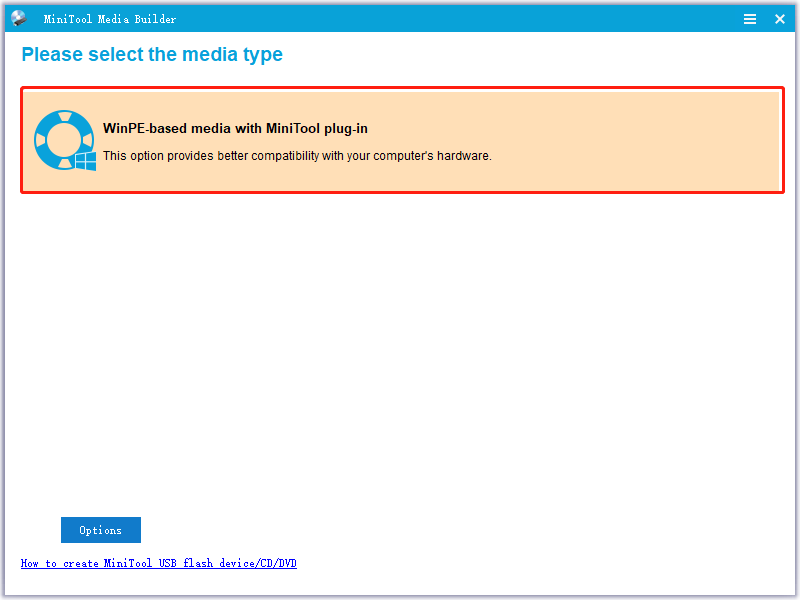
Step 3. Choose USB Flash Disk and hit Yes if prompted by a warning message. After the process is down, hit Finish and quit this program. When your computer experiences some radical changes like system crashes, hard disk failure, black screen, blue screen of death and more, you can boot your computer from this bootable USB disk and perform a system recovery.
We Need Your Voice
In a nutshell, you may get DISM error 0x800f0954 or .NET Framework error 0x800f0954 when failing to install .NET Framework 3.5 or the optional Windows update. If you are looking for some fixes for it, the five solutions mentioned above might be useful to you.
During the troubleshooting process, if you find that some of the fixes are not applicable to your current situation, please feel free to move to other fixes. For more questions about our product, you can tell us your suggestions in the comment zone below or contact us via [email protected].
DISM Error 0x800f0954 FAQ
How do I fix error code 0x800f0954?
For DISM error 0x800f0954 or .NET Framework error 0x800f0954, you can:
- Bypass Windows Server Temporarily
- Install .NET Framework via Windows PowerShell
- Clean the CBS Logs
- Amend Group Policies
For Windows 10 Language Pack error 0x800f0954, you should:
- Change Wi-Fi Settings
- Edit Wuauserv Settings
- Manually Add the Language Pack.
What is 0 * 800f0954?
There are two conditions for 0 * 800f0954 — Windows 10 Language Pack error 0x800f0954 and DISM error 0x800f0954(.NET Framework error 0x800f0954). The former appears when Windows 10 Language Pack doesn’t install properly while the latter occurs when trying to install .NET Framework 3.5 or a different optional feature in Windows 10.
How do I fix a corrupted DISM?
Fix 1: Disable Antivirus Software Temporarily
Fix 2: Run DISM Command in Clean Boot
Fix 3: Change the Correct Location if Install.wim File
Fix 4: Untick Install.wim Read-only
Fix 5: Clean up System Image Components
Fix 6: Reset Windows Update Service
Fix 7: Run Windows Update Troubleshooter
Fix 8: Disable Proxy
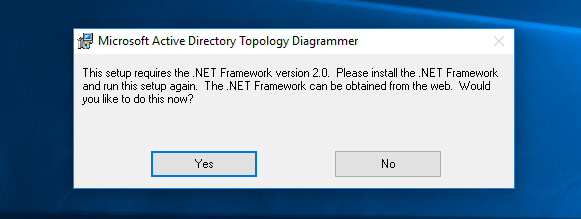
Некоторые программы в Windows 10 для корректного запуска требуют наличия установленных старых версий .NET Framework 2.0, 3.0 или 3.5.
The application requires the .NET Framework version 2.0. Please install the .NET Framework and run this setup again.
Установка.NET Framework 2.0, 3.0 и 3.5 через Windows Update
Откройте панель Settings и перейдите в раздел Apps -> Apps and features -> Programs and Features.
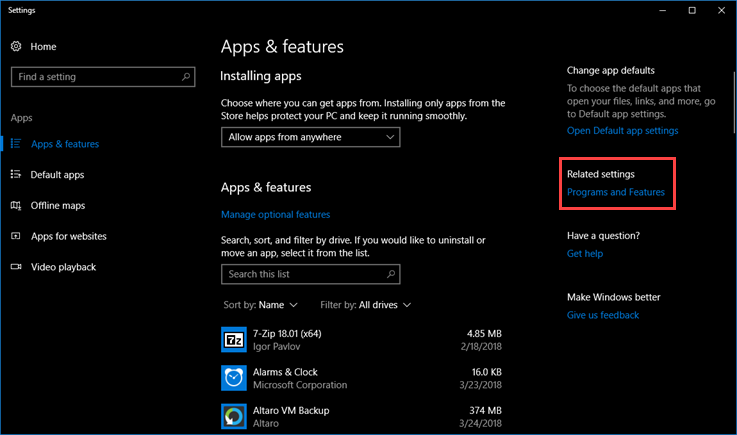
Откроется стандартное диалоговое классической Панели Управления, выберите в левом столбце Turn Windows features on or off.
Также вы можете открыть это окно, нажав Win+R и набрав optionalfeatures.
В списке компонентов Windows выберите .NET Framework 3.5 (includes .NET 2.0 and 3.0) и нажмите OK.
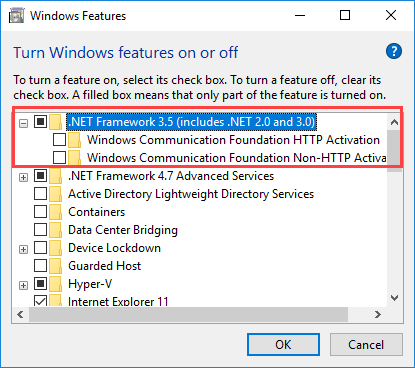
Система должна загрузить все необходимые установочные файлы .NET Framework из Интернета с серверов Windows Update.
После загрузки и установки .NET Framework Windows запросит перезагрузку.
Установка.NET Framework 2.0, 3.0 и 3.5 с помощью PowerShell
Чтобы из консоли PowerShell в Windows запустить установка .NET Framework с серверов Windows Update, выполните следующую команду:
Add-WindowsCapability -Online -Name NetFx3~~~~
Чтобы вывести список доступных компонентов Windows 10, выполните:
Get-WindowsCapability -Online
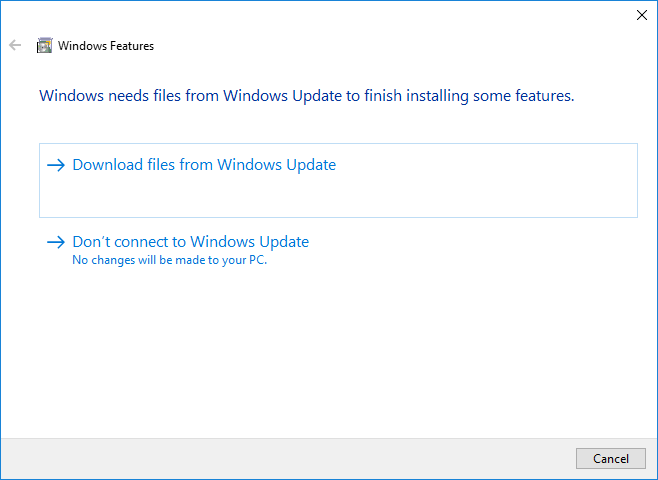
Если в вашей инфраструктуре используется сервер обновлений WSUS, при попытке установить .Net Framework из интернета, вы получите ошибку 0x800F0954. В этом случае вы можете установить .Net из установочных файлов дистрибутива Windows.
Установка.NET Framework 2.0, 3.0 и 3.5 с установочного диска Windows 10
Распакуйте ISO образ Windows 10 в локальную или сетевую папку, либо просто смонтируйте образ в виртуальный CD-ROM.
Запустите консоль PowerShell с правами администратора и выполните следующую команду (замените путь к каталогу SxS вашего распакованного дистрибутива Windows 10):
Add-WindowsCapability -Online -Name NetFx3~~~~ -Source D:\Sources\SxS
Либо вы можете запустить установку из командной строки с помощью DISM:
DISM.exe /Online /Add-Capability /CapabilityName:NetFx3~~~~ /Source:D:\Sources\SxS
Вы можете убедиться, что.NET Framework успешно установлен с помощью команды:
Get-WindowsCapability -Online -Name NetFx3~~~~
Надеюсь, эта инструкция поможет вам справиться с ошибкой 0x800F0954 при установке .NET Framework в Windows 10.
Do you encounter Error Code 0x800f0954 in Windows 10 while making an attempt to install .NET Framework 3.5? When you try to install any additional feature such as .NET Framework in Windows 10, it always communicates with Windows update. The issue occurs because WSUS (Windows Server Update Services) doesn’t let Optional Features install this software framework. Most cases indicate that WSUS fails to approve .Net installer. So, to get rid of Error Code 0x800f0954, you need to use the ISO of Windows Installation Media instead.
This error happens commonly when you try to install DotNet (.net) on Windows 10 while using a WSUS server. The Stop code comes up on the screen which indicates that the .NET installer is not approved in WSUS and you failed to enable .NET Framework. 2 methods lets you fix Error Code 0x800f0954 on Windows 10 – using PowerShell and with Registry Editor. You need to follow the Way-1 and Way-2 successively and this will solve the error.
Error Code 0x800f0954 in Windows 10 Solutions
Here is How to Fix Error Code 0x800f0954 in Windows 10 or 11 (.Net Framework) –
Way-1: Install .NET Framework 2.0, 3.0, and 3.5 in Windows 10 through Media
You need to force the installation from media using PowerShell as the best option.
Step-1: Unzip the .NET files from Windows 10 ISO to a local/ network folder. Then write down its respective path or if the location is easier, just mount it.
Step-2: Go to Search box and type PowerShell. Right-click on the result and select Run as administrator. Alternatively, open Win+X menu and click Windows PowerShell (Admin).
Step-3: Hit ‘Yes’ on UAC dialog so that elevated PowerShell may come into view.
Step-4: Here type or copy/paste the given command by replacing the location of the files you unzipped.
Add-WindowsCapability -Online -Name NetFx3~~~~ -Source D:\Sources\SxSStep-5: If you are unable to execute the above command, try out the “DISM” tool in order to carry out the same action.
DISM.exe /Online /Add-Capability /CapabilityName:NetFx3~~~~ /Source:D:\Sources\SxSStep-6: Lastly, confirm the installation of .NET Framework by typing the below-given command.
Get-WindowsCapability -Online -Name NetFx3~~~~Way-2: Use Registry Editor to Fix Error Code 0x800f0954
You can also fix Error Code 0x800f0954 with registry modification.
Note: Performing incorrect changes in the Registry Editor may adversely affect your computer. So ensure to create a System Restore point before manipulating the registry as it may corrupt certain files or OS.
So, you may like to read How to Import and Export Registry Editor on Windows 10.
First & foremost, press Win & R shortcut keys together to open Run dialog box. Type regedit in the text field and hit Ok to go ahead.
If prompted by “UAC”, click Yes to proceed further.
Next, navigate to the given path in the left column of the Registry Editor.
HKEY_LOCAL_MACHINE\SOFTWARE\Policies\Microsoft\Windows\WindowsUpdate\AUOnce you reach AU key, go to the right pane where you should find REG_DWORD (registry DWORD) namely UseWUServer.
Read How to Create a New DWORD Value in Registry Editor on Windows 10.
Double-click on the DWORD UseWUServer in order to modify its Value data.
When the Edit dialog box appears on the PC screen, change the Value data to 0. Finally, press OK to implement the changes.
Now close Registry Editor window and retry to install .NET Framework without getting Error Code 0x800f0954.
In the end, restart Windows 10 PC and check if “.NET Framework” is installed without the error.
Methods:
Way-1: Install .NET Framework 2.0, 3.0, and 3.5 in Windows 10 through Media
Way-2: Use Registry Editor to Fix Error Code 0x800f0954
That’s all!!
While installing .NET Framework 3.5 on the system, many users have reported coming across Error code 0x800F0954. The error message also occurs upon installing different Optional features in Windows 11/10.
Windows couldn’t complete the requested changes.
The changes couldn’t be completed. Please reboot your computer and try again.
Error code: 0x800F0954
What causes Error code 0x800F0954?
0x800f0954, CBS_E_INVALID_WINDOWS_UPDATE_COUNT_WSUS
Before getting into solutions, it’s important to find out the reason behind the error message. The Error code 0x800F0954 occurs when you try to install .NET Framework 3.5 or any other optional features using the Windows Features functionality or DISM. Below are all the common culprits behind the problem.
- The message will occur if there’s an obstruction in the connection between Windows Server Update Services and Windows Optional Features Installer.
- The .NET Framework 3.5 is a comparatively older .NET Framework. Therefore, it’s common to face the mentioned error while installing it via Windows Features.
- Misconfigured optional component installation and component repair settings can be another significant reason behind the problem.
Now that you have prior knowledge of different reasons causing the error message let’s check out how to get rid of them.
Below is the list of all the effective solutions to try if you receive the error 0x800F0954 when installing .NET Framework in Windows 11/10:
- Temporarily bypass WSUS server
- Clear CBS logs
- Change Component Installation and Component Repair settings
- Install .NET Framework 3.5 via PowerShell
Now, let’s take a look at all the solutions in detail.
1] Temporarily bypass the WSUS server
The first thing you should try is to temporarily bypass the WSUS server with the help of the Windows Registry. You can do so by following the below steps.
Open the Run dialogue box by pressing the Windows + R shortcut key.
Type regedit and click on the OK option.
Click on Yes on the UAC that pops up.
Head towards the following registry key.
HKEY_LOCAL_MACHINE\SOFTWARE\Policies\Microsoft\Windows\WindowsUpdate\AU
In the right panel of the screen, locate UseWUServer.
Set the value of UseWUServer to 0.
That’s it. Close the Registry Editor and reboot your system. Check if the problem is fixed or not.
Read: Microsoft .NET Framework Repair Tool will fix .NET Framework problems & issues
2] Clear CBS logs
CBS stands for Component Based Servicing, and it is a file that features logs related to both, installed and uninstalled Windows Update components. The error message was fixed by clearing CBS logs per many users. You can do the same and check if it resolves the problem for you as well. Here’s how it’s done.
Open the Run dialogue box, paste the below location and click on the OK option:
C:\Windows\Logs\CBS
Select everything inside the CBS folder.
Right-click on the selected files and choose the delete option.
Now, open Command Prompt in administrator mode.
Type the following command and press the enter key.
Dism.exe /online /enable-feature /featurename:NetFX3 /source:C:\
Once the command is executed, the .NET Framework 3.5 will have been installed on your system without any error. But if the problem continues, try the following solutions.
See: How to enable Automatic .NET Updates in Windows Server
3] Change Component Installation and Component Repair settings
The next thing to try is to make some changes to the Group Policy Editor. Here’s what you need to do.
Open the Run dialogue box, type gpedit and press the enter key.
Navigate to the below location.
Computer Configuration > Administrative Templates > System
Double click on Specify settings for optional component installation and component repair.
Select the Enabled option.
Checkmark Download repair content and optional features directly from Windows Update instead of Windows Server Update Services (WSUS).
Click on Apply > OK to save the changes.
Reboot your system and check if the problem is fixed or not.
See: Enable .NET Framework 2.0 and .NET Framework 3.5 in Windows 11
4] Install .NET Framework 3.5 via PowerShell
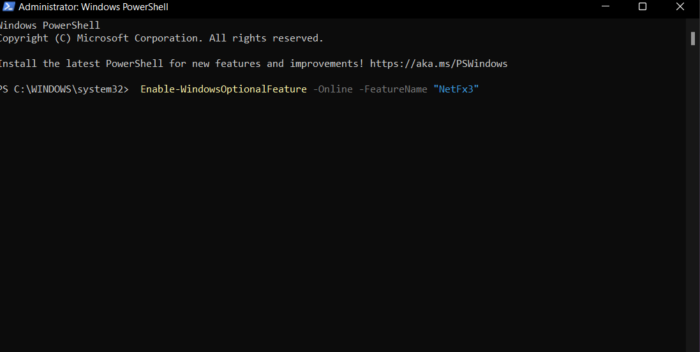
You can install the .NET Framework 3.5 via Windows PowerShell as well. The situation applies especially to users facing the mentioned issue while going through the installation process via DISM. Here’s how to get the work done.
To begin with, open Windows PowerShell in administrator mode.
In the PowerShell window, type the following command and press the enter key.
Enable-WindowsOptionalFeature -Online -FeatureName "NetFx3"
Wait until the command is executed. It will take around 10 to 15 minutes.
Also read: Windows Update Error 0x500f0984 or 0x800f0954
Read: Troubleshoot .NET Framework Installation Issues
How do I check the installed .NET Framework version on Windows 11/10?
It’s very easy to check the installed .NET Framework version. In fact, there are multiple ways to do it. You can do it using Command Prompt, Registry Editor, PowerShell, and File Explorer. To check the version via File Explorer, follow these steps: open File Explorer and navigate to %windir%\Microsoft.NET\Framework\. Here you’ll find all the installed versions.
Read: Fix .NET Framework 3.5 Installation Error 0x800F0950
How to fix error 0x800F080C when installing .NET Framework?
The error 0x800F080C when installing .NET Framework due to corrupted files or corrupted .NET Framework dependencies. You can try these solutions to solve the problem: Run the .NET repair tool, run SFC and DISM scan, and download .NET Framework offline installer. It’s very easy to troubleshoot this error.
Read Next: Fix Error Code 0x800f0954 or 0x500f0984 while installing a Windows Feature or a Windows Update.