
It is important to install Windows updates to patch known bugs and equip the system with new features. At times, you will get the error 0x800B010A when updating Windows on your system. This update error can occur with different Windows versions such as 7, 8, 10, or 11, and it may arise while updating the .NET Framework, drivers, or other operating system elements.
The error code 0x800B010A directly translates to:
A certificate chain was processed but ended with a root certificate that is not trusted by the trust provider.

We will try to fix it by troubleshooting different Windows update aspects and if that fails, we will manually install the update or perform an in-place upgrade.
1. Check for Windows Updates Again
You will see the Windows update error 0x800B010A notification if an ongoing update locked a system resource or a prerequisite update was not installed on the system. Here, checking for Windows updates again will solve the problem.
- Right-click Windows and go to Settings > Windows Update.
- Click on Check for Updates and install all the updates. Leave the one showing the error.

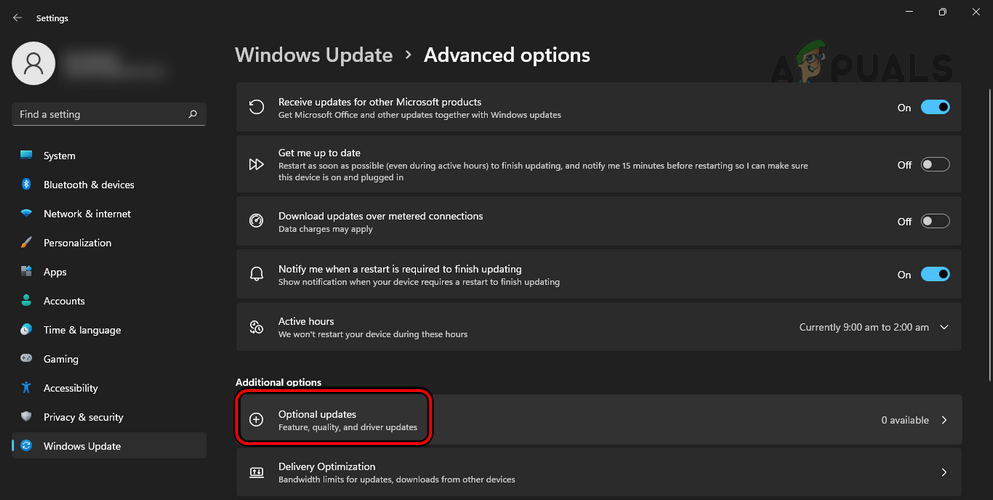
Check for Windows Updates - Restart the system and to Settings > Windows Update > Advanced Options > Optional Updates.

Open Optional Updates in the Windows Update - Install all the optional updates as well and restart your system.
- Navigate to Settings > Windows Update.
- Again, Check for Updates and install the updates available. See if the problematic update is installed.

2. Perform a Clean Boot of the System
You will fail to update your system with the 0x800B010A error if another process or service on your system is locking the access of OS components to essential resources. To check this, perform a clean boot of your system.
- Clean boot your Windows system, and check for Windows updates.

Clean Boot the Windows PC - If the process goes smoothly, another application or service was causing the issue.

3. Hide the Problematic Update
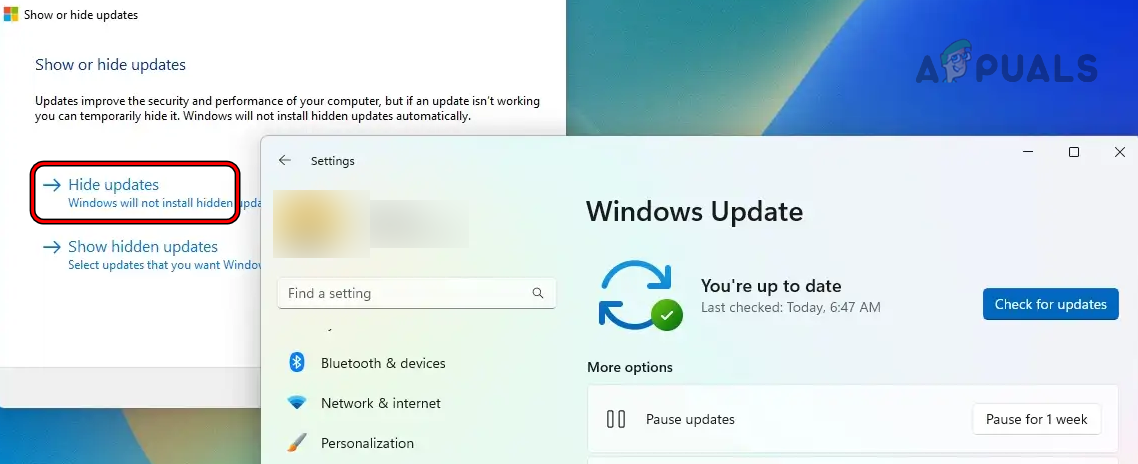
If the problematic update is for another manufacturer but you have a system from another manufacturer (e.g., a Dell PC is offered an HP keyboard driver update), then that update does not apply to your system and you should hide it.
Remember only hide the update if it does not apply to your system.

- Hide the problematic Windows update and restart your system.

Hide Windows Updates - Check for Windows updates and see if the problem is solved.
4. Reset Windows Update Components
Windows Update components are responsible for completing Windows updates on your system. If any of these components is malfunctioning or gets damaged, the update process will fail with the error at hand.
To solve this, reset Windows Update components.
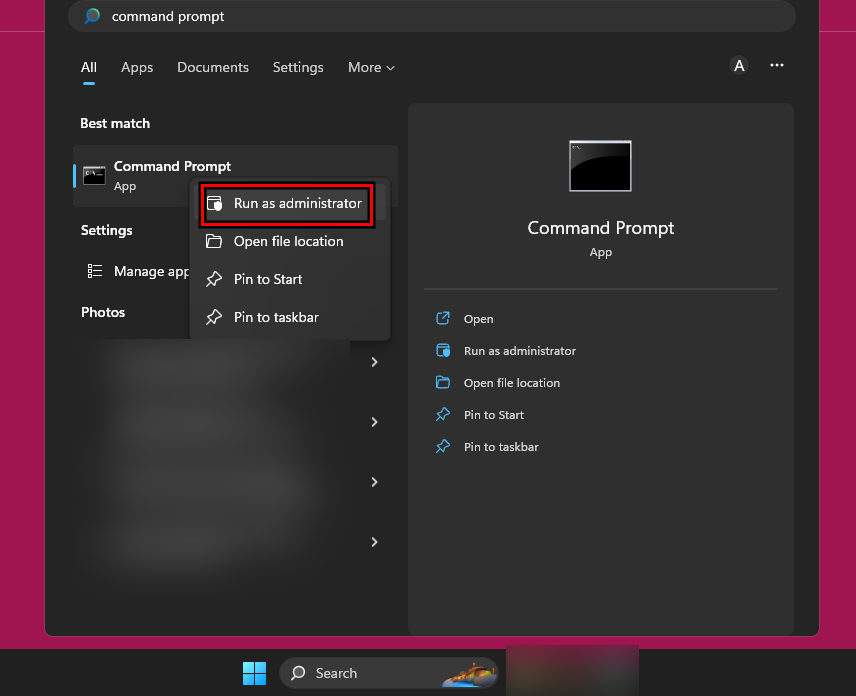
- Click Windows and search for CMD.
- Right-click on it and select Run as Administrator.

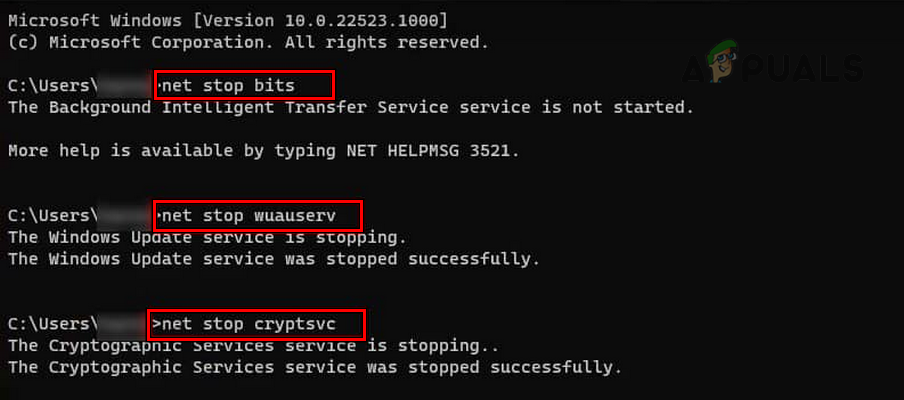
Open the Command Prompt as an Administrator - Click OK on the UAC prompt and execute the following one by one:
net stop wuauserv

net stop cryptSvc

net stop bits

net stop msiserver

ren C:\Windows\SoftwareDistribution SoftwareDistribution.old

ren C:\Windows\System32\catroot2 catroot2.old

net start wuauserv

net start cryptSvc

net start bits

net start msiserver

Exit

Reset Windows Update Components - Restart the system and check for Windows updates. See if the error is cleared.
5. Disable or Uninstall the Antivirus
You will fail to complete Windows Update with error 0x800B010A if your system’s antivirus is hindering the operation of updates. To fix this, disable or uninstall the system’s antivirus.
Warning:
Advance with extreme caution and at your own risk as disabling or uninstalling the system’s antivirus may expose the system and data to threats.
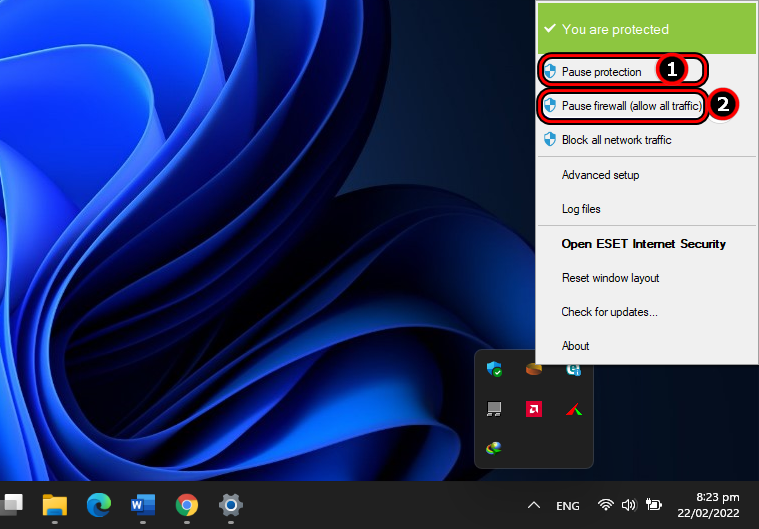
Disable the Antivirus
- Expand the hidden icons of the system tray and right-click on the antivirus icon.
- Select Pause Antivirus and confirm to pause the antivirus.

Pause ESET Protection and the Firewall - Pause the system’s firewall and check if the update error 0x800B010A is cleared.
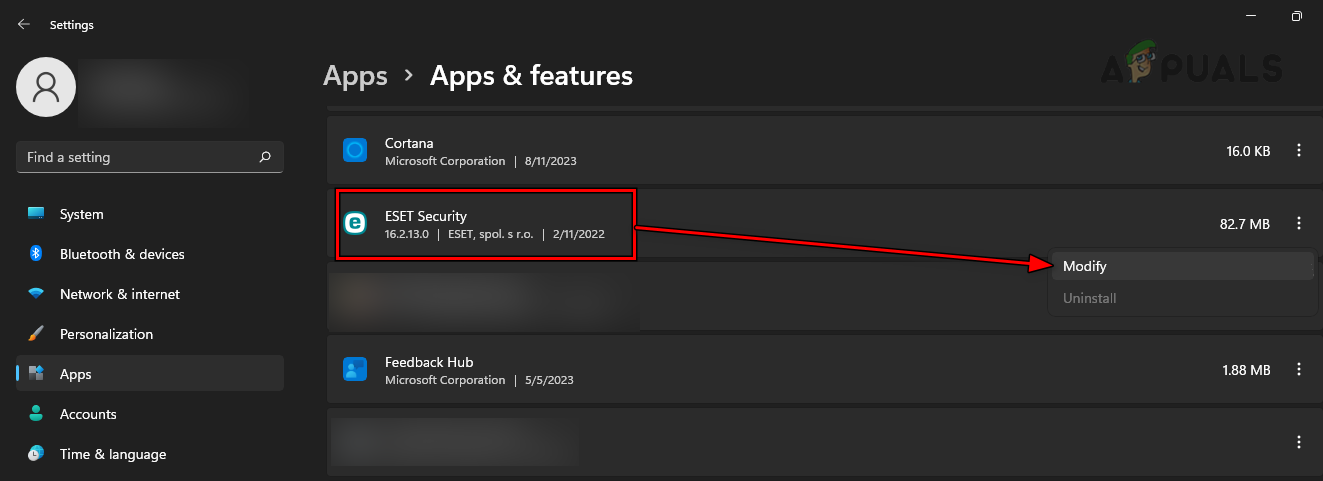
6. Uninstall the Antivirus
- Right-click Windows and select Apps & Features.
- Locate the antivirus product and expand its options.
- Select Uninstall and confirm to uninstall the antivirus.

Uninstall ESET on Windows - Once done, restart the system and check if Windows updates can be completed without showing the error 0x800B010A.
7. Manually Install the Problematic Update or Perform a Repair Install of Windows
As the Windows Update is failing to install the problematic one, manually installing the same will do the trick. If this fails, then performing a repair install of the PC’s Windows will get the job done.
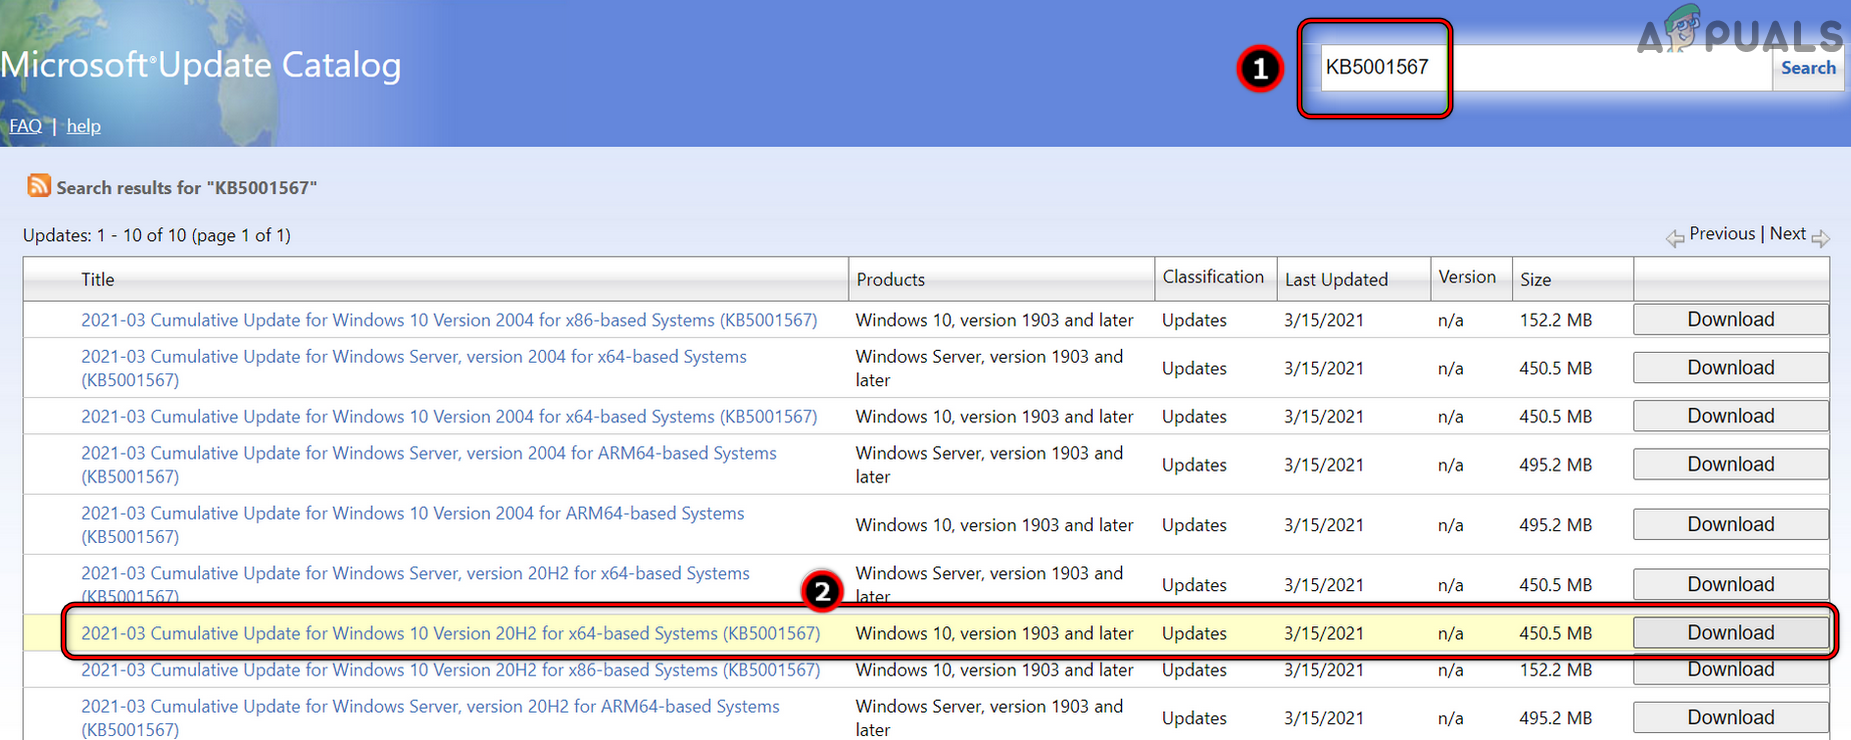
- Launch a web browser and go to the Windows Update Catalog
- Search for the problematic update and download the one that matches your setup.

Search and Download an Update from the Windows Update Catalog Website - Install it and restart the system.
- Check for Windows Updates again and verify if the issue is resolved.
- If not, perform a repair install of the system’s Windows and see if that clears the problem.
8. Export and Import Certificates
If a required certificate is not valid or gets damaged, the update process will fail to authenticate it and as a result, will stop Windows update installation, thus causing the error 0x800B010A.
In this scenario, exporting the certificates from a trusted system and importing them into the problematic system will clear the error.
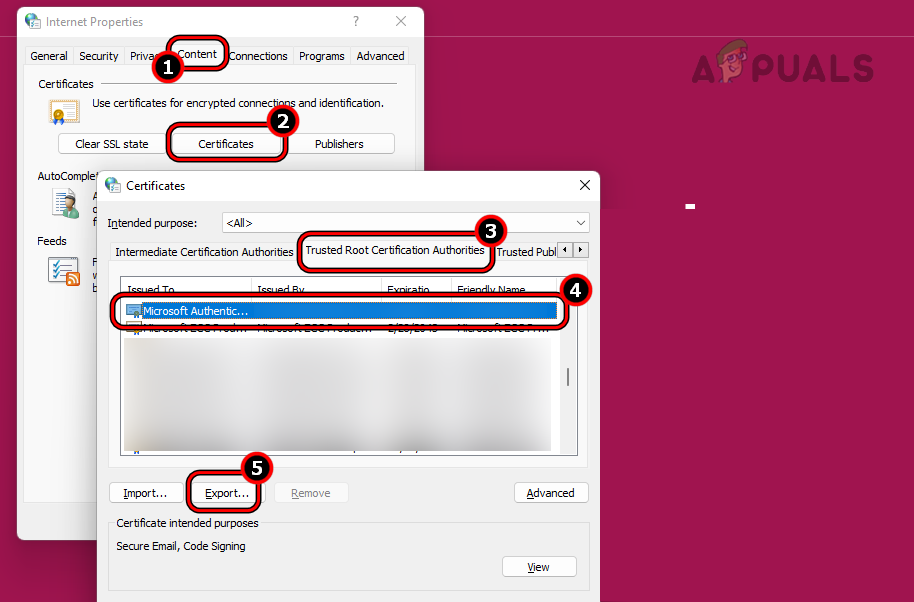
- On a working PC, click Windows and search for Internet Options.
- Open it and go to the Content tab.
- Click on Certificates and go to Trusted Root Certification Authorities.
- Go to a Microsoft-issued certificate and select it.

Export a Microsoft Certificate on a Windows PC - Click on Export and follow the prompts to export it.
- Export all the Microsoft-related certificates and copy the exported certificates to the problematic PC.
- On the problematic PC, open Internet Option and go to Content > Certificates > Trusted Root Certification Authorities.
- Click Import and import the certificates (exported earlier).
- Once done, restart the system and check for Windows updates. See if this clears the error.
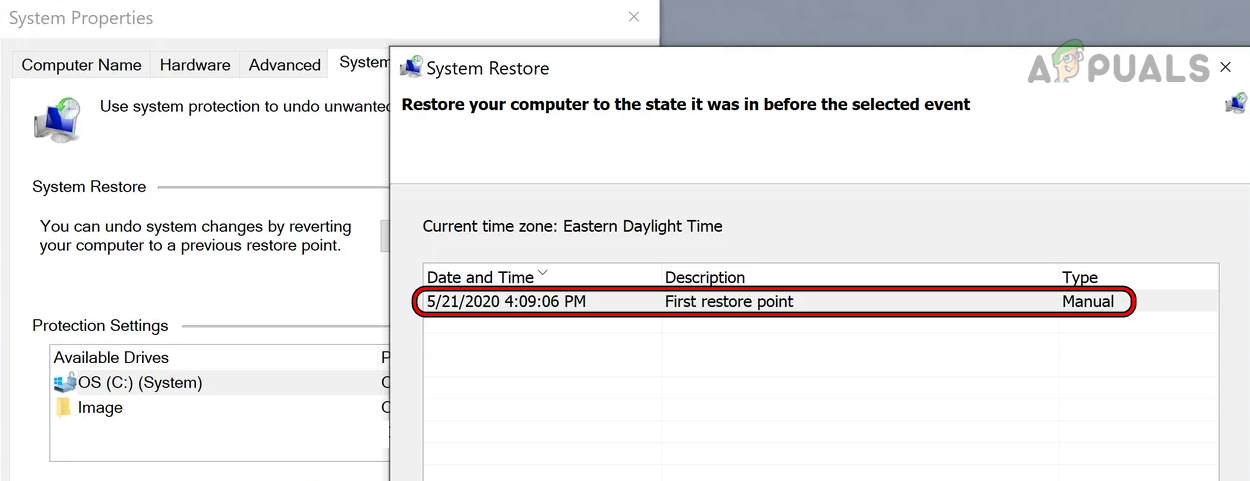
9. Restore Your System or Reinstall Windows
Windows update will fail with error 0x800B010A if a recent change to the system has made the system incompatible with the update. To fix this, restore the system to an earlier date (if a backup is available).
- Start the system restore process and wait till the process completes.

Restore Your System - Once done, check for Windows updates and hopefully, the issue would be resolved.
If this does not work, perform a clean installation of Windows on your system. If the issue persists after the clean installation, contact Microsoft Support.
Raza Arshad
Raza Arshad is a certified Google IT Support Professional. With a keen eye for detail and a passion for problem-solving, he excels in identifying and resolving bugs and Windows-related issues. Armed with a deep understanding of computer systems, Raza effortlessly navigates through complexities to pinpoint the root cause and implement effective solutions. His exceptional skills in bug detection and Windows troubleshooting make him a valuable asset in any IT support team.
Пользователи, работающие с криптографией, жалуются на появление ошибки 0x800B010A. Чаще всего код можно увидеть при задействовании электронных подписей (ЭЦП) либо на сайтах госзакупок во время регистрации.
На некоторых версиях Windows может появляться ошибка обновления с точно таким же кодом, но это проблема из совершенно иной области.
Что вызывает ошибку 0x800B010A?
Есть несколько причин для появление кода ошибки 0x800B010A:
- неактуальные сертификаты;
- отсутствуют некоторые или все корневые сертификаты;
- программе криптографии не достает критически важных обновлений.
Решение ошибки 0x800B010A
Проблема с постройкой цепочки сертификатов решается относительно просто. Главное – строго следовать советам и инструкциям ниже.
Проверка актуальности сертификатов
Для начала стоит проверить срок действия задействованных сертификатов. Вы наверняка знаете, как проводить проверку, но мы напомним:
- Нажмите WIN+S для вызова поисковика Windows.
- Пропишите в пустой строке «Сертификаты» и выберите найденный результат.
- Откройте раздел «Доверенные корневые центры сертификации».
- Дважды кликните ЛКМ на сертификат и обратите внимание на строчку «Действителен с… по…».
- Повторите эти действия для других сертификатов.
Если срок действия сертификата уже истек – требуется новый сертификат. Вы можете установить наиболее актуальные сертификаты всей пачкой, о чем ниже.
Установка универсального набора корневых сертификатов УЦ
Службе поддержки CryptoPro удалось собрать в файле root.p7b корневые сертификаты для основных удостоверяющих центров (УЦ). В этом файле можно найти сертификаты:
- Национального удостоверяющего центра РФ;
- Министерства цифрового развития, связи и массовых коммуникаций РФ;
- Головного удостоверяющего центра;
- Russian Trusted Root CA;
- CryptoPro GOST Root CA.
Установка сертификатов из скачанного файла производится относительно просто:
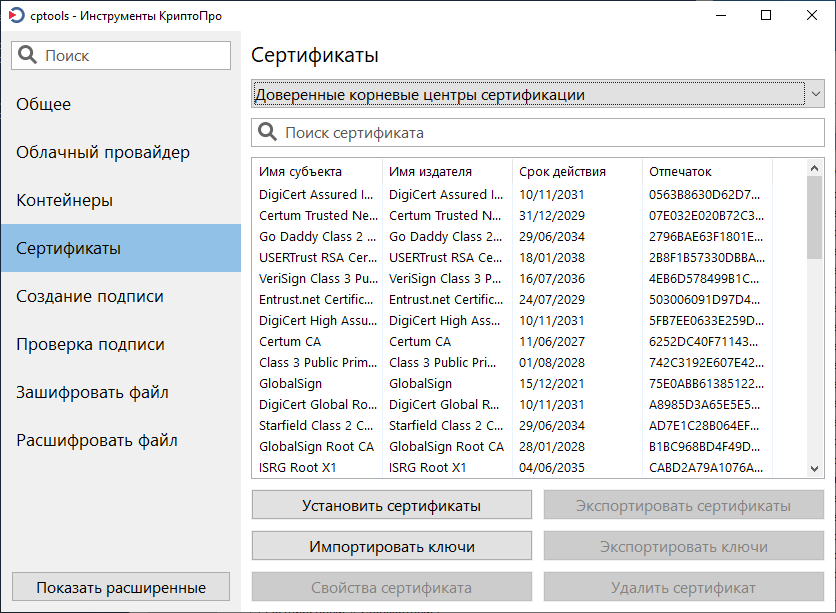
- Запустите приложение «Инструменты КриптоПро».
- Перейдите во вкладку «Сертификаты».
- Выберите из ниспадающего меню пункт «Доверенные корневые центры сертификации».
- Кликните на кнопку «Установить сертификаты».
- Укажите расположение файла root.p7b на своем ПК и нажмите «Открыть».
Установка промежуточных сертификатов – дополнительное решение
Если вышеуказанные действия не помогли в решении ошибки 0x800B010A, то нужно произвести установку промежуточных сертификатов. Делается все по аналогии с предыдущим пунктом:
- Скачайте файл ca.p7b от тех. поддержки CryptoPro.
- Запустите «Инструменты КриптоПро» и перейдите в «Сертификаты».
- Выберите «Промежуточные центры сертификации».
- Кликните на «Установить сертификаты».
- Укажите расположение ca.p7b и нажмите «Открыть».
Ошибка 0x800B010A может застать врасплох любого пользователя, но от нее легко избавиться, задействовав проверенные решения. Если у вас остались какие-то вопросы по теме, оставляйте их в комментариях.
Did you face an install error 0x800b010a while installing or upgrading to the latest patch updates on Windows 11? If yes, then follow this article till the end. In this post, we have discussed the reasons why it occurs and seven workarounds that should help you fix this error code on a Windows PC.
This installation error often occurs displaying an error message that reads the following –
Windows Update Standalone InstallerInstaller encountered an error 0x800b010a.A certificate chain could not be built to a trusted root authority.
What causes an error 0x800b010a in Windows?
As you can see in the error message itself, this error occurs when some root certificate updates are missing on your PC. If that’s indeed the case, you must manage or add new trust certificates on your computer. Here’s a complete guideline on how to do that.
In case all your root certificates are genuine and trusted, this update error must be occurring due to one or more of these reasons –
- Internal Glitches: Run Windows Update Troubleshooter, and you may resolve this install error 0x800b010a in no time.
- Disabled Update Services: Windows Update functions properly only when all required services are enabled and running in the background.
- Incorrect Date & Time: Having an incorrect date and time on your PC prevents your system from upgrading to the next available OS Build version. Correct Date and Time settings and you will be able to overcome this issue.
- Corruption within the Cache folders: If you haven’t cleared the cache folders in Windows, make sure to purge them first. You will be able to install or upgrade to new updates shortly afterward.
If none of these workarounds help to fix this error 0x800b010a, you may proceed with these solutions –
- Boot into Safe Mode and Update Windows
- Manually download and Install Pending Patch Updates
- Or, Upgrade to Windows 11 23H2 via the Media Creation Tool
1. Troubleshoot Windows Update
When you are getting an error code 0x800b010a while upgrading to the latest OS Build version of Windows, you must troubleshoot Windows Update. This tool
Here’s how to do it –
- Press Windows + I to launch Settings.
- Go to System > Troubleshoot > Other troubleshooters next, and locate Windows Update.
- Locate and click on the Run button available next to Windows Update.

Wait for the troubleshooter to launch and when it opens, click Next. You may now follow the on-screen instructions to complete the troubleshooting task. After this is over, you may close its window and restart your PC. From the next login, check if you can update Windows normally.
2. Restart All Windows Update-Related Services
An update error 0x800b010a mostly occurs when any one of the Windows Update Services is disabled on your computer. As we all know, Windows Update Services are essential for an update to function correctly, you must check all update services and re-enable the disabled one.
Here’s how to perform this task –
- Press Windows + X, and select Run.
- Type services.msc on it, and hit OK.
- When the Services window launches, scroll down and locate the following services.
Background Intelligent and Transfer Service
Cryptographic Services
Windows Update
- Right-click on each service, and select Start/Restart depending on whether a service is disabled or already running in the background.

- After you enable all these services, restart your PC and check if you can update Windows normally afterward.
3. Check Date & Time
Sometimes, an update error may also occur due to an incorrect Date and time on your computer. An incorrect date and time settings on Windows force your system not to connect with Microsoft servers thus resulting in an update error 0x800b010a.
Correct both the Date and Time settings on your computer, and you will be able to update your Windows PC without encountering the error code 0x800b010a again. Here’s how to do it –
- Press Windows + I to launch Settings.
- Select Time & language from the left navigation, and select Date & time from the right pane.
- Enable the toggle switches next to Set time zone automatically, and Set time automatically.
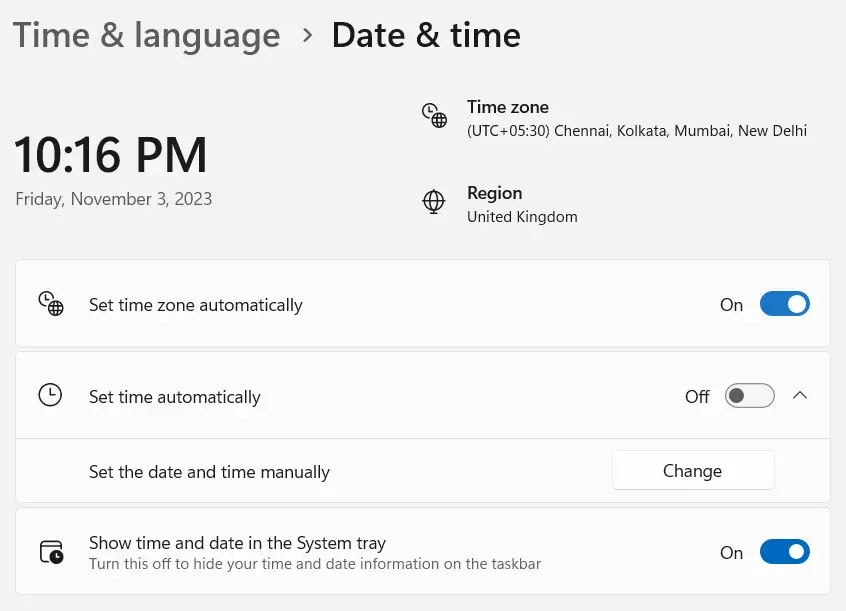
Note: In case the Set time automatically toggle switch doesn’t work, you may click on the Change button underneath it and manually set the time matching the region where you reside.
- Next, scroll down to Additional Settings, and hit Sync now.

Note: When you are correcting the Date and Time settings, make sure to press the Sync button as well.
4. Purge SoftwareDistribution & Catroot2 folders
SoftwareDistribution and Catroot2 are two cache folders in Windows that contain all the relevant information about past updates. Over a period of time, these folders might become corrupt and thus result in an update error code 0x800b010a.
Purge both these folders and check if you can update Windows normally from the next login. Do note that you have to disable all update-related services while clearing these two folders. After you have successfully purged both these folders, make sure to re-enable all those services.
Note: Learn how to Reset Windows Update Components to fix update errors
5. Boot into Safe Mode and Update Windows
Third-party apps and services often interact with the system files and make them corrupt. If you do know of some apps (recently installed) on your computer, make sure to uninstall them first.
Next, boot into Safe Mode on your Windows 11 PC, and check if you can update your Windows normally while being in this mode. The Safe Boot disables all third-party apps and services and thus it would be easy to upgrade while in this mode on your computer.
6. Manually download and Install Pending Patch Updates
Microsoft releases the standalone package of each and every update at its official Update Catalog site. If you do know which enablement package is failing to install on your computer, use its KB number to search here.
When you press the Enter key, you will see a number of matching updates popping up on the screen. Pick the update that best matches your system architecture, and hit the Download button. This site redirects you to a new page, from where you may download the setup file (in .msu file format).
Wait for this download to complete and when this is completed, you may double-click on the downloaded file to begin upgrading to the chosen OS Build version.
Here’s a complete guide on how to manually download and install pending updates on Windows 11.
7. Upgrade to Windows 11 23H2 via the Media Creation Tool
If none of the above solutions help you resolve an update error code 0x800b010a in Windows, this error must be beyond repair. In such cases, what you may do is download the latest Media Creation Tool, and download Windows 11 version 23H2 using that.
After you download this tool, double-click on its setup file to begin its installation. Double-click on its icon to launch the Media Creation Tool and follow the on-screen instructions to create an ISO image of Windows 11 Multi-edition Disk Image.
Alternatively, you may also use this tool to make the Windows Operating system bootable and then use it to clean install Windows on your computer.
How do I fix Update Error 800b0100 in Windows?
The error code 800b0100 occurs when your system misses some important files or folders from the root drive. When it happens, Windows can’t verify the authenticity and integrity of the update package and thus invokes an error code 0x800b0100 while updating Windows.
If you are using some third-party apps, boot into Safe Mode on your PC so that their interferences are restricted. Go to Settings > Windows Update, and you may now upgrade to the latest version on your Windows 11 PC.
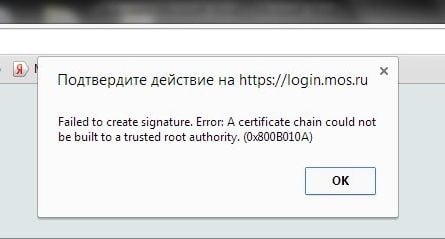
В этой статье мы рассмотрим, как устранить ошибку «Ошибка создания подписи: Не удается построить цепочку сертификатов для доверенного корневого центра. (0x800B010A)», возникающую при работе с программным обеспечением, использующим криптозащиту и электронные подписи.
Приобрести оригинальные ключи активации Windows всегда можно у нас в каталоге от 1099 ₽
Причина возникновения ошибки
Суть проблемы описана непосредственно в тексте ошибки — отсутствуют сертификаты доверенных корневых центров. Чтобы проверить это, откройте проблемный сертификат на компьютере, на котором возникает ошибка. Если в окне сертификата на вкладке «Общие» указано «При проверке отношений доверия произошла системная ошибка» или «Этот сертификат не удалось проверить, проследив его до доверенного центра сертификации», то причина ошибки именно в отсутствии нужных корневых сертификатов.

Исправление ошибки
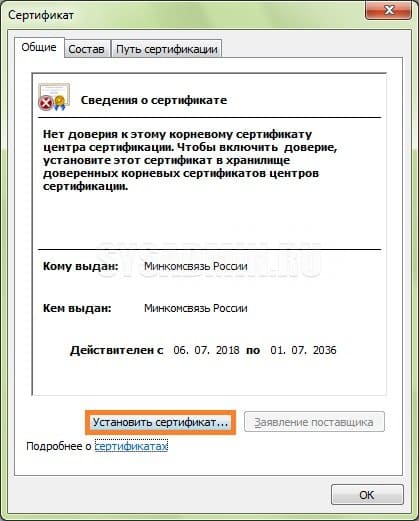
Для устранения ошибки необходимо установить корневые сертификаты, которых не хватает. Эти сертификаты можно получить у издателя проблемного сертификата, их зачастую можно найти на официальном сайте издателя. Имя издателя можно узнать в поле «Кем выдан» в свойствах сертификата.
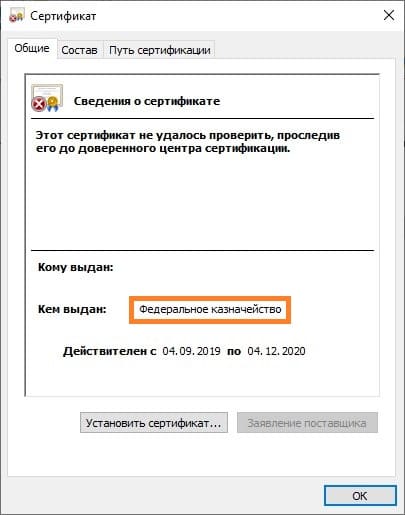
В качестве примера рассмотрим исправление ошибки для сертификатов, выданных Федеральным Казначейством России:
1. Переходим на сайт Федерального Казначейства и находим раздел «Корневые сертификаты».
2. Скачиваем «Сертификат Минкомсвязи России (Головного удостоверяющего центра) ГОСТ Р 34.10-2012» и «Сертификат Удостоверяющего центра Федерального казначейства ГОСТ Р 34.10-2012 CER».
3. Открываем оба скачанных файла и устанавливаем сертификаты.
Установка сертификатов:
— Откройте сертификат. В левом нижнем углу нажмите на кнопку «Установить сертификат».
— Откроется «Мастер импорта сертификатов». Нажмите «Далее».
— В следующем окне выберите «Поместить все сертификаты в следующее хранилище» и нажмите кнопку «Обзор».
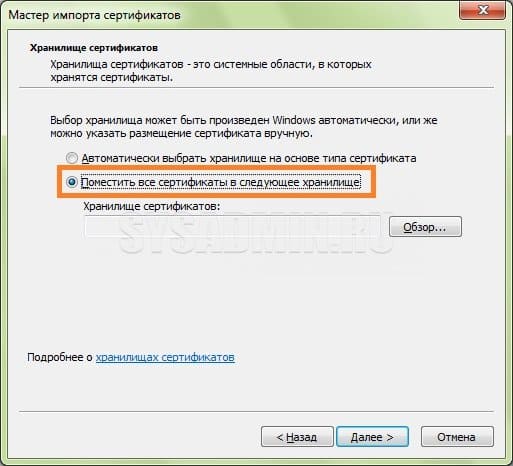
— В списке выбора хранилища выберите «Доверенные корневые центры сертификации». Нажмите «ОК», затем «Далее».
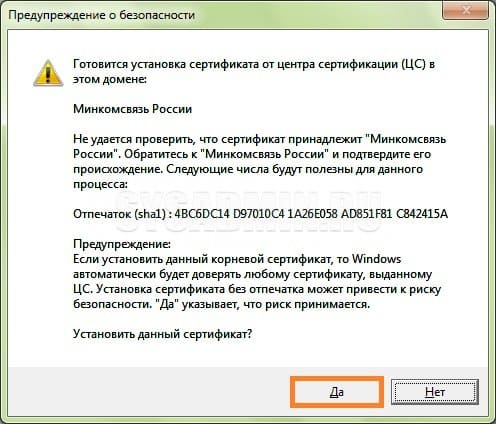
— Нажмите «Готово», а затем, в окне предупреждения системы безопасности, подтвердите установку, нажав «Да».
После завершения установки всех необходимых корневых сертификатов, ошибка должна исчезнуть.
Лицензионный ключ активации Windows от
Ошибка: «Не удается построить цепочку сертификатов для доверенного корневого центра. (0x800B010A)» часто возникает в различных приложениях при создании/проверке подписи. Она означает, что у Вас на машине не установлены необходимые промежуточные/корневые сертификаты для проверкисоздания подписи.
Для решения проблемы необходимо скачать с сайта Удостоверяющего центра, выдавшего Вам сертификат, промежуточные и корневой сертификаты и установить их в соответствующие хранилища.
Мы проанализировали наиболее частые обращения к нам и пострались собрать сертификаты самых популярных издателей в один файл, на примере которого ниже показано, как решать ошибку из данной статьи:
Шаг 1
Скачайте этот файл. Файл содержит корневые сертификаты всех основных УЦ. Подробный список дан ниже.
Шаг 2
Если у Вас на компьютере установлен КриптоПро CSP 5.0
Для ОС Windows: Зайдите Пуск-Все программы-КРИПТО-ПРО- Инструменты КриптоПро
Для MAC OS: Зайдите Finder-Программы-Инструменты
Перейдите на вкладку Сертификаты и выберите вверху раздел «Доверенные корневые центры сертификации»
Выберите кнопку «Установить сертификаты», выберите скачанный ранее файл и нажмите «Открыть»
Если у Вас на компьютере установлен КриптоПро CSP версии ниже 5.0 или Вы не используете графический интерфейс:
Для Windows: выполните в командной строке:
«C:\Program Files\Crypto Pro\CSP\certmgr.exe» -install -cert -store uRoot -file <путь к файлу> -all
Для Linux/macOS: выполните в командной строке:
/opt/cprocsp/bin/amd64/certmgr -install -cert -store uRoot -file <путь к файлу> -all
В редких случаях для построения цепочки данных сертфикатов будет недостаточно, тогда рекомендуем установить промежуточные сертификаты.
Скачайте этот файл. Файл содержит промежуточные сертификаты рекомендуемых УЦ.
Если Вы используете CSP 5.0 с графическим интерфейсом, то выполните Шаг 2, выбрав хранилище «Промежуточные центры сертификации», используя файл CA.p7s
Если Вы используете КриптоПро CSP версии ниже 5.0 или Вы не используете графический интерфейс, то используйте данные команды:
Для Windows: выполните в командной строке:
«C:\Program Files\Crypto Pro\CSP\certmgr.exe» -install -cert -store uCA -file <путь к файлу> -all
Для Linux выполните в командной строке:
/opt/cprocsp/bin/amd64/certmgr -install -cert -store uCA -file <путь к файлу> -all
Для MACOS выполните в командной строке:
/opt/cprocsp/bin/certmgr -install -cert -store uCA -file <путь к файлу> -all
Списки сертфикатов, содержащихся в файлах root.p7b, ca.p7b:
Root
| Наименование | Действителен с | Действителен по | Отпечаток |
| CryptoPro GOST Root CA | 15.11.2018 | 15.11.2033 | 34e21fc04d3576b0ada81fd081955e2778291cc5 |
| Russian Trusted Root CA | 02.03.2022 | 28.02.2032 | 8ff915ccab7bc16f8c5c8099d53e0e115b3aec2f |
| Головной удостоверяющий центр | 20.07.2012 | 17.07.2027 | 8cae88bbfd404a7a53630864f9033606e1dc45e2 |
| Минкомсвязь России | 02.07.2021 | 02.07.2039 | aff05c9e2464941e7ec2ab15c91539360b79aa9d |
| Минкомсвязь России | 06.07.2018 | 01.07.2036 | 4bc6dc14d97010c41a26e058ad851f81c842415a |
| Минцифры России | 08.01.2022 | 08.01.2040 | 2f0cb09be3550ef17ec4f29c90abd18bfcaad63a |
| НУЦ России | 01.03.2022 | 25.02.2037 | 0884889d00f1ff2c773bc5dfb42f41ddddeed492 |
CA
| Наименование | Действителен с | Действителен по | Отпечаток |
| CryptoPro TLS CA | 16.11.2018 | 16.11.2028 | f6b88598ff04d18c8132cfb074d9fb051cec8a82 |
| Russian Trusted Sub CA | 02.03.2022 | 06.03.2027 | 335d43f53451b781535ff3882df713d3c14f8a01 |
| АО «»ГНИВЦ»» | 21.01.2020 | 21.01.2035 | 9ffa4e5649ff21b471aed34fbe0eec0c235283ca |
| АО <ГНИВЦ> | 21.01.2020 | 21.01.2035 | 67b311afb1a8006a20cb1d50dc27afa6bd396658 |
| Казначейство России | 10.01.2022 | 10.01.2037 | 0b48b8d07d142a5b45e9b0e8c52186687d75e58e |
| ООО «»КРИПТО-ПРО»» | 10.05.2016 | 10.05.2026 | d24b37fcfbb979d2d4a5d1549ec4e2029d15d8a2 |
| ООО «»КРИПТО-ПРО»» | 24.10.2016 | 24.10.2026 | 1b4158b9a7399fd8b90ae8a06fc676fb0624f97e |
| УЦ 1 ИС ГУЦ | 07.12.2016 | 07.12.2026 | 0932e483c4420e668f64d360006d0beb0bfacca7 |
| УЦ 1 ИС ГУЦ | 20.07.2012 | 17.07.2027 | 9e78a331020e528c046ffd57704a21b7d2241cb3 |
| УЦ 1 ИС ГУЦ | 07.12.2016 | 12.07.2027 | 0932e483c4420e668f64d360006d0beb0bfacca7 |
| Федеральная налоговая служба | 15.11.2022 | 15.11.2037 | 08a4c134ffe120d8572df0cb8465e6c3a77e7727 |
| Федеральная налоговая служба | 21.07.2023 | 21.07.2038 | 24a2cd23cc4e75ec695031b18054f7683fdf1e86 |
| Федеральная налоговая служба | 19.04.2022 | 19.04.2037 | e5aa1938ed28e003b7fefef4eaae4ce7a979a479 |
| Федеральная налоговая служба | 26.12.2019 | 26.12.2034 | a495d499551de7f995c27a60426d38688ec75e89 |
| Федеральная налоговая служба | 26.12.2019 | 26.12.2034 | 7aa38b02798153f66a339e108d83d9d3a5a2bd6a |
| Федеральное казначейство | 13.04.2021 | 13.04.2036 | 63c41988b32303d6ecf9915699fc34d07d155b01 |
| Федеральное казначейство | 05.02.2020 | 05.02.2035 | 34d46afd0cb2a6530926ba5f5e6a058365f09969 |
| УЦ 1 ИС ГУЦ | 08.02.2017 | 07.12.2026 | 13877a8bd34589567f9b9aff6498026c0c29c617 |