
Столкнулся с интересной ошибкой 0x80073712 при установке обновлений в Windows Server 2016. Как выяснилось позже, эта ошибка связана с повреждением хранилища компонентов Windows. В этой статье рассмотрим, как исправить хранилище компонентов в Windows 10 / 8.1 и Windows Server 2016/2012 R2 и восстановить работу Windows Update.
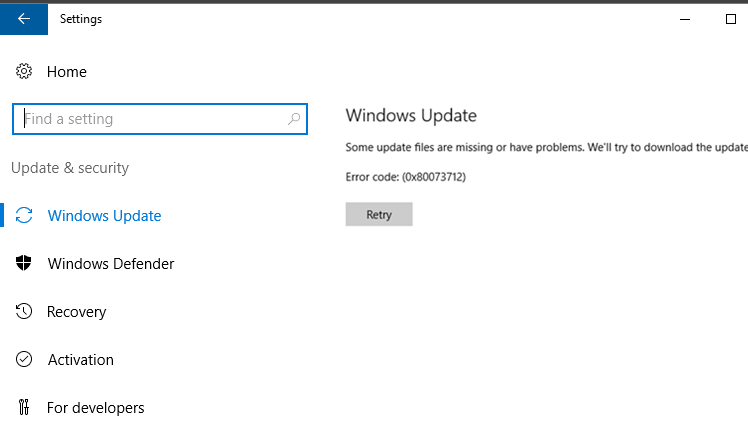
При попытке установить обновления в Центре обновления Windows появляется ошибка:
Некоторый файлы обновления отсутствуют или имеются проблемы. Мы попытаемся скачать обновление позже.
Код ошибки: (0x80073712)
Some update files are missing or have problems. We’ll try to download the update.
Error code: (0x80073712)
В первую очередь я попробовал сбросить состояние службы Windows Update и очистить каталог SoftwareDistribution по рекомендациям из статьи “Сброс настроек Центра обновления Windows”, но это не помогло.
С помощью команды
dism /online /get-packages
я проверил, что все обновления находятся в статусе Installed.

Если у некоторых обновлений указан Install Pending, вы из можете корректно удалить с помощью команды DISM (используйте ваш Package Identity):
DISM.exe /Online /Remove-Package /PackageName:Package_for_KB4485447~31bf3856ad364e35~amd64~~10.0.1.1 /quiet /norestart
Довольно долго решал, с какой стороны подойди к этой проблеме, но в рамках траблшутинга мне понадобилось установить на Windows Server 2016 компонент .Net Framework 3.5. При установке компонента .Net с помощью DISM появилась характерная ошибка, которая и натолкнула меня на дальнейшие действия:
The request to add or remove features on the specified server failed. Installation of one or more roles, role services or features failed. The component store has been corrupted. Error: 0x80073712.
Хранилище компонентов повреждено. Ошибка: 0x80073712.

При этом в файле CBS.log можно найти такую строку (%WinDir%\Logs\CBS\CBS.log):
[HRESULT = 0x80073712 - ERROR_SXS_COMPONENT_STORE_CORRUPT]
Как вы видите, по какой-то причине хранилище компонентов вашей системы повреждено, в результате чего Windows Update не может получить данные из манифеста CBS (Component-Based Servicing) необходимые для установки обновлений. Вы можете восстановить хранилище компонентов с помощью встроенного функционала DISM.
В самом простом случае при восстановлении хранилища компонентов вам не потребуется установочный диск с дистрибутивом Windows. В этом случае для восстановления система будет использовать файлы хранилища на локальном диске и сайт Windows Update (локальный WSUS сервер не может быть использован для восстановления компонентов).
В первую очередь проверьте состояние хранилища компонентов с помощью команды:
dism /online /cleanup-image /checkhealth
Если после выполнения анализа появилось сообщение “component store is repairable”, вы можете попытаться восстановить хранилище компонентов командой:
dism /online /cleanup-image /restorehealth
В некоторых случаях это достаточно. Но у меня утилита DISM выдала ошибку:
Error: 0x800f0906
The source files could not be downloaded.
В этом случае для восстановления Windows требуется установочный диск с вашим дистрибутивом Windows. Допустим, вы смонтировали ISO файл с вашим дистрибутивом Windows. Теперь нужно проверить список текущих редакций Windows в файле install.wim в подключенном образе (диске):
dism /Get-WimInfo /WimFile:e:\sources\install.wim
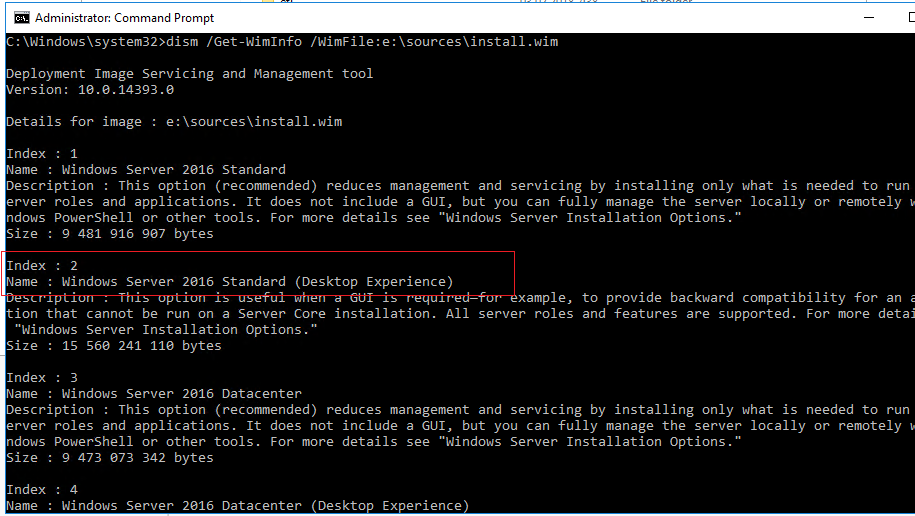
В моем случае установлена редакция Windows Server 2016 Standard (Desktop Experience), поэтому в следующей команде я использую ее индекс – 2.
dism /online /cleanup-image /restorehealth /source:e:\sources\install.wim:2 /LimitAccess
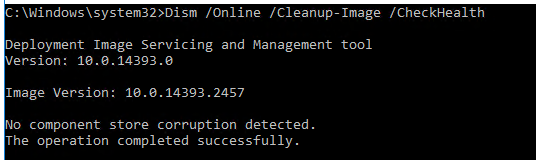
Еще раз проверьте состояние хранилища компонентов:
Dism /Online /Cleanup-Image /CheckHealth
DISM должна вернуть:
Повреждение хранилища компонентов не обнаружено (No component store corruption detected).
После восстановления хранилища достаточно перезагрузить Windows и проверить, что обновления и компоненты Windows устанавливаются без ошибки.
Windows error 0x80073712 often causes the installation of security updates to fail.
As a part of our Server Management Services, we help our Customers to fix Windows related errors regularly.
Let us today discuss the possible causes and fixes for this error.
What causes windows error 0x80073712?
Windows error 0x80073712 occurs while installing a security update due to a damaged Windows component store. It can appear in any of the following formats:
- Some update files are missing or have problems.
- Some updates were not installed.
- Code 80073712: Windows Update ran into a problem.
A typical error message looks like:

Our Support Engineers use the elevated command prompt to reset the Windows Update agent settings and clean the SoftwareDistribution directory to fix this error.
How to fix windows error 0x80073712?
We need to reset the configuration of Windows Update and clear the local update cache to resolve the error. A step by step process for the same is given below:
- Firstly, stop Windows Update, BITS, and cryptographic services:
net stop bits net stop wuauserv net stop appidsvc net stop cryptsvc taskkill /im wuauclt.exe /f - Then, delete service files qmgr*.dat from the folder %ALLUSERSPROFILE%\Application Data\Microsoft\Network\Downloader\:
Del "%ALLUSERSPROFILE%\Application Data\Microsoft\Network\Downloader\qmgr*.dat" - Rename system folders that store configuration files and update cache. After the restart of WU services, it will automatically create the folders again:
Ren %systemroot%\SoftwareDistribution SoftwareDistribution.bak Ren %systemroot%\system32\catroot2 catroot2.bak - Delete the old windowsupdate.log file:
del /f /s /q %windir%\windowsupdate.log - Reset the permissions for BITS and Windows Update services:
sc.exe sdset bits D:(A;;CCLCSWRPWPDTLOCRRC;;;SY)(A;;CCDCLCSWRPWPDTLOCRSDRCWDWO;;;BA)(A;;CCLCSWLOCRRC;;;AU)(A;;CCLCSWRPWPDTLOCRRC;;;PU) sc.exe sdset wuauserv D:(A;;CCLCSWRPWPDTLOCRRC;;;SY)(A;;CCDCLCSWRPWPDTLOCRSDRCWDWO;;;BA)(A;;CCLCSWLOCRRC;;;AU)(A;;CCLCSWRPWPDTLOCRRC;;;PU) sc.exe sdset cryptsvc D:(A;;CCLCSWLOCRRC;;;AU)(A;;CCDCLCSWRPWPDTLOCRSDRCWDWO;;;BA)(A;;CCDCLCSWRPWPDTLCRSDRCWDWO;;;SO)(A;;CCLCSWRPWPDTLOCRRC;;;SY)S:(AU;FA;CCDCLCSWRPWPDTLOCRSDRCWDWO;;WD) sc.exe sdset trustedinstaller D:(A;;CCLCSWLOCRRC;;;AU)(A;;CCDCLCSWRPWPDTLOCRSDRCWDWO;;;BA)(A;;CCDCLCSWRPWPDTLCRSDRCWDWO;;;SO)(A;;CCLCSWRPWPDTLOCRRC;;;SY)S:(AU;FA;CCDCLCSWRPWPDTLOCRSDRCWDWO;;WD) - Re-register the files of system dynamic libraries (dll) related to BITS and Windows Update:
cd /d %windir%\system32 regsvr32.exe /U /s vbscript.dll regsvr32.exe /U /s mshtml.dll regsvr32.exe /U /s msjava.dll regsvr32.exe /U /s msxml.dll regsvr32.exe /U /s actxprxy.dll regsvr32.exe /U /s shdocvw.dll regsvr32.exe /U /s Mssip32.dll regsvr32.exe /U /s wintrust.dll regsvr32.exe /U /s initpki.dll regsvr32.exe /U /s dssenh.dll regsvr32.exe /U /s rsaenh.dll regsvr32.exe /U /s gpkcsp.dll regsvr32.exe /U /s sccbase.dll regsvr32.exe /U /s slbcsp.dll regsvr32.exe /U /s cryptdlg.dll regsvr32.exe /U /s Urlmon.dll regsvr32.exe /U /s Oleaut32.dll regsvr32.exe /U /s msxml2.dll regsvr32.exe /U /s Browseui.dll regsvr32.exe /U /s shell32.dll regsvr32.exe /U /s atl.dll regsvr32.exe /U /s jscript.dll regsvr32.exe /U /s msxml3.dll regsvr32.exe /U /s softpub.dll regsvr32.exe /U /s wuapi.dll regsvr32.exe /U /s wuaueng.dll regsvr32.exe /U /s wuaueng1.dll regsvr32.exe /U /s wucltui.dll regsvr32.exe /U /s wups.dll regsvr32.exe /U /s wups2.dll regsvr32.exe /U /s wuweb.dll regsvr32.exe /U /s scrrun.dll regsvr32.exe /U /s msxml6.dll regsvr32.exe /U /s ole32.dll regsvr32.exe /U /s qmgr.dll regsvr32.exe /U /s qmgrprxy.dll regsvr32.exe /U /s wucltux.dll regsvr32.exe /U /s muweb.dll regsvr32.exe /U /s wuwebv.dll regsvr32.exe /s vbscript.dll regsvr32.exe /s mshtml.dll regsvr32.exe /s msjava.dll regsvr32.exe /s msxml.dll regsvr32.exe /s actxprxy.dll regsvr32.exe /s shdocvw.dll regsvr32.exe /s Mssip32.dll regsvr32.exe /s wintrust.dll regsvr32.exe /s initpki.dll regsvr32.exe /s dssenh.dll regsvr32.exe /s rsaenh.dll regsvr32.exe /s gpkcsp.dll regsvr32.exe /s sccbase.dll regsvr32.exe /s slbcsp.dll regsvr32.exe /s cryptdlg.dll regsvr32.exe /s Urlmon.dll regsvr32.exe /s Oleaut32.dll regsvr32.exe /s msxml2.dll regsvr32.exe /s Browseui.dll regsvr32.exe /s shell32.dll regsvr32.exe /s Mssip32.dll regsvr32.exe /s atl.dll regsvr32.exe /s jscript.dll regsvr32.exe /s msxml3.dll regsvr32.exe /s softpub.dll regsvr32.exe /s wuapi.dll regsvr32.exe /s wuaueng.dll regsvr32.exe /s wuaueng1.dll regsvr32.exe /s wucltui.dll regsvr32.exe /s wups.dll regsvr32.exe /s wups2.dll regsvr32.exe /s wuweb.dll regsvr32.exe /s scrrun.dll regsvr32.exe /s msxml6.dll regsvr32.exe /s ole32.dll regsvr32.exe /s qmgr.dll regsvr32.exe /s qmgrprxy.dll regsvr32.exe /s wucltux.dll regsvr32.exe /s muweb.dll regsvr32.exe /s wuwebv.dll - Reset Winsock settings:
netsh winsock reset - Reset system proxy settings:
netsh winhttp reset proxy - When using a local WSUS server, we can also reset the current binding of a client to the WSUS server by deleting the following parameters in the registry key HKLM\SOFTWARE\Microsoft\Windows\CurrentVersion\WindowsUpdate:
REG DELETE "HKLM\SOFTWARE\Microsoft\Windows\CurrentVersion\WindowsUpdate" /v AccountDomainSid /f REG DELETE "HKLM\SOFTWARE\Microsoft\Windows\CurrentVersion\WindowsUpdate" /v PingID /f REG DELETE "HKLM\SOFTWARE\Microsoft\Windows\CurrentVersion\WindowsUpdate" /v SusClientId /f REG DELETE "HKLM\SOFTWARE\Policies\Microsoft\Windows\WindowsUpdate" /v TargetGroup /f REG DELETE "HKLM\SOFTWARE\Policies\Microsoft\Windows\WindowsUpdate" /v WUServer /f REG DELETE "HKLM\SOFTWARE\Policies\Microsoft\Windows\WindowsUpdate" /v WUStatusServer /f - Start the previously stopped services:
sc.exe config wuauserv start= auto sc.exe config bits start= delayed-auto sc.exe config cryptsvc start= auto sc.exe config TrustedInstaller start= demand sc.exe config DcomLaunch start= auto net start bits net start wuauserv net start appidsvc net start cryptsvc - In some cases, we need to install/reinstall the latest version of Windows Update Agent (WUA). Download the file for your Windows version.
To force a reinstall of the Windows Update Agent, run the following commands:
for Windows 7 x86:WindowsUpdateAgent-7.6-x86.exe /quiet /norestart /wuforce for Windows 7 x64: WindowsUpdateAgent-7.6-x64.exe /quiet /norestart /wuforce
Now, we have to restart the computer and run synchronization with Windows Update server/WSUS.
wuauclt /resetauthorization /detectnowCheck the status of the updates
We can now go to the Windows Update and make sure that there are no errors while checking, downloading, and installing the updates.
Further, if the updates are downloaded and installed correctly, we can remove the backups:
Ren %systemroot%\SoftwareDistribution SoftwareDistribution.bak Ren %systemroot%\system32\catroot2 catroot2.bak[Need any further assistance in fixing Windows errors? – We’re available 24*7]
Conclusion
In short, Windows error 0x80073712 occurs due to a damaged Windows component store. It makes the security updates to fail. Today, we saw how our Support Engineers fix this error.
PREVENT YOUR SERVER FROM CRASHING!
Never again lose customers to poor server speed! Let us help you.
Our server experts will monitor & maintain your server 24/7 so that it remains lightning fast and secure.
GET STARTED
var google_conversion_label = «owonCMyG5nEQ0aD71QM»;

-
Microsoft Support & Malware Removal
-
Windows Update
You should upgrade or use an alternative browser.
[SOLVED] Windows Server 2016 error 0x80073712 with KB5052006
-
Thread starter
Thread startersyntax
-
Start date
Start date
- Joined
- Apr 13, 2022
- Posts
- 33
-
-
#1
SFC
C:\>sfc /scannow

Beginning system scan.  This process will take some time.

Beginning verification phase of system scan.
Verification 100% complete.

Windows Resource Protection found corrupt files but was unable to fix some
of them. Details are included in the CBS.Log windir\Logs\CBS\CBS.log. For
example C:\Windows\Logs\CBS\CBS.log. Note that logging is currently not
supported in offline servicing scenarios.
DISM
C:\>Dism /Online /Cleanup-Image /RestoreHealth

Deployment Image Servicing and Management tool
Version: 10.0.14393.4169

Image Version: 10.0.14393.4169

[===========================80.0%==============            ]
Error: 0x800f081f

The source files could not be found.
Use the "Source" option to specify the location of the files that are required to restore the feature. For more information on specifying a source location, see http://go.microsoft.com/fwlink/?LinkId=243077.

The DISM log file can be found at C:\Windows\Logs\DISM\dism.log
ComponentsScanner
Loading registry hive from C:\Windows\System32\config\COMPONENTS
Parsing loaded hive, please wait...
Hive parsed successfully - found 1,415,779 keys and 2,338,896 values
Starting corruption scan
Performing regedit load test
Scanning CanonicalData\Catalog for corruptions
Scanning CanonicalData\Deployments for corruptions
Scanning DerivedData\Components for corruptions
Scanning VersionedIndex\...\ComponentFamilies for corruptions
Checking WinSxS catalogs against CanonicalData\Catalogs
Checking f! marks
Checking manifests
Found 7 inconsistencies between WinSxS and COMPONENTS hive
Checking for malformed Deployment keys
Checking CatalogThumbprints & c! marks
7 warnings detected
Generating report


The corruption scan completed after 11766.99 seconds.
No corruptions were detected, but 7 warnings were found in the COMPONENTS hive.

If you are not experiencing issues with Windows Update, these warnings can likely be ignored.

A report has been saved to C:\Users\administrator.TEPA\Desktop\ComponentsScanner.txt. Please review this report for more information.

If you require assistance repairing these warnings, seek advice from sysnative.com or your favourite support forum.

---------------------------

Would you be willing to upload a copy of your COMPONENTS hive and details of your Windows Update configuration
to Sysnative in order to improve this tool and support further research and development?

The uploaded data is completely anonymous and no personal or identifying data will be uploaded.

This is completely optional. If you do not wish to continue with the upload the tool will exit.

Do you agree to upload your hive to Sysnative? Press "Y" for yes or "N" for no.

You have chosen not to upload this hive

The program will now exit. Press any key to continue. . .
Sorry, it seems to have skipped over the option to upload to Sysnative.
Attachments
-
ComponentsScanner.txt
-
CBS.zip
-
dism.zip
-
setupapi.dev.log.zip
- Joined
- Feb 20, 2012
- Posts
- 770
-
-
#2
Welcome to Sysnative Forums!
If you haven’t already, please review the posting instructions here, and attach the requested log files. Without log files, our helpers will not be able to assist, and this will slow down fixing your machine.
If logs have been already been provided, our team of volunteers will analyse the provided log files to build a fix for your system. Please be aware that this may take several days from your initial post, due to the high volume of threads that we receive.
— Sysnative Windows Update Team
PeterJ
Moderator, Windows Update Expert, Security Analyst
- Joined
- Dec 14, 2014
- Posts
- 15,405
-
-
#3
Follow the instructions below please.
Step 1:
WARNING! The following fix is specific to the user’s system in this thread only. No one else should follow these instructions, as it could damage your system.
Step 2:
Restart the machine.
Run the command sfc /scannow in an elevated commandprompt and report the result.
If it fails, copy the file C:\Windows\Logs\CBS\cbs.log to your desktop.
Zip the copied file and attach the zipped cbs.log to your next reply.
- Joined
- Apr 13, 2022
- Posts
- 33
-
-
#4
Thanks for chiming in.
Stage 1 of 6 failed on server
Stage 2 — 100%
Stage 3 — 100%
Stage 4 — 100%
Stage 5[a,b,c,d,e,f,g,h] — 100%
Stage 6 — Failed to create zip file with errno 2
This last error repeated 4x and I had to CTRL-C to break out of it. There failed to create the SFCfix.txt file, likely due to the error.
Reboot successful
SFC
C:\>sfc /scannow

Beginning system scan.  This process will take some time.

Beginning verification phase of system scan.
Verification 100% complete.

Windows Resource Protection found corrupt files but was unable to fix some
of them. Details are included in the CBS.Log windir\Logs\CBS\CBS.log. For
example C:\Windows\Logs\CBS\CBS.log. Note that logging is currently not
supported in offline servicing scenarios.

C:\>
Attachments
-
CBS.zip
PeterJ
Moderator, Windows Update Expert, Security Analyst
- Joined
- Dec 14, 2014
- Posts
- 15,405
-
-
#5
Run the command sfc /scannow in an elevated commandprompt and report the result.
If it fails, copy the file C:\Windows\Logs\CBS\cbs.log to your desktop.
Zip the copied file and attach the zipped cbs.log to your next reply.
- Joined
- Apr 13, 2022
- Posts
- 33
-
-
#6
C:\>sfc /ScanNow

Beginning system scan.  This process will take some time.

Beginning verification phase of system scan.
Verification 100% complete.

Windows Resource Protection found corrupt files but was unable to fix some
of them. Details are included in the CBS.Log windir\Logs\CBS\CBS.log. For
example C:\Windows\Logs\CBS\CBS.log. Note that logging is currently not
supported in offline servicing scenarios.

C:\>
Attachments
-
cbs.log.zip
PeterJ
Moderator, Windows Update Expert, Security Analyst
- Joined
- Dec 14, 2014
- Posts
- 15,405
-
-
#7
Provide the full path of the 5 folders and 1 file that are extracted.
- Joined
- Apr 13, 2022
- Posts
- 33
-
-
#8
To keep things tidy, I extracted it to C:\Temp\SFCfix
C:\temp\SFCFix>tree
Folder PATH listing
Volume serial number is 0000007B DAE1:4D0E
C:.
├───amd64_windows-defender-am-sigs_31bf3856ad364e35_10.0.14393.0_none_e9f929873253e3cd
├───manifests
├───wow64_microsoft-windows-migrationengine_31bf3856ad364e35_10.0.14393.5006_none_d8c3ace46a2d3c2b
├───wow64_microsoft-windows-statemanager.resources_31bf3856ad364e35_10.0.14393.0_en-us_b8a9ada3d79b6c71
└───x86_netfx4-system_ni_b03f5f7f11d50a3a_4.0.14305.0_none_3f7dfb0ca6ab2808

C:\temp\SFCFix>dir /s
 Volume in drive C has no label.
 Volume Serial Number is DAE1-4D0E

 Directory of C:\temp\SFCFix

03/08/2025  06:53 PM    <DIR>          .
03/08/2025  06:53 PM    <DIR>          ..
03/08/2025  06:53 PM    <DIR>          amd64_windows-defender-am-sigs_31bf3856ad364e35_10.0.14393.0_none_e9f929873253e3cd
03/08/2025  06:53 PM    <DIR>          manifests
03/07/2025  09:43 PM                41 SFCFix.txt
03/08/2025  06:53 PM    <DIR>          wow64_microsoft-windows-migrationengine_31bf3856ad364e35_10.0.14393.5006_none_d8c3ace46a2d3c2b
03/08/2025  06:53 PM    <DIR>          wow64_microsoft-windows-statemanager.resources_31bf3856ad364e35_10.0.14393.0_en-us_b8a9ada3d79b6c71
03/08/2025  06:53 PM    <DIR>          x86_netfx4-system_ni_b03f5f7f11d50a3a_4.0.14305.0_none_3f7dfb0ca6ab2808
               1 File(s)             41 bytes

 Directory of C:\temp\SFCFix\amd64_windows-defender-am-sigs_31bf3856ad364e35_10.0.14393.0_none_e9f929873253e3cd

03/08/2025  06:53 PM    <DIR>          .
03/08/2025  06:53 PM    <DIR>          ..
07/16/2016  02:19 PM        37,967,128 MpAsBase.vdm
07/16/2016  02:19 PM        75,071,248 MpAvBase.vdm
               2 File(s)    113,038,376 bytes

 Directory of C:\temp\SFCFix\manifests

03/08/2025  06:53 PM    <DIR>          .
03/08/2025  06:53 PM    <DIR>          ..
08/07/2020  01:24 AM             3,636 msil_microsoft.identitys..anagement.resources_31bf3856ad364e35_10.0.14393.3866_en-us_8cfb952fa71426f3.manifest
               1 File(s)          3,636 bytes

 Directory of C:\temp\SFCFix\wow64_microsoft-windows-migrationengine_31bf3856ad364e35_10.0.14393.5006_none_d8c3ace46a2d3c2b

03/08/2025  06:53 PM    <DIR>          .
03/08/2025  06:53 PM    <DIR>          ..
05/25/2016  07:26 PM         5,590,872 sflistrs1.dat
               1 File(s)      5,590,872 bytes

 Directory of C:\temp\SFCFix\wow64_microsoft-windows-statemanager.resources_31bf3856ad364e35_10.0.14393.0_en-us_b8a9ada3d79b6c71

03/08/2025  06:53 PM    <DIR>          .
03/08/2025  06:53 PM    <DIR>          ..
02/03/2018  11:29 PM             8,192 Windows.Storage.ApplicationData.dll.mui
               1 File(s)          8,192 bytes

 Directory of C:\temp\SFCFix\x86_netfx4-system_ni_b03f5f7f11d50a3a_4.0.14305.0_none_3f7dfb0ca6ab2808

03/08/2025  06:53 PM    <DIR>          .
03/08/2025  06:53 PM    <DIR>          ..
07/16/2016  02:20 PM        10,281,640 system.ni.dll
               1 File(s)     10,281,640 bytes

     Total Files Listed:
               7 File(s)    128,922,757 bytes
              17 Dir(s)   8,993,447,936 bytes free

C:\temp\SFCFix>
Also, I see SFCFix (the program) created C:\SFCfix with data in it. Do you want me to zip that up for you?
C:\SFCFix>dir /ah /as /s
 Volume in drive C has no label.
 Volume Serial Number is DAE1-4D0E
File Not Found

C:\SFCFix>attrib /s
A            C:\SFCFix\CrashDumps\SFCFixCrashReport\SFCFixCrashDump.dmp
A            C:\SFCFix\CrashDumps\SFCFixCrashDump1.dmp

C:\SFCFix>
PeterJ
Moderator, Windows Update Expert, Security Analyst
- Joined
- Dec 14, 2014
- Posts
- 15,405
-
-
#9
WARNING! The following fix is specific to the user’s system in this thread only. No one else should follow these instructions, as it could damage your system.
- Download the attachment SFCFixScript.txt and save it on your desktop.
- Save any work you have open, and close all programs.
- Drag the SFCFixScript.txt file over the SFCFix.exe executable and release it.
- SFCFix will launch, let it complete.
- Once done, a file will appear on your desktop, called SFCFix.txt.
- Attach that file to your next reply.
Attachments
-
SFCFixScript.txt
- Joined
- Apr 13, 2022
- Posts
- 33
-
-
#10
Attachments
-
SFCFix.txt
- Joined
- Apr 13, 2022
- Posts
- 33
-
-
#11
PeterJ
Moderator, Windows Update Expert, Security Analyst
- Joined
- Dec 14, 2014
- Posts
- 15,405
-
-
#12
It ran and didn’t take long to complete. «Failed» something or other flashed on the screen before the CMD window disappeared on its own and SFCfix.txt opened.
Great. At least we got a result now.
The result shows I made a small mistake in 1 of 6 copies. The other 5 files are copied successful.
New fix.
WARNING! The following fix is specific to the user’s system in this thread only. No one else should follow these instructions, as it could damage your system.
- Download the attachment SFCFixScript.txt and save it on your desktop.
- Save any work you have open, and close all programs.
- Drag the SFCFixScript.txt file over the SFCFix.exe executable and release it.
- SFCFix will launch, let it complete.
- Once done, a file will appear on your desktop, called SFCFix.txt.
- Attach that file to your next reply.
Attachments
-
SFCFixScript.txt
- Joined
- Apr 13, 2022
- Posts
- 33
-
-
#13
Attachments
-
SFCFix.txt
PeterJ
Moderator, Windows Update Expert, Security Analyst
- Joined
- Dec 14, 2014
- Posts
- 15,405
-
-
#14
Run the command sfc /scannow in an elevated commandprompt and report the result.
If it fails, copy the file C:\Windows\Logs\CBS\cbs.log to your desktop.
Zip the copied file and attach the zipped cbs.log to your next reply.
- Joined
- Apr 13, 2022
- Posts
- 33
-
-
#15
C:\>sfc /ScanNow

Beginning system scan.  This process will take some time.

Beginning verification phase of system scan.
Verification 100% complete.

Windows Resource Protection did not find any integrity violations.

C:\>
Since my inital report also had problems with DISM, and it takes a while to run, I’ve started «Dism /Online /Cleanup-Image /RestoreHealth». I’ll report the result.
- Joined
- Apr 13, 2022
- Posts
- 33
-
-
#16
C:\>Dism /Online /Cleanup-Image /RestoreHealth

Deployment Image Servicing and Management tool
Version: 10.0.14393.4169

Image Version: 10.0.14393.4169

[==========================100.0%==========================] The restore operation completed successfully.
The operation completed successfully.

C:\>
- Joined
- Apr 13, 2022
- Posts
- 33
-
-
#17
Attachments
-
cbs.log.zip
PeterJ
Moderator, Windows Update Expert, Security Analyst
- Joined
- Dec 14, 2014
- Posts
- 15,405
-
-
#18
PeterJ
Moderator, Windows Update Expert, Security Analyst
- Joined
- Dec 14, 2014
- Posts
- 15,405
-
-
#20
- Click on the Start button and in the search box, type regedit.
- When you see regedit on the list, right-click on it and select Run as administrator
- When regedit opens, using the left pane, navigate to the following registry key and select it by clicking on it once.
HKEY_LOCAL_MACHINE\SYSTEM\CurrentControlSet\Services - Once selected, click File > Export….
- Change the Save as type: to Registry Hive Files (*.*)
- Name this file Services (with no file extension) and save it to your desktop.
- Zip this file and attach it to your next reply.
Has Sysnative Forums helped you? Please consider donating to help us support the site!
-
Microsoft Support & Malware Removal
-
Windows Update
If you receive Windows Update error 0x80073712 or 80073712, it means that a file needed by Windows Update is damaged or missing. Windows has troubleshooting tools that can help you address this problem. Follow the steps below to use these tools.
Method 1: Run the Windows Update troubleshooter
-
Open the Windows Update troubleshooter by swiping in from the right edge of the screen, tapping Search (or if you’re using a mouse, pointing to the upper-right corner of the screen, moving the mouse pointer down, and then clicking Search), entering Troubleshooting in the search box, tapping or clicking Settings, and then tapping or clicking Troubleshooting. Under System and Security, tap or click Fix problems with Windows Update.
- Run the troubleshooter, then open Windows Update and try to install the update again.
Method 2: Run the DISM tool
- Swipe in from the right edge of the screen, and then tap Search.
(If you’re using a mouse, point to the upper-right corner of the screen, move the mouse pointer down, and then click Search.) - Enter command prompt in the search box.
- In the list of results, swipe down on or right-click Command Prompt, and then tap or click Run as administrator.
- In the Administrator: Command Prompt window, type the following commands. Press the Enter key after each command:DISM.exe /Online /Cleanup-image /Scanhealth
DISM.exe /Online /Cleanup-image /Restorehealth
- To close the Administrator: Command prompt window, type Exit, and then press Enter.
- Run Windows Update again.
Method 3: Refresh your PC
- For information about how to do this, go to How to restore, refresh, or reset your PC.
`~`
80070003
Click Start (Press “Windows Key + Q” to open Charms Bar.)
Type: cmd
Right click on cmd in start menu and select ‘Run as Administrator’
Type: net stop wuauserv
Hit Enter
Type: ren c:\windows\SoftwareDistribution softwaredistribution.old
Hit Enter
Type: net start wuauserv
Hit Enter
Type: exit
Hit Enter
Restart once it’s finished running and see if the return code still appears when checking for updates.
Attempt to download updates
- Почему возникает ошибка Центра обновлений
- 7 способов исправить сбой 0x80073712
Сбой 0x80073712 — распространенная ошибка, возникающая при попытке установить новые обновления в Windows. Она появляется по разным причинам. Разберем, почему возникает неполадка и как ее можно исправить.
Почему возникает ошибка Центра обновлений
Среди основных причин ошибки 0x80073712 можно выделить следующее:
- Проблемы со службой Центра обновления;
- Недостаток свободного места на системном разделе;
- Повреждения системных файлов;
- Неполадки при загрузке файлов обновлений;
- Деятельность вредоносного ПО.
Исправив эти проблемы, можно возобновить исправную работу Центра обновления ОС.
7 способов исправить сбой 0x80073712
Разберем 7 различных решений ошибки, которые помогут избавиться от нее в большинстве случаев. Применив несколько, можно легко устранить неполадку.
Запуск устранения неполадок
Простой способ решения — применить стандартную службу для поиска и устранения неполадок Центра обновления Windows. Программа выявляет и, по возможности, исправляет найденные ошибки. В некоторых случаях она помогает вернуть Центру обновления работоспособность. Чтобы запустить ее, проделайте следующее:
1. Запустите Параметры любым способом, например, с помощью сочетания кнопок Win + I.
2. Откройте раздел Обновление и безопасность.
3. Перейдите во вкладку Устранение неполадок, выбрав ее в левом меню.
3. Щелкните на пункт Дополнительные средства в правой части окна.
4. Выберите Центр обновления и нажмите на кнопку Запустить, чтобы открыть утилиту устранения ошибок.
5. Выполните шаги средства исправления неполадок. Для каждого случая они могут отличаться.
После этого нужно перезагрузить компьютер. Затем можно пробовать установить обновления повторно. Скорее всего, их загрузка восстановится.
Очистка системного раздела
Одна из возможных причин ошибки — отсутствие свободного пространства на диске C. Чтобы освободить место на системном разделе, можно воспользоваться встроенной программой Очистка диска. Для этого:
1. Откройте Этот компьютер в Проводнике.
2. Кликните ПКМ по системному диску и щелкните на пункт Свойства.
3. В появившемся окне нажмите на кнопку Очистка диска во вкладке Общие.
4. Дождитесь завершения оценки доступного к очистке места.
5. Отметьте виды файлов к очистке галочками. Можно оставить выбранные пункты по умолчанию. Это позволит удалить основные временные файлы и содержимое корзины. После выбора файлов к очистке нажмите на кнопку ОК.
6. Дождитесь завершения работы программы.
Диск C будет очищен и на нем освободится дополнительное пространство. В ряде случаев это помогает исправно запустить установку обновлений.
Проверка службы Центра обновления
Иногда ошибка может быть вызвана тем, что служба Центра обновления отключена в системе. Стоит проверить состояние сервиса в настройках и включить его, если окажется, что он деактивирован. Для этого:
1. Перейдите в утилиту Службы. Ее можно открыть, например, запустив программу Выполнить сочетанием клавиш Win + R и воспользовавшись в ней командой services.msc. Другой способ — найти приложение Службы в поиске на строке задач.
2. В списке служб найдите пункт Центр обновления и кликните по нему дважды.
3. В появившемся окне свойств сервиса убедитесь, что служба запущена и в графе Тип запуска установлено значение Автоматически. Если это не так, измените параметры на нужные, нажмите Применить и ОК.
4. Закройте окно утилиты Службы.
После этого можно повторно проверять работоспособность обновлений.
Проверка целостности файлов Windows
Иногда источником сбоя с кодом 0x80073712 становятся повреждения компонентов Windows. Выявить и исправить их можно при помощи встроенных в систему утилит. Например, sfc. Чтобы воспользоваться этой службой, откройте Командную строку от имени администратора. Это можно сделать, например, через поиск на строке задач.
В окне консоли нужно выполнить команду sfc /scannow. Для завершения восстановления файлов может потребоваться перезагрузка. Выполните ее, если программа уведомит о необходимости перезапустить ПК сообщением на экране.
Устранение повреждений жесткого диска
В некоторых случаях исправить ошибку помогает восстановление повреждений файловой системы диска C. Чтобы произвести его, нужно открыть CMD с правами администратора, выполнить в консоли команду chkdsk C: /f /r, после чего перезагрузить компьютер. Служба проведет поиск и устранение найденных неисправностей файловой системы, которые могли быть причиной возникновения ошибки 0x80073712.
Поиск и удаление вирусов
Другая возможная причина возникновения ошибки 0x80073712 — заражение системы вирусами. Некоторые виды вредоносного ПО препятствуют исправной работе стандартных служб Windows, таких, как Центр обновления. Стоит провести поиск и удаление вирусов с помощью любого доступного антивируса. Например, встроенного в ОС Защитника Windows или утилиты от Malwarebytes.
Переустановка Windows
Если ни один из способов решения не помог, можно прибегнуть к переустановке операционной системы. Это радикальный метод, который гарантированно позволит устранить сбой. Перед переустановкой стоит заранее сохранить все важные файлы с системного раздела, так как он будет отформатирован в процессе инсталляции новой копии ОС.