Many users encounter the Media Creation Tool error 0x80072EE7-0x20000 when using a USB drive to reinstall Windows 10. How to fix the Windows 10 error code 0x80072EE7-0x20000? Let’s explore the answer together with MiniTool Partition Wizard.
Windows 10 Media Creation Tool is a widely used program provided by Microsoft to help upgrade or clean install Windows. You can use the tool to create a bootable USB stick for reinstalling. Sometimes, however, various error codes also appear when using the tool, such as Media Creation Tool error 0x8007010B-0xA0003, Windows 11 Media Creation Tool Error 0x8007007B-0xA001B, etc.
Here’s a user report who posted the Windows 10 Media Creation Tool error 0x80072EE7-0x20000 on the answer.microsoft.com forum:
Media Creation Tool error code 0x80072EE7 -0x20000. Please help ANYONE! I decided to try reinstalling Windows 10 from a USB stick with the Media Creation Tool. However, as soon as it starts to run, I get the error code 0x80072EE7 -0x20000. If anyone can help or even explain what is causing the problem it would be amazing.https://answers.microsoft.com/en-us/windows/forum/all/media-creation-tools-error-code-0x80072ee7-0x20000/2c0181f9-62c8-4e6f-85b5-c4f3dab35963
What causes the Media Creation Tool error code 0x80072EE7-0x20000 in Windows 10? According to user reports, the error code often occurs when upgrading or reinstalling Windows 10 with the Media Creation Tool. The problem can be triggered by some possible reasons, such as a corrupted ISO file, a faulty USB stick, and broken system files.
Here we summarize 4 simple ways to fix the Windows 10 22H2 Media Creation Tool error 0x80072EE7-0x20000. Let’s try them in order until the problem gets solved.
# 1. Redownload the Windows 10 22H2 ISO File
First of all, you should check if the Windows 10 ISO file gets corrupted, which can lead to the Media Creation Tool error code 0x80072EE7-0x20000. If so, you can follow the guide below to redownload the ISO file and create a bootable USB stick.
Step 1. On a working computer, visit the official website of Windows 10 22H2 ISO file and download it.
Step 2. Transfer the ISO file to the computer that you want to reinstall Windows 10 on.
Step 3. Double-click the ISO file and mount it to a drive letter.
Step 4. Run the setup.exe file of Media Creation Tool and follow the on-screen instructions to burn the ISO file to the USB drive. If you are unclear about the process, you can refer to this post “How to Create Bootable USB from ISO Win10/11 for Clean Install”.
# 2. Reformat the USB Flash Drive
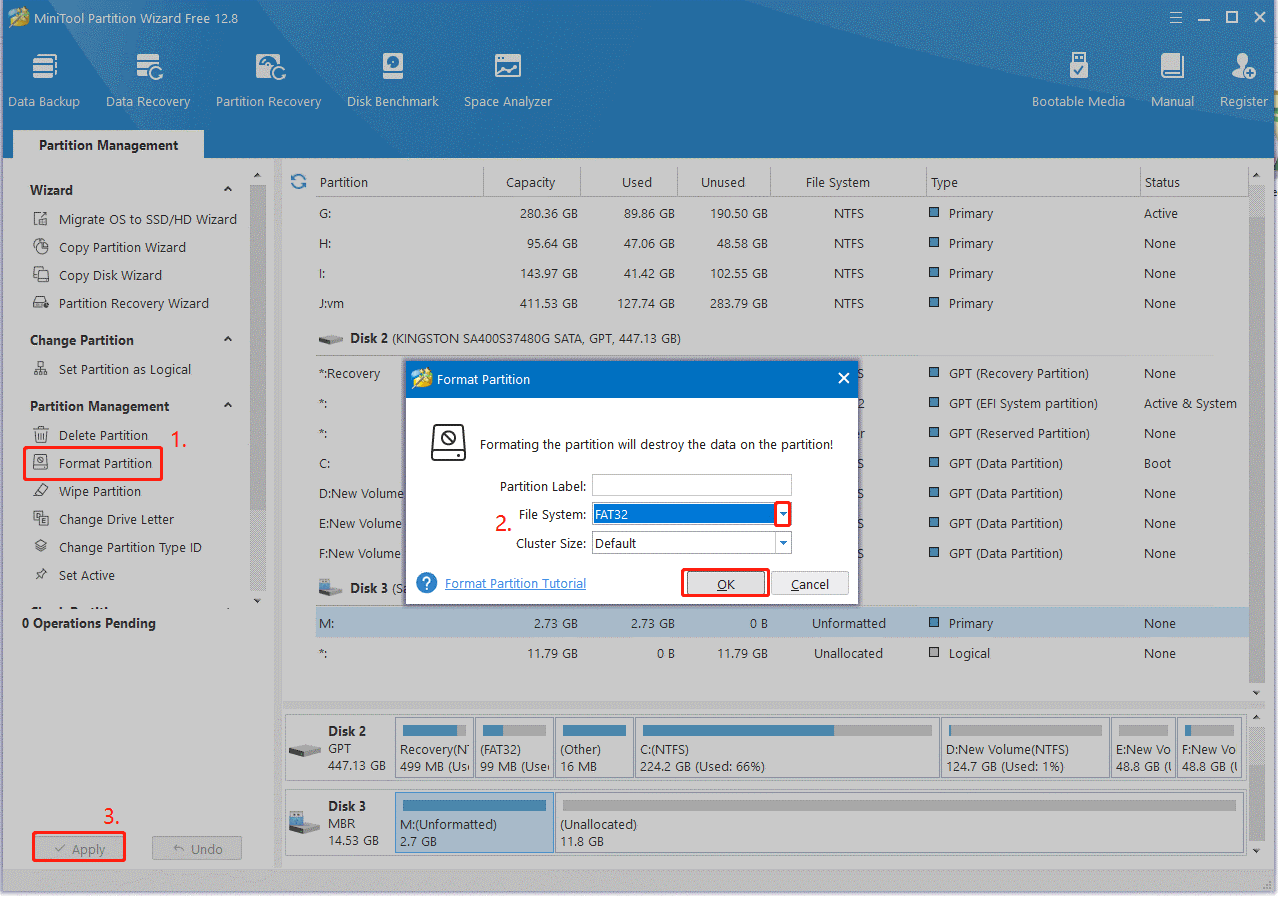
If there are bad sectors on the USB drive or the drive is not compatible with the Media Creation Tool, you may encounter the Windows 10 error code 0x80072EE7-0x20000. In this case, reformatting the USB flash drive to FAT32 can help fix the error code.
When it comes to formatting a USB, most people may want to use DiskPart or Disk Management. However, they can’t format a drive larger than 32GB to FAT32/exFAT and sometimes get stuck in formatting. So, we highly recommend you use an alternative USB drive formatter – MiniTool Partition Wizard. It cannot only format a USB to FTA32/NTFS/exFAT/Ext4 but also convert NTFS to FAT32 without data loss (and vice versa).
MiniTool Partition Wizard FreeClick to Download100%Clean & Safe
# 3. Repair Your System Files in WinRE
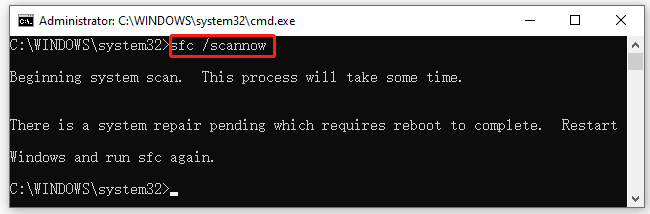
Sometimes corrupted system files are also responsible for the Windows Media Creation Tool error 0x80072EE7-0x20000. You can try running the SFC or DISM command to repair them. If your computer can’t boot normally, follow the guide below:
Step 1. Click the Power icon at the bottom of your computer’s screen, and then hold the Shift key and select Restart to enter WinRE.
Step 2. Access the Advanced options menu, and then click on Troubleshoot > Command Prompt.
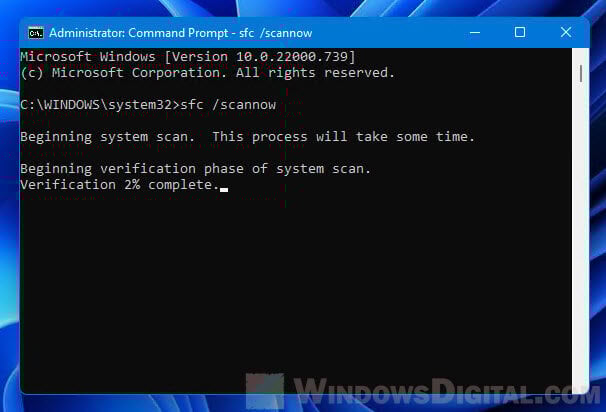
Step 3. In the elevated Command Prompt window, type sfc /scannow and press Enter. Then restart your computer to repair system files.
Step 4. When the SFC scan is complete, you can run the following DISM commands to further repair the system files.
- DISM.exe /Online /Cleanup-image /Scanhealth
- DISM.exe /Online /Cleanup-image /Restorehealth
# 4. Create Bootable USB Stick Using Rufus
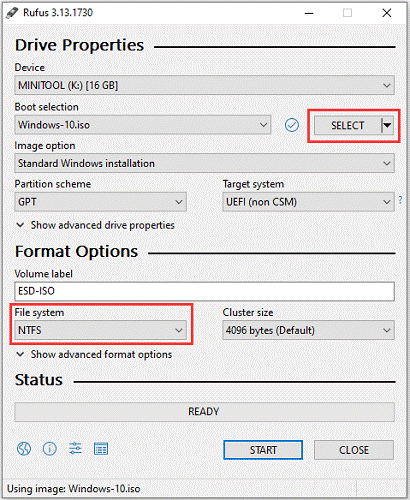
If none of above the methods can get rid of the Windows 10 22H2 Media Creation Tool error 0x80072EE7-0x20000, you may consider creating the bootable USB stick using Rufus. It can also burn the Windows 10 ISO file to the USB drive.
To create the bootable USB stick, get Rufus from its official website, download the Windows ISO file and transfer it to the computer, connect the USB drive, run Rufus, and specify all parameters for the USB. Once confirmed, click on Start to begin the process.
The Windows Update error 0x80072ee7 can pop up in both Windows 11 and Windows 10 when you’re trying to get a major update. It’s a pretty common issue people run into while updating Windows. This error can show up pretty much anywhere you’re trying to update Windows, like the usual update settings, the media creation tool, or the update assistant.
In this post, we’re going to walk through some steps to fix the Windows 11 or 10 Update error 0x80072ee7. No need to try everything at once; just go down the list until something works for you.
See also: How to restart Windows Update service on Windows 11
Check DNS settings
DNS helps guide you on the internet, including when you’re trying to update Windows. If your DNS settings are off or if the DNS server isn’t working, you might not be able to update and see the error 0x80072ee7.
Usually, your computer uses your internet service provider’s DNS unless you’ve changed it. But, using a public DNS like Google or Cloudflare’s can be a good move because they’re quicker and safer. Here’s how to switch your computer’s DNS to Google’s:
- Hit up the Start menu in Windows.
- Look for Control Panel and open it.
- Click on view network status and tasks.
- On the left, click Change adapter settings.
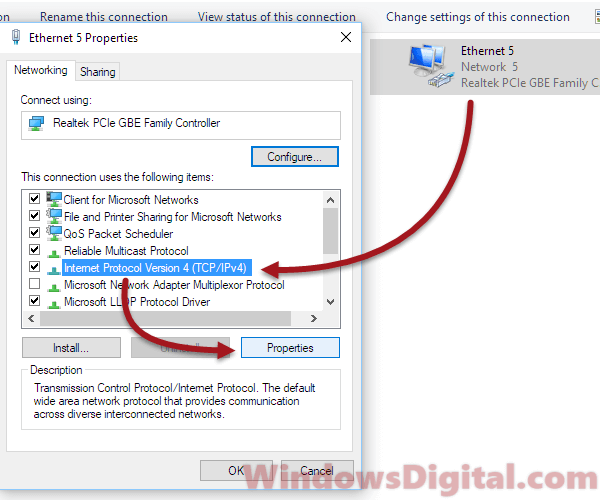
- Find and right-click the network adapter you’re using (Ethernet or WiFi).
- Choose Properties.
- Find Internet Protocol Version 4 (TCP/IPv4).
- Select it and then hit Properties.

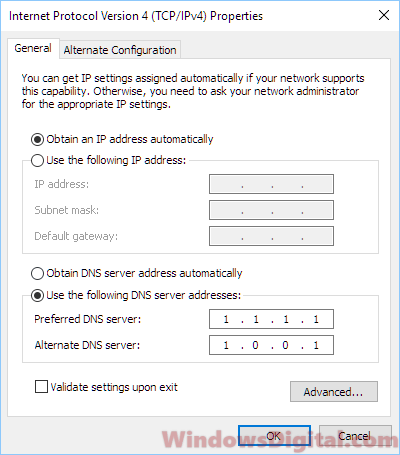
- Turn on Use the following DNS server addresses.
- Put 8.8.8.8 for preferred DNS server, and 8.8.4.4 for Alternate DNS server.
- Or, use 1.1.1.1 and 1.0.0.1 for Cloudflare DNS (which is a great option right now).

For more on DNS and how to change it on your computer, check out: How to change DNS to Google or Cloudflare DNS in Windows 11/10.
Restart Windows Update service
Restarting the Windows Update service might fix issues because it’s like giving it a fresh start. This service handles downloading and installing updates. If it gets stuck or stops responding, updates might not install right.
Stopping and starting the service again can clear out any issues stopping updates from installing. It’s a simple and effective way to try and fix Windows Update problems.
Run DISM check
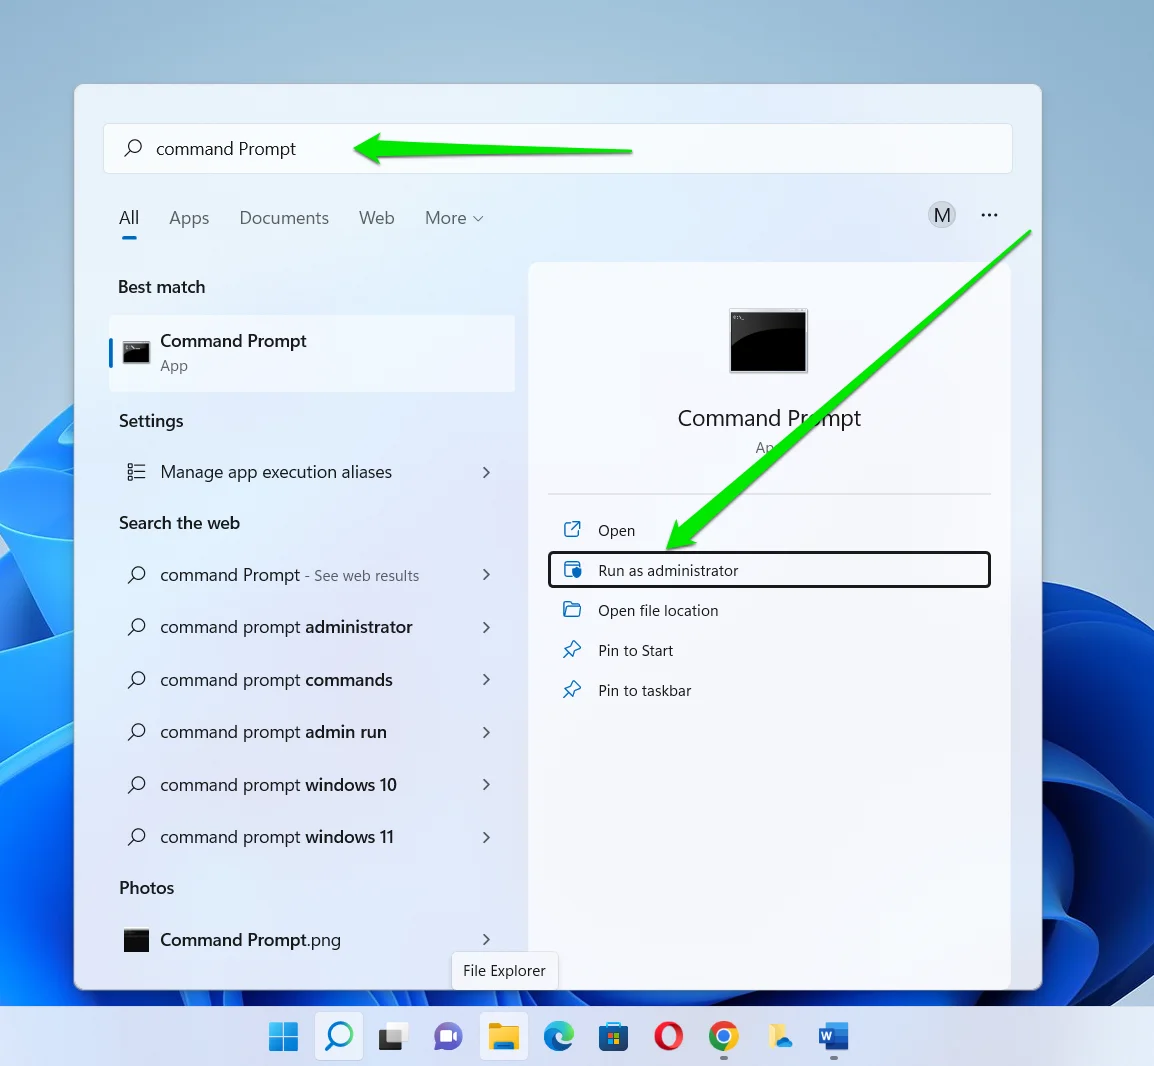
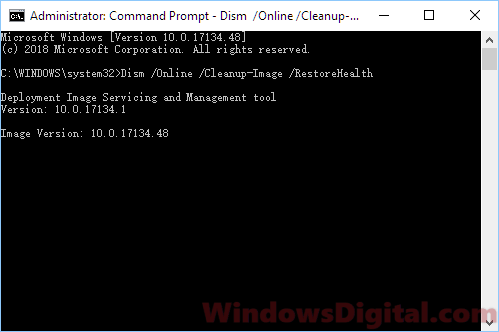
DISM, or Deployment Image Servicing and Management, is a tool in Windows that checks for and fixes Windows Update errors. Since it’s a command, you’ll need to run it from the command prompt. Here’s how:
Go to Windows search or Cortana. Look up “CMD”. Right-click Command Prompt from the results and pick “Run as administrator.” Running DISM needs admin rights. In the command prompt, type this command.
Dism /Online /Cleanup-Image /RestoreHealth
It’ll scan and fix stuff, which might take a bit. Restart your computer after, try updating Windows again, and see if the error is gone.
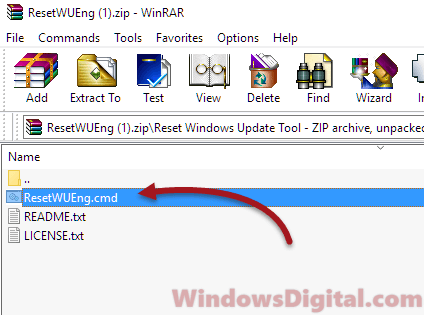
Run the WUReset script
The WUReset script resets the Windows Update Agent, which can fix update issues. Since the 0x80072ee7 error is all about Windows Update, this script might help.
Download the script here. Agree to the license to download. Unzip the file and run the ResetWUEng.cmd in the folder.
Restart your computer after, and try updating Windows to see if the problem is fixed.
Run System File Check
If nothing else works, it might mean there’s something wrong with the system files. Running the System File Check command can scan and fix any messed-up or missing system files.
To run SFC, go to Windows Search or Cortana. Search for Command Prompt. Right-click it and choose “Run as administrator.” In the command prompt, type this command.
sfc /scannow
It’ll check and fix files, which could take a while. Restart your PC afterward, then try updating Windows again.
If you’re still stuck, there might be a more serious issue with your PC that needs a closer look from a pro. Also, note that some antivirus programs can interfere with Windows Update. If you’re using one, try turning it off for a while to see if that fixes the issue. If it does, you might want to update or change your antivirus software.
Try the update at a later date
Sometimes, when nothing works to fix the problem, it could just be because the Windows Update servers are really too busy and overwhelmed. This often happens right after a big update gets released (with millions of users getting the update at once). So, if you’re stuck with the 0x80072ee7 error, try to ignore the update and come back to it later.
Waiting a day or two could just be what it needs for the issue to resolve itself. It gives Microsoft a chance to fix any problems on their end. Besides, if an issue doesn’t worth your time to keep troubleshooting, it’s best to just step back for a while and come back to it later. The issues sometimes resolve themselves.
Ошибка активации 0×80072ee7 в Windows 10 и 11 часто вводит пользователей в заблуждение, так как возникает сразу после установки операционной системы. Эта ошибка может быть вызвана различными причинами, но чаще всего связана с отсутствием важных обновлений Windows.
Причины возникновения ошибки 0×80072ee7
- Недавно Установленная ОС: Если Windows была только что установлена, она может не содержать всех необходимых обновлений, которые требуются для успешной активации.
- Проблемы С Подключением к Серверам Активации: Иногда ошибка может возникать из-за проблем с сетью или доступом к серверам активации Microsoft.
- Системные Ошибки: В редких случаях, системные ошибки или повреждение файлов могут привести к появлению данной ошибки.
Решение проблемы
Шаг 1: Установка обновлений Windows
Одним из самых надежных способов исправления ошибки 0×80072ee7 является установка всех доступных обновлений Windows. Для этого:
- Откройте «Настройки» > «Обновление и безопасность».
- Нажмите «Проверить наличие обновлений» и установите все доступные обновления.
- После установки обновлений перезагрузите компьютер и попробуйте активировать Windows снова.
Шаг 2: Проверка сетевого соединения
Убедитесь, что ваше сетевое соединение стабильно и не блокирует доступ к серверам активации Microsoft. Иногда использование VPN или прокси может мешать процессу активации.
Шаг 3: Использование утилиты устранения неполадок
Windows предлагает встроенную утилиту для устранения неполадок активации:
- Откройте «Настройки» > «Обновление и безопасность» > «Устранение неполадок».
- Выберите «Активация» и следуйте инструкциям для запуска утилиты.
Шаг 4: Контакт со службой поддержки
Если ни один из перечисленных методов не помог, рекомендуется обратиться в службу поддержки Microsoft для получения дополнительной помощи.
Заключение
Ошибка 0×80072ee7 при активации Windows 10 и 11, хотя и может показаться сложной, чаще всего успешно решается путем установки всех необходимых обновлений. Важно помнить, что активация Windows — ключевой шаг для обеспечения безопасности и стабильной работы вашей системы. Надеемся, что эти советы помогут вам успешно активировать вашу копию Windows и насладиться всеми преимуществами, которые она предлагает.
Полезная статья?
Ваша оценка
поможет нам стать лучше
-
3
Товары из статьи
Table of contents
- What Is the Error 0x80072ee7?
- Why Am I Seeing the Error 0x80072ee7?
- Step-by-Step Solutions to Fix the Error 0x80072ee7
- Solution one: Check your internet connection
- Solution two: Run the Windows Update troubleshooter
- Solution three: Flush the DNS cache
- Solution four: Adjust your DNS servers
- Solution five: Temporarily disable your firewall and antivirus
- Solution six: Manually reset Windows Update components
- How to Fix the Windows Update Error 0x80072ee7 on Windows 10?
- FAQ
This is why it can be really frustrating to run into Windows update errors such as the error 0x80072ee7. This error can disrupt your system’s ability to download and install crucial updates, but with a systematic approach, overcoming this challenge is within reach.
What Is the Error 0x80072ee7?
The error 0x80072ee7 often comes up when Windows can’t connect to the update servers. This can happen because of network issues, server unavailability, or incorrect DNS settings. Let’s try to understand the error a bit better.
Why Am I Seeing the Error 0x80072ee7?
There may be several reasons for why the error 0x80072ee7 comes up on your screen:
- Network connectivity issues: Problems with your internet connection can prevent Windows from reaching the update servers.
- DNS configuration errors: Incorrect DNS settings can lead to Windows being unable to resolve the server addresses it needs to download updates.
- Firewall or antivirus interference: Security software might mistakenly block Windows Update services or related server communication.
- Corrupted Windows Update components: Damaged or corrupted files within Windows Update itself can cause this error.
- Server unavailability: Sometimes, the Windows Update servers themselves may be down or overloaded, leading to connectivity errors.
- Corrupted DNS cache: A corrupt DNS cache can prevent proper resolution of server addresses, causing update failures.
Step-by-Step Solutions to Fix the Error 0x80072ee7
There are several things you can do to fix the error 0x80072ee7. Here’s how to get started:
Solution one: Check your internet connection
The first step is as basic as it gets. Ensure your internet connection is stable and robust. Temporary connectivity issues can often be mistaken for more serious problems.
- Restart your router to refresh your connection.
- Try connecting to a different network to rule out network-specific issues.
Solution two: Run the Windows Update troubleshooter
Windows 10 comes with an array of troubleshooters designed to automatically fix common problems, including update errors .
- Go to Settings > Update & security > Troubleshoot.
- Select Windows Update and click Run the troubleshooter.
- Follow the prompts and let Windows address any detected issues.
Solution three: Flush the DNS cache
Corrupted DNS cache can lead to connectivity issues with Windows Update servers. Clearing the cache can resolve these issues.
Here’s your detailed guide on how to do this: Simple Guide: How to View and Clear DNS Cache on Windows 10/11?
Solution four: Adjust your DNS servers
Sometimes, the default DNS servers provided by your ISP may have trouble connecting to Windows Update servers. Switching to a public DNS can help.
- Open Control Panel > Network and Sharing Center > Change adapter settings.