
В данной статье рассмотрим ошибку обновления Windows 10 — 0x8007139f, какие способы есть это исправить, рассмотрим их по порядку.
1) Открываем командную строку от имени администратора. Сделать это можете путем ввода в поиск на панели задач CMD => Далее открыть от им. администратора.
Далее по очереди вводим следующие команды, после каждой команды нажимаем «Enter».
SC config wuauserv start= auto
SC config bits start= auto
SC config cryptsvc start= auto
SC config trustedinstaller start= auto
Перезагружаем ПК.
2) Снова открываем командную строку от имени администратора и вводим новые команды. После каждой команды нажимаем «Enter».:
net stop wuauserv
net stop cryptSvc
net stop bits
net stop msiserver
Ren C:\Windows\SoftwareDistribution SoftwareDistribution.old
Ren C:\Windows\System32\catroot2 Catroot2.old
net start wuauserv
net start cryptSvc
net start bits
net start msiserver
Exit
3) Теперь открываем PowerShell от имени администратора. Сделать это можете путем ввода в поиск на панели задач powershell => Далее открыть от им. администратора.
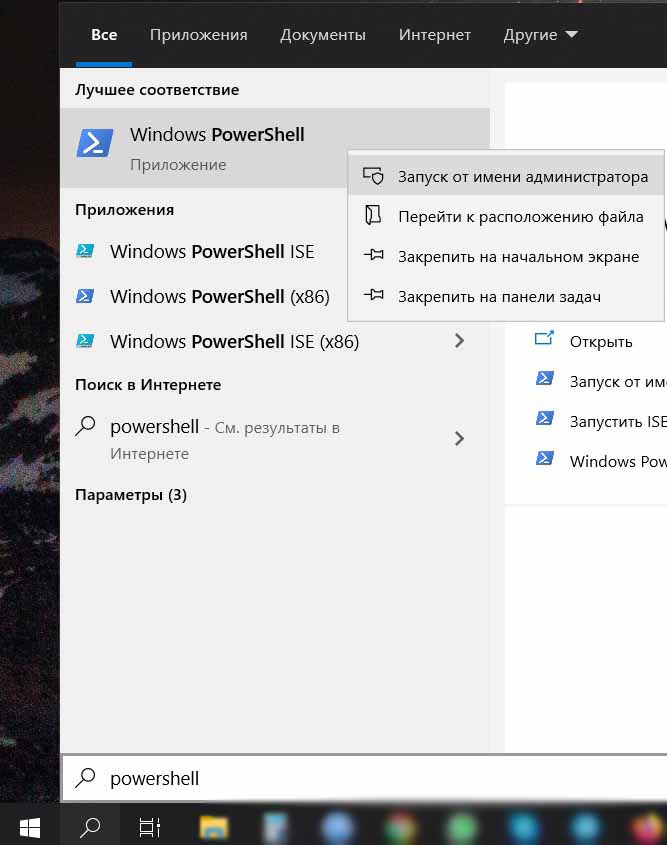
Вводим там следующие команды. После ввода команды нажимаем «Enter».:
wuauclt.exe /updatenow
Exit
Перезагружаем ПК.
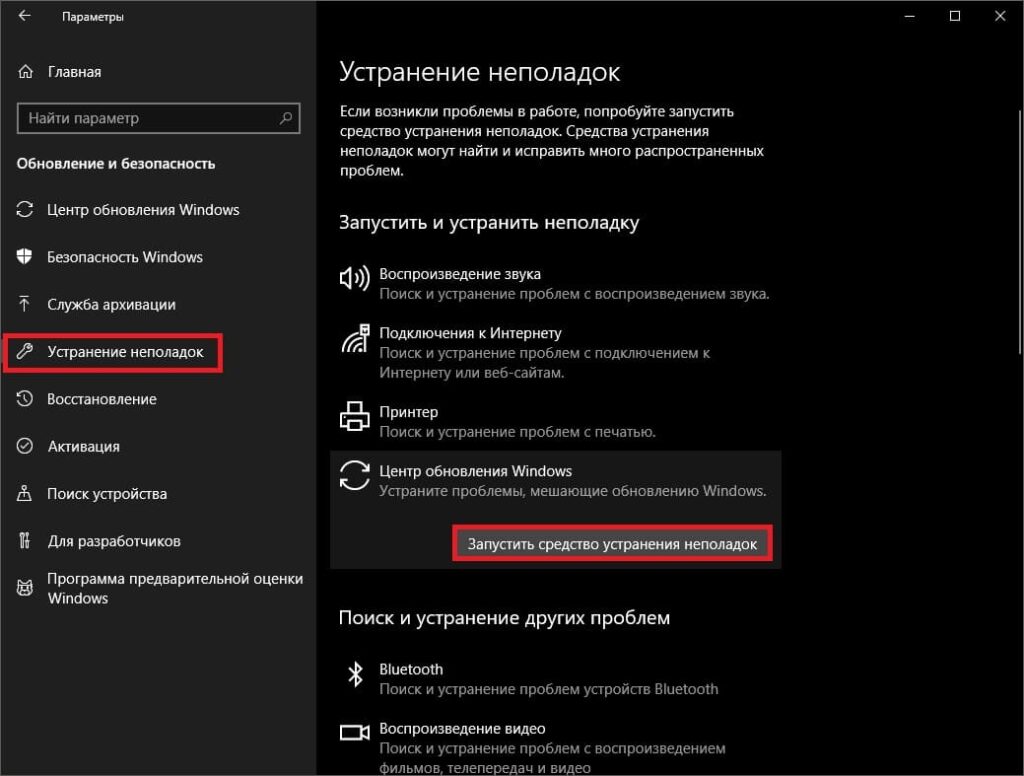
4) Теперь в поиске на панели задач вводим Параметры устранения неполадок => В новом окне «Устранение неполадок» => Запустить средства устранения неполадок. Далее следуйте инструкциям и примите решение, которые предложит Вам данная встроенная утилита.
После выполнения данных инструкций можете попробовать совершить обновление Вашей Windows 10.
0x8007139f is a common error code in Windows that can happen on Windows Update, Mail, Microsoft Account, Game Pass, or Windows Defender. If you are plagued by Windows Defender error 0x8007139f, you can read this post and MiniTool will give you multiple ways to fix it.
Windows Defender Error Code 0x8007139f
What is Window error code 0x8007139f? It could be a Microsoft account, Mail, Windows update, or Windows Defender error in Windows 10/11. Today we introduce the Windows Defender error.
Related post: How to Fix Error Code 0x8007139f on Mail in Windows 10
When you use Windows Defender to scan the PC, you may see the message saying The scan couldn’t be started. The group or resource is not in the correct state to perform the requested operation along with Error code: 0x8007139f.
The primary reasons for this may be because Windows Defender files are corrupted during Windows Update or Defender’s definition update. Besides, there may be a conflict with another antivirus program, which leads to error 0x8007139f.
What should you do when confronted with this annoying error on your PC? Don’t panic and several solutions to address this issue will be found below.
How to Fix Error Code 0x8007139f Windows Defender
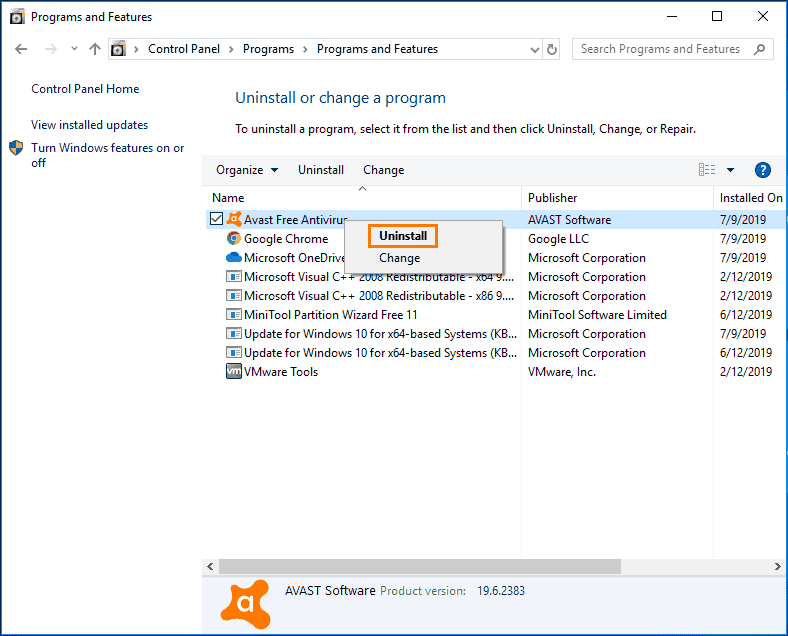
Disable or Uninstall Third-Party Antivirus Software
If you install another antivirus software on your PC, it may block from Windows Defender working with error code 0x8007139f. To fix this error, go to disable this program. For some software, you can right-click on its icon in the system tray to disable it. If you can, go to uninstall it via Programs and Features in Control Panel.
Check Windows Defender Service
Windows Defender error 0x8007139f may happen due to the service issue and you can go do check Windows Defender Service to see if it runs properly.
Step 1: Press Win + X and choose Run.
Step 2: Type services.msc and tap on OK.
Step 3: In the Services window, locate Windows Defender Service or Windows Defender Antivirus Service, and double-click on it to open the Properties window.
Step 4: If the service stops, click on the Start button. Besides, set its Startup type to Automatic. Then, click OK to save the changes.
Run SFC
Corrupted system files could trigger Windows Defender 0x8007139f. System File Checker (SFC) is the tool you can try in this case to repair the corruption.
Step 1: Run Command Prompt as administrator.
Step 2: Type sfc /scannow in the CMD window and press Enter.
Tips:
Sometimes when you run an SFC scan, you may meet a stuck issue. Just follow the guide to fix it — Windows 10 SFC /Scannow Stuck at 4/5/30/40/73, etc.? Try 7 Ways.
Turn on Windows Defender
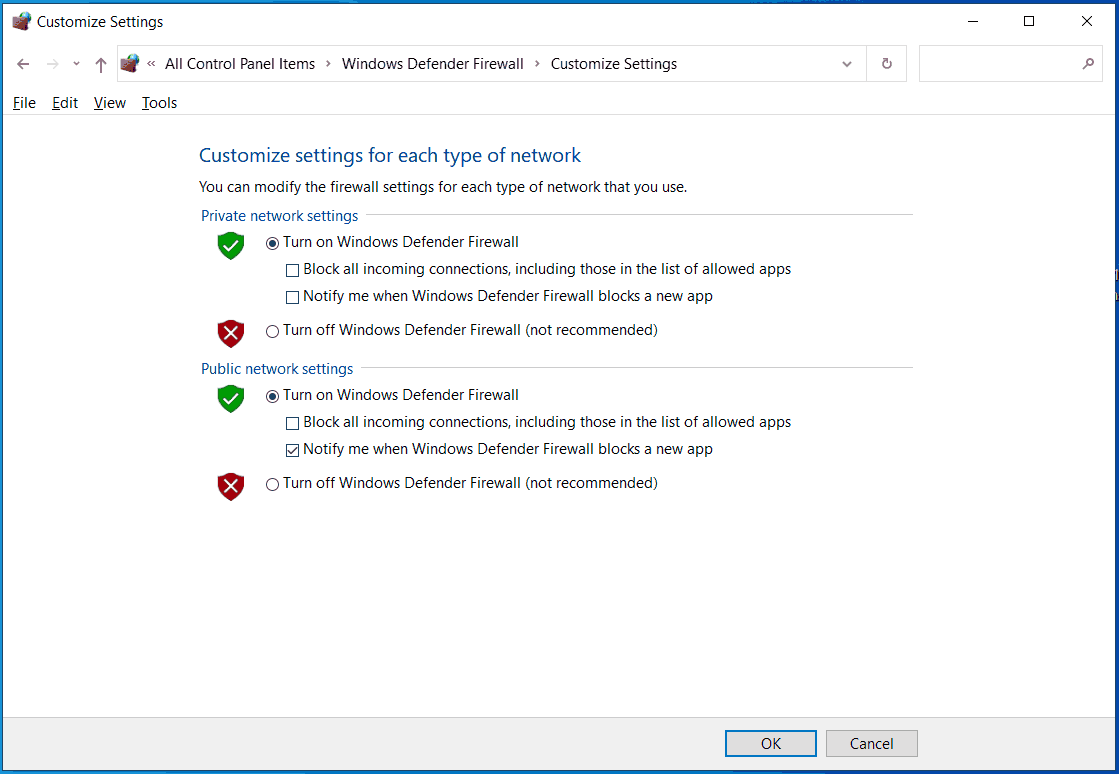
Sometimes if Windows Firewall is disabled, the feature of Windows Defender may be hampered, showing you error code 0x8007139f. So, make sure the firewall is enabled.
Step 1: Open Control Panel in Windows 11/10 and show all the items by large icons. Then, click Windows Defender Firewall.
Step 2: Tap on Turn Windows Defender Firewall on or off from the left pane and make sure the option of Turn on Windows Defender Firewall is checked under Private network settings and Public network settings.
Repair Windows Defender Registry Item
If none of these ways can fix Windows Defender error 0x8007139f, you may need to fix the Windows Defender registry item. The operation is not hard and follow these steps.
Note:
Consider that this is a registry operation, any mistaken operation could lead to system issues. So, you had better create a system restore point or create a backup for the registry as the necessary prevention measure.
Step 1: Get the RWDRK.zip file from the thewindowsclub site: https://www.thewindowsclub.com/downloads/RWDRK.zip.
Step 2: Unzip this file via a file archiver like 7-Zip, WinRAR, WinZip, .etc to get the RepairWinDefendRegKey.reg file.
Step 3: Double-click on this file to merge it with your Windows Registry.
Step 4: After that, restart your PC to check if Windows Defender error code 0x8007139f is fixed.
PC Backup (Recommended)
Windows Defender is helpful to prevent the machine from viruses and malicious attacks. But not all the threats can be detected and removed by it. To keep your data safe, we recommend to create a backup for crucial files besides using Windows Defender.
To do this task, run MiniTool ShadowMaker, a piece of reliable and free backup software for Windows 11/10/8/7. It supports file, disk, partition and system backup and recovery to meet your needs.
MiniTool ShadowMaker TrialClick to Download100%Clean & Safe
Verdict
How to fix Windows Defender error 0x8007139f? It is easy to get rid of the trouble after trying these solutions here. If you find some other useful workarounds, leave a comment to let us know. Thanks.
Если вы пытаетесь запустить определенную программу, какое-нибудь приложение, что-то установить или обновить, может возникнуть ошибка 0x8007139f. Как от нее избавиться?
Самым простым способом, приносящим реальный результат в решении какого-либо сбоя в работе ОС, является активация встроенного инструмента под названием «Устранение неполадок»:
• Откройте Пуск.
• Выберите Параметры > Центр обновления > Устранение неполадок.
• Следуйте предложенной инструкции.
• Перезапустите компьютер.
После этих действий снова попробуйте завершить начатый вами процесс, который был нарушен. Теперь все должно пройти успешно.
Но случается, что вы все сделали правильно, а ошибка осталась. В такой ситуации следует заняться очисткой реестра:
• Сканируем реестровые записи, используя специальную программу. Допустим, приложение CCleaner.
• Программа помогает обнаружить файлы, которые повреждены или отсутствуют, и исправить положение в автоматическом режиме.
• Обязательно сохраняется резервная реестровая копия, чтобы избежать проблем с ПК.
Если в итоге ошибку и не удастся победить, то польза от осуществленных мер все равно будет: система станет производительнее и быстрее в работе.
Иногда появление ошибки 0x8007139f провоцируют трояны и вирусы, наносящие вред файлам и программным компонентам. Чтобы это выяснить, необходимо просканировать операционную систему при помощи антивируса. Можно использовать как встроенный его вариант, так и сторонний.
Еще один способ борьбы с ошибкой 0x8007139f – периодическая очистка системы. В любом компьютере постепенно накапливается информационный мусор, к которому относятся временные файлы и всевозможные побочные продукты ежедневного веб-серфинга. Очистку винчестера можно провести следующим образом:
• Открываем Пуск.
• Вводим в поле поисковой строки Command.
• Выбираем те опции, которые собираемся удалить, устанавливая у каждого выбранного пункта флажок.
• Подтверждаем свой выбор.
Обратите внимание и на возможность восстановления ОС. Это действие позволит настройкам получить предыдущие значения и избавиться от неполадок. Личных файлов данная мера не коснется. Для этого:
• Войдите в Пуск.
• Введите «Восстановление системы» и подтвердите ввод.
• Введите пароль администратора, если потребуется.
• Следуйте подсказкам «Мастера».
При отсутствии положительных результатов после использования всех перечисленных методов остается переустановить Виндоус и переформатировать жесткий диск. Не забудьте скопировать все важные данные. Купить ключ активации Windows , вы можете в нашем магазине.
Как исправить код ошибки 0x8007139f
- Запуск устранения неполадок.
Самый простой и зачастую действенный способ решения сбоев операционной системы – встроенный инструмент Windows «Устранение неполадок».
Для его запуска переходим в меню «Пуск», выбираем «Параметры», «Центр обновления Windows» и выбираем «Устранение неполадок». Далее пользователю необходимо следовать простым инструкциям, перезагрузить компьютер и попытаться запустить программу или обновление ОС.
- Исправляем ошибки реестра.
Если предыдущий пункт не помог, очищаем реестр. Для этого надо просканировать его записи специальной программой, например WinTruster или CCleaner. Приложения находят отсутствующие файлы или поврежденные записи и автоматически их исправляют. Предварительно программа сохраняет резервную копию реестра, что предотвращает возможные проблемы с компьютером.
Даже если данная мера не устранит ошибку, производительность системы и ее скорость работы заметно улучшится.

- Сканируем ПК на наличие вредоносных программ.
В ряде случаев код ошибки 0x8007139f почты Windows 10 бывает вызван работой вирусов и троянов. В результате их действия повреждаются файлы и компоненты программ. Пользователю необходимо провести сканирование операционной системы встроенным или сторонним антивирусом. Выбор качественных программ достаточно широкий, можно выбрать наиболее приглянувшуюся.
- Проводим очистку диска.
Ежедневно компьютер накапливает большое количество мусора, например, временных файлов, которые появляются при интернет-серфинге или установке программ. При взаимодействии между собой они могут вступать в конфликты или приводить к неполадкам в работе жесткого диска.
Очистить систему можно при помощи встроенной утилиты Сleanmgr. Чтобы ее запустить, необходимо зайти в «Пуск» и ввести слово Command в поисковой строке.

Программа предложит выбрать категории опций для очистки. Чаще всего значительную часть объема локального диска занимают временные файлы, от которых стоит избавиться. Для этого нужно установить флажки напротив соответствующих пунктов и нажать OK.
- Восстанавливаем систему.
Восстановление операционной системы позволяет откатить настройки к предыдущим значениями и избавить от возникших ошибок. На сохраненные личные файлы в системе это никак не повлияет.
Запускается процесс в меню «Пуск», где необходимо ввести текст «Восстановление системы» и нажать Enter. При необходимости может понадобиться ввод пароля администратора. Мастер поможет восстановить состояние ПК до выбранной точки.

Если все приведенные меры не помогли, крайним решением может стать переустановка Windows с форматированием жесткого диска. Это радикальный метод решения неисправности, который потребует сохранить копии всех личных данных. Если и это не поможет, причиной, почему возникают ошибки 0x8007139f почты, программы или обновления, нужно искать в железе, а это уже тема отдельного обзора.
Предотвратить появление системных ошибок в большинстве случаев может использование лицензионного ПО и официальных версий операционных систем. Купить ключ активации Windows 10 на комфортных условиях вы можете на нашем сайте. У нас Вы получаете выгодные цены и простую форму заказа. Код активации высылается на Вашу почту сразу после оплаты.
The Error 0x8007139f is a generic error code in Windows and it might occur when either opening Mail and Calendar or when trying to update your Windows OS. The reasons vary in each case, so we have separately dealt with both issues and provided 5-7 fixes each.
This bug may also appear when you are launching the Windows Security program. The underlying causes and their solutions vary for a security app. That’s the reason why we have separately written a comprehensive guide on this topic.

- Windows Mail Error
- Windows Update Error
Fix Windows Mail Error Code 0x8007139f
If you are receiving an error code while starting the “Mail and Calendar” app, or when sending an email through it, consider applying the below fixes one by one.
1] Change the Mail Privacy Settings
You may resolve the Mail app error code 0x8007139f by simply configuring its privacy settings. Here’s how to perform this task on your Windows PC –
- Right-click on the Windows icon, and select Settings.
- Go to Privacy & Security > Email (under Permissions), and check if apps are allowed to access your email.
- If not, you may turn on the toggle switches next to “Email access” and “Let apps access your email.”
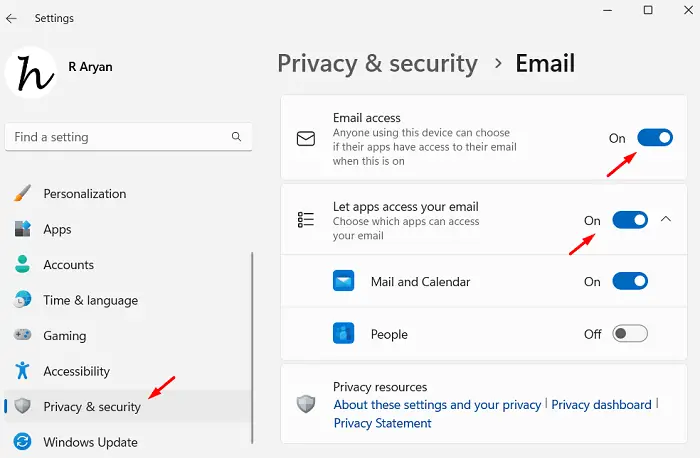
- After you turn on both these toggle switches, close the Settings app, and restart your computer.
Sign back into your device again and check if you can open the Mail app without getting an error code 0x8007139f.
2] Check if the Mail app is allowed through Windows Firewall
By default, the Mail app is allowed through Windows Firewall. There’s a possibility that you have manually restricted this app from functioning via Firewall settings. If that’s the case, you must check and allow it through Firewall again. Here’s how to perform this task –
- Press Windows + I to launch the Settings app.
- Go to Privacy & Security, and select Windows Security from the right pane.
- On the next screen, click Open Windows Security. See the Snapshot below –

- Windows Security app will launch next. Go to Firewall & network protection tab, and hit “Allow an app through firewall.”

- The system will next open the “Allowed apps” section under Control Panel.
- Click the “Change settings” button and then tick the checkboxes next to Mail and Calendar under both Private as well as Public columns.
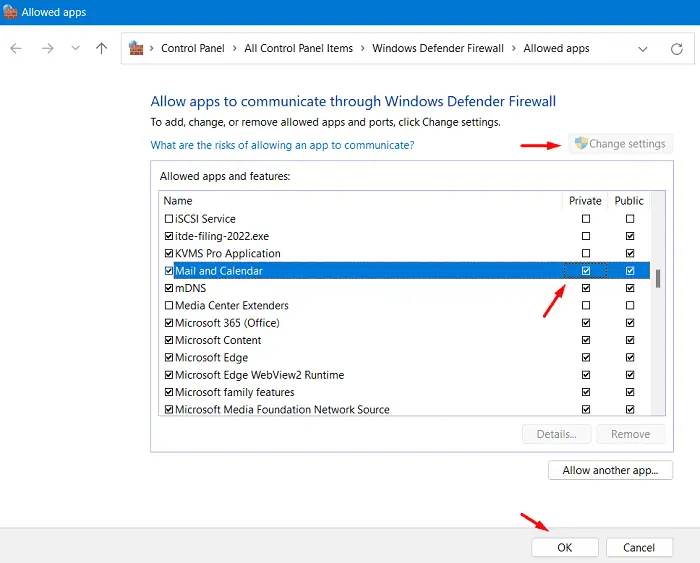
- Click OK to confirm the recent changes and restart your computer.
If the Mail and Calendar app was indeed restricted via Firewall, the error code 0x8007139f will resolve by now. However, if it wasn’t, follow the next set of solutions.
3] Run Windows Store Apps troubleshooter
Troubleshooting Windows Store Apps is another effective way to resolve this Mail error code 0x8007139f on Windows. Follow the below instructions on how to perform this task –
- Launch Settings first by pressing Windows + I.
- When the Settings app opens up, navigate to the below path –
Settings > System > Troubleshoot > Other troubleshooters
- Scroll down to the bottom of the Other section, and locate Windows Store apps.
- When found, click the Run button available on it.
- Clicking on this Run button will invoke the troubleshooter.

- Click Next and then follow the on-screen instructions to let this tool finish repairing your Microsoft Store app.
After the troubleshooting completes, restart your computer, and check if the error code 0x8007139f resolves now.
4] Reset the Microsoft Store app
Since “Mail and Calendar” is associated with Microsoft Store, you must reset the Store app itself to resolve any issues with the Mailing app. To perform this task, all you require is to start Command Prompt as administrator, and execute the below code over it –
WSReset.exe

The moment this command runs successfully, you will find Microsoft Store up and running again. Go and check if you can use the Mail and Calendar app without any issues.
5] Uninstall and then reinstall the Mail and Calendar app
If none of the above fixes help to address this Mail error code 0x8007139f on your Windows PC, you must uninstall this system app first and then reinstall it again. Follow the below instructions on how to perform this task –
- Press Windows + X, and choose Terminal (Admin).
- When the UAC window prompts, hit Yes to authorize accessing the terminal.
- On the terminal, copy/paste the following code, and press Enter –
Get-AppxPackage Microsoft.windowscommunicationsapps | Remove-AppxPackage
- The above command will uninstall the Mail and Calendar app from your system.
- Launch Microsoft Store next, and search for the “Mail and Calendar” app there.
- When found, click the Install button.
Wait for this installation to complete and as soon as this is over, restart your computer. From the next login, hopefully, you will be able to use Mail and Calendar as usual.
Windows Update error 0x8007139f solutions
This error 0x8007139f also occurs when you are trying to install pending updates on your computer. If you are struggling with the same error code and are searching for solutions, follow the below set of solutions. Let’s explore the fixes one after another in sequential order.
1] Uninstall third-party antivirus
A third-party antivirus can do much more harm than good. For example, an external security app is known to interact with the system files and make them corrupt. If you are using some premium antivirus, then it’s okay. Otherwise, simply uninstall or at least disable a free antivirus program from your system and check if the update error code 0x8007139f resolves this way.
2] Run System File Checker & DISM tools
Even after you remove a faulty security app from your system, the files that it corrupted still lie on your system. To repair such files, one must run SFC and DISM tools. The System File Checker will diagnose and repair the system files lying at “C:\Windows\System32” while the DISM tool will repair any corruption within the System image.
Follow the below instructions on how to run both these tools on Windows 11/10 –
- Press Windows + S to launch the Search window.
- Type CMD in the text field, right-click on the top result, and select Run as administrator.
- The UAC prompt will appear next, hit Yes to authorize opening the Command Prompt.
- On the elevated console, type the following and press Enter –
sfc /scannow
- Wait for this command to run and complete 100%. After this scanning and repairing process is over, run the DISM tool by copying and pasting the below code over the same console –
DISM /Online /Cleanup-Image /RestoreHealth

- Wait again for 10-15 minutes while the DISM tool is finding and repairing any corrupt files within your system.
After this is over, restart your PC, and check if you can update Windows normally now.
3] Run Windows Update troubleshooter
If the error code 0x8007139f is still appearing, you may take the help of the troubleshooting tool. When you run this tool, it checks for the underlying causes inside your system and repairs the issues that it finds. Here’s how to proceed ahead with this task on Windows 10 –
- Press Win + I hotkey to launch the Settings app.
- Go to Update & Security thereafter Troubleshoot from the left navigation.
- Click the “Additional troubleshooter” link from the right pane.
- When this window expands, locate and click over Windows Update.
- You will next see a button – Run the troubleshooter.

- Click on this button and wait for the troubleshooter to start on your Windows 10 PC.
- When the troubleshooter launches, click Next and follow the on-screen instructions.
After this is over, I hope you were able to update your Windows OS to its next available Build version.
Note: Windows 11 users may find this setting by visiting the below path –
Settings > System > Troubleshoot > Other troubleshooters

Locate Windows Update available under “Most frequent” and hit the Run button available on it. Next, follow the on-screen guideline to resolve this error code.
4] Reset Windows Update components
The presence of corruption within the system might also result in an error code 0x8007139f when updating Windows. This mostly happens because the cache folders keep even the long outdated contents inside them. Purge both cache folders on Windows 10 by following these steps and check if this problem resolves this way.
- First of all, open Command Prompt with administrative privileges.
- On the UAC dialog, hit Yes to allow opening this system app.
- On the elevated console, run these codes one after another –
net stop wuauserv
net stop cryptSvc
net stop bits
net stop msiserver
Ren C:WindowsSoftwareDistribution SoftwareDistribution.old
Ren C:WindowsSystem32catroot2 Catroot2.old
net start wuauserv
net start cryptSvc
net start bits
net start msiserver
- The commands starting with “Ren” will rename both SoftwareDistribution and Catroot2 folders by adding an extension
.oldto their names. - Restart your PC and you will find two new folders created automatically at the deleted locations. Go and ensure the same at the following paths –
SoftwareDistribution – C:\Windows\
Catroot2 – C:\Windows\System32\
Go to Settings > Update & Security > Windows Update next and hit Check for updates. Windows 11 users may directly check for updates by visiting Settings > Windows Update.
5] Manually install pending updates
If none of the above workarounds help to resolve this update error code 0x8007139f on Windows, you should manually download the standalone package from Microsoft Update Catalog and later install it on your PC. Here’s a detailed guide on how to manually download and install pending updates on Windows 10 or for that matter, Windows 11.
6] Perform a System Restore
The update error code 0x8007139f must have been resolved by now. In case, it doesn’t, and you do have a restore point available on your computer, you may use that to revert back your system to its previous stable state.
Perform this task and check if doing this resolves the error code 0x8007139f on your Windows PC. If not, proceed ahead with the clean installation of Windows on your computer.
7] Perform an in-place upgrade
Microsoft offers even performing an in-place upgrade on Windows 11/10 PC. Go for this method only when none of the above fixes work in your case. The complete procedure is outlined below –
- First of all, visit the official website to download the Media Creation Tool.
- Run this tool and when this starts, click “Update now” followed by the Next button.
- Select Download and install updates (recommended) and then hit Next again.
- After this is ready to install the update, click Change what to keep.
- Make sure to choose Keep personal files and apps, and hit Next.
Follow the on-screen instructions until this in-place upgrade process is over. I hope the above set of solutions helps you to overcome the error code 0x8007139f on your PC. Let’s know in the comment section if you face any difficulty following the solutions elaborated on in this blog post.