
Windows Update Error 0x8007065e is very common when you update your Windows. This article in MiniTool will show you what it is and how to solve it. Try these fixes to see if your issue can be solved.
Windows Update Error 0x8007065e
There is a strong possibility that error 0x8007065e appears when you try to update Windows. This error code indicates a series of problems like preventing you from updating your system correctly and some relevant Windows functions.
The cause of this error code is diverse. First, maybe there is a corrupt file in the system and you are likely to misconfigure the system after it updates unsuccessfully. Second, your antivirus or firewall can be the culprit, too. Third, the Internet connection failure might also get Windows Update stuck and show data of this type is not supported.
Ways to Fix Windows Update Error 0x8007065e
Here are some ways about how to fix this annoying issue. Go through these ways and check which one works best for you!
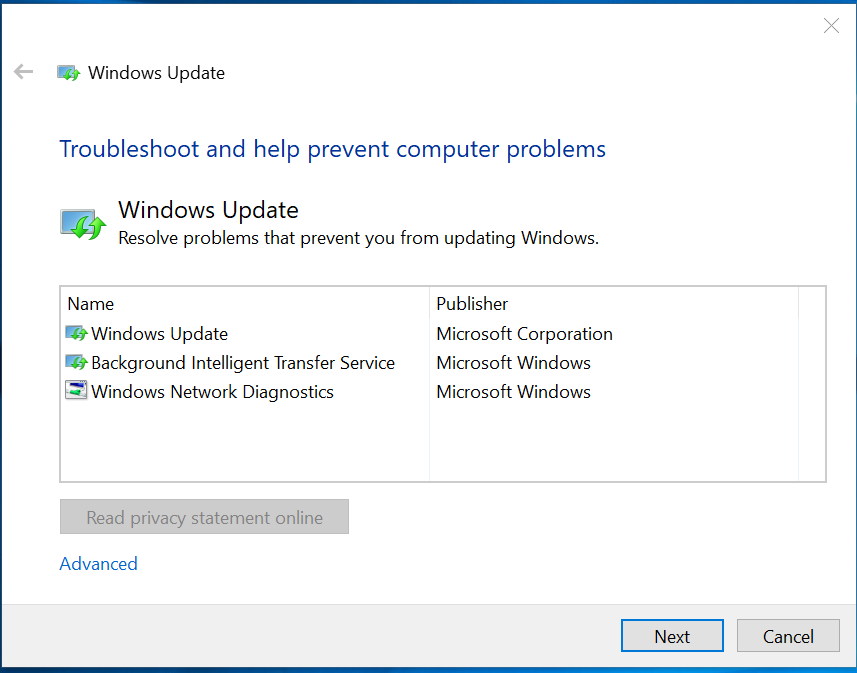
Way 1: Run Windows Update Troubleshooter
This is one of the best solutions because not only can it solve the Windows Update error 0x8007065e but also can it manage to solve any problem related to Windows updates. Here’s how to do it:
Step 1. Click Start and choose Setting.
Step 2. In the setting interface, you can click Update & Security.
Step 3. Click Troubleshoot and click Additional troubleshooters.

Step 4. Select Windows Update under Get up and running.

Step 5. Click on Run the troubleshooter and follow the on-screen instructions.
Step 6. Restart your PC and update your system.
Tip: Besides repairing Windows update error code 0x8007065e, running Troubleshooters can solve more problems. There is another article for you to learn more about that – How to Run Windows 11/10 Troubleshooters to Fix PC Problems.
Way 2: Use the SFC Command
If Windows Update error 0x8007065e still appears, you should make sure that the system file checker tool repairs the corrupted files. Try the following steps to do this work.
Step 1. Click Start and type cmd.
Step 2. When Command Prompt appears, right-click it and select Run as administrator.

Step 3. There will be a prompt to ask you if you allow the progress to make changes in the system. Click Yes.
Step 4. When the command line window pops up, paste SFC/scannow in the command line and hit Enter.

Step 5. Then the operating system will start a scan and fix corrupted and missing files for you.
Step 6. Reboot your computer.
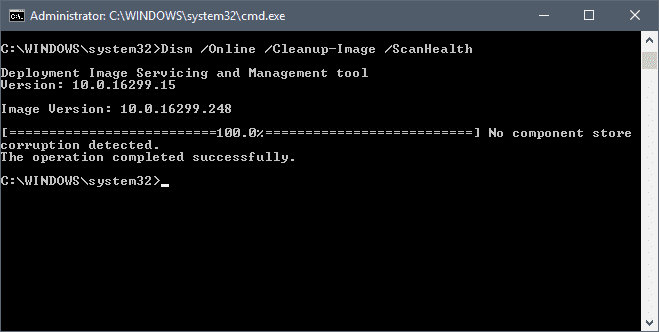
Way 3: Use DISM Command
Windows files are very important for the operating system to run smoothly. You can repair the outdated Windows files that hinder system working performance by using the DISM command. Here are the steps:
Step 1. Open Command Prompt.
Step 2. In the CMD window, paste the following command and hit Enter.
DISM.exe /Online /Cleanup-image /Restorehealth

Step 3. The progress might take some time, please wait patiently.
Step 4. Reboot your PC.
Way 4: Rename the Software Distribution Folder
Windows update error 0x8007056e may also result from some corrupted installer files that store in the Software Distribution folders. You can force your system to recreate the folder by renaming a specified one.
Step 1. Open the CMD window.
Step 2. When the black console window pops up, paste the following command and hit Enter after each one.
net stop wuauserv
ren c:windowssoftwaredistribution sdold
net start wuauserve
Step 3. After the progress finishes, reboot your computer.
Tip: Some of you may ask, “I can rename Software Distribution folders but can I delete it, either?” The answer is obviously Yes. You can learn more in this article – How to Rename or Delete Software Distribution Folder on Windows.
Way 5: Uninstall the Third-party Antivirus Programs Temporarily
The third-party security program can interfere with the update progress. To prevent this, you can uninstall those applications temporarily by the next steps:
Step 1. Click Start and then select Setting.
Step 2. In the setting interface, click Apps.
Step 3. In Apps & features, click the security software that you want to uninstall.
Step 4. Hit Uninstall.
Step 5. Click Uninstall again after a commission prompt pops up.
Step 6. Restart your PC to check if the Windows update error 0x8007056e still appears.
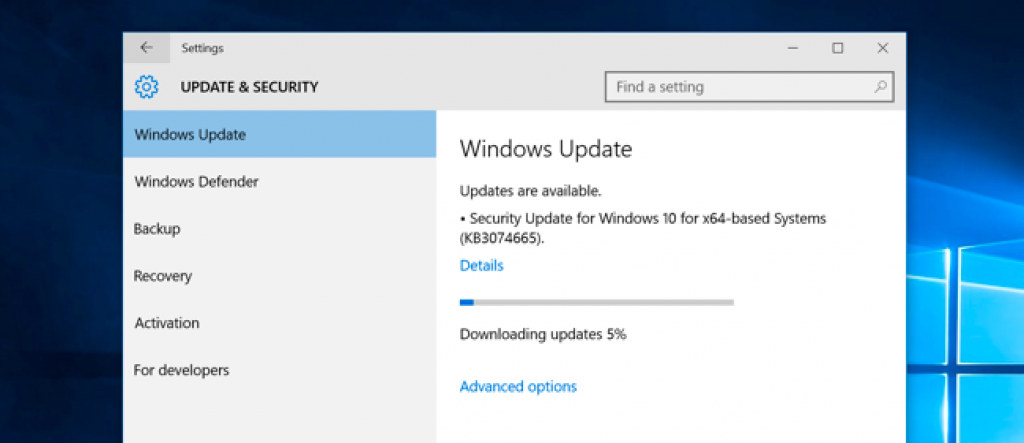
Way 6: Install the Failed Updates Manually
Rerunning the failed updates can help to locate the missing files and avoid appearing Windows update error 0x8007056e.
Step 1. Click Start and choose Update & Security.
Step 2. Click on Windows Update and then choose View update history.

Step 3. If you see the wrong updates, you can download the related files on Microsoft Website again.
Step 4. Install the failed updates manually.
One of the common error codes that users get, especially in the context of the “Windows update” is 0x8007065e. Because of this issue, the OS becomes unable to download any patch or build on your system. The problem indicates the inability of the operating system to start-up the Windows Update service. This might be rendering it impossible for your computer to connect to the update servers at Microsoft. Occurrence of the error takes place mainly when the update files get corrupt due to any internal conflicts or virus attacks, etc.
It is not unusual to find errors or interruptions like this while you are getting Windows Updates. Almost all users would have experienced some sort of problems in this respect, at least once. In this article, we discuss a few fixes for this very situation which are listed below for your easy navigation.
Error 0x8007065e Windows 10 During Update Download Solutions
Here is how to fix Error 0x8007065e Windows 10 During Update Download –
1] Run the built-in Windows Update Troubleshooter
You can totally rely upon Windows Update Troubleshooter to fix a wide range of related troubles. That is exactly why we list it as one of the top fixes as problem solver in that context. While you might not always be able to recognize and resolve the particular issue due to the technicalities, a troubleshooter can be of great help. So, not just in case of 0x8007065e, but for any problem that comes up related to Windows updates, do try this method out. Here is how to run this built-in tool –
Step-1: Press “Windows logo key + I” simultaneously in order to open Windows Settings app.
Step-2: In the next user interface, select Update & Security.
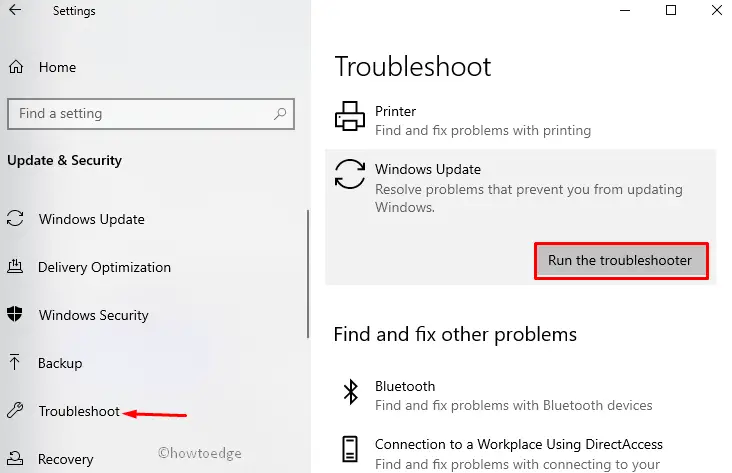
Step-3: Hit the Troubleshoot subsection that you see to the left of the page. Click Additional troubleshooters link on the right side.
Step-4: You are looking to hit Windows Update. When you do, the tab will expand, hit Run the Troubleshooter button.
Step-5: The utility will start detecting for all the possible issues and will eventually make an attempt to repair them as well.
2] Manual installation of the latest patches
Sometimes, you get errors while the system automatically downloads the patch, but getting it manually may skip any conflicts. So try grabbing the entire update package from the Catalog site. Here is what you need to do –
- Launch any web browser and go to the official site of Microsoft Update Catalog.
- On the web page, search for the latest update that is available for your Windows version. (You can even check in the Windows Updates section of your Settings and note the latest KB number.)
- Hit Download corresponding to the patch that you would like to install.
- When prompted, select Save. Hit on the downloaded file at the bottom of your browser to initiate the update process. You shouldn’t face any errors while getting the updates in this manner.
3] Temporarily uninstall or disable third party security programs
There have been countless instances of third-party antimalware tools interrupting with the update processes. To check and prevent this, you can try temporarily uninstalling or disabling those apps from the device. Depending on the software, turning off should be easy- you can do it simply by right-clicking on its icon from the system tray and selecting Disable. Here is how you can uninstall them –
- First of all, do a right-click on Start icon and select Apps and Features from the Win+X menu.
- Here, you should be able to see the entire list of installed apps on your system. Either scroll and locate the antivirus program you want to uninstall or find it using the search box.
- Click on the software so that it expands revealing two buttons.
- Hit on ‘Uninstall’ button.
- A dialog box will appear thereafter, asking for confirmation. Again, do a hit on ‘Uninstall’ to affirm the removal procedure.
- Restart and see if you are still receiving Error 0x8007065e during Windows Update.
4] Fix corrupted system components PC causing 0x8007065e
As you read earlier, faulty or broken system files are one of the most common reasons for update errors. So, when confronting such problems, make sure that you run the system file checker tool to repair those distorted files. The process is pretty simple as well and here is what you need to do –
- Type Cmd in the Search box and in the results you would see ‘command prompt’.
- Right-click on the same and select the option ‘Run as an Administrator’.
- Windows will ask permission to allow the program to make changes in your system. Allow it by clicking the Yes button on the UAC dialog box.
- When the black console window opens up, type in or copy-paste “
SFC /scannow” in the command line.
- Press Enter and let the scan begin. The OS will look for any corrupted or missing files and the procedure may take some time.
- Restart Windows 10 PC and try to start the update procedure again.
5] Reset Windows update components
This is one of the effective solutions to get rid of errors like 0x8007065e. This fix involves completely resetting any changes in Windows Update components with the help of an executable tool – Reset “Windows Update Agent”. This program will need the user to have administrative permissions to run it.
- Open any browser and navigate to this page.
- Click the button ResetWUEng.zip and then, select I agree.
- Select ‘Save’ when prompted.
- Once the download gets over, open and run the file ResetWUEng.
- Go through the on-screen instructions to successfully complete the resetting process.
6] Rename the SoftwareDistribution Folder to fix 0x8007065e
Now, there is also a possibility that the update error is resulting from some corrupt installer files that might be stored in the SoftwareDistribution folder. A quick solution here is renaming this specific folder and thereafter trying to download and install the patches again. The purpose of this whole thing is that it would force your Operating system to recreate the folder. This may ultimately fix the problem you are facing, given that Windows download a fresh copy of the folder thus leaving no corruption.
- Open Command prompt as an administrator by just following the steps we discussed in fix 4.
- When the black window opens, type or copy-paste the below-given commands one by one and press Enter after each one of them.
net stop wuauserv
ren c:windowssoftwaredistribution sdold
net start wuauserv
- After a few minutes, restart your computer and see whether you are able to get the updates normally without any complications.
7] Repair System File Corruption
Running DISM RestoreHealth tool will help you out in fixing the faulty Windows image files which will eventually mitigate the installation issues as well.
- Get access to the Command Prompt with the admin privileges. Copy-paste or type in the below command line and hit Enter to initiate the scan.
DISM.exe /Online /Cleanup-image /Restorehealth
- It may take a few good minutes to start the scan and may take around 30 minutes to complete it.
- Let the scan finish and then make an attempt to download the updates again. Hopefully, this will repair the Windows image files and the installation will smoothly take place.
Methods:
1] Run the built-in Windows Update Troubleshooter
2] Manual installation of the latest patches
3] Temporarily uninstall or disable third party security programs
4] Fix corrupted system components PC causing 0x8007065e
5] Reset Windows update components
6] Rename the SoftwareDistribution Folder to fix 0x8007065e
7] Repair System File Corruption
That’s all!!
Readers help support Windows Report. We may get a commission if you buy through our links.
Read our disclosure page to find out how can you help Windows Report sustain the editorial team. Read more
Updating the OS is critical for a stable and error-free Windows experience. But what if you encounter issues during the process? One such is the 0x8007065E Data of this type is not supported Windows Update error.
Remember, when you run an outdated version of Windows, the PC runs slower, incompatibility issues may arise, and apps may automatically crash. So, let’s find out all about the error.
What is Windows Update standalone installer error 0x8007052E?
The update error usually arises in Windows 7 when you are manually downloading and installing the updates, but users were affected by it on Windows 10 as well. And unless you follow the necessary troubleshooting steps, the error message will keep appearing.
Here are a few reasons you might be encountering the error:
- Corrupt system files: When the system files are corrupt, you run into several issues with the OS, including errors while updating Windows.
- Issues with the Windows Update components: The WU components are critical for the updates to install successfully, but these are often found to be corrupt.
- Downloading the incorrect package: When manually updating Windows, it’s imperative that you download the right package. Otherwise, it might throw an error during installation.
How can I fix error 0x8007065e?
Before we head to the slightly complex solutions, here are a few quick ones you can try:
- Restart the computer and then try installing the update.
- Disable any installed antivirus or firewall and check if the 0x8007065e Data of this type is not supported error disappears. If yes, we recommend you switch to an error-free antivirus for better results.
If none of these work, move to the fixes listed next.
1. Download the correct update package
- Get the KB (Knowledge Base) number for the package throwing the error, head to Microsoft Update Catalog, and search for it.

- Now, click on the Download button for the package that suits your system architecture.
- Click the link in the new window.

- Once the download is completed, run the setup, and follow the on-screen instructions to install it.


When encountering the 0x8007065e Data of this type is not supported update error in Windows 7, the primary check should be to verify whether the downloaded package is right. Check if it’s 32-bit or 62-bit, and for the correct iteration.
2. Use third-party software
You can fix error 0x8007065E Data of this type is not supported by using a reliable third-party tool that optimizes your Windows OS and restores registry settings to their default values.
A dedicated tool specializes in Windows repair. It scans and diagnoses your damaged PC, then repairs it using technology that not only repairs your Windows Operating System but also reverses the harm done with a full database of replacement files.
It does a thorough system diagnosis, performs rigorous system optimization, removes malware and viruses, and fixes the Windows registry.
3. Rename the SoftwareDistribution folder
- Press Windows + R to open Run, type cmd, and hit Ctrl + Shift + Enter.

- Click Yes in the UAC prompt.
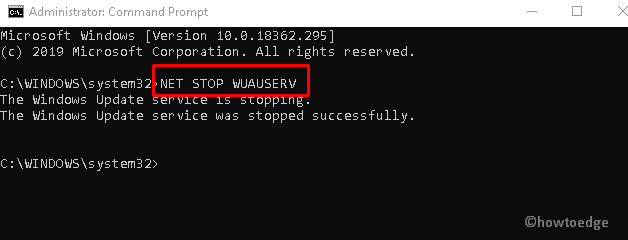
- Now, paste the following command and hit Enter to stop the Windows Update service:
NET STOP WUAUSERV
- Next, execute the following command to rename the SoftwareDistribution folder to SoftwareDistributionOld:
REN C:\WINDOWS\SoftwareDistribution SofwareDistributionOld
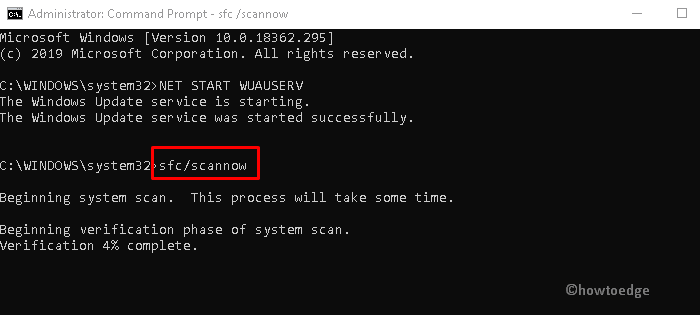
- Finally, run this command to restart the service:
NET START WUAUSERV


4. Run the DISM and SFC scan
- Press Windows + S to open Search, type Command Prompt, and then click on Run as administrator.

- Click Yes in the prompt.
- Now, paste the following three commands individually and hit Enter after each to run the DISM tool:
DISM /Online /Cleanup-Image /CheckHealthDISM /Online /Cleanup-Image /ScanHealthDISM /Online /Cleanup-Image /RestoreHealth - Once done, execute the following command to run the SFC scan:
sfc /scannow


Running the DISM tool and SFC scan proves quite useful when getting the 0x8007065e Data of this type is not supported error. Remember first to run DISM and then the SFC scan, as the former creates a suitable environment for the latter.
- Fix: ERROR_CANNOT_BREAK_OPLOCK (Error Code 802)
- ERROR_ABANDON_HIBERFILE 787 (0x313) [Solved]
- Fix: ERROR_BAD_MCFG_TABLE (Error Code 791)
- ERROR_THREAD_WAS_SUSPENDED (Error Code 699) [Solved]
5. Reset Windows Update components
- Press Windows + R to open Run, type cmd, press Ctrl + Shift, and click on OK.
- Now, execute the following commands individually to reset the Windows Update components:
net stop bitsnet stop wuauservnet stop appidsvcnet stop cryptsvcDel "%ALLUSERSPROFILE%\Application Data\Microsoft\Network\Downloader\qmgr*.dat"Ren %systemroot%\SoftwareDistribution SoftwareDistribution.bakRen %systemroot%\system32\catroot2 catroot2.baksc.exe sdset bits D:(A;;CCLCSWRPWPDTLOCRRC;;;SY)(A;;CCDCLCSWRPWPDTLOCRSDRCWDWO;;;BA)(A;;CCLCSWLOCRRC;;;AU)(A;;CCLCSWRPWPDTLOCRRC;;;PU)sc.exe sdset wuauserv D:(A;;CCLCSWRPWPDTLOCRRC;;;SY)(A;;CCDCLCSWRPWPDTLOCRSDRCWDWO;;;BA)(A;;CCLCSWLOCRRC;;;AU)(A;;CCLCSWRPWPDTLOCRRC;;;PU)cd /d %windir%\system32

regsvr32.exe atl.dll
regsvr32.exe urlmon.dll
regsvr32.exe mshtml.dll
regsvr32.exe shdocvw.dll
regsvr32.exe browseui.dll
regsvr32.exe jscript.dll
regsvr32.exe vbscript.dll
regsvr32.exe scrrun.dll
regsvr32.exe msxml.dll
regsvr32.exe msxml3.dll
regsvr32.exe msxml6.dll
regsvr32.exe actxprxy.dll
regsvr32.exe softpub.dll
regsvr32.exe wintrust.dll
regsvr32.exe dssenh.dll
regsvr32.exe rsaenh.dll
regsvr32.exe gpkcsp.dll
regsvr32.exe sccbase.dll
regsvr32.exe slbcsp.dll
regsvr32.exe cryptdlg.dll
regsvr32.exe oleaut32.dll
regsvr32.exe ole32.dll
regsvr32.exe shell32.dll
regsvr32.exe initpki.dll
regsvr32.exe wuapi.dll
regsvr32.exe wuaueng.dll
regsvr32.exe wuaueng1.dll
regsvr32.exe wucltui.dll
regsvr32.exe wups.dll
regsvr32.exe wups2.dll
regsvr32.exe wuweb.dll
regsvr32.exe qmgr.dll
regsvr32.exe qmgrprxy.dll
regsvr32.exe wucltux.dll
regsvr32.exe muweb.dll
regsvr32.exe wuwebv.dll
regsvr32.exe wudriver.dll
netsh winsock reset net start bits net start wuauserv net start appidsvc net start cryptsvc
That’s it! Once you are done resetting the WU components, the 0x8007065e Data of this type is not supported error should disappear for good. If it doesn’t, performing an in-place upgrade should do the trick.
And if you don’t want to take the manual route, we recommend using an effective PC repair tool that will automatically identify and eliminate issues with Windows.
Tell us which fix worked for you in the comments section below.
Ivan Jenic
Windows Hardware Expert
Passionate about all elements related to Windows and combined with his innate curiosity, Ivan has delved deep into understanding this operating system, with a specialization in drivers and driver troubleshooting.
When he’s not tackling diverse driver-related problems, Ivan enjoys watching good movies and spending time hiking with his family and friends.
In this guide, we will discuss the Windows Update Error 0x8007065e, its prime reasons, and probable solutions to fix this. This bug arises often due to a corrupt cumulative update (missing some core files). We have brought some remarkable solutions to fix “0x8007065E Data of this type is not supported” if you ever face such error messages.
Corrupt system files, Unusual settings of Windows components are some of the main culprits behind generating such errors. Perform Windows Troubleshooting, run sfc/scannow, rename the SoftwareDistribution folder may work to resolve this anomaly. Manually downloading and installing the recent KB patch update may also address this trouble.
If none of the workarounds fix this, try Resetting Updates components as the last resort-
- Run Windows Update Troubleshooter
- Manually install the latest cumulative update
- Rename SoftwareDistribution folder
- Perform System files scan
- Restore files health and performance
- Reset Windows Update components
Here are the probable solutions to fix the Update Error 0x8007065e on your Windows 10 PC-
1. Run Windows Update troubleshooter
Windows Update Troubleshooter is an auto diagnostic tool that can scan and address any Windows Update issues. Here are the steps to begin troubleshooting-
- At first, sign in as an administrator on your Windows 10 device.
- Next, go to the Settings app and select the Update & Security category.
- Here, select Troubleshoot from the left column followed by Windows Update on its corresponding right pane.
- Succeeding after hit Run the Troubleshooter to let the process begin.
- Lastly, follow the on-screen instructions. Once over, Reboot your PC and Update your system.
2. Manually install the latest cumulative update
Additionally, you can install the cumulative update manually as well on your system to fix errors that occur while downloading. To do this, you need to download the recent patch file by following these guidelines-
Step-1: Firstly, visit the Windows 10 update history page.
Step-2: When the web page opens up, search the recently released cumulative updates from the left pane.
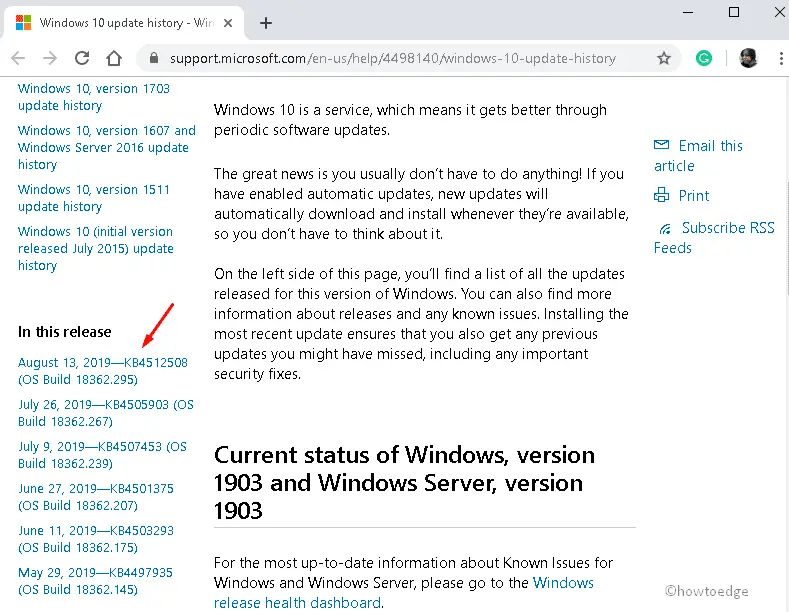
Step-3: After that copy, the KB (for instance – KB4512534) number then navigate to the Microsoft Update Catalog website.
Step-4: Here, paste the KB number (eg: KB4512534 ) in the search field then press Enter key.
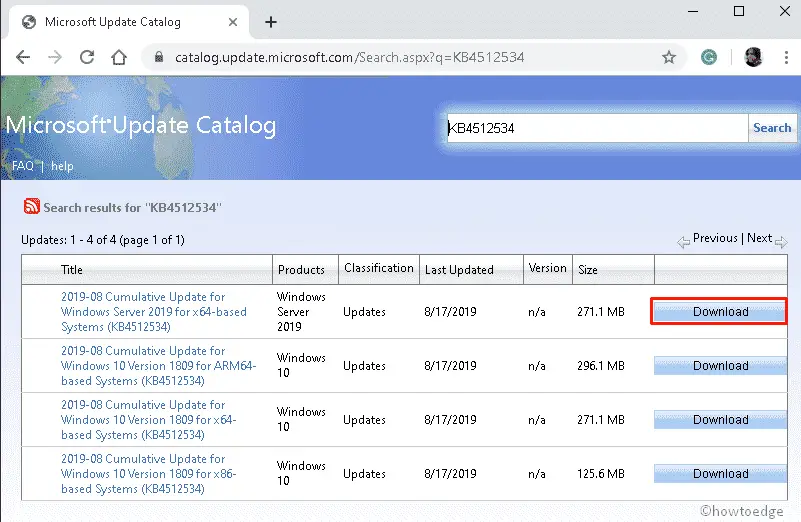
Step-5: Further, download the cumulative updates suitable for your system architect either 32 or 64 bit.
Note: If you don’t know your system architecture, go to Settings-> System-> About and see the device specification. See the Snapshot below –
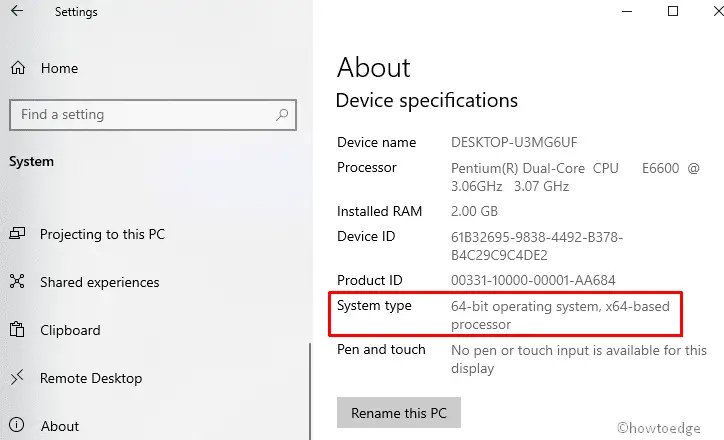
Step-7: After installing the updates, Restart your system and check whether the error gets resolved or not. If not, move to the next workaround-
3. Rename SoftwareDistribution folder
Sometimes SoftwareDistribution folder may also create a nuisance and halt the necessary update. Renaming this directory may address the Error 0x8007065e on your WIndows device. Let’s see how to proceed-
- Make a click on the Search icon and type Command Prompt.
- Next, right-click on the well-matching result and select Run as administrator.
- Click Yes on the User Account Control prompt to authenticate entrance.
- Near blinking cursor, execute the following codes one by one-
NET STOP WUAUSERV ( press Enter)
REN C:\WINDOWS\SoftwareDistribution SDOLD (press Enter)
NET START WUAUSERV ( press Enter)
- This may take several minutes to complete the task, so wait patiently. Once over, Restart your system.
- After re-login to the computer, navigate to the below path and see if there are any available patches-
Settings > Update & Security > Check for Updates

4. Perform System files scan
In case the Check for updates does not function due to error 0x8007065e, this might be due to the presence of corrupt system files. To get out of this situation, you need to repair these files using the SFC command.
- Press Win log and S altogether to launch the Search tab.
- Type Command Prompt in the void box there forth right-click on the same and choose Run as administrator.
- When the UAC window comes into the display, hit Yes.
- Henceforth, execute the sfc/scannow command on the next wizard. This will detect and repair any corrupt core files.
- Once the above task finishes, Restart your PC and download the latest cumulative updates without any interruption.
5. Restore files health and performance
Although the Windows files are the prime components that operate Windows 10 in a smooth manner. In case, any of these becomes obsolete may hamper its working performance. It is thereby recommended to Repair the Windows files using the DISM command. Just follow these simple steps-
- Jointly hold and release Win and R to launch Run dialog.
- Type cmd in the text area and press Ctrl+Shift+Enter to invoke Command Prompt (Admin).
- If UAC prompts, tap Yes in order to sanction administrative privileges.
- Thereupon, Run the following command line and hit the Enter key at the end.
DISM.exe /Online /Cleanup-image /Restorehealth
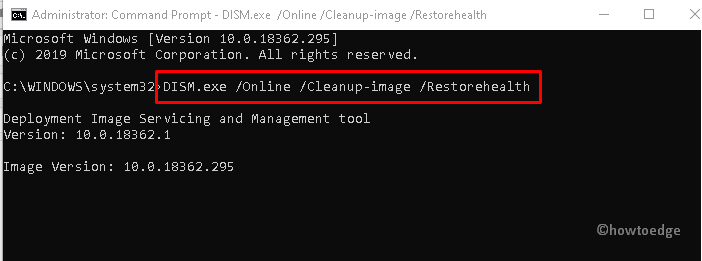
- This task will take approx 20 minutes to complete, so wait accordingly.
- Once finished, Restart your PC and update your Windows Machine.
6. Reset Windows Update components
If the Update Error 0x8007065e still persists on your PC, you should try executing these codes on the command prompt. Let’s explore the steps to reset the Windows Update components.
- At first, make a click on the Start button and type cmd.
- When the Command Prompt appears, right-click on it and choose Run as administrator.
- In case, UAC prompts, tap Yes.
- Succeeding that, copy/paste these command lines one by one and hit Enter separately –
net stop bits
net stop wuauserv
net stop appidsvc
net stop cryptsvc
The above command lines will stop the working performance of Background Intelligence Transfer, Windows Update, and Cryptographic Services.
- Afterward, execute these commands one after another to begin the resetting process-
Del "%ALLUSERSPROFILE%\Application Data\Microsoft\Network\Downloader\*.*"
rmdir %systemroot%\SoftwareDistribution /S /Q
rmdir %systemroot%\system32\catroot2 /S /Q
sc.exe sdset bits D:(A;;CCLCSWRPWPDTLOCRRC;;;SY)(A;;CCDCLCSWRPWPDTLOCRSDRCWDWO;;;BA)(A;;CCLCSWLOCRRC;;;AU)(A;;CCLCSWRPWPDTLOCRRC;;;PU)
sc.exe sdset wuauserv D:(A;;CCLCSWRPWPDTLOCRRC;;;SY)(A;;CCDCLCSWRPWPDTLOCRSDRCWDWO;;;BA)(A;;CCLCSWLOCRRC;;;AU)(A;;CCLCSWRPWPDTLOCRRC;;;PU)
- Repair all DLL files by running the codes below on the CMD –
cd /d %windir%\system32
regsvr32.exe /s atl.dll
regsvr32.exe /s urlmon.dll
regsvr32.exe /s mshtml.dll
regsvr32.exe /s shdocvw.dll
regsvr32.exe /s browseui.dll
regsvr32.exe /s jscript.dll
regsvr32.exe /s vbscript.dll
regsvr32.exe /s scrrun.dll
regsvr32.exe /s msxml.dll
regsvr32.exe /s msxml3.dll
regsvr32.exe /s msxml6.dll
regsvr32.exe /s actxprxy.dll
regsvr32.exe /s softpub.dll
regsvr32.exe /s wintrust.dll
regsvr32.exe /s dssenh.dll
regsvr32.exe /s rsaenh.dll
regsvr32.exe /s gpkcsp.dll
regsvr32.exe /s sccbase.dll
regsvr32.exe /s slbcsp.dll
regsvr32.exe /s cryptdlg.dll
regsvr32.exe /s oleaut32.dll
regsvr32.exe /s ole32.dll
regsvr32.exe /s shell32.dll
regsvr32.exe /s initpki.dll
regsvr32.exe /s wuapi.dll
regsvr32.exe /s wuaueng.dll
regsvr32.exe /s wuaueng1.dll
regsvr32.exe /s wucltui.dll
regsvr32.exe /s wups.dll
regsvr32.exe /s wups2.dll
regsvr32.exe /s wuweb.dll
regsvr32.exe /s qmgr.dll
regsvr32.exe /s qmgrprxy.dll
regsvr32.exe /s wucltux.dll
regsvr32.exe /s muweb.dll
regsvr32.exe /s wuwebv.dll
netsh winsock reset
netsh winsock reset proxy
Once you have executed the above codes, restart the services that you have stopped earlier using these command lines-
net start bits
net start wuauserv
net start appidsvc
net start cryptsvc
After executing all the codes successfully, Reboot your system and Update your computer without getting Update error 0x8007065e.
Updated May 2025: Stop error messages and fix your computer problem with this tool. Get it now at this link
- Download and install the software.
- It will scan your computer for problems.
- The tool will then fix the issues that were found.
Today this blog discusses Windows Update error 0x8007065e, its root causes, and possible solutions to fix it. Often this error occurs due to a corrupted cumulative update (which is missing some kernel files). We have provided some notable solutions to resolve the “0x8007065E data type not supported” issue when these error messages occur.
Corrupted system files and unusual settings of Windows components are some of the main causes of these errors. Run Windows troubleshooter, run sfc / scannow and rename the SoftwareDistribution folder to fix this anomaly. Manually downloading and installing the latest KB update can also fix this issue. If none of the workarounds fixes this problem, as a last resort, try rolling back components from updates.
Run Windows Update Troubleshooter
This automatic diagnostic tool checks for update issues on your PC and fixes them for you. Make sure you are logged in as administrator to run the tool.
- Click the Start button and select Settings> Update & Security> Troubleshoot.
- Select Windows Windows from the Start menu.
- Click Troubleshoot.
- Follow the instructions on the screen
Fix damaged Windows system files
- Click the Start button and enter Command Prompt.
- Right click on Command Prompt and select “Run as administrator”.
- When prompted, click Yes or enter the administrator password.
- Type DISM.exe / Online / Cleanup-image / Restorehealth and press Enter.
- Note the space before each “/”
This step can take from a few minutes to 30 minutes.
- Type sfc / scannow and press Enter.
- Note the space between “sfc” and “/”
- Wait for the process to complete.
Retry failed updates
Please try again to run failed updates first. This can help Windows find the missing file and fix error 0x8007065E of this type is not supported. Therefore, follow these steps to rerun failed updates:
Updated: May 2025
We highly recommend that you use this tool for your error. Furthermore, this tool detects and removes common computer errors, protects you from loss of files, malware, and hardware failures, and optimizes your device for maximum performance. This software will help you fix your PC problems and prevent others from happening again:
- Step 1 : Install PC Repair & Optimizer Tool (Windows 11, 10, 8, 7, XP, Vista).
- Step 2 : Click Start Scan to find out what issues are causing PC problems.
- Step 3 : Click on Repair All to correct all issues.
- From the Start menu, select Control Panel, then Windows Update.
- Then click Show update history.
- If the updates fail, you can try downloading the files again.
- Then manually install the failed updates.
Rename the SoftwareDistribution folder
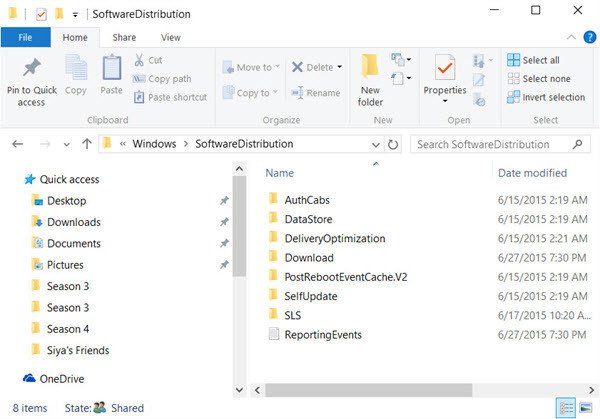
In addition, corrupted installation files are stored in the Software Distribution folder.
Another way to avoid error 0x8007065E. This data type will not be supported by renaming the SoftwareDistribution folder and trying to download and install Windows updates again.
This will allow Windows to recreate the folder and the problem will be resolved. Here are the steps to rename the software distribution folder:
- Press the Windows key and enter command prompt or cmd.
- Right click on Command Prompt and select Run as Administrator.
- Type NET STOP WUAUSERV and press Enter.
- Also type REN C: WINDOWSSoftwareDistribution SDOLD and press Enter.
- When you’re done, type NET START WUAUSERV and press Enter.
- Reboot your computer after 10 minutes.
- After restarting the system, wait another 10 minutes. Now go to Windows Updates and check for updates. Select the oldest update and install it.
Following these steps will allow Windows to create a new SoftwareDistribution folder again, which will fix the corruption issue. Hence, this will fix error 0x8007065E Unsupported data of this type.
RECOMMENATION: Click here for help with Windows errors.