
Do you find Error 0x800704B3 in Windows 10 or 11 while getting Windows update or connecting to the network? When this issue occurs you become unable to get updates and establish a connection to access internet.
We are providing a few trustworthy ways to fix this Windows update problem or network issue in the following part.
Error 0x800704B3 Windows 11 and 10 Solutions
Solution-1: Uninstall 3rd party antivirus or utility
Recall your mind if the problem started after installation of a 3rd party utility like Antivirus, VPN app, Firewall, or other. After you identify the real culprit remove it from your system. Else uninstall the tools one by one checking the cause of Windows update error code r0x800704B3.
For Windows 10 –
- Open Windows Settings program by pressing Win and I keys.
- Select Apps.
- Go to the right side of the application and locate the software you need to remove.
- Click on its icon and choose Uninstall on the expanded pane. Follow the on-screen instructions until the end.
- You can take help of Revo uninstaller or the remover software offered by the manufacturer. Reboot the computer and start a fresh check for updates.
For Windows 11 –
- Click the Search.
- Type – apps & features.
- Locate the app that causes the error.
- Next, click 3 dots and choose – Uninstall.
- Again click ‘Uninstall.’
Solution-2: Create A new user account
Corrupt user account might cause to display error code 0x800704B3. Most security issues arise in this situation preventing the Windows update file to download and install. So we suggest creating a new user account and test if the problem still occurs. In case, the issue is gone delete the old malfunctioning account and restart the system.
For Windows 10 –
- Launch Windows Settings app and select Accounts.
- Click on Sign in with a Local account instead in the right side and type your password if it already exists.
For Windows 11 –
- Open Settings (Win+I).
- Select – Accounts.
- Click – Your info.
- Choose – Sign in with a local account instead.
- Follow the instructions coming out on the screen.
Solution-3: Check for the Broken Windows System files
Error 0x800704B3 may occur due to the damaged system file. SFC is an important tool in this kind of circumstances that can trace out and fix the mess up.
- Press Win+R, type cmd and hit Ctrl+Shift+Enter.
- Select Yes when User Account control pop up locks the display.
- Type SFC/ SCANNOW on the black window and then gently strike on Enter Key.
- Let the scan complete as it will take few minutes.
- Reboot your PC and check if the error no longer exists.
Solution-4: Change Services Status
The error 0x800704B3 Windows 11 or 10 causes no network access then it is a good idea change the status of the service TCP/IP NetBIOS Helper. Some bugs or tools stop support for the NetBIOS over TCP/IP (NetBT) service and NetBIOS name resolution. As a result, you fail to establish the network connection.
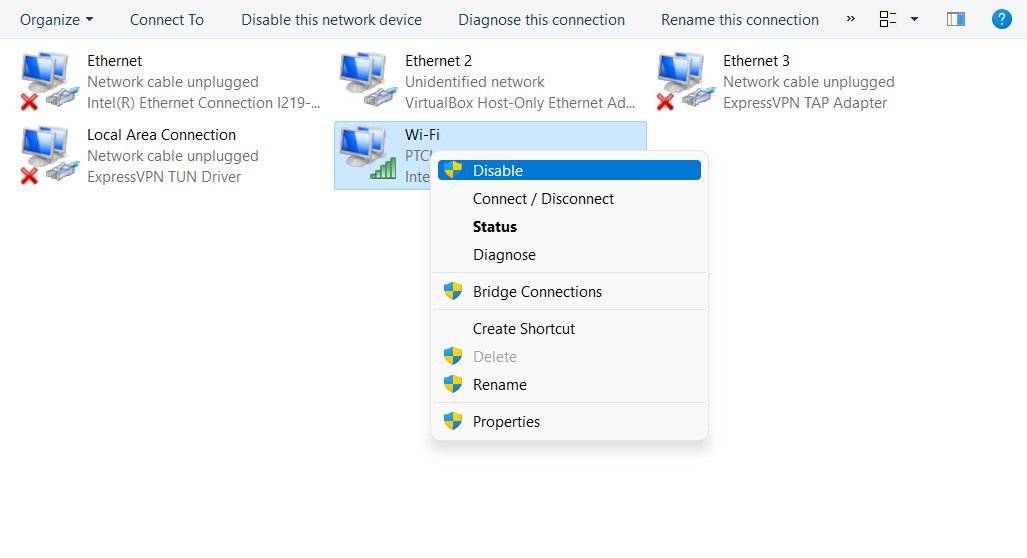
- Right-click on the Start button and select Computer Management from the list of options.
- Once the console appears, double click on Services and applications in the left pane. Now select Services.
- Click on TCP/IP NetBIOS Helper and press Start on the Properties wizard.
- Sometimes TCP/IP NetBIOS Helper may fail to start showing the error – The system could not find the specified path. In this situation,
- Press Windows logo key, type regedit.exe, and then hit Enter.
- Once the Registry editor comes out, copy
- “HKEY_LOCAL_MACHINE\SYSTEM\CurrentControlSet\services\lmhosts”
- paste into the address bar and press the Enter key.
- Go to the right pane, do a right-click on the Value Start and select Modify.
- Enter 2 under the Value data field and choose OK.
- Check if the Error 0x800704B3 Windows 11 or 10 gets fixed after a restart.
Solution-5: Check SMB protocols
Few users tell that when they disable SMB Protocols the error settles down.
- Open Elevated command prompt, copy the below piece of command
- sc.exe config lanmanworkstation depend= bowser/mrxsmb10/nsi
sc.exe config mrxsmb20 start= disabled - paste, and then press Enter.
Solution-6: See if Homegroup is creating the issue
On some user’s system, error 0x800704B3 Windows 11 or 10 occurs due to a problem with Homegroup. However, many of them get success after disabling all built-in security tools like Firewall, Windows Defender, etc. So you can follow this way if you are a homegroup user.
Follow the list and navigate to the solutions –
Solution-1: Uninstall 3rd party antivirus or utility
Solution-2: Create A new user account
Solution-3: Check for the Broken Windows System files
Solution-4: Change Services Status
Solution-5: Check SMB protocols
Solution-6: See if Homegroup is creating the issue
That’s all!!
When the 0x800704b3 error occurs in Windows, you are unable to connect to any network, cannot access the C drive, and some applications won’t open either. It can be very frustrating as more often than not, you’ll need to access the internet on your PC or laptop.
If your network services are disabled in the background, you will be getting this error on your system. It’s obvious that if these services are turned off, the computer won’t connect to the internet, and hence the network error would show up.
So, in order to start the network services again, you can either use the Task Manager or the Command Prompt.
We’ll explain all of the solutions for the Windows 0x800704b3 error below, and you can go through each one of them to try them out.
1. Run Windows Network Adapter Troubleshooter
This is the most basic way to counter a network issue. Since the error we are facing here has to do with the network, running the built-in Network Adapter troubleshooter can help fix it.
Follow the steps below to run the troubleshooter.
- Press Win + R keys together to open run and inside the text field enter this command to run troubleshooter:
msdt.exe /id NetworkDiagnosticsNetworkAdapter
Network Adapter command in Run
- Click on Next to start the scan.

Network Adapter screen
- Wait for the troubleshooter to inspect and fix the issues.
- Once done, see if you can connect to your network now.
2. Run SFC and DISM Scans
The SFC and DISM scans will help in identifying and removing corrupt system files from your computer. Besides, it will also look for integrity violations and try to repair them as well. On top of that, if the problem is with your Windows image, these commands will fix it too. This process needs to be executed in Safe Mode. You can follow our guide about booting into safe mode for both Windows 10 and Windows 11 before performing the steps below.
Once done, then here’s how to run the SFC and DISM scans.
- Press the Windows key now and type cmd.
- Run the command prompt as administrator.
- Type in the following commands in order one by one:
sfc /scannow
DISM /Online /Cleanup-Image /CheckHealth
DISM /Online /Cleanup-Image /ScanHealth
DISM /Online /Cleanup-Image /RestoreHealth
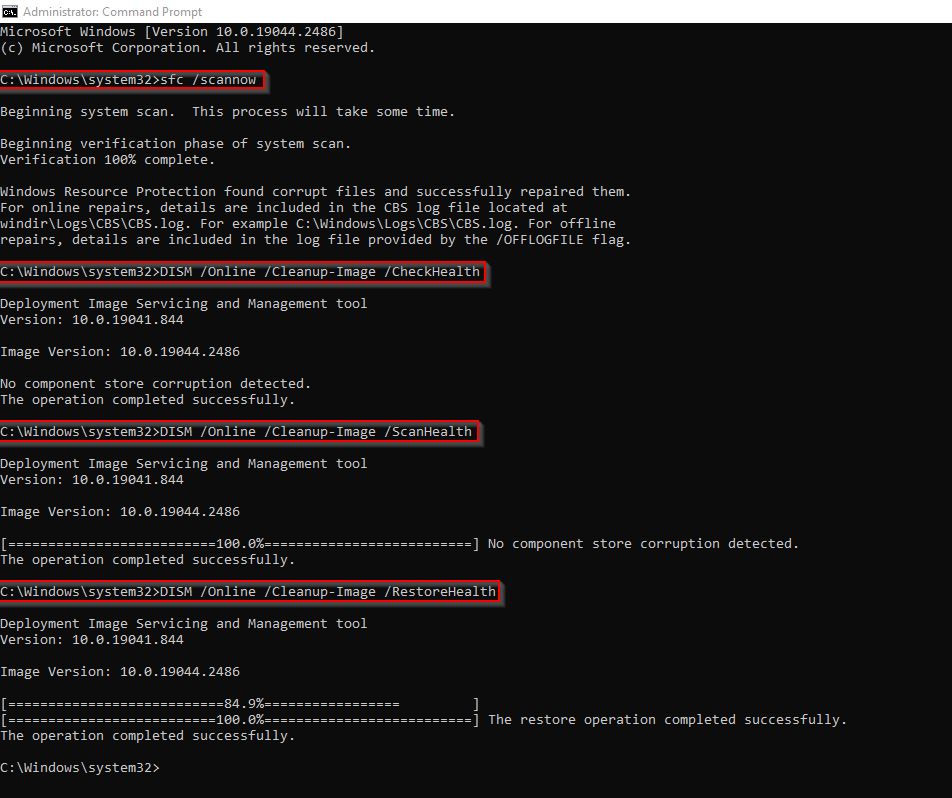
After the process is done, restart your PC to boot into normal mode and see if the error is gone or not.
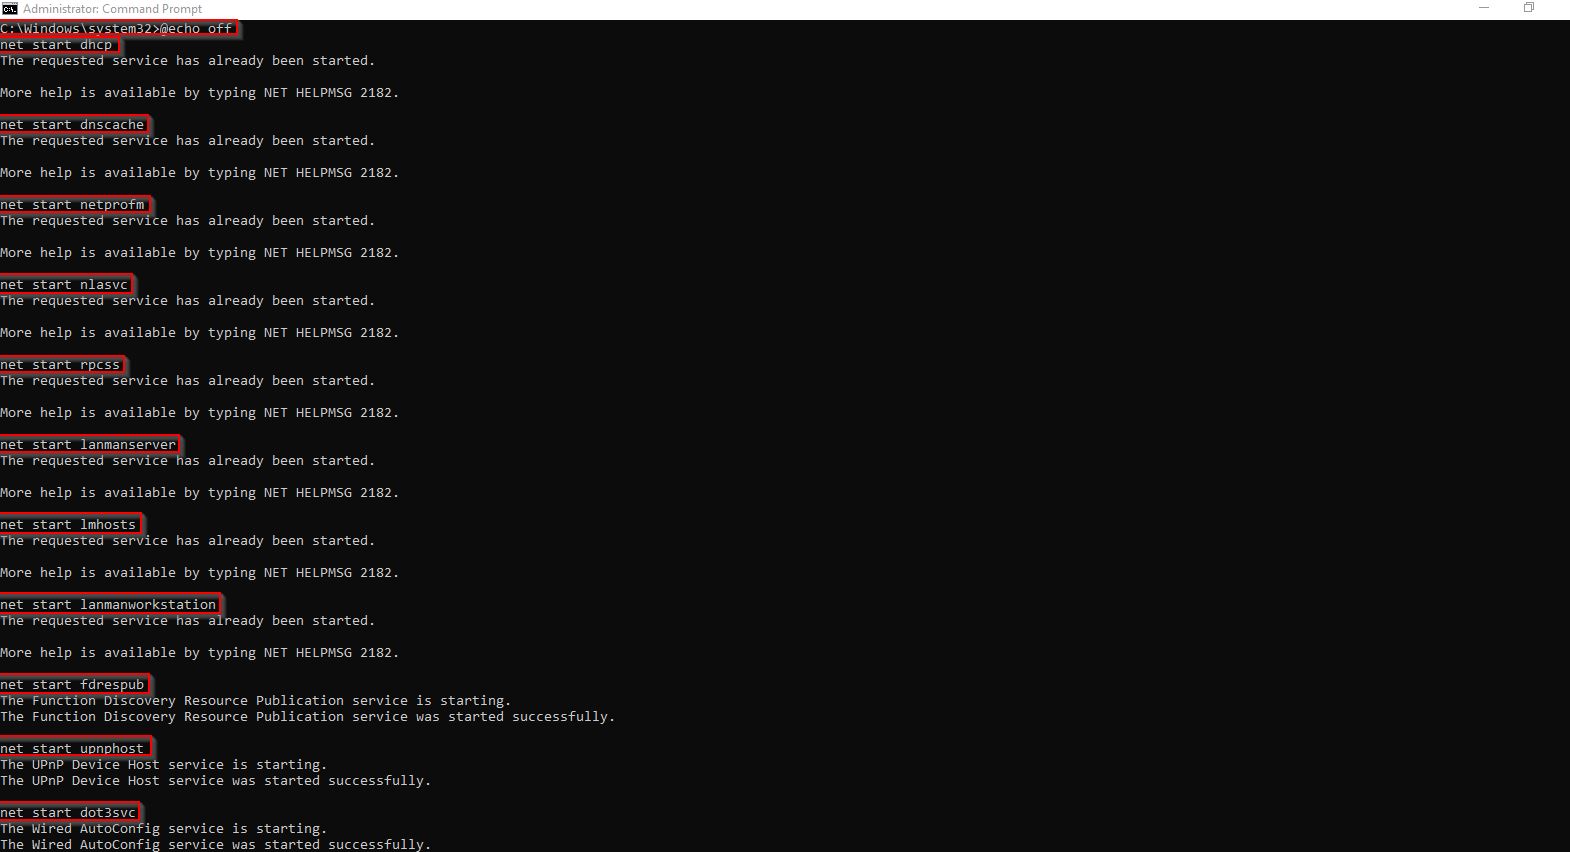
3. Change the Status of Network Services to Running
It’s pretty clear that you won’t be able to connect to the internet if some of your network services are stopped in the background. As a result, Windows will display the 0x800704b3 error. Therefore, running the network dependencies in the background through the Task Manager is recommended.
Here’s how to do it:
- Press the Windows key and type cmd in the search bar
- Open the Command Prompt as administrator.
- Now run the following commands one by one and connect to your network again:
net start dhcp
net start dnscache
net start netprofm
net start nlasvc
net start rpcss
net start lanmanserver
net start lmhosts
net start lanmanworkstation
net start fdrespub
net start upnphost
net start dot3svc
net start wlansvc
net start eventsystem
net start browser
net start wzcsvc
4. Start the TCP/IP NetBIOS Helper
This service allows users to print, share files, and log on to their network. In the event that this service is not running or the value data is wrongly entered, the NetBIOS Helper won’t run, and the user won’t be able to connect to the network. First, try to start the TCP/IP NetBIOS Helper service. If that shows an error, then move on to change its value data to 2.
Here’s how to carry out the whole process.
- Select Computer Management after right-clicking on the Start button.
Computer Management option in Windows 10 - Expand the Services and Applications tab and click on Services.
- Now scroll down and right-click on TCP/IP NetBIOS Helper and select Start.

Computer Management Window - You can encounter an error that says “The system could not find the specified path” while starting the service. If so, press the Windows key and open the command prompt as administrator.
- Now run the following command to change the value data in lmhosts to 2:
reg add "HKEY_LOCAL_MACHINE\SYSTEM\CurrentControlSet\services\lmhosts" /v "start" /t REG_DWORD /d 2 /f

Value data changing command

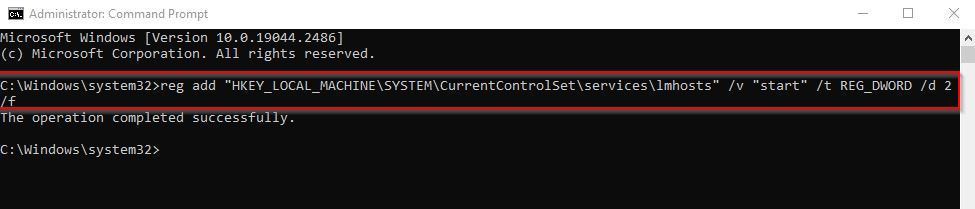
- Check whether Windows is still showing the error or not after restarting your PC.
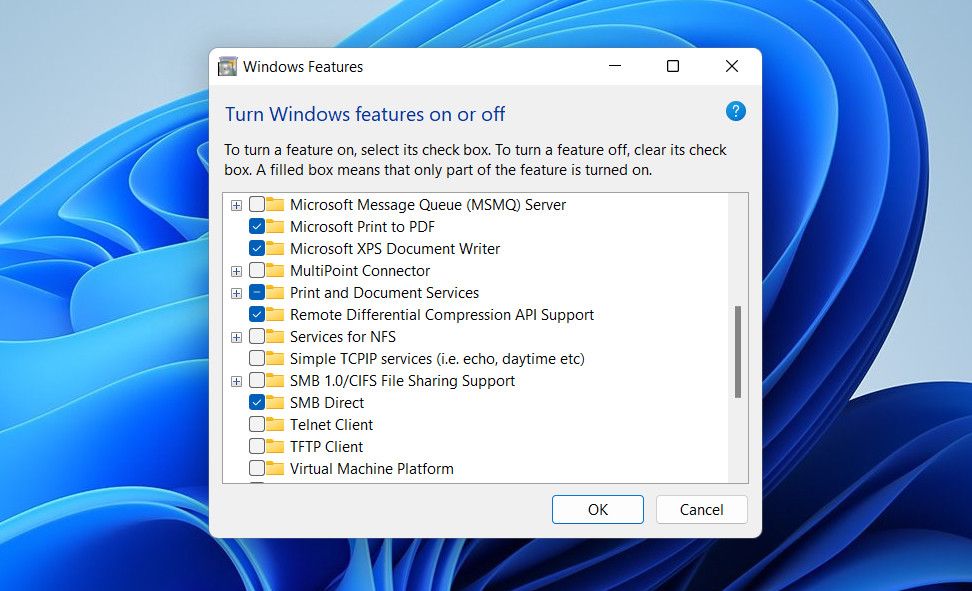
5. Disable SMB 1.0 Protocol
SMB is a network file-sharing protocol whose main purpose is to share access to different resources (files, printers, communication) over a network. There are three versions (SMB 1.0, 2.0, and 3.0) of the Server Message Block at the moment.
Version 1.0 is disabled by default. Therefore, if you have enabled it by mistake, your system will fail to connect to the network, and hence the 0x800704b3 error will show up in Windows.
But no worries, just follow the steps below and disable SMB Version 1.
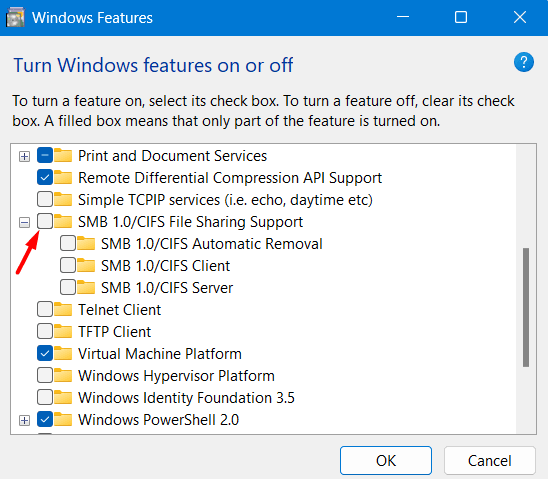
- Click on the Start button and type Windows Features in the search bar.
- On the subsequent window, look for SMB 1.0 and uncheck the option.

Uncheck SMB 1.0
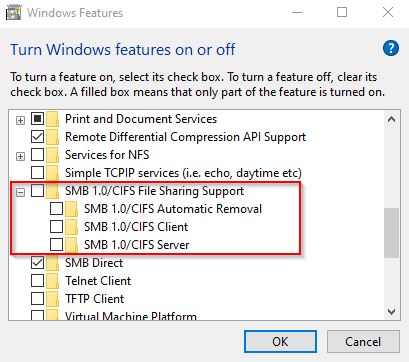
- Click OK and restart your PC.
- Now check if you can connect to the network.
6. Create a New User Account
Sometimes the problem can be with the account you are using. It could be due to corrupted system files, viruses, or malware. You can create a new admin user account and see if the issue gets fixed or not.
- Enter the following commands after running the command prompt as administrator:
net user "account name" /add
net localgroup administrators "account name" /add
- Enter the name you prefer in place of “account name“
- Now see if the same error occurs in the new account or not.
If the error is gone, follow our guide to transferring all your data to the new account.
7. Perform an In-Place Windows Repair
This method will reinstall Windows without disturbing any files or applications on your computer. Moreover, if there are any corrupt or damaged system files, they will be repaired.
Make sure you use an admin account for the repair and only keep the mouse, keyboard, and LAN cable plugged in. Unplug the rest of the peripherals. Additionally, uninstall any third-party anti-virus software.
Now here’s how to carry out the process.
- Download the Media Creation Tool from the Microsoft website.
- Click on Run.
- Click Yes on the UAC window.
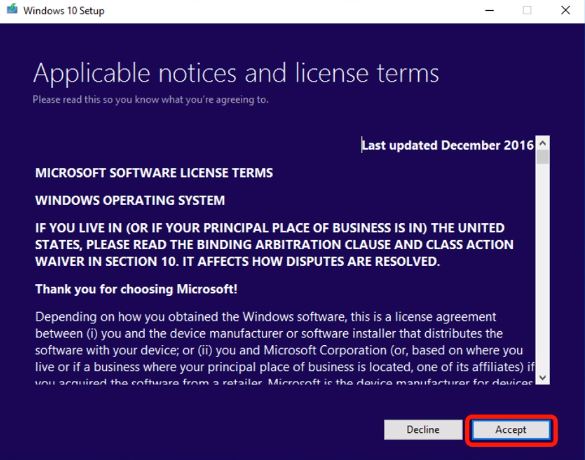
- Once the Media Creation Tool downloads, you will see the Windows 10 setup.
- Accept the license terms.

License terms screen
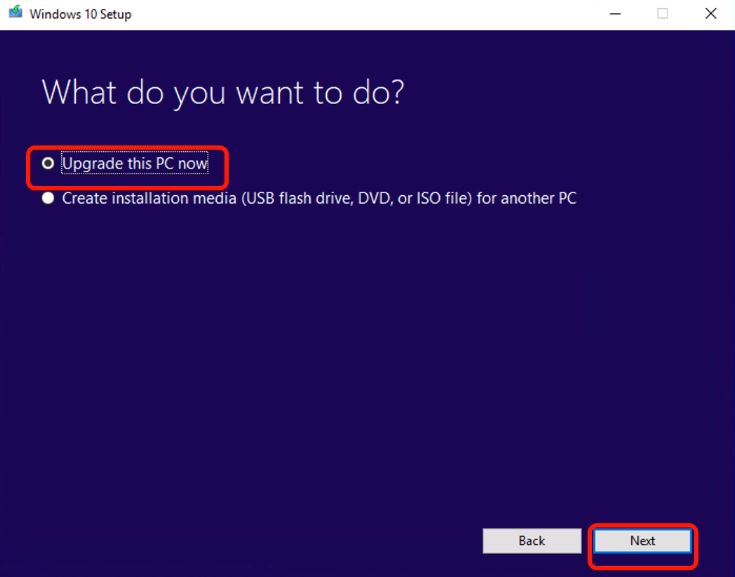
- Select Upgrade this PC Now in the proceeding window and click Next.

Upgrade this PC now screen
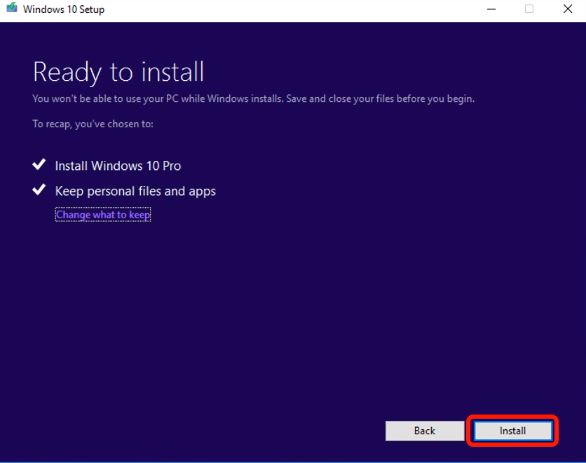
- Now click Install on the Ready to Install screen.

Ready to install screen
- Your PC will restart multiple times during the installation process.
- Once done, sign in with your admin account.
- Click Accept after selecting the Privacy Settings.
- Decline or Use Cortana on the next screen.
- Now the home screen of your system will show up and you can successfully sign in.
- After signing in, check if the error has been countered or not.
8. Custom Install Windows
If none of the processes above work, try to reinstall Windows via an ISO file to get rid of the 0x800704b3 error. Don’t worry, you won’t lose any of your data. After Windows gets installed, you can recover the files from the Windows.old folder.
Here’s how to custom-install the latest version of Windows.
- Use your Windows Installation Media (USB or Disc) to start the setup.
- Move to the next screen after pressing Enter or any other key.
- Wait until the Windows logo is showing up.
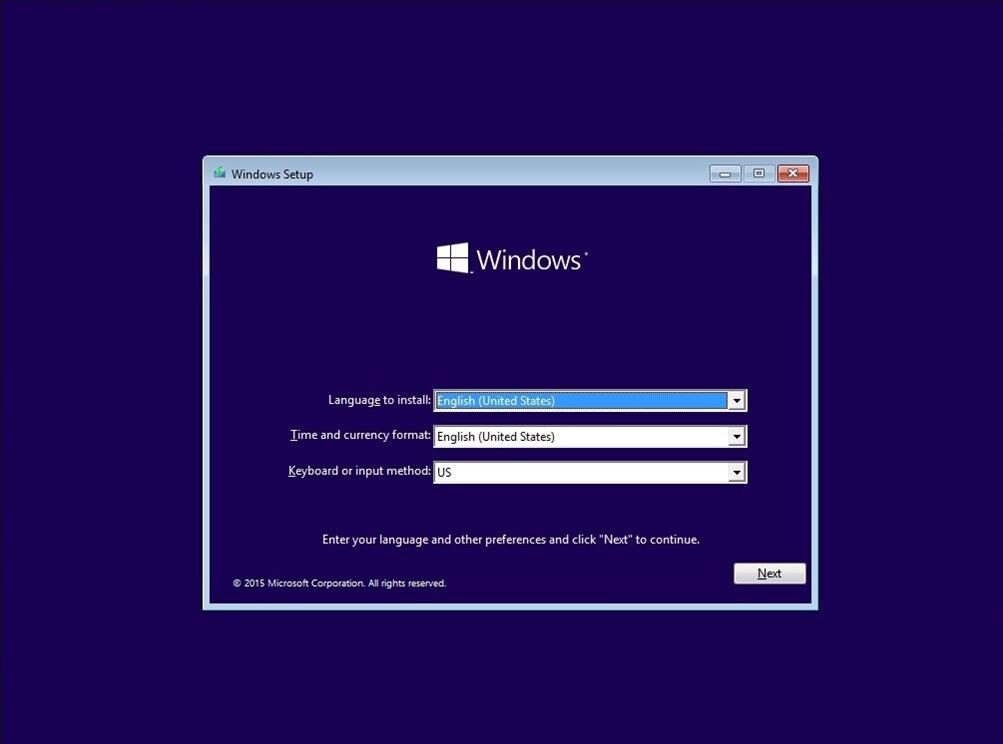
- Afterward, select your preferred language, time, and input method.

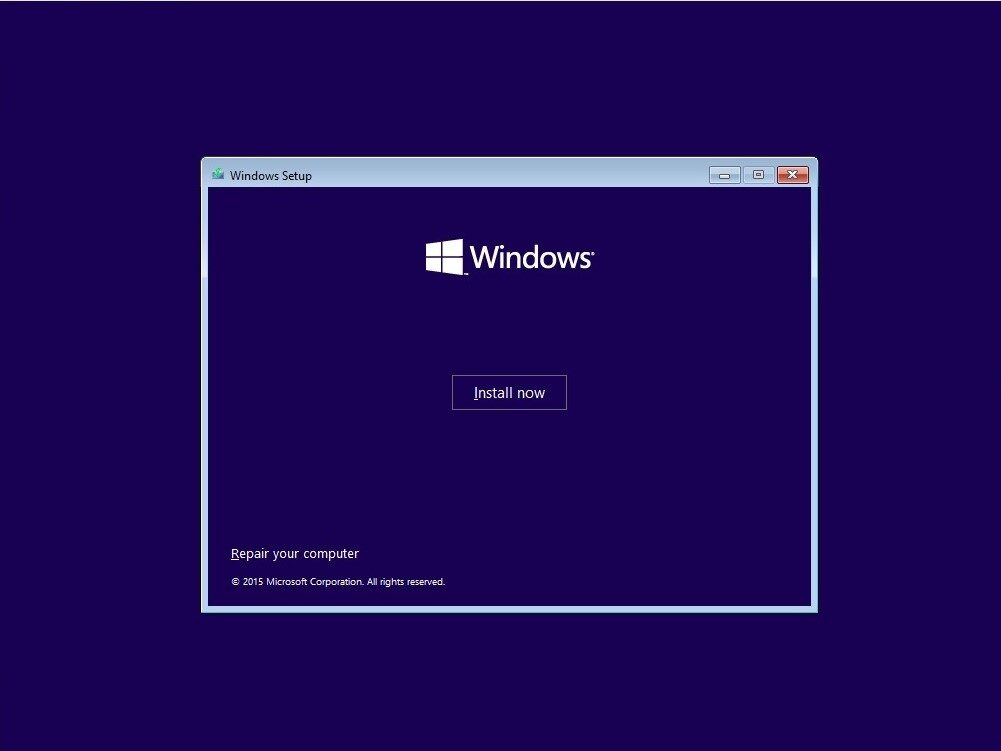
Windows setup language, time, and input method screen - Click on Install Now.

Install Now screen - Click Next on the license prompt.
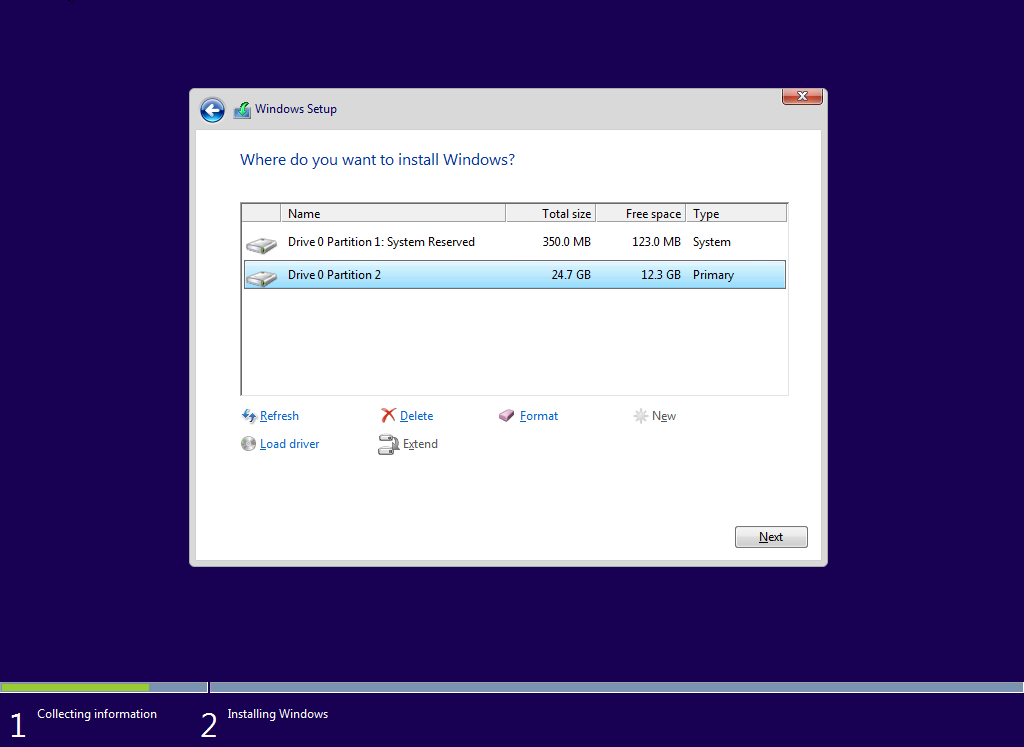
- Now click Custom and then choose the Primary partition.

Primary Partition screen - Click Next and then click OK on the warning prompt.
- Wait for the installation.
- After this, Windows will restart automatically and again reboot into setup.
- After Windows restarts for the last time, you can customize the settings.
- Windows will now look for an active network connection and if the issue has been resolved, it will connect to the network.
You may be struggling with the annoying error code 0x800704b3 in Windows 10/11. What causes this error? How can you get rid of the trouble? Take it easy and MiniTool helps analyze the reasons behind it, as well as several effective solutions to help you out.
0x800704b3 Windows 11/10
Network error code 0x800704b3 often crops up on Windows 10 or Windows 11 PCs, making you very frustrated. This common error indicates a network connection failure, which blocks you from connecting to the Internet or accessing network resources including shared files, printers, etc.
On the screen, the popped-up error message states “The network path was either typed incorrectly, does not exist, or the network provider is not currently available”. Why does the error happen on your computer? Corrupted system files, enabled SMB 1.0 protocol, not running network-related services, a conflict from an antivirus tool, etc. may give rise to the network error 0x800704b3.
Thankfully, a bunch of solutions below can easily help you out, and let’s walk them through.
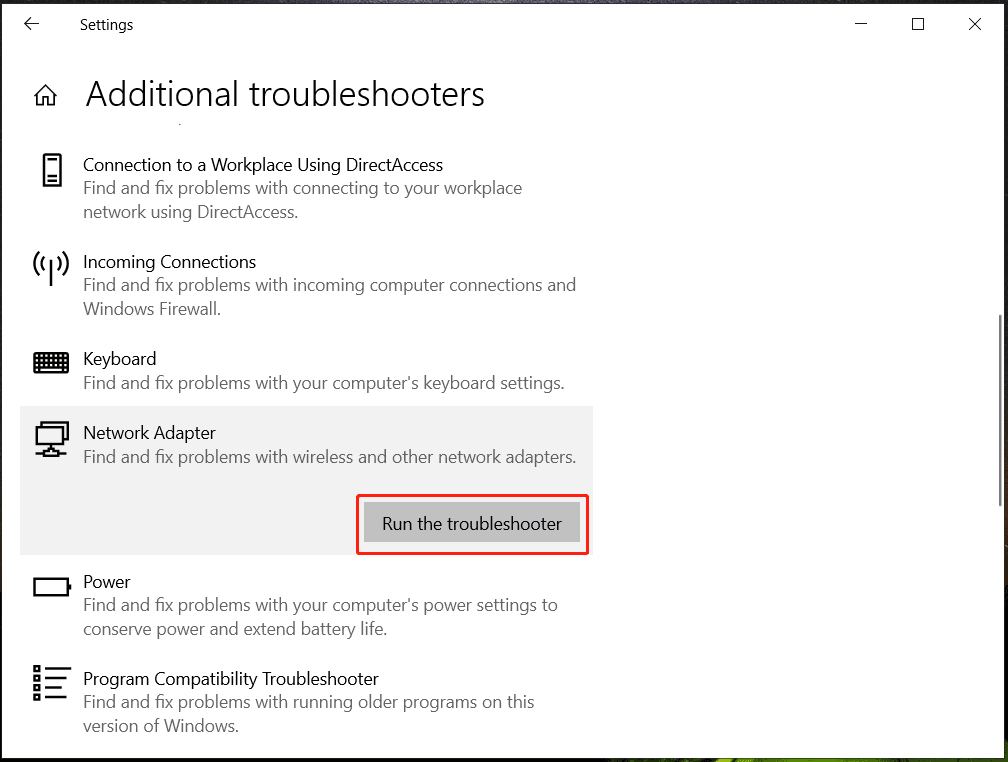
Fix 1. Run Network Troubleshooter
When confronted with network error code 0x800704b3, first of all, running the network troubleshooter will be wise. With this handy tool built into Windows 11/10, you can detect some common issues and fix them.
Step 1: Open Settings using Win + I on your keyboard.
Step 2: Go to Troubleshoot > Update & Security > Additional troubleshooters in Windows 10. Or go to System > Troubleshoot > Other troubleshooters on Windows 11.
Step 3: Locate Network Adapter and click the Run or Run the troubleshooter button to begin the troubleshooting process.
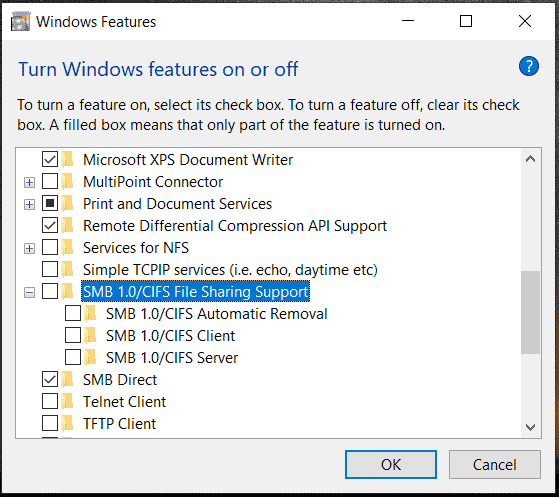
Fix 2. Disable SMB Protocol 1.0
SMB, short for Server Message Block, refers to a protocol that allows you to share files, printers, and other resources on a network. If the old version, SMB 1.0, is enabled on your PC, some network issues like error code 0x800704b3 may arise. Just go to check and disable this protocol.
Step 1: Type Windows features into the search box and hit Turn Windows features on or off.
Step 2: In the subsequent window, find SMB 1.0/CIFS File Sharing Support, untick this option and the boxes associated with it.
Step 3: Hit OK to save the change and restart your PC.
Fix 3. Enable Network Services
On Windows 11/10, there are many services responsible for proper network connectivity but incorrect settings of these services may result in network error code 0x800704b.
Step 1: Type services into the search box and hit Enter to open Services.
Step 2: Find the DHCP Client service, double-click on it, and hit Start if it isn’t running. Or tap Stop and then Start. Also, set the Startup type to Automatic.
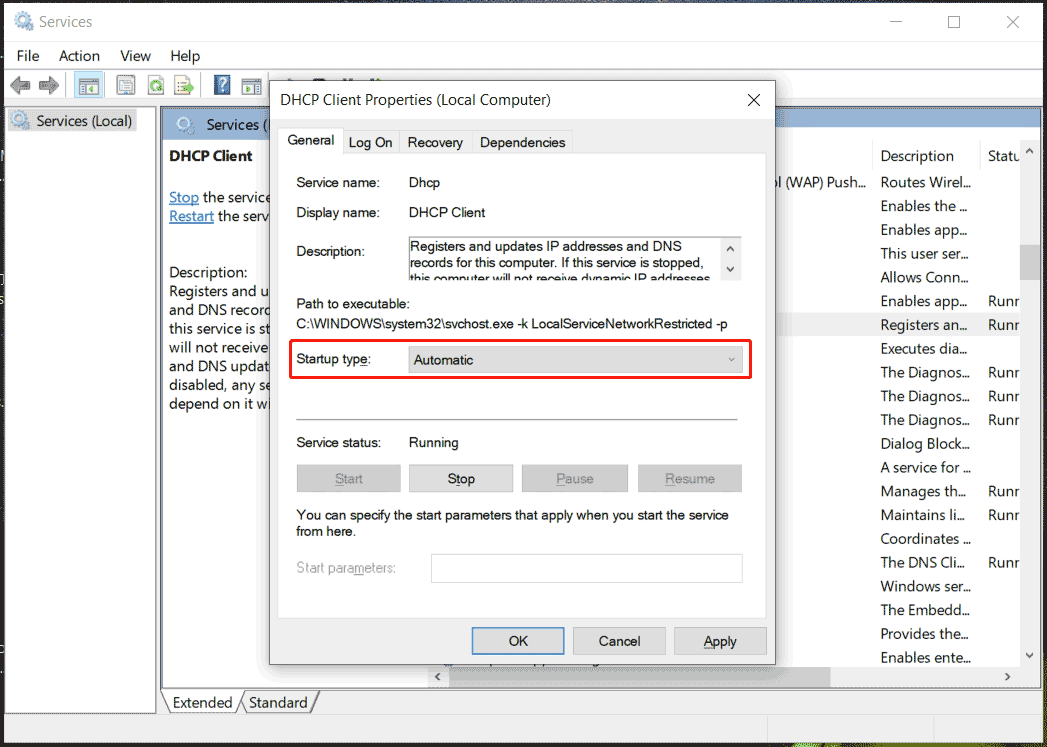
Step 3: Do the same thing for the following services:
- DNS Client
- Network Connections
- Network Location Awareness
- Network List Service
- TCP/IP NetBIOS Helper
- WLAN AutoConfig (when using Wi-Fi)
Later, check if Windows 11/10 0x800704b3 has been solved. If not, continue troubleshooting it.
Fix 4. Fix Windows System Files
Corruption in Windows system files sometimes may be the culprit behind your network error. When confronted with error code 0x800704b3, run SFC or DISM.
Step 1: Open Command Prompt with admin rights by typing cmd into the search box and clicking Run as administrator on the right side.
Step 2: Execute this command – sfc /scannow. Don’t forget to hit Enter.
Step 3: Run DISM /Online /Cleanup-Image /RestoreHealth.
Fix 5: Uninstall Antivirus Software
Recall your mind if Windows 10/11 network error code 0x800704b3 appears after installing a third-party program like antivirus software, VPN app, firewall, etc. Then, remove it from your PC.
Step 1: Open Control Panel via the search box.
Step 2: Tap on Uninstall a program under Programs.
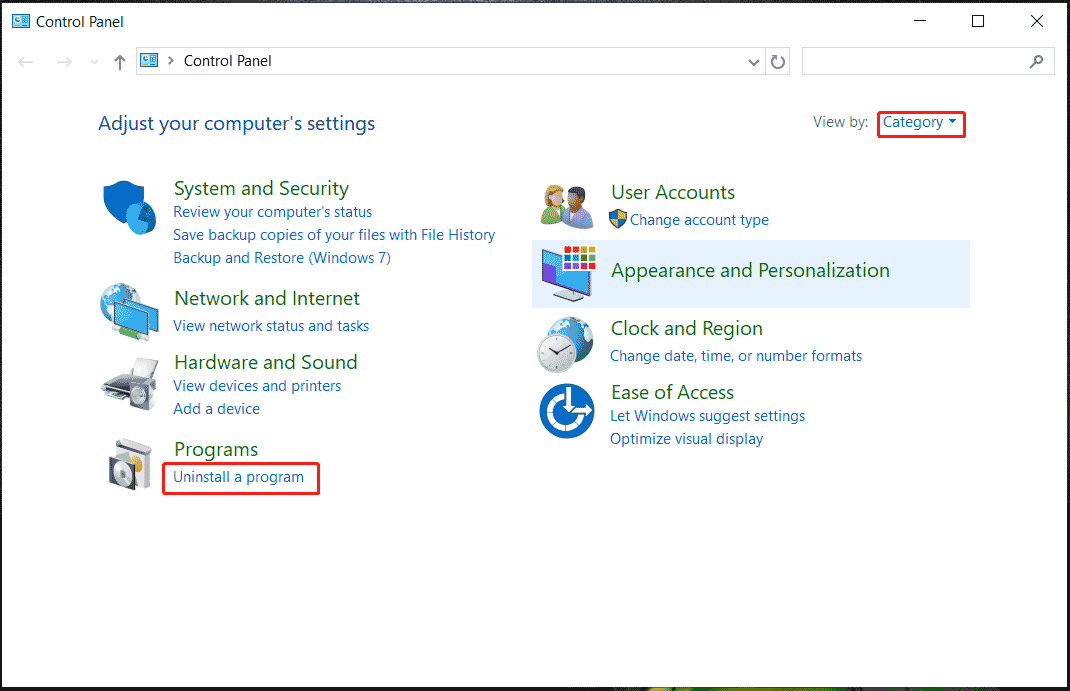
Step 3: Locate the one that may cause the network error and uninstall it.
Fix 6. Create a New User Account
A corrupt user profile may be responsible for Windows 11/10 network error 0x800704b3 and we suggest creating a new user account to see if it solves the issue. For details, refer to this guide – How to Add or Remove a User/Microsoft Account on Windows 11.
Bottom Line
Network issues can be annoying, especially when you urgently need it for browsing. Hopefully, multiple fixes are mentioned in this post to get you rid of the network error code 0x800704b3.
In case you fail to address it, the last one you can resort to will be reinstalling the Windows 11/10 system. Before the reinstallation, make sure you back up your important files using MiniTool ShadowMaker, brilliant PC backup software.
MiniTool ShadowMaker TrialClick to Download100%Clean & Safe
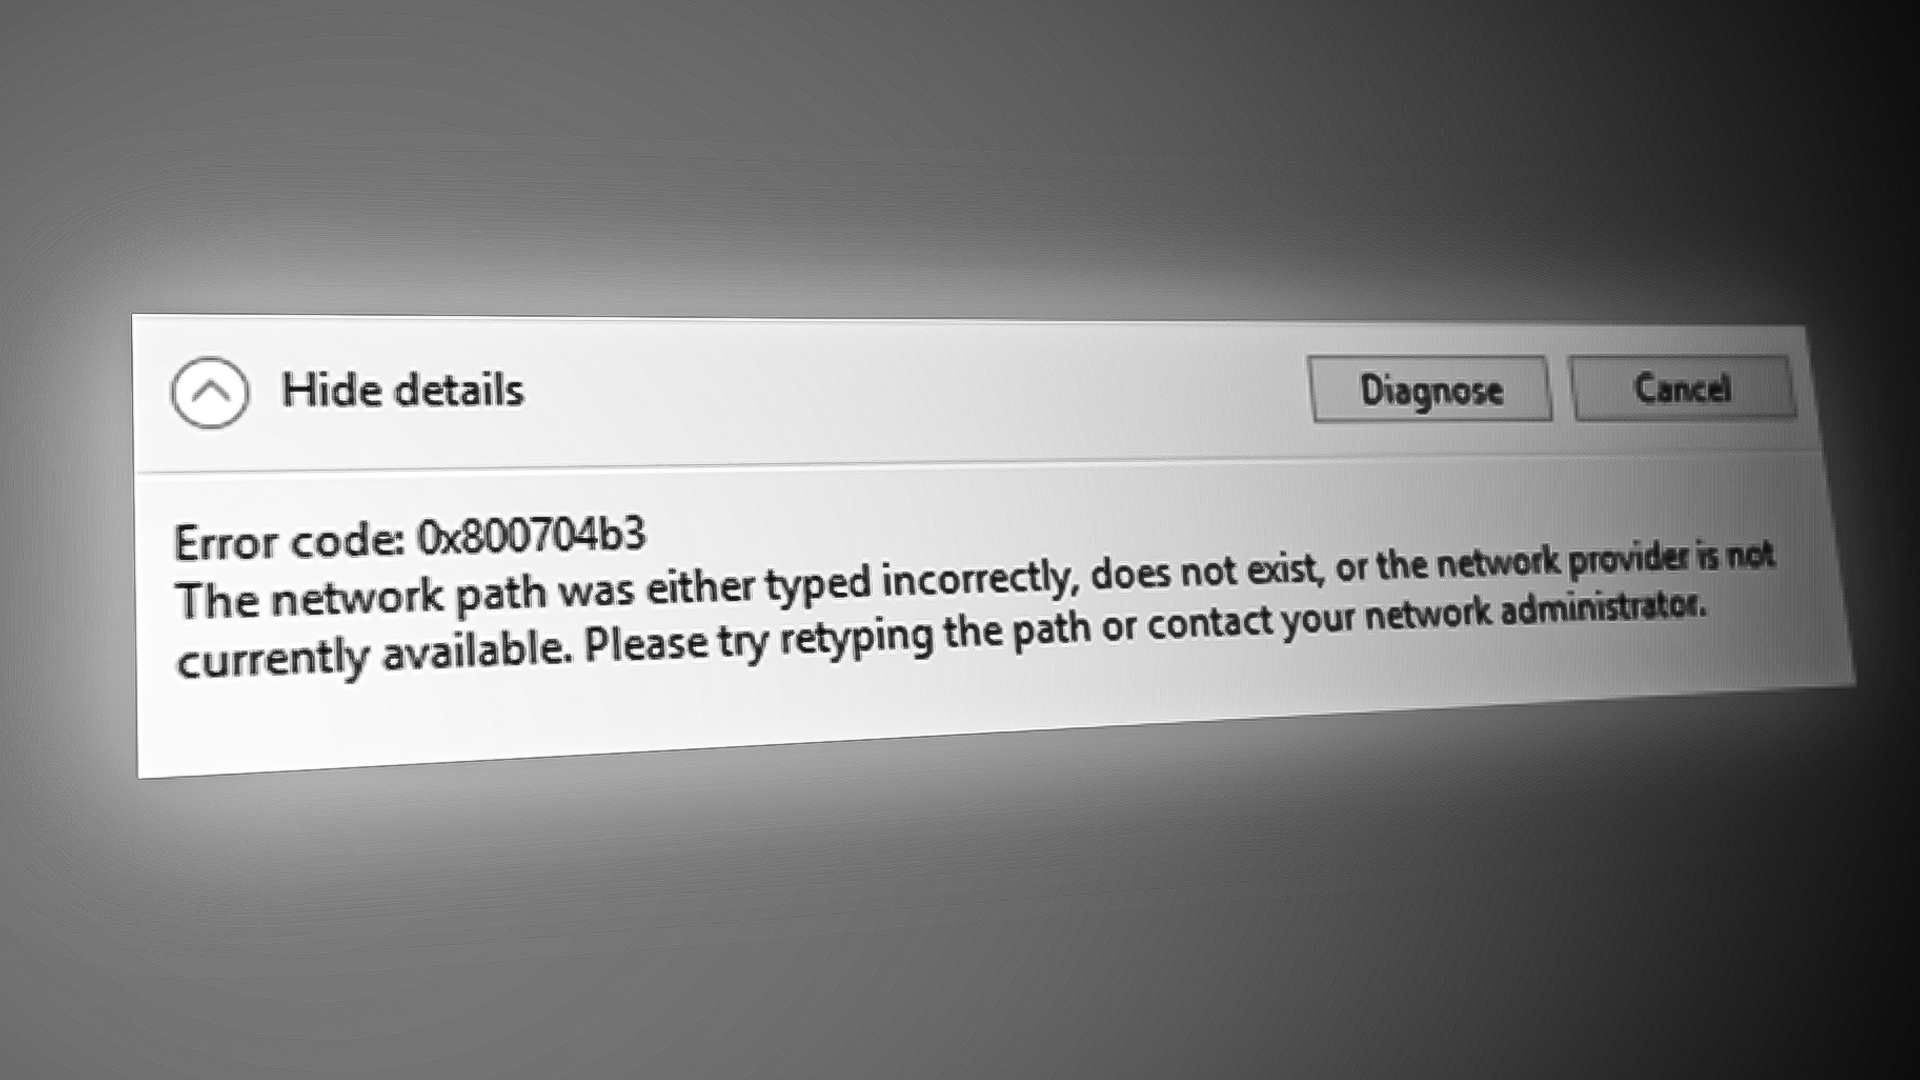
The network error 0x800704b3 occurs when you attempt to connect to the internet or a network resource. This code is also associated with a message that states «The network path was either typed incorrectly, does not exist, or the network provider is not currently available. Please try retyping the path or contact your network administrator.»
Below, we discuss the different solutions that you can try to fix this problem for good.
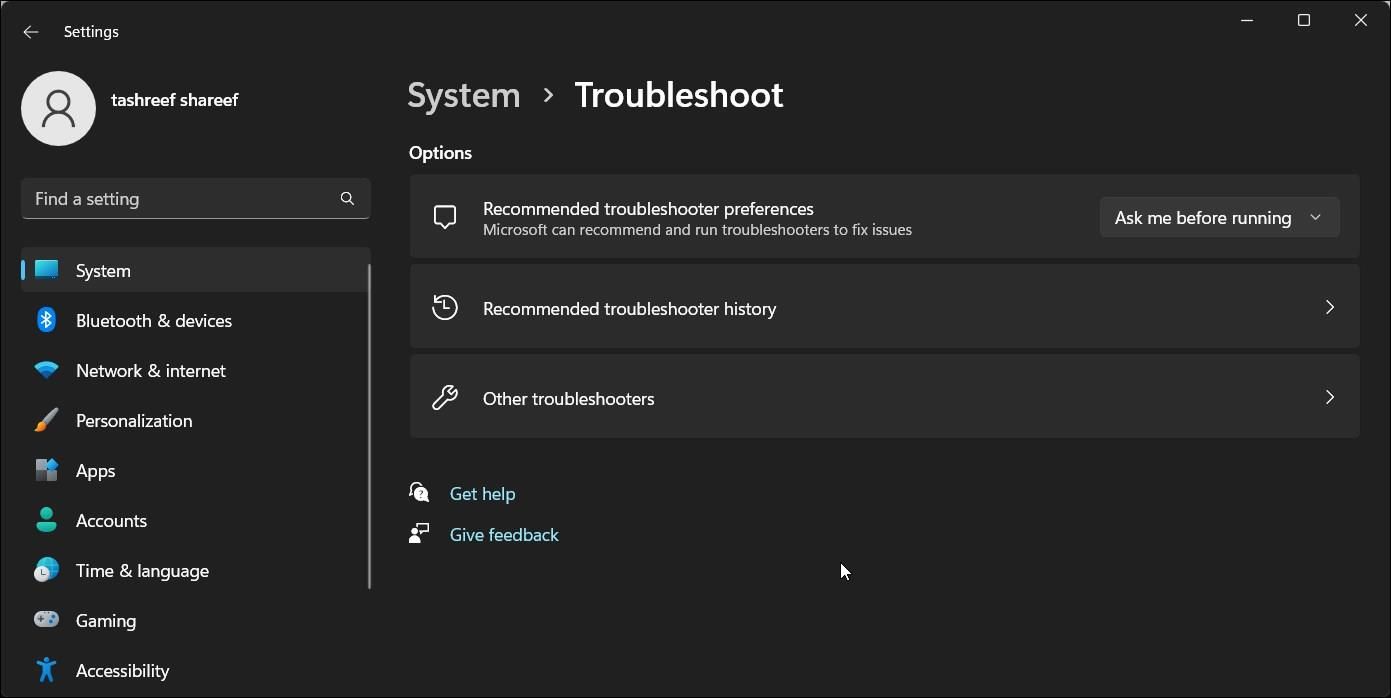
1. Run the Network Troubleshooter
If you encounter a network error, the first thing you should try is running the network troubleshooter. It’s a handy tool built into Windows that can quickly scan your network settings, detect common network issues, and even apply automatic fixes.
In case the troubleshooter can’t resolve the problem automatically, it may offer suggestions for manual fixes that you can try out.
Here is how to proceed:
- Press the Win + I keys together to open the Settings app.
- Choose System > Troubleshoot.
-
Click on Other troubleshooters.

-
In the following window, look for the Network troubleshooter and click on the Run button for it. The troubleshooter will now start scanning the system for potential errors. If it finds anything, it will notify you.

- Once the scan completes, check the results. If the troubleshooter has suggested fixes, click on Apply this fix.
- Otherwise, choose Close the troubleshooter and move to the next method below.

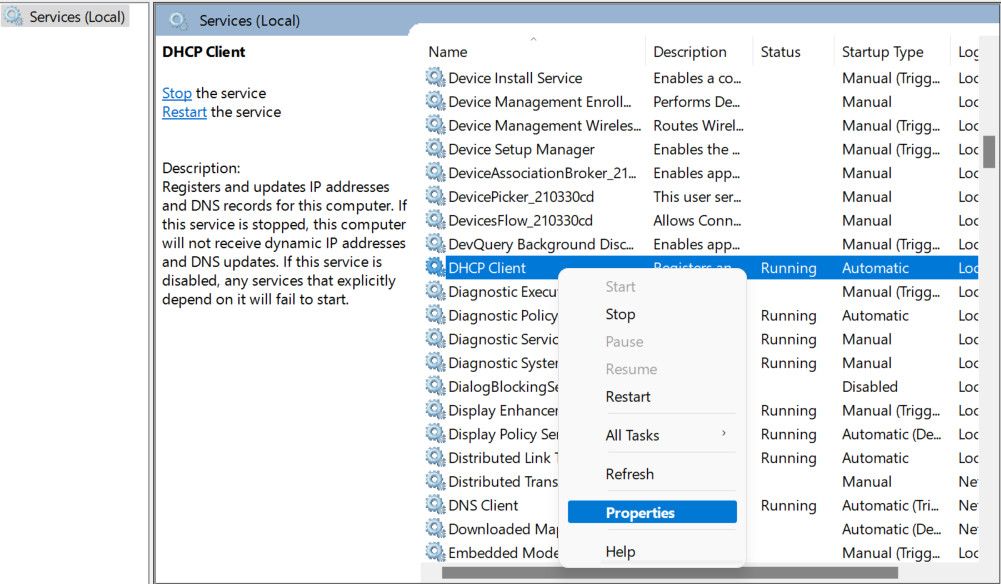
There are a few vital Windows services that play a crucial role in ensuring proper network connectivity. These services are responsible for establishing and maintaining network connections. However, if any of these services become corrupt or malfunction, it can lead to the network error you are experiencing.
Here is how you can ensure the required services are running:
- Press the Win + R keys together to open Run.
- Type «services.msc» in Run and click Enter.
- In the following window, locate the DHCP Client service and right-click on it.
-
Choose Properties from the context menu.

- Click on the Start button for it if the service was not running already. If it was, click Stop, wait for a few seconds, and click Start again.
-
Ensure the Startup type is set to Automatic.

- Click Apply > OK to save the changes.
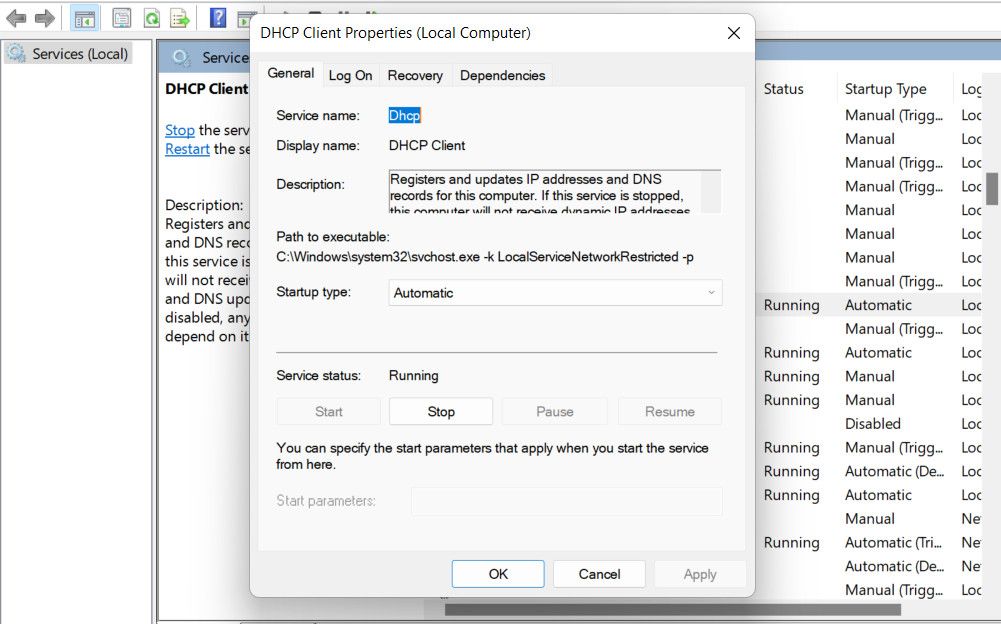
Perform the same steps for these services:
- DNS Client
- Network Connections
- Network List Service
- Network Location Awareness
- TCP/IP NetBIOS Helper
- WLAN AutoConfig (if using Wi-Fi)
Once all the services are running, close the Services window and check if the problem has been resolved. While you are at it, you can also try to update your network drivers as in some cases, outdated or corrupt drivers can prevent the system from establishing successful connections, leading to issues like the one at hand.
3. Disable and Re-enable Network Adapter
You can also try to reset your network connection to fix the problem. This will resolve temporary glitches or conflicts that might be causing the network error.
Follow these steps to proceed:
- Right-click on the network icon in the corner of the taskbar. It typically is in the form of a computer monitor or a Wi-Fi signal indicator.
- Choose Open Network & Internet settings from the context menu. This will launch the Network & Internet settings window.
-
Navigate to Advanced network settings > More network adapter options.

-
You should now see a list of available network adapters. Right-click on the one you are currently using and choose Disable from the context menu.

- Wait for a few before right-clicking on it again and choosing Enable.
- Once done, close the Settings window and try to perform the action that was initially triggering the error.
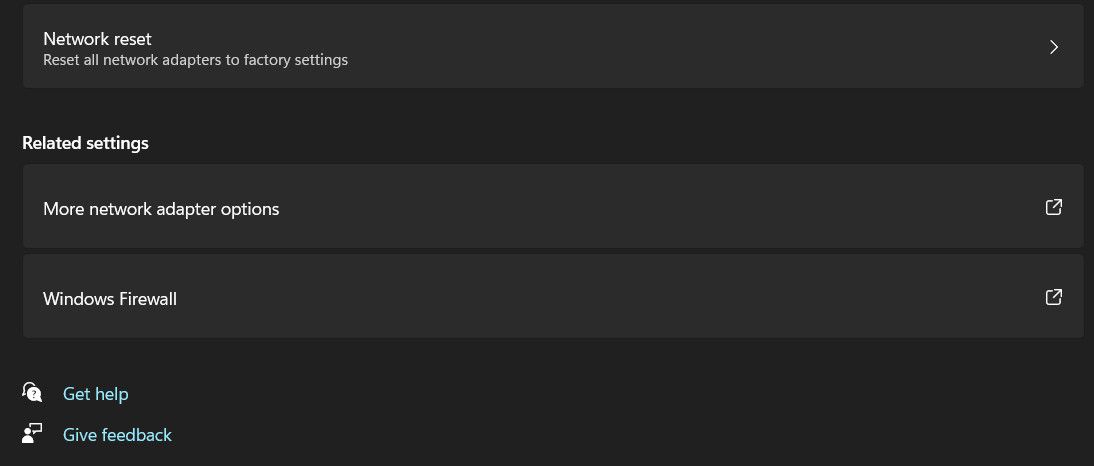
If the problem was being caused by issues with the adapter, this should fix them.
4. Disable SMB 1.0 Protocol
The SMB (Server Message Block) protocol allows file and printer sharing between the different devices on a network. The SMB 1.0 is an older version of the protocol and can lead to different issues due to some known vulnerabilities as well as incompatibility.
Disabling it can help you prevent any potential conflicts or compatibility issues that might be arising from this protocol and leading to the error.
Follow these steps to proceed:
- Press the Win + S keys together to open the Search utility.
- Type Windows Features and click on Open for «Turn Windows features on and off».
- In the following dialog, locate SMB 1.0 and uncheck the box associated with it.
-
If a confirmation prompt pops up, click Yes.

- Click OK to save the changes and restart your computer. Upon reboot, check if the issue is resolved.
5. Reset TCP/IP Stack
The TCP/IP stack is a set of protocols that enable and allow network communication on your computer. There are times when the TCP/IP settings can become corrupt or are simply misconfigured, which leads to issues like the one at hand.
To fix problems with the TCP/IP stack, you can reset it. This will revert it to its default, error-free state, hopefully resolving the network issue in the process.
Here is how you can do it:
- Open Run by pressing Win + R keys together.
- Type «cmd» in Run and press the Ctrl + Shift + Enter keys together to open Command Prompt as administrator.
- Click Yes in the User Account Control prompt.
-
In Command Prompt, type the following command and click Enter to execute it. This will reset Winsock Catalog.
netsh winsock reset -
Now, execute this command to reset the TCP/IP stack.
netsh int ip reset - Finally, restart your computer to apply the changes.
If the error persists, you can try repairing the system files and Windows image using the SFC and DISM utilities. Our comprehensive guide on using the built-in Windows troubleshooting tools discusses this in detail.
Network Errors Resolved
Network errors can be frustrating, especially if you need to access the internet urgently. Hopefully, the fixes we have listed above will help you fix the error at hand once and for all. If it reappears, you can contact the official Microsoft support team with the essential information and report the issue to them.
In this post, we will discuss a network error code 0x800704b3, what triggers this error code, and the six fixes that might resolve this network connectivity issue on Windows PC. This error normally occurs when you are trying to connect to a network or accessing the internet over it.
Upon encountering this network problem, you might see an error message that says –
Windows cannot access
*File location*.exe
Check the spelling of the name. Otherwise, there might be a problem with your network. To try to identify and resolve network problems, click diagnose....

Several users reported receiving a completely different error message that reads the following –
Error code: 0x800704b3
The network path was either typed incorrectly, does not exist, or the network provider is not currently available. Please try retyping the path or contact your network administrator.
What causes a network error 0x800704b3?
When you read the error message, it is quite clear that the network path has to do something with this error code. Either you have typed an incorrect network path, or the typed-in path doesn’t exist.
In cases where you are entering a correct network path and the network provider is available, this error could be a direct result of the following conditions –
- Presence of some malware or viruses on your system
- Corruption within the system files or folders
- You have accidentally enabled SMB version 1.0
- A few network services are not running in the background
Now that you know the reasons behind a network issue, let’s learn the working ways to overcome this error code.
Before you apply any solution, make sure to double-check the typed-in network path. If the network path is correct and yet you are receiving an error code 0x800704b3, attempt the below fixes one after another.
- Troubleshoot Network Adapter
- Check and activate Network Control Services
- Remove external security apps
- Run SFC and DISM Scans
- Disable SMB 1.0 Protocol
- Create a new user account and log in using that
1] Troubleshoot Network Adapter
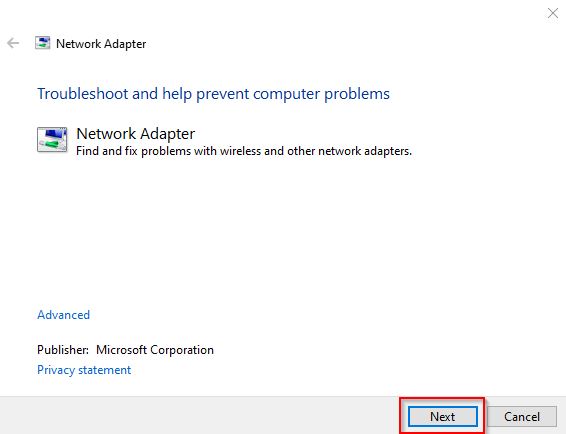
The most effective way to resolve a network issue is by running the built-in troubleshooter. This tool will check for the underlying causes on your system and if it finds any trouble, the same will be resolved automatically. Here’s how to perform this task –
- Press Win + I to enter the Settings page.
- Go to System > Troubleshoot, and click Other troubleshooters.
- Scroll down to Network Adapter under the Other section, and click the Run button available on its right end.
- When the troubleshooting window appears, click Next.

- Now, follow the on-screen instructions that come moving forward.
Wait for a few seconds while the troubleshooter is scanning and repairing the issue leading to a network error. After its work is completed, check if you can now connect to your saved network. Before you do so, make sure to execute the below command on an elevated console having administrative privileges.
Alternatively, you may also copy/paste the below code on the Run dialog and press the Enter button.
msdt.exe /id NetworkDiagnosticsNetworkAdapter
Now that you are done with the diagnostic part, let’s check if you can connect to a network online.
Five Ways to Fix “Network discovery is turned off” Error
2] Check and activate Network Control Services
Users are able to connect to a network only when certain network-related services are running in the background on their PCs. When either of these services gets corrupted or stopped working, you might start encountering error codes.
So, it is essential to check all the network services and restart them if any service is not running on your device. Here’s how to check and restart a stopped network service on Windows 11/10 –
- Press Ctrl + Shift + Esc altogether to launch Task Manager.
- Select Services on the left navigation, and head over to its right side.
- Scroll down and locate DHCP and check its current status.
- If it displays Stopped, right-click on it and select Start.

- The chosen service will start immediately afterward.
Now, repeat the above steps for all these services –
DHCPDNS ClientNetwork ConnectionsNetwork Location AwarenessRemote Procedure Call (RPC)ServerTCP/IP Netbios helperWorkstationFunction Discovery Resource PublicationUPnP Device Host servicesWired Auto ConfigWLAN Auto ConfigCOM+ Event SystemComputer BrowserWireless Zero Configuration
Now that you have restarted the stopped services, check if the network error code 0x800704b3 resolves afterward.
How to Add and Connect to a Wi-Fi Network in Windows 11
3] Remove external security apps
Network connectivity problems may also arise because of the presence of some buggy apps, especially when it is a third-party antivirus program. If that’s the case, disable your external antivirus and check if you can connect to your network. In case the network issues resolve afterward, you must get rid of that particular application.
Network errors might also occur when you are using some proxy, a VPN, or have bypassed Firewall. Undo the recent changes on your Windows PC and check if the problem resolves this way.
Fix: WiFi Connected But No Internet Error on Windows 11/10
4] Run SFC and DISM Scans
After you have removed the third-party apps from your system, make sure to run the SFC and DISM tools on your PC. These utility programs will check for file corruption and resolve them automatically. Here’s how to perform this task –
- Press Win + R to launch the Run dialog.
- Type “CMD” on it and press Ctrl + Shift + Enter keys altogether.
- When the UAC prompts, hit Yes to authorize opening Command Prompt as an administrator.
- On the elevated console, execute this code first –
sfc /scannow

- The SFC will look for the integrity of the system files, so this whole process will take some time. When this tool finds any missing or damaged files, the same will be replaced with their correct versions.
- Now that you have repaired all system files and folders, run the DISM command, as outlined below –
DISM /Online /Cleanup-Image /RestoreHealth
- The DISM tool will check for any file corruption inside your System Image and repair the corrupt ones.
- Wait for this command to complete 100%. After this is over, close CMD, and restart your PC.
Sign back into your Windows PC again and check if you can connect to your Network without encountering an error code 0x800704b3.
How to Reset the Network Settings on Windows 11/10
5] Disable SMB 1.0 Protocol
The Server Message Block (SMB) is basically a network file-sharing protocol and is used for sharing access to printers, files, and other resources on a network. At present, Windows supports three different versions of SMB and they are SMB 1.0, SMB 2.0, and SMB 3.0. By default, the SMB v1 comes disabled on recent PCs. If you have accidentally enabled this version, your device will face trouble accessing the network.
Disable SMB v1 by opening the Windows features page and your network will start working as usual. Here’s how to perform this task –
- Press Win + S to launch Windows Search.
- Type “Windows Features” on it and click the top result.
- On the succeeding screen, scroll down to SMB 1.0 and uncheck the box available on its left end.
- Click OK to confirm this action, and restart your PC.
When Windows 11/10 reloads, check if you can connect to a network now.
How to Forget a Saved Wi-Fi Network on Windows 11
6] Create a new user account and log in using that
If none of the above workarounds help to resolve the network error code 0x800704b3, your user profile must have been corrupted. It could be because of some virus attack, or some system files behaving strangely.
Create a new user profile having admin rights, and log into your PC using that. Hopefully, the network error must have been resolved by now. If you find any section difficult to follow, let’s know in the comment section.