
Все способы:
- Решаем ошибку 0x8007042c обновления Windows 10
- Способ 1: Запуск основных служб
- Способ 2: Проверка целостности системных файлов
- Способ 3: Проверка системы на вирусы
- Способ 4: Ручная установка обновлений
- Вопросы и ответы: 5
Обновления для операционной системы Windows 10 выпускаются с частой периодичностью, однако не всегда их инсталляция происходит успешно. Существует перечень различных проблем, возникающих при выполнении этой процедуры. Сегодня мы затронем ошибку с кодом 0x8007042c и детально рассмотрим три основных метода ее исправления.
Читайте также: Обновление Windows 10 до последней версии
Решаем ошибку 0x8007042c обновления Windows 10
При появлении упомянутого выше сбоя вы были уведомлены, что с установкой файлов возникли неполадки и попытка будет повторена позже, но чаще всего автоматически это никак не исправляется. Поэтому придется прибегнуть к осуществлению определенных действий, позволяющих наладить работу Центра обновлений.
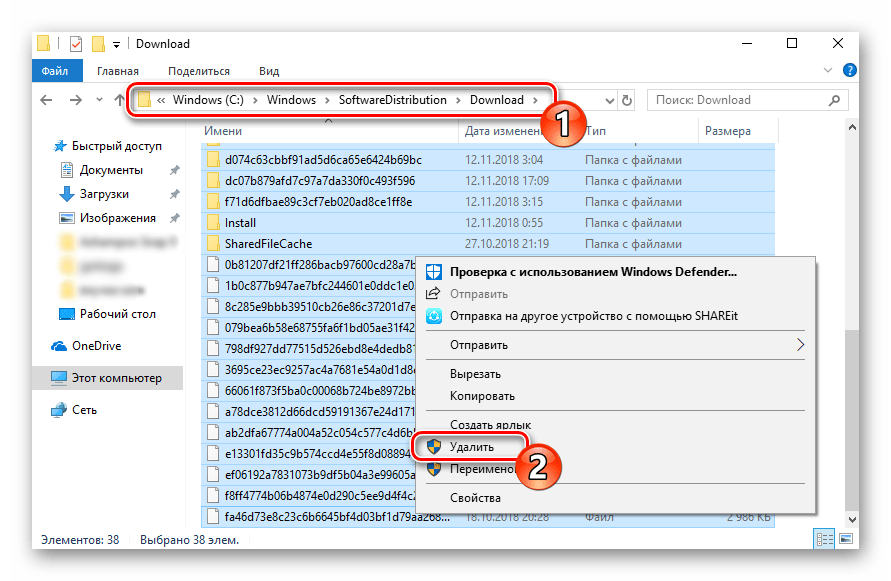
Перед переходом к трем способам мы настоятельно рекомендуем перейти по пути C:\Windows\SoftwareDistribution\Download\ и очистить все содержимое, воспользовавшись учетной записью администратора Виндовс 10. После удаления вы снова можете попробовать запустить обновление и в случае повторного возникновения неполадки приступать к выполнению следующих инструкций.
Способ 1: Запуск основных служб
Иногда происходят системные сбои или пользователи самостоятельно отключают какие-либо службы. Чаще всего именно из-за этого некоторые функции работают не совсем корректно. При неполадке 0x8007042c внимание следует обратить на такие службы:
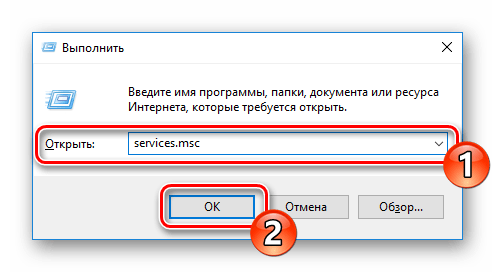
- Откройте окно «Выполнить», зажав комбинацию клавиш Win + R. В поле ввода напечатайте
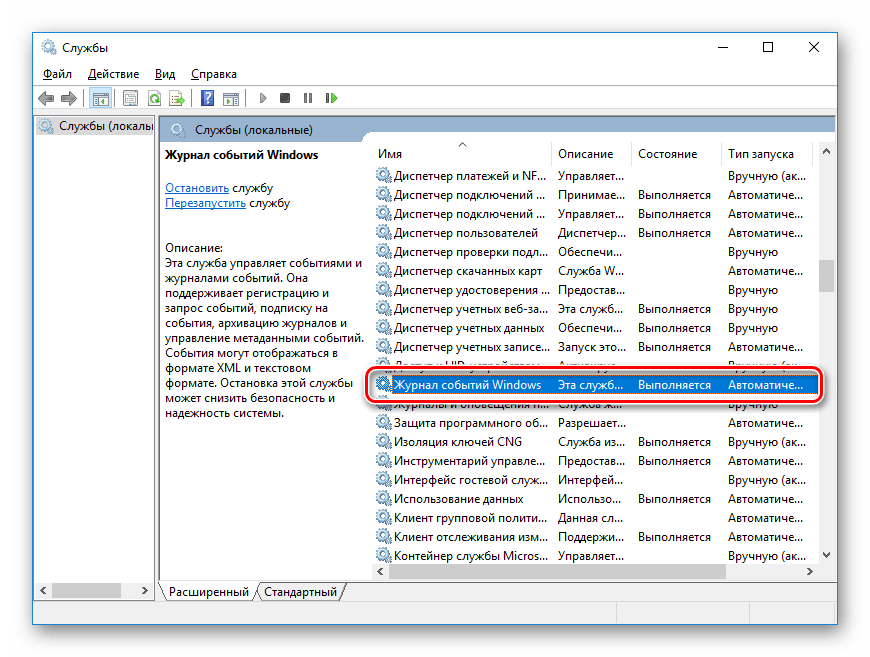
services.mscи кликните на «ОК». - Отобразится окно служб, где в списке отыщите строку «Журнал событий Windows» и дважды нажмите на ней левой кнопкой мыши.
- Убедитесь в том, что тип запуска производится автоматически. Если параметр остановлен, включите его и примените изменения.
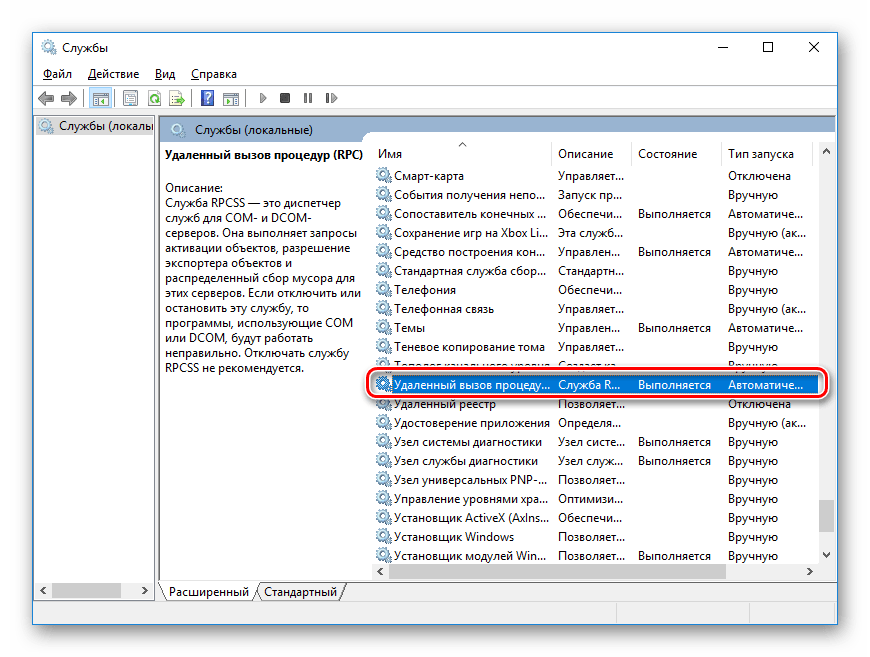
- Закройте окно свойств и найдите следующую строку «Удаленный вызов процедур (RPC)».
- В окне «Свойства» повторите те же действия, что были рассмотрены в третьем шаге.
- Осталось только проверить последний параметр «Центр обновления Windows».
- «Тип запуска» отметьте «Автоматически», активируйте службу и кликните на «Применить».


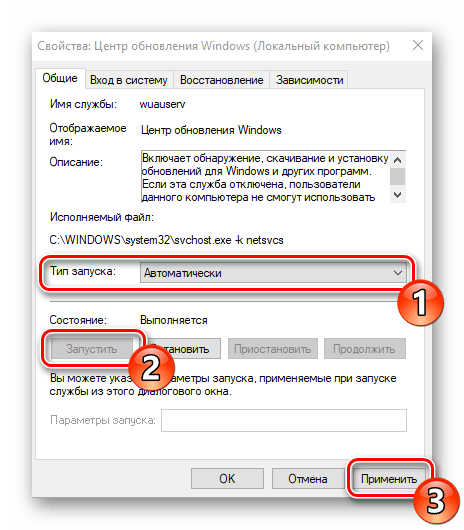
После проведения данного процесса дождитесь повторного запуска инсталляции нововведений или начните его самостоятельно через соответствующее меню.
Способ 2: Проверка целостности системных файлов
Нарушение целостности системных файлов провоцирует различные сбои в Виндовс и приводит к появлению ошибок, в том числе это может касаться и 0x8007042c. Диагностика данных и их восстановления выполняется с помощью встроенной утилиты. Запускается она так:
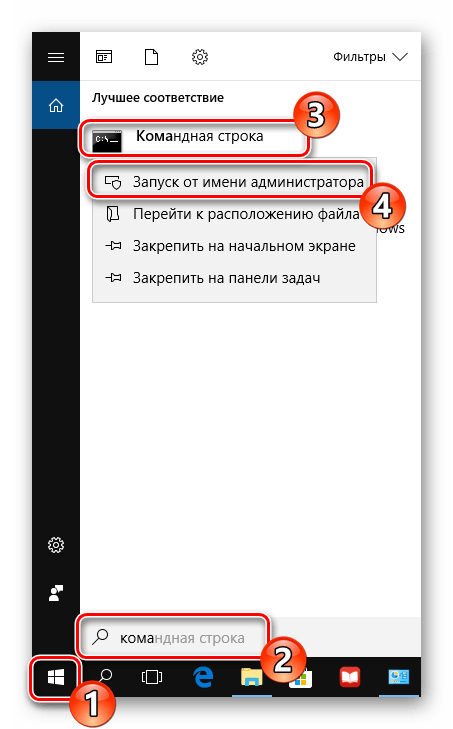
- Откройте «Пуск», наберите «Командная строка» и перейдите в нее от имени администратора, кликнув на значке приложения правой кнопкой мыши и выбрав соответствующий пункт.
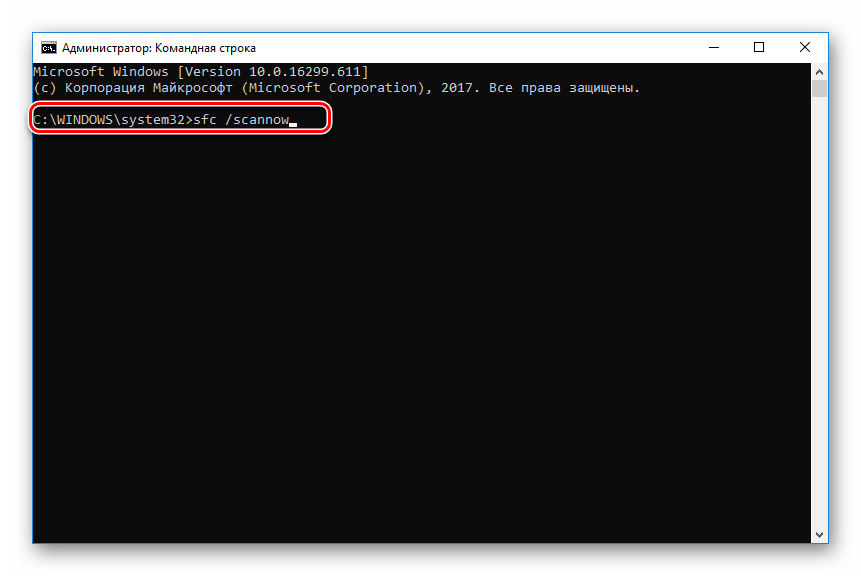
- Запустите средство сканирования системы командой
sfc /scannow. - Анализ и восстановление займет определенное время, а после этого вы будете уведомлены о завершении процедуры.
- Далее остается только перезагрузить компьютер и повторно инсталлировать обновление.
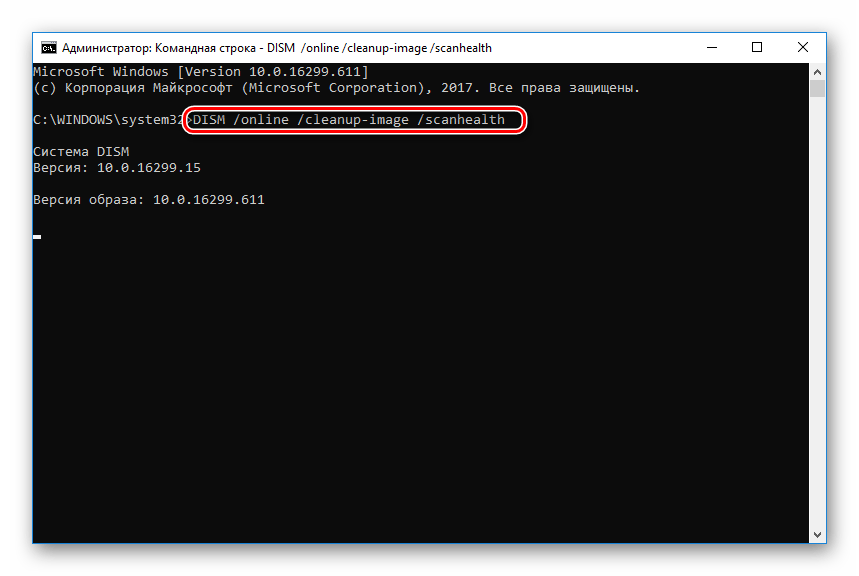
Если анализ прошел неудачно, появились сообщения о невозможности его проведения, скорее всего, произошло повреждение хранилища исходных файлов. При возникновении такой ситуации сначала осуществляется восстановления данной информации с помощью другой утилиты:
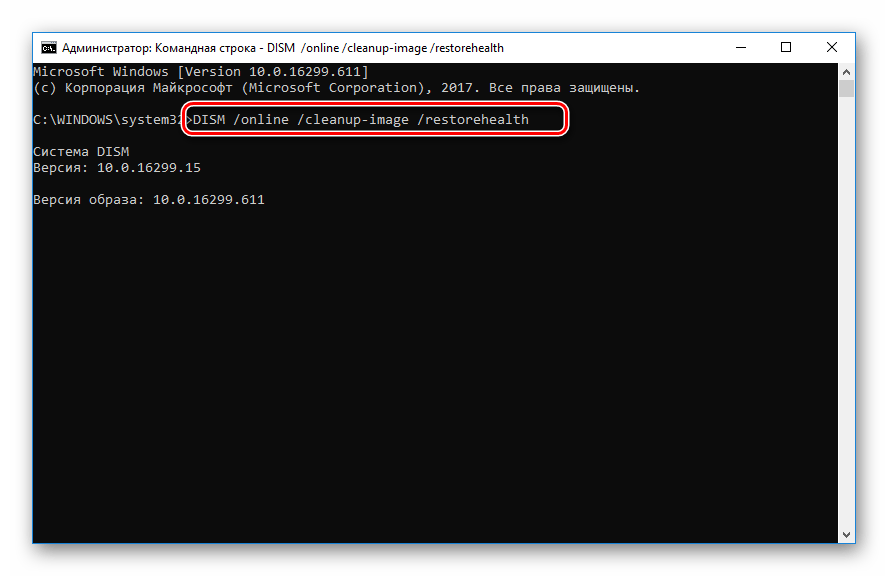
- В запущенной от имени администратора «Командной строке» впишите строку
DISM /Online /Cleanup-Image /ScanHealthи нажмите на Enter. - Дождитесь завершения проверки и при обнаружении проблем воспользуйтесь следующей командой:
DISM /Online /Cleanup-Image /RestoreHealth. - По завершении перезагрузите ПК и повторно запустите утилиту
sfc /scannow.
Способ 3: Проверка системы на вирусы
Предыдущие два метода являются наиболее эффективными и помогают в большинстве случаев. Однако при заражении компьютера вредоносными файлами запуск служб и проверка целостности системных данных никак не поможет решить возникшую ошибку. В такой ситуации советуем проверить ОС на наличие вирусов любым удобным вариантом. Детальные инструкции на эту тему вы найдете в другой нашей статье по ссылке ниже.
Подробнее: Борьба с компьютерными вирусами
Способ 4: Ручная установка обновлений
Ручная инсталляция не решает возникшую проблему, но позволяет обойти ее и добиться наличия на ПК необходимых нововведений. Производится самостоятельная установка буквально в несколько шагов, вам нужно лишь знать, что скачивать. Разобраться с этим вопросом вам поможет статья от другого нашего автора по следующей ссылке.
Подробнее: Устанавливаем обновления для Windows 10 вручную
Справиться с ошибкой 0x8007042c обновления Windows 10 порой бывает сложно, поскольку сразу непонятна причина ее возникновения. Поэтому приходится перебирать все возможные методы и искать тот, который окажется эффективным в сложившейся ситуации. Выше вы были ознакомлены с четырьмя способами решения, каждый из них будет действенен при разных условиях.
Наша группа в TelegramПолезные советы и помощь
Applies ToWindows 7 Enterprise Windows 7 Home Premium Windows 7 Professional Windows 7 Ultimate Windows 7 Home Basic
Проблемы
При попытке запустить брандмауэр Windows, если служба брандмауэра отключена, или ваш компьютер заражен вредоносной программой, появляется следующее сообщение об ошибке:
0x8007042c
Решение
Чтобы устранить эту проблему, проверьте компьютер на наличие вредоносных программ и удалите их, выполнив инструкции в способе 1.
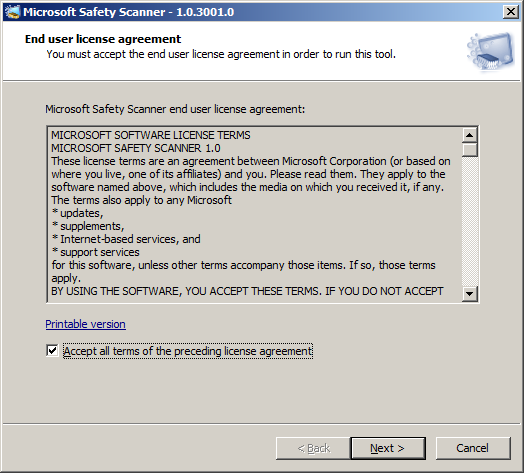
Если в последнее время вы не проверяли компьютер на наличие вирусов или вредоносных программ, настоятельно рекомендуется это сделать. Для удаления вредоносных программ можно использовать Microsoft Safety Scanner. Для этого выполните следующие действия.
-
Перейдите на следующий веб-сайт корпорации Майкрософт: Средство проверки безопасности (Майкрософт)
-
Нажмите кнопку Скачать сейчас. Следуйте инструкциям по загрузке и установке Microsoft Safety Scanner. Сохраните файл на рабочий стол при появлении соответствующего запроса.
-
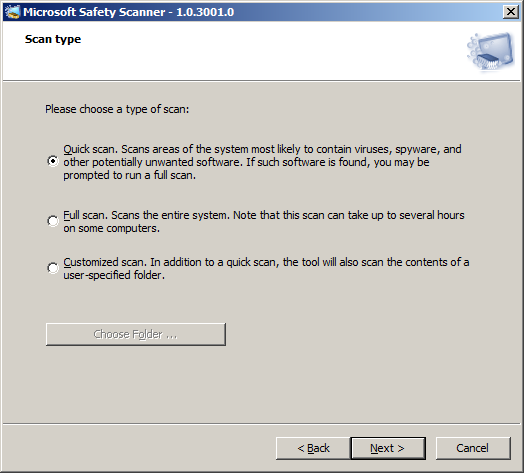
По завершении установки перейдите на рабочий стол и дважды щелкните значок Microsoft Safety Scanner. Он может отображаться как msert.
-
Установите флажок Принять все условия лицензионного соглашения и нажмите кнопку Далее два раза.

-
Выберите Быстрая проверка, а затем нажмите кнопку Далее.
-
Средство проверки безопасности (Майкрософт) проверит ваш компьютер и удалит все вредоносные программы.
-
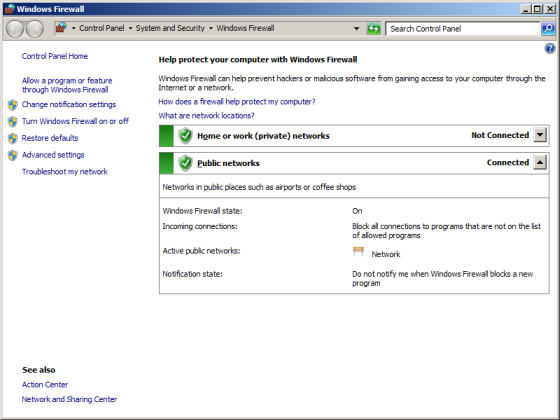
Нажмите кнопку Пуск и введите Брандмауэр Windows в поле Найти программы и файлы (Windows 7) или в поле Начать поиск (Windows Vista).
-
Выберите пункт Брандмауэр Windows.
-
В области навигации (слева) панели управления выберите пункт Включение и отключение брандмауэра Windows.

-
Выберите Включить брандмауэр Windows для каждой сетевой папки, затем нажмите кнопку ОК.
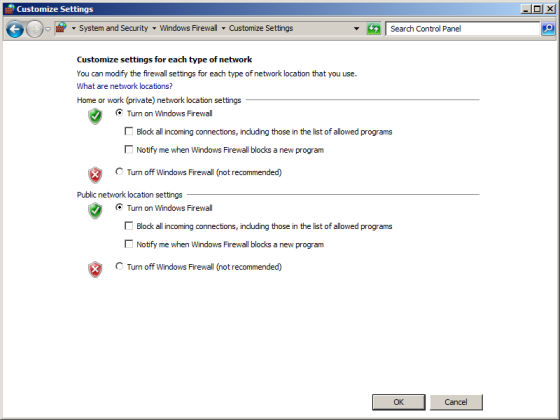
Если при попытке включить брандмауэр по-прежнему возникает ошибка с кодом 0x8007042c, перейдите к способу 2.
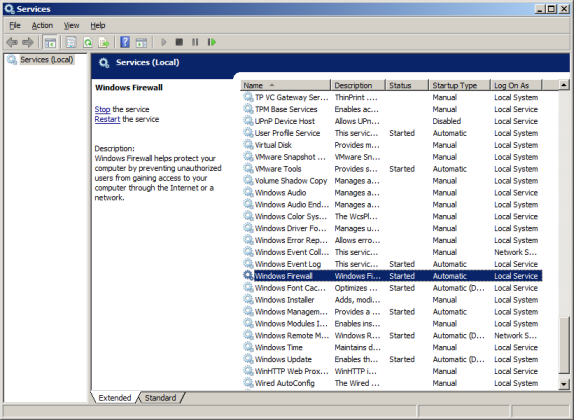
Вы можете запустить службы брандмауэра Windows, а затем сделать так, чтобы в будущем они запускались автоматически. Для этого выполните следующие действия.
-
Нажмите кнопку Пуск и в поле Поиск введите Службы.
-
Щелкните правой кнопкой мыши пункт Службы и выберите команду Запуск от имени администратора. Если потребуется, введите имя пользователя и пароль администратора, а затем нажмите клавишу ВВОД.
-
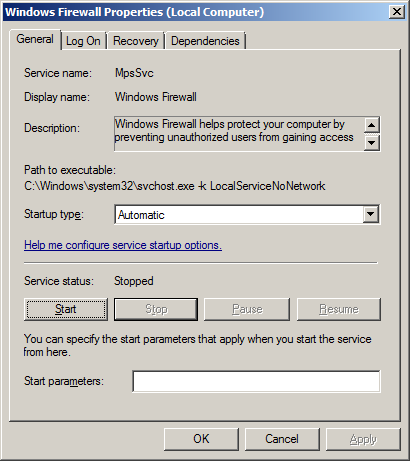
Прокрутите содержимое окна вниз, пока не увидите элемент Брандмауэр Windows, затем дважды щелкните строку Брандмауэр Windows.

-
Щелкните поле Тип запуска, а затем выберите пункт Автоматически.

-
Если для параметра Состояние службы указано значение Остановлена, нажмите кнопку Запустить.
-
Нажмите кнопку Применить, а затем — ОК.
-
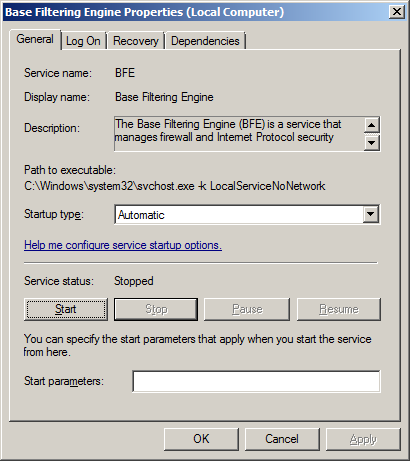
Прокрутите содержимое окна вниз, пока не увидите элемент Базовый модуль фильтрации, затем дважды щелкните строку Базовый модуль фильтрации.
-
Если для параметра Состояние службы указано значение Остановлена, нажмите кнопку Запустить.
-
Нажмите кнопку Применить, а затем — ОК.
-
Перезапустите Windows и проверьте, включен ли брандмауэр Windows.
Если при попытке включить брандмауэр по-прежнему возникает ошибка с кодом 0x8007042c, перейдите к способу 3.
Чтобы остановить и повторно запустить эти службы с помощью пакетного файла, выполните указанные ниже действия.
-
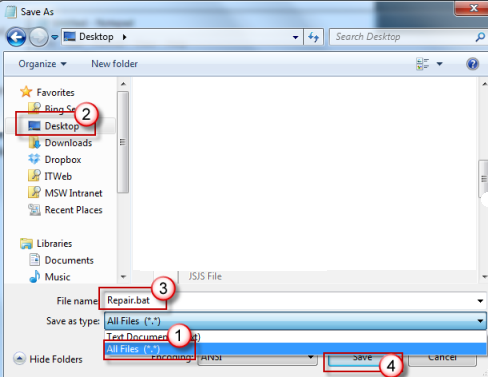
Нажмите кнопку Пуск, в поле Поиск введите Блокнот и выберите пункт Блокнот в списке программ.
-
Выделите приведенный ниже текст, щелкните его правой кнопкой мыши и выберите команду Копировать. Щелкните правой кнопкой мыши в окне Блокнота и выберите команду Вставить.
sc config MpsSvc start= auto
sc config KeyIso start= auto
sc config BFE start= auto
sc config FwcAgent start= auto
net stop MpsSvc
net start MpsSvc
net stop KeyIso
net start KeyIso
net start Wlansvc
net start dot3svc
net start EapHostnet
net stop BFE
net start BFE
net start PolicyAgent
net start MpsSvc
net start IKEEXT
net start DcaSvcnet
net stop FwcAgent
net start FwcAgent
-
В Блокноте в меню Файл выберите команду Сохранить как, а затем в поле Имя файла введите Repair.bat.
-
Щелкните поле Тип файла и выберите вариант Все файлы (*.*).
-
На панели слева щелкните элемент Рабочий стол и нажмите кнопку Сохранить.

-
В меню Файл выберите пункт Выход.
-
На рабочем столе щелкните правой кнопкой мыши файл Repair.bat, который вы сохранили на шаге 5, и выберите пункт Запуск от имени администратора.
Внимание! Если потребуется подтвердить остановку службы, нажмите клавишу Y на клавиатуре, а затем клавишу ВВОД.
-
Попробуйте снова запустить брандмауэр Windows. Если брандмауэр Windows запускается, удалите файл Repair.bat. Для этого щелкните файл Repair.bat правой кнопкой мыши, выберите команду Удалить, а затем нажмите кнопку Да.
Если при попытке запустить брандмауэр Windows по-прежнему появляется сообщение об ошибке с кодом 0x8007042c, обратитесь в Центр справки и поддержки пользователей Майкрософт по вопросам безопасности. Для этого перейдите на веб-сайт по адресу https://technet.microsoft.com/ru-ru/security/cc165610.aspx.
Дополнительная информация
Нужна дополнительная помощь?
Нужны дополнительные параметры?
Изучите преимущества подписки, просмотрите учебные курсы, узнайте, как защитить свое устройство и т. д.
If you face the error code 0x8007042c while trying to update Windows 10, you are the right place as today we will discuss how to fix Windows 10 error 0x8007042c. As Windows updates are essential for the proper functioning of the Windows but with this error code, you won’t be able to update your PC which will make it vulnerable to virus and other security attacks. Anyway, without wasting any time let’s see how to actually Fix Windows 10 Update Error 0x8007042c with the below-listed guide.

Table of Contents
Make sure to create a restore point just in case something goes wrong.
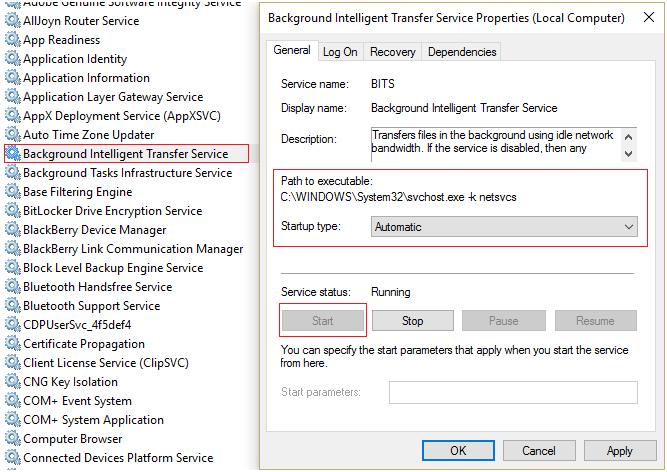
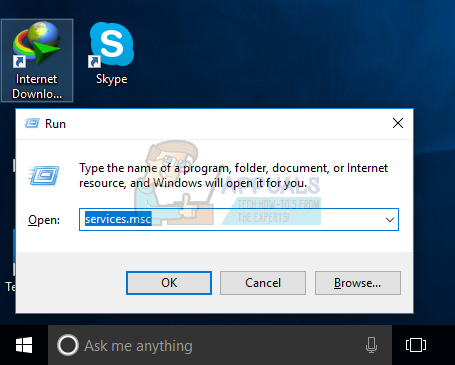
Method 1: Make sure Windows Services are running
1. Press Windows Key + R then type services.msc and hit Enter.
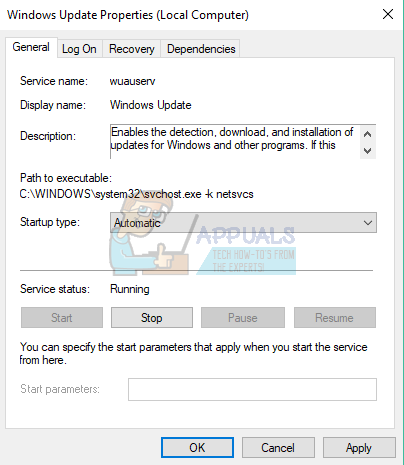
2. Locate the following services:
Background Intelligent Transfer Service (BITS)
Cryptographic Service
Windows Update
MSI Installer
3. Right-click on each of them and then select Properties. Make sure their Startup type is set to Automatic.

4. Now if any of the above services are stopped, make sure to click on Start under Service Status.
5. Next, right-click on Windows Update service and select Restart.

6. Click Apply, followed by OK and then reboot your PC to save changes.
See if you can Fix Windows 10 Update Error 0x8007042c, if not then continue with the next method.
Method 2: Rename SoftwareDistribution Folder
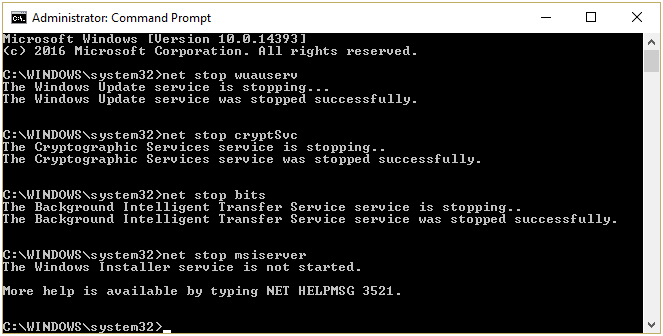
1. Open Command Prompt. The user can perform this step by searching for ‘cmd’ and then press Enter.

2. Now type the following commands to stop Windows Update Services and then hit Enter after each one:
net stop wuauserv
net stop cryptSvc
net stop bits
net stop msiserver

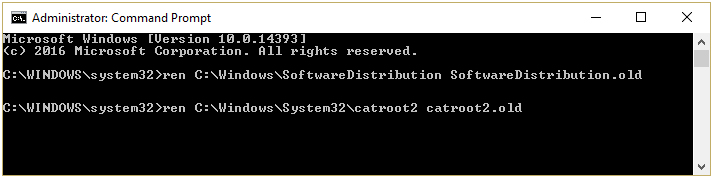
3. Next, type the following command to rename SoftwareDistribution Folder and then hit Enter:
ren C:\Windows\SoftwareDistribution SoftwareDistribution.old
ren C:\Windows\System32\catroot2 catroot2.old
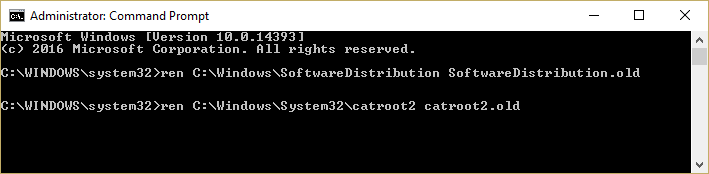
4.Finally, type the following command to start Windows Update Services and hit Enter after each one:
net start wuauserv
net start cryptSvc
net start bits
net start msiserver

5.Reboot your PC to save changes.
Method 3: Temporarily Disable Antivirus and Firewall
Sometimes the Antivirus program can cause an error, and to verify this is not the case here; you need to disable your antivirus for a limited time so that you can check if the error still appears when the antivirus is off.
1. Right-click on the Antivirus Program icon from the system tray and select Disable.
2. Next, select the time frame for which the Antivirus will remain disabled.

Note: Choose the smallest amount of time possible, for example, 15 minutes or 30 minutes.
3. Once done, again try to connect to open Google Chrome and check if the error resolves or not.
4. Search for the control panel from the Start Menu search bar and click on it to open the Control Panel.
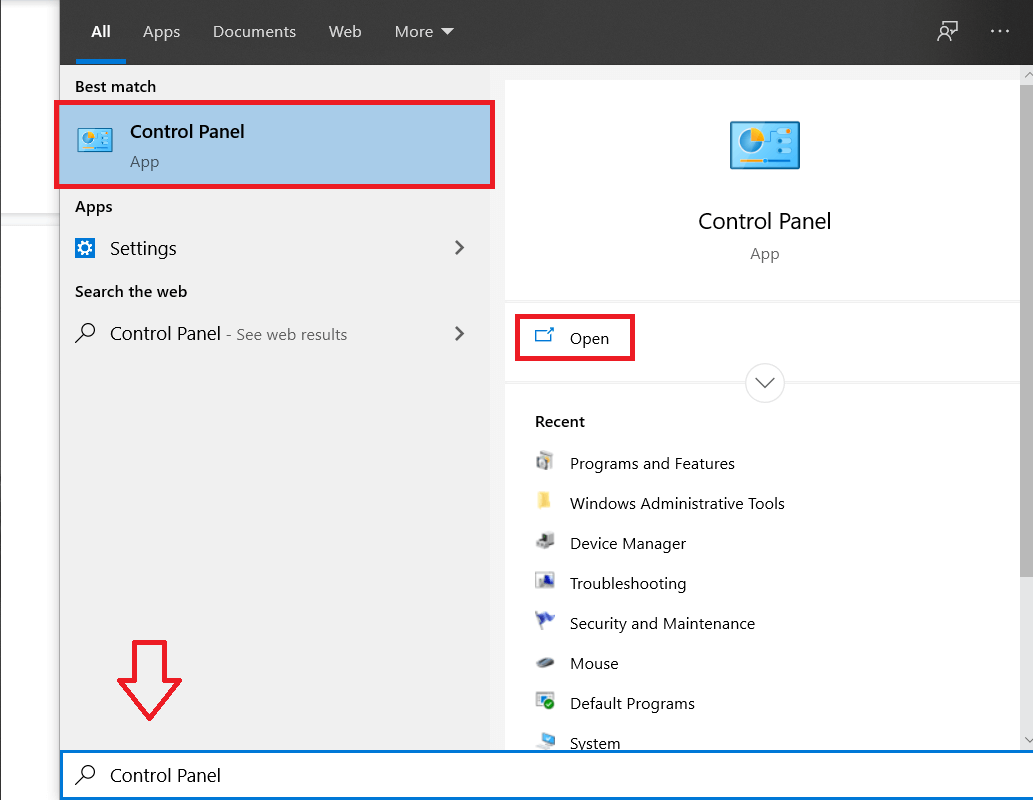
5. Next, click on System and Security then click on Windows Firewall.

6. Now from the left window pane click on Turn Windows Firewall on or off.

7. Select Turn off Windows Firewall and restart your PC.

Again try to open Google Chrome and visit the web page, which was earlier showing the error. If the above method doesn’t work, please follow the same steps to turn on your Firewall again.
Recommended:
- No Internet Connection after updating to Windows 10 Creators Update
- Fix Windows Update Error 0x80010108
- Fix Error 0X80010108 In Windows 10
- Fix The file or directory is corrupted and unreadable
That’s it you have successfully Fix Windows 10 Update Error 0x8007042c but if you still have any questions regarding this article then feel free to ask them in comment’s section.
Is your Windows PC or Laptop is showing error 0x8007042c while updating or executing any tasks?
If your answer is YES then you are at the right place, in this blog we will discuss Windows update 0x8007042c error and apply different methods to fix this irritating error.
To Fix Error Code 0x8007042c , we recommend Advanced System Repair:
This software is your one stop solution to fix Windows errors, protect you from malware, clean junks and optimize your PC for maximum performance in 3 easy steps:
- Download Advanaced System Repair rated Excellent on Trustpilot.
- Click Install & Scan Now to install & scan issues causing the PC problems.
- Next, click on Click Here to Fix All Issues Now to fix, clean, protect and optimize your PC effectively.
According to some users, this error message generally appears and blocks the update process. You can’t fix this error code after restarting your PC/laptop or applying any temporary method.
So, you need to follow the methods given in this article and apply them carefully. But, before applying any of the discussed methods it is recommended to know some of the common causes of Windows 10 Update Error 0x8007042c.
If you are receiving this error message then there is an issue in Windows Update, Windows Firewall, or some other related services. Sometimes, third-party antivirus applications can also generate this issue.
Why is 0x8007042c Error Preventing Windows 10 Update Process?
- An interruption in the execution of Windows Service
- Disabled Firewall service
- Computer Malware infection
- Corruption of Registry
Well, these are some of the causes responsible for the Windows update error 0x8007042c. Now follow the given fixes carefully to fix the error and install the Windows update easily.
How do I Fix Error Code 0x8007042c?
Note: Before applying any of the below-given tricks you should create a restore point of your system or laptop. This is because to deal with any kind of accidental situations.
Fix 1: Check the Windows Services and make sure it is running properly
- Open run dialogue box by pressing Windows + R key and then type “services.msc” as shown in the below image. Press Enter key.

- Now you need to find the below-given services:
Background Intelligent Transfer Service (BITS)
Cryptographic Service
Windows Update
MSI Installer
- After finding them, right-click on them one by one and then select Properties. In the properties section, you should check that their Startup type is set to Automatic.
- If you found any of the services in disabled mode, then click on Start under Service Status.
- After it, right-click on the Windows Update service and choose Restart.
- Click on Apply followed by OK and then restart your PC/Laptop to save changes.
See if the issue is solved or not, if Windows 10 Update Error 0x8007042c is fixed then ok otherwise continue with the below method.
Fix 2: Rename SoftwareDistribution Folder
- Now you need to open the command prompt with admin privilege, press Windows Key + X then choose Command Prompt (Admin).
- After it runs the below-given commands to stop Windows Update Services.
Note: To run these commands, press Enter key after each command:
net stop wuauserv
net stop cryptSvc
net stop bits
net stop msiserver
- After running all the above-given commands, then type the following command to rename SoftwareDistribution Folder and then hit Enter:
ren C:\Windows\SoftwareDistribution SoftwareDistribution.old
ren C:\Windows\System32\catroot2 catroot2.old
- At last, type the below-given command to start Windows Update Services and press Enter key after every command as you did in the above section:
net start wuauserv
net start cryptSvc
net start bits
net start msiserver
- Restart your PC to save changes.
Visit Microsoft for More Discussion: https://support.microsoft.com/en-in/help/2530126/-0x8007042c-error-message-when-you-try-to-start-windows-firewall
Fix 3: Use Inbuilt Troubleshooter to Fix Error Code 0x8007042c
Go with the inbuilt troubleshooter of Windows. This tool will help you to detect and fix the error. Follow the below-given steps to run the inbuilt troubleshooter
- Go to the Windows search option by pressing Windows key and search for the troubleshooter.
- After it, click on the troubleshooter and choose the settings tab that is below the search box.
- Click on the option to find and fix problems and after it selects the view all option.
- Choose the Windows update troubleshooter and run it.
This tool will take a few minutes to find and fix any types of errors. After the completion, try to update your PC again.
Or you can set your Windows OS to update itself on the next scheduled time.
Fix 4: Turn off Antivirus
As above said that, Windows 10 Error Code 0X8007042C can appear because of the third-party antivirus installed on your system. Follow the below-given steps to fix the error.
- Completely remove or uninstall any third-party antivirus you have installed previously on your system.
- After it, click on the Windows key and search for updates.
- Open the updates window, and then check for updates.
- Install all the updates on your system.
- After the completion of the installation, reboot your computer.
Easy Solution to Fix Error 0x8007042c in Windows 10
Well, if the given fixes won’t work for you to fix Windows update error 0x8007042c, then it is suggested to run the PC Repair Tool, to fix the error easily. This is an advanced repair utility that just by scanning once detect and fix various Windows errors and issues.
Despite this, it is also capable to fix various other stubborn computer errors, protect you from file loss, Windows files corruption, malware and virus infection, DLL errors, application errors and many others. It not only fixes errors but also increases the Windows PC performance.
Get PC Repair Tool, to fix Windows update error 0x8007042c
Conclusion
So, this is all about the Windows update error 0x8007042c, try the fixes given one by one to get rid of the error and update the Windows 10 system with ease.
Follow the given fixes carefully and check which one works for you.
Or else you can also run the PC Repair Tool, to fix the error automatically and boost your system performance.
Hope the article worked for you.
Hardeep has always been a Windows lover ever since she got her hands on her first Windows XP PC. She has always been enthusiastic about technological stuff, especially Artificial Intelligence (AI) computing. Before joining PC Error Fix, she worked as a freelancer and worked on numerous technical projects.
The error 0x8007042c is associated with a number of issues in Windows. For some users, this error appears and prevents them from downloading the latest Windows 10 updates, others also get this error on any operation in the Windows settings telling you some network problems were detected or you’re not connected. This error has also occurred to users upgrading to Windows 10.
This issue is caused when Windows Update, Windows Firewall, and some related services are not running. The presence of 3rd party antivirus application have also caused this issue. Starting the stopped services or temporarily uninstalling your antivirus should fix this issue.
In this article, we’ll look at how to solve this error easily. The first method should solve this issue but if it doesn’t work, you can try the second.
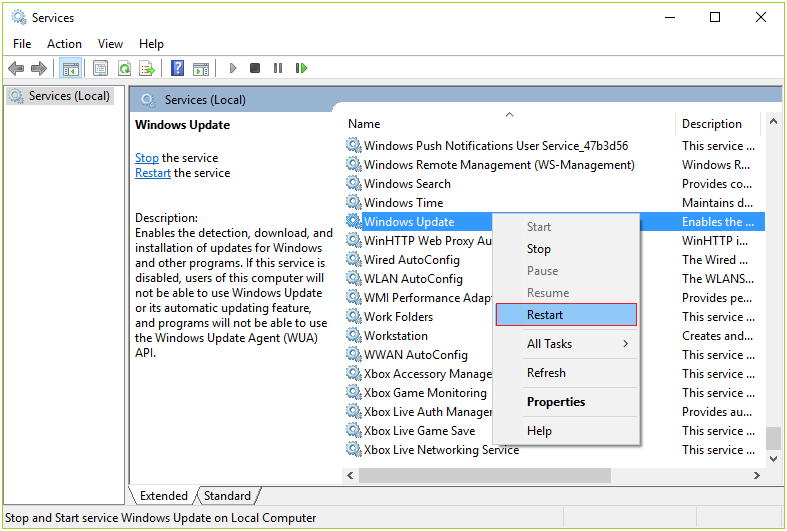
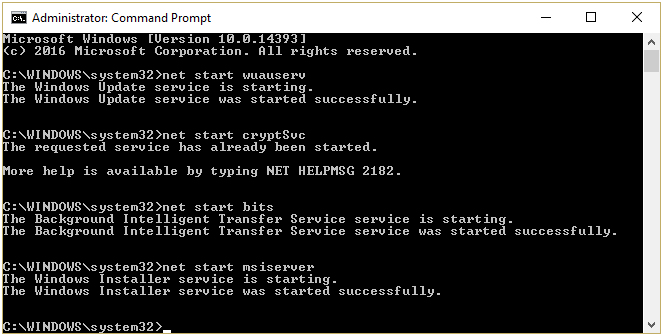
Method 1: Checking Windows Services
- Press the Windows Key + R, type in services.msc in the Run dialog box and click OK to open the Windows Services Console.

- Search for the following services and double-click on them. Make sure the Service status is running and Startup type is set to automatic:Windows Event Log
Remote Procedure Call (RPC)
Windows Update
Windows Firewall
- After enabling these services, try to install Windows Updates again to check if the issue has been solved. Alternatively, you can download this batch script and Run As Administrator.
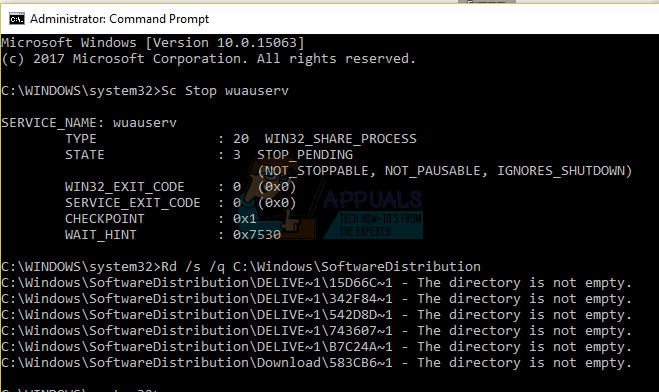
- Press the Start button and type “cmd”. Right-click on “Command Prompt” and click “Run as Administrator”. Accept the UAC prompt when the prompt comes up.
- Enter the following commands in the elevated command prompt:
Sc Stop wuauserv
Rd /s /q C:\Windows\SoftwareDistribution
- When done, restart your computer and try installing the Windows Updates.
Method 2: Uninstalling Your Antivirus
Removing your antivirus and firewall software is likely to solve the issue. It’s not sufficient to deactivate your antivirus. You can remove such softwares from the Programs settings or you can use a removal tool provided by your vendor to completely remove installed files and registry settings..
- Download the removal corresponding tool from your antivirus software using the links below.
- Avast
- AVG
- Avira
- BitDefender
- Comodo Internet Security
- Web Antivirus
- ESET NOD32
- F-Secure
- Kaspersky
- Malwarebytes
- McAfee
- Microsoft Security Essentials
- Norton
- Panda
- Symantec
- Trend Micro
- Verizon
- Web Root
- Launch the downloaded utility and follow its prompts to completely remove the anti-malware application from your system.
- Reboot your PC.
- Try performing an update to see if the issue has been solved. After performing the update, you can reinstall your antivirus.
Kevin Arrows
Kevin Arrows is a highly experienced and knowledgeable technology specialist with over a decade of industry experience. He holds a Microsoft Certified Technology Specialist (MCTS) certification and has a deep passion for staying up-to-date on the latest tech developments. Kevin has written extensively on a wide range of tech-related topics, showcasing his expertise and knowledge in areas such as software development, cybersecurity, and cloud computing. His contributions to the tech field have been widely recognized and respected by his peers, and he is highly regarded for his ability to explain complex technical concepts in a clear and concise manner.